On clicking the To Do option on the Today screen the following list is displayed.
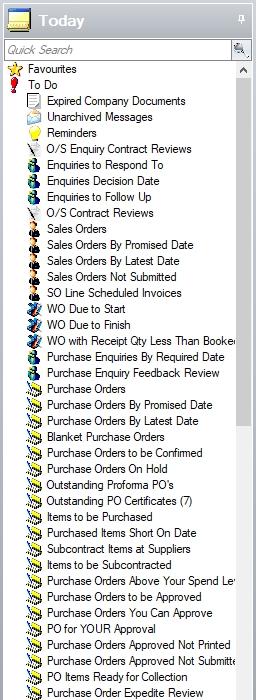
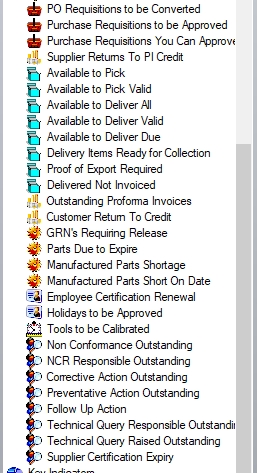
Selecting any of the options listed will display any of the details for that category on the main grid to the right of this list. Access to the options available in the To Do is set by the administrator in the User Access > Today section of the Admin system options.
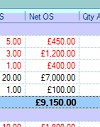
The results grid for most of the To Do option can be formatted to suit the user. The user can group, summarise and shuffle the presented columns to provide them a result set that is unique to them so to best use the information provided. The user can group information by dragging the relevant column heading to the top of the results grid. Summary totals will also be displayed for the selected group.
To save any changes to the grid, the user should select the SET AS DEFAULT option from the GRID OPTIONS button. This will retain the formatting for the user.
Many of the screens also have a PRINT and/or EXPORT option available. These allow the user to export the details to Excel and/or print hard copies of the details for further review/analysis if required.
![]()
To Do Options
Expired Company Documents
This screen highlights any company documents that are recorded in Progress that have expired. This is based on the expiration date assigned to the document itself and the current date. Any documents which are due to expired will be listed here for the user to see in black. Any documents where the expiry date has already passed will be shown in red.
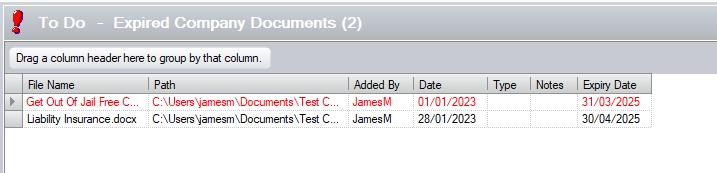
The user can double-click on any document listed to go directly to the Company Documents screen, where the documents can be updated as required.
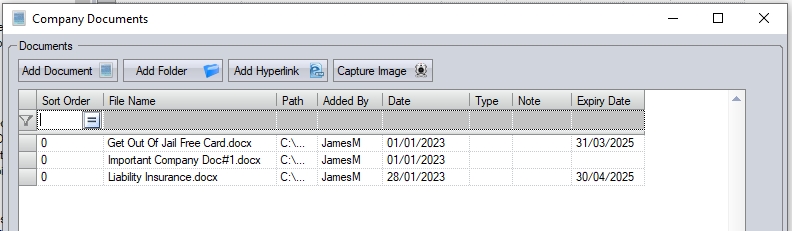
This section displays messages that have been sent to the user by another Progress user that still require being actioned. These messages would have been previously entered into the Progress Message Centre. Please refer to the appropriate section of the manual for more information on this topic. Only unactioned messages for the individual user who is currently logged onto Progress has entered will be displayed. Unactioned messages for other users will not be shown.
The user can access any of these messages by simply double-clicking the message in question.
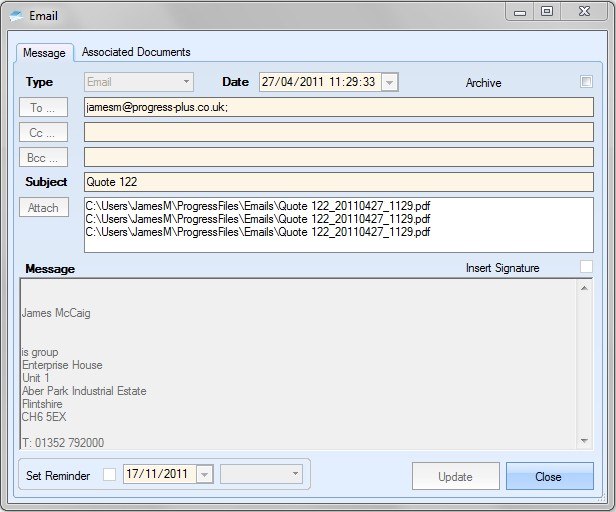
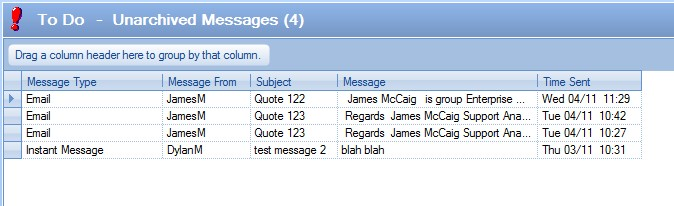
If the user is finished with the message in question, they can archive the message by clicking the ARCHIVE tickbox and selecting the UPDATE option.
![]()
The message will then drop off the To Do screen as shown below.
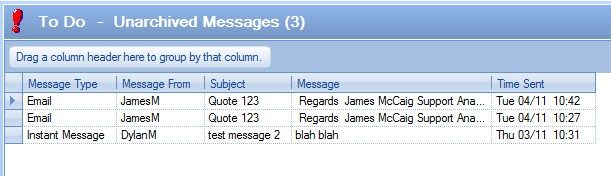
This section displays reminders that the user may have entered against a supplier or customer in the relevant sections. Only reminders that the individual user who is currently logged onto Progress has entered will be displayed. Reminders entered by other users will not be shown.
Reminders displayed in black are currently outstanding and have not been actioned. The date for these reminders to be actioned has not yet been passed. Reminders displayed in red are currently outstanding and have not been actioned. The date for these reminders to be actioned has passed.
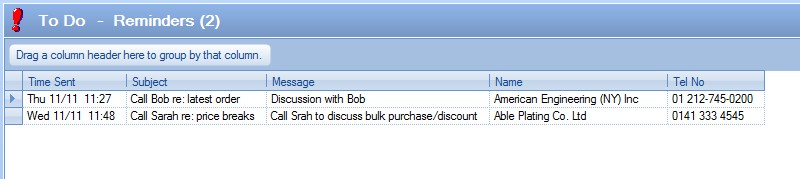
Double-clicking any of the reminders will display a message reminder box with all current reminders shown.
From here the user can select the reminder and DISMISS to remove them from their list altogether or select OPEN ITEM to open the reminder and view the full details.
The user may, if necessary, change the information contained in this reminder by clicking onto the Message field and updating the current message. The user may choose to change the contact Name for this reminder by choosing another one from the drop-down list. The date for the reminder can also be changed by selecting a new date via the calendar look-up on the SET REMINDER field at the bottom. Clicking the UPDATE option will save any amendments made and return the user to the Message Reminder window.
The user can also access their reminders from the Message Centre option shown below.
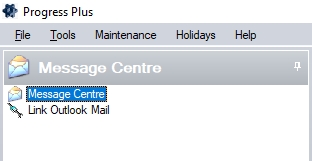
This menu option will open the message centre where all emails, notes and reminders are held. A window similar to the one below will be displayed.
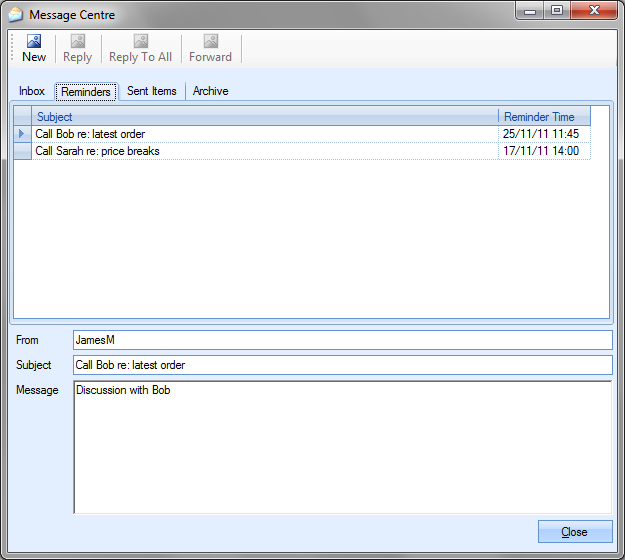
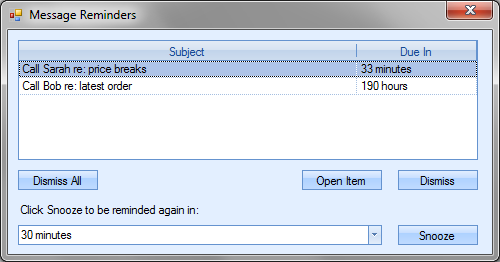
Once a reminder has been actioned, it can be removed from the list by simply double-clicking the reminder either on the Reminders option on the To Do screen, or from the Message Centre. This will display the Message Reminders window.

To remove a reminder, simply highlight the reminder in question and click the DISMISS option. To delete all, click the DISMISS ALL option. Alternatively, the user can delete individual reminders by selecting the OPEN ITEM option and unticking the reminder option at the bottom of the window
![]()
Any deleted reminders will drop off the To Do screen.
O/S Enquiry Contract Reviews
This option highlights any outstanding tasks the current user has in relation to enquiry contract reviews with any overdue tasks shown in red.

The user also has the ability to see any outstanding tasks for other employees by ticking the SHOW ALL EMPLOYEES option at the foot of the screen and clicking the REFRESH option.
![]()
This will update the screen with all outstanding tasks.
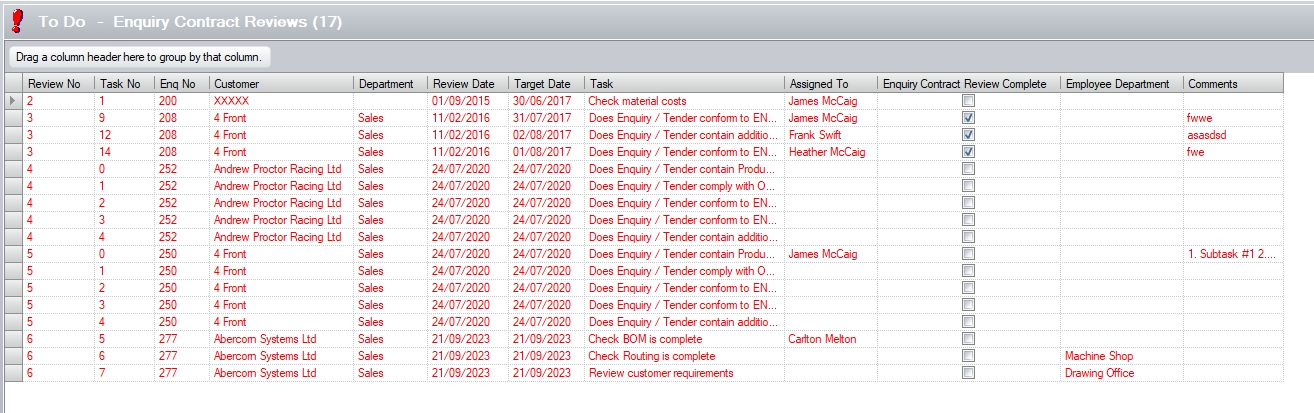
The user can access any of the listed contract reviews by simply double-clicking them on this screen.
This option works in conjunction with the enquiry STATUS field on the enquiry form. This form will display details of enquiries with the status of "received", but not yet "submitted". This will therefore be a list of enquiries that the user has still to send a quotation to that fall within the selected date range.
Enquiries that are displayed in black are currently outstanding and have not been quoted. The date for these enquiries to be responded to has not yet passed.
Enquiries that are displayed in red are currently outstanding and the date for these enquiries to be responded to has passed and these enquiries are now late.
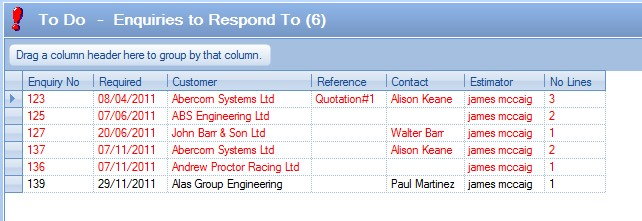
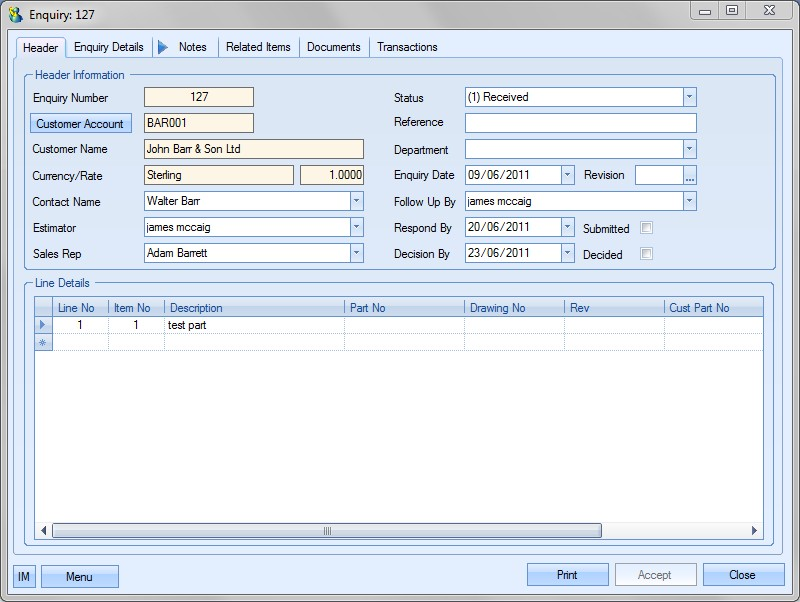
To view all the information contained for an enquiry the user may simply ‘double click’ on the required line. A screen similar to the following will be displayed.
This option works in conjunction with the enquiry STATUS field on the enquiry form. This form will display details of enquiries with the status of SUBMITTED or RECEIVED. This will therefore be a list of enquiries that fall within the selected date range that the user has sent a quotation to or needs to quote and he or she is awaiting is awaiting a decision from the customer.
Enquiries that are displayed in black are currently outstanding (i.e. the enquiry status is not "Decided") but the decision date for these enquiries has not yet passed.
Enquiries that are displayed in red are currently outstanding (the enquiry status is not "Decided") and the decision date for these enquiries has passed and these enquiries are now late.
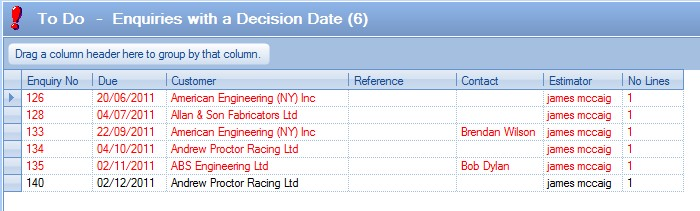
To view all the information contained for an enquiry the user may simply ‘double click’ on the required line. The selected enquiry will then be displayed.
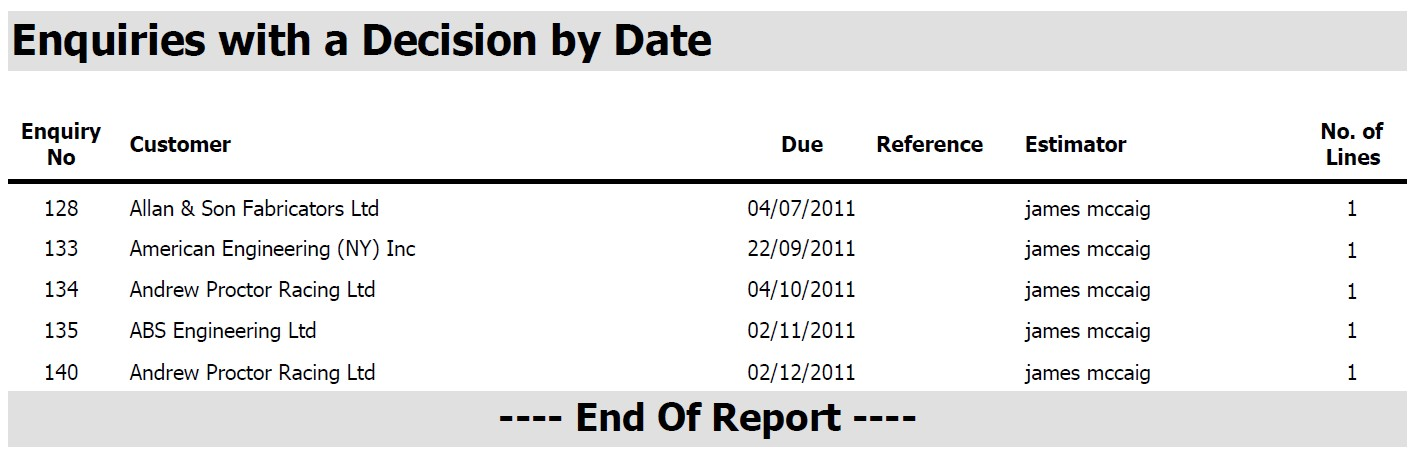
The PRINT button on the bottom of the Today form permits the users to print off a hard copy of the information regarding the enquiries awaiting a decision displayed in this screen. An example is shown as follows:
This option works in conjunction with the Enquiry Status field on the enquiry form. This form will display details of enquiries with the status of Submitted or Received. This will therefore be a list of enquiries that fall within the selected date range that the user has sent a quotation to or needs to quote and he or she is awaiting is awaiting a decision from the customer but which have also been marked for follow up by the current user. Enquiries marked for follow up by other users are not displayed.
Enquiries that are displayed in black are currently outstanding (the Enquiry Status is not Decided) but the decision date for these enquiries has not yet passed.
Enquiries that are displayed in red are currently outstanding (the Enquiry Status is not Decided) and the decision date for these enquiries has passed and these enquiries are now late.
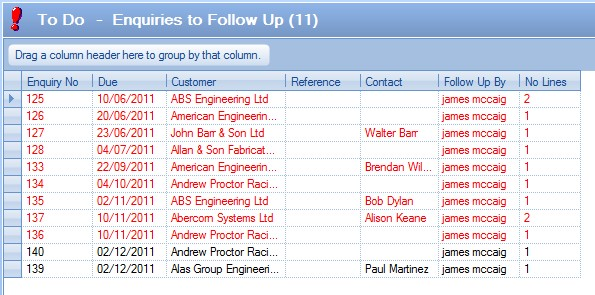
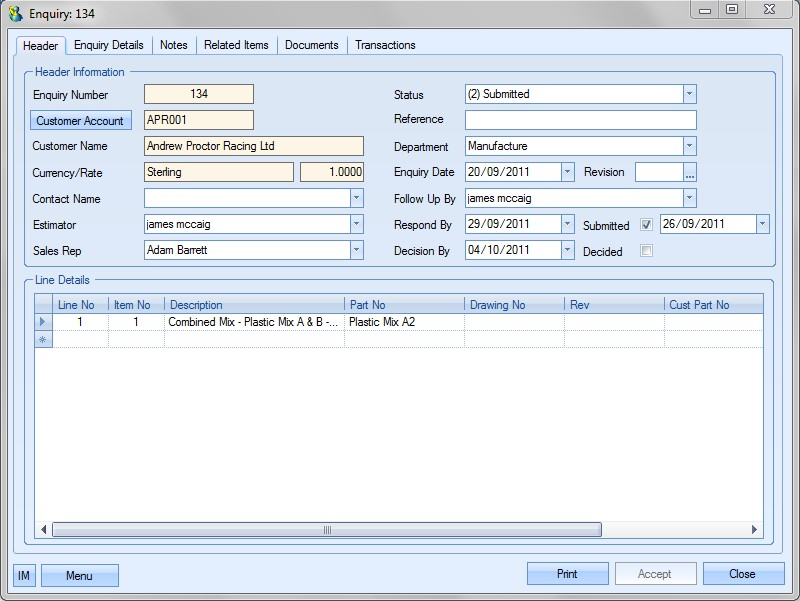
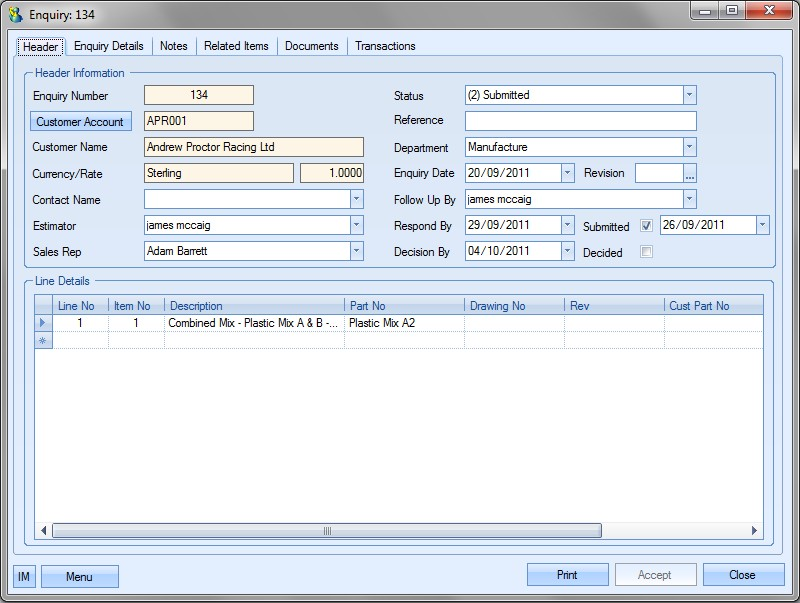
To view all the information contained for an enquiry the user may simply ‘double click’ on the required line. A screen similar to the following will be displayed.
This option displays to users details of any contract review tasks that are currently due within the No. of Days Due specified on the To Do screen or any that are outstanding for the current user.

Items that are displayed in red have a due date that has passed and these review tasks are now late. This list can be extended to all outstanding corrective actions by selecting the Show All Employees option at the bottom of the screen.
![]()
Clicking Refresh after choosing to view all employees presents the user with the full outstanding list.

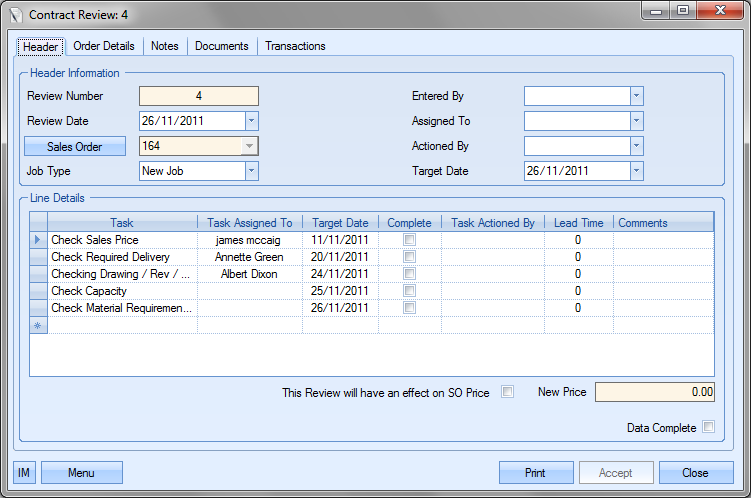
Double clicking on the line containing the details of the required preventative action will open a screen similar to the following to those users with sufficient access rights containing the information regarding the selected review task.
Once the contract review task has been marked as complete, the contract review task will drop off the O/S Contract Review screen.

The PRINT button on the bottom of the Today form permits the users to print off a hard copy of the information regarding the outstanding contract review tasks in the Today screen.
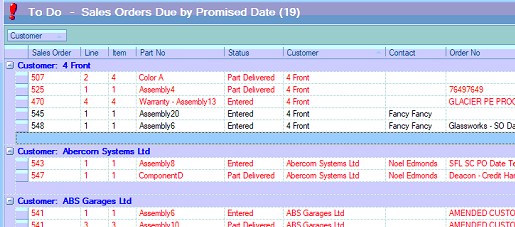
This option displays current outstanding sales orders that fall within the selected date range.
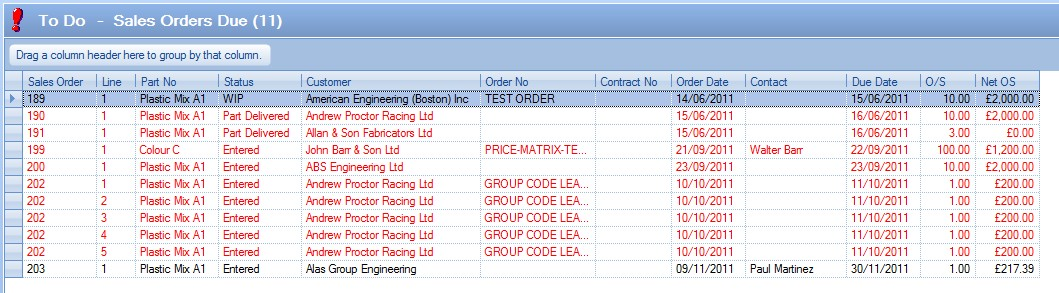
Sales orders displayed in black are currently outstanding and have not been delivered. The date for these orders to be delivered has not yet passed.
Sales orders displayed in red are currently outstanding and have not been delivered. The date for these orders to be delivered has passed and these orders are now late.
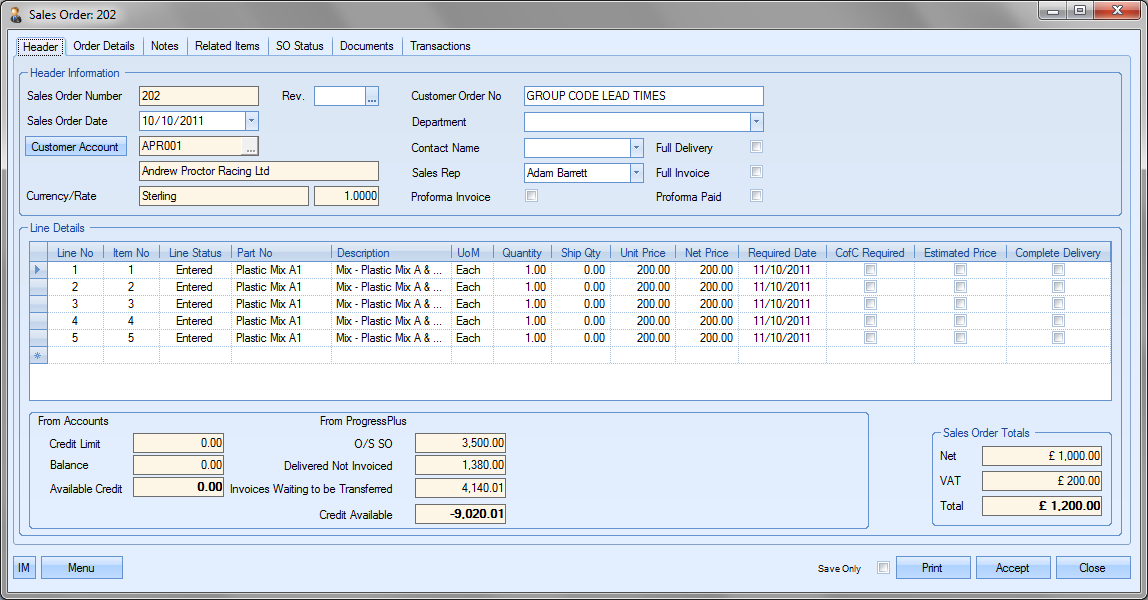
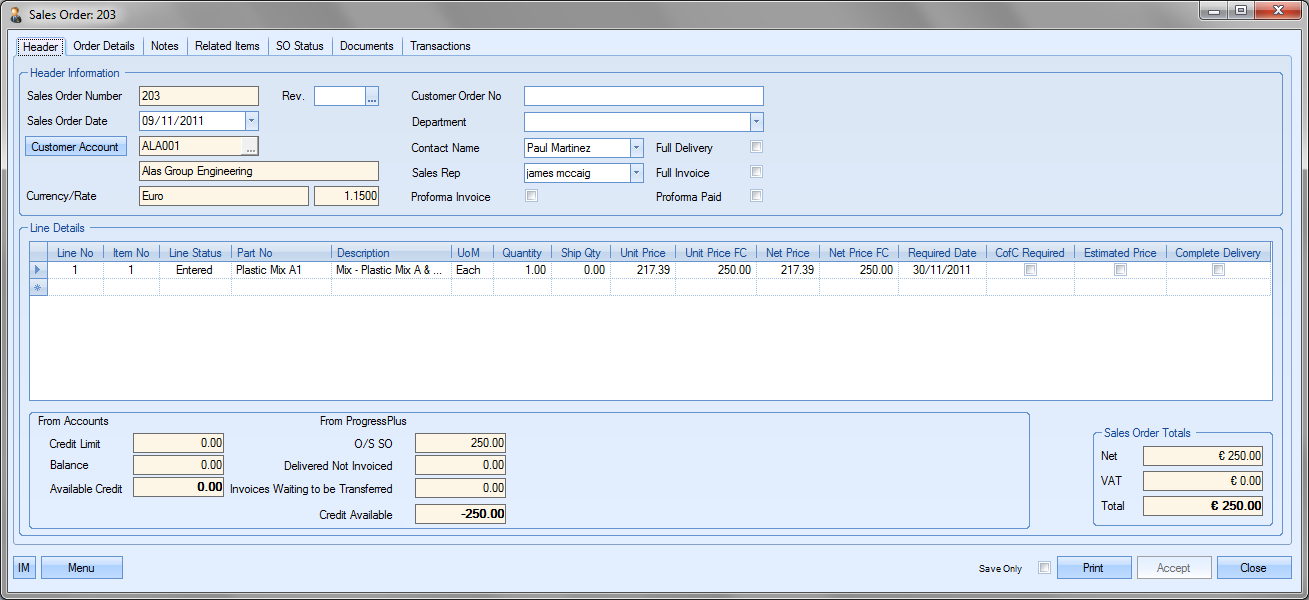
To view all the order information contained for an order the user may simply ‘double click’ on the required line. This will present the user with the sales order.
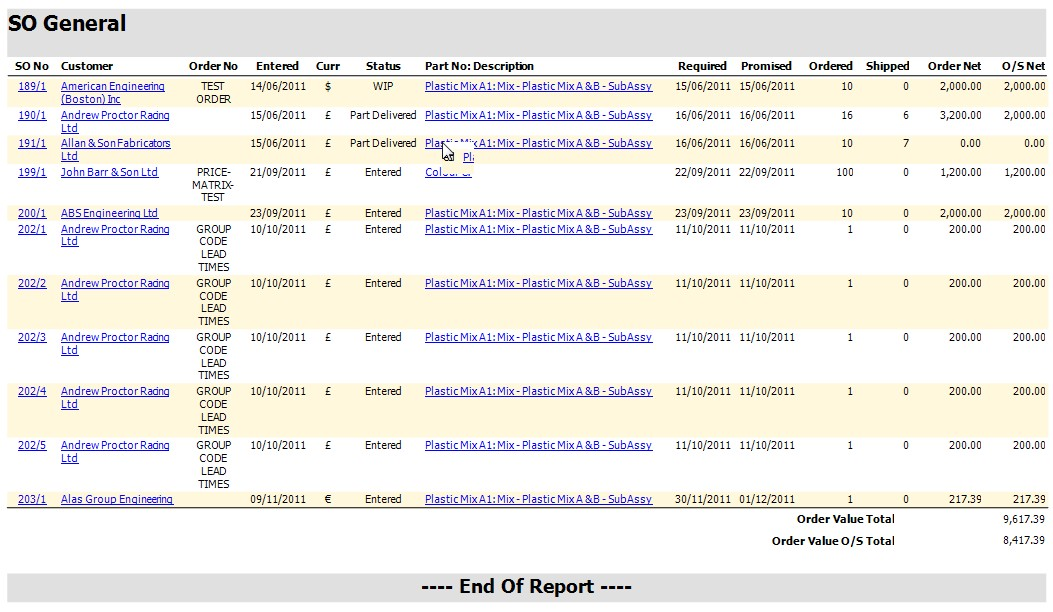
The PRINT button on the bottom of the Today form permits the users to print off a hard copy of the information regarding the sales orders displayed in this screen. An example is shown as follows:
This option displays current outstanding sales orders that fall within the selected date range. The promise date for these orders may be different from the customer’s required date if the user has amended the promise date held against the sales order line.
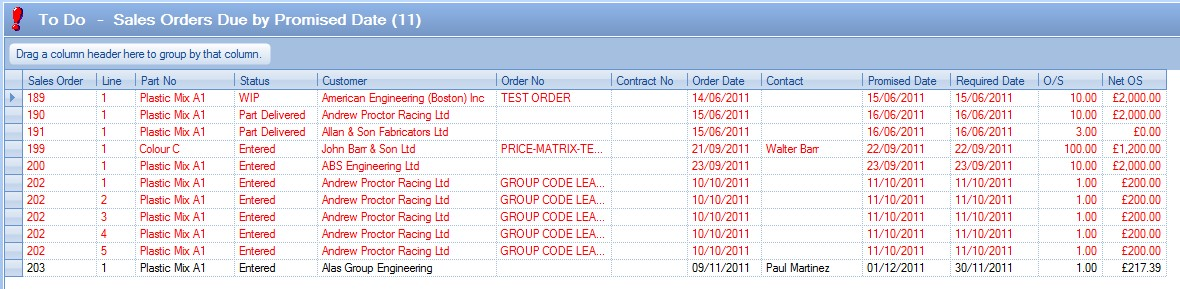
Sales orders that are displayed in black are currently outstanding and that have not been delivered. The date for these orders to be delivered has not yet passed.
Sales orders that are displayed in red are currently outstanding and that have not been delivered. The date for these orders to be delivered has passed and these orders are now late.
To view all the order information contained for an order the user may simply ‘double click’ on the required line. This will present the user with the sales order.
The PRINT button on the bottom of the Today form permits the users to print off a hard copy of the information regarding the sales orders displayed in this screen. An example is shown as follows:
This option displays current outstanding sales orders that fall within the selected date range. The latest date for these orders may be different from the customer’s required and promised date if the user has amended the promise date held against the sales order line.
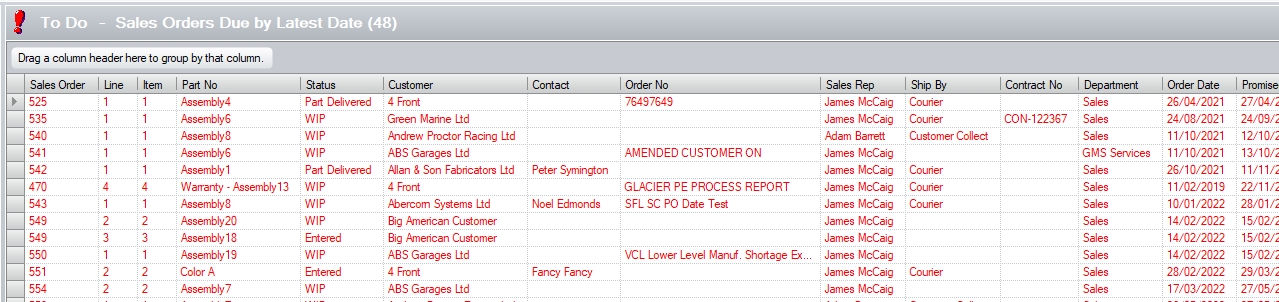
Sales orders that are displayed in black are currently outstanding and that have not been delivered. The date for these orders to be delivered has not yet passed.
Sales orders that are displayed in red are currently outstanding and that have not been delivered. The date for these orders to be delivered has passed and these orders are now late.
To view all the order information contained for an order the user may simply ‘double click’ on the required line. This will present the user with the sales order.
The PRINT button on the bottom of the Today form permits the users to print off a hard copy of the information regarding the sales orders displayed in this screen. An example is shown as follows:
Sales Orders Not Submitted
This option lists all sales orders that still to be submitted to the customer (i.e. acknowledged - printed and sent to customer) except those that have been cancelled.
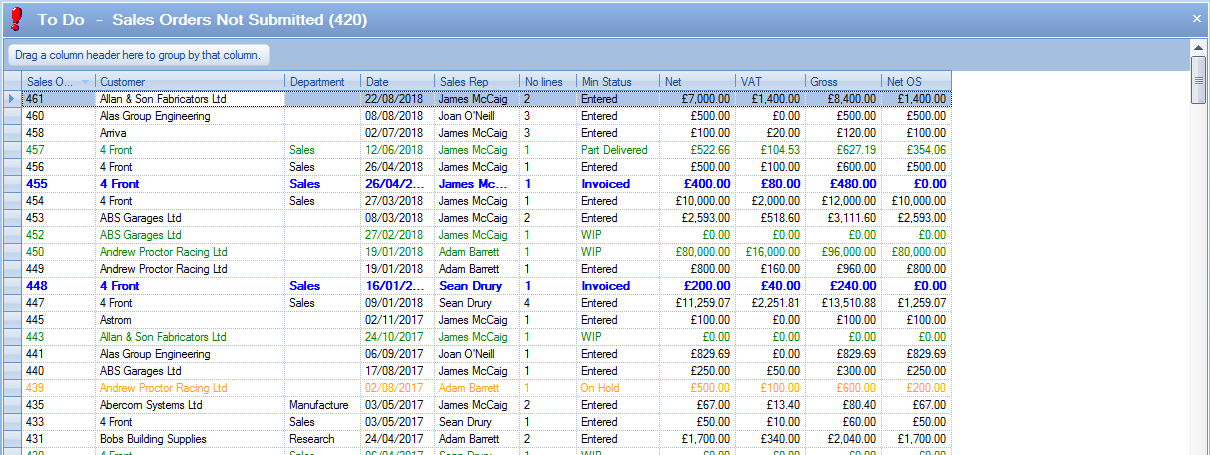
The sales orders listed can be accessed by double-clicking on them. This will open the sales order selected allowing the user to action accordingly.
SO Line Scheduled Invoices
This option lists all scheduled invoiced that have been raised against sales order that are due within the Due No. of Days value set on the Today screen. Any overdue invoices will be displayed in red while all others are displayed in black.
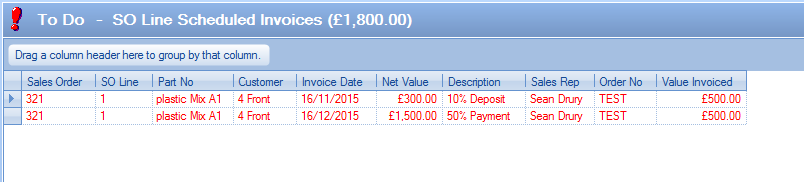
The user can create the required invoice by simply double-clicking on the listed items, from which a new invoice window will be displayed.
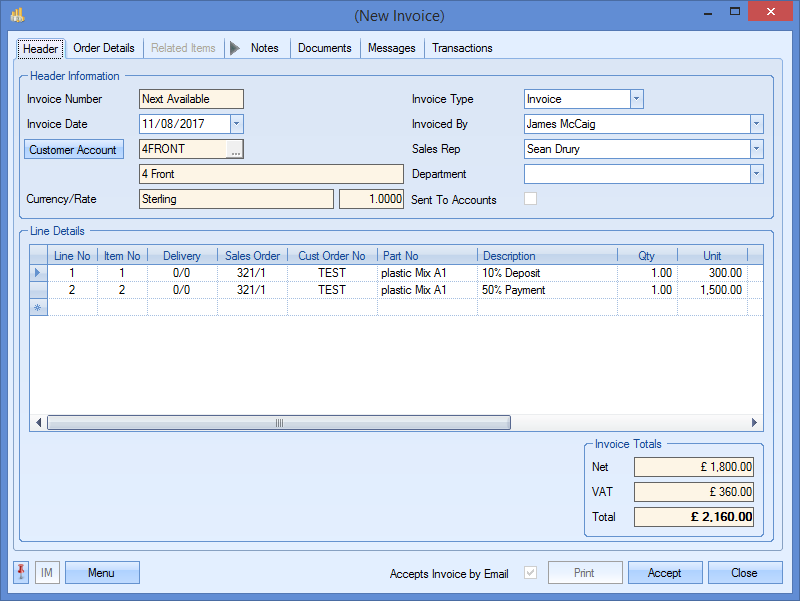
The user can then follow normal invoice procedure and send the customer the invoice as required.
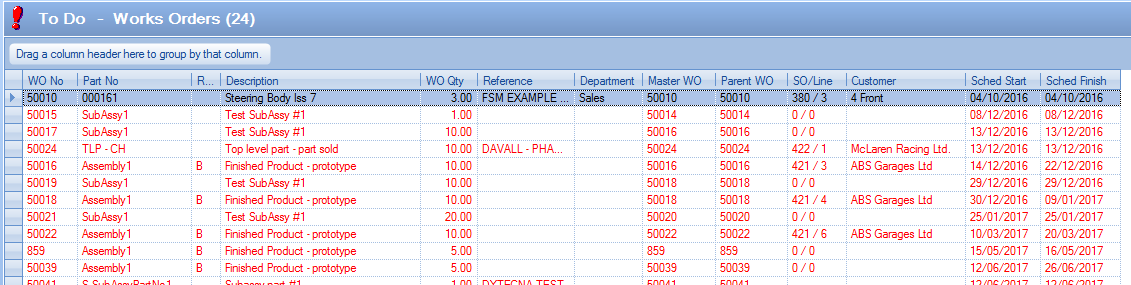
WOs Due To Start
This screen lists all the work orders that are due to start within the specified number of days on the Today screen based on the WO scheduled start date. The user can directly access any work order by simply double-clicking on the work order in question. Any work orders that are overdue will be shown in red.
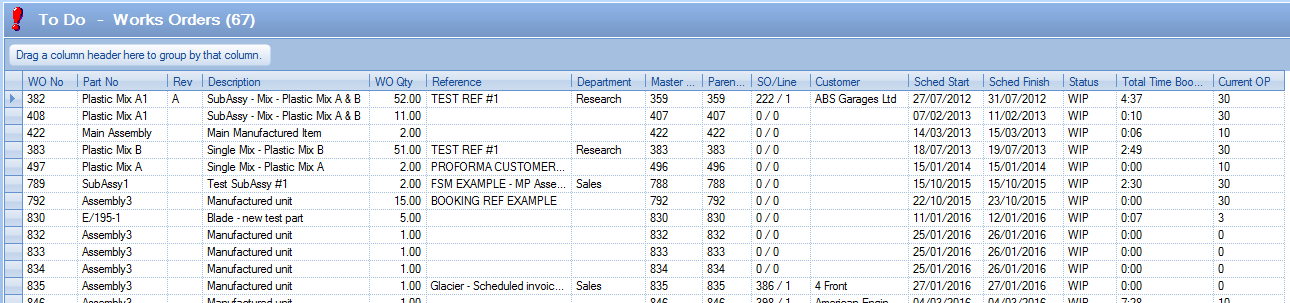
WOs Due To Finish
This screen lists all the work orders that are due to finish within the specified number of days on the Today screen based on the WO scheduled finish date. Work orders shown in red are overdue. As per the WO Due To Start screen, the user can access any work order by simply double-clicking on the order shown.
WO With Receipt Qty Less Than Booked Qty
This screen shows a list of work orders where the quantity booked against the operations does not match the quantity receipted against the work order.

Again, the user can access any work order listed for further investigation by simply double-clicking on the listed work order to open it up.
Purchase Enquiries By Respond Date
This screen shows a list of all open purchase enquiries which have been raised and which are due within the specified number of days on the Today screen based on the enquiry's required date.
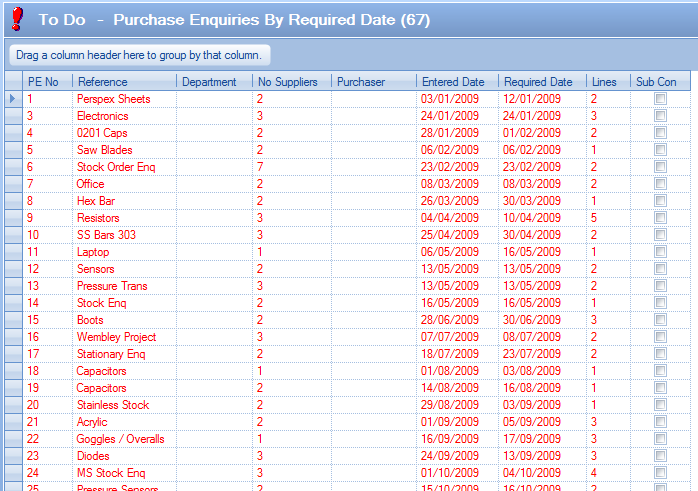
Any purchase enquiry listed in red is overdue. The user can access any of the listed purchase enquiries by simply double-clicking on the item they want.
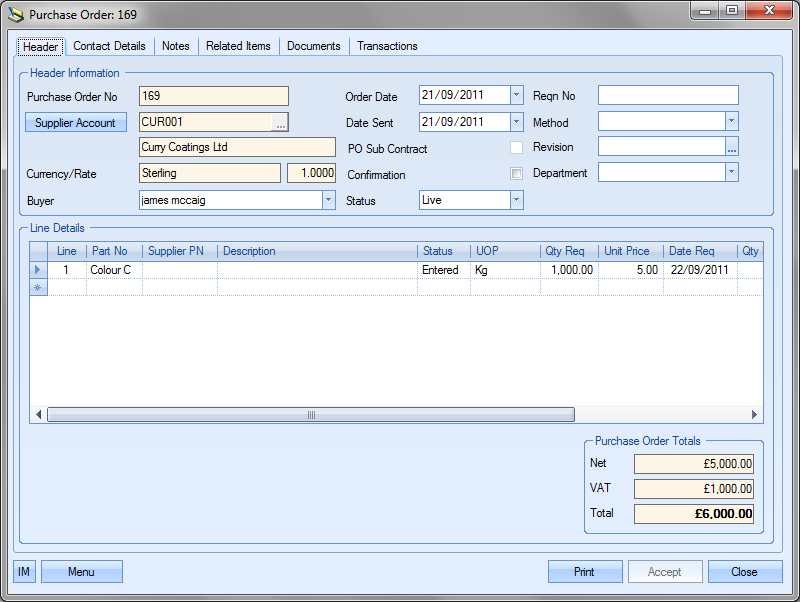
This option displays current outstanding purchase orders that fall within the selected date range.

Purchase orders that are displayed in black are currently outstanding and have not been received. The due date for these orders to be received has not yet passed. Purchase orders that are displayed in red are currently outstanding and have not been received. The due date for these orders to be received has passed and these orders are now late. To view all the order information contained for an order the user may simply ‘double click’ on the required line. The selected purchase order will be displayed.
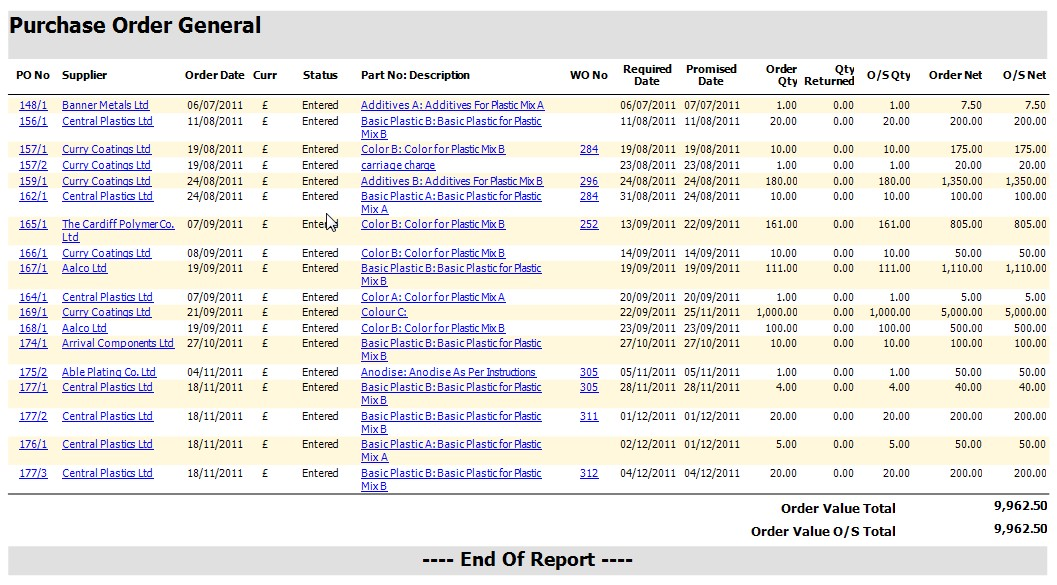
The PRINT button on the bottom of the Today form permits the users to print off a hard copy of the information regarding the outstanding purchase orders displayed in the Today screen. An example is shown as follows:
Purchase Orders By Promised Date
This option displays current outstanding purchase orders that fall within the selected date range. The promised date for these orders may be different from the suppliers required date if the user has amended the promised date held against the purchase order line after agreeing the date with the supplier.
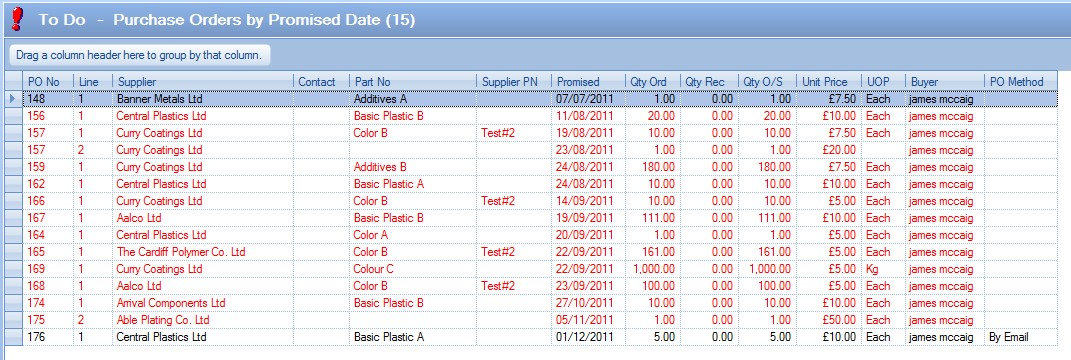
Purchase orders that are displayed in black are currently outstanding and have not been received. The due date for these orders to be received has not yet passed.
Purchase orders that are displayed in red are currently outstanding and have not been received. The due date for these orders to be received has passed and these orders are now late.
To view all the order information contained for an order the user may simply ‘double click’ on the required line. The purchase order will then be displayed.
The PRINT button on the bottom of the Today form permits the users to print off a hard copy of the information regarding the purchase orders displayed in this screen.

Purchase Orders By Latest Date
This option displays current outstanding purchase orders that fall within the selected date range. The latest date for these orders may be different from the suppliers required and promised date if the user has amended the latest date held against the purchase order line after agreeing the date with the supplier.
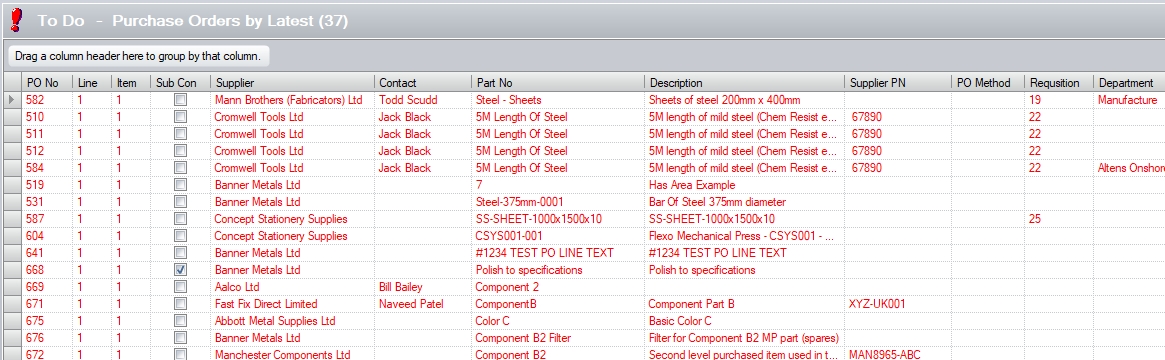
Purchase orders that are displayed in black are currently outstanding and have not been received. The due date for these orders to be received has not yet passed.
Purchase orders that are displayed in red are currently outstanding and have not been received. The due date for these orders to be received has passed and these orders are now late.
To view all the order information contained for an order the user may simply ‘double click’ on the required line. The purchase order will then be displayed.
The PRINT button on the bottom of the Today form permits the users to print off a hard copy of the information regarding the purchase orders displayed in this screen.
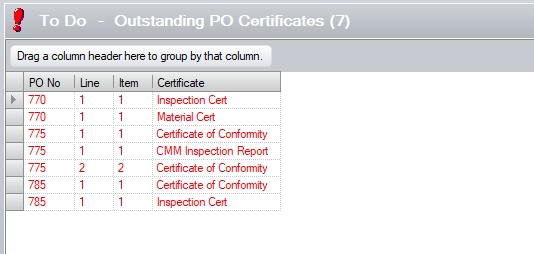
Purchase Orders To Be Confirmed
This option displays a list of any current purchase orders, with at least one line with a status less than fully received and the confirmation check box in the Purchase Order header unticked. The confirmation check box allows users to indicate whether a confirmation has been received from the supplier.
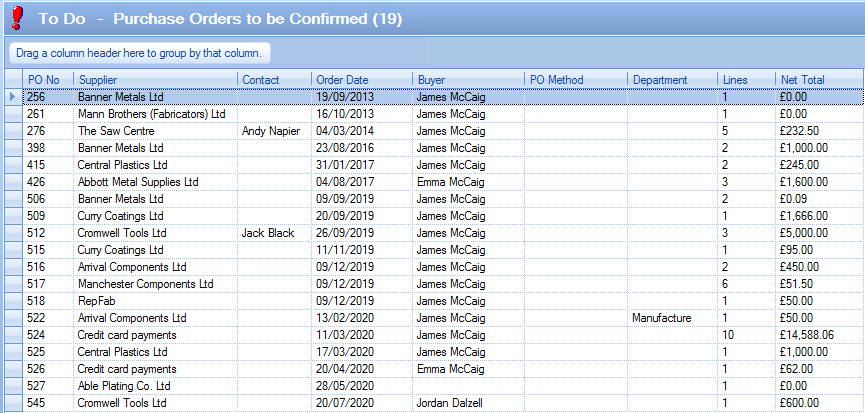
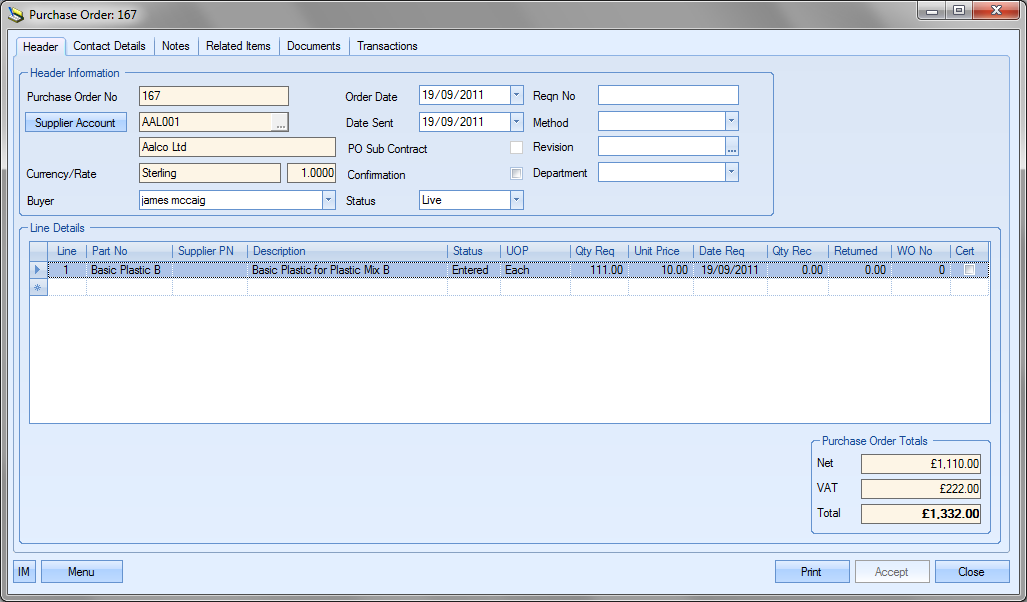
To view all the order information contained for an order the user may simply double-click on the required line. A screen similar to the following will be displayed as shown.
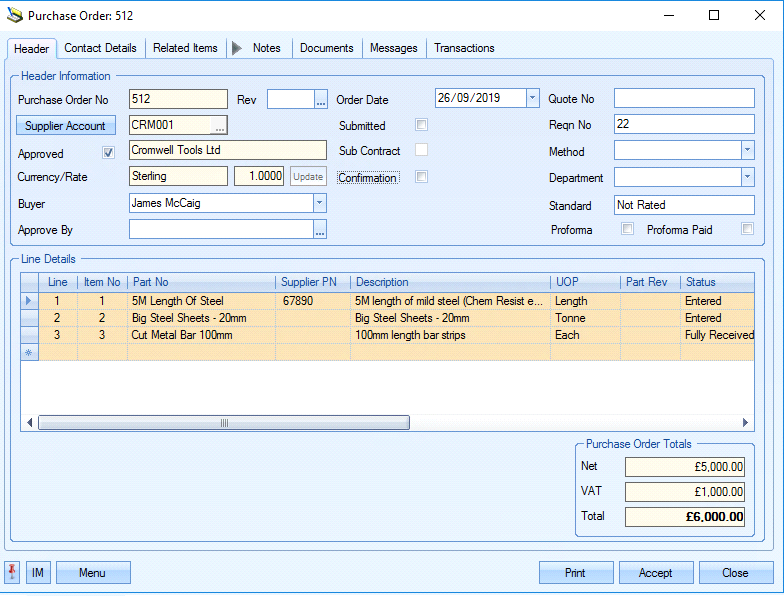
Assuming the user has the permissions to do so, they may tick the confirmation box if they have received confirmation from the supplier.
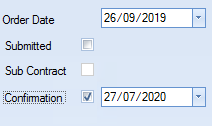
Once ticked, the current date will be stamped on the header although the user can set this to any date they wish. Clicking the Accept button will save the PO and then clicking the Close button will return the user to the Today screen. Clicking the Refresh button on the Today screen will now see the purchase order drop off the list of purchase orders to be confirmed.
Purchase Orders On Hold
This option shows the user all purchase order lines currently with a status of ON HOLD.

The user can access the listed PO(s) by double-clicking on the PO in the grid. This will open the purchase order for the employee and show the ON HOLD line.
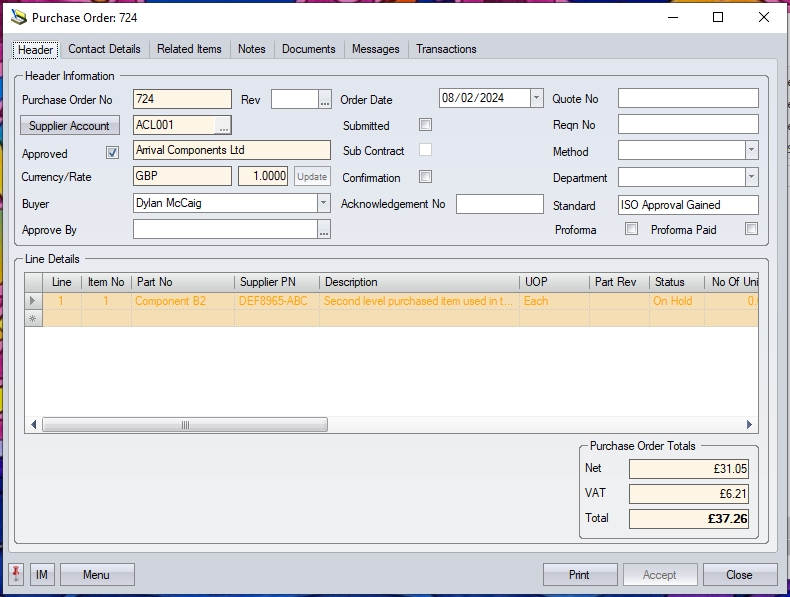
Outstanding Proforma POs
This option highlights any purchase orders that have been marked as "proforma" but have not been marked as paid. Since proforma POs would typically require the supplier to be paid in advance of receipt of the goods, this screen highlight these POs to ensure there is no unnecessary delay any orders.
The user can view the details any of the purchase orders listed by simply double-clicking on them to open the purchase order. To remove any of the listed purchase orders from this screen, the user has to update the purchase order to say that it had been paid.
The EXPORT option at the bottom of the screen will also allow the user to export out the current list of purchase orders for further analysis in Excel.
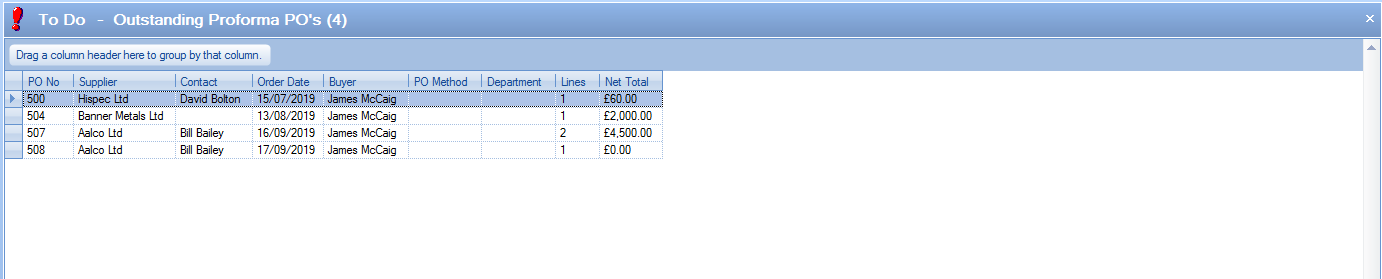
Outstanding PO Certificates
This screen highlights certificates that have yet to be received from the supplier in relation to goods orders on a PO. This screen is part of the Enhanced PO Certification functionality and will only be available if that is switched on for use. Items listed in red highlights goods received, but with outstanding certification. Those shown in black are outstanding certs where no goods have yet been received.
The user can double-click any of the listed items to open the associated PO for viewing.
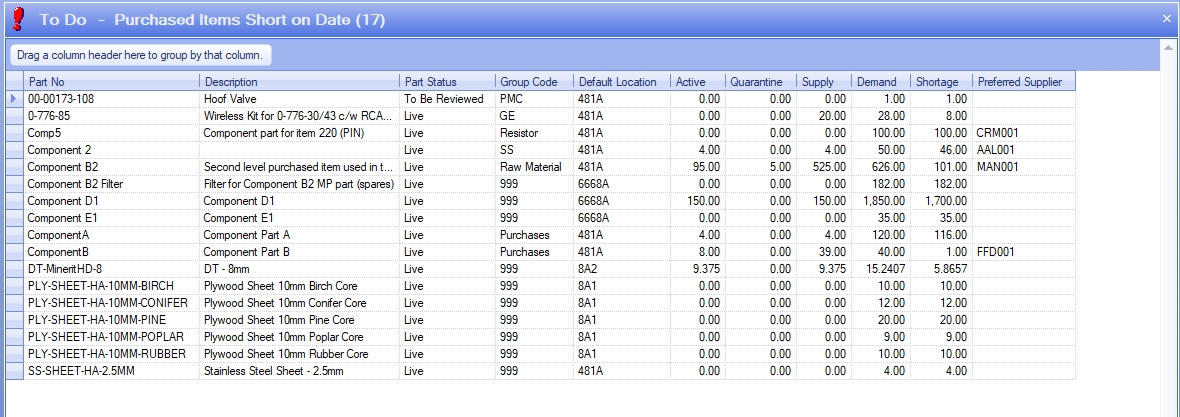
The Items to be Purchased option displays a list of items that have an overall shortage (i.e. Supply < Demand). On choosing this option, a screen similar to the following will be displayed.

Like many of the Today screens, the data displayed on this screen is based on the date or number of days specified on the Today screen.
![]()
This date/number of days allows the user to look ahead for a specified period of time to see the requirements/items due within that period.
NOTE: Due to the complexity of calculations behind the Items To be Purchased screen, an option has been added to ignore this figure/date and to show the overall purchasing requirements. This is useful where a large number of parts MP parts are listed and should speed up the generation of the screen.
![]()
Ticking this option and clicking REFRESH will update the grid without considering the days/date set.
In addition to the IGNORE NO OF DAYS option, the user has some other options available. These are shown at the bottom of the screen.
![]()
Include Obsolete Parts Ticking this option will include parts with a status of "obsolete"
Include Free Issue Ticking this option will include any free issue stock in the part's SUPPLY figure
Include Forecast WOs Ticking this option will include any forecast WOs in the part's DEMAND figure
Use MSL Ticking this option will show show that date the part's stock drops below its minimum stock level (MSL) value instead of when it reaches zero
Applying any of these requires the user to click REFRESH to update the information accordingly.
Once the list of parts is displayed, double-clicking on any part will open the PO Shortage screen for the selected item. This will default to show the details for only the selected part.
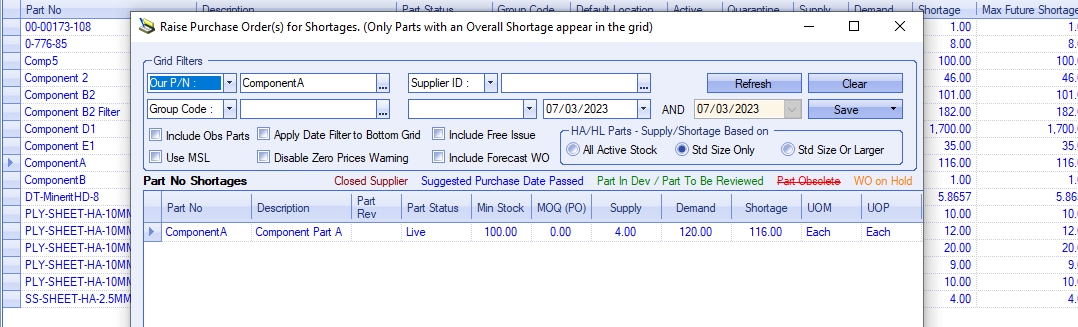
To see the full list (i.e. the same as the Today screen), the user can remove the filtered part number and click REFRESH to see the complete list of parts with a shortage.
For more information on the PO Shortage screen, and what can be done from there, please refer to the Supplier > Purchasing section of the manual.
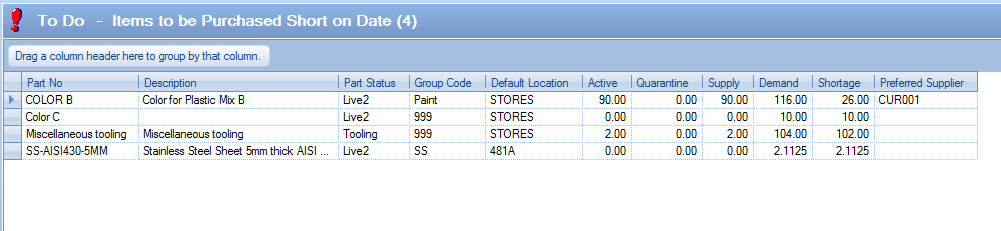
This screen highlights any purchased items that have a shortage based on the current date and the specified number of days or the specified target date on the Today screen. Unlike the Items To be Purchased screen above, this only considers activity up to the specified point in time, which shows short term shortages and ignores longer term incoming stock.
The overall stock status situation of a part is calculated on ALL demand and supply information. As a result, long term supply can suggest there is no immediate shortage of a part which could lead to inventory supply issues earlier than the user thinks. This screen looks at only activity up to a specified point in time, so looks at the supply and demand in a shorter time frame and calculates whether the part will incur a shortage within this time frame.
The user also has similar options to the Items To Be Purchased screen available at the bottom, allowing them to include obsolete parts, free issue stock and forecast work orders if required.
![]()
Include Obsolete Parts Ticking this option will include parts with a status of "obsolete"
Include Free Issue Ticking this option will include any free issue stock in the part's SUPPLY figure
Include Forecast WOs Ticking this option will include any forecast WOs in the part's DEMAND figure
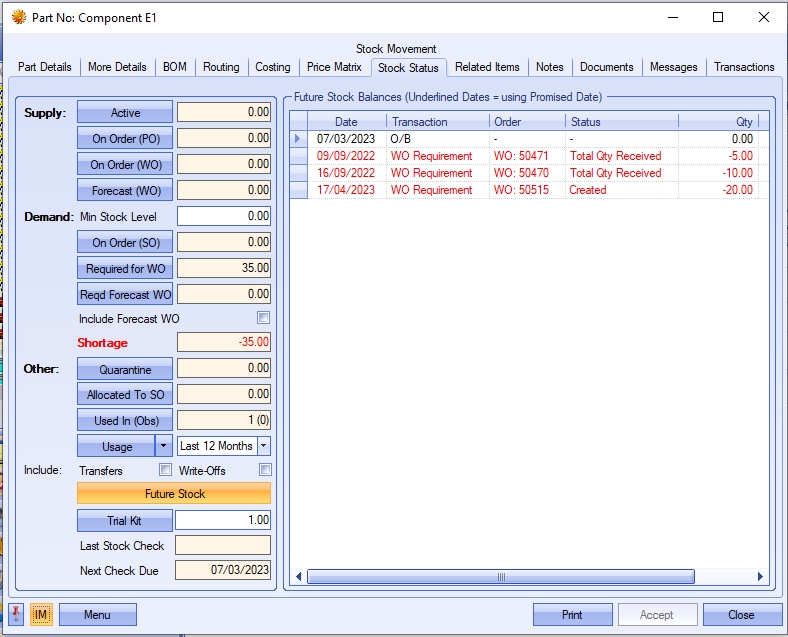
The user can also see further details on the listed parts by double-clicking on them. This will present the user with the part's Future Stock screen, allowing them to see future ins/outs of stock and whats driving the shortage.
Example:
Part number Color C has an overall surplus (+80) of stock based on all supply and demand. As a result, the Items To Be Purchased screen does not highlight a shortage.
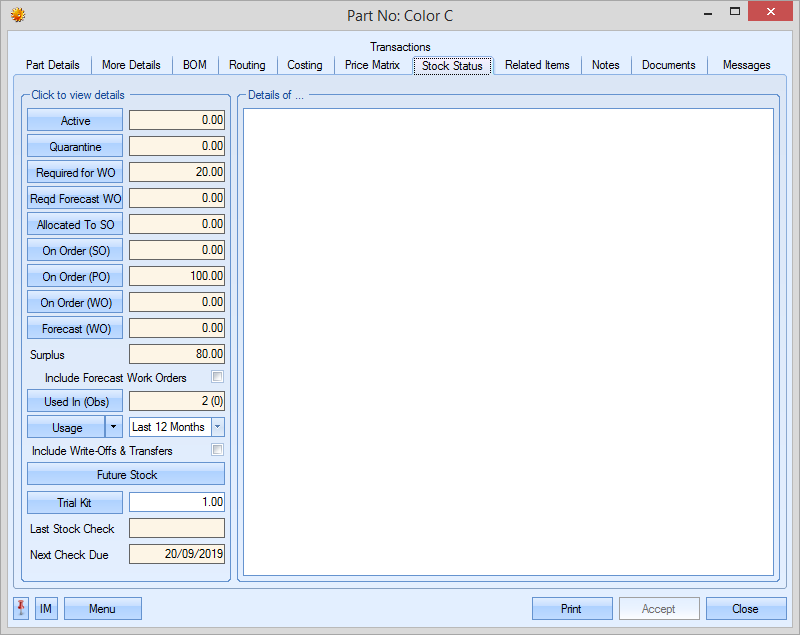

However, in the short term, there is an immediate need to buy some of Color C due to an imminent works order requirement, since the current supply will not arrive from the supplier until long after the work order requirement needs to be fulfilled. Based on the current date and the specified number of days on the Today screen, the Items To Be Purchased Short On Date screen detects this and highlights the shortage and need for action.
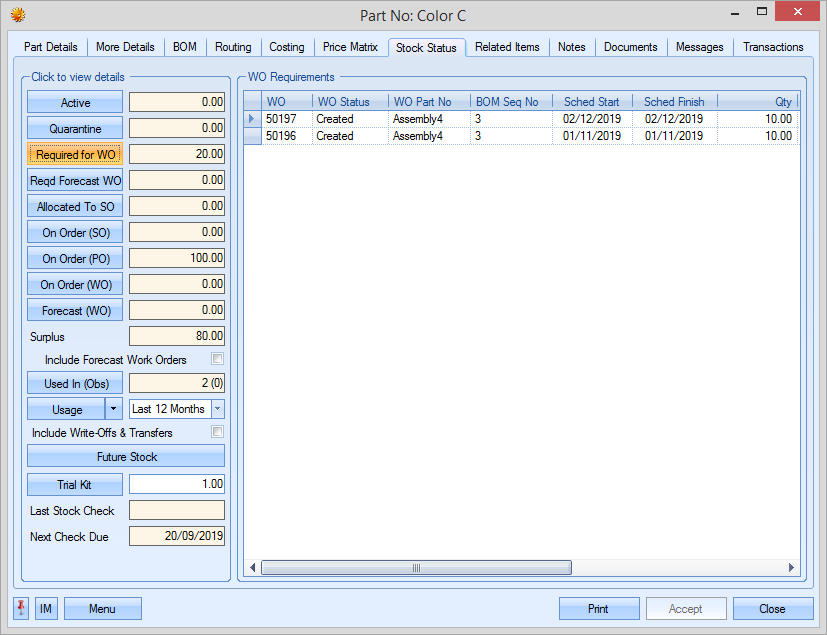
Imminent Req For WO quantity (20) is greater than current supply/stock (0)
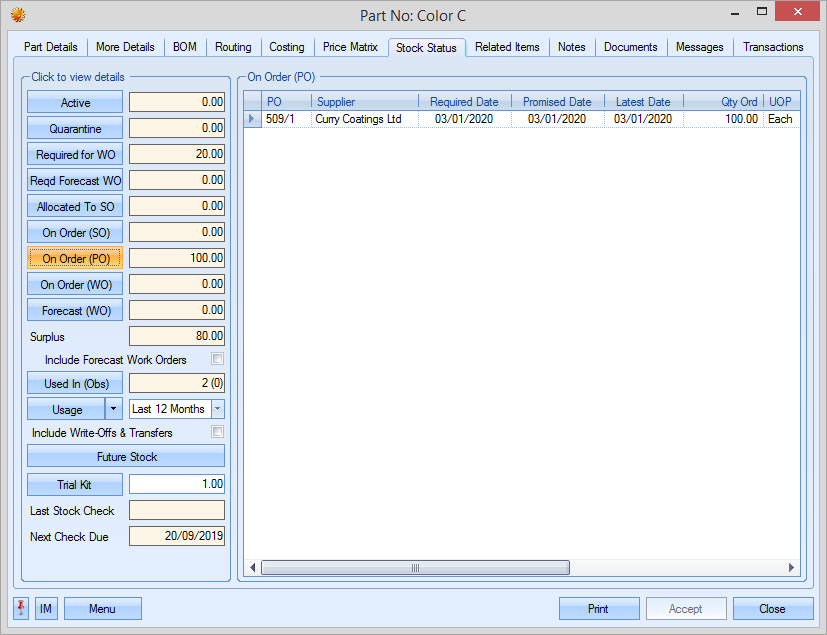
Additional supply from POs (100) not going to arrive until Jan 2020
Items To Be Purchased Short On Date highlights this as an issue
The user can use this information to contact the supplier to see about expediting existing POs to ensure the immediate requirements are met and/or raise new POs to cover the immediate requirements.
For more information on purchase orders and the PO Shortage screen, please refer to the Supplier > Purchasing section of the manual.
This screen displays a list of subcontract operations for works orders that have not yet had a subcontract purchase order raised for them. For items displayed in red the operation scheduled start date for this subcontract operation has passed and these operations are now late.

On double clicking the required line details of the selected works order and subcontract operation, a screen similar to the following will be displayed. Details displayed include the relevant works order number, part number, part description, works order scheduled start date, operation number and operation description. None of the information contained in these fields can be amended from this screen.
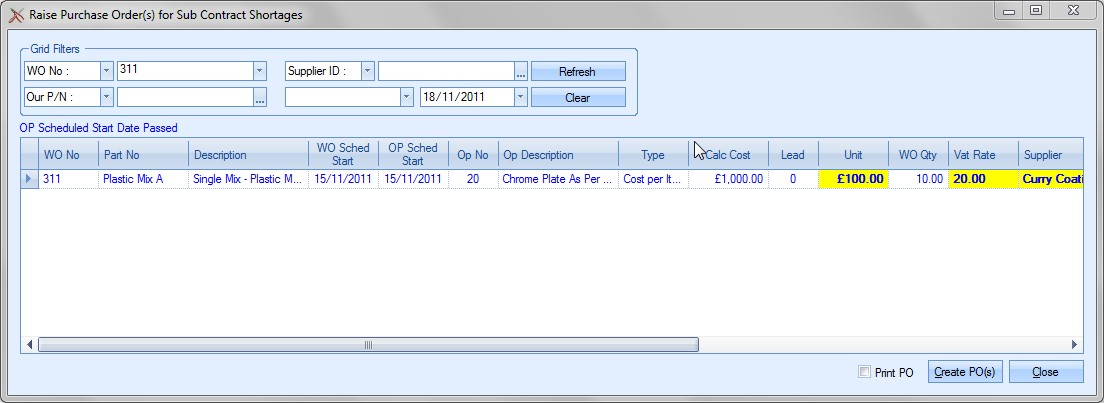
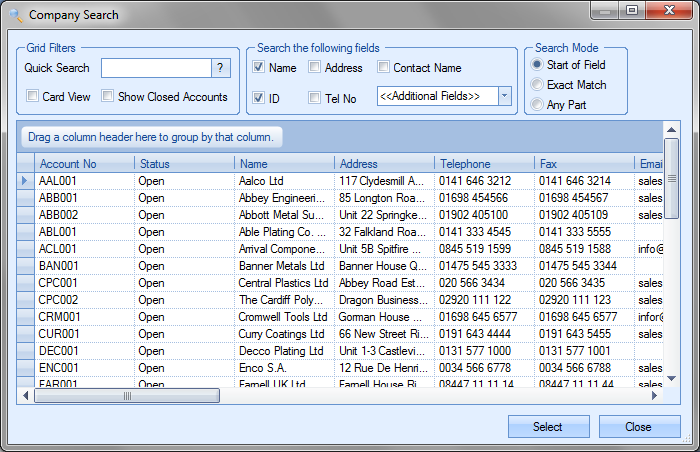
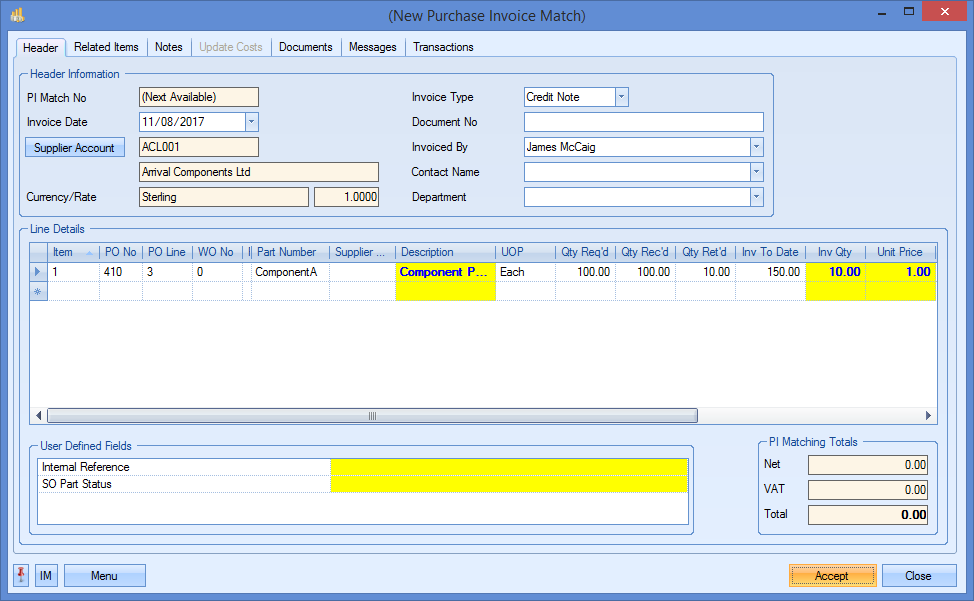
When using the Items to be Subcontracted option the screen will display any preferred supplier that has been set up against the routing for this part. If no preferred supplier has been entered against the part or if the user wishes to raise a purchase order for an alternative supplier, clicking on the Supplier lookup (in yellow) will produce a list of available suppliers which the user can select from.
The screen will also display any expected cost as previously entered against the routing entry for this part in the Unit field (yellow). This can be amended by the user if required. The user may also change the VAT Rate and Date Required for this purchase order. The Qty field will default to any outstanding shortage for this subcontract operation though again the user can amend this information if required.
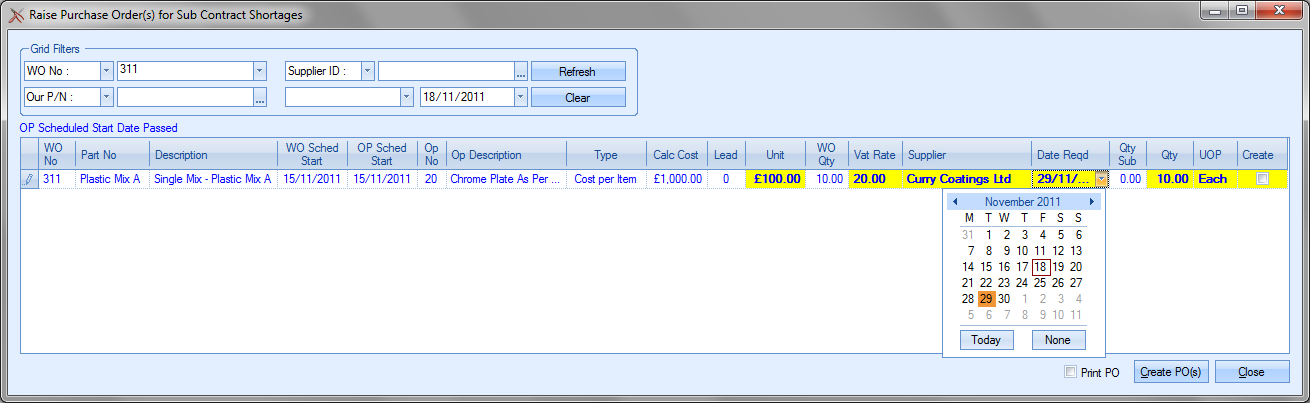
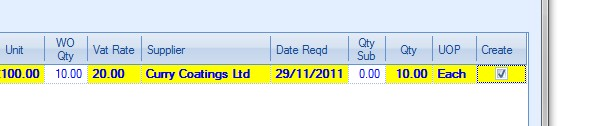
When all relevant information has been amended the user must click on the Create tickbox.
After confirming the selected item pressing the Create PO(s) button on the bottom of the form will produce the purchase order for the subcontract shortage.
Clicking Close will return the user to the Today screen. Please refer to the PO section of this manual for more information on raising subcontract purchase orders.
Subcontract Items At Suppliers
This option shows all the items that are currently out at subcontractors. This list is based on the subcontract PO line items being marked as DESPATCHED.
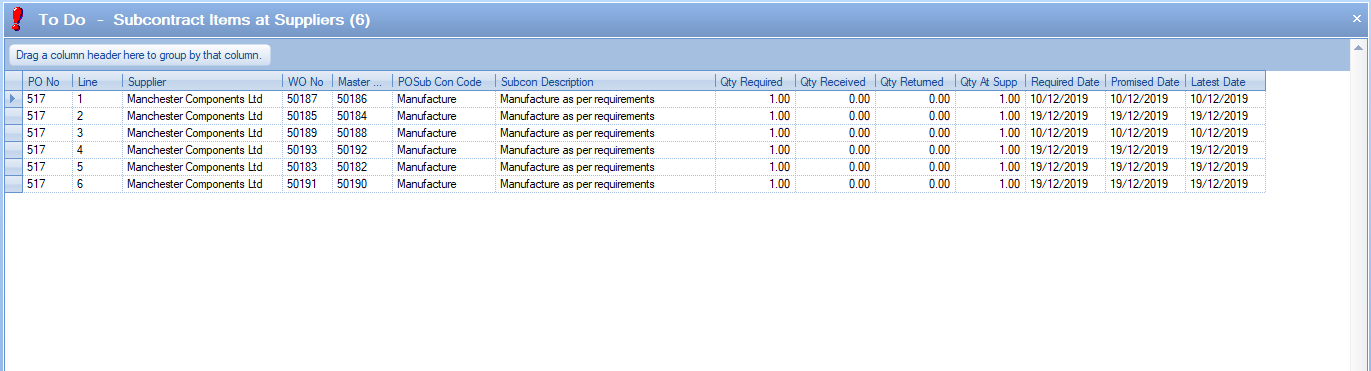
Once the items return from subcontractors and are booked into stock in full, the items will drop off this screen.
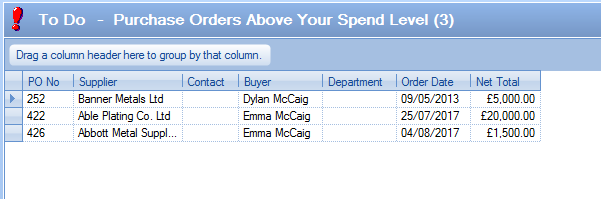
Purchase Orders Above Your Spend Level
NOTE: This option will only be in use if Progress is configured to use PO spend levels.
This option shows all purchase orders created that are above the spend level of the current user. These are POs which need to be processed by another user who does have authority to send the PO to the supplier.
Purchase Order To Be Approved
NOTE: This option will only be in use if Progress is configured to use the PO approval process.
This screen shows all purchase orders which are still to be approved. The screen will default to only purchase orders raised by the current user, but the user can include all purchase orders waiting to be approved by clicking the SHOW ALL EMPLOYEES option at the bottom of the screen.
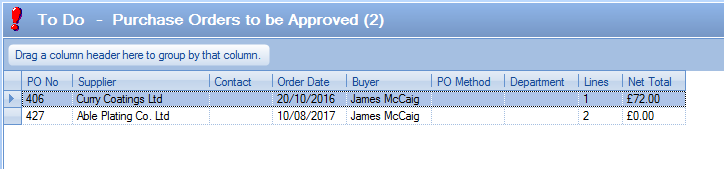
The user can access any of the purchase orders listed by simply double-clicking on the purchase order. If the user is not allowed to approve the PO due to it being created by them or if its above their PO View Limit value set against their user access rights, the system will inform them accordingly.
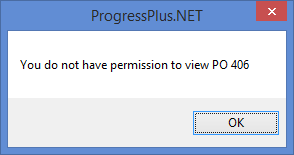

If the current user does have authority to approve the purchase orders listed, they can access and update the purchase order as necessary.
Purchase Orders You Can Approve
This screen lists all purchase orders which the current user has authority to approve.
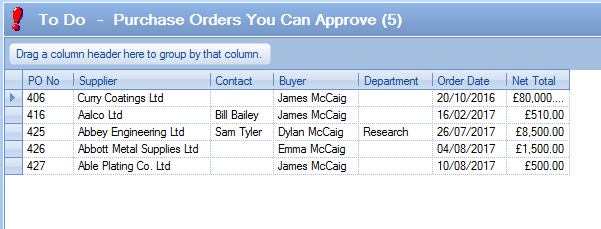
If there are no POs the user can approve, then they will be notified as such.

The user can approve any of the purchase orders listed on this screen by simply double-clicking them to open the purchase order record and clicking the APPROVED option as shown below.
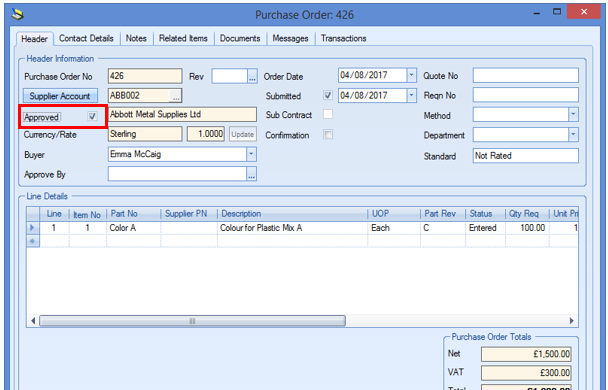
Once the purchase order has been approved, it can be sent to the supplier as per normal process.
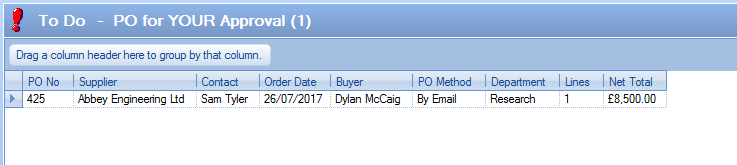
PO For YOUR Approval
This option lists all purchase orders that have been specifically assigned to the current user for approval.
Purchase orders appear on this screen when the purchase order APPROVE BY field has been populated with the employee name associated with the current user as shown below.
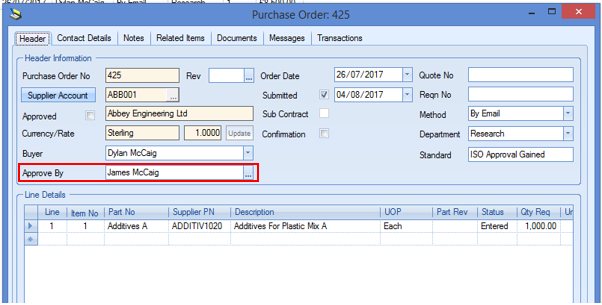
The user can access the PO for approval by double-clicking the listed PO as per most of these screens, however, assigning a specific employee to approve the purchase order will still require the assigned employee to have authority to approve the PO, otherwise the system will inform them as such.
Once the purchase order has been approved, it can be sent to the supplier as per normal process.
Purchase Orders Approved Not Printed
When the system is configured to use PO approvals, this screen shows all outstanding POs (i.e. not fully received) which have been approved but not yet printed/sent to the supplier.
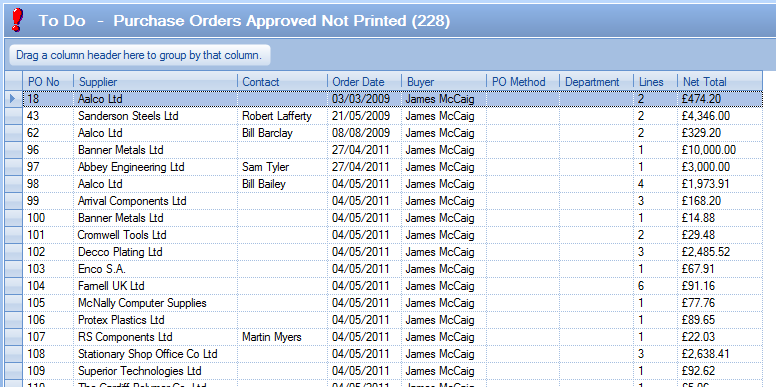
By default, the screen will only show purchase orders where the current user is the buyer, however, the user can view all purchase orders by ticking the SHOW ALL EMPLOYEES option at the bottom of the screen and clicking the REFRESH option.
![]()
As is the case with most of these screens, the user can access any of the listed purchase orders by simply double-clicking on the record listed on this screen. The usual authority is required to access the listed purchase orders, so if the current user does not have authority to view or print the PO, the system will inform them.
Any purchase orders like this will have to be processed further by someone with suitable authority.
PO Items Ready For Collection
This screen lists all purchase order items that have been marked as ready for collection from the supplier. Overdue items are shown in red while all other PO line items are shown in black.

The PO line items are marked for collection using the Ready For Collection tick box (shown below). This is updated manually by a user once confirmation is received from the supplier.
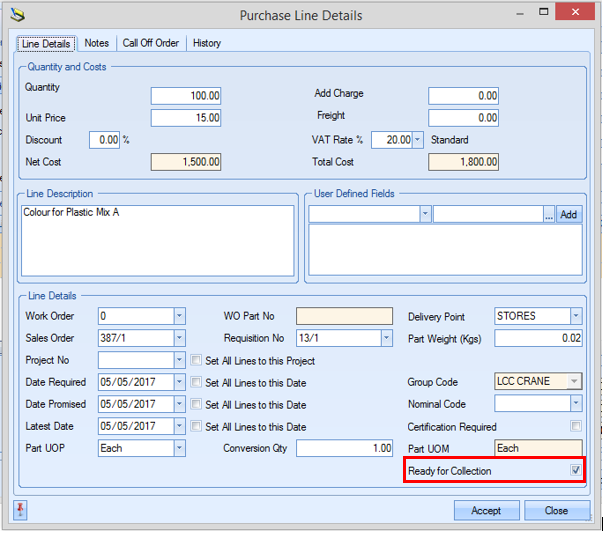
PO line items will drop off this screen once they have been fully booked into stock.
The PRINT option at the bottom of the screen will generate a report of all items listed while the EXPORT option will allow the user to create a spreadsheet of all listed items for further analysis out with Progress Plus.
Purchase Order Expedite Review
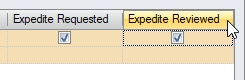
If the system is configured to use the Supplier Portal module, this screen can be used to see a list of purchase orders that have been expedited with suppliers via the portal, and any feedback they have provided. Order lines expedited will have the EXPEDITE REQUESTED flag ticked on the order line.
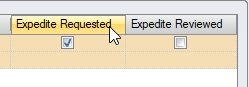

PO lines highlighted in red indicate the item is overdue based on the LATEST DATE of the order line.
The screen includes any notes added by the Progress user as part of the expedite, and also supplier feedback notes for quick reference. The user can also quickly access the purchase order in question by simply double-clicking on the item in the grid for the order to be displayed.
Once the user has reviewed the expedition notes, and its are marked as EXPEDITE REVIEWED on the order line, the item will drop off this screen.
PO Requisitions to be Converted
This screen shows all purchase requisitions that are waiting to be converted to purchase orders.

By default, the screen will only show those associated with the current user, however, the user can view all purchase requisitions by ticking the SHOW ALL EMPLOYEES option at the bottom of the screen and clicking the REFRESH option.
![]()
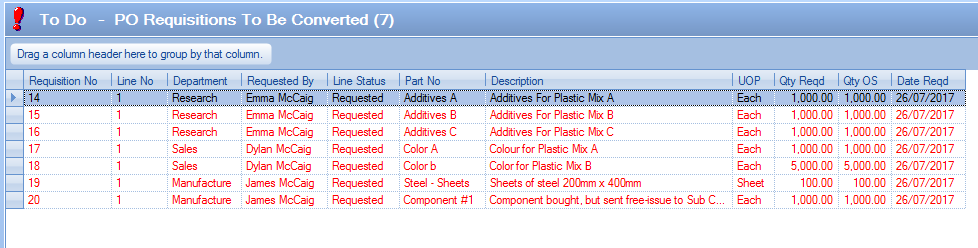
The user can access any of the listed purchase requisitions by simply double-clicking on the listed record to open them. Once opened, the user can amend or view as required.
Purchase Requisition to be Approved
NOTE: This option will only be in use if Progress is configured to use the PR approval process.
This screen shows all purchase requisitions which are awaiting approval.
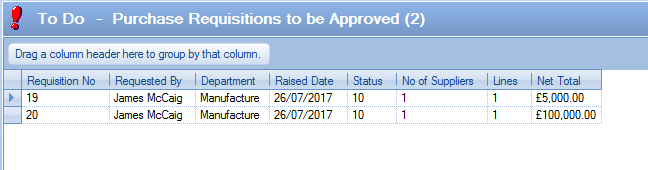
By default the system will show only those purchase requisitions associated with the current user, but the user can view all awaiting approval by ticking the SHOW ALL EMPLOYEES option at the bottom of the screen.
![]()
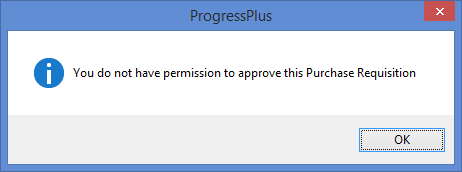
The user can access any purchase requisition listed for approval by simply double-clicking on the record required. If the current user does not have authority to to approve the selected purchase requisition, the system will inform them.
If the user does have authority to approve the selected purchase requisition, they can mark the requisition as approved by simply ticking the APPROVED tickbox and clicking ACCEPT to update the requisition.
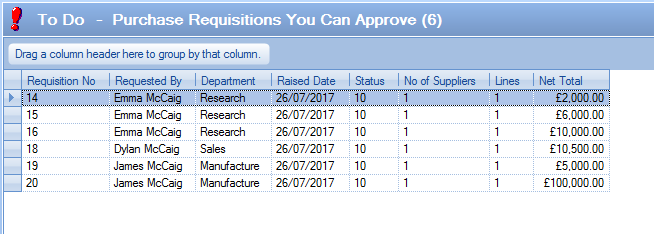
Purchase Requisition You Can Approve
NOTE: This option will only be in use if Progress is configured to use the PR approval process.
This screen shows all purchase requisitions within the current user's approval limits which are awaiting approval.
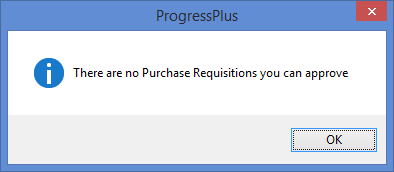
If there are no purchase requisitions for the user's approval, then the system will inform them.
The user can approve any of the listed purchase requisitions by simply double clicking on the selected requisition, updating the APPROVED tickbox and saving the purchase requisition.
Supplier Returns To PI Credit
This screen shows items which have been marked for a purchase invoice credit to be raised as the result of a supplier return transaction. If the system is configured to use offcut parts, then additional unit and dimensional information will also be displayed for those parts.
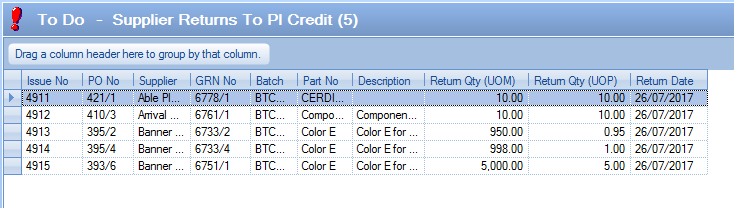
(Standard supplier returns)
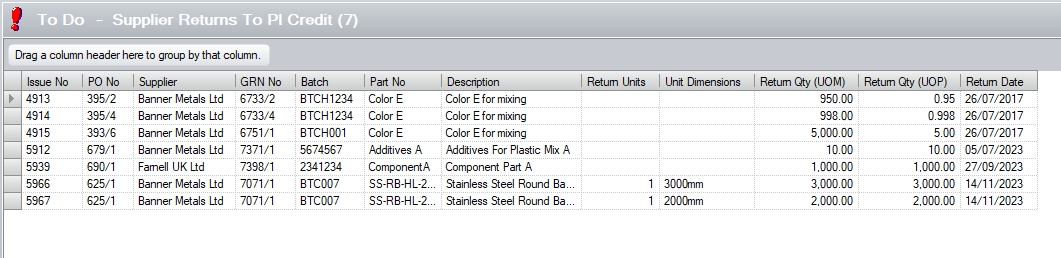
(Offcut supplier returns)
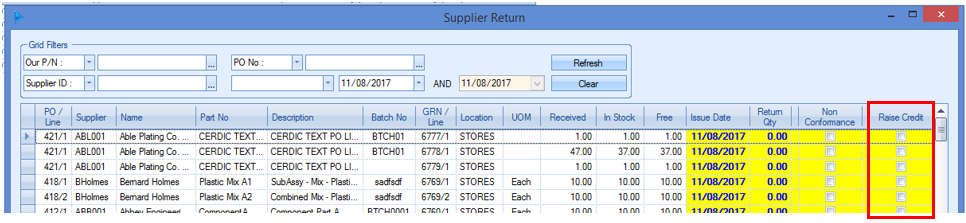
All items listed here are the result of a user marking the supplier return as requiring a credit to be raised. This is done on the supplier return screen as shown below.
If the user has authority to create purchase invoices and credits, they can raise the purchase credit directly from this screen by simply double clicking on the listed item. If they do not have authority, the system will inform them of such.
The user will be presented with a new purchase credit window will be displayed with the relevant details for the user to review before accepting to create the required credit.
Further information on raising purchase invoice credits can be found in the relevant section of this manual.
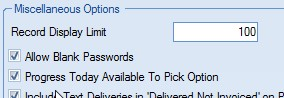
The Available to Pick option is only displayed on the Today screen if this option has been ticked in the Systems Options – Miscellaneous section by the administrator.
This option is primarily used for companies that may hold in stock orders for customers that are not due to be despatched for a certain time and cannot be delivered too early. This option will only show orders that are due to be delivered within the number of days selected. Using this option may stop stores and/or despatch employees delivering goods to customers when they are not yet required.
If this option has not been chosen within the Systems Options – Miscellaneous section by the administrator the Available to Deliver section of the Today screen would show all orders that can be delivered regardless of when they are due to be shipped.

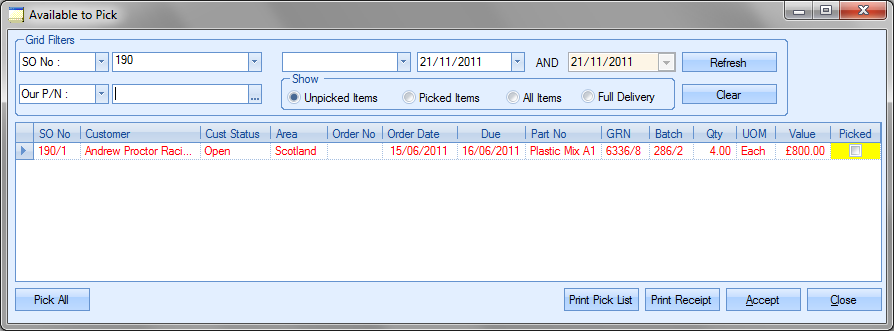
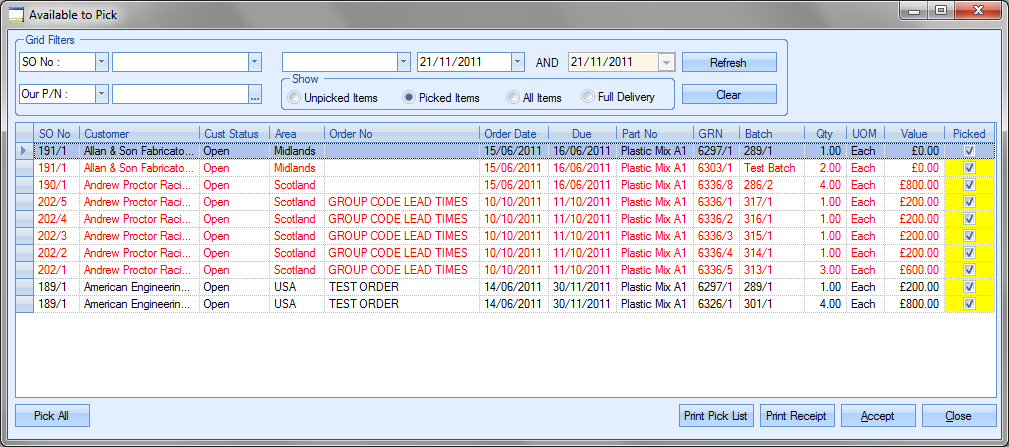
On selecting this option and pressing either the Pick button at the bottom of the form or double-clicking one of the listed SOs, a screen similar to the following will appear.
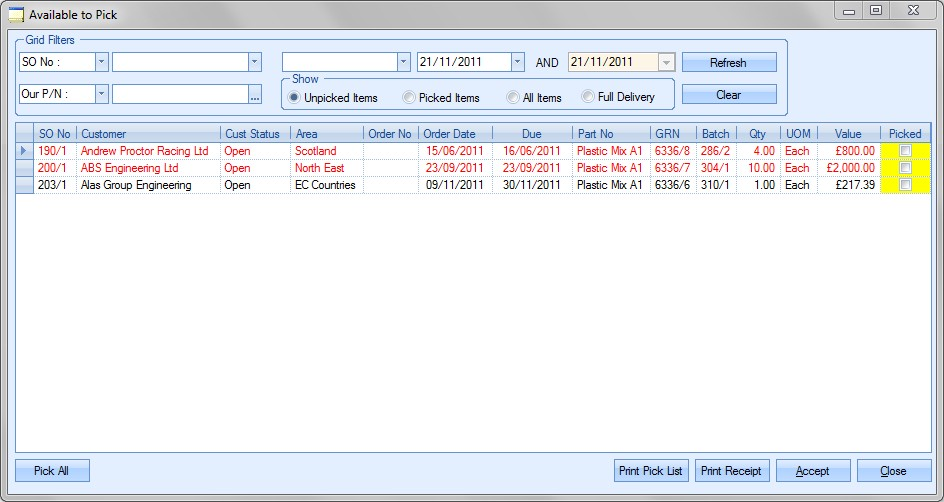
This screen displays to the user a list of all the sales orders that currently have stock allocated to them and are required to be delivered within the number of days specified in the Due No. Of Days value at the bottom of the Today screen. Any sales order lines currently on hold will be highlighted in orange to inform the user.
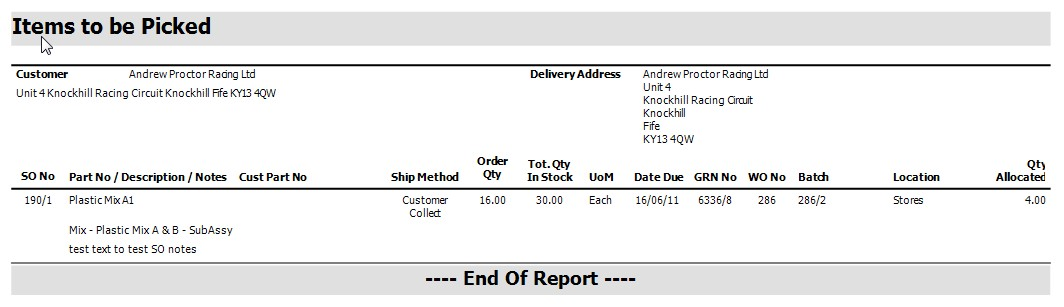
The Print Pick List option will generate a report of all the items currently available to pick. An example of which is shown below.
The Pick All option at the bottom will select all the items for picking as follows.

After the Pick All button has been pressed the label on the button will now change to Clear All. This permits the user to reverse the ticks placed in the Picked field (yellow) for each item as follows.

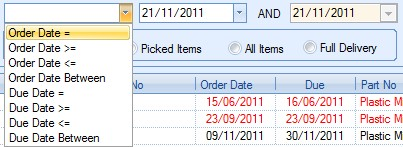
The filters at the top of the window permit the user to filter down the list of items to be picked based on the selection criteria they choose to use. The user can select from the following fields from the drop down box.

The user can also filter the date using the following date filter options.
The user can also filter this screen based on the Show filters.
![]()
Unpicked Items
Shows all items waiting to be picked before being delivered.
Picked Items
Shows all items that have already been picked and are waiting to be delivered.
All Items
Shows all items with inventory allocated that are already picked or are waiting to be picked.
Full Delivery
Shows items where the complete SO is ready for delivery.
Once the user has selected any filters, clicking Refresh will filter the data shown.
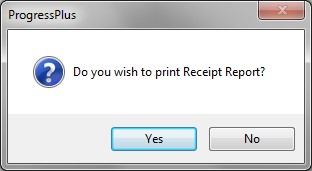
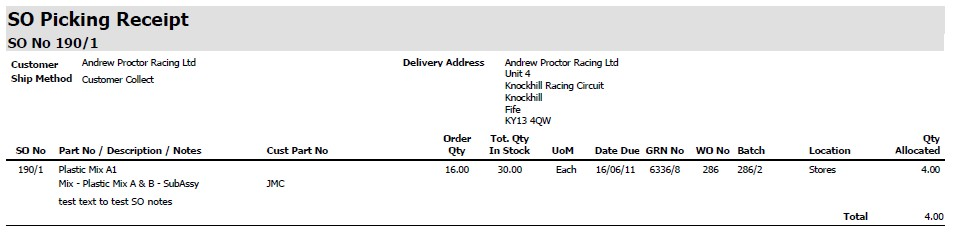
After all required items have been picked, the user must click on to the Accept button on the form. The user will then be asked if they wish to generate a Receipt Report. This will list the details of all the items picked by the user.
An example of the report is shown below
Receipt reports can also be generated retrospectively for any items already picked but not yet delivered. To generate this report, change the filter options to show “Picked Items”.
![]()
This will show all items currently picked.
Clicking the Print Receipt option here will generate the receipt report for all the items listed.
After items have been “picked” they will then appear in the Available to Deliver section.
Available To Pick Valid
This screen works in the same way as the Available To Deliver Valid screen as it will take into consideration any constraints placed on the SOs, taking into account the Due No of Days, the Full Delivery, Complete Delivery and Proforma Invoice options that are set in the Sales Orders themselves. Again, any sales order lines currently on hold will be highlighted in orange to inform the user.
Actioning any items on this screen is the same process as the Available To Pick screen described in the section above.
This option displays all items that are in stock and available to be delivered for current outstanding sales orders. It does not include Sales Order lines that have a status of On Hold.
This is a complete list of all these items and does not take into account any figure selected in the Due No of Days or the Full Delivery, Complete Delivery and Proforma Invoice options that are set in the Sales Order. For those users that have used the Available to Pick option this will display items that have been picked. Please refer to the Available to Pick section of this manual for more information on picking inventory prior to delivering.
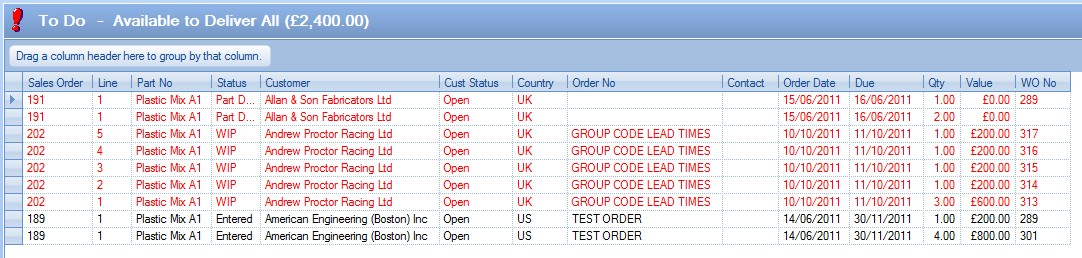
Available to deliver items that are displayed in black are currently outstanding and have not yet been delivered. The date for these items to be delivered has not yet passed.
Available to deliver items that are displayed in red are currently outstanding and have not yet been delivered. The date for these items to be delivered has passed and these orders are now late. Any sales order lines currently on hold will be highlighted in orange to inform the user.
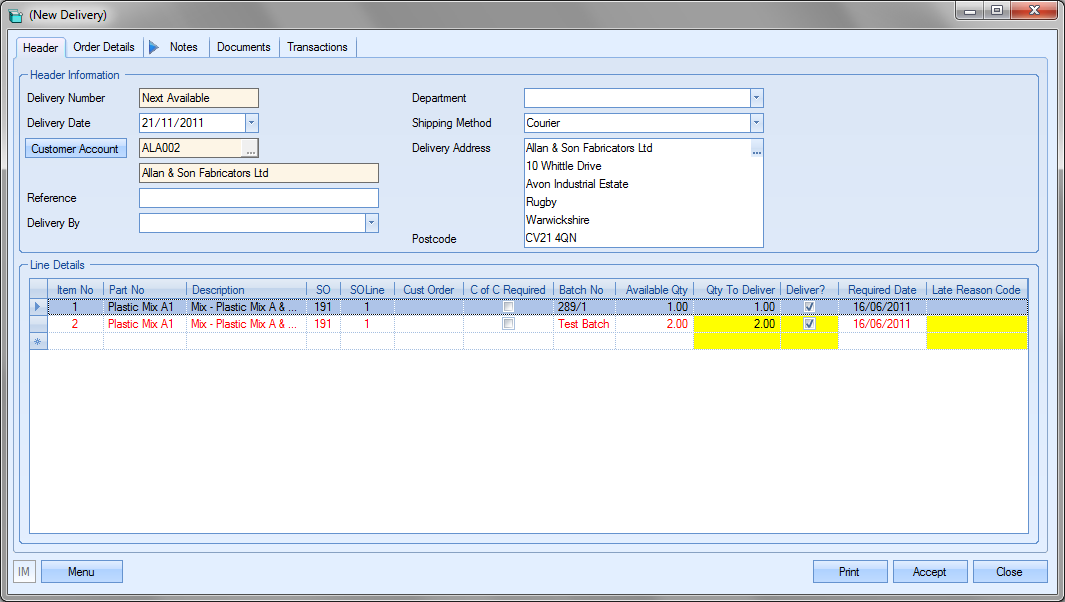
To view all the order information contained for an order item the user may simply ‘double click’ on the required line. A screen similar to the following will be displayed.

The user may if required change the information contained in this order if he or she has permission to do so as determined within the User Access Rights section of Progress Admin. For more information on amending sales orders please refer to the Delivery section of this manual.
Clicking either the Accept or Cancel button will return the user to the Today screen.
The Print button on the bottom of the Today form permits the users to print off a hard copy of the information regarding the Available To Deliver All items displayed in the Today screen.
This option displays all items that are in stock and available to be delivered for current outstanding sales orders. It does not include Sales Order lines that have a status of On Hold.
This is a complete list of all the SO items taking into account any figure selected in the Due No of Days or the Full Delivery, Complete Delivery and Proforma Invoice options that are set in the Sales Order. For those users that have used the Available to Pick option this will display items that have been picked. Please refer to the Available to Pick section of this manual for more information on picking inventory prior to delivering.

Available to deliver items that are displayed in black are currently outstanding and have not been delivered. The date for these items to be delivered has not yet passed. Available to deliver items that are displayed in red are currently outstanding and have not been delivered. The date for these items to be delivered has passed and these orders are now late. Again, any sales order lines currently on hold will be highlighted in orange to inform the user.
To view all the order information contained for an order item the user may simply ‘double click’ on the required line. A screen similar to the following will be displayed.
The user may if required change the information contained in this order if he or she has permission to do so as determined within the User Access Rights section of the Security section of Progress. For more information on amending sales orders please refer to the Delivery section of this manual.
Clicking either the Accept or Cancel button will return the user to the Today screen.
The Print button on the bottom of the Today form permits the users to print off a hard copy of the information regarding the Available To Deliver Valid items displayed in the Today screen.
This option displays only items that are in stock and available to be delivered for current outstanding sales orders and due to be delivered within the number of days selected in the Due No of Days option. For those users that have used the Available to Pick option this will display items that have been picked and are due to be delivered within the number of days selected. It does not include Sales Order lines that have a status of On Hold.
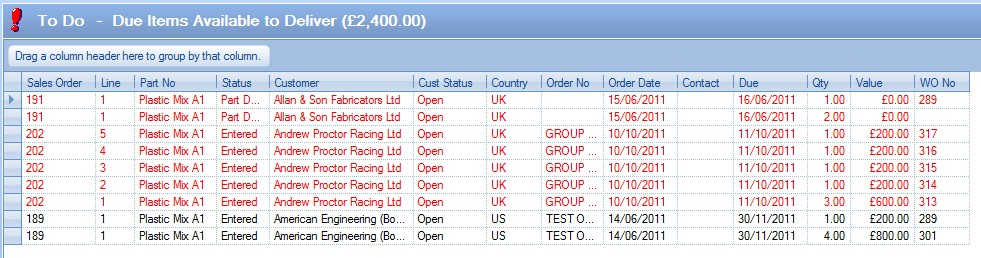
Available To Deliver items that are displayed in black are currently outstanding and that have not been delivered. The date for these items to be delivered has not yet passed. Items that are displayed in red are currently outstanding and have not been delivered. The date for these items to be delivered has passed and these orders are now late. Again, any sales order lines currently on hold will be highlighted in orange to inform the user.
To view all the order information contained for an order item the user may simply double-click on the required line. A screen similar to the following will be displayed.
The PRINT button on the bottom of the Today section permits the users to print off a hard copy of the information regarding the Available To Deliver Due items displayed in the Today screen.
Delivery Items Ready For Collection
This option shows all delivery ready items that can be collected by customers.
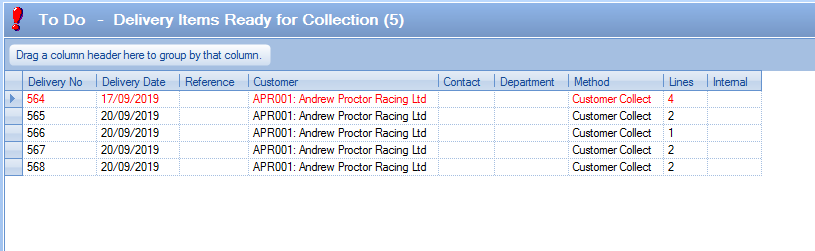
Overdue items are highlighted in red while all other deliveries are shown in black. The deliveries on this screen are shown based on the Ready For Collection tick box being ticked on the delivery (shown below).
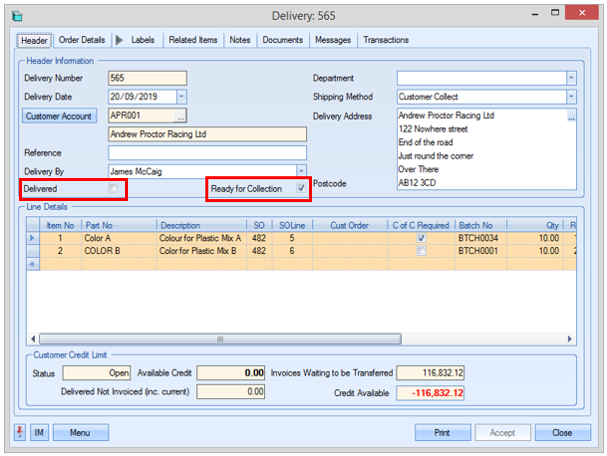
Double-clicking the listed delivery will open the delivery record for the user to view. Once the goods have been collected by the customer, the item will be removed from this screen when the user updates the Delivered tick box on the delivery (shown above) which automatically unticks the Ready For Collection option.
The user can generate a report of all listed items using the Print option at the bottom of the screen and can also export out the listed deliveries to Excel using the Export option if they wish to analyse the details further out with Progress.
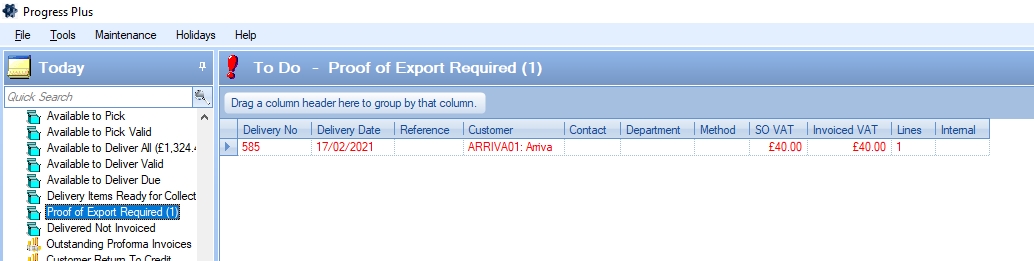
Proof of Export Required
This screen highlights any deliveries that have been raised that require proof of the goods' export. This is based on the POE Required flag on the delivery itself.
Once the proof of export has been received, the delivery can be updated to reflect this by ticking the POE Received option.
![]()
Ticking this will remove the delivery from the Proof of Export Required screen.
This option displays items that have been delivered but not yet invoiced. This is a complete list of all these items and does not take into account any figure selected in the Due No of Days option. The total value of these lines is also displayed.
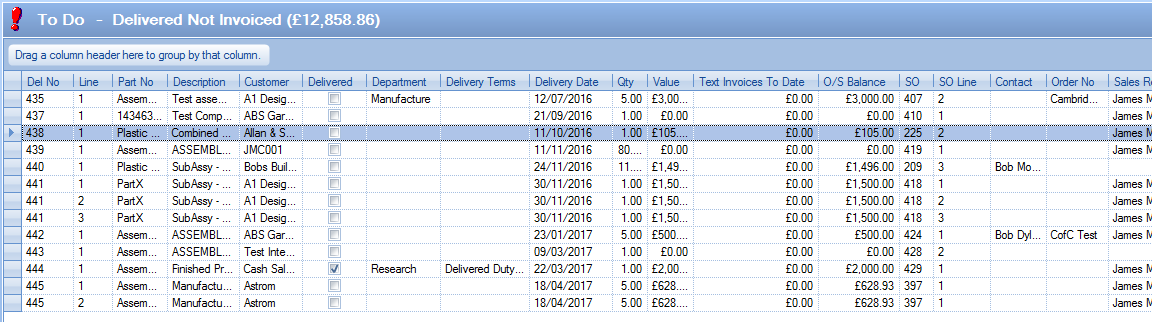
Text deliveries can also be included in this list if this option has been ticked in the Systems Options – Miscellaneous section by the administrator.
![]()
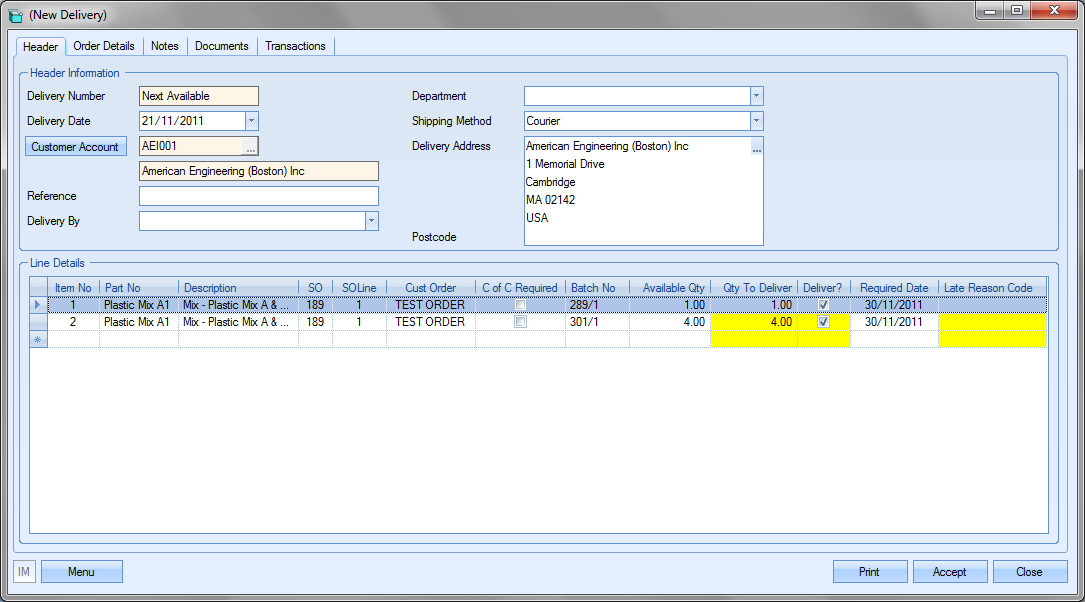
To create an invoice for a delivered sales order item the user may simply ‘double click’ on the required line. A screen similar to the following will be displayed. The user must be vigilant when using this option as all items still to be invoiced for this customer will be displayed.
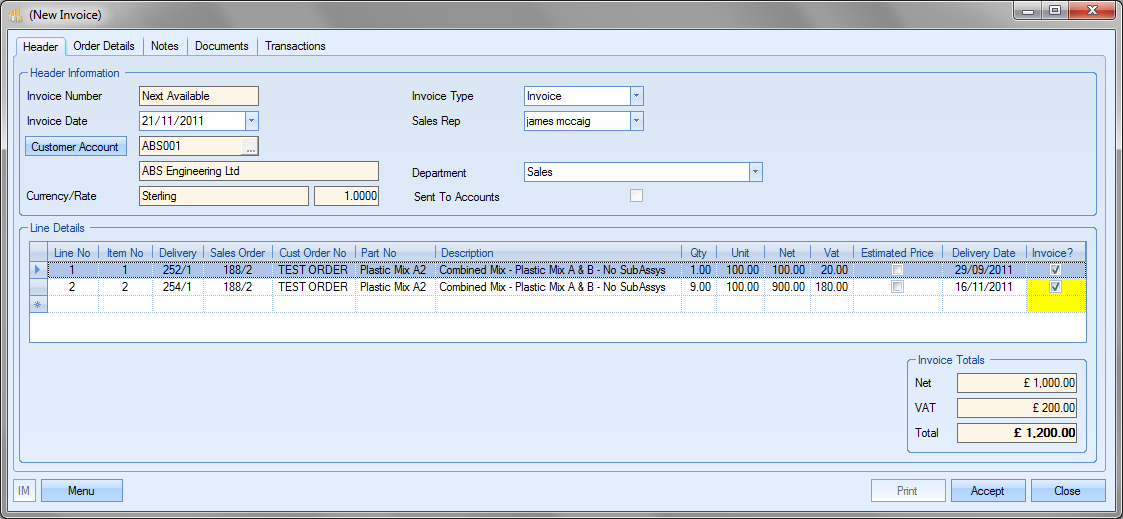
By default, all items listed will have the Invoice (yellow) box ticked. If all items are to be invoiced, the user simply has to click the Accept button to generate the invoice. If only select items are to be invoiced, the user must tick the Invoice (yellow) box only for items to be invoiced and then press the Accept button on the bottom of the form. For more information regarding invoicing please refer to the appropriate section of this manual.
As with other sections of the Today screen the user may if required change only certain information contained on this screen if he or she has permission to do so as determined within the User Access Rights section of the Security section of Progress. For more information on amending delivery notes please refer to the Invoice section of this manual.
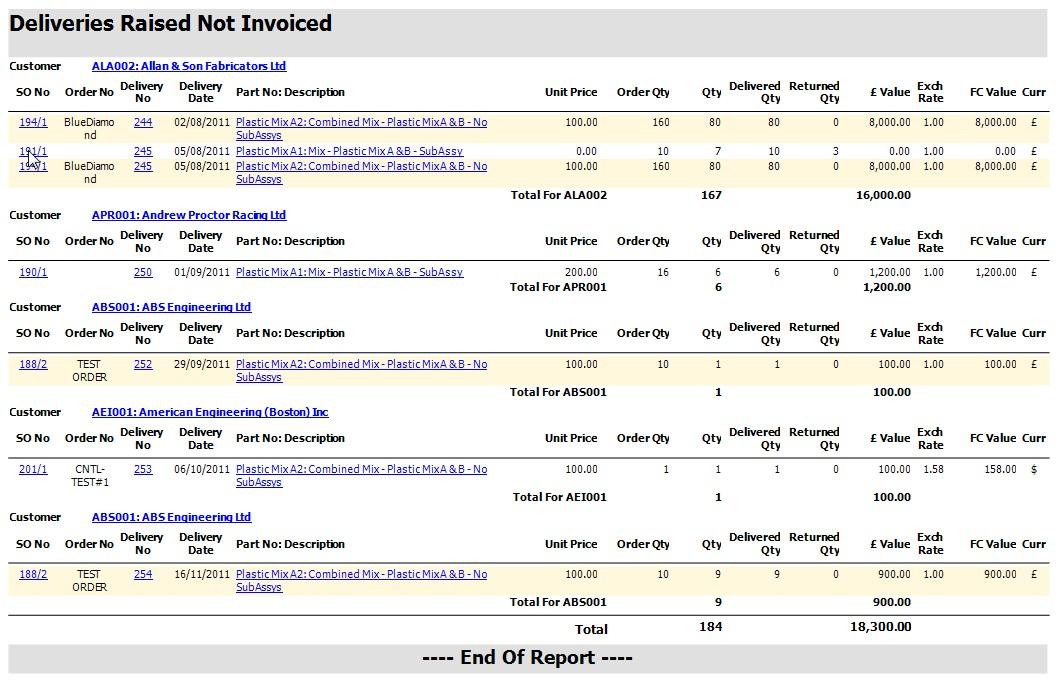
The Print button at the bottom of the form permits the users to print off a hard copy of the information regarding the deliveries not invoiced displayed in the Today screen.
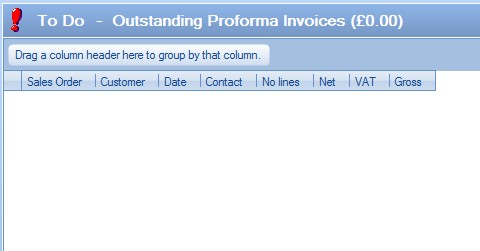
This option displays current outstanding proforma invoices for any SOs where a proforma invoice was required and has not yet been paid by the customer.
To view all the order information contained for an order the user may simply ‘double click’ on the required line. A screen similar to the following will be displayed.
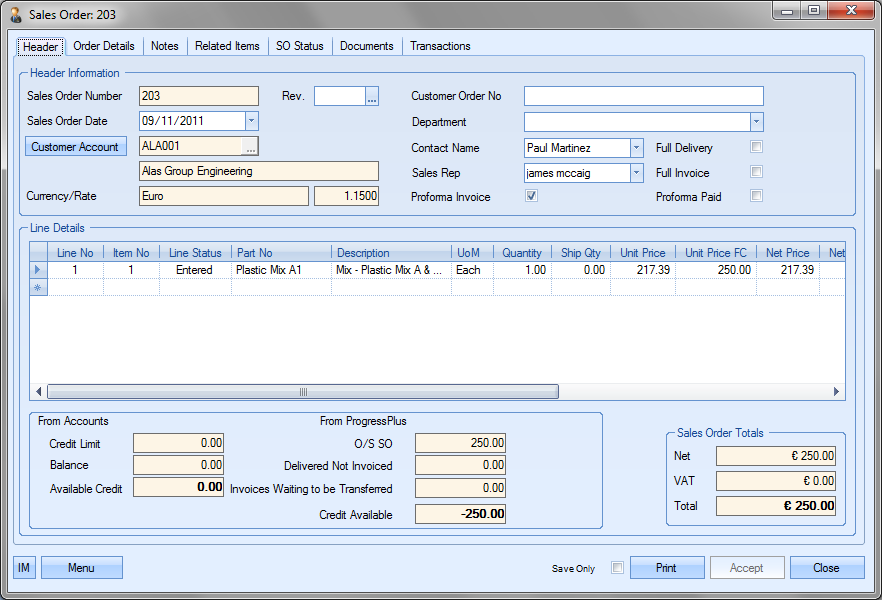
If the customer has paid the proforma invoice as required, the user can update the order to reflect this by simply clicking the Proforma Paid tickbox.
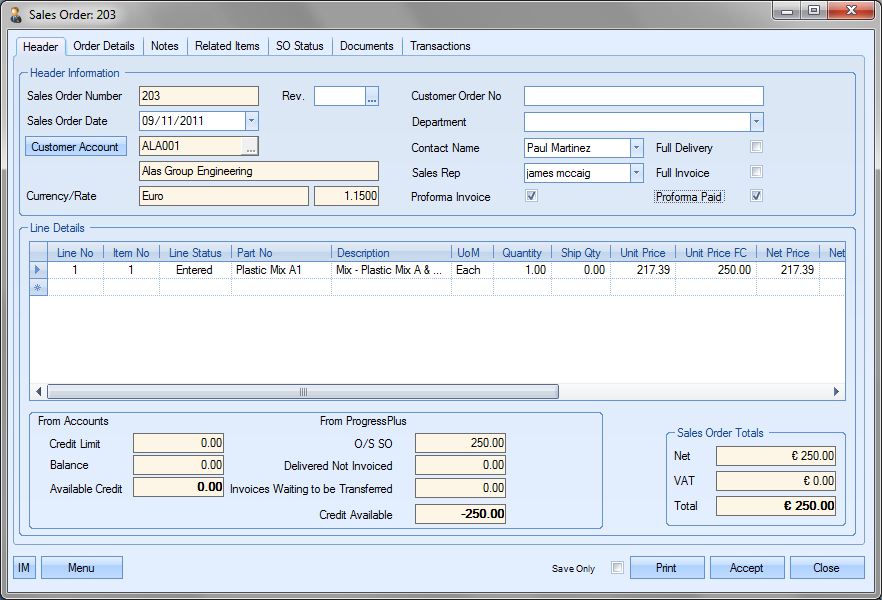
The user may, if required, change other information contained in this order if they have permission to do so as determined within the User Access Rights section of Progress Admin. For more information on amending sales orders please refer to the SO section of this manual.
Clicking either the Accept or Cancel button will return the user to the Today screen.
If the user has updated the SO to reflect payment of the proforma invoice, the SO will drop off the Outstanding Proforma Invoices screen.
Customer Return To Credit
This screen shows all customer return transactions that require a credit note to be created and sent to the customer.
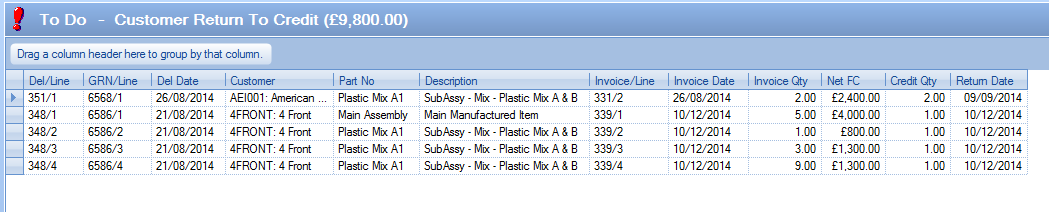
Creating the required credit note can be done directly from this screen by double clicking on the selected item. If the current user has authority to create credit notes, this will present the user with a new credit note window as shown below.
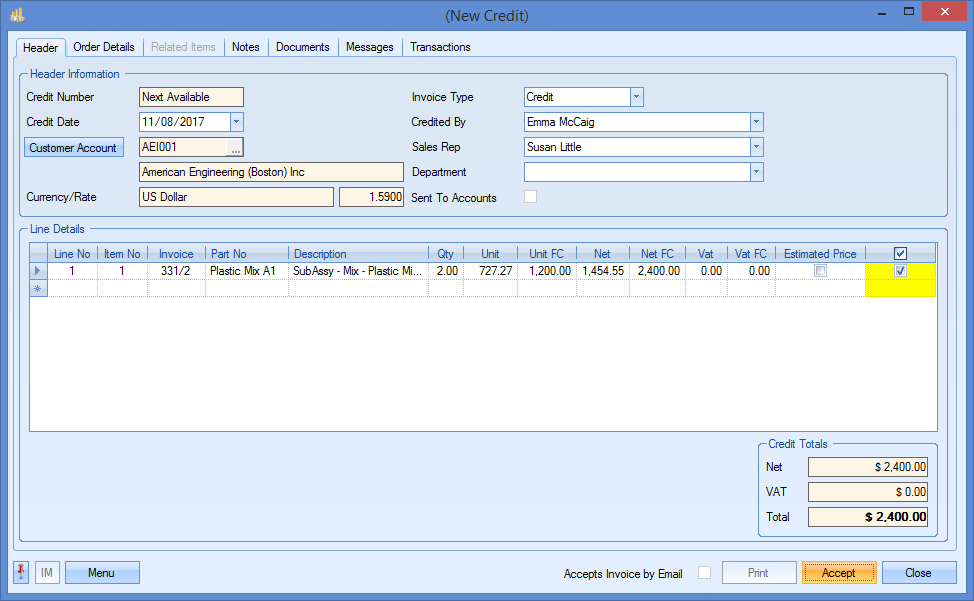
Once the credit note has been reviewed, the user can click ACCEPT to generate the credit note as required. This item will then drop off the Customer Return To Credit screen.
This screen lists all received batches of stock that are currently on temporary hold due to the Requires Release option being ticked. This could be due to the inventory item itself being marked as Requires Release that puts all batches on hold or it could be an individual batch that's been marked as Requires Release.
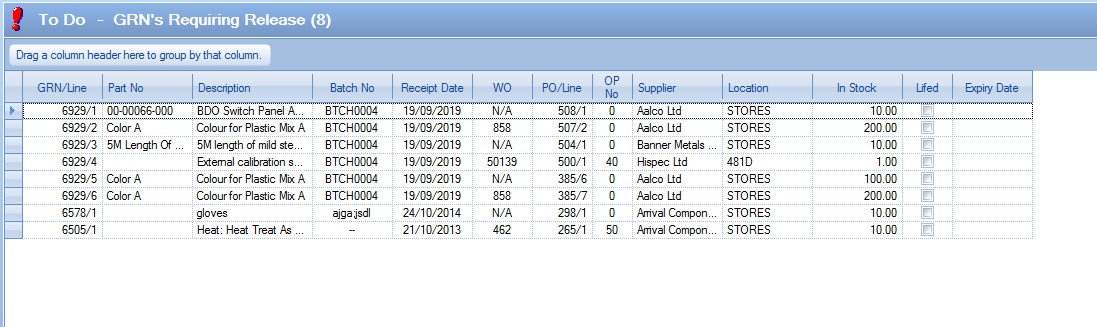
The user can release any of the listed batches into active stock by double-clicking the item on the screen. This will open the Release Stock screen. This is the same screen as can be accessed from the Parts List section of Progress.

From here, the user can view the different receipt types that are currently on hold, as well as select the batches to be release into active stock. This can be done by simply ticking the option on the right hand side and clicking the Accept option. Once the batch has been released into stock, the batch will be removed from the list of items awaiting release.
In addition to the ability to release the batches held, the user has a Print option on this screen which will generate a report of all items awaiting release and also an Export option which will create a spreadsheet of all items awaiting release for further analysis out with Progress Plus.
For more information on the Requires Release option and the control of received batches, please refer to the Inventory section of the manual.
This option displays to users a list of inventory items that have an expiry date and that are due to expire within the selected number of days. The date used for this is the expiry date recorded against the GRN when received into stock. This screen also shows the purchasing and manufacturing lead time so the turnaround time for replacing these items can be seen too.
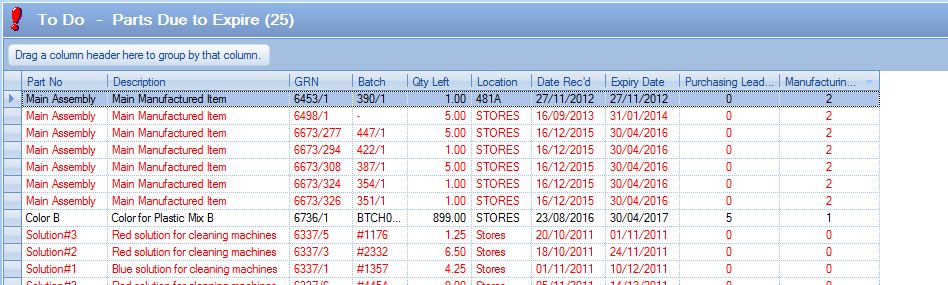
Items listed in red have an expiry date in the past. This inventory has now expired. To view all the information contained for a part number listed, including its stock details, the user may simply ‘double click’ on the required line. A screen similar to the following will be displayed.
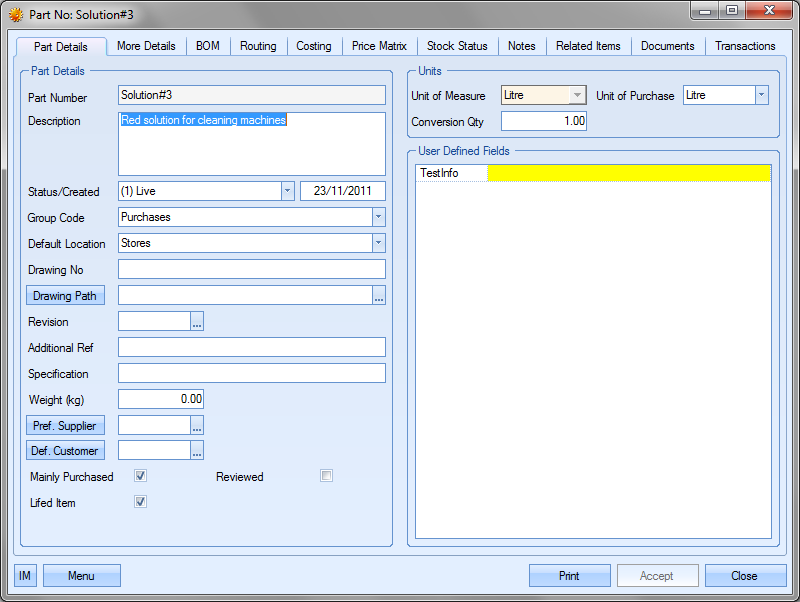
The stock details for the selected part number can be viewed by clicking on the Stock Status tab at the top of the screen.
The user may if required change the information contained in this part record if he or she has permission to do so as determined within the User Access Rights section of the Security section of Progress. For more information on amending works orders please refer to the Inventory section of this manual.
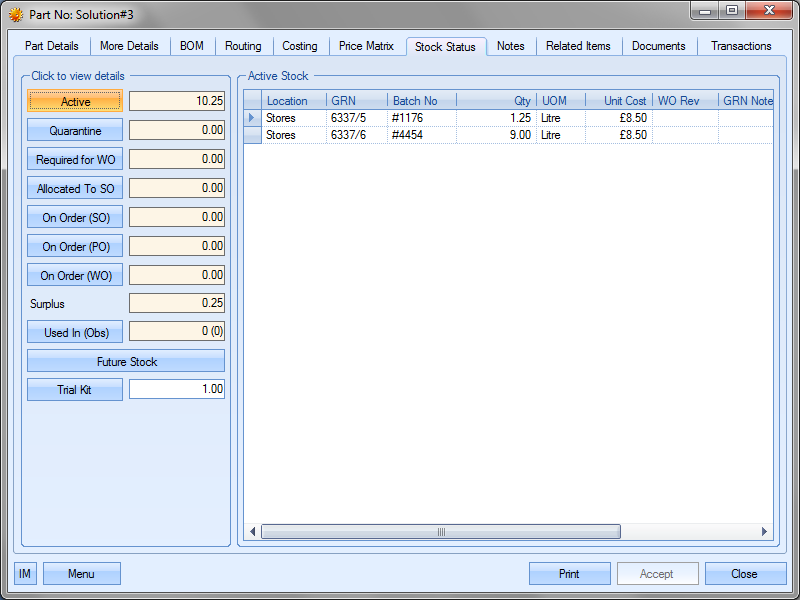
The GRN details can be viewed by clicking on the GRN number of the expired batch. Selecting the GRN number required will present the user with a search box. The user may if required access and change the information contained in this part record if he or she has permission to do so as determined within the User Access Rights section of the Security section of Progress. For more information on amending works orders please refer to the Inventory section of this manual.
Clicking Accept or Close will return the user to the Parts Due To Expire screen.
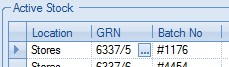
Clicking the search box opens the GRN History details.
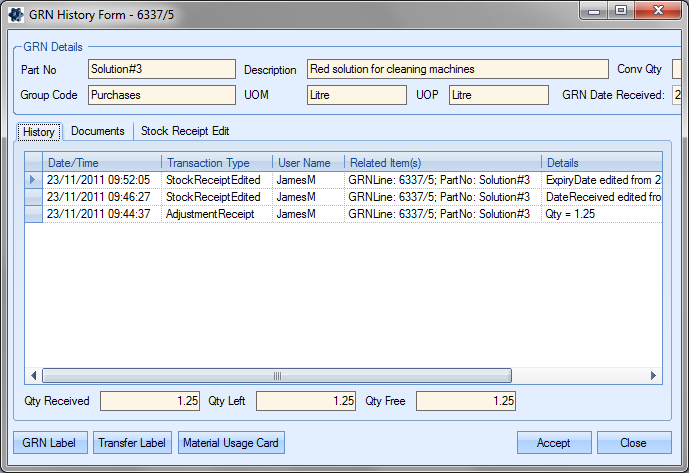
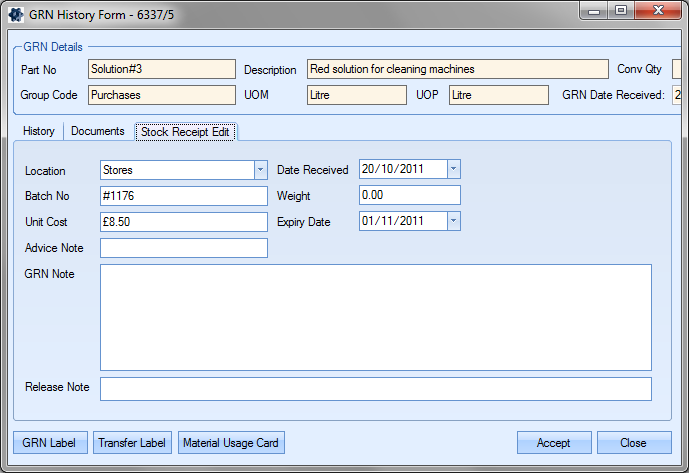
The expiry date information for the GRN record is held in the Stock Receipt Edit tab.
Clicking Accept or Close will return the user to the Inventory Stock Status screen.
Manufactured Parts Shortage
This screen lists all manufactured parts that currently show a stock shortage based on their current supply and demand, with the demand broken down into MSL, SO and WO values.
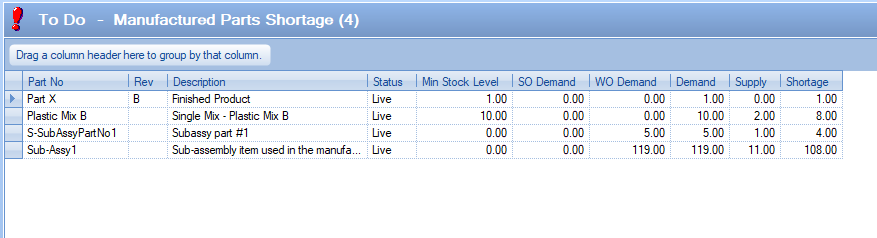
The user can interrogate this information further by accessing the inventory record of the listed part by clicking on the Part No field and clicking the "build" button ![]() . They can then review the Stock Status section of the inventory record to see where the part's supply and demand is coming from. If further action is required, the user can raise WOs via the associated SOs or directly from the WO screen itself.
. They can then review the Stock Status section of the inventory record to see where the part's supply and demand is coming from. If further action is required, the user can raise WOs via the associated SOs or directly from the WO screen itself.
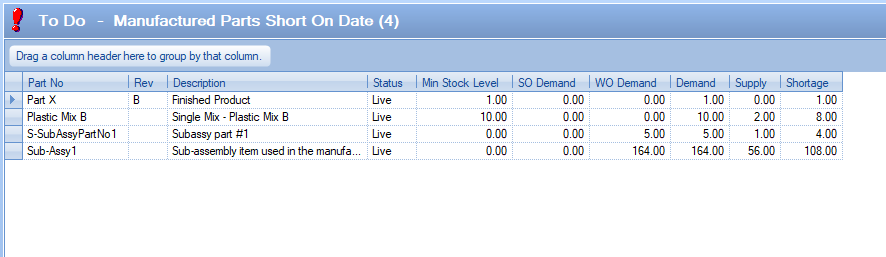
Manufactured Parts Short On Date
This screen highlights any manufactured items that have a shortage based on the current date and the specified number of days or the specified target date on the Today screen. Unlike the Manufactured Parts Shortage screen above, this only considers activity up to the specified point in time, which shows short term shortages and ignores longer term incoming stock.
The overall stock status situation of a part is calculated on ALL demand and supply information. As a result, long term supply can suggest there is no immediate shortage of a part which could lead to inventory supply issues earlier than the user thinks. This screen looks at only activity up to a specified point in time so looks at the supply and demand in a shorter time frame and calculates whether the part will incur a shortage within this time frame.
Example:
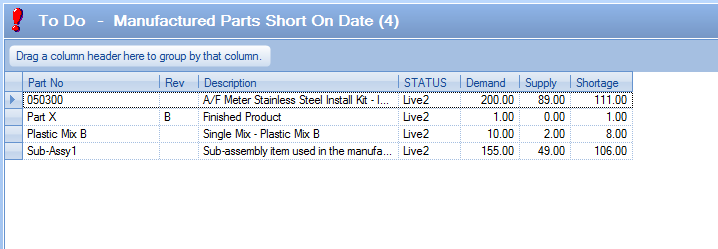
Part number 050300 has an overall surplus (+4) of stock based on all supply and demand. As a result, the Manufactured Parts Shortage screen does not highlight a shortage.
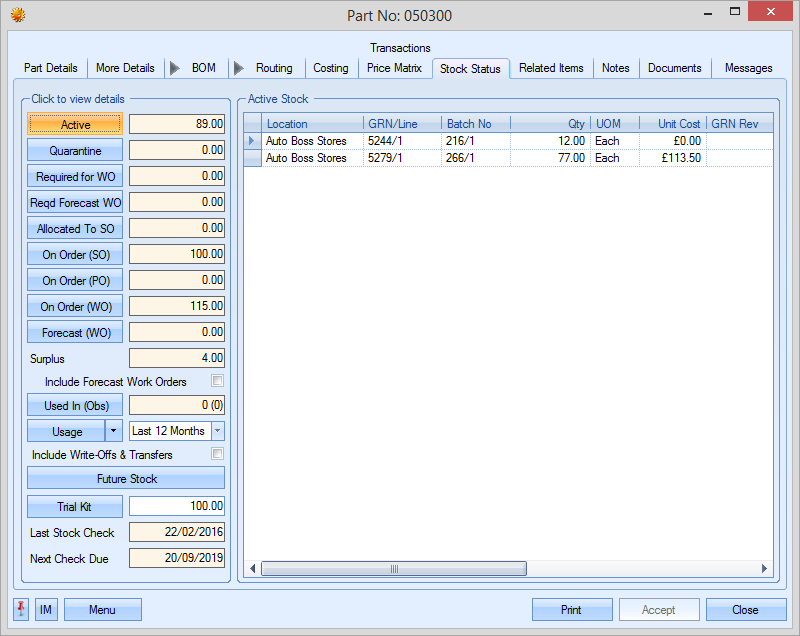

However, in the short term, there is an immediate need to get some additional units made due to an imminent sales order requirement, since the additional supply will not produce the stock until long after the order needs to be fulfilled. Based on the current date and the specified number of days on the Today screen, the Manufactured Parts Short On Date screen detects this and highlights the shortage and need for action.

Imminent sales order quantity (100) is greater than current supply/stock (89)
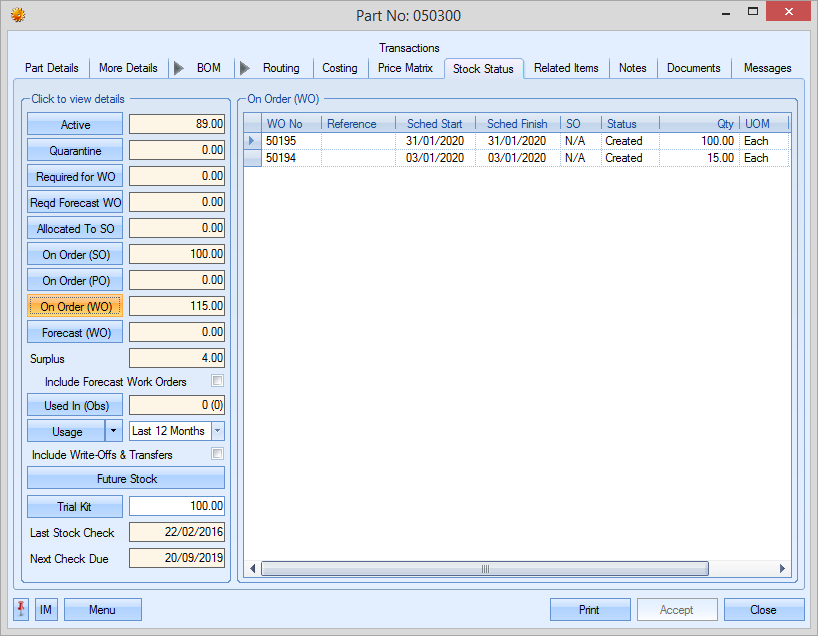
Additional supply from WOs (115) not going to be ready until Jan 2020
Manufactured Parts Short On Date highlights this as an issue
The user can action any requirements from the Manufactured Parts Short On Date screen by double-clicking the item of interest. This will open the work order Below MSL screen, filtered for a required date less than or equal to the current date plus the specified number of days on the Today screen or a required date less than or equal to the specified date on the Today screen, allowing the user to action the immediate requirement. Listed parts will drop off this screen once there is no shortage over the specified period.
For more information on the Below MSL screen, please refer to the Works Orders section of the manual.
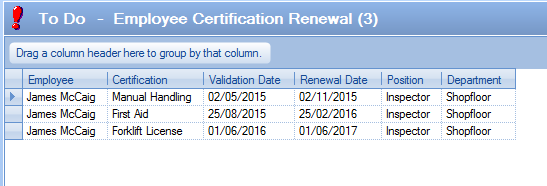
Employee Certification Renewal
This screen lists all current employee certifications that are due for renewal within the specified Due No Days on the Today screen or that have already lapsed based on the certifications expiry date.
By default, this screen only shows current employees, but the user can include "ex" employees by ticking the option at the bottom of the screen. With this ticked, clicking REFRESH will include any ex employees in the list too.
![]()
The employee certifications are recorded against the employee records in Progress as shown below.
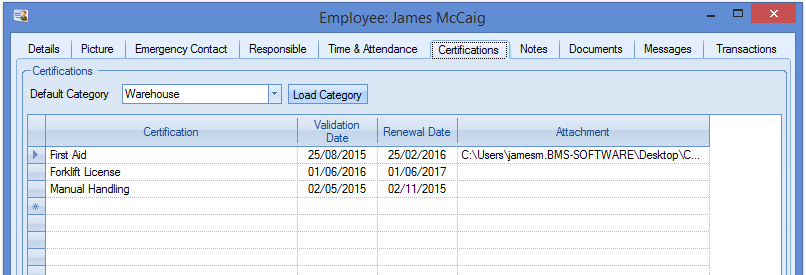
Any certificates recorded against the employees are assigned a renewal date and its this date that is checked for when the certification is due for renewal. Once an employees certification has been renewed, the details in the employee record can be updated until the next renewal date comes round.
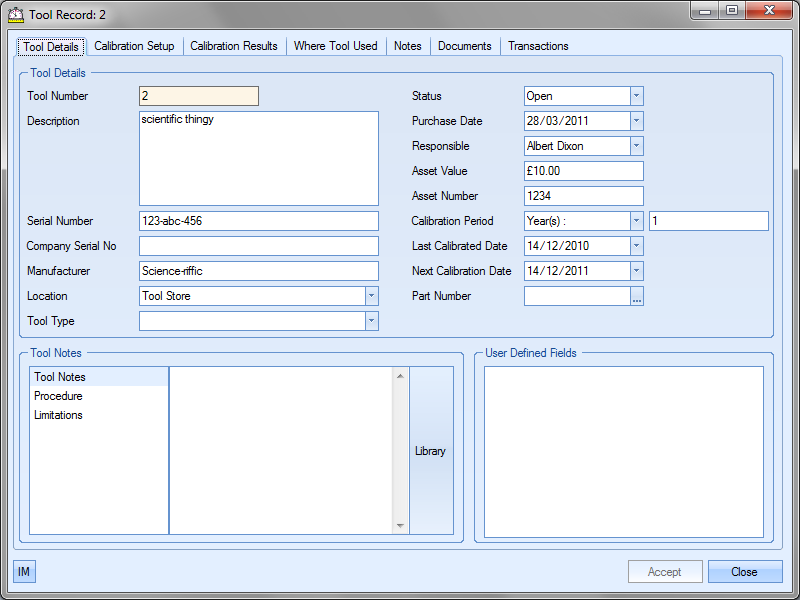
This option displays to users details of any tools that require to be recalibrated within the No. of Days value specified on the To Do screen.

Information regarding the tool including the date of the last calibration and the date of the next due calibration are displayed. For items that are displayed in red the due date for these calibrations to be performed has passed and these calibrations are now late.
To view all the information contained for a calibration the user simply has to ‘double click’ on the required line. A screen similar to the following will be displayed.
The user may if required change certain information contained on this calibration record if he or she has permission to do so as determined within the User Access Rights section of the Security section of Progress. For more information on amending calibration records, please refer to the Quality section of this manual.
Clicking either the Accept or Cancel button will return the user to the Today screen.
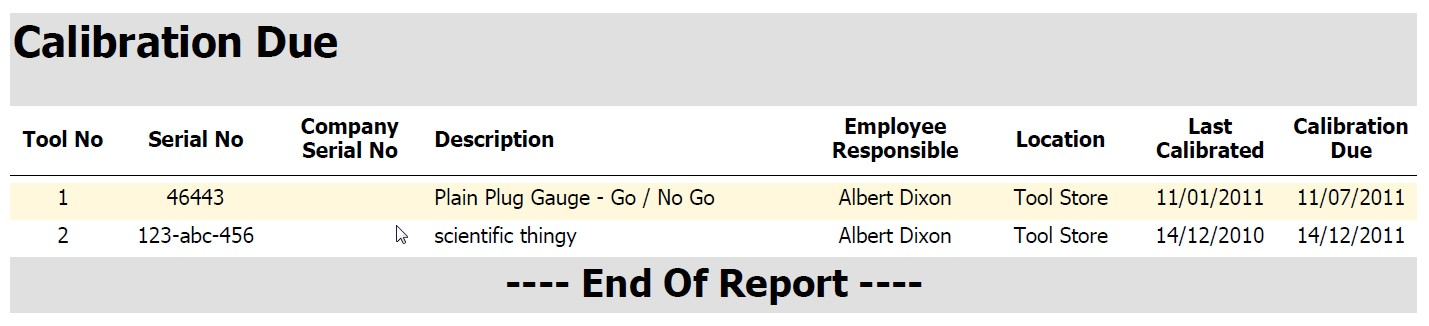
The Print button on the bottom of the Today form permits the users to print off a hard copy of the information regarding the tools to be calibrated displayed in the Today screen.
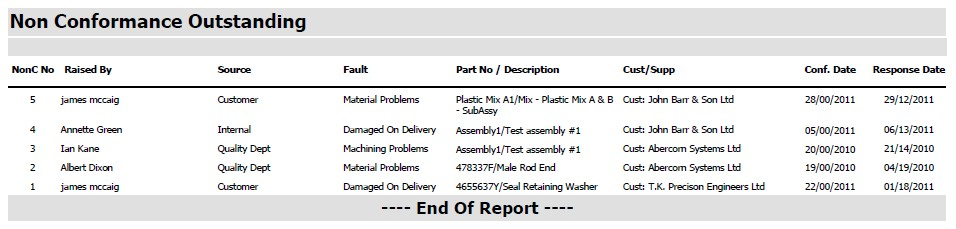
This option displays to users details of any non conformances that are currently outstanding.

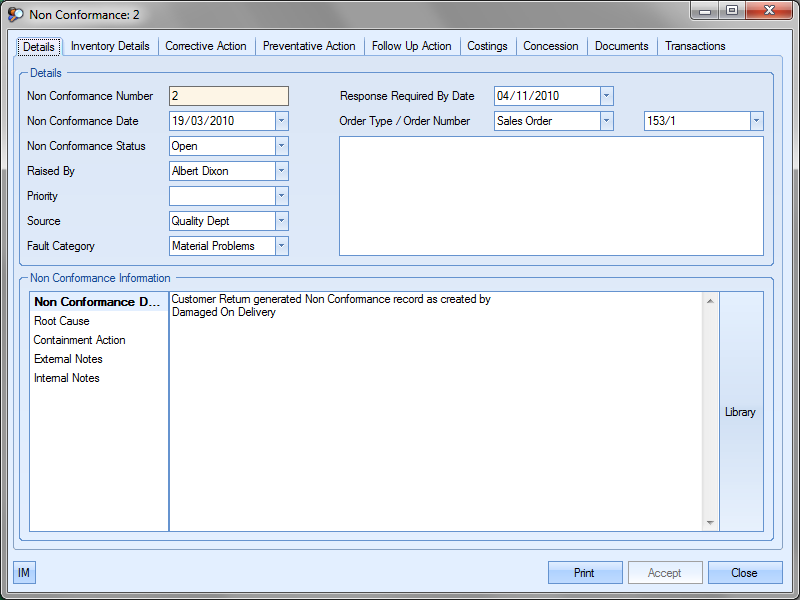
Double clicking on the line containing the details of the required non conformance will open a screen similar to the following to those users with sufficient access rights containing the information regarding the selected non conformance.
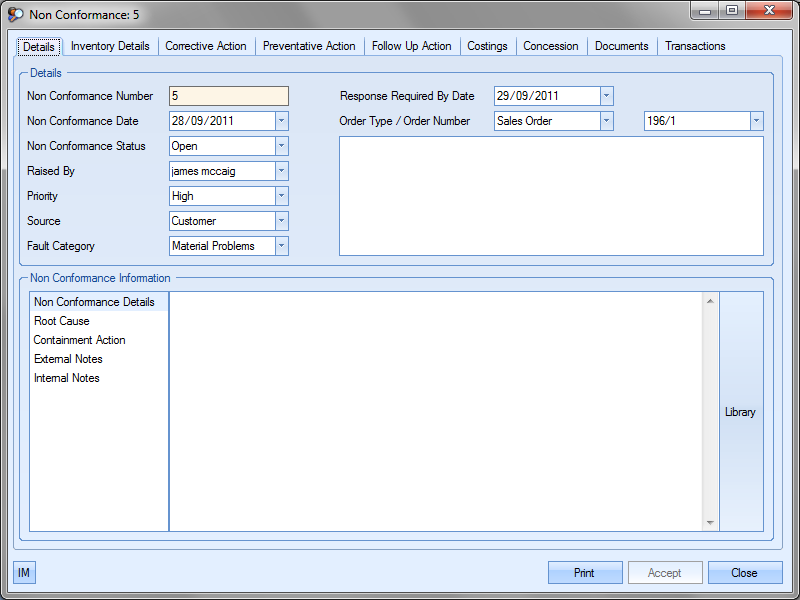
As with other sections of the Today screen the user may if required change only certain information contained on this screen if he or she has permission to do so as determined within the User Access Rights section of the Security section of Progress. For more information on supplier details please refer to the Non Conformance section of this manual.
Clicking the Close or Accept buttons will return the user back to the Today screen.
Once the non conformance has been completed and the user has updated the record to mark it as closed, the non conformance will drop off the Non Conformance Outstanding screen.
The Print button at the bottom of the form permits the users to print off a hard copy of the information regarding the non conformances displayed in the Today screen.
This option displays to users details of any non conformance follow up actions that are currently outstanding for the current user.

This list can be extended to all outstanding corrective actions by selecting the Show All Employees option at the bottom of the screen.
![]()
Clicking Refresh after choosing to view all employees presents the user with the full outstanding list.

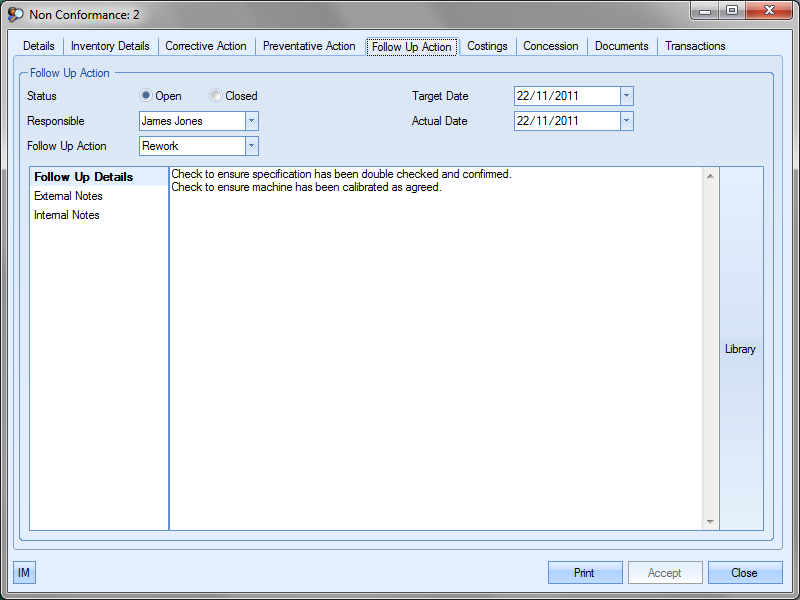
Double clicking on the line containing the details of the required preventative action will open a screen similar to the following to those users with sufficient access rights containing the information regarding the selected follow up action.
Details of the follow up action can be found by clicking on the Follow Up Action tab along the top of the Non Conformance screen
As with other sections of the Today screen the user may if required change only certain information contained on this screen if he or she has permission to do so as determined within the User Access Rights section of the Security section of Progress. For more information on supplier details please refer to the Non Conformance section of this manual.
Clicking the Close or Accept buttons will return the user back to the Today screen.
Once the follow up action tasks have been completed against the non conformance and the user has updated the non conformance record to mark the follow up action as closed, the follow up action details will drop off the Follow Up Action screen.
This option displays to users details of any non conformance corrective actions that are currently outstanding for the current user.
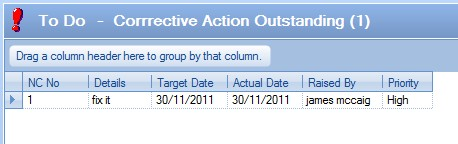
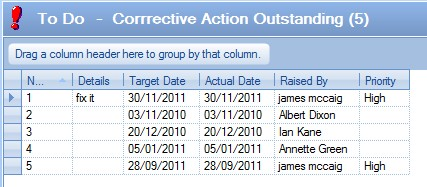
This list can be extended to all outstanding corrective actions by selecting the Show All Employees option at the bottom of the screen.
![]()
Clicking Refresh after choosing to view all employees presents the user with the full outstanding list.
Double clicking on the line containing the details of the required corrective action will open a screen similar to the following to those users with sufficient access rights containing the information regarding the selected corrective action.

Details of the corrective action can be found by clicking on the Corrective Action tab along the top of the Non Conformance screen
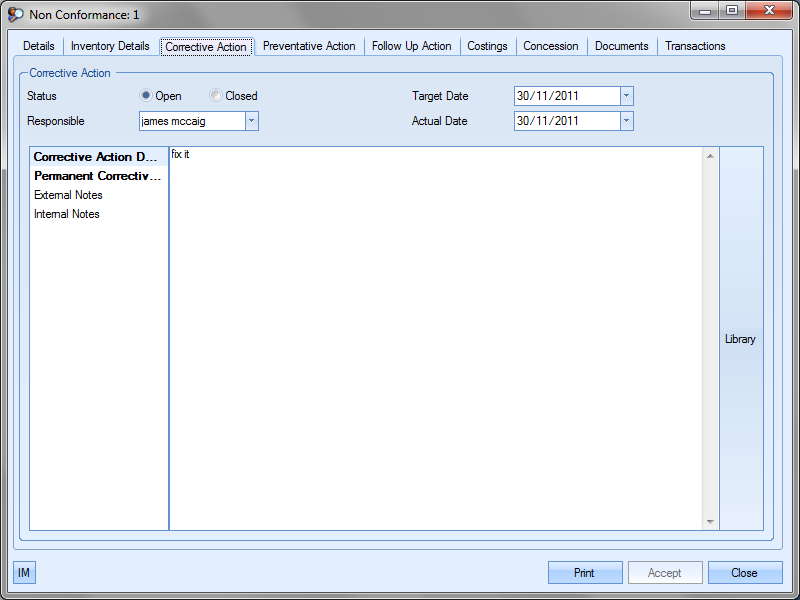
As with other sections of the Today screen the user may if required change only certain information contained on this screen if he or she has permission to do so as determined within the User Access Rights section of the Security section of Progress. For more information on supplier details please refer to the Non Conformance section of this manual.
Clicking the Close or Accept buttons will return the user back to the Today screen.
Once the corrective action tasks have been completed against the non conformance and the user has updated the non conformance record to mark the corrective action as closed, the corrective action details will drop off the Corrective Action Outstanding screen.
The Print button at the bottom of the form permits the users to print off a hard copy of the information regarding the corrective actions displayed in the Today screen.

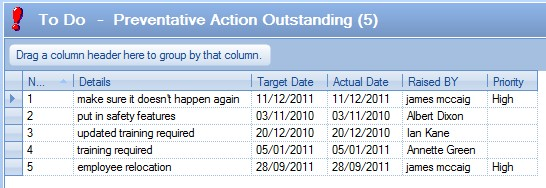
Preventative Action Outstanding
This option displays to users details of any non conformance preventative actions that are currently outstanding for the current user.
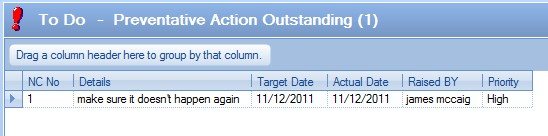
This list can be extended to all outstanding preventative actions by selecting the Show All Employees option at the bottom of the screen.
![]()
Clicking Refresh after choosing to view all employees presents the user with the full outstanding list.
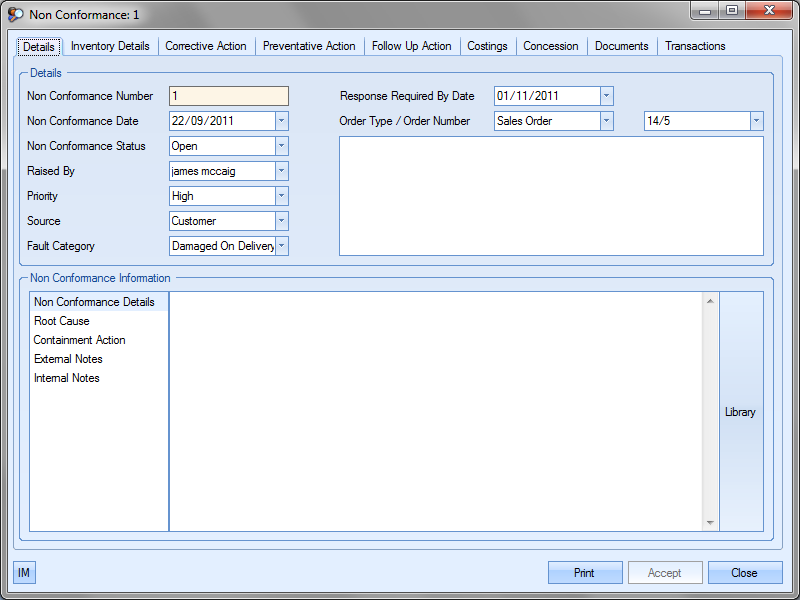
Double clicking on the line containing the details of the required preventative action will open a screen similar to the following to those users with sufficient access rights containing the information regarding the selected preventative action.
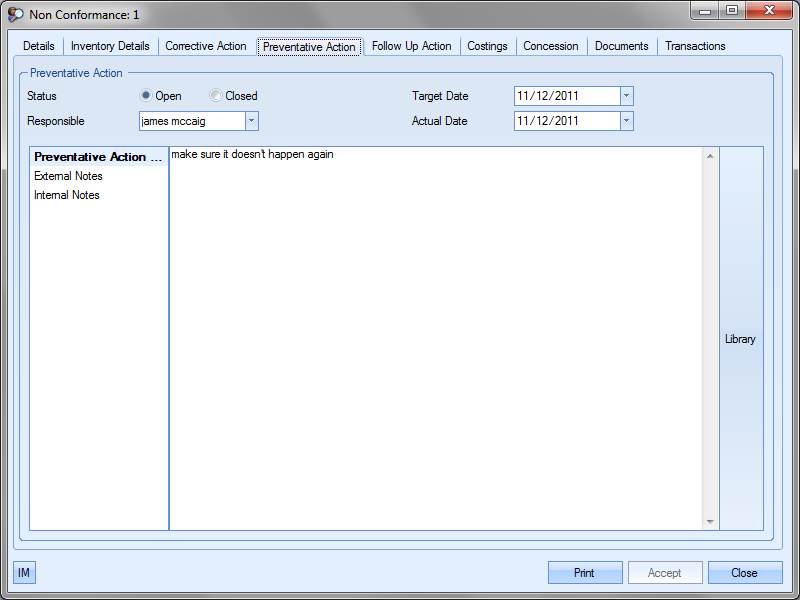
Details of the preventative action can be found by clicking on the Preventative Action tab along the top of the Non Conformance screen
As with other sections of the Today screen the user may if required change only certain information contained on this screen if he or she has permission to do so as determined within the User Access Rights section of the Security section of Progress. For more information on supplier details please refer to the Non Conformance section of this manual.
Clicking the Close or Accept buttons will return the user back to the Today screen.
Once the preventative action tasks have been completed against the non conformance and the user has updated the non conformance record to mark the preventative action as closed, the preventative action details will drop off the Preventative Action Outstanding screen.
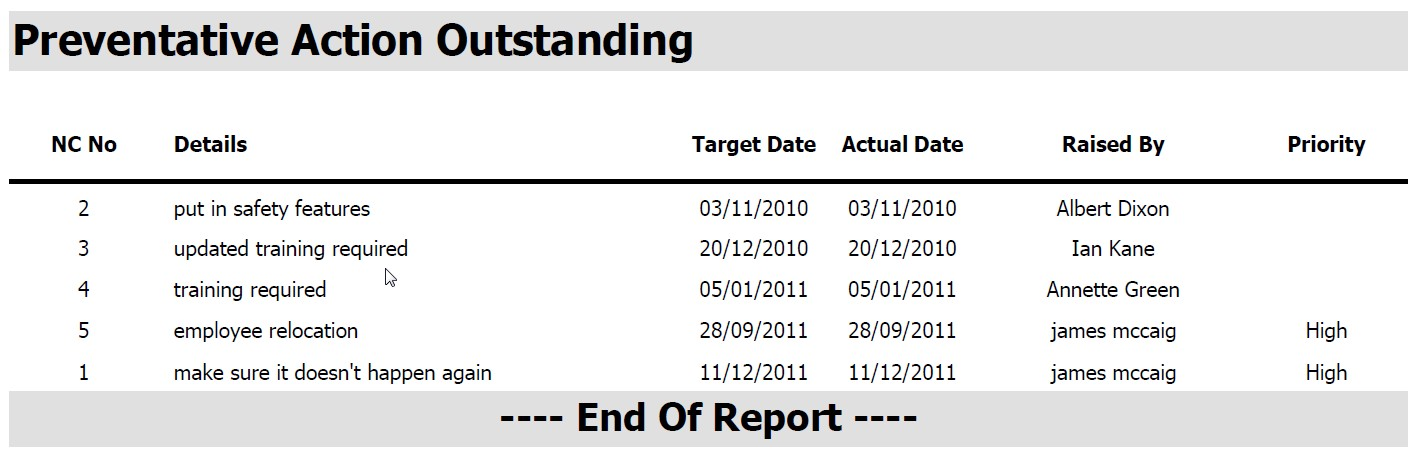
The Print button at the bottom of the form permits the users to print off a hard copy of the information regarding the preventative actions displayed in the Today screen.
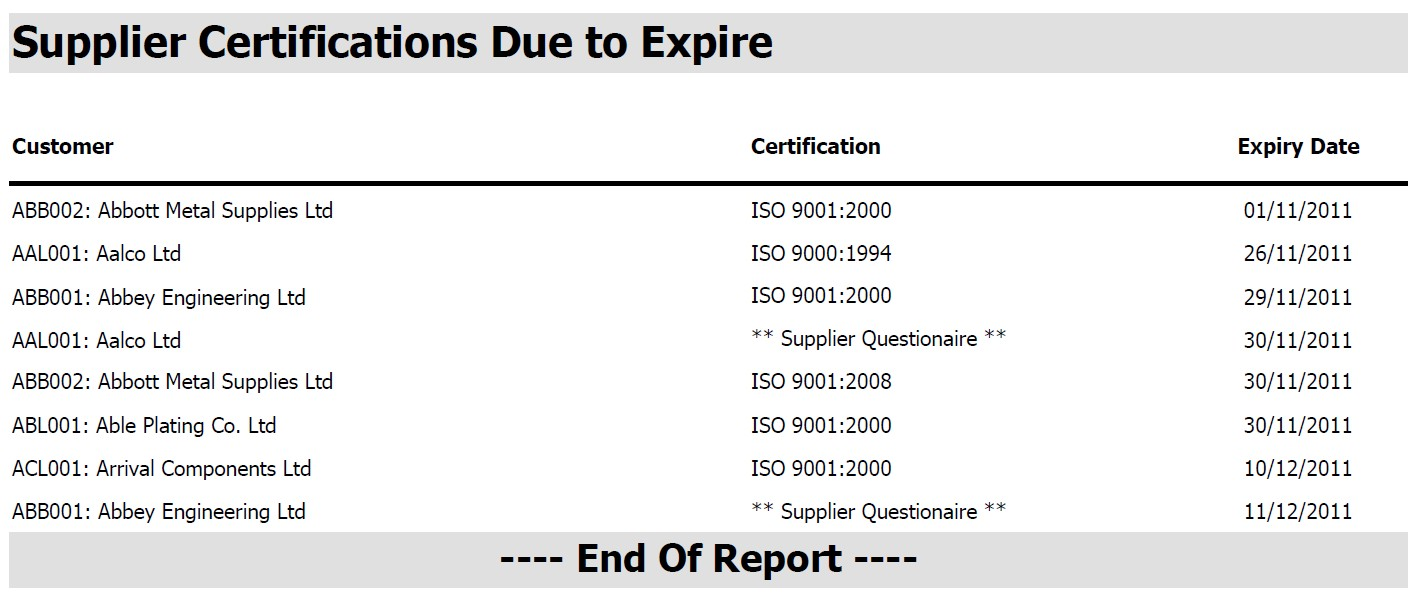
This option displays to users details of any certificates that a supplier may hold e.g. ISO 9002 etc that are due to expire. The information regarding these certificates is entered in the Contacts section against the relevant supplier. For items that are displayed in red, the due date for these certificates to be updated has passed and these certificates are now out of date.
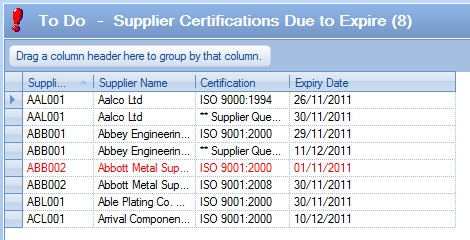
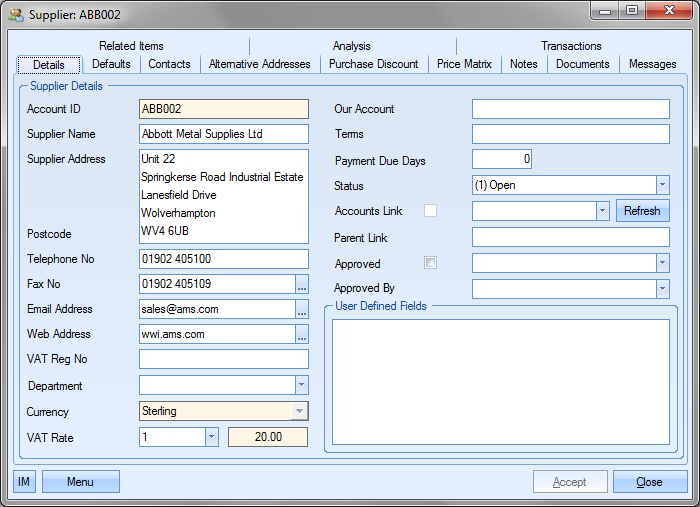
Double clicking on the line containing the details of the required supplier will open a screen similar to the following to those users with sufficient access rights containing the information regarding the selected supplier.
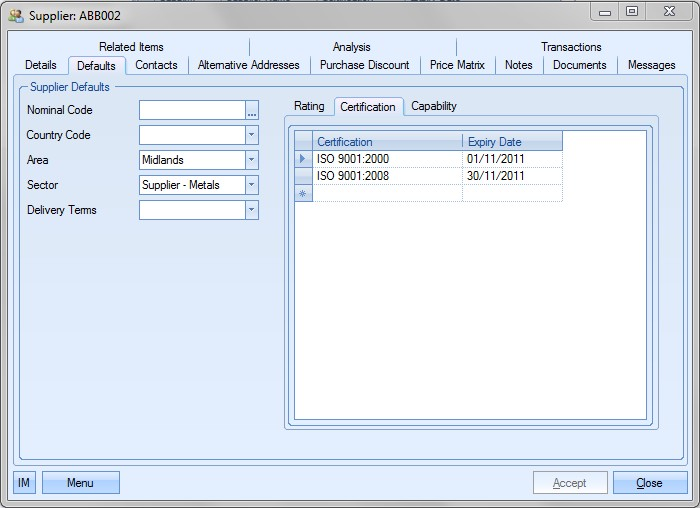
Certification details are maintained in the Defaults tab of the supplier information.
As with other sections of the Today screen the user may if required change only certain information contained on this screen if he or she has permission to do so as determined within the User Access Rights section of the Security section of Progress. For more information on supplier details please refer to the Invoice section of this manual.
Clicking the Close button will return the user back to the Today screen.
The Print button at the bottom of the form permits the users to print off a hard copy of the information regarding the supplier certifications displayed in the Today screen.