The Time and Attendance (T&A) module permits users to view existing, create new, and/or amend T&A records that have been entered via the TANDA or SFDC clients. or create entries for employees who have not clocked in due to absence or working off-site. The details of holidays and periods of employee absence can also be entered from this screen.
Users who only have READ ONLY access to this section will be able to run the various reports available, however, they will not be able to edit or create new T&A records.
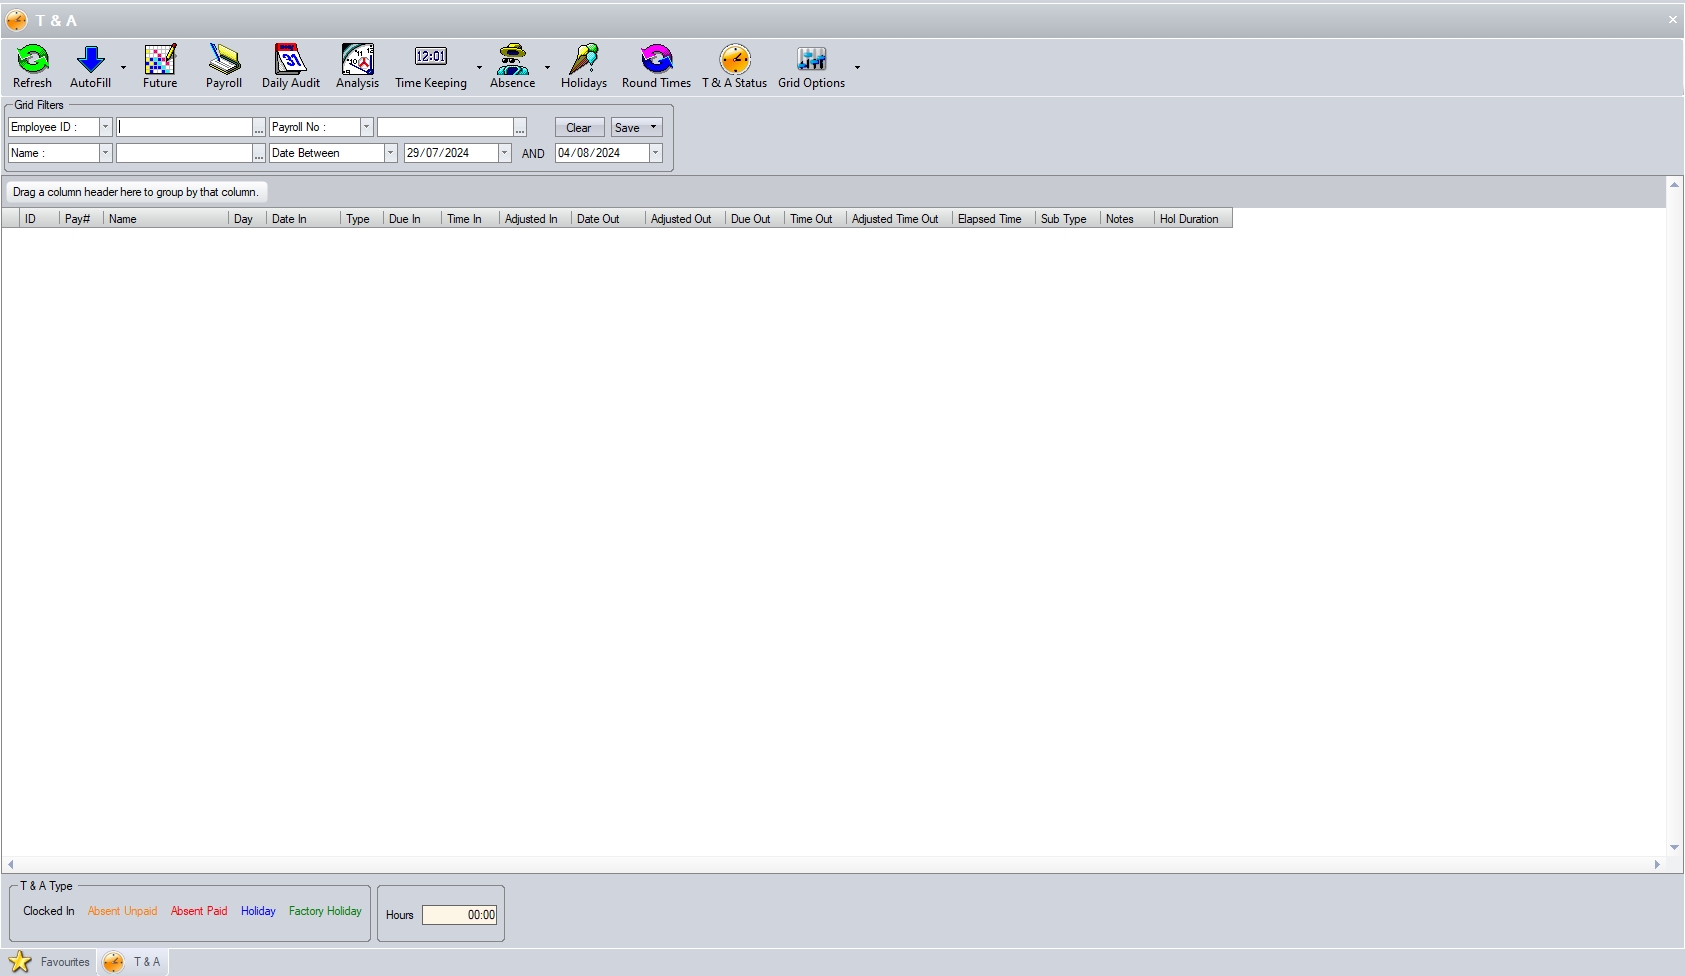
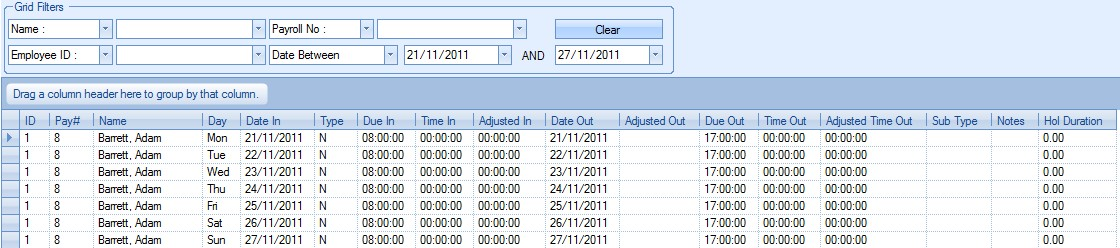
Using the various filters available on this screen, the user can view existing T&A records, or create blank ones for based on the selected filters if they are required for absences, off site days, etc. The user has a number of filters available, including date filters. Once any filters have been applied, clicking REFRESH will display all matching T&A records in the grid below.

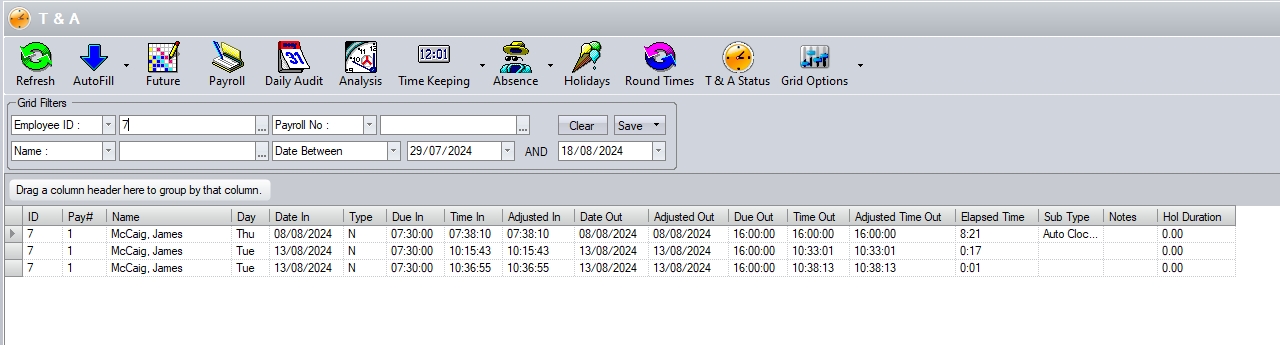
The fields displayed in this grid are: -
| ID | The employee ID. This is not to be confused with the employee’s Payroll Number. When accessing SFDC the employee will “clock-in / out” using his / her ID Number. |
| Payroll # | Employee’s payroll number |
| Name | The Name of the employee |
| Day | The day of the record e.g. Mon (Monday), Tue (Tuesday) etc |
| Date In | The date that the employee ‘clocked in’ |
| Type | Timesheet type. There are 4 different types of timesheet entries: - |
| N - Normal A standard timesheet entry usually entered via the SFDC system manually added by the user may for employees who have not accessed the SFDC system for some reason. |
| AP - Absent Paid A manually entered timesheet entry to record a authorised absence by the employee |
| AU - Absent Unpaid A manually entered timesheet entry to record an unauthorised absence by the employee |
| H - Holiday A manually entered timesheet entry to record a holiday taken by the employee |
| Due In | The start time of the employee’s shift as per the employee' shift pattern and shift times |
| Time In | The employee’s actual ‘clock in’ time as recorded |
| Adjusted In | The adjusted time of the employee’s ‘clock in’ based on the rounding rules set in the system |
| Date Out | The date that the employee ‘clocked out’ |
| Adjusted Out | The adjusted date of when the employee ‘clocked out’ |
| Due Out | The finish time of the employee’s shift as per the employee' shift pattern and shift times |
| Time Out | The employee’s actual ‘clock out’ time as recorded |
Adj. Time Out The adjusted time of the employee’s ‘clock out’ based on the rounding rules set in the system
| Elapsed Time | The total period between the employee's adjusted in and out times |
| Sub Type | The T&A sub type. Provides additional detail on the T&A record e.g. “AP – Dentist” (indicates paid absence – dentist appointment, etc) |
| Notes | Displays any notes added to the T&A record for the employee. |
| Hol Duration | Combined with “H” TYPE above, indicates whether holiday is half day, full day or the holiday hours (if recording holidays in hours). |
AutoFill T&A records
These options allows the user to create a record where no T&A entry has been created. This is useful for entering an absence record, or for entering a blank ‘normal’ record where the employee has not clocked in on the day required (i.e. no T&A record exists). This option can also be used to update shifts/shift patterns on existing T&A records if the employee has changed shifts from those captured against their T&A records.
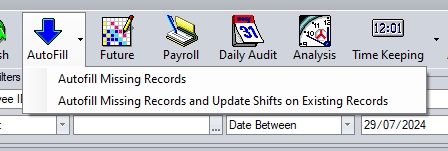
Autofill Missing Records
This option will generate a ‘blank record’ for each employee for the date range chosen. To chose a date range, the user must first set the date range filter in the grid filters. The date set will be the period that the blank T&A records will be generated.
After selecting the required dates the user must press the Refresh button. If the user wishes to apply additional filters, (i.e. employee ID, etc.) they can do so, ensuring the blank T&A records generated are specific to the filters specified. Selecting the AUTOFILL MISSING RECORDS option will now generate blank T&A records for any dates within the period based on any additional filters applied.
Once the blank T&A records have been created, the user can edit them as required (i.e. create absences, missing T&A records, etc.)
Autofill Missing Records and Update Shifts on Existing Records
This option will do exactly the same as above but will also update the employees to the latest shift pattern for that employee. THis option is useful for updating existing T&A records for employees who have changed shifts and have T&A records recorded against previous shifts/shift pattern. This option will simply create blank T&A records for the giving date range, filters, etc. but will update any existing T&A records within the period to the employees' current shift pattern.
Creating/Editing/Deleting T&A records
Adding a ‘Normal’ T&A Entry
If this is a ‘normal’ day and for some reason the employee has not clocked in and out of the SFDC system but was at work, the user can enter the attendance details for the employee for that day.
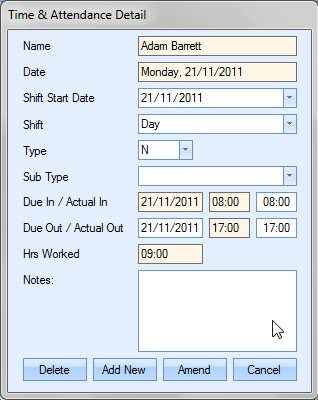
The Type should be N for Normal.
The Actual In field holds the time that the employee should have ‘clocked in’ at
The Date Out holds the date that the employee should have ‘clocked out’ at
The Actual Out holds the time that the employee should have ‘clocked out’ at
Once the user has amended this information as required he or she should press the Amend button to send this information to the timesheet grid.
The details of this entry will now be displayed on the grid. The details of this entry will also be included in any subsequent reports that the user may chose to produce such as the Daily Audit or Payroll Report.
Adding ‘Paid Absence’ T&A Entry
If this employee was not at work for the chosen day due to absence (not a holiday) but the absence was authorised, then the user may record details of this absence.
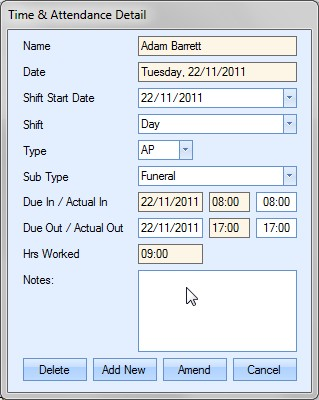
The Type should be AP for Absence Paid
The Actual In field holds the time that the employee should have ‘clocked in’ at
The Date Out holds the date that the employee should have ‘clocked out’ at
The Actual Out holds the time that the employee should have ‘clocked out’ at
Once the user has amended this information as required he or she should press the Amend button to send this information to the timesheet grid.
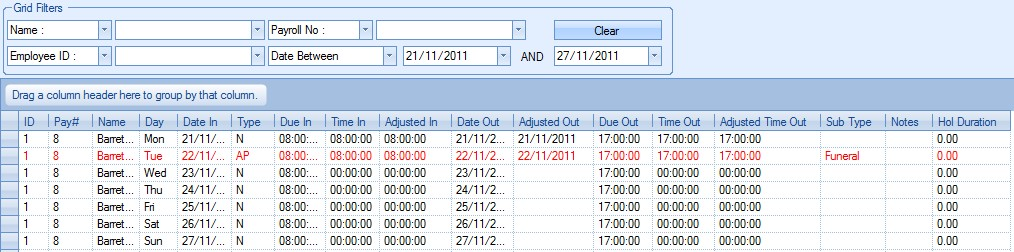
The details of this entry will now be displayed on the grid. Paid absences are displayed in red. The details of this entry will also be included in any subsequent reports that the user may chose to produce such as the Daily Audit or Payroll Report.
Adding ‘Unpaid Absence’ T&A Entry
If this employee was not at work for the chosen day due to absence (not a holiday) and the absence was not authorised, then the user may record details of this absence.
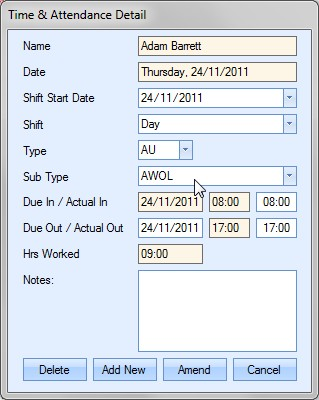
The Type should be AU for Absence Unpaid
The Actual In field holds the time that the employee should have ‘clocked in’ at
The Date Out holds the date that the employee should have ‘clocked out’ at
The Actual Out holds the time that the employee should have ‘clocked out’ at
Once the user has amended this information as required he or she should press the Amend button to send this information to the timesheet grid.

The details of this entry will now be displayed on the grid. Unpaid absences are displayed in orange. The details of this entry will also be included in any subsequent reports that the user may chose to produce such as the Daily Audit or Payroll Report.
Adding ‘Holiday T&A Entry
If this employee was not at work for the chosen day due to a holiday, then the user may record details of this absence.
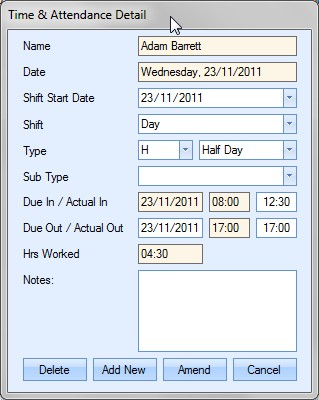
The Type should be H for Absence Paid – User can then select FULL or HALF DAY holiday
The Actual In field holds the time that the employee should have ‘clocked in’ at
The Date Out holds the date that the employee should have ‘clocked out’ at
The Actual Out holds the time that the employee should have ‘clocked out’ at
Once the user has amended this information as required they should press the AMEND button to send this information to the timesheet grid.
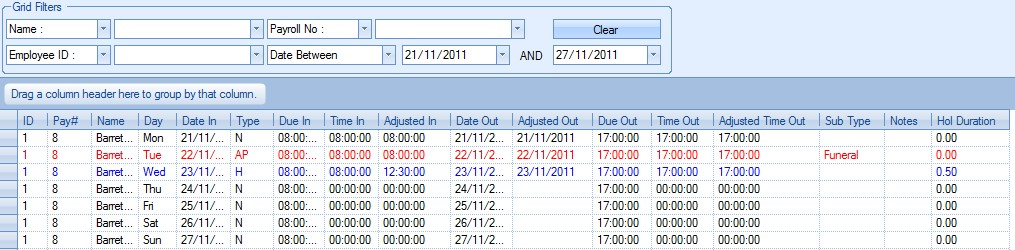
The details of this entry will now be displayed on the grid. Holidays are highlighted in blue. The details of this entry will also be included in any subsequent reports that the user may chose to produce such as the Daily Audit or Payroll Report.
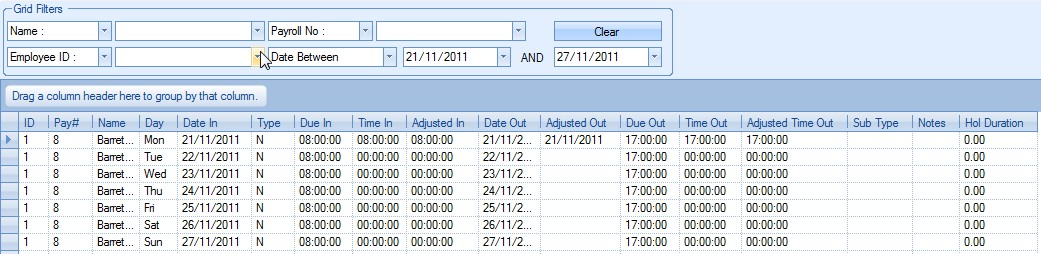
Amending Existing T&A Records
The user can amend T&A records that have been entered. This is useful in the scenario where an employee has ‘clocked in’ the SFDC but forgotten to ‘clock out’ until the next day. The user is also able to change the type of timesheet entry from e.g. absence to holiday. To select the required record the user may use the filters in the manner as previously described. The user must then double-click on the required record that is displayed in the grid. The detail screen will be displayed for the user to edit as required.
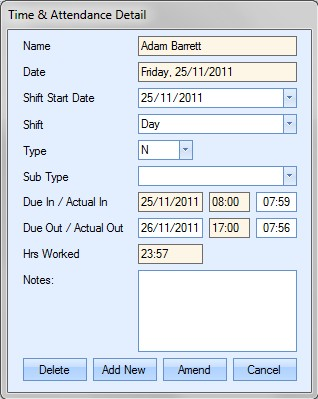
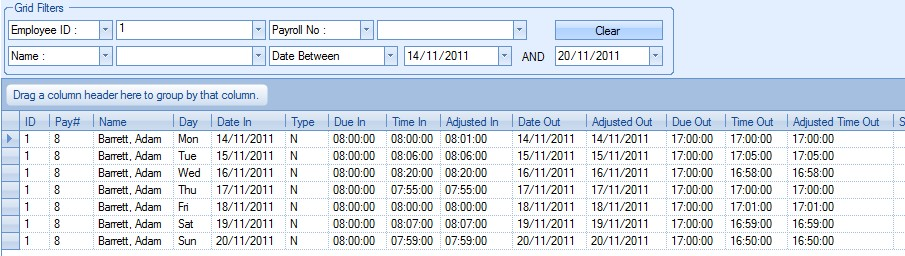
In the above example the employee has ‘clocked in’ on the Friday morning but not ‘clocked out’ at the end of the shift. When he went to ‘clock in’ on the Saturday morning the SFDC system would have informed him that he was already ‘clocked in’.
The employee would then have to ‘clock off’ and then ‘clock in’ again. This however, would result in a period of almost 24 hours attendance being logged against this employee. Any period of attendance in excess of 12 hours is highlighted in the Hrs field as shown in the above diagram.
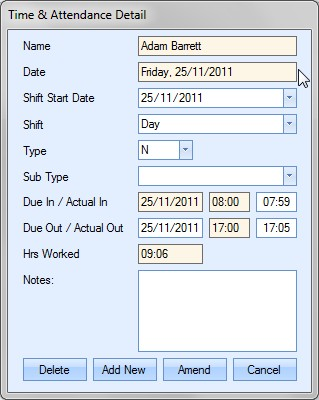
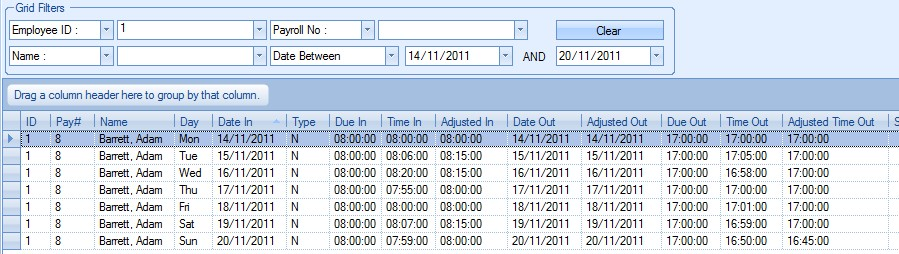
The user may now amend the Due Out and Actual Out to the correct figures taking care to amend the Actual Out field before amending the Date Out field. The amended record is shown on the next screen. The user can save the changes by clicking on the Amend option.
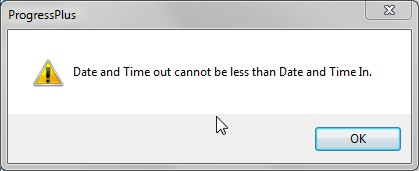
If the user should try to amend the Date Out field before the Actual Out field this may result, in some scenarios, the following message being displayed.
Once updated, the details of this entry will now be displayed on the grid. The details of this entry will also be included in any subsequent reports that the user may chose to produce such as the Daily Audit or Payroll Report.
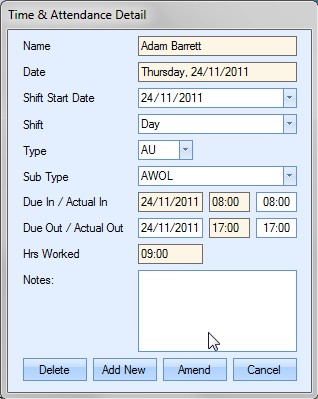
The user may also amend the Type of timesheet. The most common reason for doing this is for changing a holiday record to an absence record or vice versa. After selecting the required record, the user change the Type to one of the following: -
| N - Normal | A standard timesheet entry usually entered via the SFDC system manually added by the user may for employees who have not accessed the SFDC system for some reason. |
| AP - Absent Paid | A manually entered timesheet entry to record a authorised absence by the employee |
| AU – Absent Unpaid | A manually entered timesheet entry to record an unauthorised absence by the employee |
| H - Holiday | A manually entered timesheet entry to record a holiday taken by the employee |
Any changes to timesheet type can be saved by clicking on the Amend option once done.
Deleting T&A Records
The user can delete timesheet records that have been entered if there are 2 or more records for the same employee on the same day. This is useful in the scenario where an employee has 2 records entered for the one day e.g. he or she has had a holiday record and an absence record entered for the same day.
To select the required record the user may use the filters in the manner as previously described. The user must then double-click on the required record that is displayed in the grid.
To delete the record, the user simply has to click the Delete option. They will be prompted to confirm the deletion.
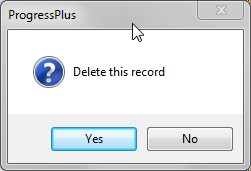
Pressing Yes to this option will delete the record.
If the user should try to delete a record for which there is only one entry on that day for the employee a message similar to the following will be displayed.
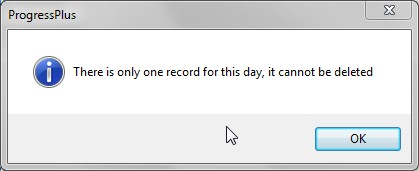
The user must press the OK option to continue. If the user still wishes to delete and not amend this record they must create a replacement record for this day. The user will then be able to delete the required record.
Round Times
This option allows the user to manually round employee T&A times to the nearest 15 minutes based on teh rules set up in the Admin section of Progress. NOTE: This function can have a significant effect on the Payroll report.
e.g.
An employee clocks in at 08:04
Shift begins at 08:00
Minutes Late Allowed = 5
If the user used the Round Times option this employee’s ‘clock in’ time would be adjusted to 08:00 and he or she would therefore be paid from that time.
If however the following occurs
An employee clocks in 08:06
Shift begins at 08:00
Minutes Late Allowed = 5
If the user used the Round Times option this employee’s ‘clock in’ time would be adjusted to 08:15 and they would therefore be paid from that time.
The following diagrams display the effect that the Round Times function can have on timesheet entries and the Payroll report.
Before Round Times
After Round Times
Before Round Times
After Round Times

The user can see the effect of the Round Times function in the Total Hrs figure at the bottom of the report.
This option function has a similar effect on employee who ‘clock out’ early from work.
e.g.
An employee clocks out at 16:27
Shift Ends at 16:30
Minutes Early Allowed = 5
If the user used the Round Times option this employee’s ‘clock out’ time would be adjusted to 16:30 and they would therefore be paid to that time.
If however the following occurs
An employee clocks out at 16:24
Shift Ends at 16:30
Minutes Early Allowed = 5
If the user used the Round Times option this employee’s ‘clock out’ time would be adjusted to 16:15 and they would therefore be paid to that time.
This option function has a similar effect on employee who ‘clocks in’ early to work
e.g.
An employee clocks in at 07:31
Shift Starts at 08:00
If the user used the Round Times option this employee’s ‘clock in’ time would be adjusted to 07:45 and he or she would therefore be paid from that time.
This option permits the user to enter holidays or absences for a selected employee. On choosing this option a screen similar to the following will be displayed.
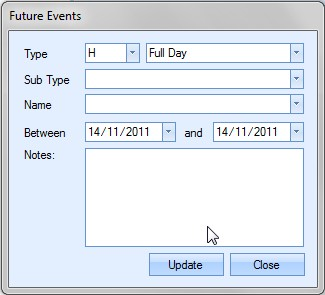
The user can select the type of event from the drop down list as well as the duration (if a holiday is being entered). The sub type can also be selected from its drop down list. The user can then select the employee from the Name drop down list. On clicking the Name lookup a screen similar to the following will be displayed, permitting the user to click on an employee name to choose that person.

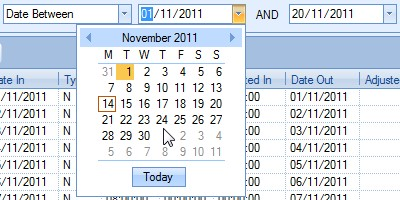
The user may now choose the date or dates of the holiday by clicking onto the calendars on the Between date fields.

Once all the details have been entered, the user can click the Update option to update the timesheet records for the chosen. If timesheet records already exist for the employee and dates shown, the system will prompt the user to confirm the update with the following message:
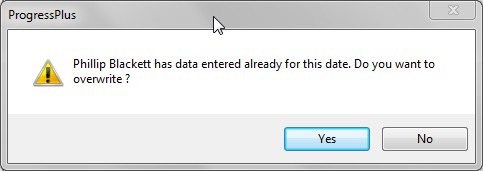
Selecting Yes will proceed to overwrite the details already recorded for this employee.

Payroll
This option permits the user to generate payroll details for the selected criteria. The user can use the various filters on the screen e.g. Name, Department, Date Range,etc to choose what records they require the payroll screen to contain. After choosing the required criteria via the filters in the manner previously described, the user must press the Refresh button to populate the record grid. The user can then press the Payroll option to display the Payroll screen with the calculated data.
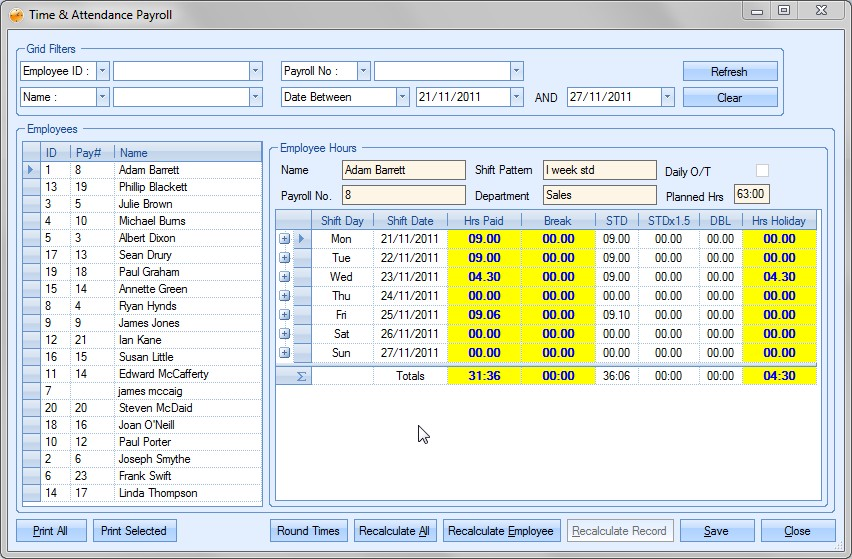
The Round Times option will round the employee times to the nearest 15 minutes. Please refer to the Round Times section for more details.
The Recalculate All and Recalculate Employee options will recalculate either all or the selected employee’s payroll data based on the settings set up in the system for shifts, shift rates, overtime, etc. This will over ride any manual changes made to this employee’s data. The Recalculate Record option only applies to daily overtime and will recalculate a specific day based on the system settings.
If the payroll details have been calculated prior to the current date, the system will highlight the RECALCULATE ALL option in red to indicate that the payroll details may be out of date. The user can recalculate the payroll details by clicking on the RECALCULATE ALL, ensuring the payroll details are calculated using the latest T&A information.
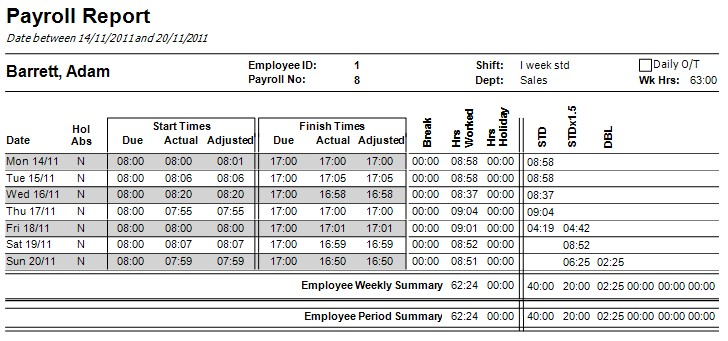
From the payroll screen above, the user can print the Payroll report for either all or individual employees using the print options. An example of the report produced is shown below:
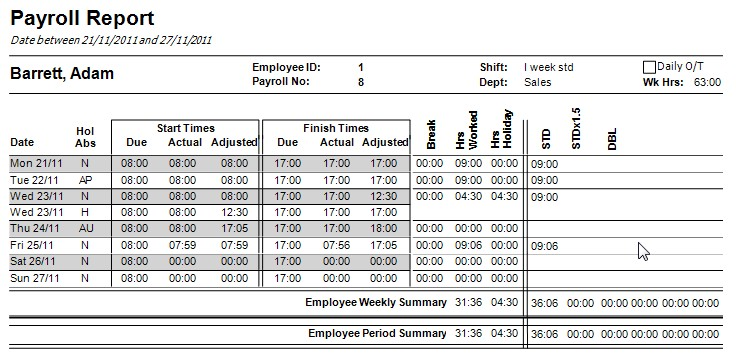
The report detail all the T&A entries for the employee with the daily totals displayed to the right (totals shown for BREAK, HRS WORKED and HRS HOLIDAY). The employee’s pay rate is then also shown for the hours recorded. Any overtime is shown under its respective column where applicable. Weekly and period totals are shown at the bottom for each employee.
Additional T&A reporting
Daily Audit Report
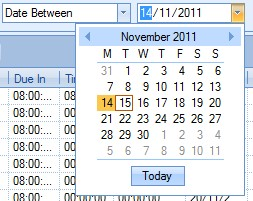
This option permits the user to view the attendance details of all employees for a particular date. To select the required date the user must click onto the calendar lookup beside the Date Between filter field.

A screen similar to the following will be displayed permitting the user to select the required date from the calendar. Only one date need be selected as this report deals only with time information for a specific date.
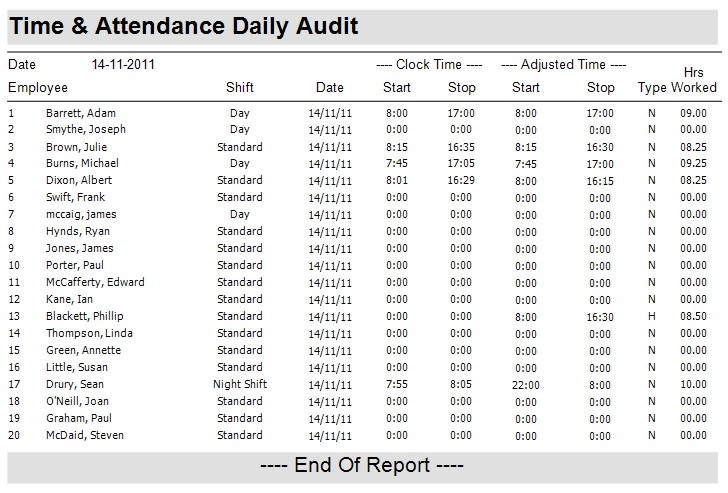
After selecting the required date the user can click onto the Daily Audit button on the screen. A report similar to the following will be displayed showing the user details of employee’s ‘clock ins’ and ‘clock outs’ along with any holidays or absences.
Employee Analysis Report
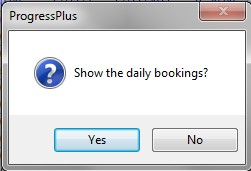
This option allows the user to see a summarised or detailed account of the employees’ hours and how they were spent. Selecting this option will present the user with an initial prompt to see the daily bookings.
Selecting No here will present the summarized report. A report similar to the following will then be displayed.
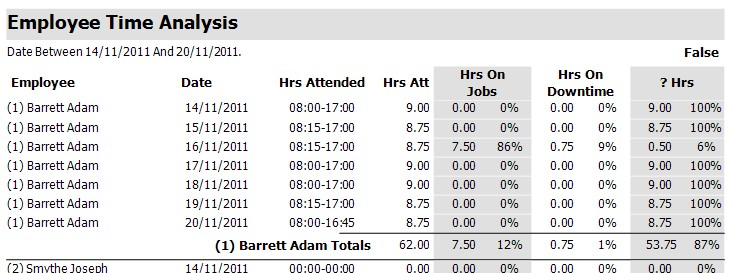
This report shows the employee’s hours for each day and a break down of how those hours were spent. Hours On Jobs shows the total time booked against jobs while Hrs On Downtime shows the total time recorded against the timesheet category of Lost. The ? Hrs section shows the remaining time that is unaccounted for i.e. the difference between the total hours attended and the sum of hours spent on jobs and hours lost to downtime.
If the user selects Yes to the initial prompt, the report will show the same report as above, but will include the daily booking for the employee also. A report similar to the following will be displayed.
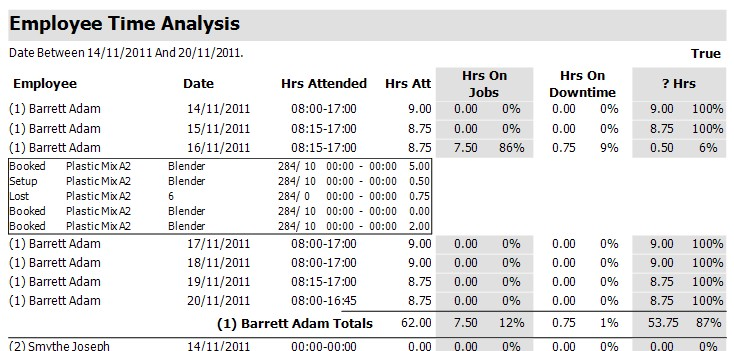
The daily bookings are displayed under each day’s totals. They include the WO and operation number as well as the time range (if recorded) and the total time for that booking. Lost time entries display the code for the Lost Time Category as specified in the Maintenance section.
Timekeeping Report
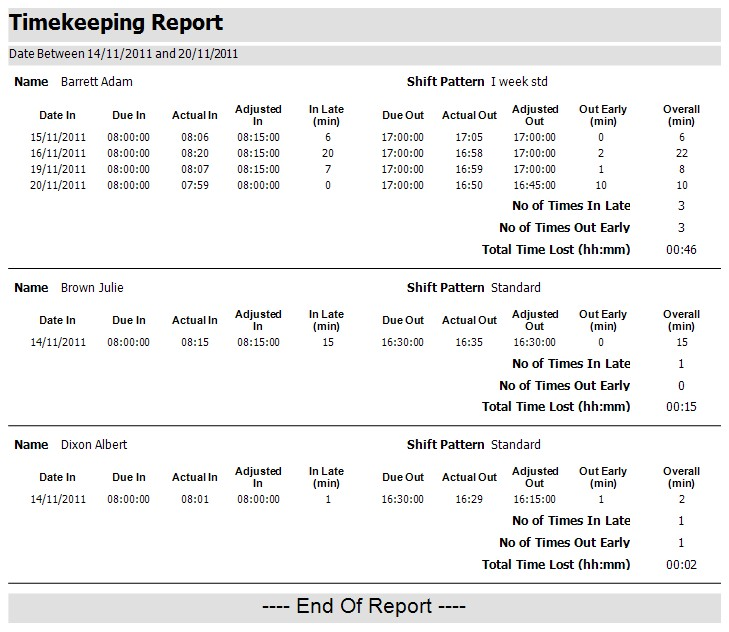
This option permits the user to view a Timekeeping report for the selected criteria. The user may use the various filters on the screen e.g. Name, Department, Date Range, etc to choose what records they require the Timekeeping report to contain. After choosing the required criteria via the filters in the manner previously described, the user must press the Refresh button to populate the record grid. The user can press the Timekeeping button to view / print off the report.
If the user wishes to view all records for the current week he or she needs only to press the Refresh button without selecting any further criteria. The user can press the Timekeeping button to view / print off the report.
A screen / report similar to the following will be displayed containing the details of the time bookings for the selected criteria.
Absence Report
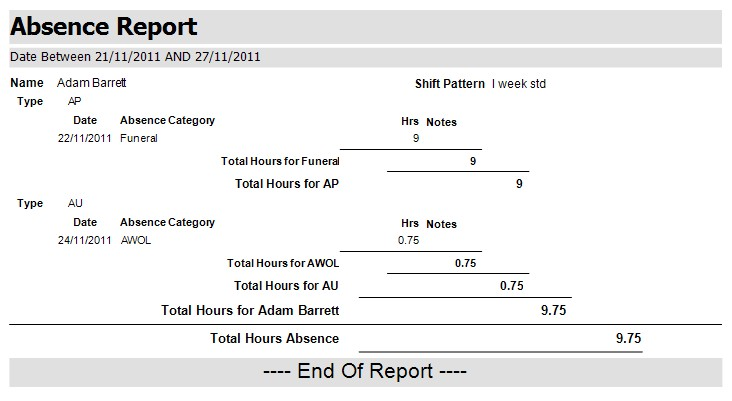
This option permits the user to view an Absence report for the selected criteria. The user may use the various filters on the screen e.g. Name, Department, Date Range, etc to choose what records they require the Absence report to contain. After choosing the required criteria via the filters in the manner previously described, the user must press the Refresh button to populate the record grid. The user can press the Absence button to view / print off the report.
If the user wishes to view all records for the current week he or she needs only to press the Refresh button without selecting any further criteria. The user can press the Absence button to view / print off the report.
A screen / report similar to the following will be displayed containing the details of the absences for the selected criteria.
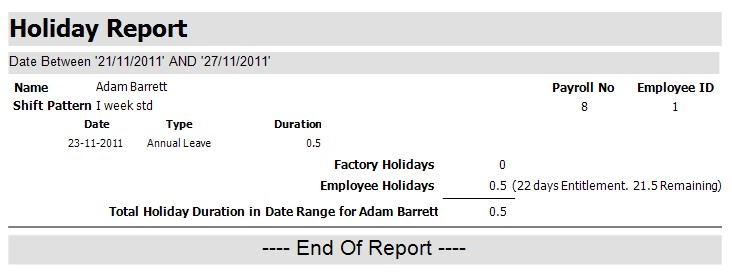
Holiday Report
This option permits the user to view a Holiday report for the selected criteria. The user may use the various filters on the screen e.g. Name, Department, Date Range, etc to choose what records they require the Holiday report to contain. After choosing the required criteria via the filters in the manner previously described, the user must press the Refresh button to populate the record grid. The user can press the Holiday button to view / print off the report.
If the user wishes to view all records for the current week he or she needs only to press the Refresh button without selecting any further criteria. The user can press the Holiday button to view / print off the report.
A screen / report similar to the following will be displayed containing the details of the holidays recorded for the selected criteria.
Miscellaneous T&A Options
Employee Responsible For Functionality
If the system and user's access rights are configured to use this functionality, the user will only be able to see their direct reports (i.e. the employees they are responsible for). This is configured via the user access permissions in the Admin section of Progress. Users can be set as RESPONSIBLE FOR in the T&A Access Rights.

This will restrict the T&A section to just the employees that they user is responsible for, allowing the user to only maintain and/or view just the employees assigned to them.
