This section of Progress allows user to raise queries in relation to items in the system. This could be related to suppliers, customers, work orders, purchase orders, etc. and provides traceability of all communication, actions and responses both internally and externally. The main Technical Query screen is where all technical queries are recorded and where they can be accessed by the users.
Like most sections within Progress, the user has Grid Filters at the top of the screen which they can use to find the information they are looking for, including filters for associated dates too.

Setting any filters requires the user to click REFRESH to apply them. The screen will then update to show all technical queries which match the filter criteria. The user also has an option to show/hide closed technical queries. There are technical queries that have been completed. By default, these do not appear in the list, but can be included by ticking the SHOW CLOSED option at the bottom of the screen. This will ensure closed technical queries are also included in any on-screen results.
![]()
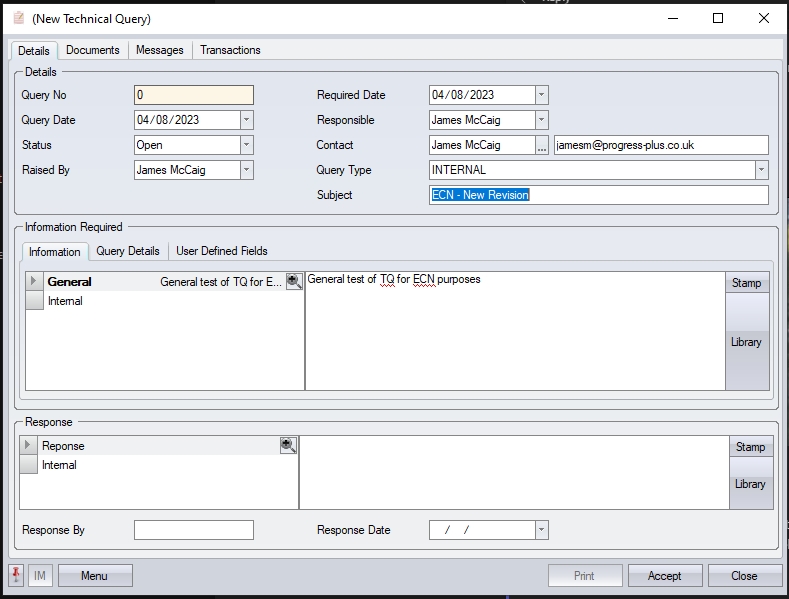
New Technical Query
New technical queries can be created directly from this section using the NEW option. This presents the user with a blank technical query form for them to complete.
The first section at the top is the main technical query details, including date created, its status and who is responsible for it.
Query No This is the unique technical query number. This is assigned by the system when the user clicks ACCEPT to save.
Query Date This is the date the technical query was raised. This will default to the current date but can be amended by the user.
Status This is the current status of the technical query. All new queries, by default, are open. When the technical query is complete, the status can be closed.
Raised By This is the name of the employee who created the technical query. This will default to the current user's name when created, but can be amended to another.
Required Date This is the date when a response or resolution is required. This will default to the current date, like the Query Date, but the user can set this as required.
Responsible This is the name of the employee who is responsible for the technical query. The user can select an existing employee from the drop-down list.
| Contact | This is the contact (internal or external) for the technical query. Using the Contact Selector, the user can select from the list of existing users, employees, or from a list of customer or supplier contacts depending on the nature of the technical query. |
Once the type of contact is selected, the system will present a list for the user to choose from.
Once selected, the details are returned to the technical query screen.
![]()
| Query Type | The user can use this to set whether the technical query is an internal or external query. |
| Subject | This allows the user to enter a brief description of what the technical query is about. |
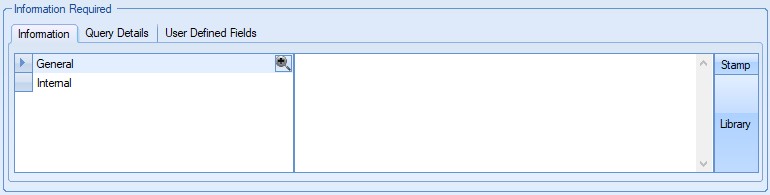
The next section of the technical query is where the specifics of the technical query are recorded. This section is split into three tabs; Information, Query Details and User Defined Fields as shown below.
Information
This section allows the user to add a general note with the details of the technical query and also record internal notes.
Query Details
This section allows the user to link the technical query to any associated item(s) within Progress. This could be a sales order, a supplier, a PO, etc. This will then link the technical query and allow the user to see and access the linked items from the technical query itself or access the technical query from the associated item(s) via their Related Items screens.
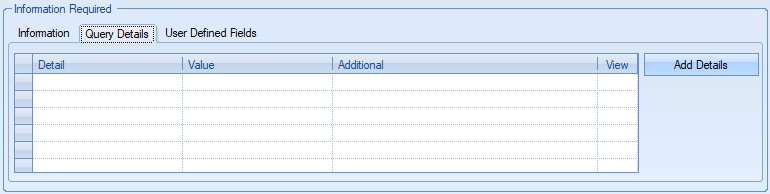
To select the associated item(s) the user can click the ADD DETAILS option and select the type of item they wish to link. The types of items are split into three categories as shown below, with each type providing the relevant options the user can select from.
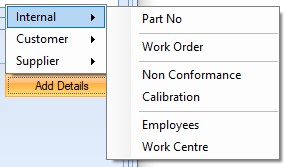
(Internal related items)
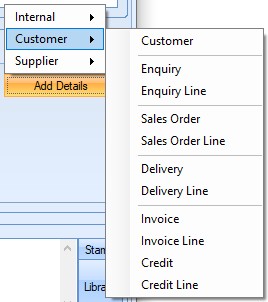
(Customer related items)
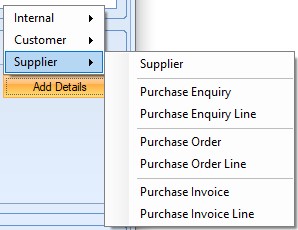
(Supplier related items)
When the user selects any of the available options, they will be prompted to select the associated item. Some examples are shown below.
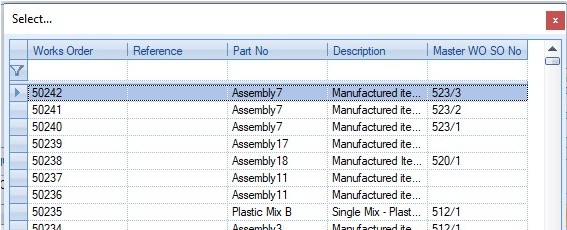
(Works Order selection)
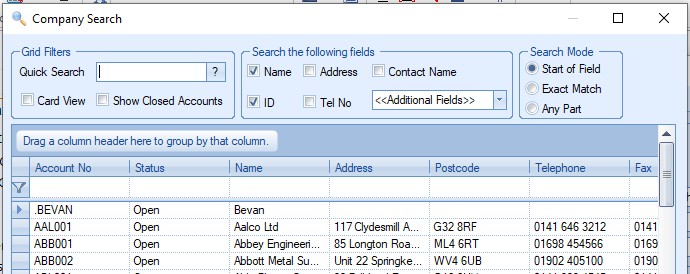
(Supplier selection)
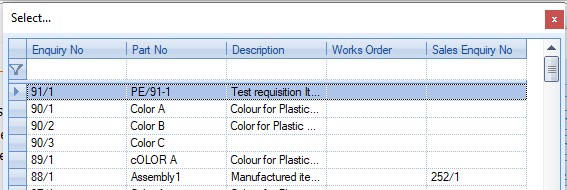
(Purchase Enquiry selection)
Once the relevant item has been selected, clicking the ACCEPT option will pull the details through to the technical query based on the user's selection. Some examples of which are shown below.
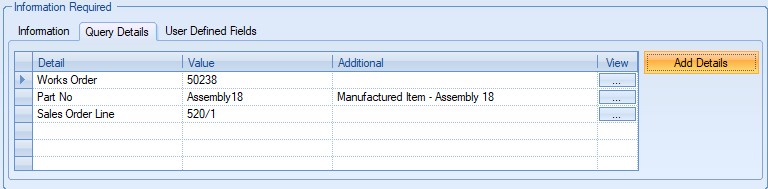
(Works Order details)
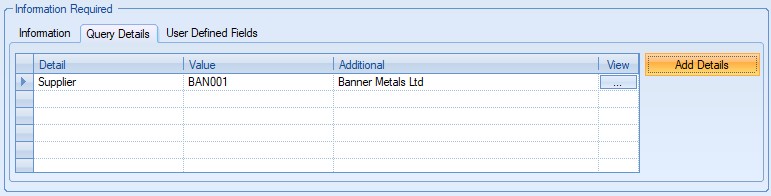
(Supplier details)
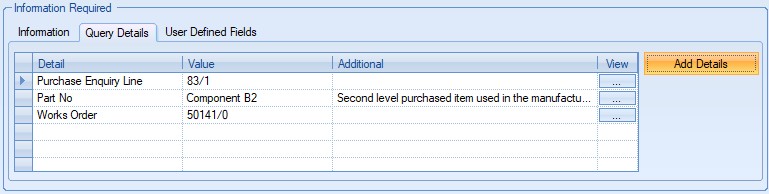
(Purchase Enquiry details)
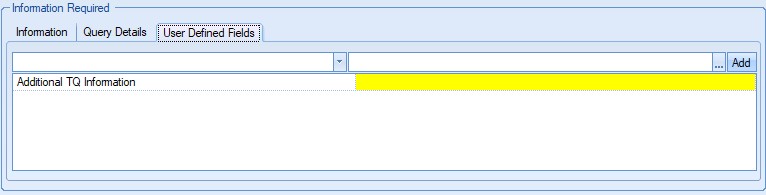
User Defined Fields
This section allows the user to complete any user-defined fields (UDFs) that have been set up for technical queries, just like the same sections throughout the system.
The last section of the technical query is for recording the response from the internal or external source involved. This is where the user can record details of the response, who had responded and the response date. The INTERNAL note allows internal notes to be recorded too.

Once all the information has been entered, the user can click ACCEPT to save the technical query, with the system assigning it the next unique number as its ID.
Copying Existing Technical Queries
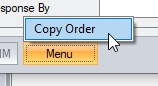
The user is also able to copy the details from an existing technical query. This option is available when creating a new technical query, and cannot be used from within an existing technical query. The option is available via the MENU option at the bottom of a new technical query.
Selecting this option will prompt the user to select the previous technical query they wish to copy, along with what information they wish to bring across to their new technical query.
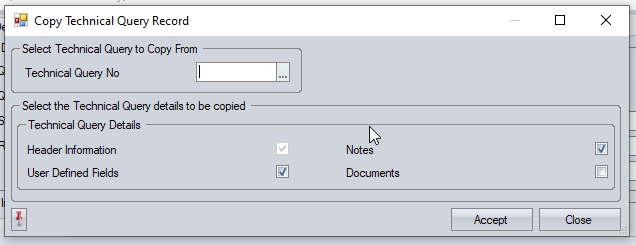
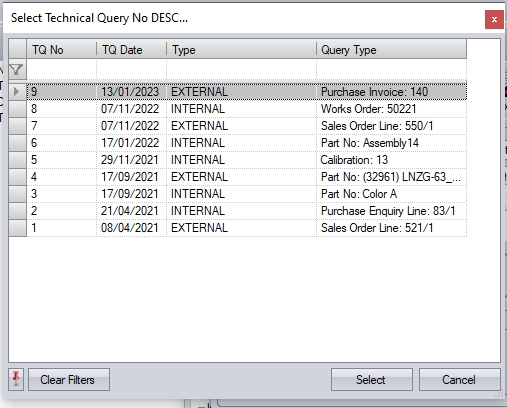
The user can select the technical query from the selection box at the top.
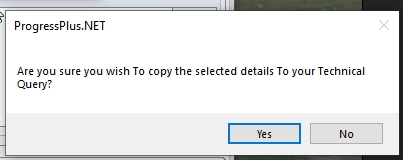
Once teh user has selected the technical query, and the information they wish to copy, clicking ACCEPT will prompt the user to confirm, before proceeding to populate the new technical query with the selected information.
The user can then proceed to complete any additional information that's required for their new technical query, clicking ACCEPT to save when complete.
Documents
Like the same sections throughout the system, this section allows the user to link documents, folders and web addresses. This can be a network folder where all the technical query details are stored, specific files or websites associated with the technical query.

The options at the top of the screen allow the user to select the type of document to be linked. Selecting any of these will present the user with the option to select the file or folder to be linked or will prompt for the web address to be linked as shown below.
(File selection)
(Folder selection)
(Web Address selection)
Once items have been linked, they are listed in the Documents section as shown below.
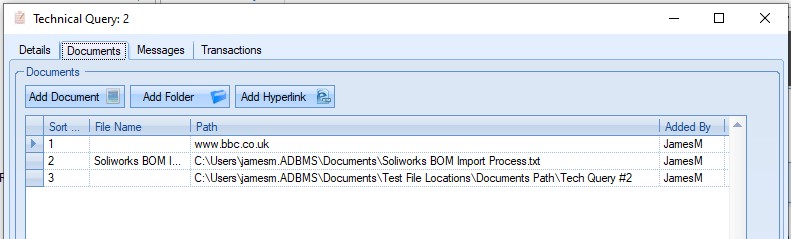
The user can access any of the items listed by highlighting the relevant item and clicking the OPEN PATH or VIEW DOCUMENT (linked file only) icons at the bottom-left of the screen (shown below).
![]()
The OPEN PATH option will open either the selected linked folder, the web address or the file location of the linked file. The VIEW DOCUMENT option will open the selected linked file.
Once the user is finished, clicking ACCEPT will save any items that have been linked to the technical query.
Messages
This section shows all associated communications in relation to this technical query.
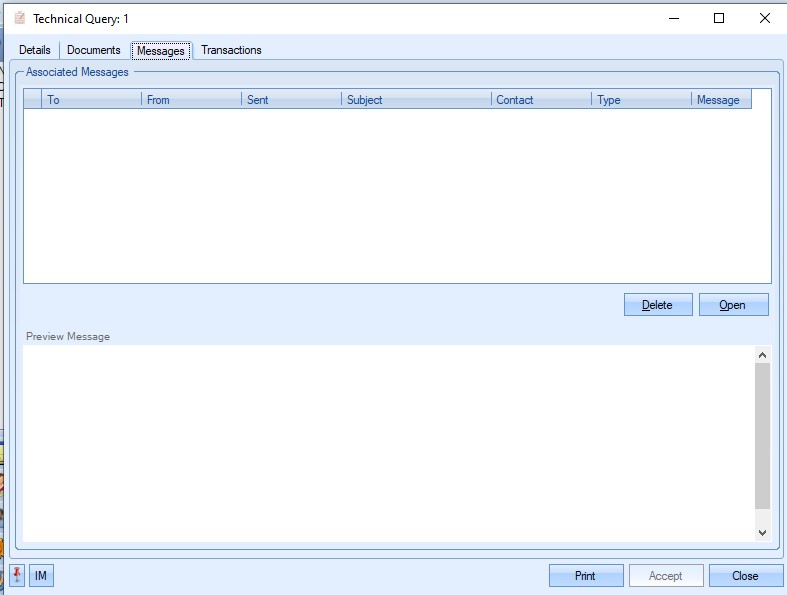
Any emails, messages or other communications associated with the technical query will be listed here. The user can open, view and respond to any of the messages listed here by highlighting and clicking the OPEN option.
Transactions
This section shows a full list of transactions made against the technical query. The transactions are listed in chronological order with the latest transactions at the top.
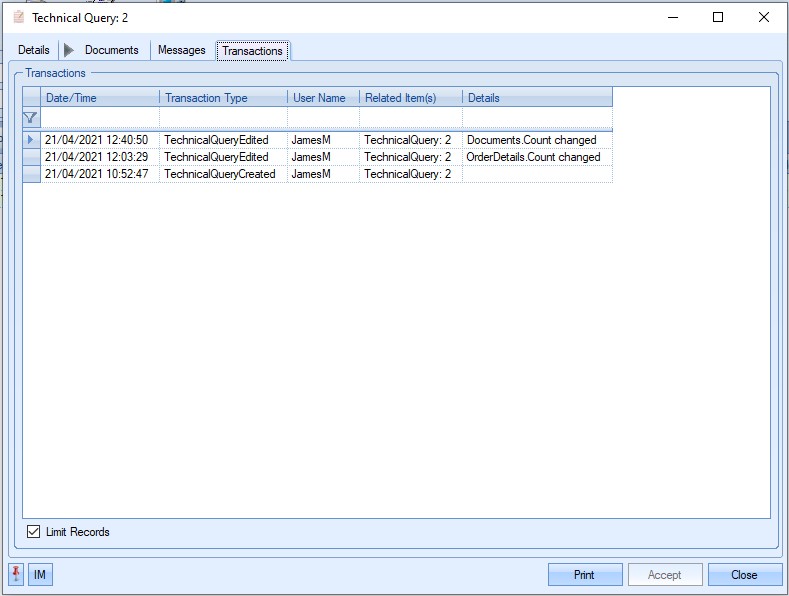
This can be used to trace what has happened to the technical query from the point it was created to its current state, with details captured of all transactions made against the order.
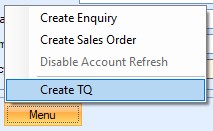
Additional Options
As well as creating technical queries directly from this section, they can also be raised from most other areas of the system via the item's MENU option. Where the item is a single entity, for example a customer, supplier or WO, the user has an option similar to those shown below.
(Customer TQ option)
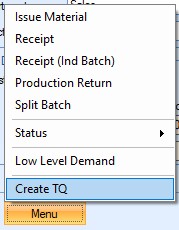
(Works Order TQ option)
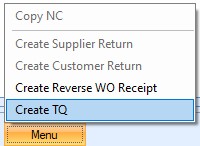
(Non Conformance TQ option)
Where the item has sub-items, for example a purchase or sales order, the user has options to raise the technical query against the entire order or against specific order lines. These are shown as follows within the items Menu option, where the option for the line is based on the one currently highlighted.
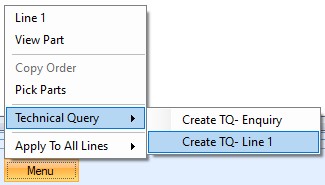
(Enquiry TQ options)

(Sales Order TQ options)
Where a technical query is raised from within an item, Progress will record all the items relevant details within the technical query's Query Details section. This saves the user having to manually add the details. Some examples are shown below.

(Customer related TQ details)
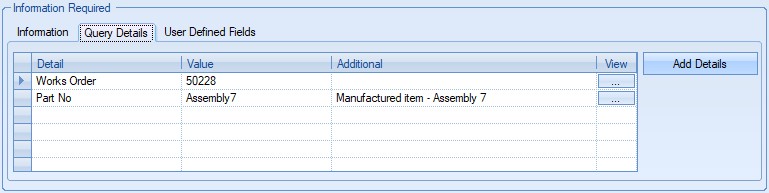
(Works Order TQ details)
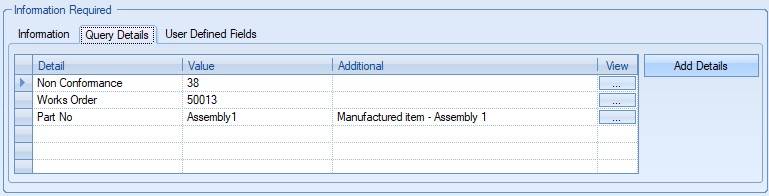
(Non Conformance TQ details)
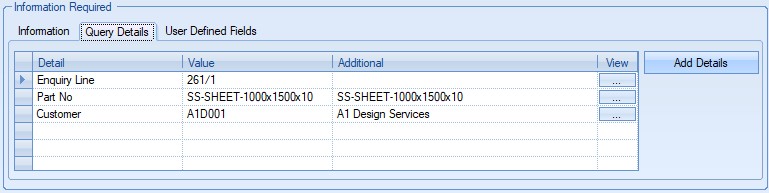
(Enquiry line TQ details)
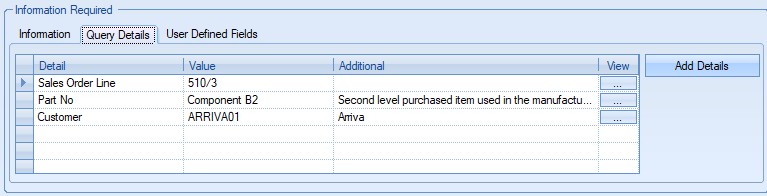
(Sales Order TQ details)
With the associated information automatically pulled through from the selected item, the user can then proceed to complete the rest of the information required for the technical query.
Once complete, clicking ACCEPT will save the technical query in the system.