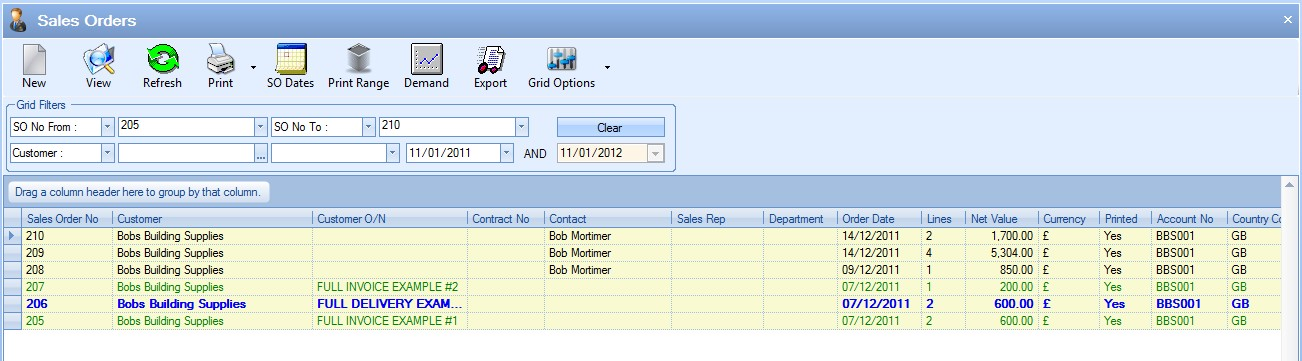
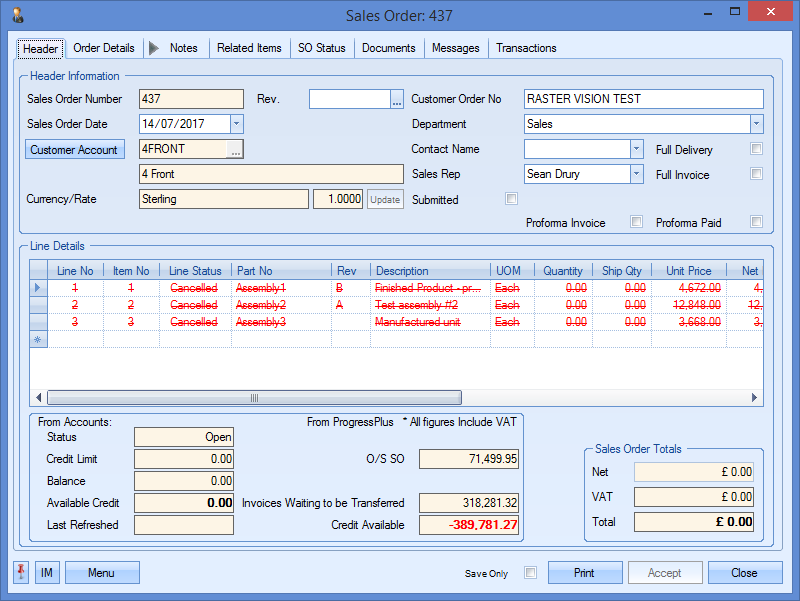
This section allows the user to create and view sales orders for customers who have placed orders. When the user selects the Sales Orders option within the Customer section of Progress, they are presented with a screen similar to that shown below.
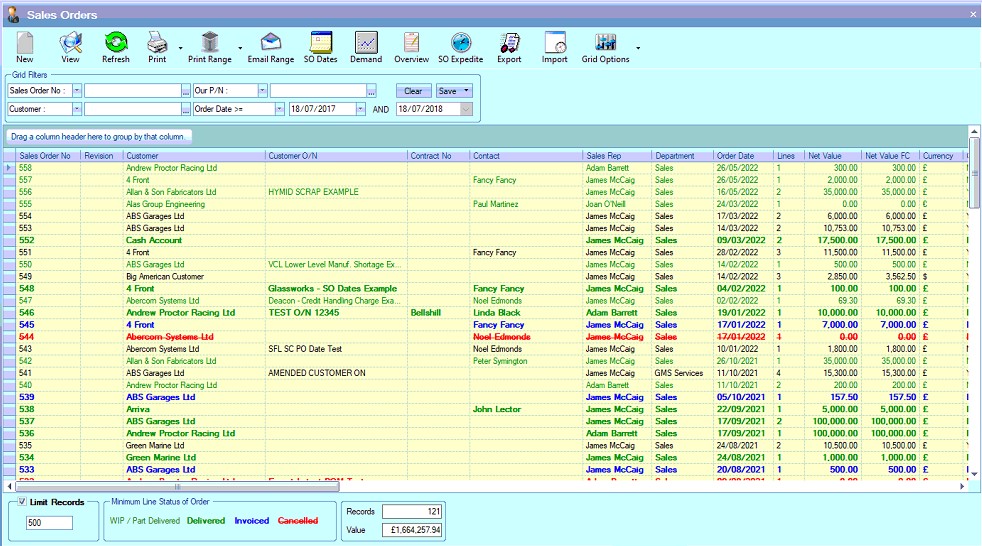
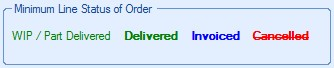
This screen will show all sales orders currently in Progress. The sales orders listed are colour coded to indicate the current minimum status of the order as indicated by the legend at the bottom of the screen.
The total number of sales orders listed is shown at the bottom along with the total value of all these orders. If the Limit Records option is ticked, then the screen will list only the specified number of records and the total value of those records.

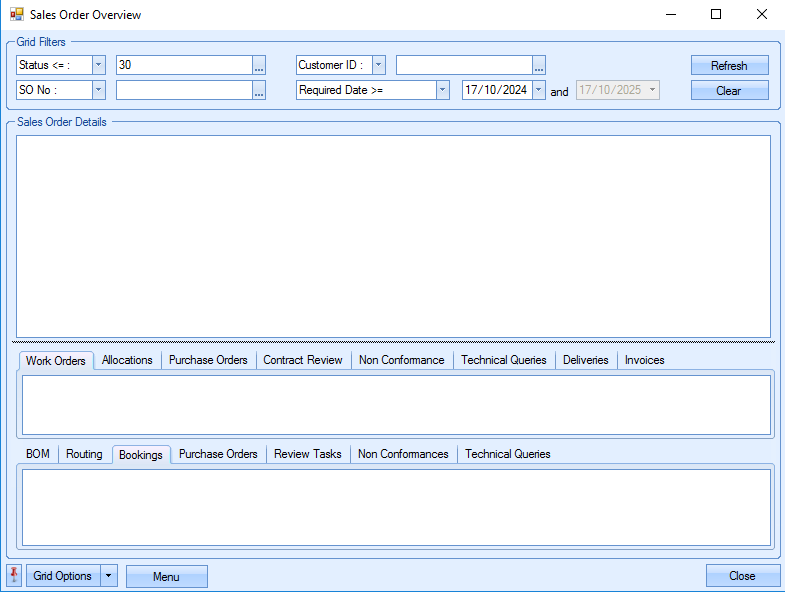
Existing sales orders are listed in the main screen. The user can filter for specific sales orders using the filters at the top of the enquiry screen.

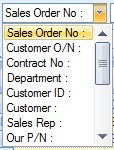
The user can select which pieces of information they wish to filter on using the drop-down lists to select the required field.
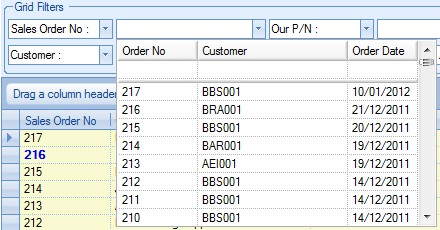
The user can then use the associated drop-down list to select the required values for the filters as shown below.
Once the user has selected the required filters, they can see the results by clicking the REFRESH option at the top of the screen. This will reduce the listed sales orders to only those that meet the selected filter criteria.
View
The user can access any of the sales orders by double-clicking on the required sales order or highlighting the sales order and clicking the View option at the top of the screen. Either method will open the selected order and display a screen similar to the following.
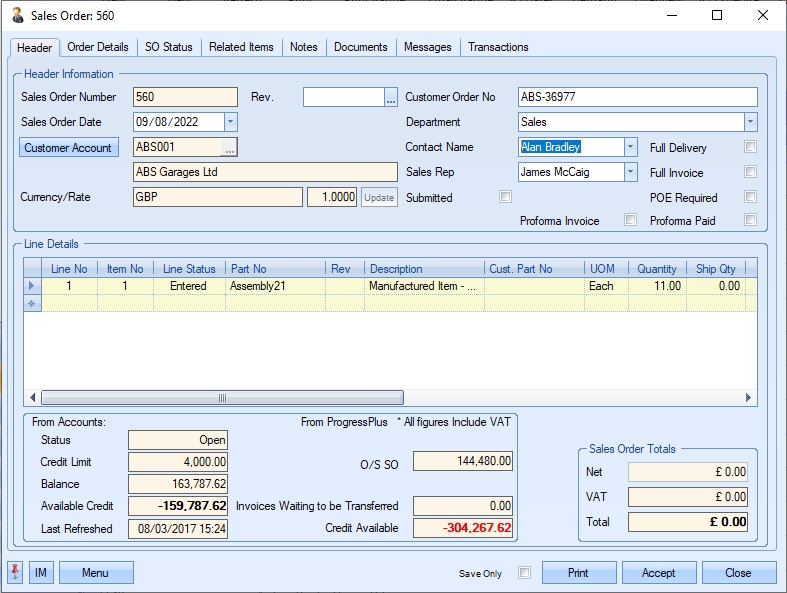
The user may if required change the information contained in the order if they have permission to do so as determined within the User Access Rights section of the Security section of Progress.
Clicking CLOSE or ACCEPT will return the user to the Sales Order Browse screen.
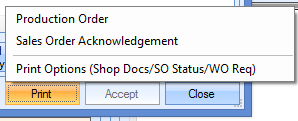
This option allows the user to print out the selected sales order acknowledgment directly from the Sales Order Browse screen. The user simply has to highlight the required order and then click the PRINT option at the top of the screen to generate the sales order acknowledgment. The PRINT option also has two additional options available. Clicking on the little arrow to the right of the PRINT option presents the user with the option to print either a Pro Forma or Production Order document for the selected sales order.
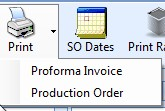
The user can select either of these options to print out the required document.
If the system is configured to update the SUBMITTED flag and date automatically when printed or emailed, the SO will be updated to reflect this.
Print Range
This option allows the user to print the sales order acknowledgment document for a range of sales orders. The user can use the grid filters at the top of the page to select the sales orders required.

Once selected, clicking the PRINT RANGE option will prompt the user to confirm before printing the sales order acknowledgment for all the sales orders listed.
The user also has the option of saving the range of acknowledgments, as well as options to print and save a range of proforma invoices and production order documents. These options can be accessed by clicking on the arrow to the right of the PRINT RANGE option.
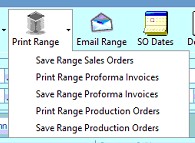
As above, the PRINT options will generate the selected document for all the sales orders on the main Sales Order Browse screen. All the SAVE options will generate and save the selected document for the range of sales order selected to the folder specified in the Admin section for the Documents path.

Again, if the system is configured to automatically update the SUBMITTED flag and date, the SOs will be updated to reflect this once all are printed.
Email Range
This option allows the user to email a range of sales order acknowledgment documents to the relevant contact for the selected customers.
NOTE: This option is ONLY available to users who have their email set up to send directly from within Progress.
Like the PRINT RANGE option above, the user can use the grid filters to select the range of sales order they wish to email. Once selected, clicking the EMAIL RANGE option will open a window similar to the following.
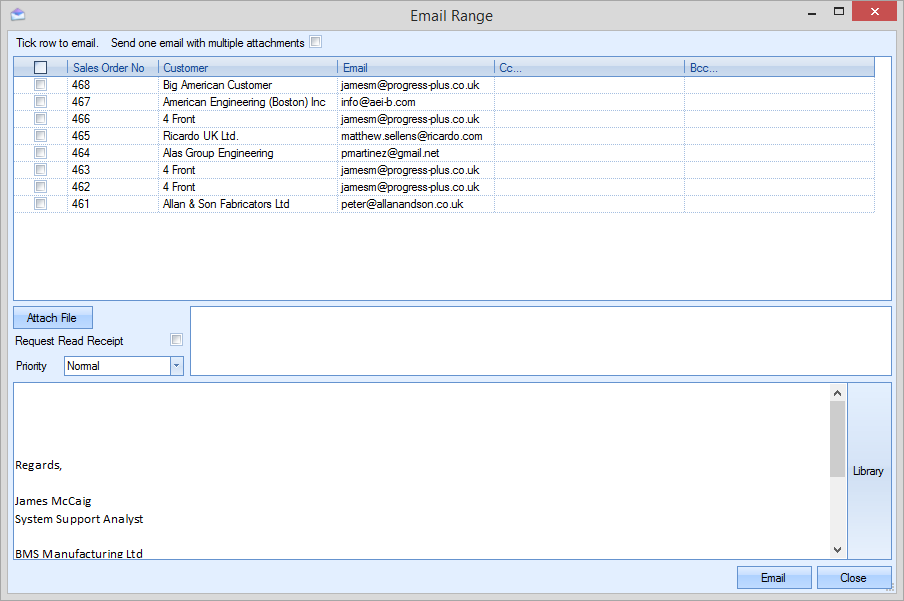
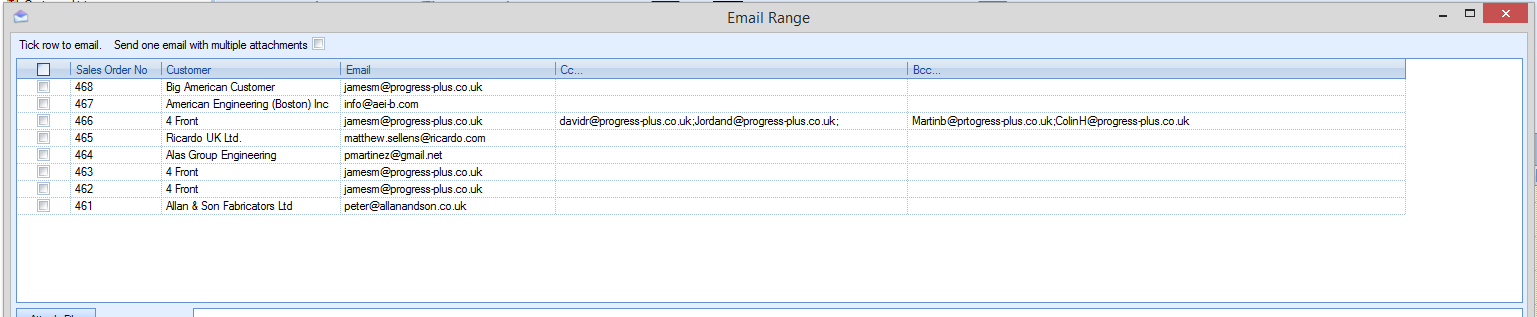
The top of this window shows the selected list of sales orders along with the contact email address set up against the customer. The user can select the sales order they wish to send using the tick box along side each sales order. If they wish to add additional email contacts, they can be added to the CC and BCC fields against each SO listed. Multiple email addresses can also be added to each CC and BCC field by separating them with a semi-colon. An example is shown below.
The user can also attach files using the ATTACH FILE option as well as request a read receipt and set a suitable priority for the email being sent. An suitable email message can be added via the bottom half of the window. This text will be the same across all emails being sent.
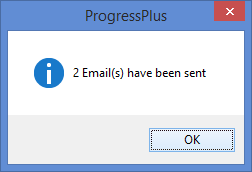
Once the user has selected the orders to be sent and filled in the rest of the details, they can click the EMAIL option to send the emails. Once sent, the system will confirm with a message similar to the following.
Again, if the system is configured to automatically update the SUBMITTED flag and date, the SOs will be updated to reflect this once all are sent.
SO Dates
This option allows the user to amend sales order dates as well as any associated WO or PO dates as a result of the SO date changes made. To use this option, the user must highlight the required sales order and then click on the SO Dates option. This will present the user with the following screen.
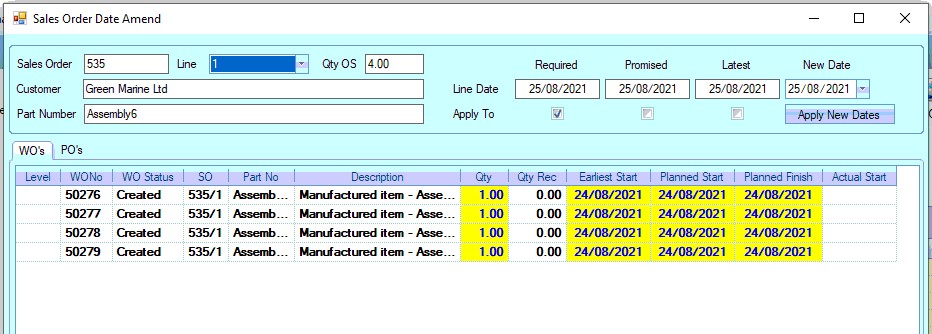
The top part of the window displays the sales order information. The Line field defaults to the first line of the SO, but can be changed by the user if required.
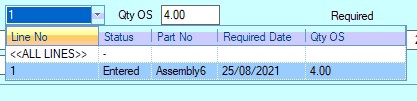
If looking at a specific SO line, the system will show the relevant Required, Promised and Latest dates of that SO line. If looking at all SO lines, the system shows the earliest of these dates across all lines. The header also changes to highlight this.

Below the sales order information is the associated WO and PO information.

The user can change the SO line date using the NEW DATE calendar option at the top of the screen to the new date. They user can also indicate which of the SO line dates are updated too using the tick boxes displayed.

Once selected, clicking the APPLY NEW DATES option updates the WO dates accordingly, with each WO or having the dates refreshed based on the new date and associated lead times.
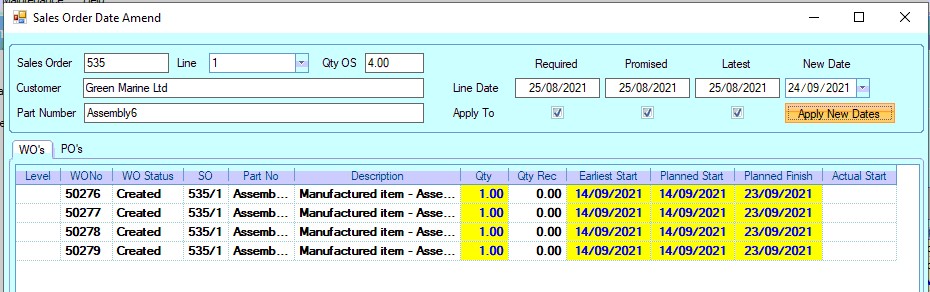
By default, the system will not allow the new WO dates to be earlier than the current date, however, if the user wishes to allow this, there is an option that can be ticked at the bottom of the screen.
![]()
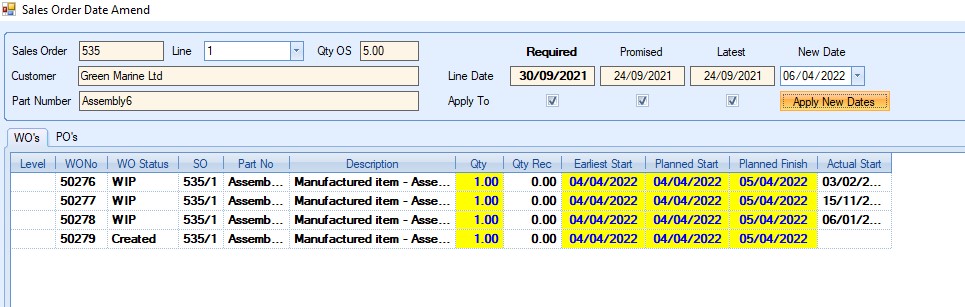
If the new SO dates result in any of the associated WOs dates being before the current date, the system will set these to the current date by default, however, ticking the option above, will allow the WO dates to be set in the past if preferred. Using the example above, the screen shots below show how the option works.
(Option unticked - New SO date results in associated WOs being set with current date)
(Option ticked - New SO date results in associated WOs being set with date in the past)
Once the SO line has been updated, the user must click ACCEPT to save the new dates before making a similar change to another of the SO lines. Once all changes have been made, the user can click CLOSE to return to the Sales Order section of Progress.
The PO tab, which shows any associated purchase orders, will highlight any POs which are due in early or late based on the changes to the SO dates , highlighting them in green or red respectively. POs will be classed as early based on the specified number of days shown at the bottom of the screen.


Demand
The DEMAND option initialises the Sales Order Line Requirements screen for the selected sales order. This is the same screen presented to the user when a new sales order is added to the system and allows the user to decide how they wish to fulfill the sales order requirements. Selecting this option presents the user with the following screen. The user can view all the lines of the sales order with outstanding requirements or they can select specific SO lines using the filter option at the top.
The DEMAND screen shows the user a breakdown of the selected sales order line details. The sales order line items are shown in red with their respective BOM items listed immediately underneath.
The user has a number of options available to them. These are shown in the top-right of the screen.
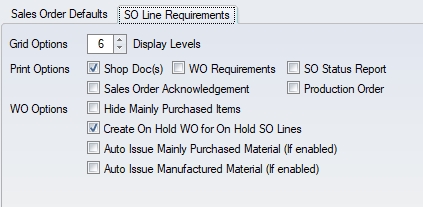
The default settings for these options can be set in the Admin section of Progress, under the Enquiry & SO > SO Line Requirements tab's WO Options as shown below. These defaults will be set when the user accesses the DEMAND screen within Progress, but can be amended by the user if required.
For more information on the sales order system settings, please refer to the Administrator Functions > Options section of the manual.
The HIDE PURCHASED ITEMS option will filter out any parts on the displayed BOM(s) that are marked as Mainly Purchased (MP). This can be useful with large BOMs, allowing the user to see only the manufactured parts of the BOM for which they may need to raise WOs.

(Hide Purchased Items option unticked)

(Hide Purchased Items option ticked)
The CREATE ON HOLD WOS FOR ON HOLD SO LINES option will allow the user to create WOs for the SO lines if the SO lines are on hold. If unticked, no work orders will be created for the sales order lines (i.e. they are ignored). This allows the user control over whether on hold sales order lines generate the required work orders, and subsequent material and production demand.
The ISSUE MP ITEMS option allows the user to automatically issue any existing stock of mainly purchased parts to the work orders being created. This is done on a FIFO basis and will issue all material available to the work orders until they have been fully issued based on the WO BOM requirements, or until there is no further stock available to issue. If specific material is to be used on the work orders or there is a need for strict control of the material used, this option should be left unticked, and all material should be issued to the job manually as this will allow the user to issue specific batches of material to the work orders.
The ISSUE MANUFACTURED ITEMS option allows the user to automatically issue any existing stock of non-mainly purchased parts to the work orders being created. These could be sub-assembly items that have been manufactured previously and are in stock for example. Again, this is done on a FIFO basis and will issue all stock available to the work orders until they have been fully issued based on the WO BOM requirements, or until there is no further stock available to issue. Again, if strict control of the batches issued is required, this should be left unticked and the parts issued manually.
From this DEMAND screen, the user can decide how the sales order quantities are fulfilled. The user can select from the following options:
MAKE ALL: This will create WOs for all requirements regardless of any available inventory held in stock.
ALLOCATE AVAILABLE & MAKE BALANCE: This will allocate any available inventory and generate a WO for the remaining balance.
ALLOCATE AVAILABLE ONLY (MAKE NONE): This will allocate any available inventory only. No additional WOs will be created.
| MAKE SUGGESTED MANUFACTURING QTY: | This will create WOs for the system calculated suggested quantity. This takes into account the SO line requirement along with batch and MOQ quantities. |
Selecting one of the above options will update the Qty To Allocate (FIFO) and/or the Raise WO Qty fields (highlighted in yellow) with the quantities the system has calculated based on the user’s selection. Clicking ACCEPT will action the user’s selection and allocate or generate work orders as decided and any selected documents will be generated and printed as selected.
NOTE: Although the user has the options above to quickly decide whats required, the user should always review the RAISE WO QTY figures to ensure they are correct. Discrepancies in available stock can impact the figures set by the system and could result in incorrect work order quantities or missing work orders.
Overview
This option present the user with an overview of sales orders. The user can select a range of sales orders and see all the associated information in one place as well as allow them to add notes quickly to any other related item, and also see the details of associated WO's BOM and routing, etc. When the user clicks this option, they will be presented with the following screen.
The grid filters at the top of the screen allow the user to filter for the sales orders they wish to view, including by any sales order user-defined fields (UDFs) set up against the sales orders.

Once the relevant filters have been applied, the user can click the REFRESH option to display the sales order information.
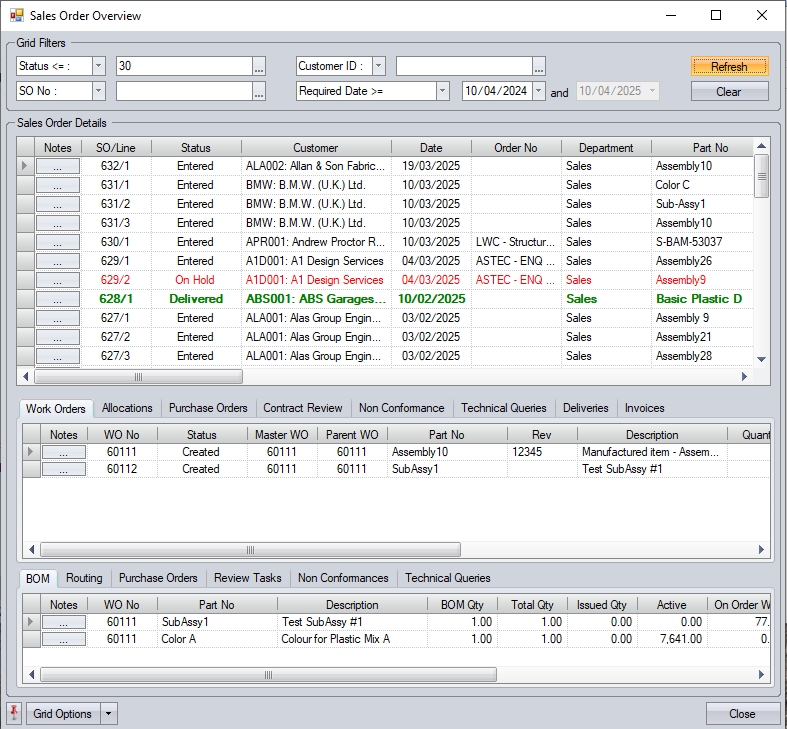
The first section of this screen shows the sales order details.

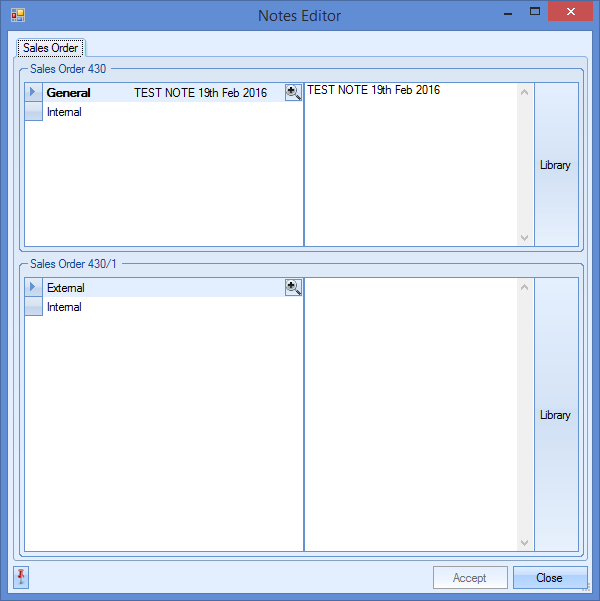
This allows the user to see all the relevant details for each of the sales order lines but also allows them to access the NOTES section using the ![]() option at the start of each line. Clicking this option presents the user with the Notes Editor window which allows them to add comments/notes in relation to the selected sales order and sales order line via the top and bottom half of the window.
option at the start of each line. Clicking this option presents the user with the Notes Editor window which allows them to add comments/notes in relation to the selected sales order and sales order line via the top and bottom half of the window.
Once any notes have been added, the user can click ACCEPT to save the details. CLOSE will return them to the main Overview screen.
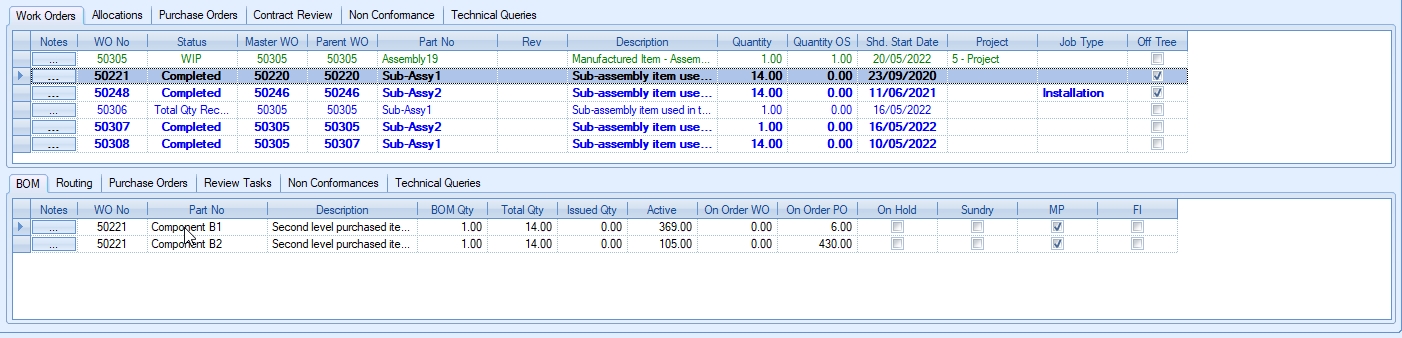
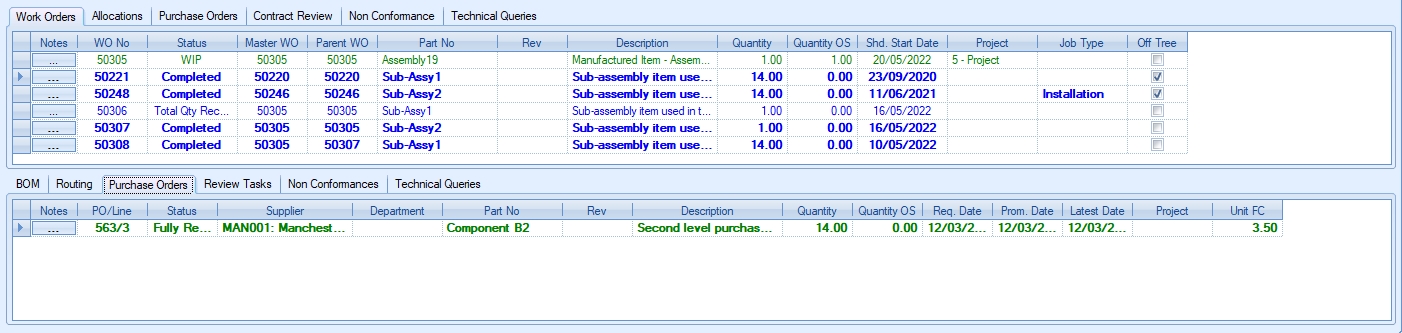
The middle section of the Overview screen shows the associated work orders, purchase orders, stock allocations, contract reviews, non-conformances, technical queries, deliveries and invoices for the selected sales order in the first section (i.e. anything that's linked to the selected sales order).
Selecting the relevant tab will show the associated details. Purchase orders listed here will be orders which are directly linked to a sales order line. This will be when something is being purchased to sell on to the customer without the need for a works order.

(associated work orders)
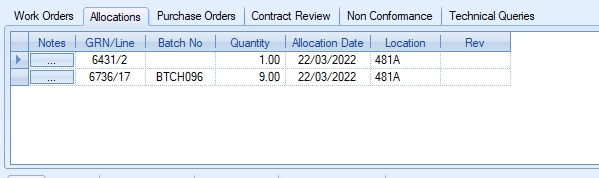
(associated stock allocations)

(associated purchase orders)
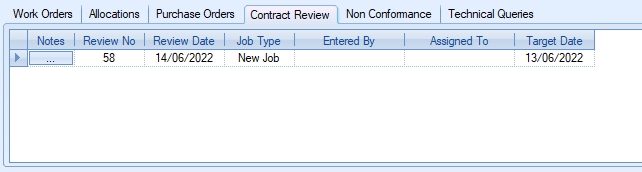
(associated contract reviews)

(associated non-conformances)
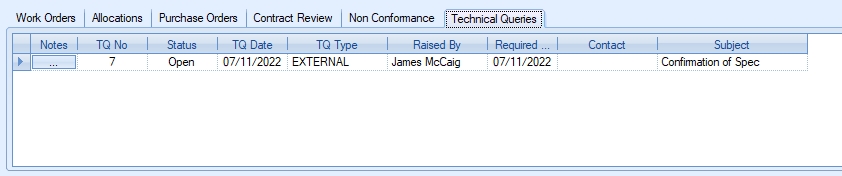
(associated technical queries)

(associated deliveries)

(associated invoices/credits)
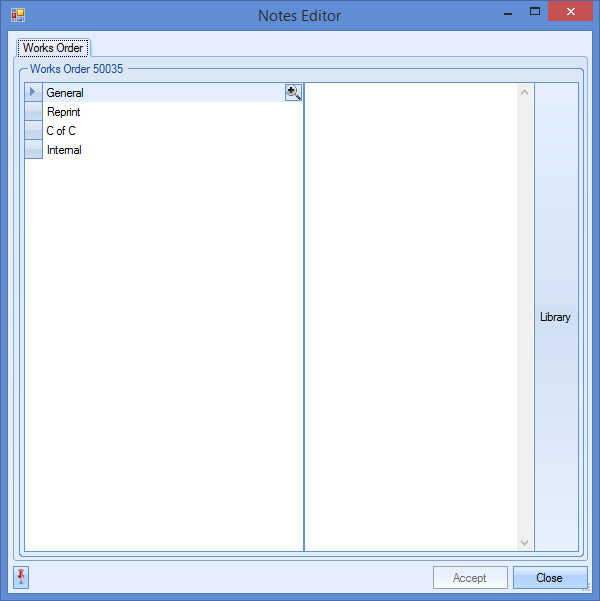
Again, like the first section, the user can click on the NOTES option, ![]() , to access the Notes Editor window to add notes to any of the associated items as required. This will present the user with the relevant notes sections for the work order, allocations, purchase order, contract review, non-conformance, technical query, delivery or invoice selected. The below screen shows the notes related to a work order for example.
, to access the Notes Editor window to add notes to any of the associated items as required. This will present the user with the relevant notes sections for the work order, allocations, purchase order, contract review, non-conformance, technical query, delivery or invoice selected. The below screen shows the notes related to a work order for example.
The final section of the Overview window allows the user to see the details of any item highlighted in the middle section. For a selected work order, the user can see the BOM, routing, associated purchase orders, outstanding contract review tasks and technical queries for the work order selected in the middle section.
(associated BOM of selected work order)
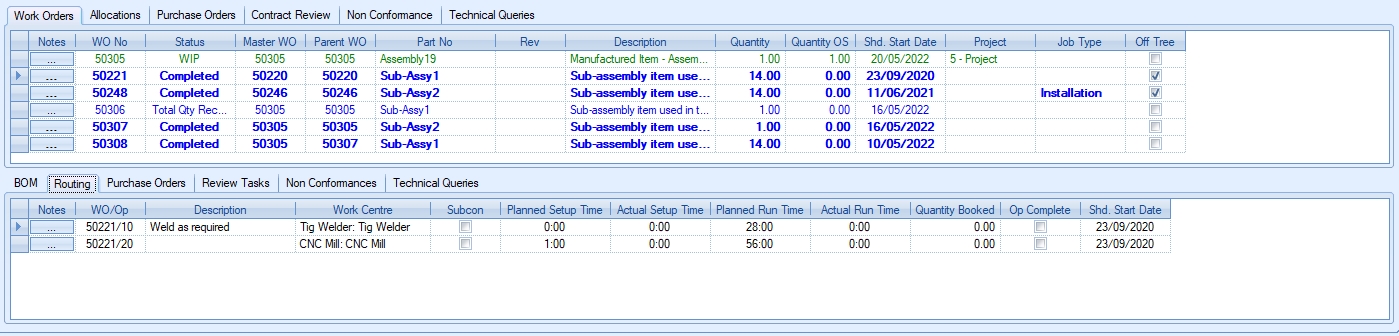
(associated routing of selected work order)
(associated bookings of selected work order)
(associated purchase orders of selected work order)
(associated non-conformances of selected work order)
(associated technical query of selected work order)
All items listed in the last section are related to the selected work order, all except the Review Tasks tab, which shows the selected tasks of the associated sales order contract review.
Again, like the previous sections, the user can click on the NOTES option to access the Notes Editor window to add notes to any of the associated items as required. Below are some examples of the notes screens for the details shown in the final section of the screen.
(Notes for work order BOM item)
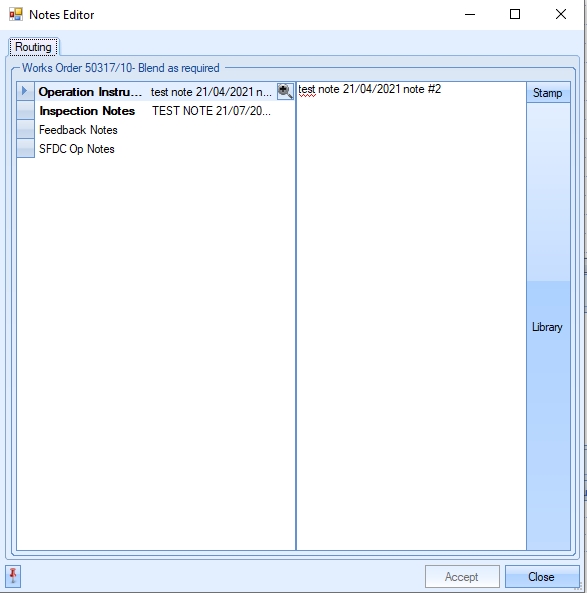
(Notes for work order routing operation)
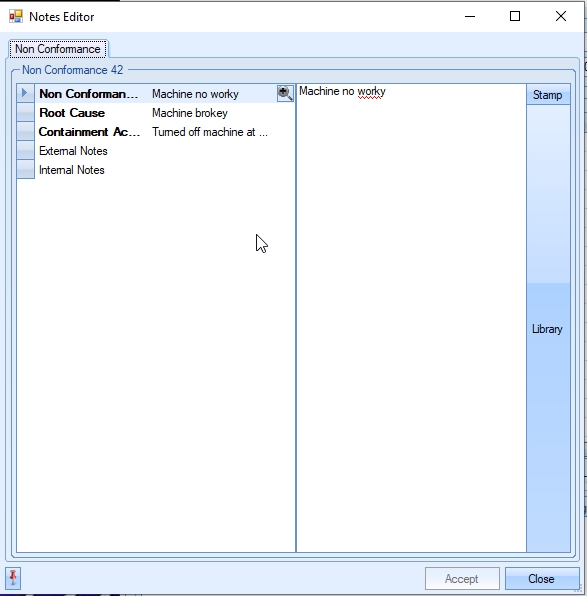
(Notes for work order non-conformance)
SO Expedite
This option allows the user to email customers to update them on their order(s).
NOTE: This option is only available if sending emails directly from Progress
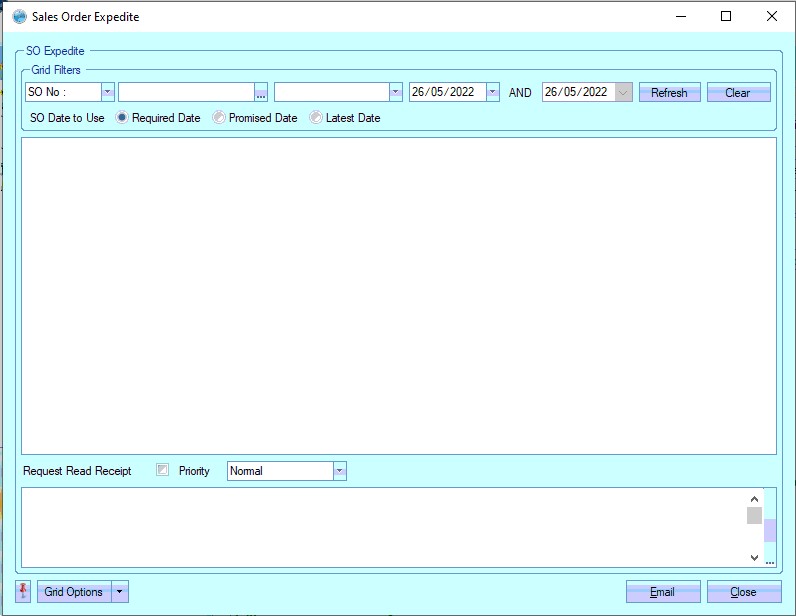
The user has filter options at the top of the screen to narrow down the list of sales orders they wish to see.

The SO Date To Use options allow the user to specify which date they wish to use. This also updates the date range filters to use the selected date.
![]()
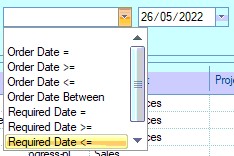
(Required Date selected)
![]()
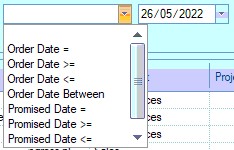
(Promised Date selected)
If the user wishes to see all orders, or once filters have been applied they can simply click REFRESH to see a list of orders that meet the filter criteria.
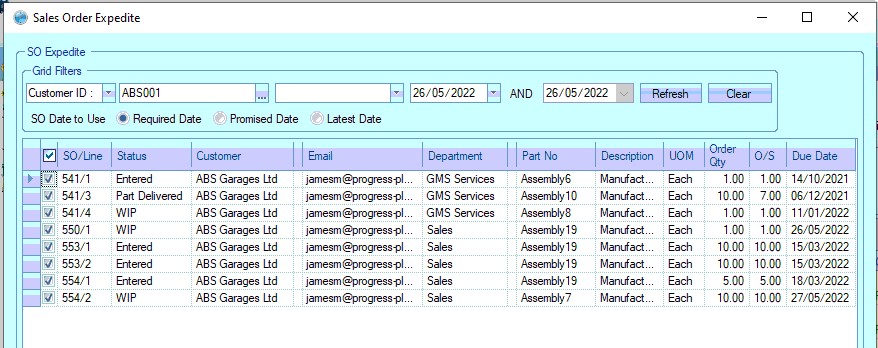
Once the list of sales orders is listed, the user can select which orders they are including in their email to the customer by ticking them individually or, if all are to be included, tick the column heading for all sales order to be selected.
The bottom section of the screen allows the user to compose an email to the customer, with additional options for read receipts and priority. The user's email signature will also be included in the message box if one is setup in Progress.

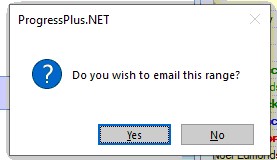
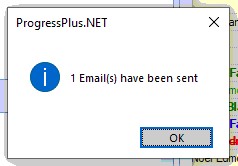
Once the user has entered their message to the customer, they can click the EMAIL option to send the message. Progress will ask the user to confirm the action, before also confirming the number of emails sent.
If the user has further emails to send to other customers, they can repeat the steps above to get the list of sales orders they require. If done, the user can click CLOSE to return to the main sales order screen.
Export
This option allows the user to export the current list of sales order shown on the sales order screen to Excel. The user can use the filters at the top of the sales order screen to filter the sales orders displayed as previously described.
Once the user has filtered as required, and clicked Refresh to update the sales orders listed, clicking the Export otion willask the user to create a file to export the data to.

The user can specify a file name and click SAVE to create the file. The file will then be opened automatically in Excel for the user to use.

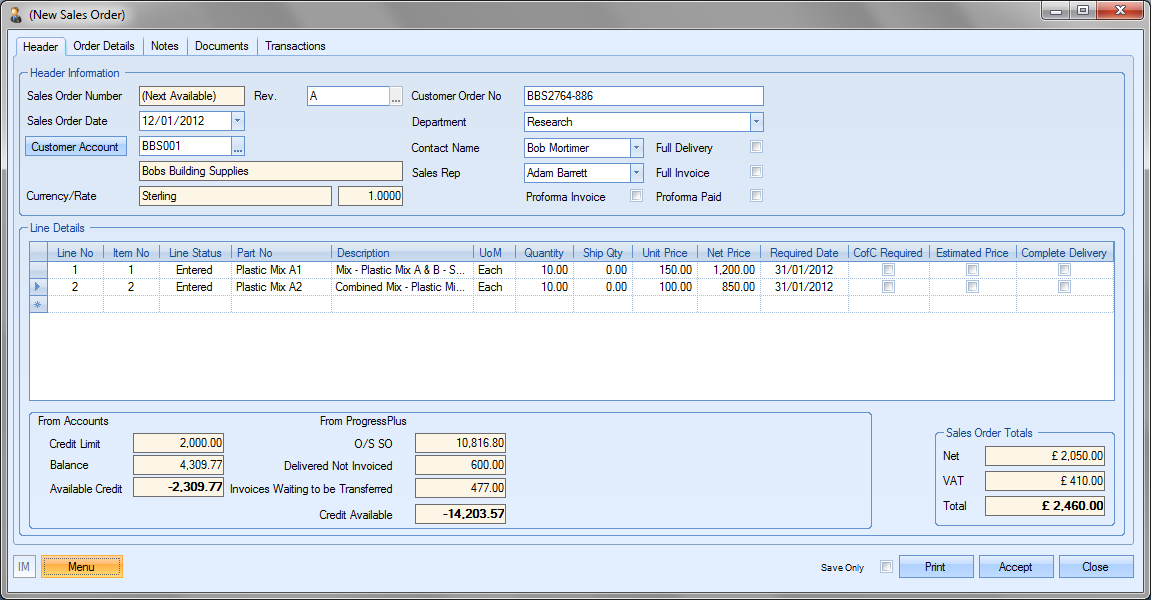
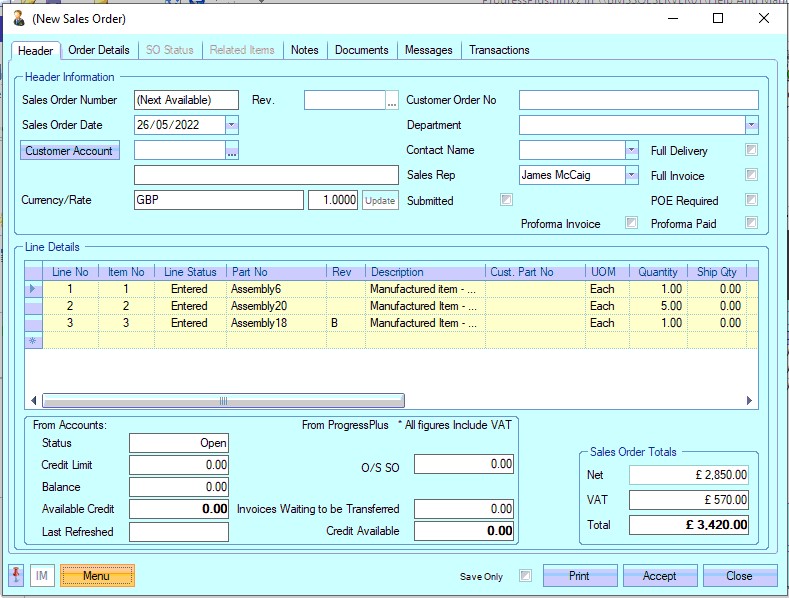
New Sales Orders
The user can create a standalone sales order (i.e. not created from an enquiry) by clicking on the NEW option at the top of the sales order screen. This will present the user with the new sales order window.
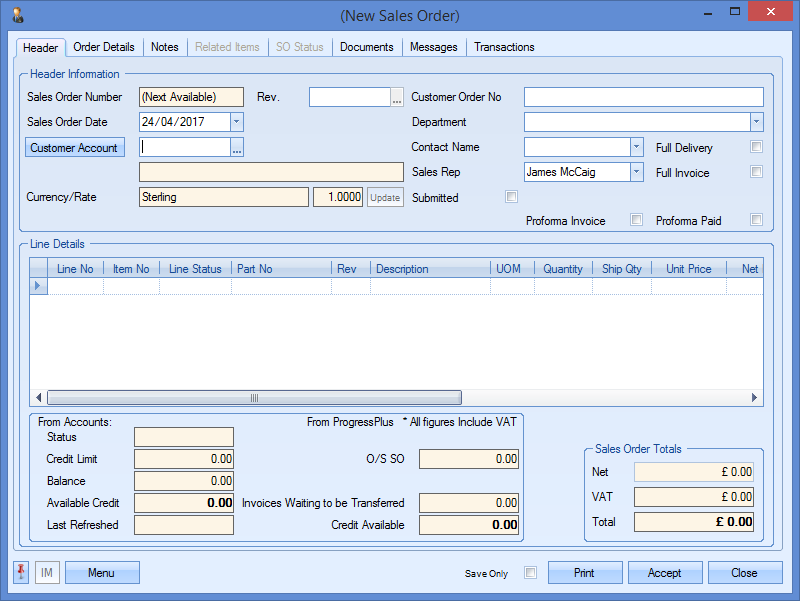
From here, the user can start to enter the necessary details for the new sales order. Progress will allocate the next available enquiry number once the user creates the enquiry. This is allocated when the user clicks the Accept option. The sales order date will default to the current date.
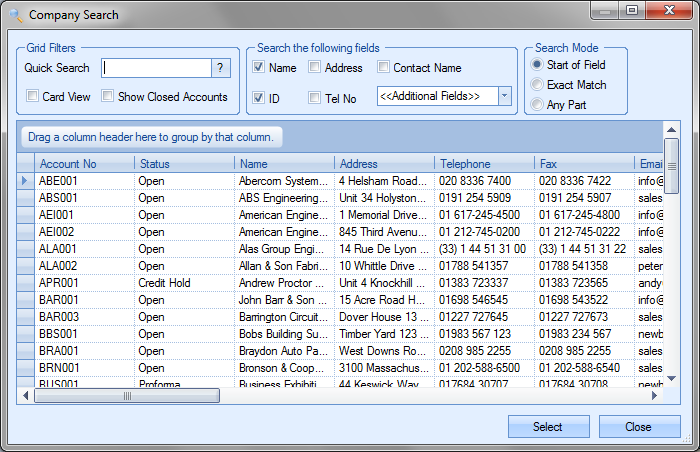
The user must select the customer using the CUSTOMER ACCOUNT field at the top of the form. The user can click on the search box,![]() , to display the customer search window. The user can highlight the customer and click SELECT to choose the customer required and return to the new sales order window.
, to display the customer search window. The user can highlight the customer and click SELECT to choose the customer required and return to the new sales order window.
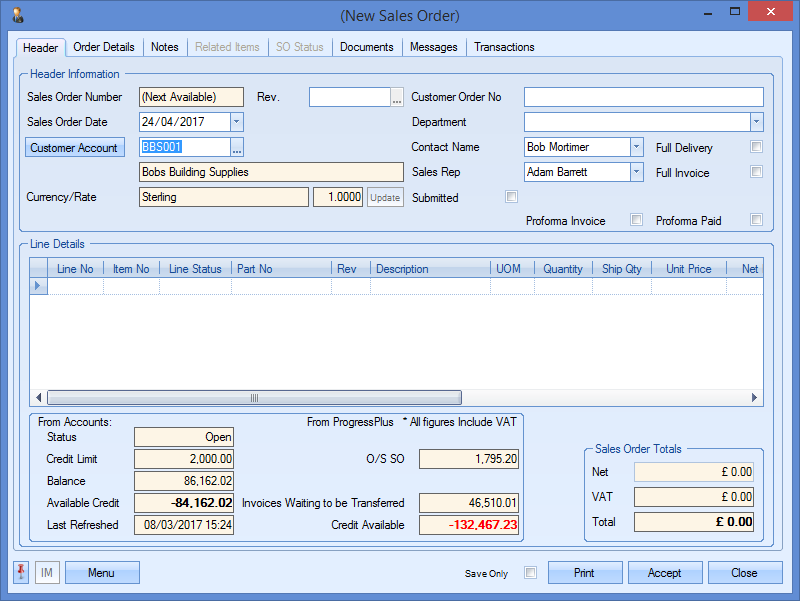
Once the customer is selected, the sales order window is updated with the customer’s details. If the customer has a default Contact and/or a default Sales Rep set up, this information is pulled through to the sales order. If these have not been specified against the customer, the user can select a Contact and Sales Rep name from the drop-down lists available.
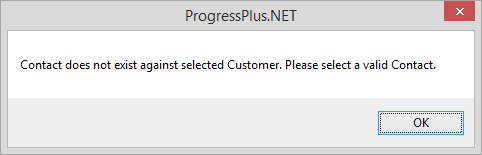
NOTE: Selection of the contact can be restricted to valid customer contacts using a one of the system options in the Admin section of Progress. This option makes it mandatory to select only from the existing contact list for the customer. The option to switch this on is shown below and is accessible in the Miscellaneous system options.
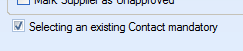
Trying to enter a contact name which doesn't already exist against the customer results in the following warning appearing.
As well as displaying the default customer information, Progress will also display the latest credit and customer status information for the customer from Sage if the accounts link is in use between Sage and Progress. The credit limit and balance figures are displayed from Sage with the Available Credit value calculated as:
Available Credit (a/c) = Credit Limit – Balance
The remaining values displayed are based on information already within Progress for this customer.
| O/S SO: | Total value of all SO items still to be shipped to the customer. |
| Delivered Not Invoiced: | Total value of all deliveries to customer still to be invoiced. |
| Invoices Waiting To Be Transferred: | Total value of invoices waiting to be transferred to Accounts package. |
| Credit Available: | Calculated based on all other fields shown. Value is calculated as: |
| Avail. Cred (a/c) – O/S SO – Del. Not Inv – Inv. Wait. Trans |
If the user wishes to specify a revision for the sales order, this can be added in the Rev field at the top of the window.
![]()
Initially, the user can enter a revision (1, A, etc). Subsequent revision changes will capture the date and user making the revision change and allow the user to add notes in relation to the change.
The user can also specify a Customer Order No if known, although this can be added later if still to be confirmed. Amending the customer order number at a later date is possible, however, there may be work orders raised which were created based on the original customer order number. To ensure any changes made to the customer order number in the sales order are reflected in any linked WOs, the system option below will result in the system prompting the user to update the linked WOs.
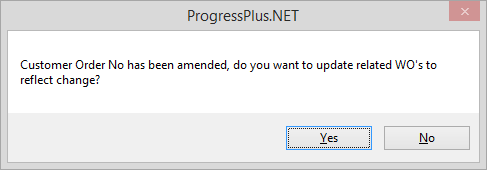
Clicking YES will flush the changes through to any linked WOs.
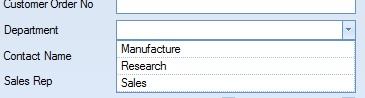
If the sales order is to be recorded against a specific internal department, the user can select a value from the list of Departments set up in Progress within the List Maintenance section.
The user also has some additional parameters they can set against the SO.
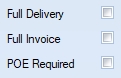
![]()
The Full Delivery option enforces complete shipment of the sales order items. Only when the entire order is allocated and ready for delivery will the user be able to create the delivery.
The Full invoice option ensures that the sales order is invoiced in its entirety. Any deliveries made while the SO still has outstanding items cannot be invoiced until all lines have been delivered.
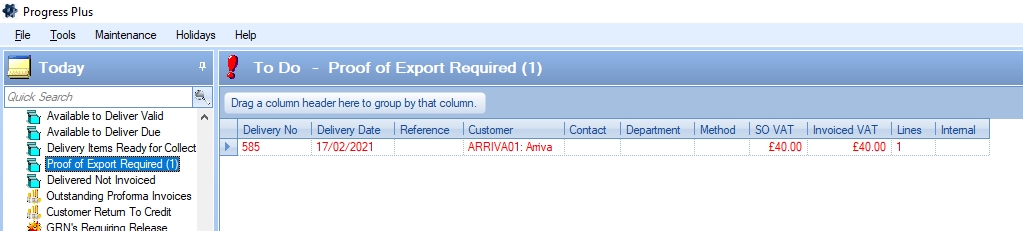
The POE Required option allows the user to indicate if a Proof of Export (PoE) is required by the customer. Any deliveries created for this sales order will have the PoE option ticked too based on the sales order. Once the delivery is created, it will be highlighted on the Proof of Export Required screen on the Today > To Do section. This allows someone to action as required.
The Proforma Invoice option indicates whether the customer has to pay for the order in advance of shipment. Ticking the Proforma Invoice option will stop delivery until the sales order record is updated to have the Proforma Paid option ticked. This would then allow the delivery to be created.
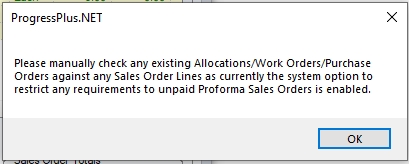
If the Proforma option is ticked and the system is configured to stop highlighting of requirements for proforma orders and/or sales order already has allocated stock assigned to the sales order lines, the system will warn the user of this to ensure they are aware that there is stock assigned for delivery. The user should ensure any existing requirements, orders, etc. are checked.
Once all the information is entered at the top of the sales order record, the user can now start to enter the details of the parts being sold. The user can enter the details into the first blank line shown, then repeat for any subsequent parts.

| Line No: | This is the sales order line number. This is set by Progress. |
| Item No: | This defaults to match the sales order line number, but can be amended to reflect the line number on the customer order if preferred. |
| Line Status: | This is the status of the sales order line. Defaults to ENTERED status upon creation. The status of the line changes to indicate the status of the order depending where it is in the process of being completed. The statuses displayed are as follows: |
| ENTERED: Default status of new sales order line. Indicates order is on system, but job has not been started yet. |
| WIP: Indicates associated work order has started and is in progress. |
| PART DELIVERED: Indicates part of the required qty has been fulfilled, but there is still an outstanding quantity to be delivered. |
| DELIVERED: Indicates full required quantity has been delivered to customer. |
| INVOICED: Indicates sales order line has been invoiced. |
| CANCELLED: Sales order line has been cancelled and is no longer a requirement. |
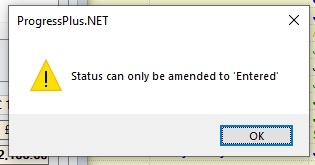
NOTE: If a sales order line is marked as CANCELLED, it can be reinstated to ENTERED status ONLY. Any previously associated work orders, purchase orders or allocations need to be reassigned. Any attempts to assign a status thats not valid will result in teh user being informed as such.
If the sales order line is relinked with work order(s), purchase orders(s) and/or allocations, the sales order line status will recalculate to the correct status (i.e. WIP) when the sales order is reopened.
| Part No: | This is the Progress part number to be shipped to the customer. |
| NOTE: This is a mandatory field. Each sales order line must have a valid part number. |
| Revision: | This is the revision of the part being sold. This will default to the selected part number's current revision, but the user can select a specific revision they have stock of other revisions or the customer requests a specific revision. |
| To change the revision, the user can drill into the revision field, to select one of the valid revisions recorded against the part number. |
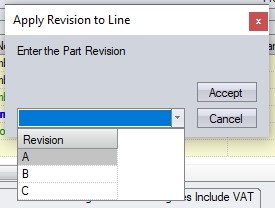
If the required revision doesn't exist against the part number, then the user will have to add this to the part before it can be selected on the SO line.
If the user changes the revision on the SO, the system will check existing allocated stock and associated WOs to ensure they are also at the same part revision.
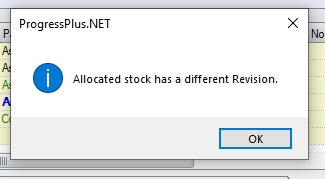
(Warning when SO line revision is different from current allocated stock)
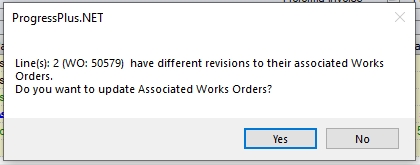
(Warning when SO line revision doesn't match associated WO revision)
| Description: | Displays the selected part number’s description as held in the part’s inventory record. |
| UoM: | Displays the part’s unit of measure (UoM) as recorded in the part’s inventory record. |
| Quantity: | This is the quantity requested by the customer. |
| Ship Qty: | This is the total quantity shipped so far against the sales order line. |
| Unit Price: | This is the individual selling price of the part. |
| Net Price: | This is a calculated field and is the total NET value of the sales order line. Calculated as: |
| NET Price = Quantity* Unit Price (with discount or surcharge % applied) |
| Required Date: | This is the date the customer requires the quantity of parts ordered. Setting this date will also set the Promised Date and Latest Date to the same date. If the user sets this to a date which is a factory holiday in Progress (i.e. when they are closed for business), the system will warn the user accordingly. |
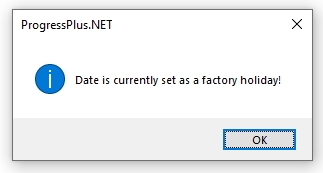
| Promised Date: | This is the date the user/company is committing to. Setting this will update the Latest Date too. If the user sets this to a date which is a factory holiday in Progress (i.e. when they are closed for business), the system will warn the user accordingly. |
| Latest Date: | This date is used to catch any further slippage in dates if the order is not delivered against the Required or Promised dates. If the user sets this to a date which is a factory holiday in Progress (i.e. when they are closed for business), the system will warn the user accordingly. |
| CofC Required: | This option specifies whether the shipment of this part requires a certificate of conformance. Selecting this option will result in this being indicated when the delivery is created. |
| Estimated Price: | This option specifies whether the unit price used on the sales order is an estimated price. This allows for the sales order to be created and processed with an estimated price, but stops a final invoice being created until the unit price on the sales order is verified and confirmed (estimated price tickbox is cleared). This option is controlled from the System Admin options of Progress. The admin option determines whether this option is available for use. For more information, refer to the System Admin Options section of this manual. |
![]()
| Complete Delivery: | This option specifies whether this specific sales order line requires full delivery. Only when the full qty is allocated to the sales order will the user be allowed to create a delivery. |
Once the order details have been entered, the screen will look something like the following
NET Total
The NET figure will show the total value of the sales order created. If a discount has been applied to any of the sales order lines, the NET figure will have an asterisk (*) shown against it to highlight this.
![]()
![]()
VAT Total
When a new sales order is created, the individual lines will default to the VAT rate specified against the customer. However, if the order contains a mix of VAT rates across the different line items, the system will highlight this by showing an asterisk (*) against the VAT total figure shown at the bottom right corner of the sales order.
![]()
![]()
Cancelling SO Lines
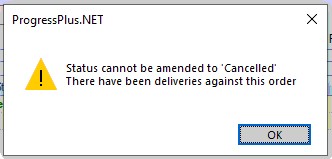
Where existing SO lines need to be cancelled, the user can do this by changing the line status to "Cancelled". Sales order lines which have shipments recorded against them cannot be cancelled, with the system informing the user as such. The system will also highlight if invoices have been raised against the SO line, however, this will not stop the user from cancelling if they choose to do so as long as no deliveries have been made.
When cancelling an SO with deliveries against it

When cancelling an SO with just invoices against it
Once the line has been cancelled, the system will highlight any associated work orders or purchase orders that are tied to the SO line.
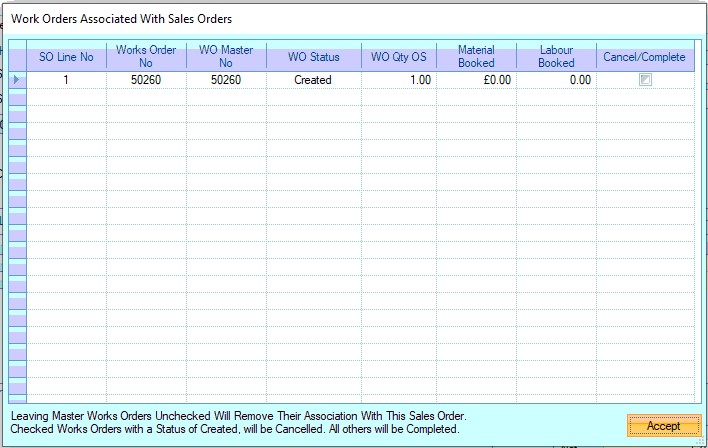
Cancelling associated WOs
Where there are linked WOs, the system gives the user the option cancel them or keep them. If the user chooses to cancel the associated WOs, the system will automatically update the status of all those selected in the screen above. If the user chooses to not cancel the WOs, then these will be updates so they are no longer linked to the cancelled SO line.
Where there are linked POs, the system highlights this to the user with a message.
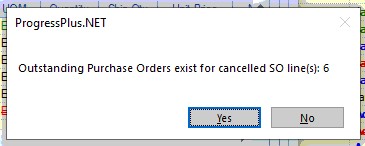
NOTE: No changes are made to the PO line. Cancellation of the PO line is left for the Purchasing department to make a decision on it and to contact the supplier with a revised PO if required.
Order Details
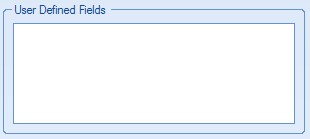
This section of the sales order allows the user to view and amend contact information as well as any User Defined Fields set up to be recorded against the main sales order information.
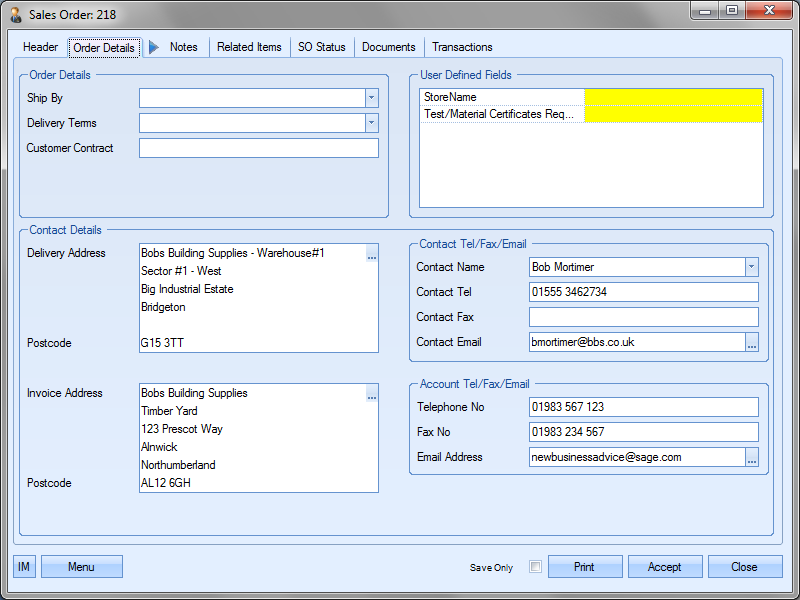
The user can specify specific SHIP BY and DELIVERY TERMS as well as record any CUSTOMER CONTRACT number that this sales order may refer to.
The SHIP BY and DELIVERY TERMS can be selected from the drop-down list. Both lists are maintained in the List Maintenance section of Progress.
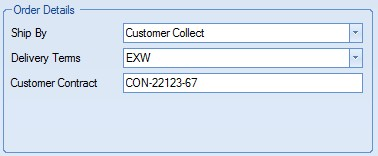
Any User Defined Fields that have been configured to be recorded against the main sales order data will be displayed in the appropriate section of this screen.
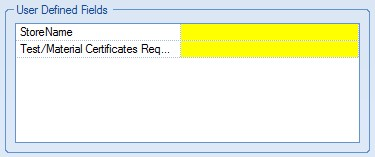
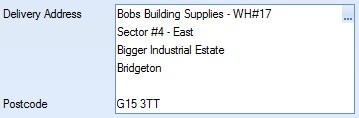
The bottom half of the screen shows all the contact information for the customer. This includes addresses, both delivery and invoice, as well as the default contact and customer information.
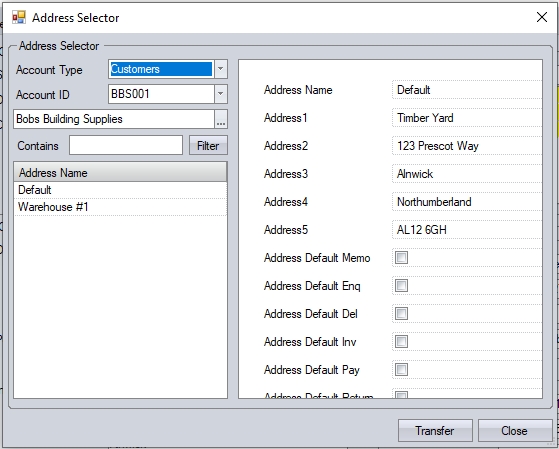
The default delivery and invoice address will be displayed here based on the information set up against the customer. If nor alternative addresses have been set up for delivery or invoicing, the customers main address will be displayed for both. If either of the addresses need to be changed to an alternative address that has been set up for the customer, the user can click on the ![]() option beside either address to select another address from the system. This will present the user with the Address Selector form that they can use to find and select the address required.
option beside either address to select another address from the system. This will present the user with the Address Selector form that they can use to find and select the address required.
If either address needs to be amended to an address not already set up for the customer, the user can overtype the address as necessary.
Any changes made can be saved against the sales order by the user clicking on the ACCEPT option.
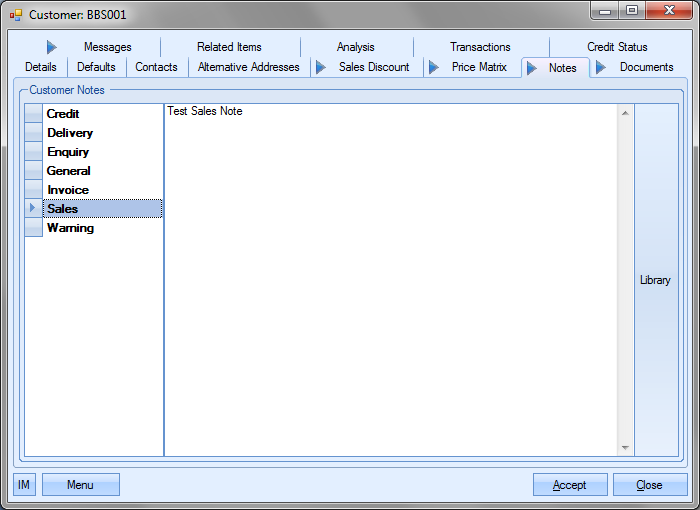
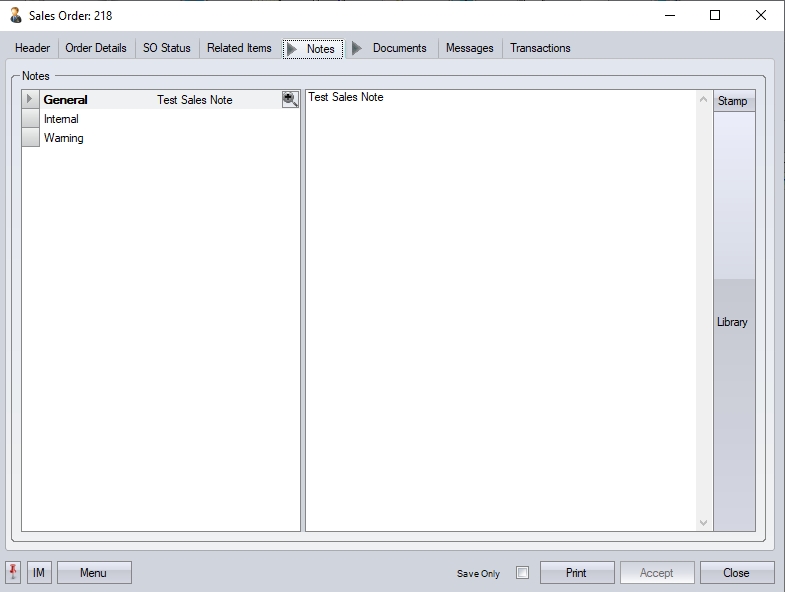
Notes
This section of the sales order allows the user to record a note against the sales order or select one from the Library List. If a customer sales order note has been set up against the customer record, this will default to this note section.
Any changes made can be saved against the sales order by the user clicking on the ACCEPT option.
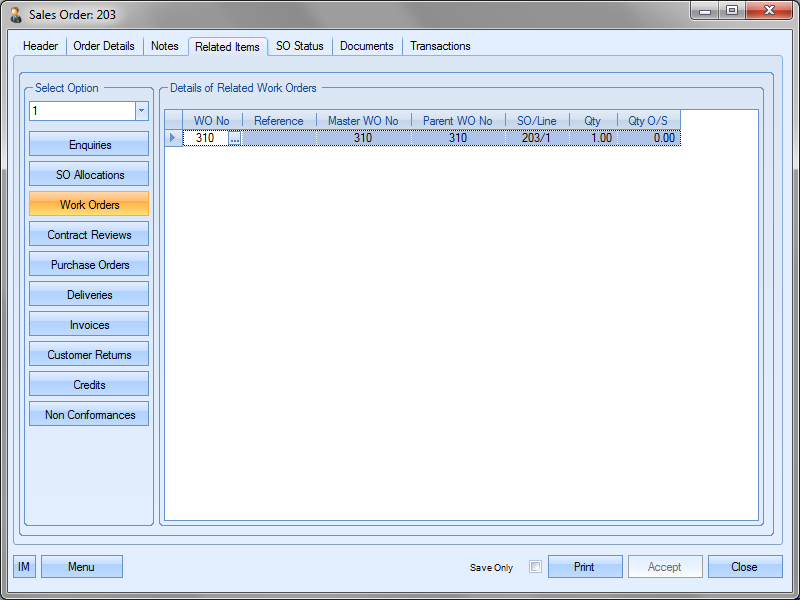
Related Items
This section of the sales order can be used to view any related records to do with the current sales order.
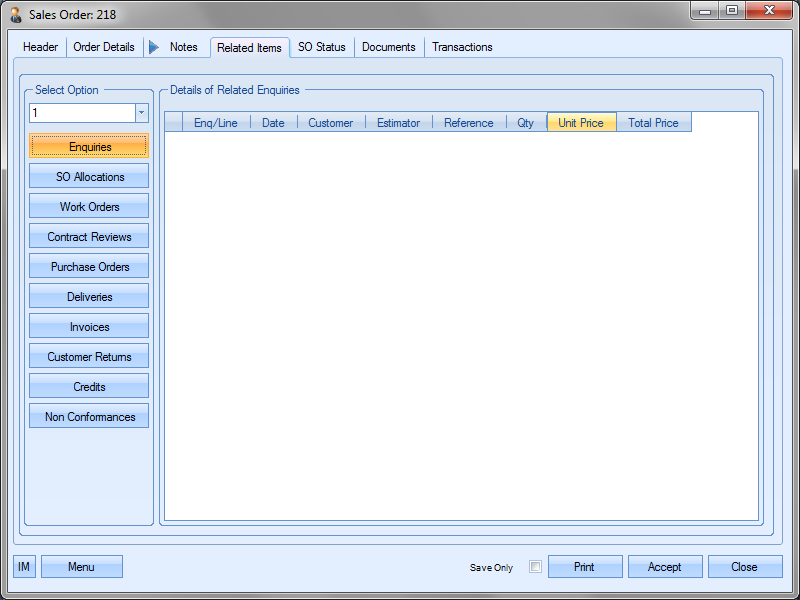
The user can select the sales order line number using the drop-down list at the top. This selects the criteria to be used for showing the related information.
| Enquiries | This will display all related enquiries to the selected sales order line. |
| SO Allocations | This will display all allocated inventory for the selected sales order line. |
| Work Orders | This will display all works orders raised against the selected sales order line. |
| Contract Reviews | This will display all contract reviews created against this sales order line. |
| Purchase Orders | This will display all purchase orders raised against the selected sales order line. |
| Deliveries | This will display all deliveries raised against the selected sales order line. |
| Invoices | This will display all invoices raised against the selected sales order line. |
| Customer Returns | This will display all customer returns made against the selected sales order line. |
| Credits | This will display any credits that have been raised against invoices for the selected sales order line. |
| Non Conformances | This will show all non conformances raised against the selected sales order line. |
Any information displayed under any of the options above can be accessed directly by clicking on the ![]() option against the displayed items as shown below.
option against the displayed items as shown below.
SO Status
This section of the sales order shows the status of each of the SO lines. When SO is initially created, it will simply list the line items with a status of "Entered" but this will update once WOs, POs or allocated stock is linked to the SO lines. Below are some examples of sales orders with different statuses.
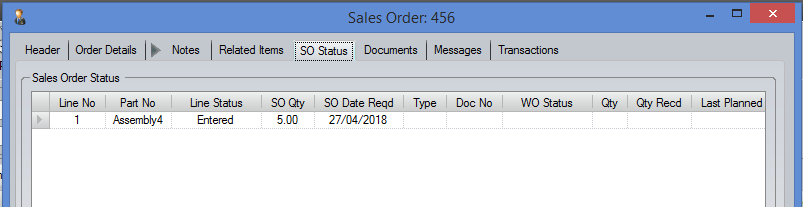
Initial sales order status
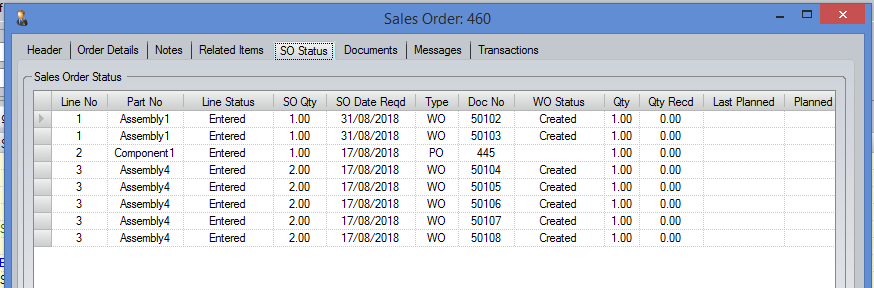
Sales order with linked WOs and POs
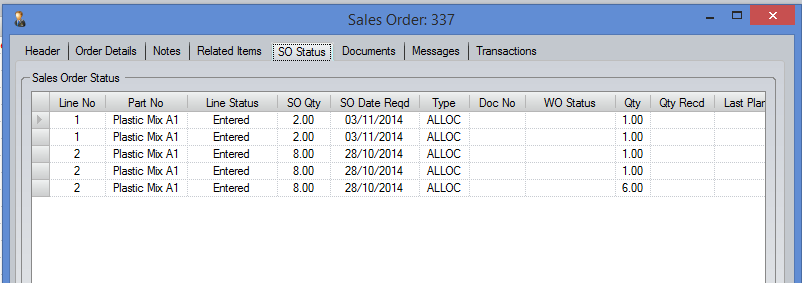
Sales order with allocated stock
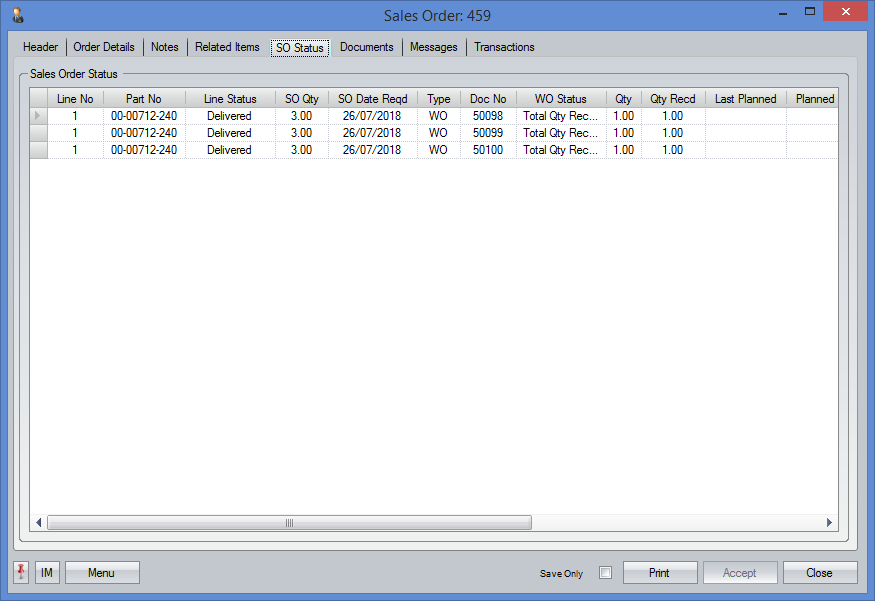
Sales order after being delivered
Documents
This section allows the user to add documents to the sales order.
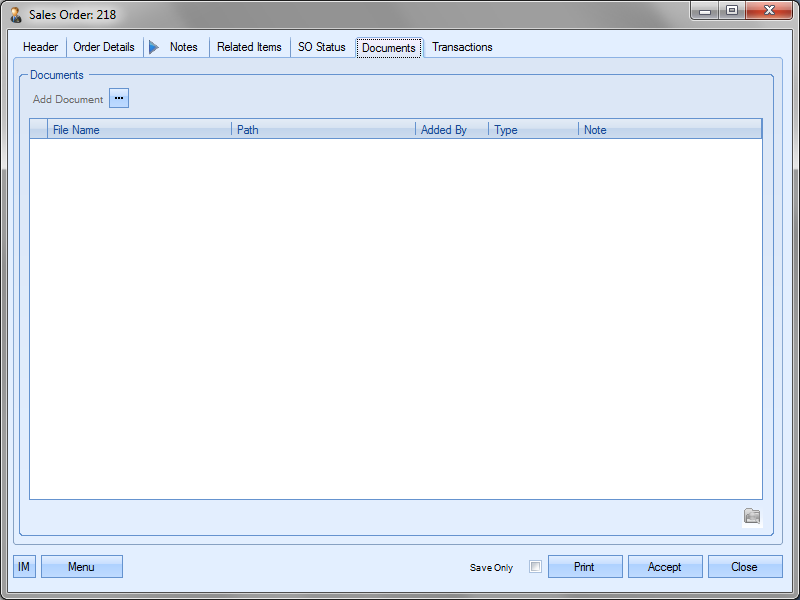
To add documents, the user must click the Add Document option. This will present the file selection window. The user can then navigate to the files before selecting them.
![]()
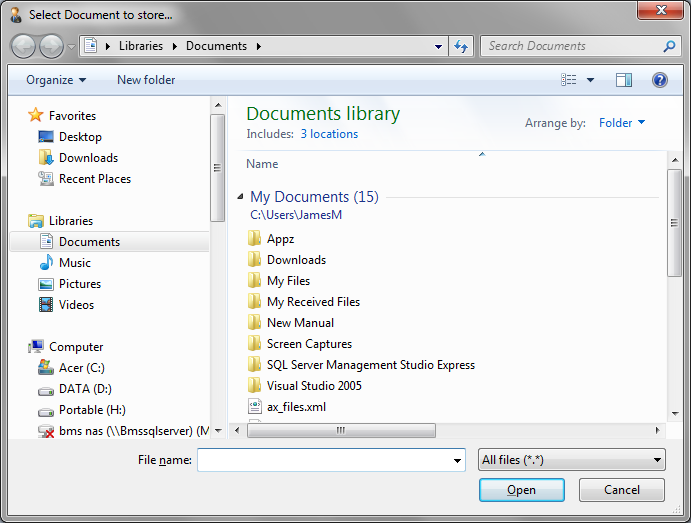
Once the user has selected the file required, clicking the Open option will add it to the document list on the sales order.
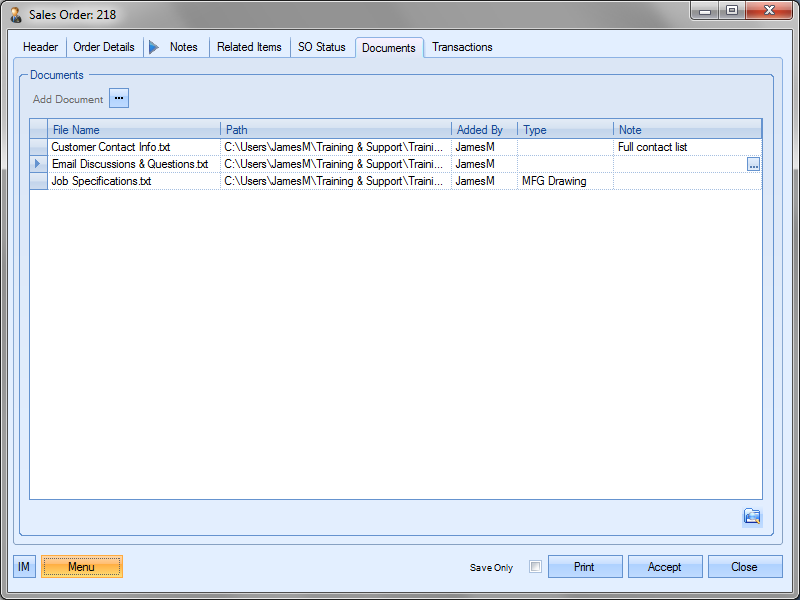
The user can add Document Types and notes to any documents added using the fields available. Any changes made can be saved against the sales order by the user clicking on the ACCEPT option.
Messages
This section shows all associated messages and emails relating to the sales order.
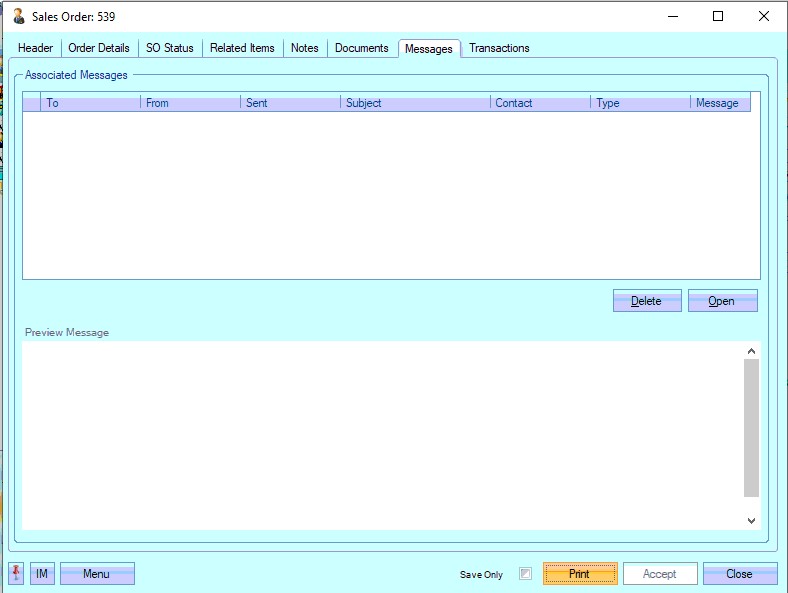
Any communication relating to the sales order (i.e. emails, instant messages, etc.) will all be listed here for the user to view.
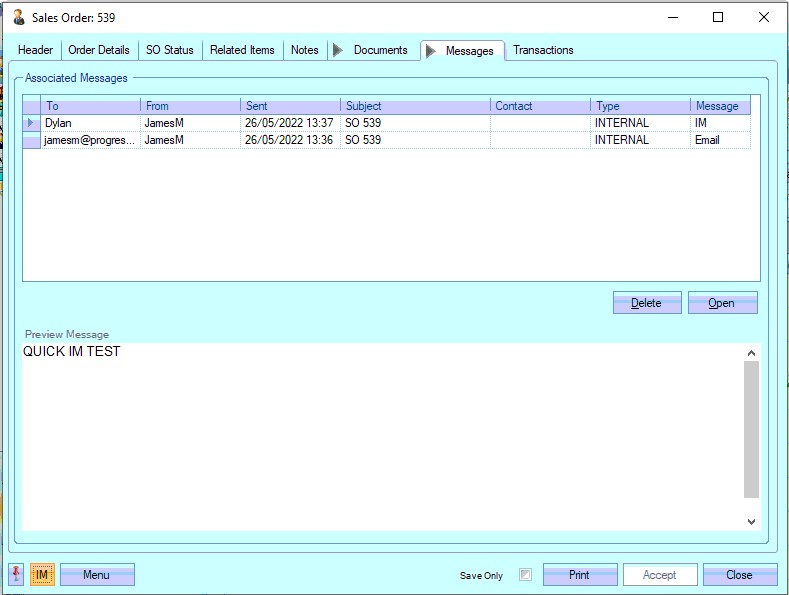
The user can open any of the items listed on this screen but either double-clicking on the listed item or by highlighting and clicking OPEN. The selected item will then be displayed for the user to view.
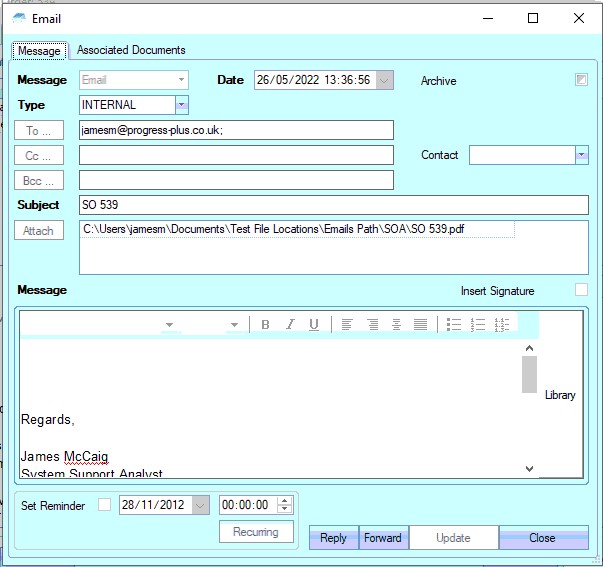
The user also has the ability remove messages recorded, if permitted. Permission to delete messages is set up against the user permissions. For more information on user permissions, please refer to the Administrator Functions > Access section of the manual. If the user has permission to remove messages, then the DELETE option will be available.
Messages can be deleted by simply highlighting the item and clicking the DELETE option. The user will be prompted to confirm the deletion.
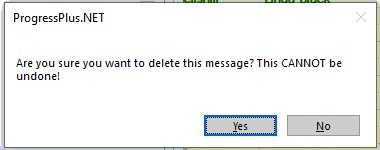
Clicking YES will delete the selected message, and the screen will be updated.
Transactions
This section shows a full list of transactions made against this sales order. The transactions are listed in chronological order with the latest transactions at the top.
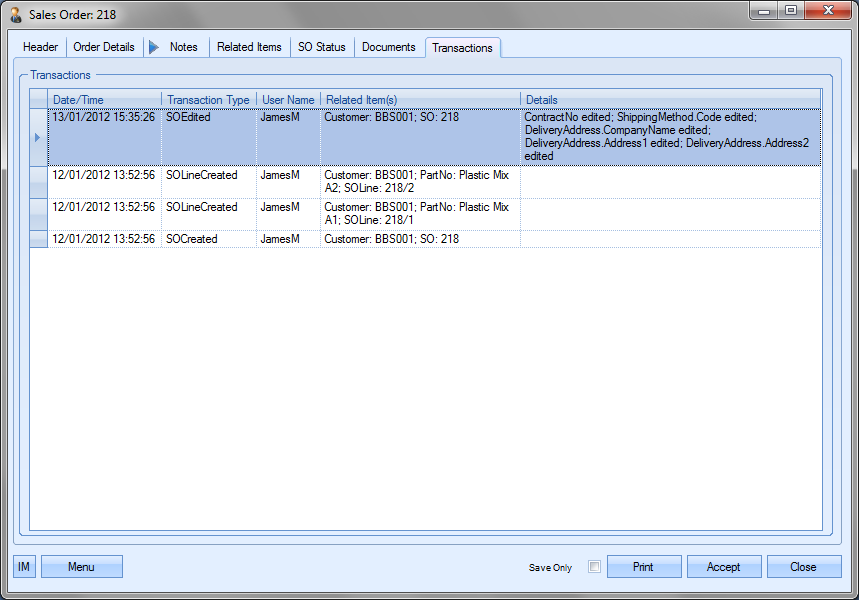
This can be used to trace what has happened to the sales order from the point it was created to its current state, with details captured of all transactions made against the order.
Save Only option
Changes to the sales order can be saved without opening either the contract review screen or the sales order line requirements screen by the user clicking the SAVE ONLY option at the bottom of the sales order screen.
![]()
Ticking this box and clicking ACCEPT will save any changes to the sales order, but will not trigger any of the subsequent screens that can appear.
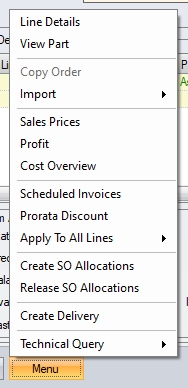
Additional Menu Options
Additional options for the sales order can be found in the MENU option at the bottom. This presents the following list of options.
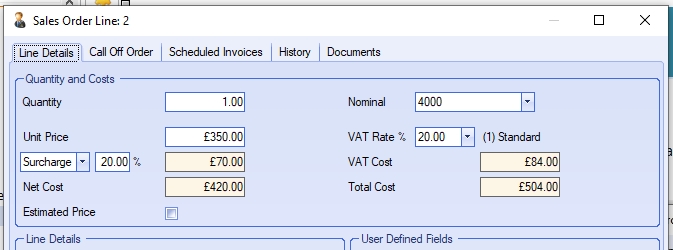
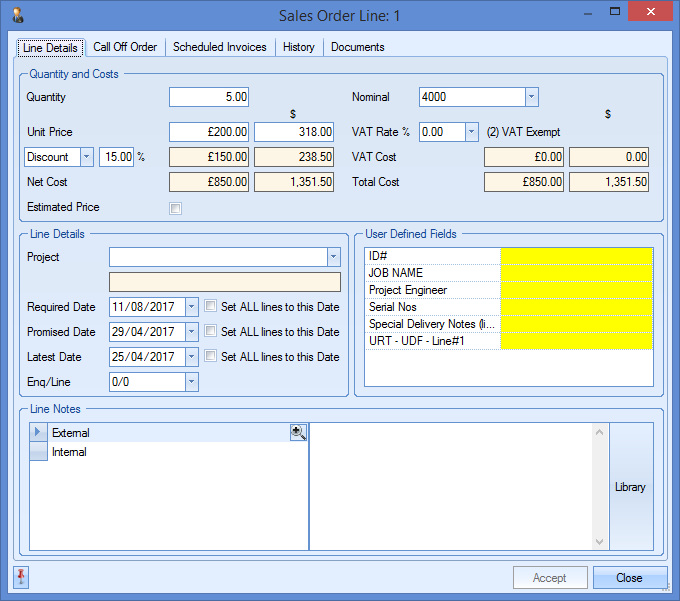
Line Details
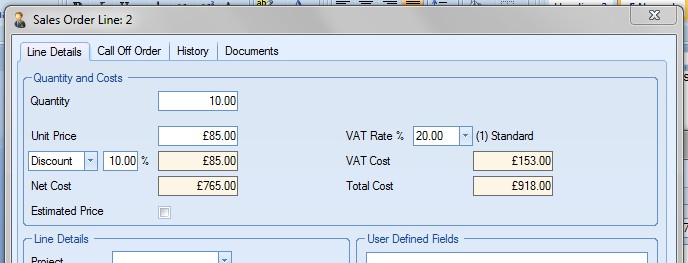
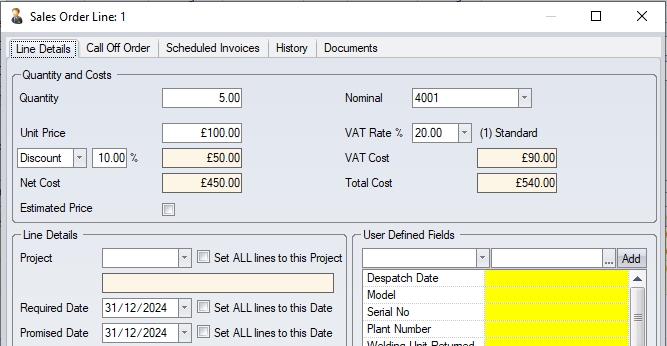
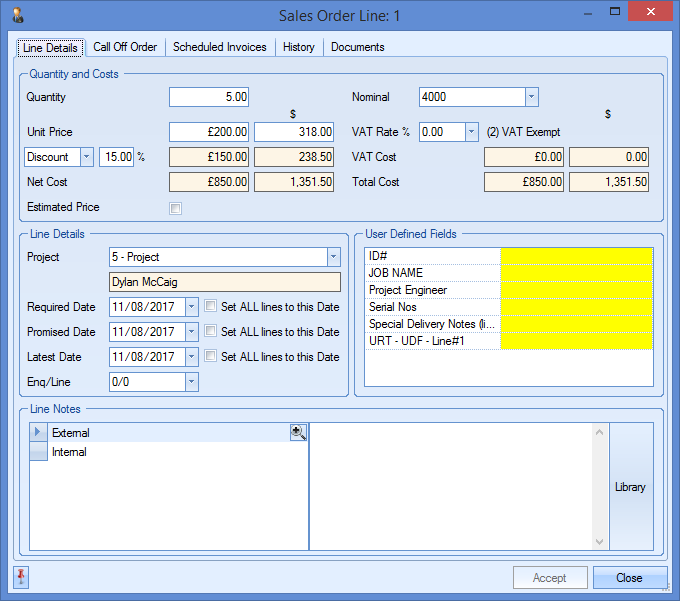
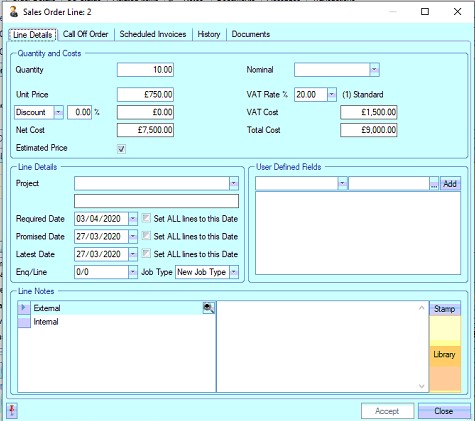
Further details for each sales order line can be viewed and amended in the sales order line details screen. Selecting this option presents the user with the following.
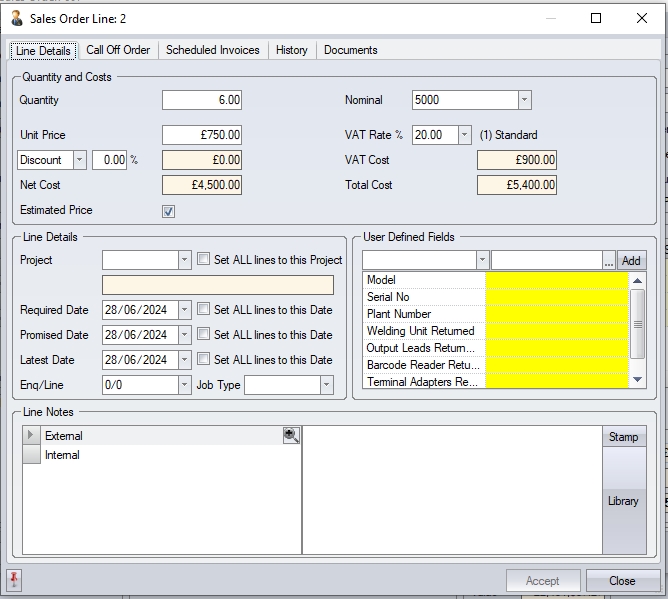
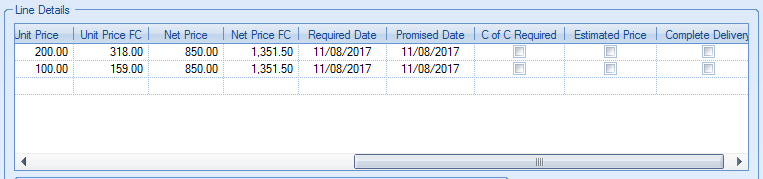
This displays a more detailed view of the sales order line selected. Any information entered on the main screen above will be pulled through to this screen when opened. The customer discount displayed is based on any discounts set up for the customer. For more information on customer discounts, please refer to the Customer section of this manual. If the customer has no discounts specified this will default to zero. All quantity, price, NET and Vat values show the same values as entered on the sales order line. If the order is for a foreign currency customer, then some additional fields are shown for the foreign currency values.
(Base currency customer)
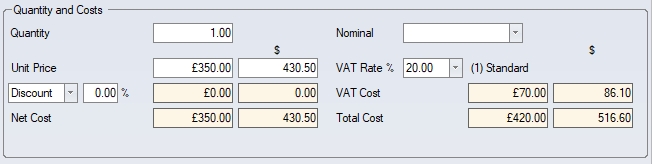
(Foreign currency customer)
The user can also link the sales order line to a specific project. The project can be selected from the drop-down list on this screen.
In addition to the REQUIRED date set on the sales order line, the user can also enter a PROMISED date and LATEST date. The PROMISED date is typically an agreed date that has been promised with the customer if the REQUIRED date cannot be achieved. By default, the PROMISED date matches the REQUIRED date, but can be amended on the sales order line. The LATEST date may be used if neither the REQUIRED date or PROMISED date can be met but a new date has been agreed with the customer.
The user can also update all other sales order lines accordingly using the SET ALL LINES TO THIS DATE/PROJECT options. This is particularly useful for large sales orders where all parts are linked to the same project and/or have the same REQUIRED, PROMISED and LATEST dates.
If any User Defined Fields (UDFs) have been set up for completion on the sales order lines, then these will be displayed in this window too.
Internal and external notes can also be recorded against the sales order line. These can be manually entered or can be selected from the Progress Notes Library.
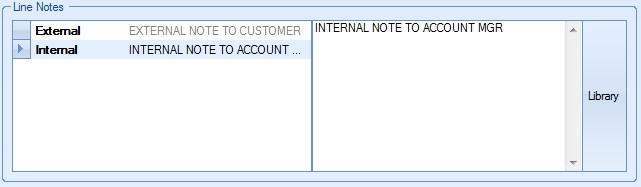
If the user wishes to select a note from the library, they can do so by clicking on the LIBRARY option. This will present the user with the library list of notes.
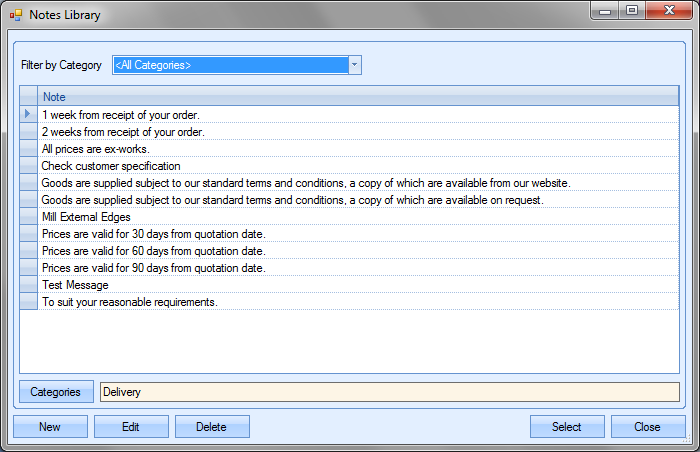
The user can filter the library list using the category drop-down list at the top of the window. For more information on using and amending the library list of notes, refer to the Notes Library section of this manual. Once the required note has been selected, the user can click Select option to pull this back through to the notes section of the sales order line.
Call Off
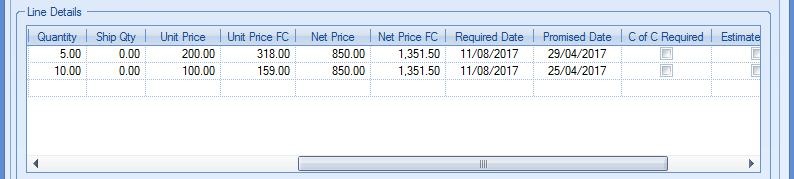
This tab allows the user to split down an initial SO line quantity into multiple call off quantities with the relevant dates.
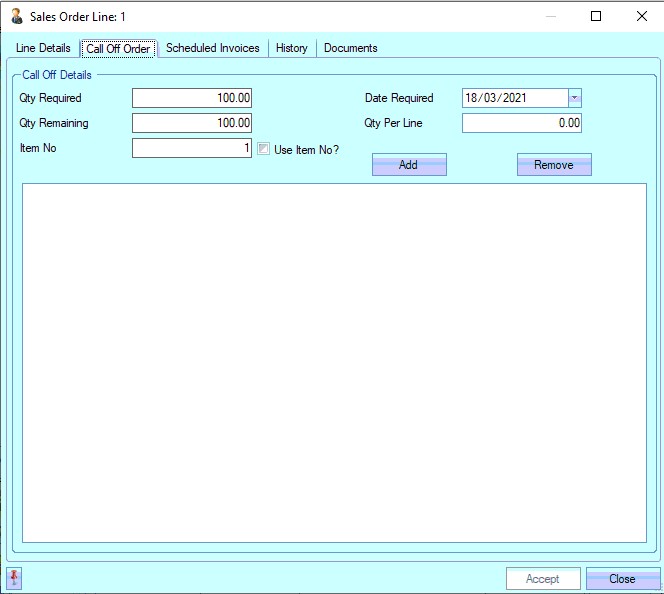
From here, the user can breakdown the SO line quantity into the required quantities and dates using the options at the top of the screen. The user can select the required date for the batch and also the quantity using the Date Required and Qty Per Line options. Once set, clicking the ADD option will add it to the grid below.
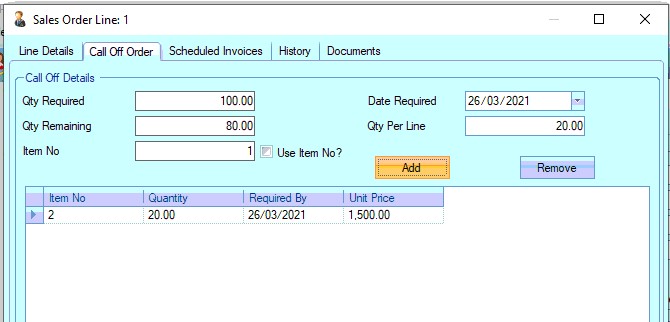
By default, the new SO lines will be assigned an ITEM NO value to match the LINE NO value, however, the user can retain the ITEM NO of the original SO line by ticking the Use Item No? option.
![]()
The user can repeat this process for as many "call offs" as they require. Once all have been created, clicking the ACCEPT option will create the necessary SO lines for the selected quantities and dates.
Scheduled Invoices
This section allows the user to create a schedule of invoices for the SO line. This is useful where invoices are to be raised at particular stages of the jog or on specific dates.
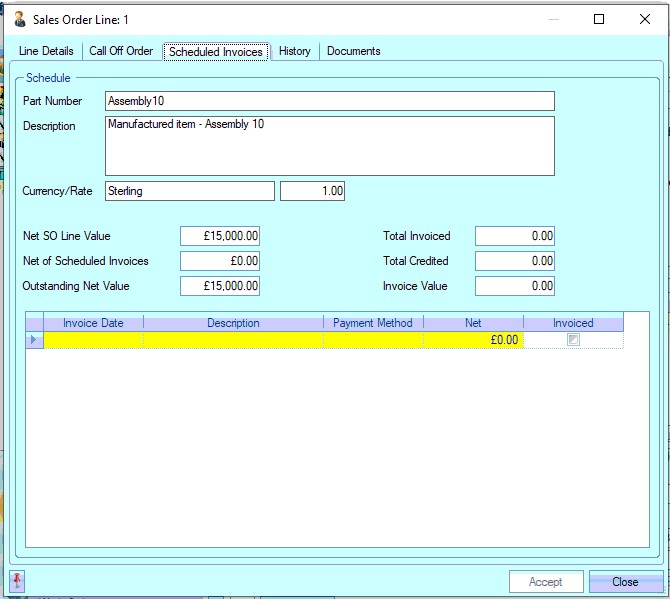
From here, the user can see all the sales value information including any invoice or credit values already raised against the SO line.
The user can add invoices dates and values using the grid at the bottom of the screen. As each scheduled invoice is created, the system updates the top-half of the screen to reflect the schedule.
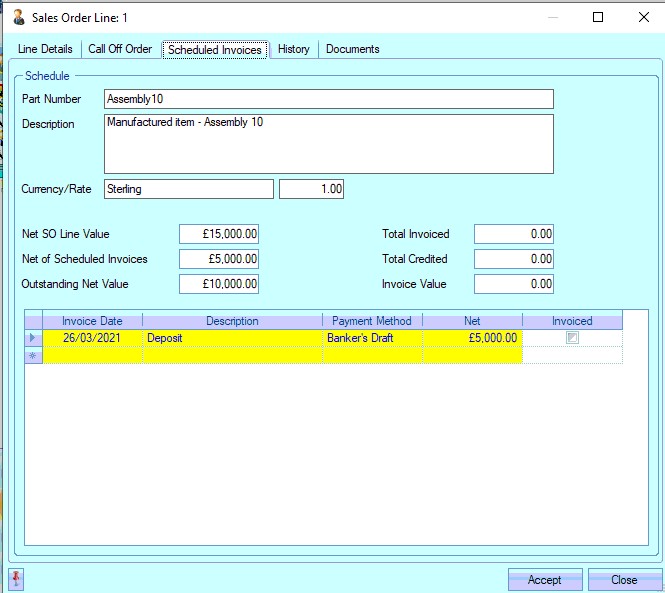
The user can add as many scheduled invoices as they require. Once they have been added, clicking ACCEPT will save the scheduled invoices and will highlight them on the Today > To Do > SO LIne Scheduled Invoices screen when they are due, allowing the user to create the invoices from the Today screen.
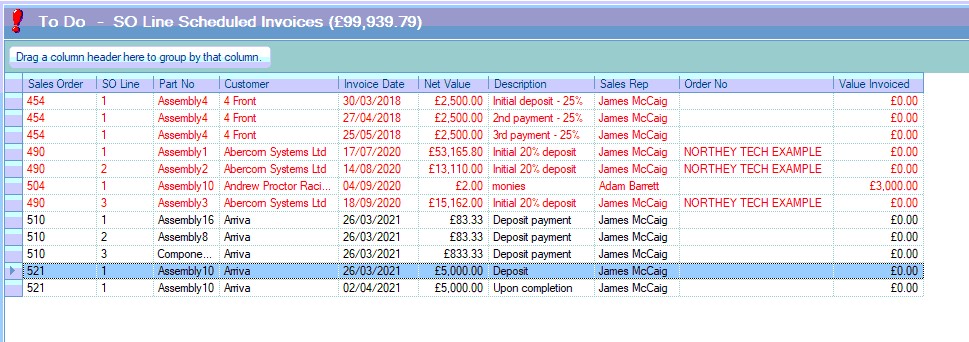
For more information on raising scheduled invoices from is screen, please refer to the Today section of the manual.
History
This screen allows the user to see the invoice history of the part and customer, as well as other historical invoice information.
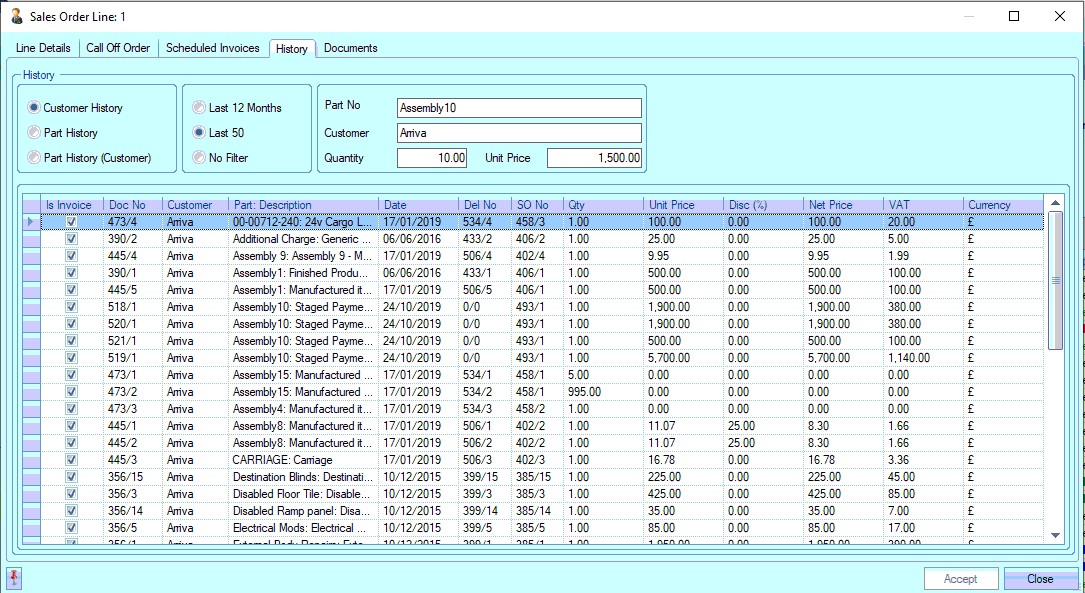
The user has a few options available on what is displayed:
Customer History: List of all customer invoices for the selected period. regardless of part number
Part History: List of all invoices for the selected part number for the selected period, regardless of customer
Part History (customer): List of all invoices for the selected customer AND part number for the selected period
Last 12 Months: Sets period as last 12 months from current date
Last 50: Sets period as last 50 months from current date
No filter: Sets to date filter for the results (i.e. shows everything)
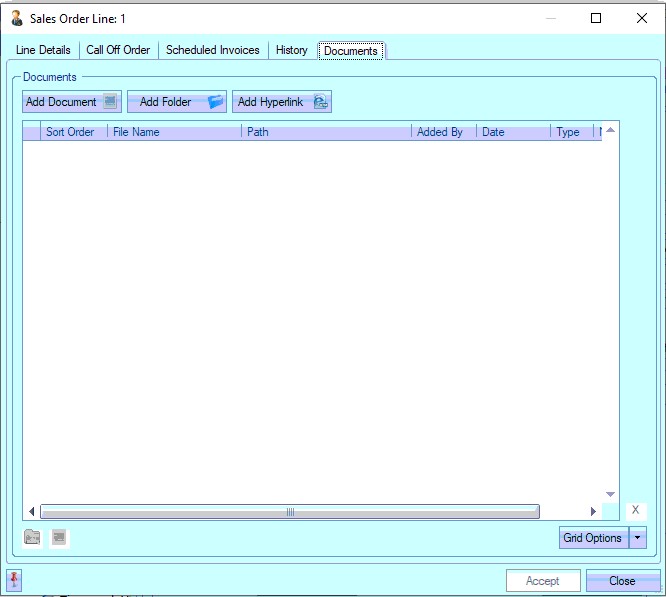
Documents
This screen allows the user to attach specific documents, folders and hyperlinks to the SO line. This is the same screen that can be found throughout the system for adding documents to various places.
To add documents, the user must click the ADD DOCUMENT option. This will present the file selection window. The user can then navigate to the files before selecting them.
Once the user has selected the file required, clicking the Open option will add it to the document list on the sales order. Selecting the ADD FOLDER or ADD HYPERLINK option will prompt the user for the folder or web address.
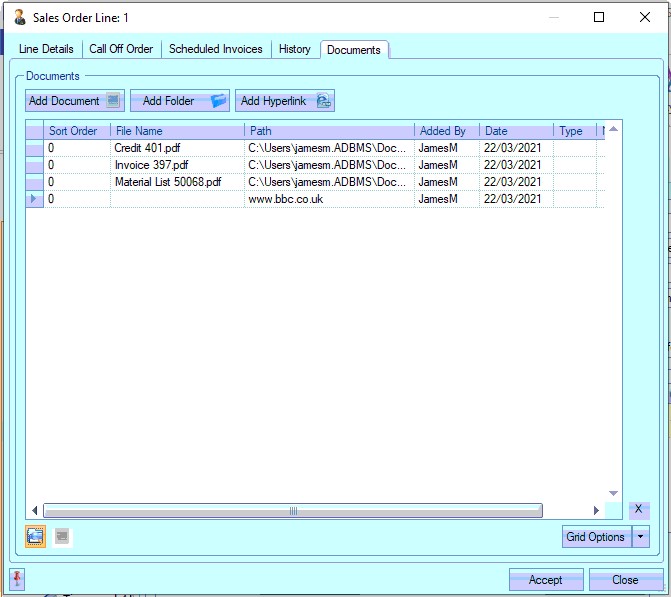
The user can add Document Types and notes to any documents added using the fields available. Any changes made can be saved against the sales order by the user clicking on the ACCEPT option. The user can also open any document, folder or link saved against the SO line by simply double clicking on it to view it.
View Part
Selecting this will present the user with the inventory part screen for the currently selected part.
This will allow the user to verify or, if authorised, change any details of the part record. Clicking Accept or Close will return the user to the sales order screen.
Copy Order
When creating new sales orders, the user has the option to copy the line details of an existing sales order. This can be useful for large sales orders or repeat orders. To use this option, the user must create a new sales order. Once the new sales order screen appears, the user can then select the COPY ORDER option from the Menu options. The user will be presented with the following screen.
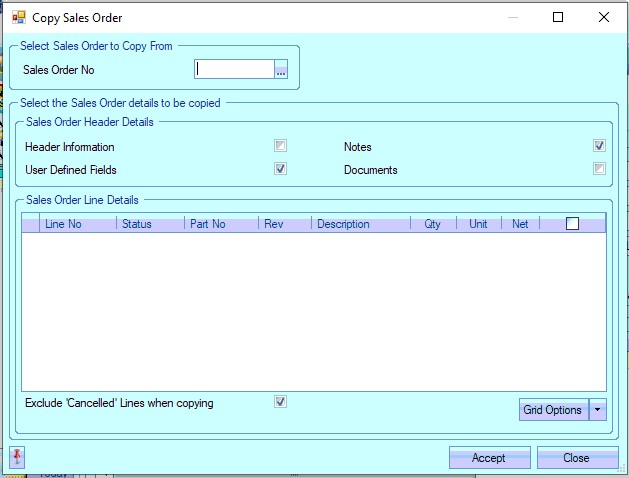
The user can select the existing order to copy using the search option at the top of the screen.
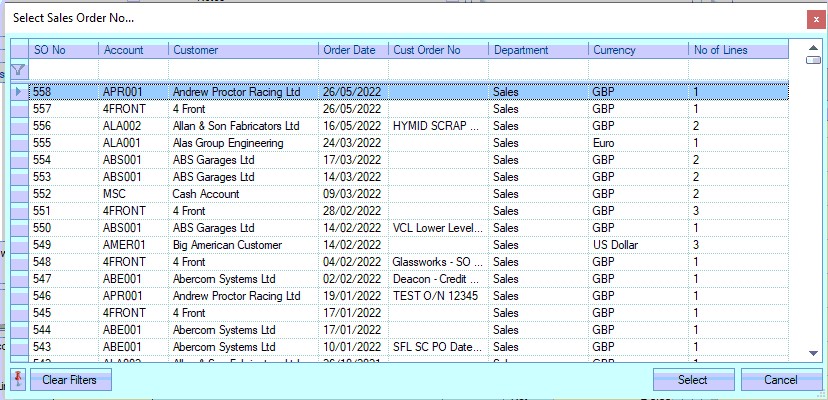
To copy the order, the user simply has to highlight the order required and click on the SELECT option. The screen will then be populated with the selected sales order's information.
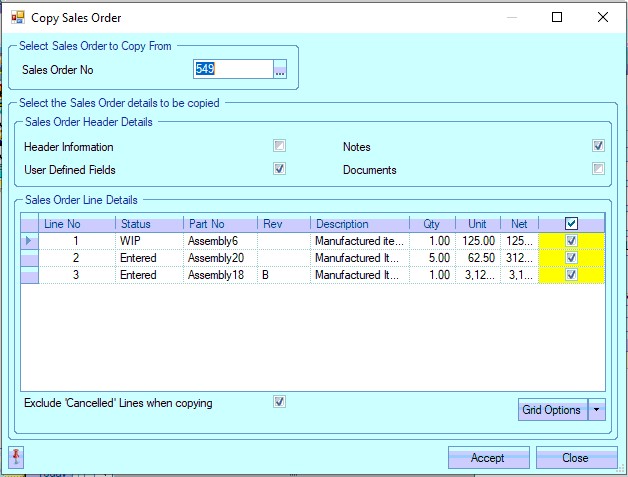
The user can now select the details they wish to copy to the new sales order. The first section allows the user to copy the general information from the previous order. This can be the customer, contacts, order numbers, etc. as well as any documents notes and/or user defined field values. If any of this information is required, the user just ticks the relevant boxes.

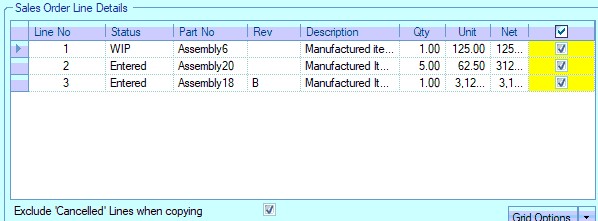
The user also has a list of the sales order line items from the previous order too. The user use this to select individual items to be copied to the new order. An option to include previous cancelled SO lines is also available.
Once all the details have been selected, the user can click ACCEPT to proceed with the copy. The system will prompt the user to confirm.
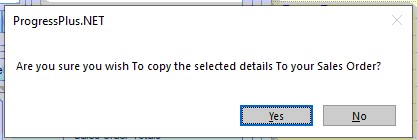
If the user proceeds, all the sales order details from the selected order will be copied to the newly created order.
Clicking the ACCEPT option will create the new sales order with the details copied over from the previous order as required.
Import
This option allows the user to import sales order lines into a sales order. This option is only available if the sales order doesn't already have any existing order lines, however, the user can generate the formatted spreadsheet used for importing the details from any existing sales order.
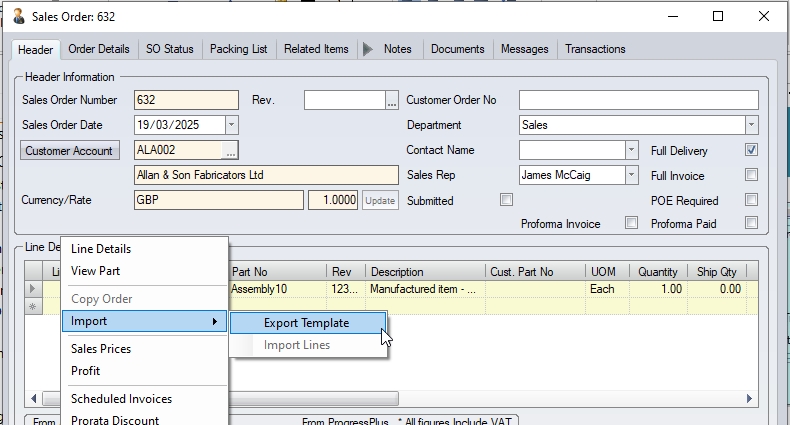
(No import option once existing SO has lines)

(Import option available on SO with no lines)
The import template spreadsheet is a fixed-format spreadsheet (i.e. all columns must be included in the spreadsheet).

(Export of a populated sales order)

(Blank import spreadsheet for populating sales order)
The user can use this spreadsheet to manually complete the information, and then import it directly into a new sales order. The columns highlighted in yellow are those that need completed as a minimum.
ITEM NO This is the sales order ITEM NO field. This should be a sequential number (i.e. 1, 2, 3, etc) or can be specific values provided by the customer as part of their PO.
PART NO This must be a valid Progress part number.
REV This allows the user to enter the specific part revision thats being sold (if applicable). This must be a valid revision set up against the part number in Progress.
| IGNORE PRICE MATRIX? | This is a TRUE/FALSE value, and determines whether the system picks up the unit price from an existing customer price matrix, or takes the price specified in the import spreadsheet. |
| QUANTITY | This is the quantity being sold to the customer. |
| DISCOUNT% | This allows the user to specify a discount or surcharge percentage to be applied to the order line. Discount %s are entered as positive numbers (i.e. 10% discount is entered as "10") while surcharge %s are entered as negative numbers (i.e. 10% surcharge is entered as "-10"). If no discount or surcharge is being applied, this should be set to zero. |
| UNIT PRICE | This is the selling price per unit being used for the order item |
| REQUIRED DATE | This allows the user to enter when the customer would like the goods. |
| PROMISED DATE | This will typically be the same as the REQUIRED DATE initially, unless a confirmed PROMISE DATE has been agreed, and is different to the REQUIRED DATE. |
| PROJECT NO | This allows the user to specify the associated Progress project if known. |
| ESTIMATED PRICE | This is a TRUE/FALSE option that allows the user to specify whether the price being set is only an estimated price. SO lines marked as ESTIMATED PRICE cannot be invoiced until the price has been confirmed on the SO line. |
| COFC REQUIRED | This is a TRUE/FALSE field that allows the user to specify whether a Certificate of Conformity document is required for the sales order line item. |
| LINE NOTES | This field allows the user to add additional line notes for the order line item. These are imported into the EXTERNAL LINE note field. |
Once the spreadsheet is completed and ready for import, the user can select the IMPORT LINES option within a new sales order and select the file to be imported. This will populate the sales order with the details entered into the spreadsheet.

(Completed spreadsheet ready for importing)
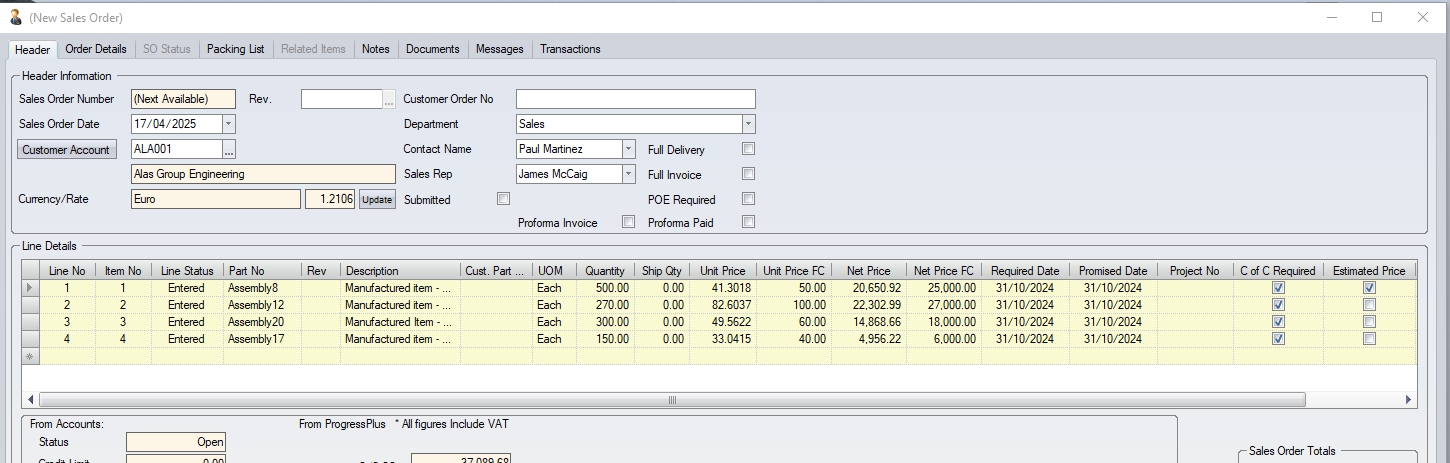
(Resulting sales order once details are imported)
Once the details have been imported, the user can amend the order further as required.
This option allows the user to see a details breakdown of where the pricing has come from for each sales order line. The user can also amend the prices against each SO line and then apply the changes to the SO using the APPLY tick box.

Profit
This screen allows the user to see the profit being made on the sale of purchased items on the sales order. Selecting the Profit option will present the following window. This lists all the sales order lines along with their quantity, selling price, cost, profit and the percentage profit.

The information shown is as follows.
| Line No | This is the sales order line number. |
| Part No | This is the part on the sales order line. |
| Description | Description of sales order part number. |
| Quantity | This is the quantity specified on the sales order line. |
| Selling Price | This is the NET price specified on the sales order line. |
| Sales Order Unit Price x Sales Order Quantity |
| Cost | This is calculated as follows: |
| (Part No Purchasing Cost / UoPUoMConv) x Sales Order Quantity |
| Profit £ | This is calculated as follows: |
| Selling Price – Cost |
| Profit % | This is calculated as follows: |
| (Profit £ / Cost) * 100% |
At the bottom of the screen, Progress also calculates a profit total and percentage for the entire sales order.
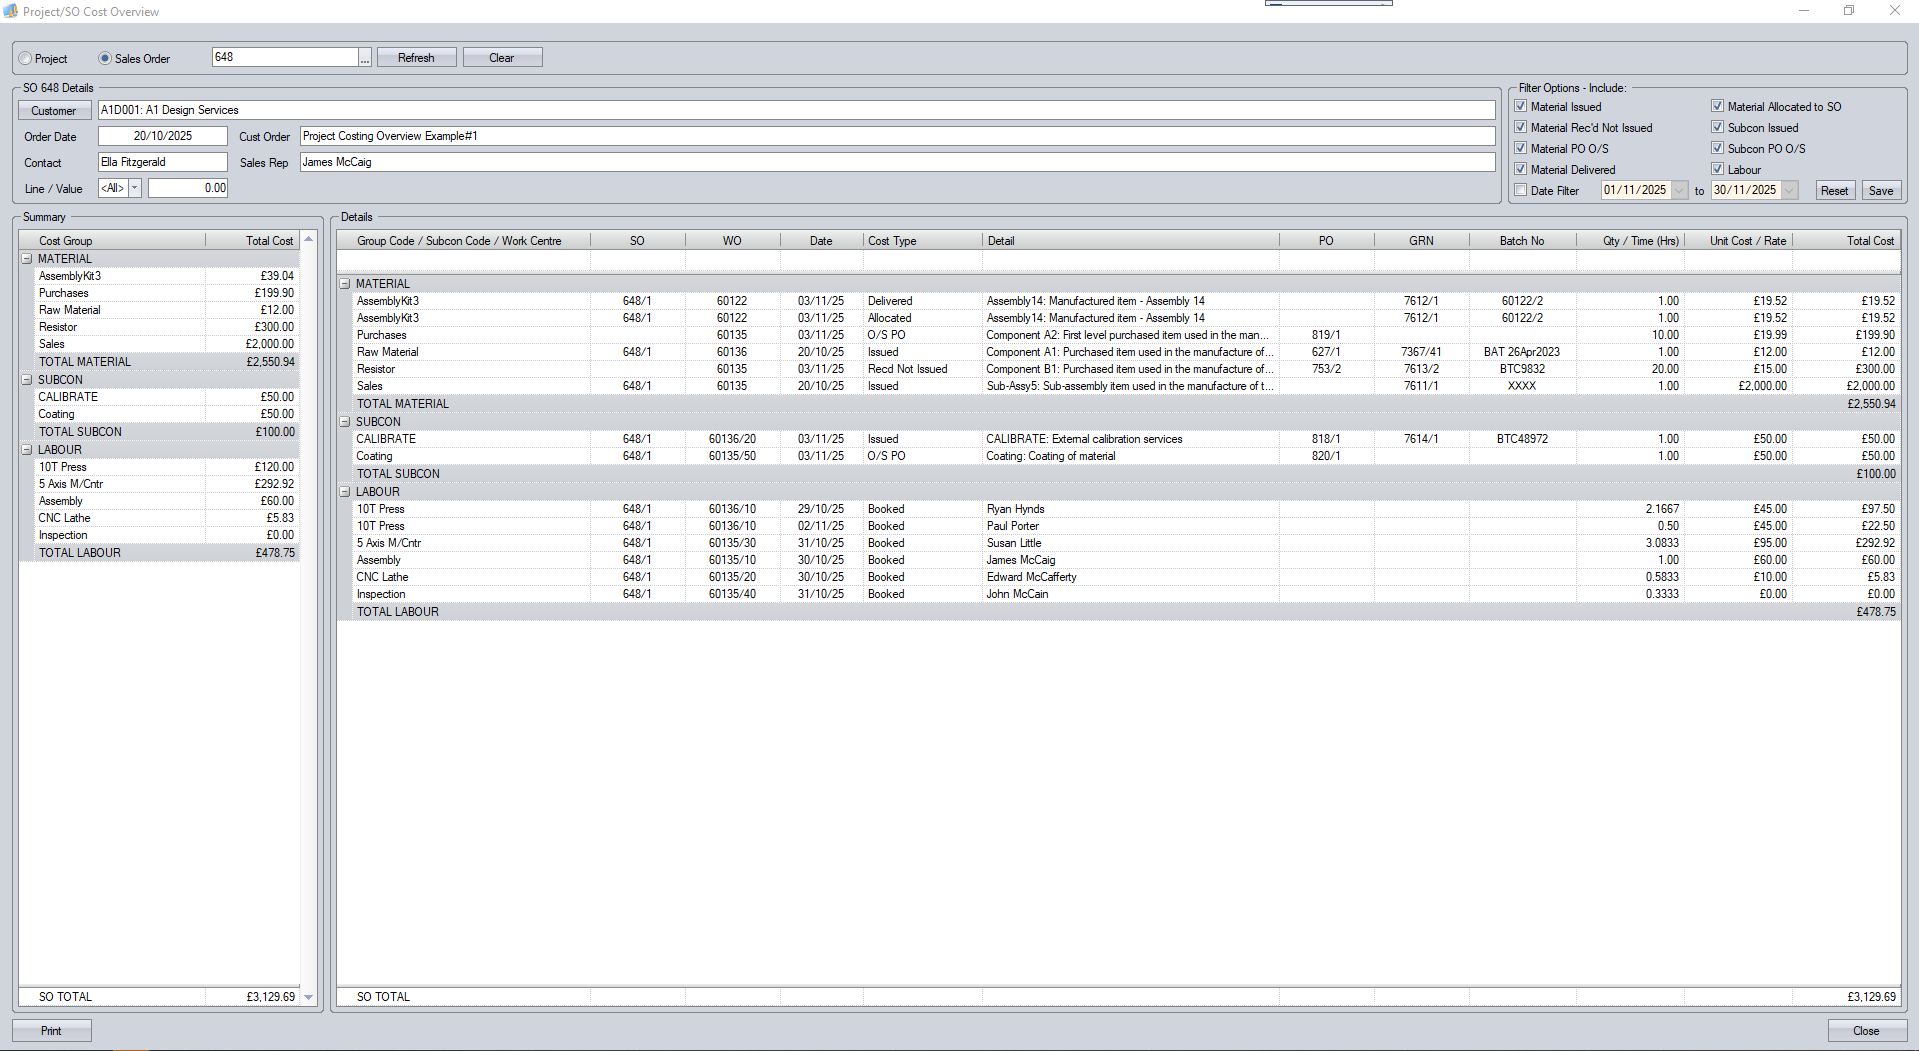
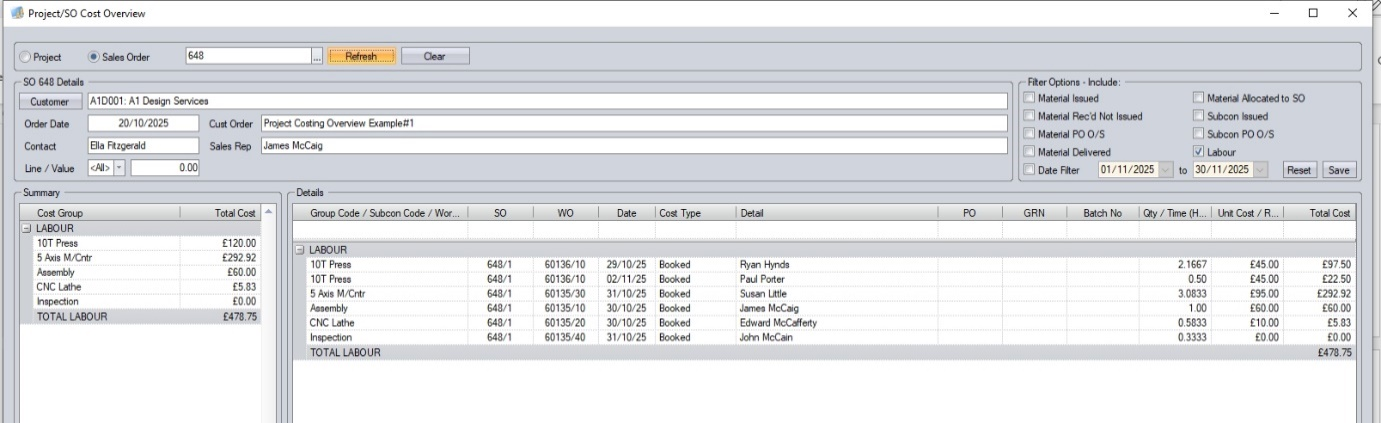
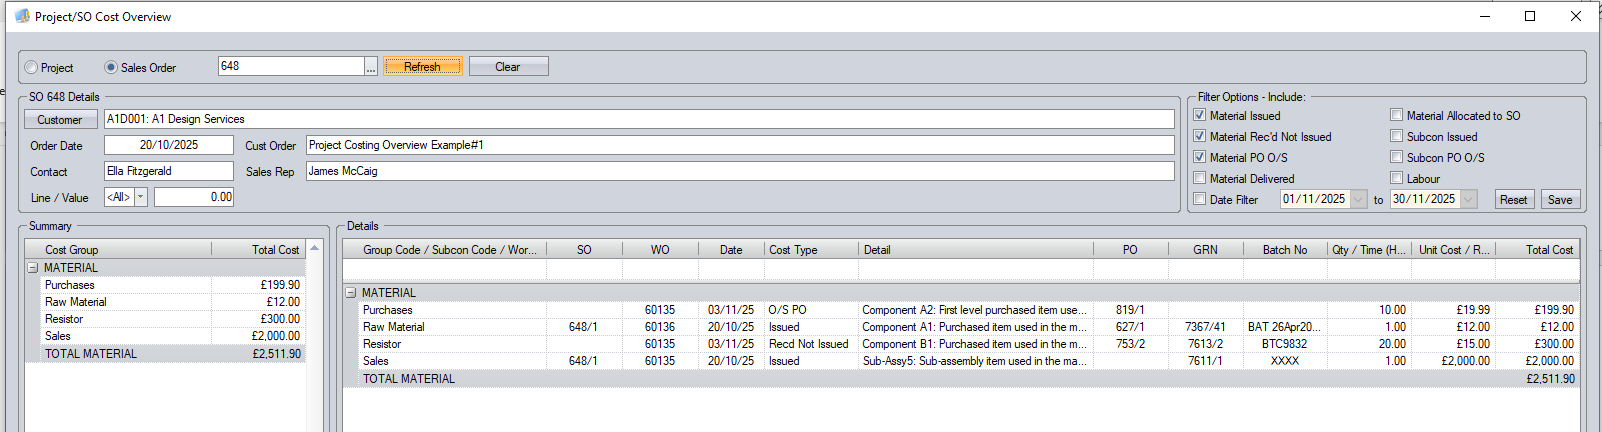
Cost Overview (SO)
This option presents the user with a cost overview screen for the current sales order. This screen lists all the associated cost details for the sales order, both summarised and with detail.
The Cost Overview screen can also be viewed based on a project, with the option at the top of the screen for the user to switch between.

The Cost Overview screen is also accessible from within the Maintenance > Projects section of Progress too, where the user will be presented with a cost overview of the selected project.
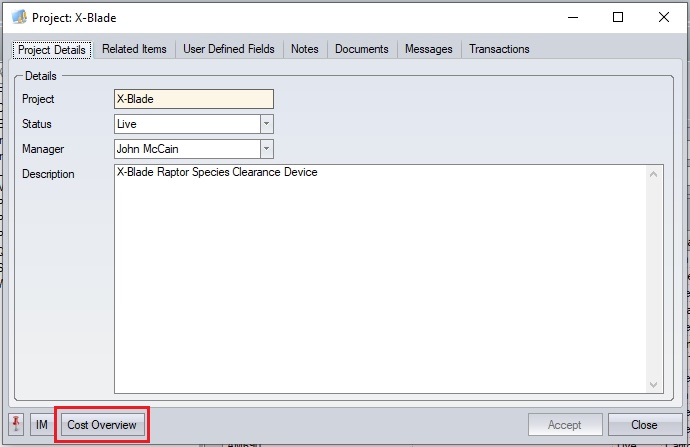
For more information on projects, please refer to the Maintenance section of the manual.
Upon opening, the screen will display all the details of the current sales order at the top of the screen.
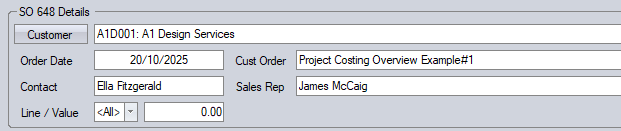
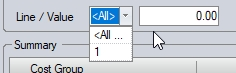
The user can access the customer account details using the CUSTOMER option if required and can also select a specific order line for review if required using the drop-down list provided.
The lower part of the Cost Overview screen shows summary and detailed breakdowns of all the associated costs selected using the filters above. On the left, you have a summary breakdown by group code (Material), subcontract code (Subcon) and work centre (Labour) which summarises the material, subcontract and labour costs, while on the right you have the details associated with each summary category, with all the associated order, part, quantity, cost value, etc. with both sections having summary totals for each element and overall too.
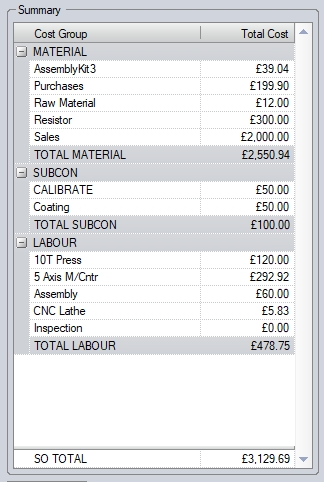
(Summary costs)
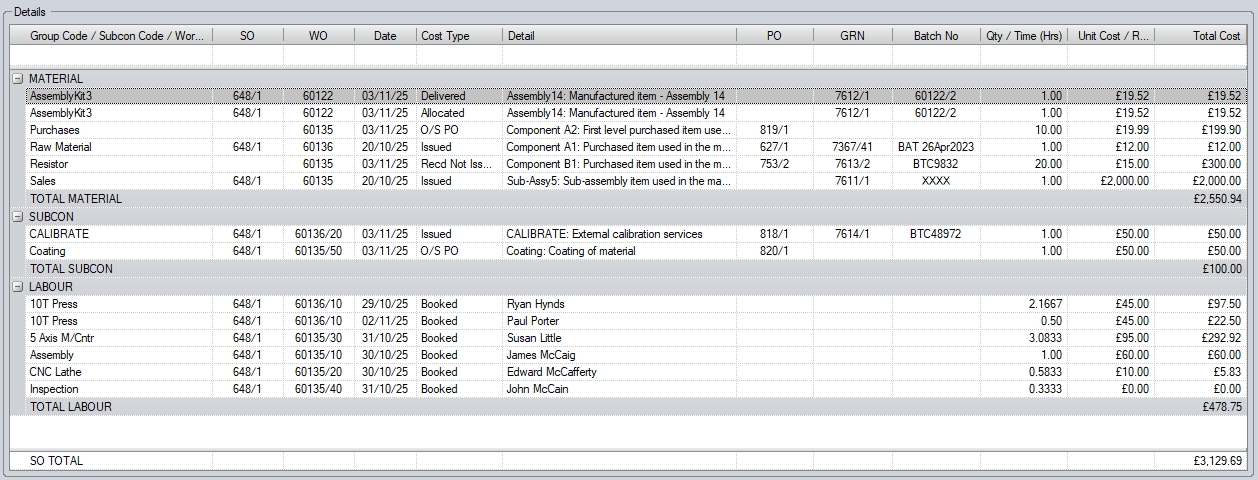
(Detailed costs)
Like many of the grids in Progress Plus, the user can drill into the information in many of the columns to quickly access parts, orders, etc. by clicking into the field as shown below.
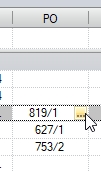
Doing so will open the selected order, GRN, part, etc. for the user to see further details.
To the right of the order details, at the top, the user has a selection of option available regarding what’s shown on the Cost Overview screen.
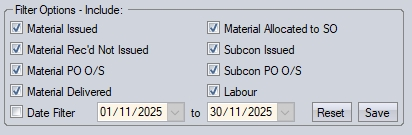
These options allow the user to select which elements are displayed on the screen, allowing them to focus on specific elements associated with the sales order or project.
•MATERIAL ISSUED shows all material issued to associated work orders linked to the order/project
•MATERIAL REC’D NOT ISSUED shows all material purchased for the order/project which has been booked into stock, but not yet issued to the associated work order
•MATERIAL PO O/S shows all purchase orders raised for the sales order/project which have yet to arrive from the supplier(s)
•MATERIAL DELIVERED shows cost value of all delivered items to the customer(s)
•MATERIAL ALLOCATED TO SO shows all finished goods stock allocated to the order/project
•SUBCON ISSUED shows all subcontract costs issued to work orders associated with the order/project
•SUBCON PO O/S shows the details of subcontract POs raised for work orders linked to the order/project, which have yet to be received back from the supplier(s)
•LABOUR shows all associated labour costs recorded against work orders linked to the order/project
•DATE FILTER allows the user to filter any of the selected option above by date range
The user can select any combination of these options, depending on what they wish to see, with the selected item details displayed in the grids below.
(Labour only example)
(Material only example)
The user can also generate summary and detailed reports for the selected information using the PRINT option at the bottom.
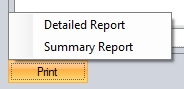
Selecting either of the print options will generate a report based on the filter options selected by the user on the screen.

(Detailed report)
(Summary report)
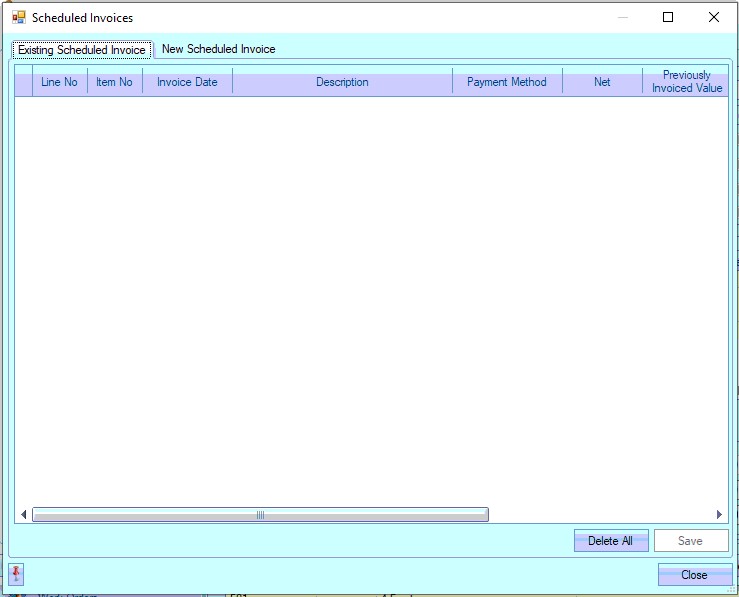
Scheduled Invoices
This option allows the user to raise scheduled invoices against the entire sales order, based on a specified percentage or value. When the user clicks this option, they are presented with the screen below, showing any already existing scheduled invoices.
To add new scheduled invoices for the sales order, the user should click on the NEW SCHEDULED INVOICE tab.
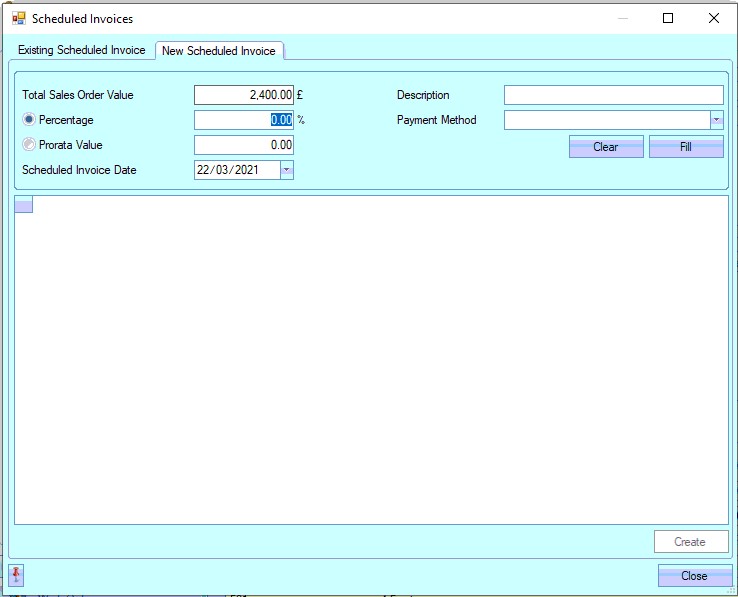
This shows the user the current total sales order value and options for setting the scheduled invoice value based on a percentage or a total value as well as the planned date of the invoice.
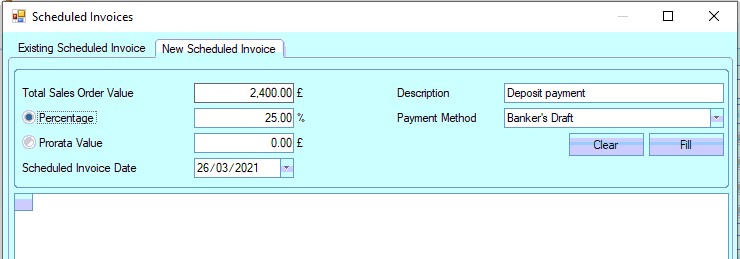
Once populated, the user clicks FILL to populate the grid below. This fills the grid with a list of the SO lines along with the invoice value, based on the percentage or pro-tata'd value.

(Scheduled invoice value based on a percentage)
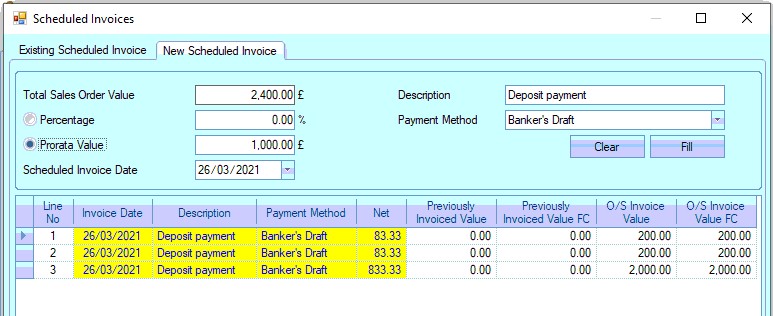
(scheduled invoice value based on pro-rata value)
The user can create as many scheduled invoices for the entire SO as required. The process above would simply be repeated once each batch of planned invoices is created.
NOTE: Where a value has been pro-rata'd and there is a shortfall due to rounding, the system will highlight this will a warning in red. They user can then made a decision on whether any of the pro-rata'd values are amended to match the overall total.
![]()
Once the user has saved the planned invoices, these will be listed on the initial Existing Scheduled Invoices screen.
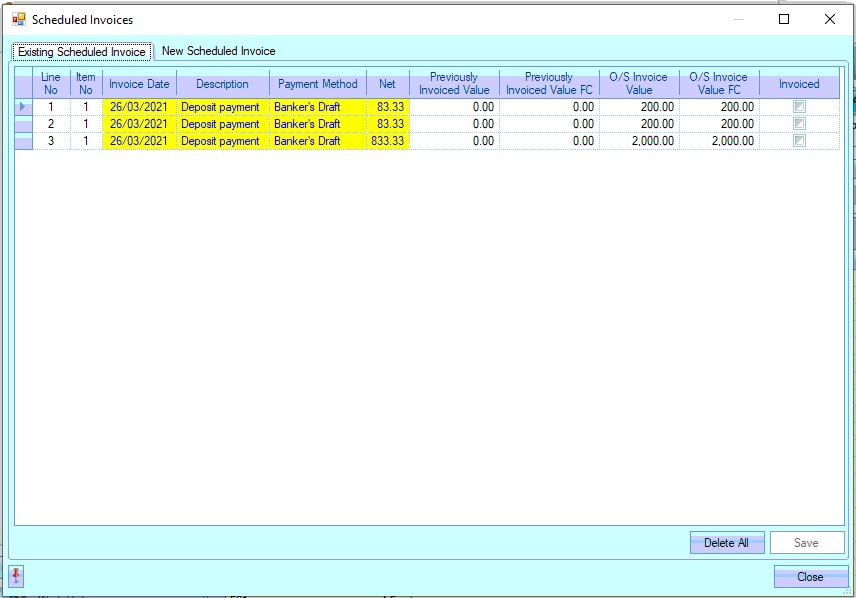
Existing scheduled invoices can also be deleted if required by simply highlighting the invoice to be removed and clicking the invoice and pressing the DELETE key or, if all are to be removed, click the DELETE ALL option at the bottom of the screen. This will remove the selected invoice(s).
NOTE: Only scheduled invoices which have not yet been invoiced can be deleted.
Pro-rata Discount
This option allows the user to specify a discount or surcharge value and then spread that value across all the SO lines, either equally or on a prorata basis.
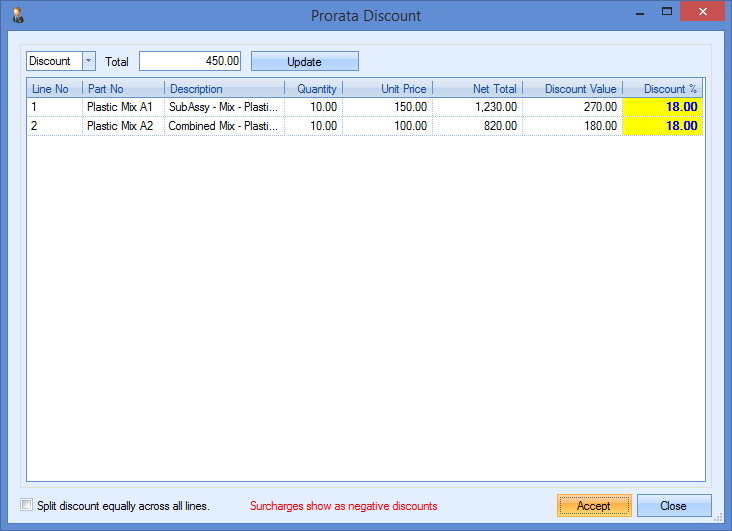
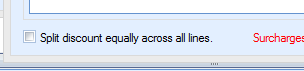
The user can select whether its a discount or surcharge value using the drop-down menu at the top and specify the value in the appropriate field. Clicking the UPDATE option will spread the value across all the SO lines listed in the grid below. By default, the value will be prorata'd across all the lines. If the user wishing to spread the value equally, then they can click the SPLIT DISCOUNT EQUALLY ACROSS ALL LINES option at the bottom of the window and click UPDATE to refresh the numbers.
Once the user has applied the the discount as required, they can click ACCEPT to save the changes and return to the main SO window.
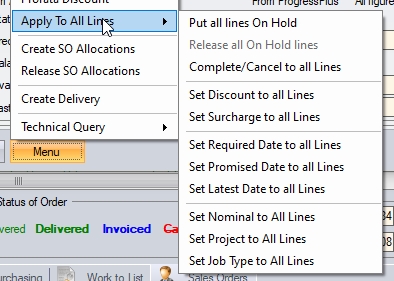
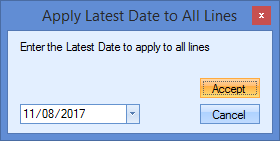
Apply To All Lines options
These options allow you to set specific values and dates against all the sales order lines at once. This is useful if discounts are to be applied to large sales orders or if dates change against a sales order with a large number of line items. The user can select these options from the Menu options.
Put all lines On Hold/Release all lines On Hold
This option will place all SO lines onto "on hold" status or release all SO lines from "on hold" status respectively.
Complete/Cancel to all lines
This option will present the user with a screen to allow them to decide which lines on the sales order will be marked as cancelled/complete and also cancel/complete any associated WOs too.
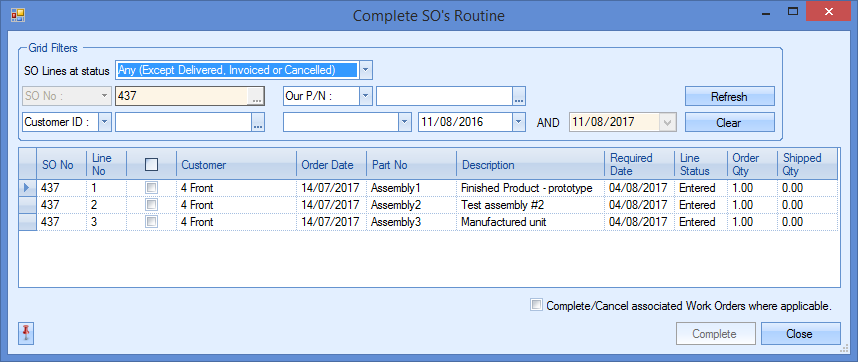
Although the screen will be defaulted to the selected sales order from which it was opened, the user can filter further by part number, customer, etc. using the grid filters at the top of the screen, pressing REFRESH to update the grid with the selected items. The user can then select the SO lines that are to be updated by ticking them accordingly.

If the SO lines have associated WOs, those can also be updated accordingly by ticking the option at the bottom-right of the window.
![]()
If this is left unticked, the associated WOs will not be amended. Once all selections have been made, the user can click the COMPLETE option to update the SOs (and WOs if selected) accordingly. Progress is displayed at the bottom-left corner.
![]()
Once done, the user can click the CLOSE option to return to the SO, which will now be updated accordingly.
Set Discount to all Lines option
If the user selects this option, the user is prompted to enter the discount % to be applied.
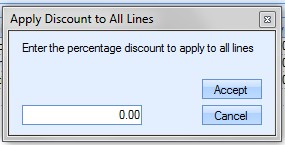
The value entered and accepted by the user is then applied to every sales order line and can be viewed against the line details of the sales order line. Sales order line values and overall sales order totals will be updated accordingly.
Set Surcharge to all Lines option
If the user selects this option, the user is prompted to enter the surcharge % to be applied.
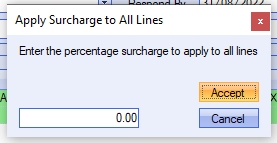
The value entered and accepted by the user is then applied to every sales order line and can be viewed against the line details of the sales order line. Sales order line values and overall sales order totals will be updated accordingly.
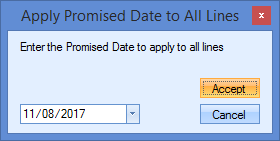
Set Required Date to all Lines option
If the user selects this option, the user is prompted to select a date from the calendar to set as the new Required Date.

Once the new date is selected and accepted by the user, the sales order lines are updated accordingly. The new requirement date can be viewed on the main sales order screen against each line and also in the sales order line detail screen.
Set Promised Date to all Lines option
If the user selects this option, the user is prompted to select a date from the calendar to set as the new Promised Date.
Once the new date is selected and accepted by the user, the sales order lines are updated accordingly. The new promised date can be viewed in the sales order line detail screen.

Set Latest Date to all Lines option
If the user selects this option, the user is prompted to select a date from the calendar to set as the new Latest Date.
Once the new date is selected and accepted by the user, the sales order lines are updated accordingly. The new latest date can be viewed in the sales order line detail screen.

Set Nominal to all Lines option
This option allows the user to set the nominal code against all order lines to a selected value. Clicking this option will present the user with a drop-down list of nominals that they can select from.
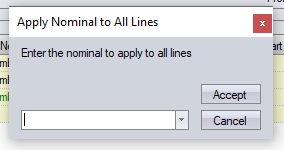
Once selected, and the user clicks ACCEPT, the nominal code set against all order lines will be set accordingly.
Set Project to all Lines option
If the user selects this option, the user is prompted to select a project from all projects currently recorded in Progress in the Project section.
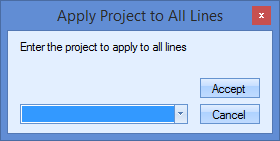
Once the project is selected and accepted by the user, the sales order lines are updated accordingly. The project can then be viewed in the sales order line detail screen.
Set Job Type To All Lines
This option allows the user to select a job type and apply it to all lines of the sales order.
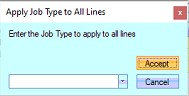
Once the user has selected the job type they want, clicking ACCEPT will update all sales order lines accordingly. The set job type can be seen in the sales order line details as shown below.
Create SO Allocations
This option is a direct path to the CREATE SO ALLOCATIONS screen which is located in the Inventory > Allocation section of Progress.

When selected, the system will open the allocation window and will filter specifically for the current SO.
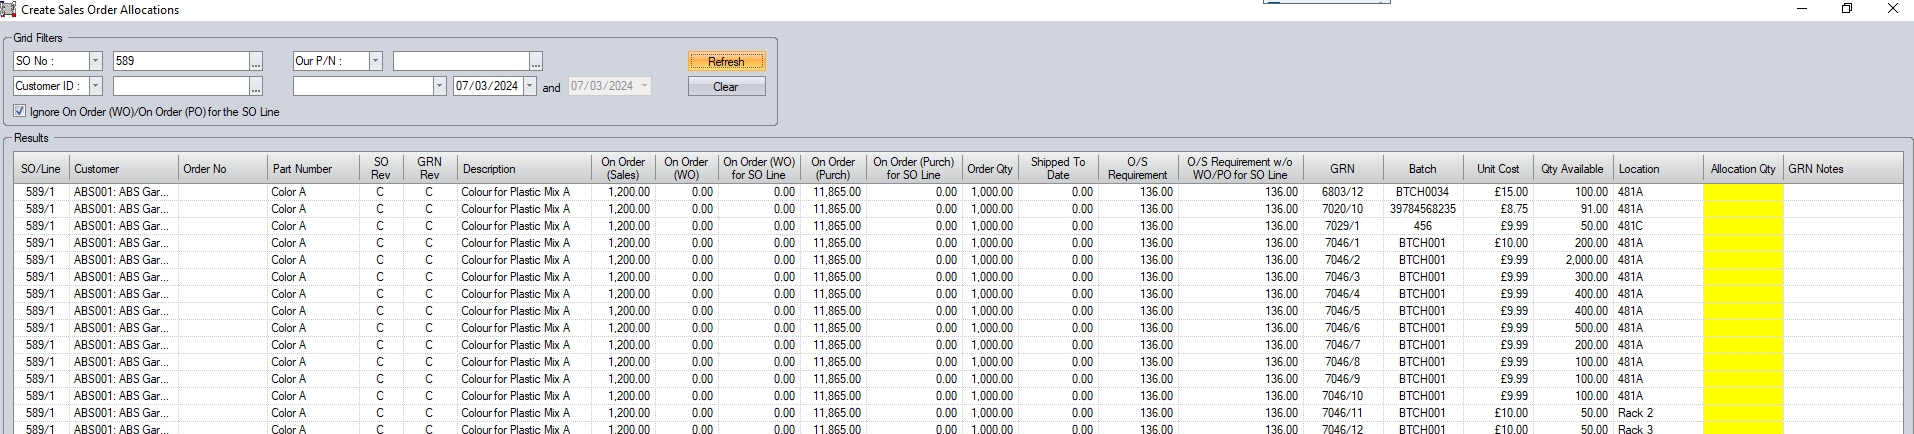
The user can then allocate against the SO line from stock as required by completing the ALLOCATION QTY field and clicking ACCEPT to save the allocations.
Allocations can only be made to an SO line if there is an existing outstanding requirement not already fulfilled by a linked WO or existing stock, however, it is possible to allocate stock even if there is a linked WO if the user has the permissions to do so. This is set in the user's access rights in the Admin section and allows the user to allocate stock to the SO line as long as there is an outstanding quantity to be shipped.
![]()
More on this can be found in the Administrator Functions > Access section of the section of this manual. For more information on the Create SO Allocations screen, please refer to the Inventory > Allocations section of the manual.
Release SO Allocations
This option is a direct path to the RELEASE SO ALLOCATIONS screen which is located in the Inventory > Allocation section of Progress.
When selected, the system will open the allocation window and will filter specifically for the current SO.
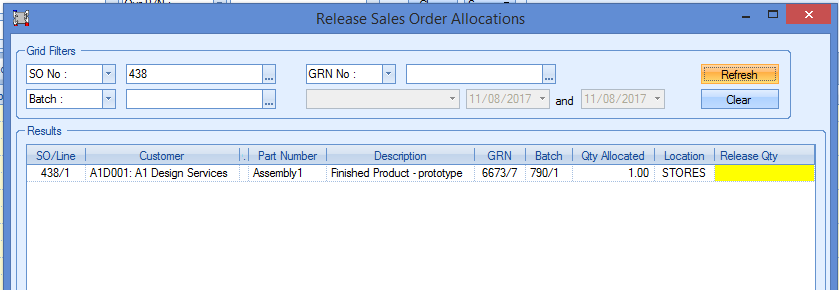
The user can then release the allocations against the SO line as required by completing the RELEASE QTY field and clicking ACCEPT to release the allocations.
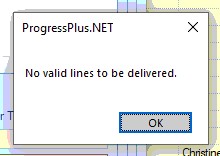
Create Delivery
This option allows the user to create a delivery directly from the SO itself. This will open a new delivery window with all SO lines with allocations against them listed for delivery. The user can then complete the delivery as per normal delivery process. If there are no SO lines available for delivery, the system will inform the user.
Sales Order Validation Checks
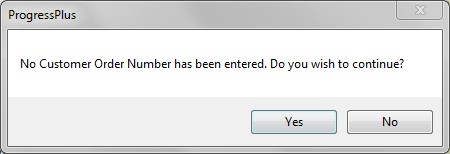
Once all the necessary detail has been added to the sales order, the user can save the order by clicking on the Accept option. This will record the sales order and allocate a system generated number for this sales order. If the system admin settings have been set up to warn of blank customer order numbers, the user will be presented with a message indicating this.
![]()
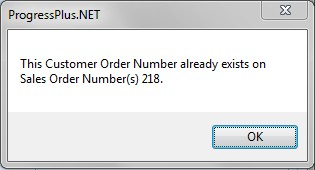
The user can then add the customer order number if known or can leave it blank for now if it’s still forthcoming from the customer. If Progress has been set up to also warn of duplicate customer order numbers, the user will be presented with a message indicating this.
![]()
The user can then change the order number before saving. If the system has also been set up to warn of duplicate contract numbers, the user will be presented with a message indicating this also.
![]()

The user can then change the contract number before saving. Once all the criteria have been met, the sales order will be created.
Another system admin setting that can be used is for the automatic creation of a Contract Review document upon creation of a new sales order. If this system option is set, the user will be presented with a blank Contract Review screen when the sales order has been created.
![]()
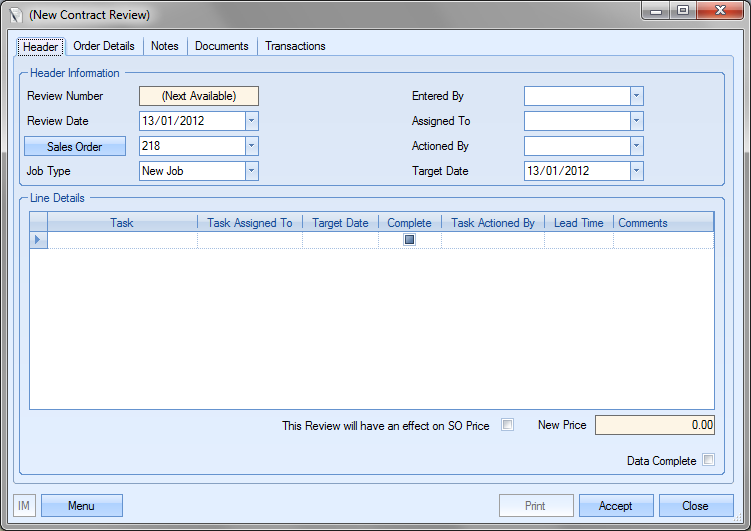
If the new sales order requires a Contract Review to be created, the user can create one from this screen by clicking the Accept option at the bottom of the window. The user can complete the form at this point or come back and complete it at a later date. If the sales order does not require a Contract Review to be created for it, the user can click on the Close option at the bottom. If a Contract Review record is required for a sales order after the sales order has been created, the user can create a contract review record in the Contract Review section of Progress and link it to the sales order. For more information on contract reviews in Progress, refer to the Contract Review section of this manual. For all of the system options described above, refer to the System Admin Options section of this manual.
Sales Order Line Requirements
The next stage in the processing of adding a sales order is the Sales Order Line Requirements screen. This screen allows the user to determine how the sales order line quantities will be fulfilled for the customer, whether fulfilled from finished goods stock or by manufacturing the items required.
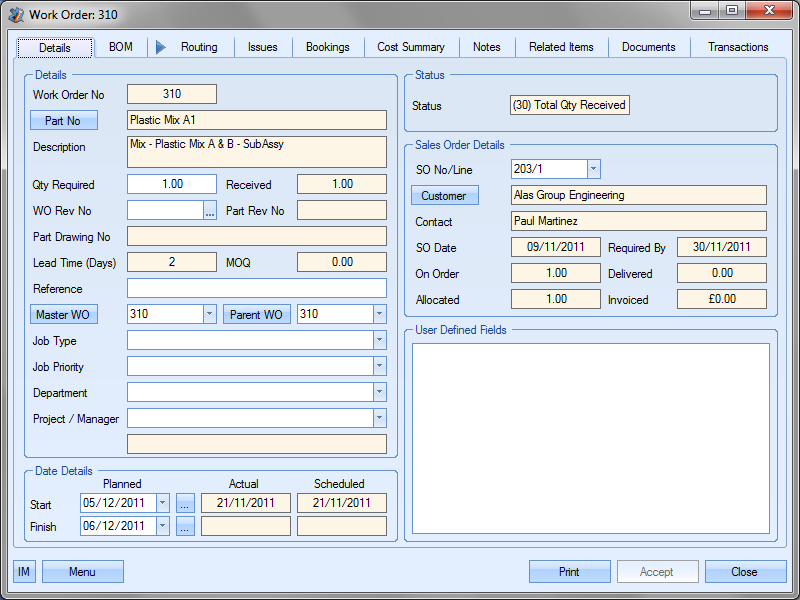
The screen above shows all sales order lines where there is an outstanding requirement. From here, the user will specify how they wish to fulfill the customer’s requirements. Each sales order item is listed, along with a breakdown of its component parts as well as any sub-assemblies and their component parts. The first few columns are used to show the BOM level of the items in question. Top level parts, column 1, are the parts from the sales order and are also displayed in red.
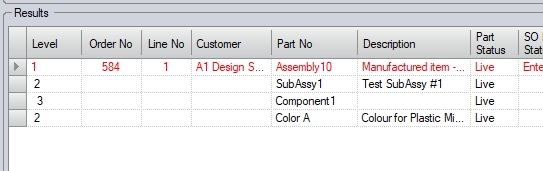
In the example above, sales order line #1 has a sub-assembly component part which itself has BOM items. The breakdown of BOM components/levels can be seen by the LEVEL value. The number of BOM levels displayed can be changes at the top of the screen using the DISPLAY X LEVELS option. The default level value is set in the Admin system options.
To the right of the BOM information is the current stock status.

| Part Status | This is the current part status as set against the part record |
| SO Line Status | This is the current status of the sales order line |
| Order Qty | For the top level part, this is the sales order quantity. Component parts default to 0 since they are not on the sales order. |
| Line Requirement | This is the total quantity of each part, including the top level part, required to fulfill the sales order |
| MOQ (WO) | This is the minimum work order quantity for any manufactured parts on the BOM displayed. This would be the minimum quantity the work order would be raised for. |
| On Order (WO) | This is the current number of units being manufactured on existing work orders for this part |
| Batch Qty (WO) | This is the batch quantity of the part when work orders are raised. This will be used to round to the nearest batch quantity when the work orders are raised. |
| Available to Allocate | This is the stock quantity currently available to allocate towards the sales order requirement. This is calculated as: |
| Active Qty – Allocated to SO |
| (component parts default to 0 in this column) |
| Free Stock | This is the total quantity available in stock (both top level parts and component parts) |
| Shortage/Surplus | This is the overall shortage or surplus quantity of component parts currently in stock. This is calculated as: |
| Total Stock – Total Requirements |
| Where: |
| Total stock is the sum of Active, Quarantine, On Order PO and On Order SO |
| Total requirements is the sum of Min Stock Level, WO and SO requirements |
| Suggested Manuf. Qty | This is the system-suggested quantity for manufactured items, based on the quantity required for the SO line quantity, minimum order quantity and batch quantity. |
| Mainly Purchased | Flag to indicate whether the part is a purchased part or not. |
| FI | Flag to indicate whether the part is free issue or not. Parts marked as FI, and all their lower-level BOM items, will not generate requirements as they are assumed to be supplied by the customer. |
| Reviewed | Flag to indicate whether the part is to be reviewed |
| Routing | Flag to indicate whether the part has routing entries set up. Typically this is only for manufactured parts. |
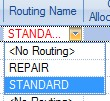
| Routing Name | The name of the routing to be used. The user can select an alternative routing on this screen if the default routing is not the required one. |
The final two columns shown on this screen relate to the action decided by the user on how the sales order line requirements are fulfilled. These show the quantities being allocated from inventory and the work order quantity for the work orders being created to manufacture the sales order item.
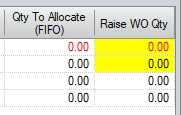
The boxes in yellow are those that can be edited by the user manually, or will be updated by the system depending on how the user wishes to proceed. The user has three main options here.
![]()
| MAKE ALL | This option will generate work orders for the full sales order line quantity, regardless of any stock already showing in inventory |
| ALLOCATE AVAILABLE & MAKE BALANCE | This option will allocate any stock currently in inventory and raise work order for outstanding balance |
| ALLOCATE AVAILABLE ONLY (MAKE NONE) | Only allocate available inventory. No work orders will be created |
| MAKE SUGGESTED MANUFACTURING QTY | This option will set the RAISE WO QTY quantity based on the quantity required to fulfil the sales order line, the part's minimum order quantity for work orders, and also the part's batch sizes for work orders. |
MAKE ALL
Selecting the MAKE ALL option results in a confirmation prompt being displayed for the user. This just informs the user that the two yellow boxes (Qty to Allocate and Raise WO Qty) will be updated accordingly.
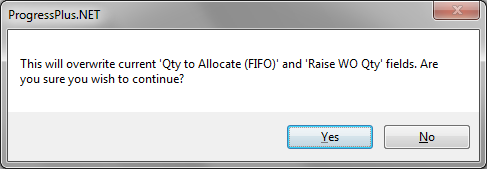
If the user clicks the NO option, then the system will return to the sales order line requirements window. If the user clicks the YES option, the system will calculate and update the yellow boxes.

The system calculates the work order quantity required to make the full sales order line quantity, regardless of any stock that may exist of the required manufactured items. In the case of the example above, the full sales order line quantity is set, but Progress also updates the Raise WO Qty figures for any sub-assemblies that are component parts of any of the sales order lines parts. These quantities will be based on manufacturing the exact quantities required to fulfil the sales order line quantity. For the example above, a Master WO will be created for the sales order line item and a child WOs will be created for the sub-assembly component. These will be linked so the Master WO will be fed from child WOs. Clicking the ACCEPT option will create the necessary WOs and link them to the current sales order.
ALLOCATE AVAILABLE & MAKE BALANCE
Selecting the ALLOCATE AVAILABLE & MAKE BALANCE option results in a confirmation prompt being displayed for the user. This just informs the user that the two yellow boxes (Qty to Allocate and Raise WO Qty) will be updated accordingly.

If the user clicks the No option, then the system will return to the sales order line requirements window. If the user clicks the Yes option, the system will calculate and update the yellow boxes.

The system allocates any available stock and calculates the work order quantity required for the outstanding balance. In the example above, Progress has allocated the 3 available units (i.e. Free Stock) and has planned a work order for a quantity of 4. For the work order of 4, the system needs 4 of the sub-assembly part and has raised a work order quantity of 4 as a result too. If the user clicks the ACCEPT option, Progress will allocate all the available inventory to the sales order line, and create the necessary WOs and link them to the current sales order.
ALLOCATE AVAILABLE ONLY (MAKE NONE)
Selecting the ALLOCATE AVAILABLE ONLY (MAKE NONE) option results in a confirmation prompt being displayed for the user. This just informs the user that the two yellow boxes (Qty to Allocate and Raise WO Qty) will be updated accordingly.

If the user clicks the No option, then the system will return to the sales order line requirements window. If the user clicks the Yes option, the system will calculate and update the yellow boxes.

As can be seen above, Progress has not calculated any work order quantities but any available inventory has been marked for allocation to the sales order line. If the user clicks ACCEPT, Progress will allocate the available inventory to the sales orders ready for delivery.
MAKE SUGGESTED MANUFACTURING QTY
Selecting the MAKE SUGGESTED MANUFACTURING QTY option results in a confirmation prompt being displayed for the user. This just informs the user that the two yellow boxes (Qty to Allocate and Raise WO Qty) will be updated accordingly.
If the user clicks the NO option, then the system will return to the sales order line requirements window. If the user clicks the YES option, the system will calculate and update the yellow boxes.

WIth this option, the system will calculate the required WO quantities required based on the part's existing stock, supply/demand, minimum order quantity and batch size and will set this value accordingly. In the example above, the SO line quantity of 7 and a batch quantity of 3 means the system will raise a WO for 9 (the nearest multiple of the batch quantity that covers the requirement). To manufacture 9 of the top-level assembly, the system needs 9 of the sub-assembly part too, and with a batch quantity of 5, suggests a WO quantity of 10, again, the nearest batch quantity to cover the requirements. If the user clicks the ACCEPT option, Progress will create the necessary WOs and link them to the current sales order
The user has a number of options available to them when using this screen. These are shown in the top-right of the screen.
The default settings for these options can be set in the Admin section of Progress, under the Enquiry & SO > SO Line Requirements tab's WO Options as shown below. These defaults will be set when the user accesses the DEMAND screen within Progress, but can be amended by the user if required.
For more information on the sales order system settings, please refer to the Administrator Functions > Options section of the manual.
The HIDE PURCHASED ITEMS option will filter out any parts on the displayed BOM(s) that are marked as Mainly Purchased (MP). This can be useful with large BOMs, allowing the user to see only the manufactured parts of the BOM for which they may need to raise WOs.
(Hide Purchased Items option unticked)
(Hide Purchased Items option ticked)
The CREATE ON HOLD WOS FOR ON HOLD SO LINES option will allow the user to create WOs for the SO lines if the SO lines are on hold. If unticked, no work orders will be created for the sales order lines (i.e. they are ignored). This allows the user control over whether on hold sales order lines generate the required work orders, and subsequent material and production demand.
The ISSUE MP ITEMS option allows the user to automatically issue any existing stock of mainly purchased parts to the work orders being created. This is done on a FIFO basis and will issue all material available to the work orders until they have been fully issued based on the WO BOM requirements, or until there is no further stock available to issue. If specific material is to be used on the work orders or there is a need for strict control of the material used, this option should be left unticked, and all material should be issued to the job manually as this will allow the user to issue specific batches of material to the work orders.
The ISSUE MANUFACTURED ITEMS option allows the user to automatically issue any existing stock of non-mainly purchased parts to the work orders being created. These could be sub-assembly items that have been manufactured previously and are in stock for example. Again, this is done on a FIFO basis and will issue all stock available to the work orders until they have been fully issued based on the WO BOM requirements, or until there is no further stock available to issue. Again, if strict control of the batches issued is required, this should be left unticked and the parts issued manually.
Print Options
The user can specify which documents they wish to produce from this screen using the Print Options at the bottom.
The PRINT OPTIONS selection allows the user to determine which of the work order documents are to be generated along with any other associated documents as shown below.
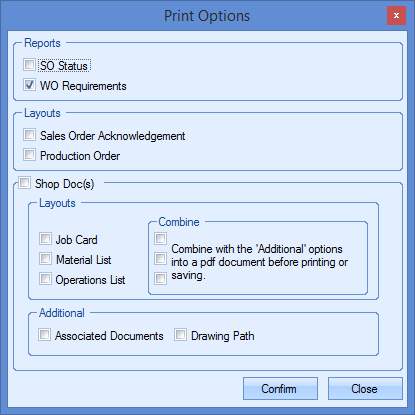
These options default based on the default print options set up in the Admin section of Progress, however, the user can amend these individually using the screen above. The COMBINE options allow the user to compile multiple documents into a single document - useful for when the user wants to print duplex or save the documents as a single PDF. For more information on the default print settings, please refer to the Administrator Functions section of the manual.
Filter Options
The user can also change the information displayed using the Search filters at the top of the screen and clicking the Refresh option.

Clicking Refresh will update the information displayed below based on the sales order and filters selected.
The user can also specify which documents they would like to produce based on the action taken on this screen. The user can select the documents required using the options at the top right of the screen.
Line Details
This option allows the user to look at the selected line in more detail. Highlighting one of the top-level parts presents the user with the following window.
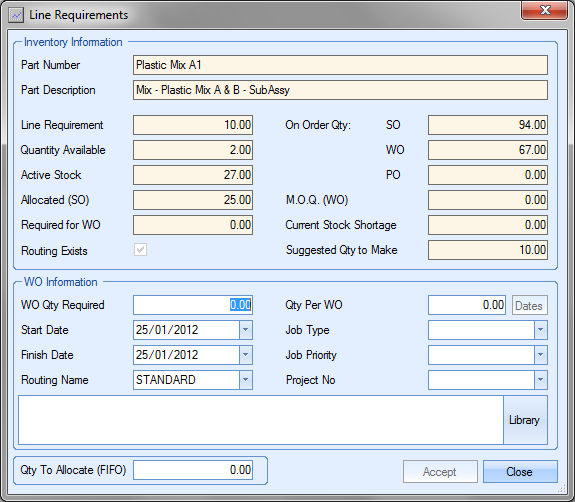
The top half of the screen displays the part inventory status in detail. This shows much the same information as the part’s Stock Status screen as well as a suggested work order quantity.
The bottom half of the screen allows the user to set specific information for the work order(s) to be generated. From here, the user can specify the creation of a single work order for the required quantity, set the work order dates and set various other labels that will be pulled through to the work order created. The user can also choose to split the required quantity into multiple work orders with multiple work order dates if they so wish.
For the creation of a single work order for the full requirement, the user would have a screen similar to the following.

Clicking the Accept option will take the details back to the sales order requirements screen.

Note, however, how this has not updated the subassembly work order quantities. By using the Line Details option, the user is bypassing Progress in calculating the necessary work orders to fulfill the sales order requirements. If the subassembly work orders are required, the user would have to manually update the quantities required for these also.
If the user chooses to create multiple work orders for the sales order line requirements, the user can specify this in the Line Details screen also.
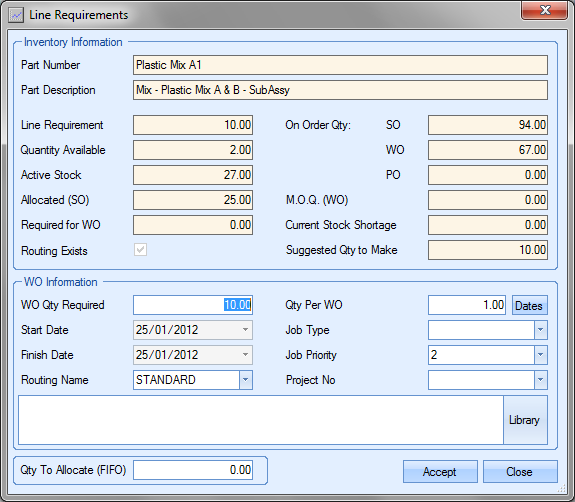
To create multiple work orders, the user must specify the Qty Per WO value. If the user enters a value here, the Dates option becomes available for the user.
.![]()
Clicking the Dates option allows the user to specify the individual work order dates for the works orders planned.
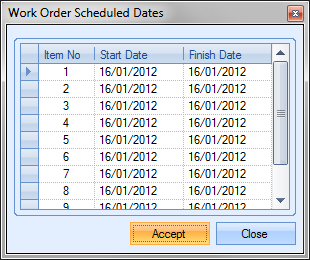
The user can then amend the dates if the customer requires each of the units on different dates. Once the dates and any other information have been entered, clicking Accept will pull the details through to the sales order line requirement screen as before.
Again, using the Line Details option will override the calculations made by Progress. Any subassemblies would have to be manually updated accordingly to ensure their availability for fulfilment of the sales order requirements.
The Line Details screen also allows the user to see the current inventory information and set an allocation quantity if they do not wish to raise work orders.
![]()
Specifying the Qty To Allocate (FIFO) will result in the quantity pulling through to the sales order line requirements screen as shown when the user clicks the Accept option.

Once the user has decided how they wish to fulfill the sales order line requirements, they can click on the Accept option to process any work orders and allocations. If any documentation has been requested by the user, this will also be generated and printed. Any work orders generated will be visible in the Works Order screen.