This section of options covers more miscellaneous options that are not specific to any particular section of the system.
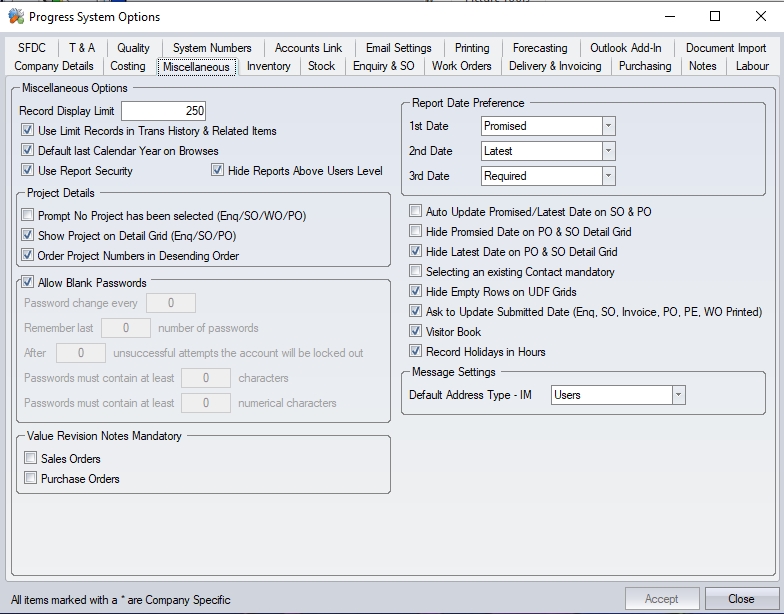
Record Display Limit
The Record Display Limit will be consistent in every browse screen in the system. If 1000 is entered, the first 1000 records will automatically be displayed when the Refresh button (usually located at the top of the form) is clicked in the relating form based on any filters set. When in the browse screens, this number can be changed to suit, but it will resort back to the default value the next time the screen is entered. Records are limited to prevent excessive processing time when there are a lot of historical records.

Example of Limit Records on Works Order Browse
Use Limit Records In Trans History & Related Items
Where historical data in Progress can get rather extensive, this option allows the system to be limited to the number of entries set by the Limit Records option. The default value is specified here, however, the users can amend the figure on their individual PCs. This option will limit the Transaction History and Related Items grids to the same number of records.
Default Last Calendar Year On Browse
This option simply defaults the dates on any of the Browse screens to the last calendar year.
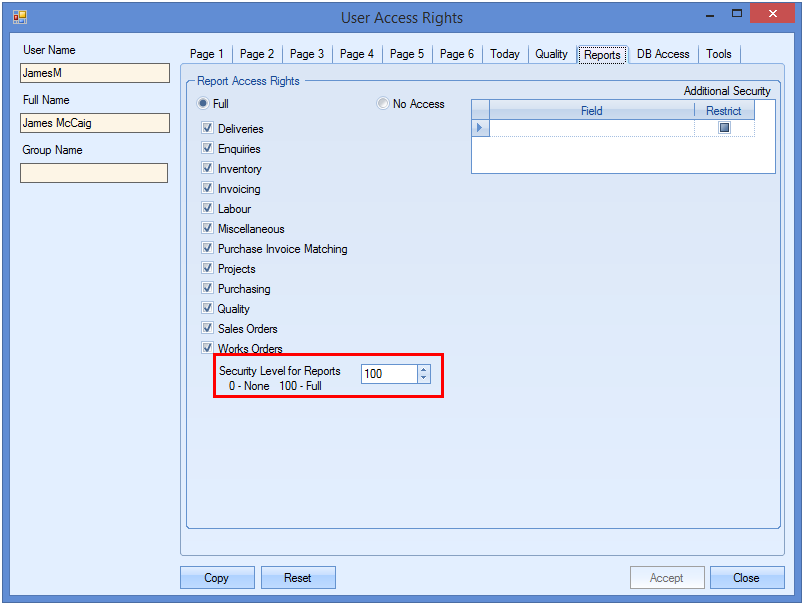
Use Report Security/Hide Reports Above Users Level
These option control the report access for users. The first option, Use Report Security, switches on/off the report security in Progress. If switched on, then each user of the system can be assigned a security level in their access rights which will grant them access to any report with a suitable security level. The screen below shows where the user report security level is set.
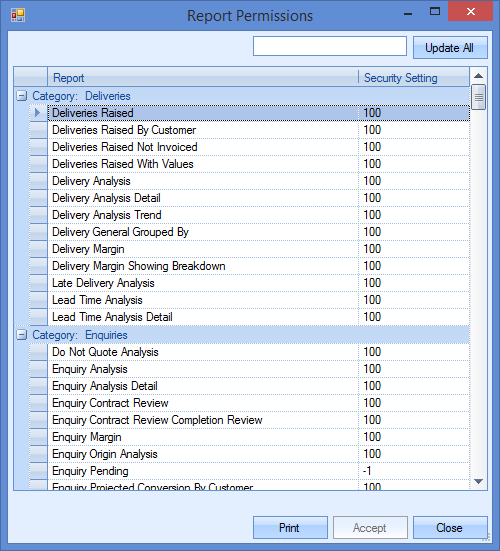
The screen below shows where the report security level is set against each report.
Any report with a security level higher than the user's will not be available to run.
The second option, Hide Reports Above Users Level, will hide any reports that the user does not have access too.
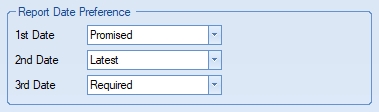
Report Date Preference
This allows the user to specify the importance of the dates available in Progress and allows them to set which ones they with to use/show when it comes to reporting.

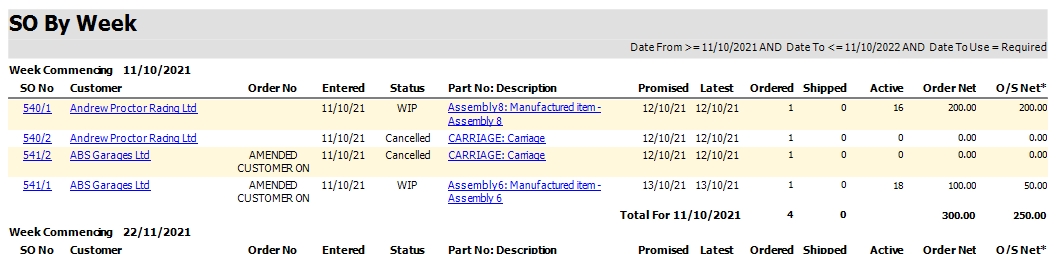
Based on how this is set, Progress will then show the preferred dates on standard reports. For example, below shows one report, based on the date preferences above.
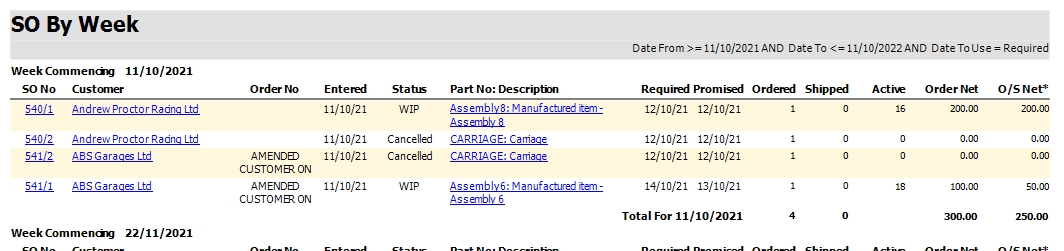
(This report contains two date columns and shows the Required and Promised as per system options)
Changing the date preferences in the Admin options updates the report as follows.
Project Details
These options dictate how projects are managed within different areas of the system.
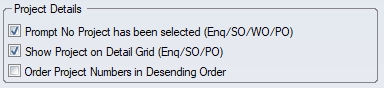
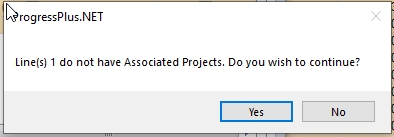
Prompt No Project Has Been Selected (Enq/SO/WO/PO) will prompt the user if no project has been selected in areas of the system. If ticked and no project is entered, the system will highlight this to the user when the enquiry or order is saved.
Show Project on Detail Grid (Enq/SO/PO) adds the PROJECT NO field to the line detail grids for enquiries, sales orders and purchase orders.

(PO line details)

(SO line details)
Order Project Numbers In Descending Order, simple sets the sort order of the projects in the drop-down list from which the user selects.
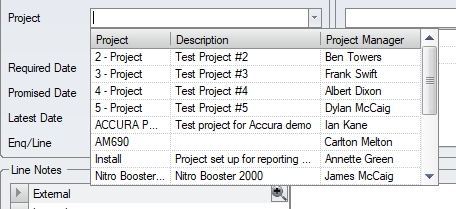
(Option unticked - sequenced alphanumerically)
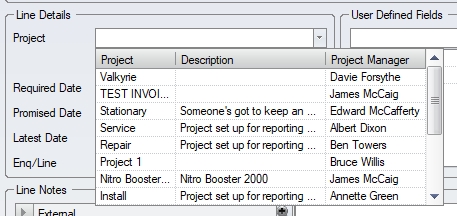
(Option ticked - sequenced alphanumerically descending)
Allow Blank Passwords
The administrator is able to authorise users to use only their username to log into progress plus, by ticking this option. If this option is left unticked users will be forced to enter a password when logging in the system.
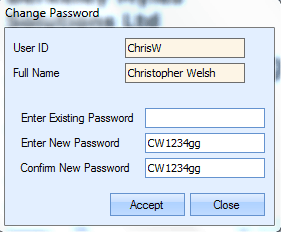
On accessing the main system for the first time (or after clearing a previously entered password) the user will be presented with a screen similar to the following.

| Enter Existing Password | This should be left blank |
| Enter New Password | The user can enter a password into this field. This password can be a mixture of characters and numbers if desired but will be case sensitive. |
| Confirm New Password | The user must enter the same password again to confirm. Clicking the Accept button will permit the user to access the system. |
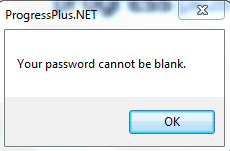
If the user tries to click Accept without entering a password a message box similar to the following will be displayed and on clicking OK the user will be returned to the previous screen.
The following options become available when this option is not ticked. This gives the user some additional options regarding password control.

These options allow the user to specify the following:
•The period (days) after which the user passwords must be change.
•The number of previous passwords which are not allowed to be reused
•The number of login attempts before system locks user out
•The minimum number of characters of the password
•The minimum number of numerical characters of the password
Auto Update Promised/Latest Date on SO & PO
This option will automatically amend the PROMISED DATE and LATEST DATE on purchase orders and sales orders. This will work as follows:
Setting the REQUIRED DATE on a purchase or sales order will set all three dates to the same (REQUIRED, PROMISED and LATEST)
Subsequent changes to the PROMISED DATE will update the LATEST DATE
Amendments to the LATEST DATE only affect the LATEST DATE.
This allows the users to use the LATEST DATE as their reference date as this should always reflect the latest agreed date, while allowing them to retain the initial REQUIRED and PROMISED dates for reference.
Using this option also sets the LATEST DATE as the driver for a number of reports and functions within Progress Plus. These are listed below.
Future Stock Shortages (Reports > Inventory)
Future Stock Surplus (Reports > Inventory)
PO Shortages Screen (Suppliers > Purchasing)
Future Stock Option (Part's Stock Status)
Below MSL Screen (Work Orders)
Shop Floor Loading Screen (SFL)
Hide Promised Date On PO & SO Detail Grid/Hide Latest Date on PO & SO Detail Grid
These options dictate as to whether the additional date fields for PROMISED and LATEST DATE appear on the PO and SO line grids. When ticked, the PO and SO line grid will show only the REQUIRED DATE field. When not ticked, both the PROMISED DATE and LATEST DATE will also be shown on the SO and PO line grids.
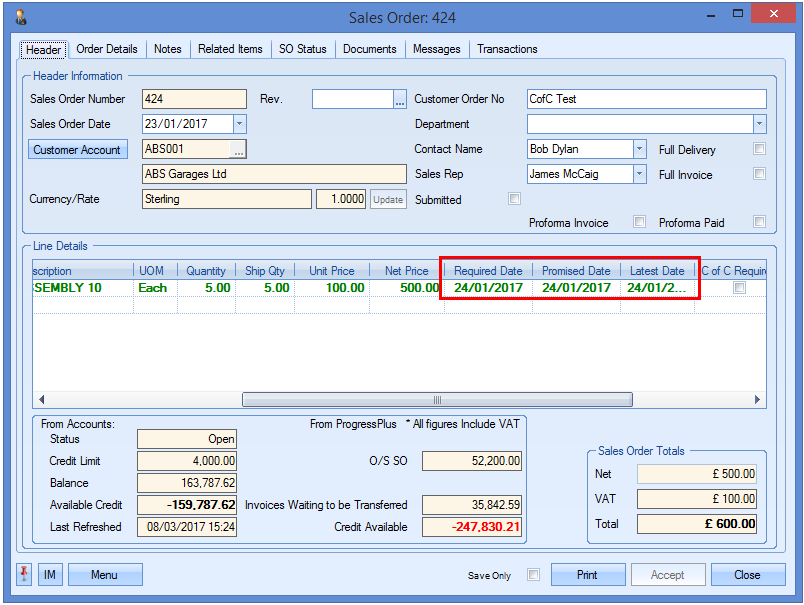
Selecting An Existing Contact Mandatory
This option will force the user to select an existing contact from the customer or supplier when creating new orders. They will not be able to manually enter any name unless it already exists as a contact. Entering an invalid name will result in the user being presented with the following warning.
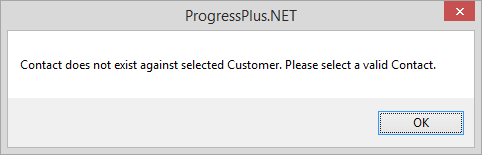
Hide Empty Rows on UDF Grids
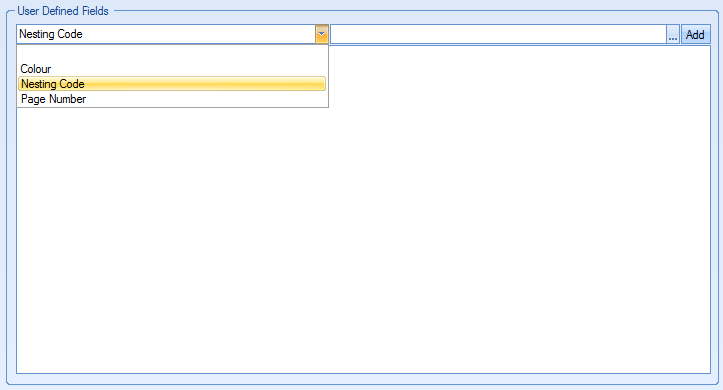
This option will hide all empty UDF fields set up against the different areas of the system. Any UDFs already in use against items in the system will display as usual, however, any non-used UDFs will be hidden. If the user wants to make use of any of the hidden UDFs, then they need to select them from the drop-down list and enter a value before adding it to the item, as shown below.
Selecting the hidden UDF
Entering the UDF value

Adding the UDF
Ask to Update Submitted Date (Enq, PO, SO)
This option will make the system ask the user whether they wish to update the SUBMITTED flag on POs, SOs, etc when they print/preview it. By default, the system will update the flag when the document is printed, as the assumption is that its been physically printed or emailed, however, this option stops the automatic updating of the SUBMITTED flag and allows the user to update it only when they have sent it.
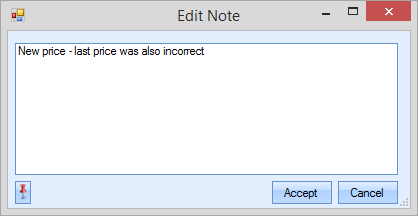
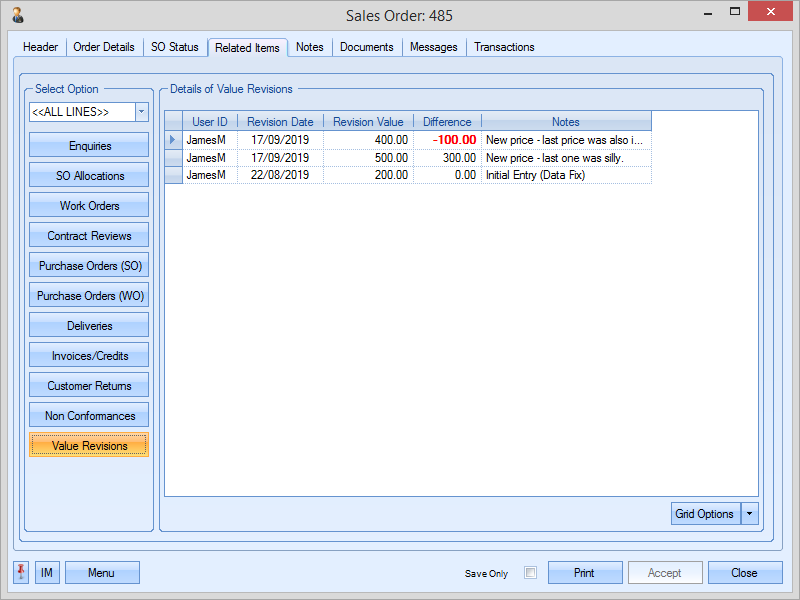
Value Revision Notes Mandatory (SOs/POs)
This option is for changes to SO or PO prices to be accompanied with a note. Any changes to the prices on the orders will prompt the user for a note to be added.
All notes/changes are logged against the order and can be viewed in the Related Items section of the order in the Value Revisions section, as shown below.
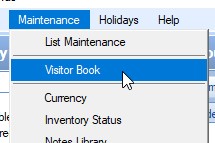
Visitor Book
This option switches on the Visitor Book option, which can be found in the Maintenance menu.
For more information on the Visitor Book functionality, please refer to the Maintenance section of the manual.
Record Holidays In Hours
This option allows the system to be configured to record holiday periods in hours as opposed to days. Having this option ticked means all references to holidays in the system are made in numbers of hours, including employee entitlement.
NOTE: It is not possible to have some employees on hours and others on days - this system option applies the setting to all employees.
Message Settings
Default Address Type - IM
This system option allows the user to set the default list of contacts when sending internal messages (IMs) from the Message Centre section of Progress. The user can select from the drop-down list of options.
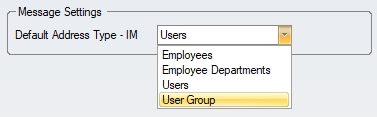
When sending IMs from the main system, the selected group will be the default when the user clicks the TO/CC/BCC option within the IM screen.
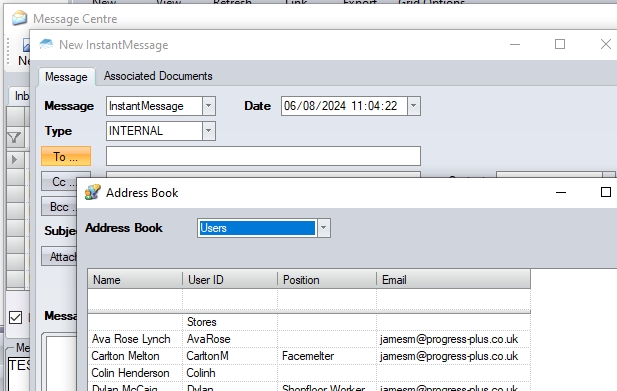
(Default set to Users)
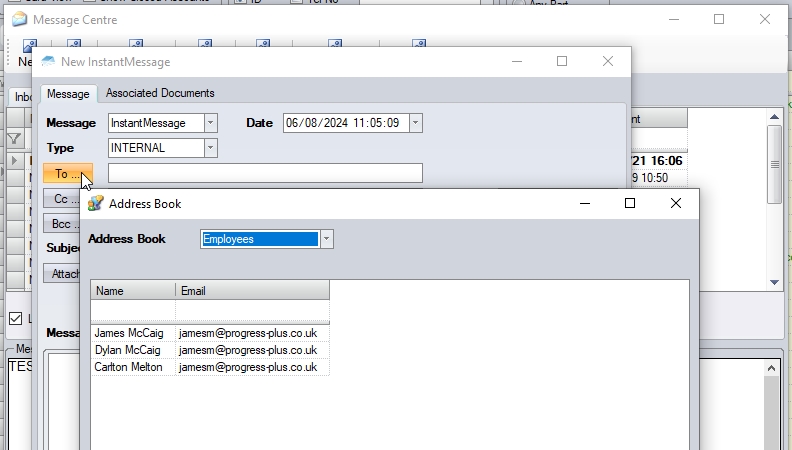
(Default set to Employees)
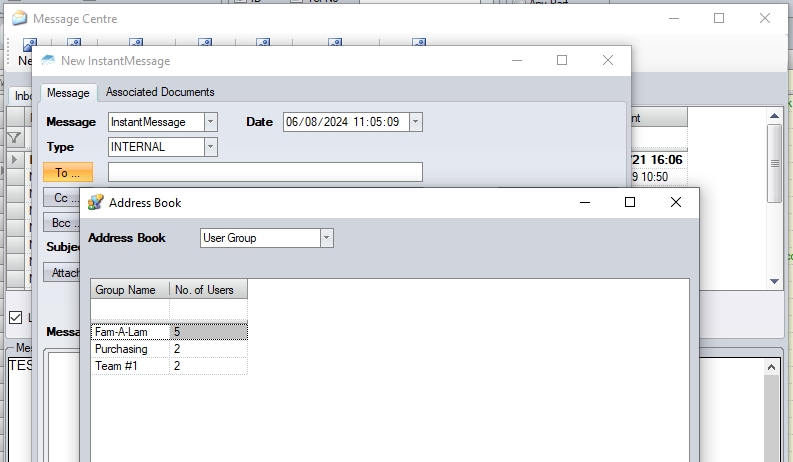
(Default set to User Group)
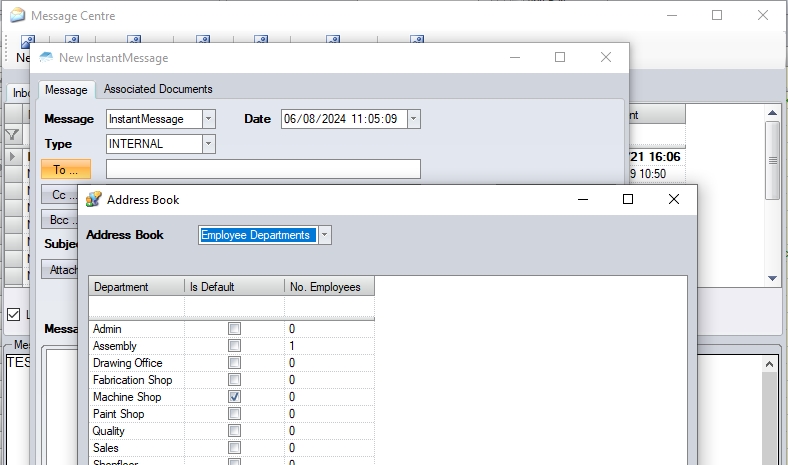
(Default set to Employee Departments)