This section of the inventory screen groups together all out-going or inventory-reducing operations.
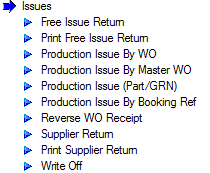
The operations listed in this section cover everything from issuing material to work orders to supplier returns and write offs. All the options available are described in the following sections.
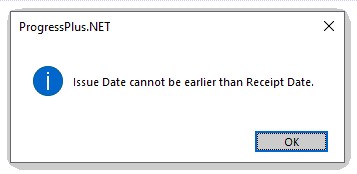
NOTE: Most of the Issue options allow the user to amend the ISSUE DATE when carrying out the action. This is designed to allow the user to retrospectively record actions with the correct dates, however, validation of the ISSUE DATE will stop the user from issuing a GRN if the issue date is earlier than the GRN's receipt date. If the user sets an ISSUE DATE which is before the GRN receipt date, they will be shown the message below and have to amend to a suitable date (i.e. post GRN receipt date).
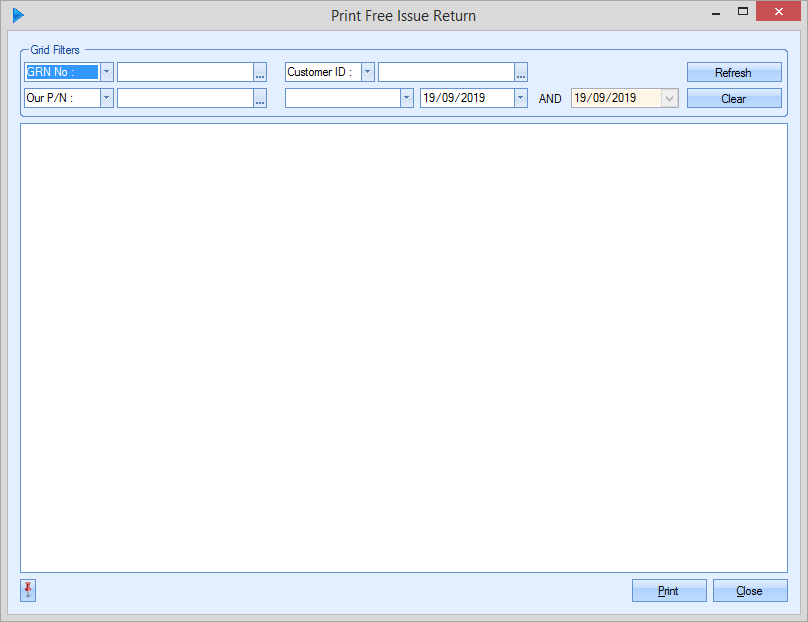
Free Issue Return
This option allows the user to reverse a free issue receipt of material, most typically from when a customer provides material for use.
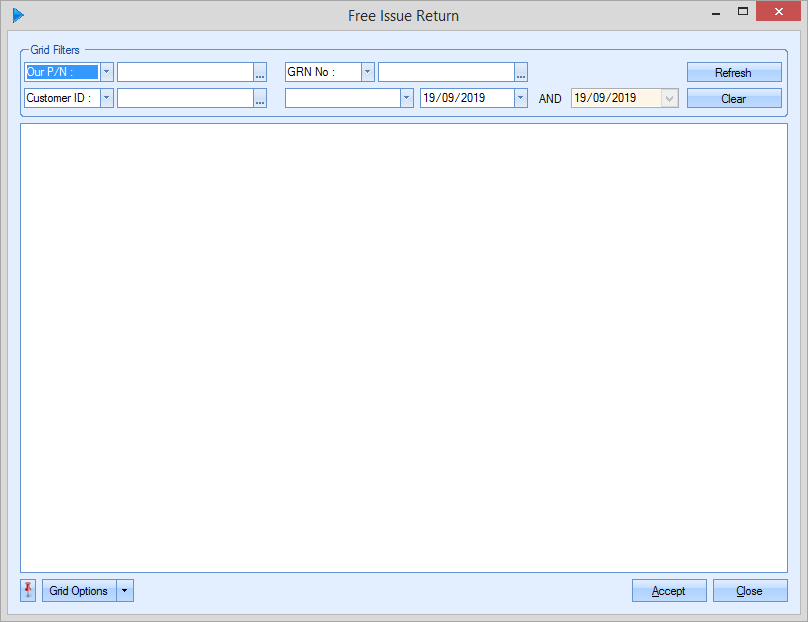
The user can search for the required material by part number, GRN and also customer ID using the grid filters at the top of the screen as well as by receipt date using the date filter. Once any filters have been applied (if any), the user can click REFRESH to search for anything that meets the search criteria.

All GRNs which match the search criteria will be displayed. Once the user has identified the receipt(s) they are interested in, they simply enter the quantity to be returned into the RETURN QTY field along with the appropriate date and any issue notes they wish to add. Once completed, the user would click ACCEPT to reverse the quantity from the selected GRN(s).
Print Free Issue Return
This option allows the user to generate a document to accompany goods which have already been systematically returned using the Free Issue Return option.
Just like the Free Issue Return option, the user can search for the returned material by part number, GRN and also customer ID using the grid filters at the top of the screen as well as by receipt date using the date filter. Once any filters have been applied (if any), the user can click REFRESH to search for anything that meets the search criteria.
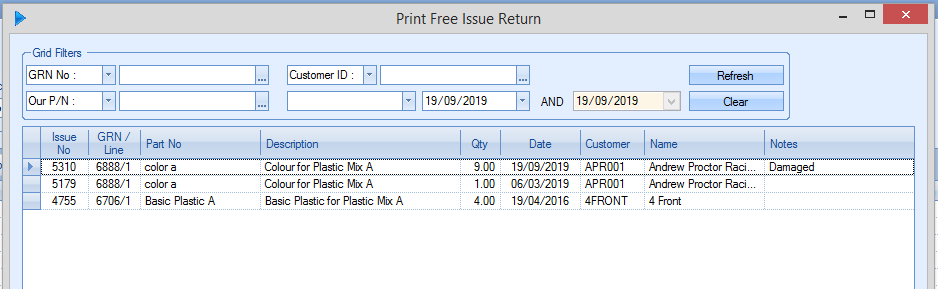
Once the user has identified the return they are interested in, they simply highlight the issue number/return they are looking for and click the Print option to generate the document.
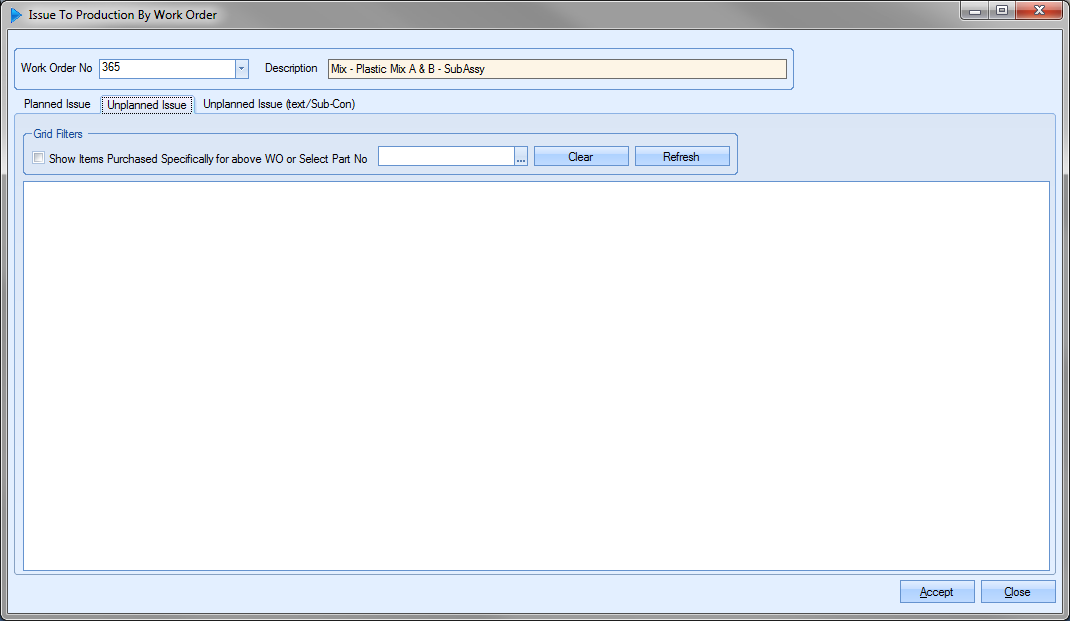
This option allows the user to issue material to non-complete work orders using the work order as a reference. Clicking on this option presents the user with the following screen.
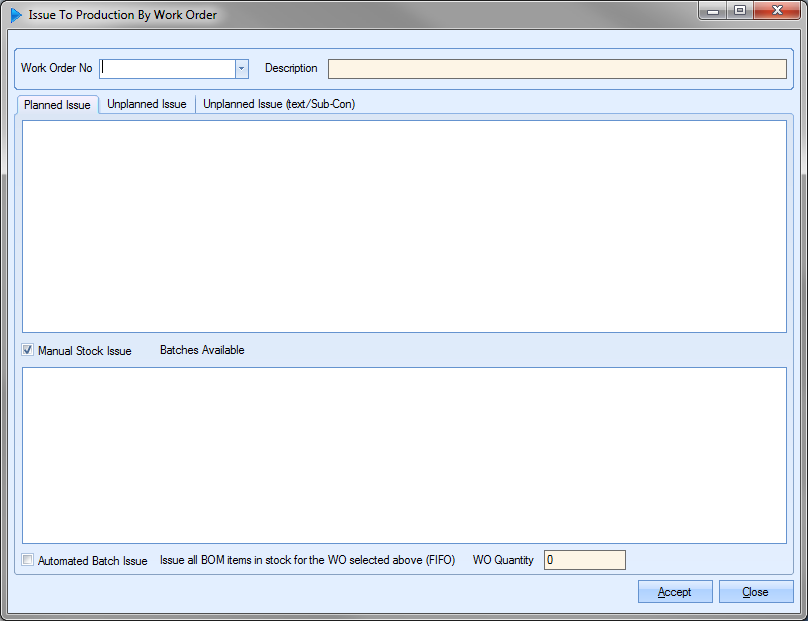
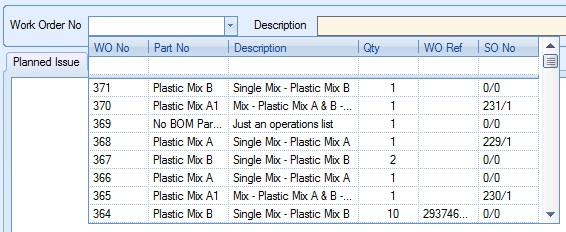
The user can select the work order required using the drop-down list at the top.
The user has three options with regards to issuing material to work orders:
| Planned Issue | This is where the material being issued has been planned for this work order based on the BOM set up against the work order. This would be the standard approach of issuing material to work orders. |
| Unplanned Issue | This is where alternative or additional material needs to be issued due to a change in the material available or due to an additional unexpected requirement for the work order. Examples may be where planned material is unavailable and an alternative is being used or due to an issue during the work order, a piece of unplanned material has to be used in the work order. |
| Unplanned Issue (Text/Sub-Con) | This is where an unplanned, non-inventory item or sub-contract operation needs to be issued to the work order. Examples may be where consumable items are issued to work orders to associate costs or where additional sub-contract operations were required as part of the work order which were not planned for. |
Planned Issue
The screen defaults to the Planned Issue tab. This shows a list of component parts that are on the current BOM for the work order selected.
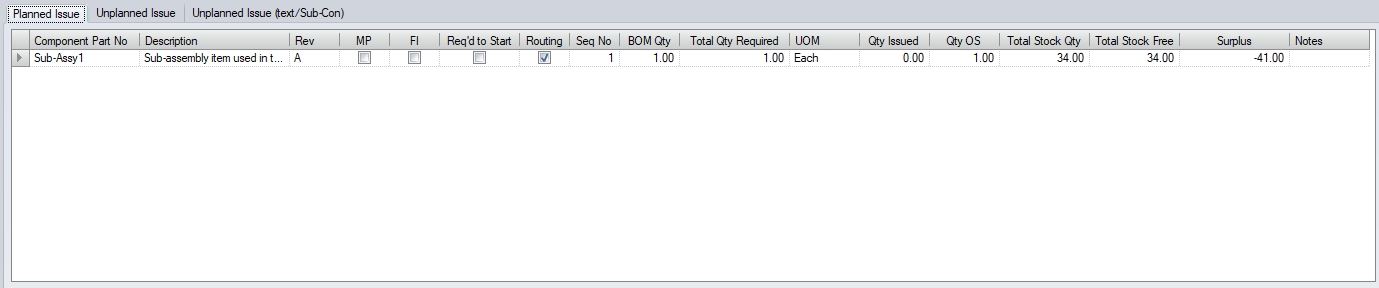
Each line shows the basic component details of the BOM component, the total requirement for the work order as well as the total quantity available in stock. The grid legend indicates the colour coding used, but is as follows:
Blue: Quantity Issued = Quantity Required
Orange: Quantity Issued > Quantity Required
Green: Quantity Issued < Quantity Required
Black: Quantity Issued = 0
Red: Total Free Stock < Quantity Outstanding
Strikeout: If BOM item has a line through it, this part cannot be issued to the WO.
The user also has visibility of whether the parts are mainly purchased (MP), are sub-assembly items (ROUTING), free issue (FI) and/or required for the job to start.
The user can issue material to the work order in two ways; manual issue or automated issue. The manual issue allows the user to select the individual batches of the each component to be issued to the work order whereas the automated issue process issues the required quantity based on FIFO (First In First Out) for all component parts. The user can choose which method they wish to use by clicking on the appropriate tickbox option.
![]()
![]()
Manual Stock Issue
To issue material to a work order manually, the user must select the parts individually. As the user selects each part, the available stock is displayed in the bottom half of the screen.
NOTE: If Progress is configures to automatically fill the ISSUE QTY field based on the oldest stock, this column will be populated against all available batches until either the WO has been fully issued to, or there is no further stock. If the system is not configured to automatically populate the ISSUE QTY, the user will have to fill this in manually against the batches being used. Foe more information on this, please refer to the Stock Issues options in the Admin section of Progress,

The user can amend the suggested issue quantity and batches if they wish to do so by changing the issue quantities on the bottom half of the screen. Once the user is happy with the selected material, they can click the ACCEPT option to issue the material to the work order. If the full work order requirement is issued by the user, the part listed in the top half of the screen will be update to show in blue.

The user can then repeat the process above for any other component parts they wish to issue to the work order.
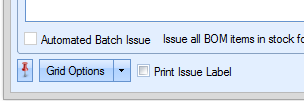
Automated Batch Issue
If the user has selected to issue material to the work order using the AUTOMATED BATCH ISSUE option, Progress will default to the full work order quantity, but the user can amend this quantity if required. The user can also set the ISSUE DATE to a preferred date, otherwise the issue date will default to current date.
![]()
The specified work order quantity determines the amount of the component material to be issued. An example is shown below.
WO Quantity: 10
Component A BOM Qty: 1 Total WO Req: 10
Component B BOM Qty: 5 Total WO Req: 50
Component C BOM Qty: 2 Total WO Req: 20
Using the AUTOMATED BATCH ISSUE option for the following quantities will result in the issuing of the following component quantities.
Automated Batch Issue Quantity: 5
Component A: 5 Component B: 25 Component C: 10
Automated Batch Issue Quantity: 1
Component A: 1 Component B: 5 Component C: 2
Automated Batch Issue Quantity: 7
Component A: 7 Component B: 35 Component C: 14
Once the user has specified the WO quantity to be issued, the user can click the ACCEPT option to issue the component material. If any component part does not have enough stock available to fulfill the work order quantity specified by the user, then Progress will issue all available material. The outstanding quantity will remain open until additional inventory is available for issue.
Access to the AUTOMATED BATCH ISSUE option can also be disabled if preferred. This ensures that a manual issue of material MUST be done. Access to this option is set in the Stock options in the Admin section of Progress.
![]()
With this option ticked, users will not be able to make use of the automated batch issue at all, with the option being unavailable as shown below.
If the user has clicked the PRINT ISSUE LABEL option for either option above, the labels will be produced upon completion of the issue.
Unplanned Issue
If the user requires issuing unplanned material to a work order, they can do this by selecting the UNPLANNED ISSUE tab on the Production Issue By WO screen after they have chosen the work order required. Doing so will present the user with the following screen.
If specific, unplanned material has been purchased for the selected work order, the user can display this material by clicking on the following option:
![]()
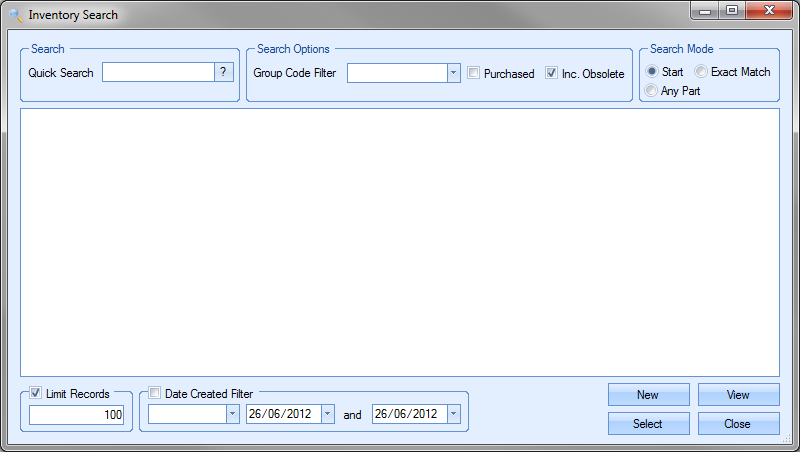
Alternatively, the user can search through existing inventory to locate the part required. This can be done using the following search option.
![]()
Clicking on the ![]() option will present the user with the inventory search screen. The user can use this to identify the part they require.
option will present the user with the inventory search screen. The user can use this to identify the part they require.
Once the unplanned component has been identified, the user can click on the REFRESH option to see the available stock.
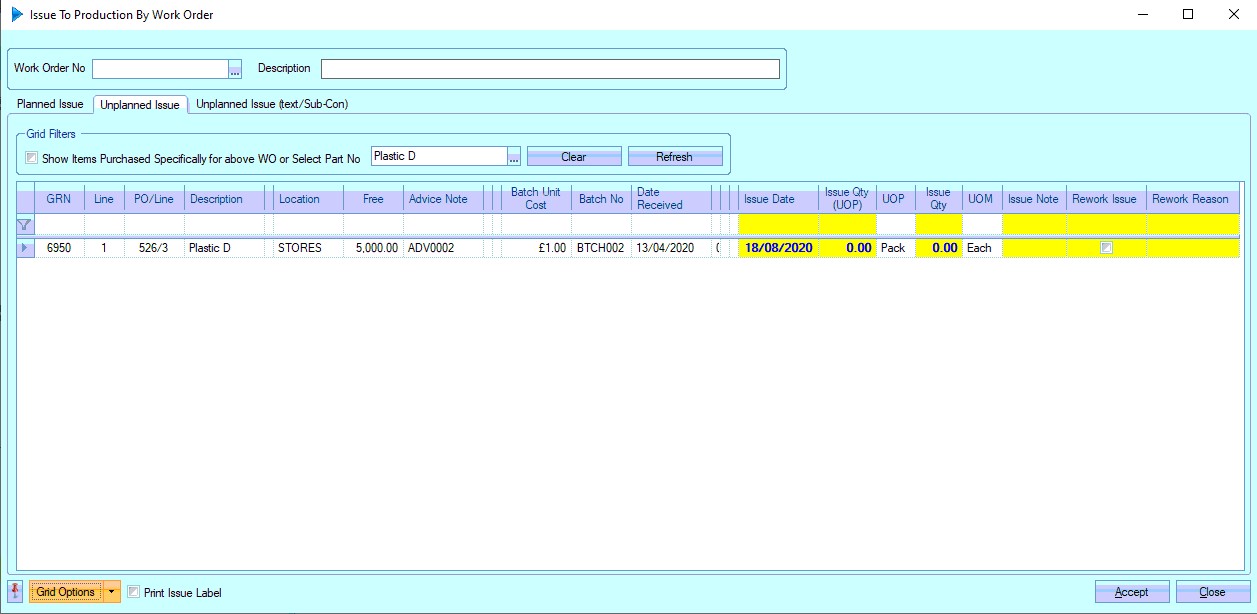
If a large number of inventory records exist, the user can filter these further using the blank filter row displayed directly above the inventory records.
Once the user has identified the inventory batches to be issued, the user can enter the quantity to be issued. If the user needs to issue more than one batch, they can specify the quantities from each batch required. The user can also mark the unplanned issue as "rework issue" and assign a rework reason against it, allowing rework analysis to be done via the work order reports.
Once all issue quantities and details have been entered, the user can issue the material by clicking on the ACCEPT option. If the user has clicked the PRINT ISSUE LABEL option, the labels will be produced upon completion of the issue.
Unplanned Issue (Text/Sub-Con)
If the user requires issuing unplanned material that is not an existing inventory item or if a sub-contract operation has to be issued to a different work order than it was purchased for, the user can do this using this option. Clicking on this tab presents the user with the following screen.
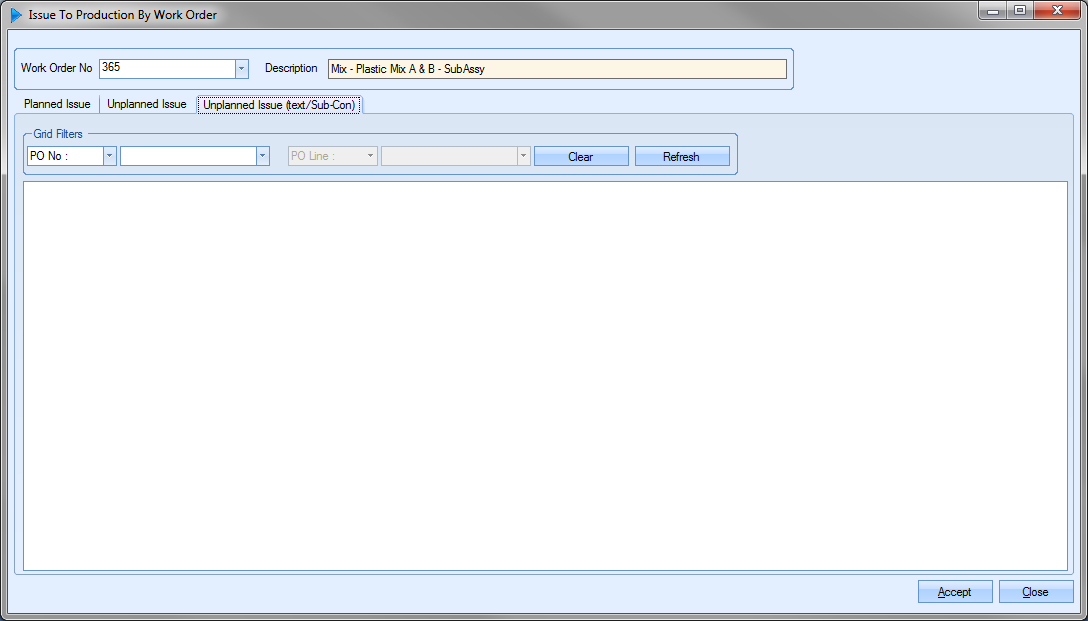
The user can search for the items required using the grid options available. If the user opts to search by purchase order number, the second drop-down list will be active. This will provide the user with a list of purchase order lines to choose from that have available stock that can be issued.
![]()
Once the user has selected the purchase order information or the supplier required, they can click the REFRESH option to view the details of their selections.
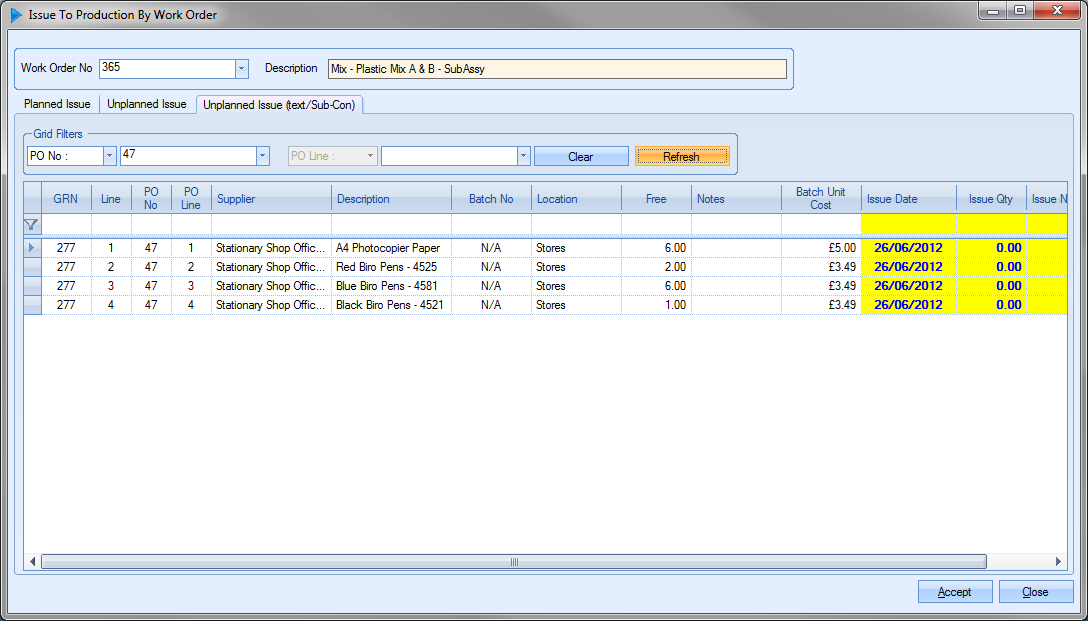
As before, the user can specify the issue quantities before clicking ACCEPT to issue the items to the work order.
This option allows the user to issue component material to a batch of work orders based on a Master work order selected by the user. Selecting this option presents the user with the following screen.
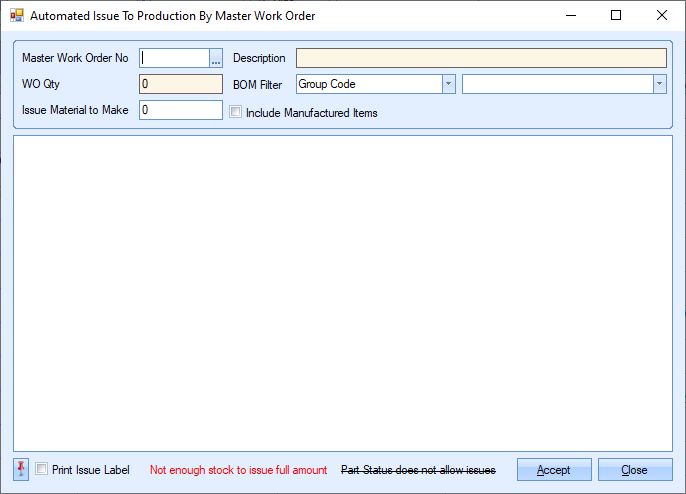
The user can select the master work order using the drop down list at the top. When the user selects a master work order, the work order details are populated at the top and a component list is generated at the bottom half of the screen.

Any component parts that do not have enough stock available are highlighted in red. The user can also filter the component list using the BOM FILTER option at the top of the form. This provides an additional filter to narrow down the types of component parts the user wishes to see. Filters include Group Code, Group Code Family, Part Status and Stock Category. Applying any of these filters will automatically refresh the component list accordingly as shown below.
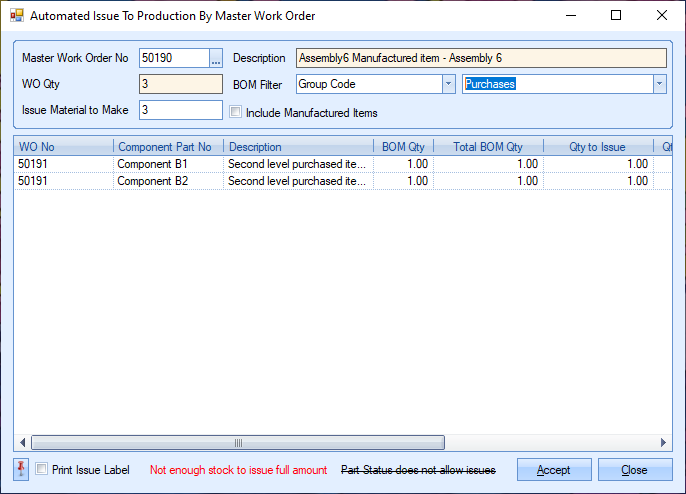
Once the relevant master WO and parts have been selected, the user can issue the material by clicking ACCEPT.
Production Issue (Part/GRN No)
This option allows the user to issue component material to work orders based on a part number and GRN number. This option can be used to issue a single component part to multiple work orders. Clicking this option will present the user with the following screen.
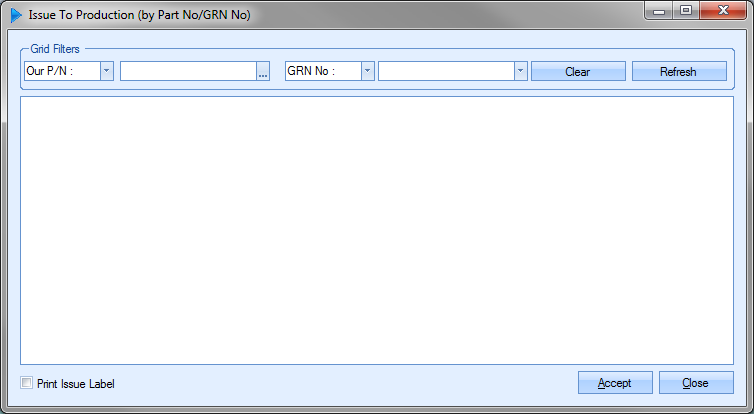
The user can select the part number and/or GRN number using the grid filters at the top of the screen.

Once the details have been entered, the user can click REFRESH to display the part and work order information.

The screen will be populated with the GRN information. Each GRN number will be displayed against all the work orders where the part appears on the BOM. The user can then specify the quantity of each GRN number listed to be issued to the work orders.
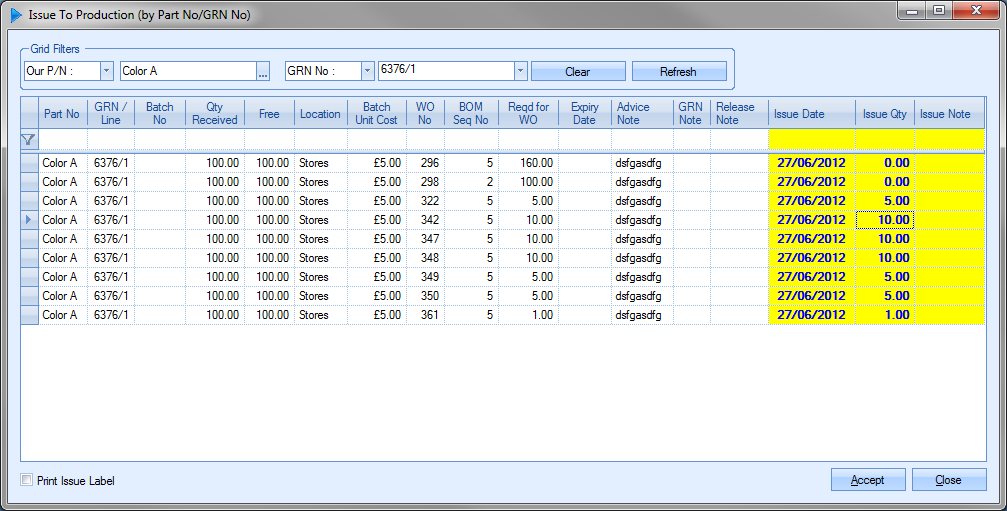
If the user requires issue labels to be produced for these transactions, the user can tick the PRINT ISSUE LABEL option in the bottom left of the screen.
![]()
Once the quantities have been specified, the user can issue the component material by clicking on the ACCEPT option. If labels have been requested, these will print automatically to the designated printer.
Production Issue By Booking Ref
This option allows the user to issue material to a range of WOs all captured under a single booking reference. Material issues to booking references are split across multiple WOs based on a pro rata basis which is calculated based on the planned BOM component quantities of the WOs in questions.
To issue material to a booking reference, the user must first select the booking reference. This will generate a list of parts that ALL the WOs require for the user to see.
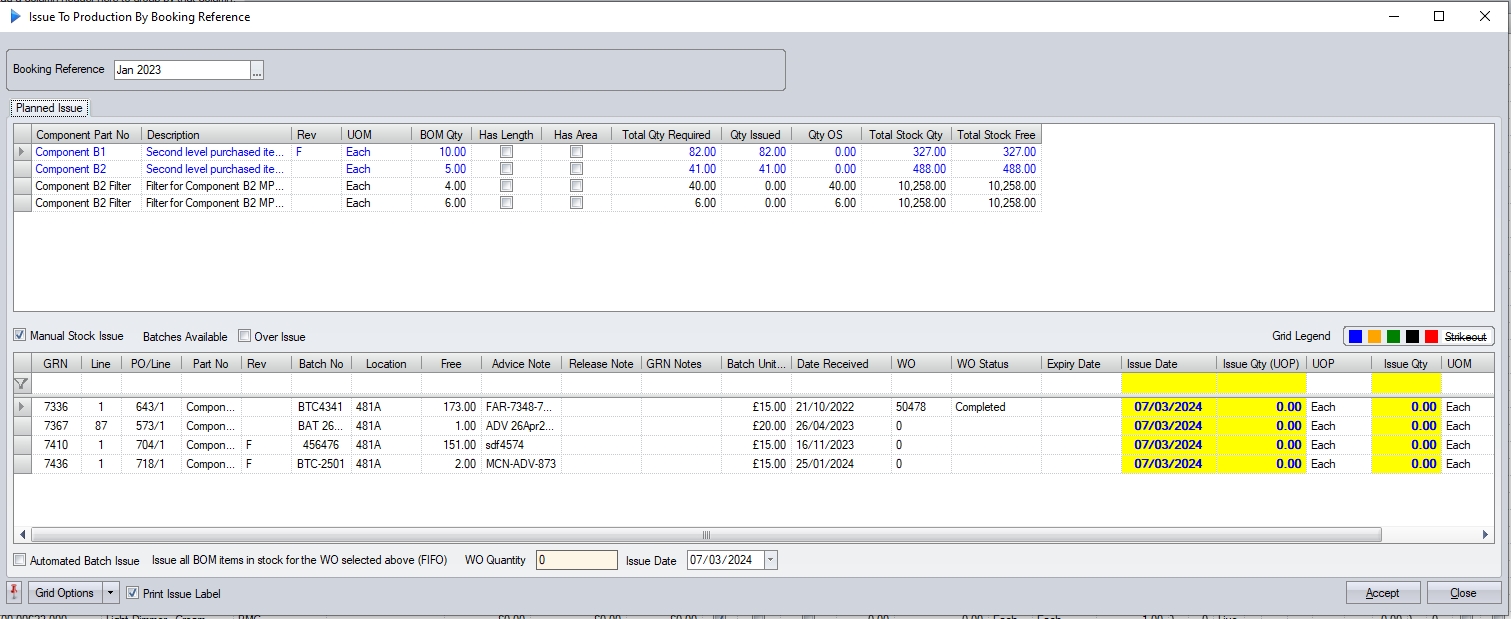
The rest of the process is similar to the Production Issue By WO screen. The user selects the part on the top half of the screen to see the batches available for issue in the bottom half. The user can then enter the quantity to be issued to the WOs against the batch(es) to be used. Clicking ACCEPT will complete the material issue to all the WOs that required that component item and issue a quantity based on the prorata split of the WOs who require that component part. The user can then repeat the process for all other items.
Example:
The following WOs are all grouped together under a single booking reference, Assembly6. The table below also shows the material required for each individual WO.
WO No |
BOM Item |
Planned Qty Required |
50182 |
Plastic D |
100 |
50182 |
Color A |
5 |
50184 |
Plastic D |
200 |
50184 |
Color A |
4 |
50186 |
Plastic D |
400 |
50186 |
Color B |
8 |
50188 |
Plastic D |
100 |
50188 |
Basic Plastic A |
1 |
50190 |
Plastic D |
300 |
50190 |
Basic Plastic A |
3 |
50190 |
Color B |
3 |
50192 |
Plastic D |
100 |
50192 |
Basic Plastic A |
2 |
As you can see, there are common parts required across all of the WOs and others that are only required by some. When it comes to issuing by booking ref, the system will split all issues across all WOs that require the part. This is done based on a pro rata basis (i.e. the planned quantity as a percentage of the total requirement).
Looking at component Plastic D, this is used across all WOs. The total requirement across all WOs is 1200 units. Therefore, any issues of component Plastic D to the booking reference will result in the following split:
WO No |
BOM Item |
WO Requires Qty |
Prorata Calculation |
Prorata % |
50182 |
Plastic D |
100 |
100/1200 = 0.083333 |
8.3333 |
50184 |
Plastic D |
200 |
200/1200 = 0.166667 |
16.6667 |
50186 |
Plastic D |
400 |
400/1200 = 0.33333 |
33.3333 |
50188 |
Plastic D |
100 |
100/1200 = 0.083333 |
8.3333 |
50190 |
Plastic D |
300 |
300/1200 = 0.25 |
25% |
50192 |
Plastic D |
100 |
100/1200 = 0.083333 |
8.3333 |
If half the material is issued to the booking ref (600 units) then the quantity split would be as follows:
WO No |
BOM Item |
WO Requires Qty |
Prorata % |
Issue Qty |
WO Issue Qty |
50182 |
Plastic D |
100 |
8.3333 |
600 |
50 |
50184 |
Plastic D |
200 |
16.6667 |
600 |
100 |
50186 |
Plastic D |
400 |
33.3333 |
600 |
200 |
50188 |
Plastic D |
100 |
8.3333 |
600 |
50 |
50190 |
Plastic D |
300 |
25% |
600 |
150 |
50192 |
Plastic D |
100 |
8.3333 |
600 |
50 |
So, if we proceed with the issue of 600 units, the issue transactions are as follows:
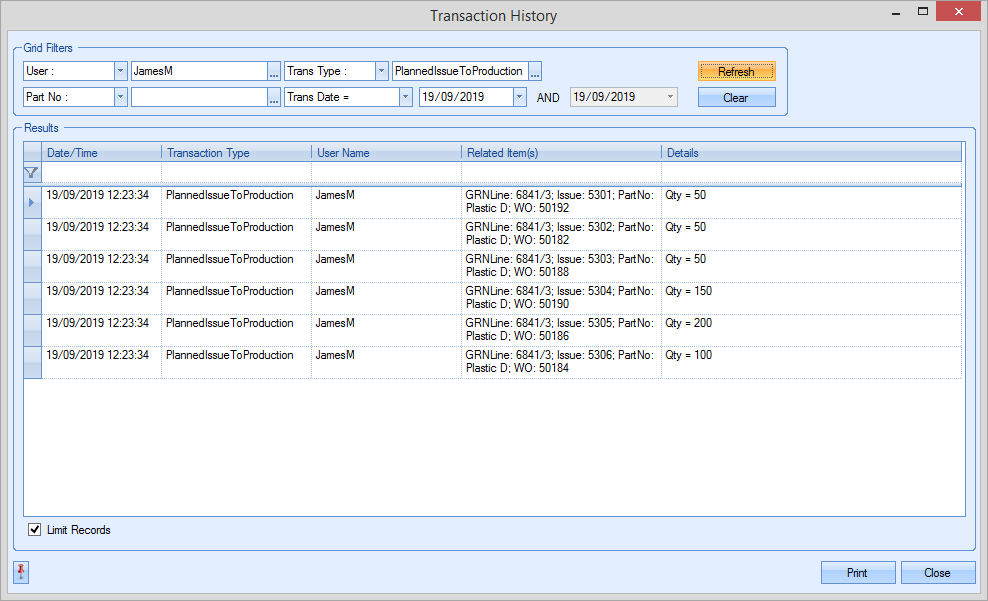
As the transactions above show, the correct material quantities have been issued to all the WOs based on the pro rata calculation.
Looking at another example, component part Basic Plastic A, we can see this is only required on a few of the WOs within the booking reference. The total requirement across all WOs is 6 units. Therefore, any issues of component Basic Plastic A to the booking reference will result in the following split:
WO No |
BOM Item |
WO Requires Qty |
Prorata Calculation |
Prorata % |
50188 |
Basic Plastic A |
1 |
1/6 = 0.166667 |
16.6667 |
50190 |
Basic Plastic A |
3 |
3/6 = 0.5 |
50 |
50192 |
Basic Plastic A |
2 |
2/6 = 0.33333 |
33.3333 |
If half the material is issued to the booking ref (3 units) then the quantity split would be as follows:
WO No |
BOM Item |
WO Requires Qty |
Prorata % |
Issue Qty |
WO Issue Qty |
50188 |
Basic Plastic A |
1 |
16.6667 |
3 |
0.5 |
50190 |
Basic Plastic A |
3 |
50 |
3 |
1.5 |
50192 |
Basic Plastic A |
2 |
33.3333 |
3 |
1 |
So, if we proceed with the issue of 3 units, the issue transactions are as follows:
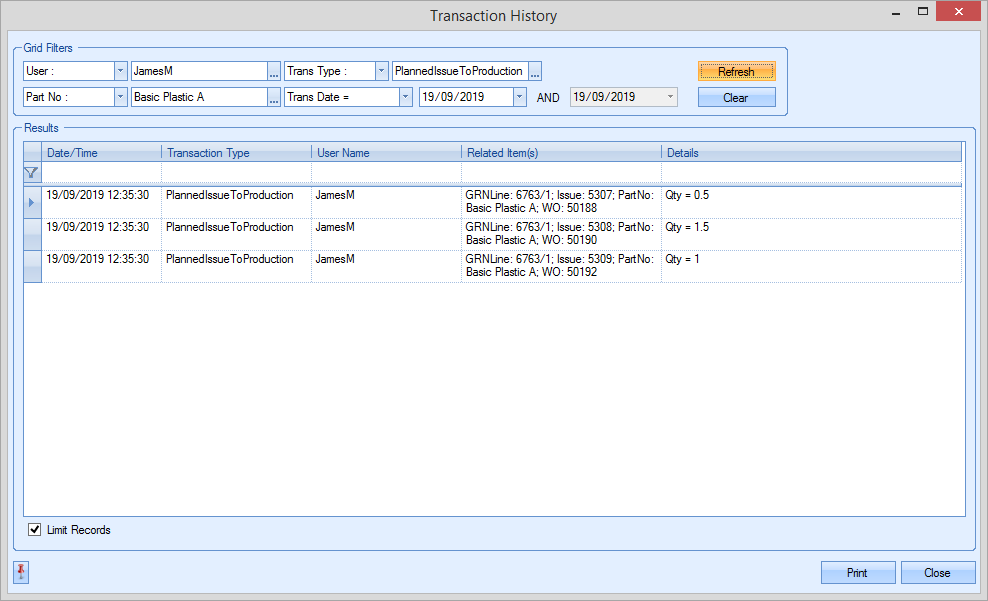
As the transactions above show, the correct material quantities have been issued to only the WOs that require this material, again, based on the pro rata calculation.
The user also has the ability to issue all the material to all the WOs using the AUTOMATED BATCH ISSUE option at the the bottom of the screen.
![]()
Similar to the same option on the Production Issue By WO screen, this will issue the required quantity based on a "first in, first out" (FIFO) approach and will issue the oldest material first. When this option is selected, the system defaults the WO QUANTITY value to the sum of the WO quantities (i.e. issuing in full), however, the user can amend this with the system pro rata-ing the issue quantity based on the requirements and updating the issue quantity against the available batches on a FIFO basis. Clicking ACCEPT will continue with the issue of material accordingly.
The user also has the ability to issue material to booking references where the TOTAL QTY REQUIRED has already been fully issued, using the OVER ISSUE option underneath the top screen.
![]()
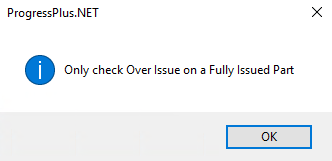
If the MANUAL STOCK ISSUE and OVER ISSUE options are ticked, and the TOTAL QTY REQUIRED has not been fully issued for that item, then the user will get the following message.
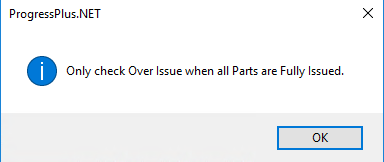
If the AUTOMATED BATCH ISSUE and OVER ISSUE options are ticked, if the TOTAL QTY REQUIRED has not been fully issued for all items then the user will get the following message.
This option allows the user to reverse receipts made against work orders. This can be used for correcting over receipts or for returning finished products to the work order for rework.
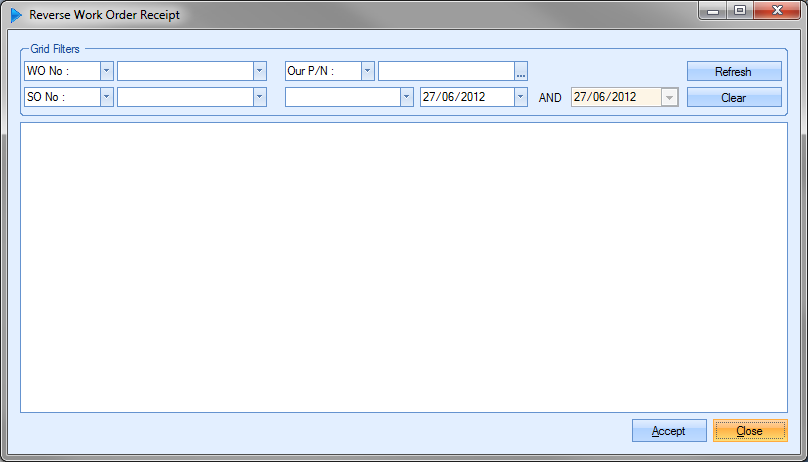
The user can use the filters at the top of the screen to locate the work order to be reversed.

Once any criteria have been specified the user can view the data by clicking the REFRESH option. This will show all work orders that match any specified criteria and that have inventory available for reversal to work orders.
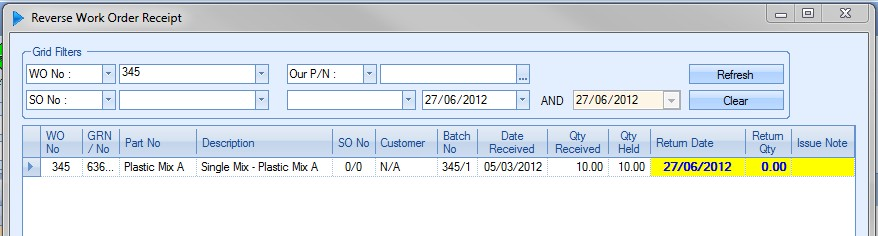
The user can specify the quantity to be returned to the work order using the RETURN QTY column of the screen. Once any quantities have been entered, the user can complete the reversal by clicking on the ACCEPT option. Any reversals made will reduce the available inventory by the specified amount and increase the outstanding work order quantity by the same.
This option allows the user to reverse purchase order receipts made in Progress Plus. This option can be used for correcting over-receipts or for returning damaged material to suppliers. Clicking on this option will present the user with the following screen.
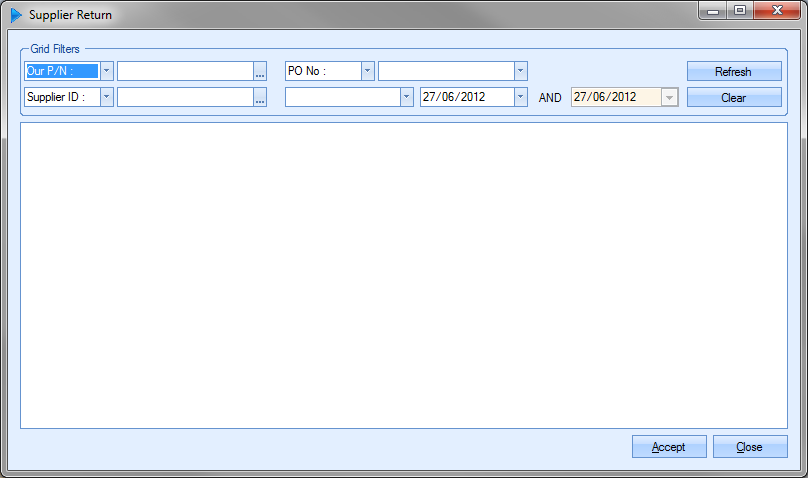
The user can use the filters at the top of the screen to locate the receipt to be reversed.

Once any filters have been set, the user can view any matching receipts by clicking the REFRESH option.
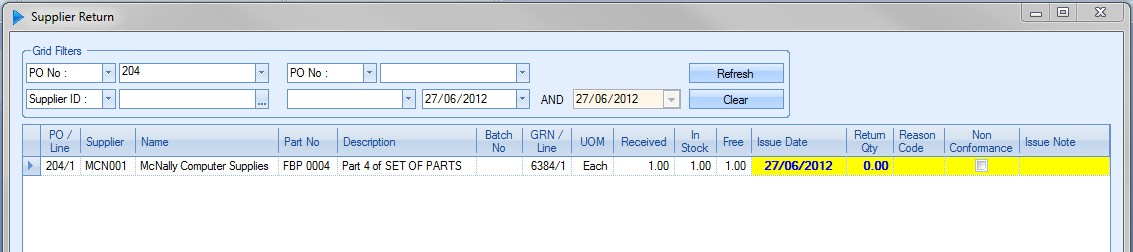
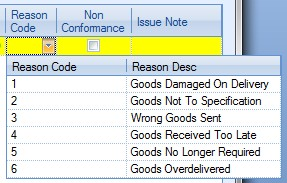
The user can enter the quantity being returned to the supplier and specify a reason code for the return from the drop-down list which is populated via the List Maintenance section.
The user also has an option to mark the supplier return as requiring a PI credit to be raised. This flags the PO as requiring a PI credit and highlights the PO on the Today > To Do > Supplier Returns To Credit screen.

(option to flag PO as requiring a PI credit)

(Supplier Returns To Credit screen)
If the Quality module has been purchased as part of the Progress system, the user will have the option to create a non conformance from the supplier return. To create a non conformance, the user must tick the NON CONFORMANCE option.

With this option ticked, clicking the ACCEPT option to complete the supplier return will create a non conformance record in the Quality section of Progress.
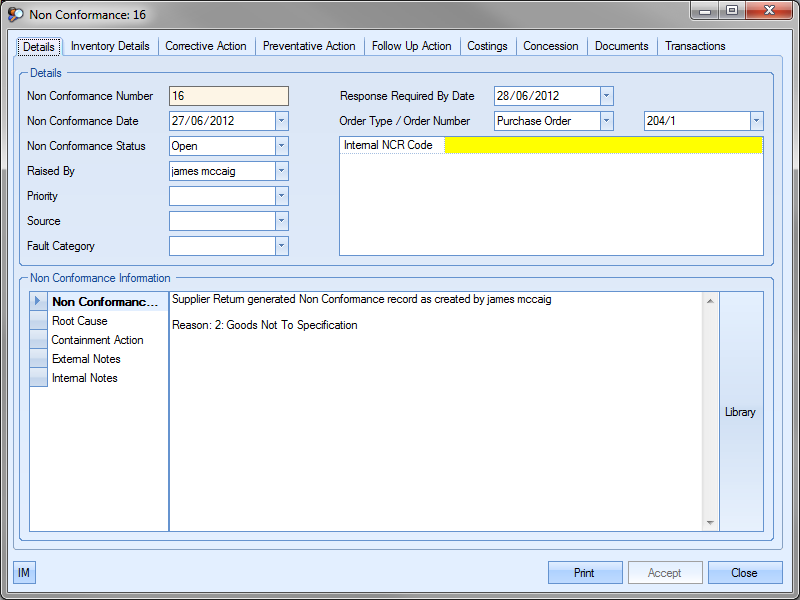
For more information on non conformances and the Quality section of Progress, please refer to the Quality section of this manual.
This option works alongside the Supplier Return option. Once a supplier return transaction has been completed, the user can generate a printed document(s) to accompany the goods back to the supplier. Clicking on this option presents the user with the following screen.
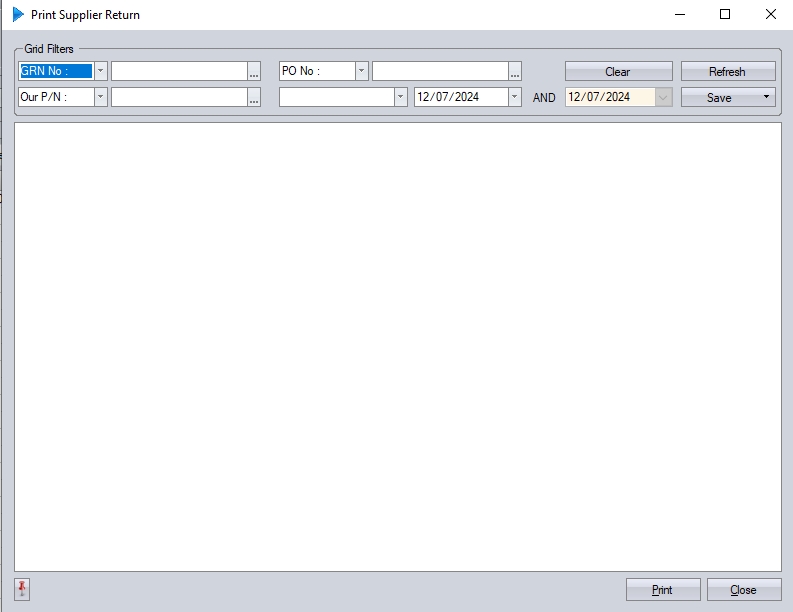
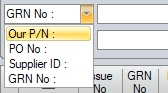
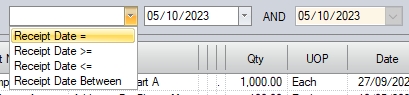
The user can search for specific returns using the grid filters at the top of the screen, including based on the GRN receipt date.
(Print Supplier Return filter options)
Once the filters have been set the user can click the REFRESH option to update the screen. All supplier returns that meet any specified criteria will then be displayed.
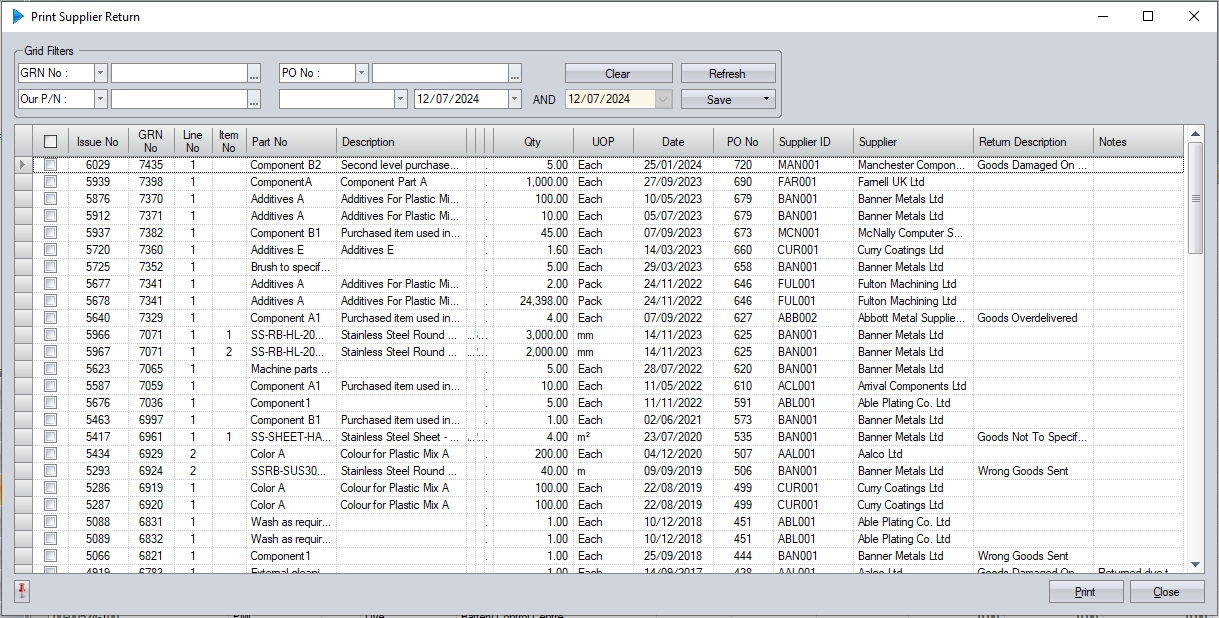
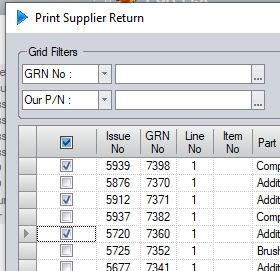
The user can then select the required supplier return transaction(s) and click the PRINT option.
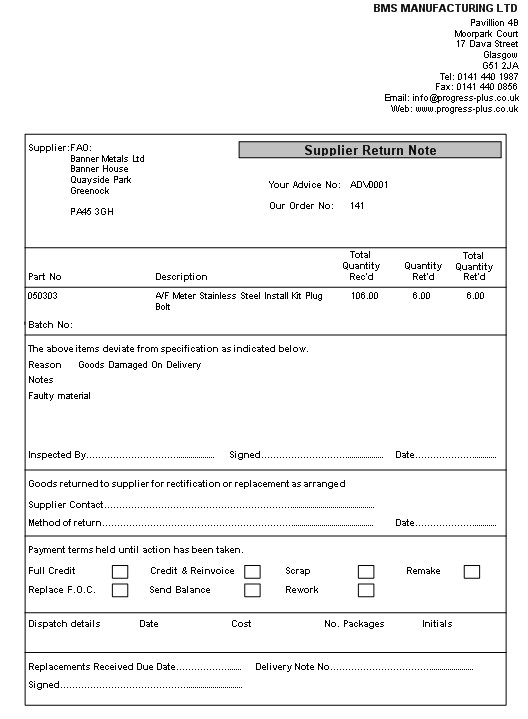
This will generate the Supplier Return document for each of the selected returns. An example document is shown below.
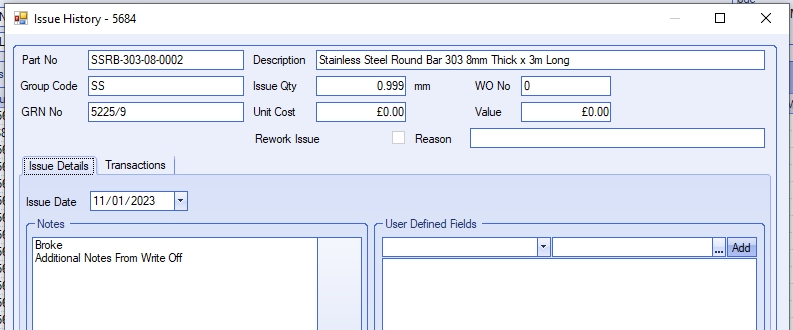
This option allows the user to write off inventory for a specified part number, group code or location. This can be used after a stock take has been completed and/or stock quantities need to be adjusted. Clicking this option presents the user with the following screen.

The user can use the grid filters at the top of the screen to locate the inventory records that need to be written off.

Once any filters have been applied, the user can click the REFRESH option to view the data.
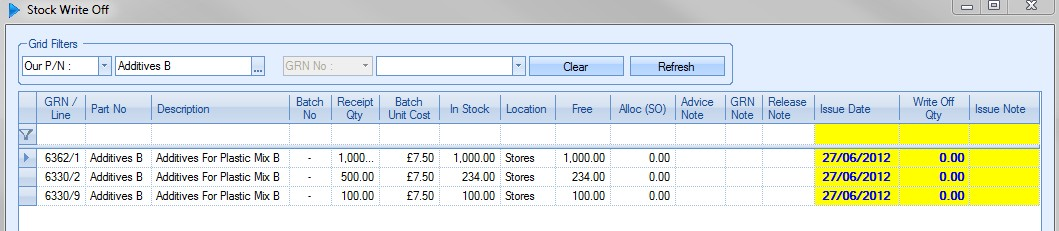
All parts that match the selected criteria will be displayed. Once the user identifies the relevant GRN, they can enter the quantity to be written off, amend the date, set a write off reason from the drop-down list and add any additional notes they wish to add, with the additional notes text being added to the subsequent issue record