This tool in Progress allows the user to forecast future manufacturing requirements and have this information considered from a material requirements and labour perspective. This tool is accessible from within the TOOLS menu at the top of the main Progress window.
Once selected, the user is presented with the main Forecasting window as shown below.
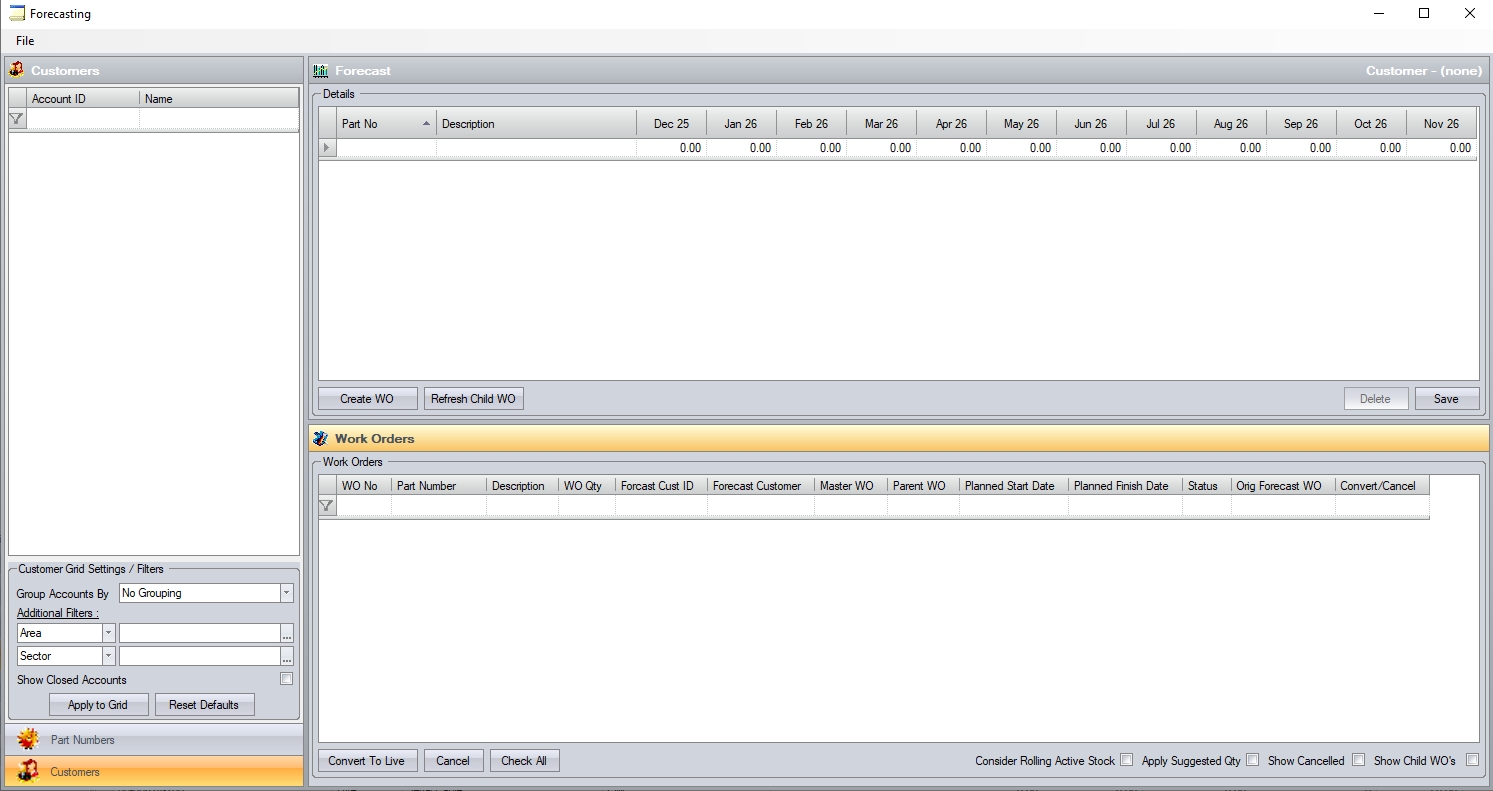
The main screen is split into three main sections:
Customer/Part
This section displays the forecast information from either a part number or customer perspective.

The labels at the bottom allow you to change between each view with the displayed forecast and work order information refreshed accordingly. Each of these screens will list any parts or customers that have been loaded into the forecast. This allows the user to select specific customers or parts to view the forecast information on.
The options at the bottom allow filters and groupings to be set to further tailor the information the user wishes to view.
Forecast
This section displays the forecast quantities for each customer per part or each part per customer depending on the view being taken using the Customer/Part Number section.
Forecast By Part No
Forecast By Customer
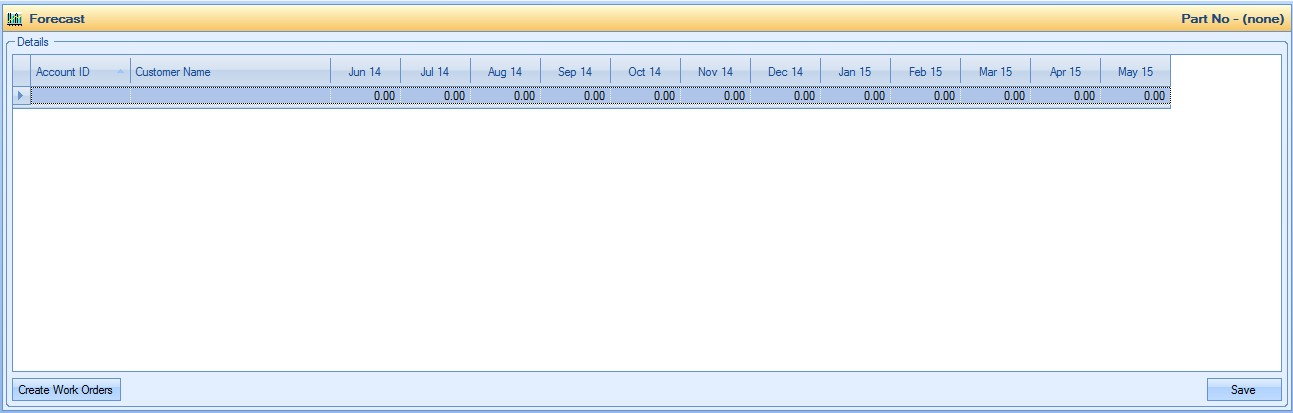
Each part number or customer will be listed with the associated forecast quantity for the next twelve months. From this section, the user has an option to save any forecast quantities that are entered using the SAVE option but also the option to generate forecast WOs for further planning purposes using the CREATE WORK ORDERS option.
Work Orders
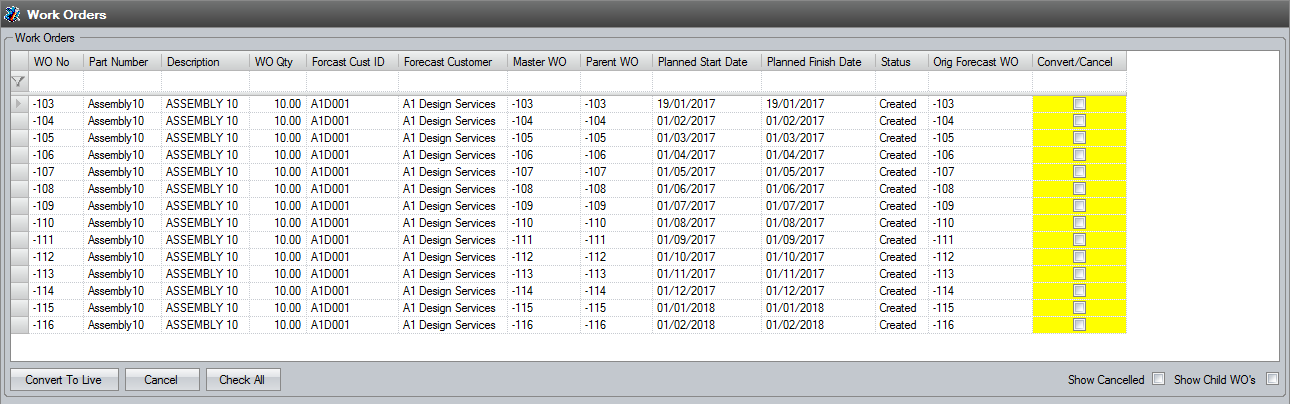
This section displays all the associated forecast work orders that have been generated based on the forecast quantities entered in the Forecast section above.
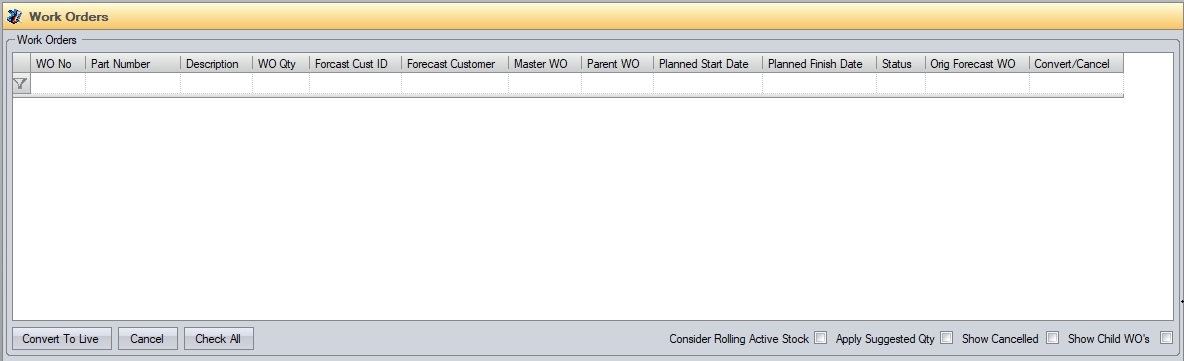
All forecast work orders for the selected part and/or customer will be listed here once generated. From here, the user has an option to convert the forecasted WOs to actual manufacture orders, cancel the forecast WOs as well as the following options:
Consider Rolling Active Stock This option will consider sub-assembly parts' ACTIVE stock for the period when calculating sub-assembly WO requirements if multi-level BOMs are used
Apply Suggested Qty This option will consider the sub-assembly part's minimum order quantity (MOQ) and WO batch quantities when calculating the child WO forecast quantities if multi-level BOMs are used
Show Cancelled WOs This option will include cancelled forecast WOs in the bottom grid results
Show Child WOs This option will include forecast sub-assembly WOs in the bottom grid if multi-level BOMs are used
Adding a New Forecast by Customer
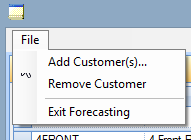
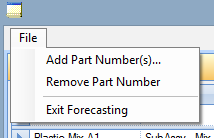
To create a new forecast for a customer, the user needs to add the customer first. This is done using the FILE option at the top of the screen.
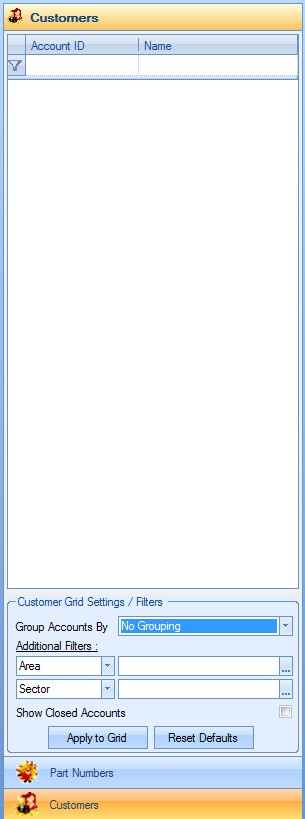
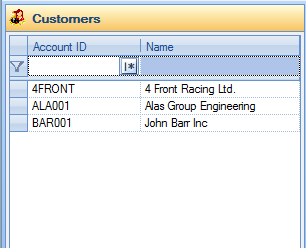
Once selected, the user is presented with the customer selection screen. This will initially be blank as shown below.

The user can use the filters at the top to identify specific customer(s) required or they can simply click on the REFRESH option to see the full customer list.
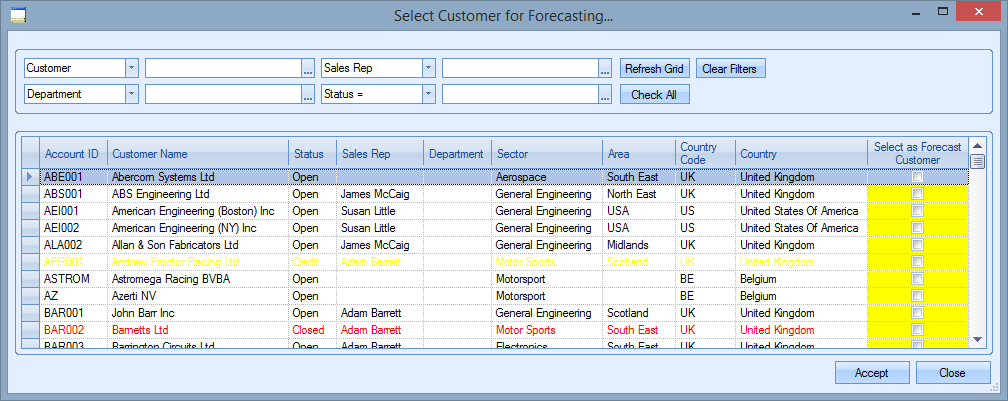
The user can tick the customer(s) they wish to add to the forecasting tool by ticking the box on the right-hand side of the screen. Once selected, the user can click the ACCEPT option to add the customer(s) to the main forecasting screen. All customers added are listed in the customer list on the left-hand side of the screen.
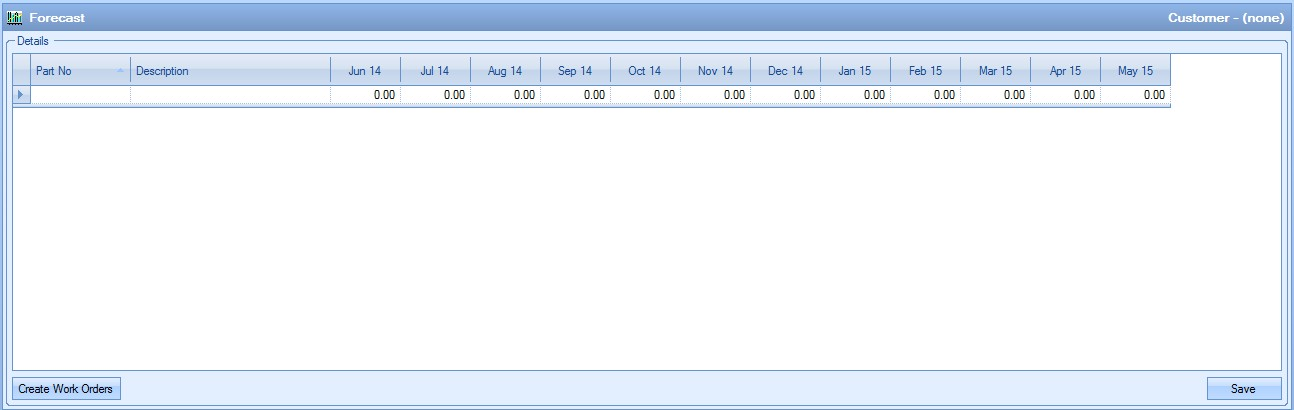
When a customer is selected in this list, their current forecast information is displayed in the Forecast section to the right. Initially this will be blank as shown below.

The forecast information is then added on a part-by-part basis, with each monthly requirement quantity added in the appropriate date column.

Once added, the user can simply save the forecast information as entered by clicking the SAVE option, or generate forecast work orders by clicking on the CREATE WORK ORDERS option.
Adding a New Forecast by Part Number
To create a new forecast for a part number, the user needs to add the part number first. This is done using the FILE option at the top of the screen.
Once selected, the user is presented with the part selection screen. This will initially be blank as shown below.
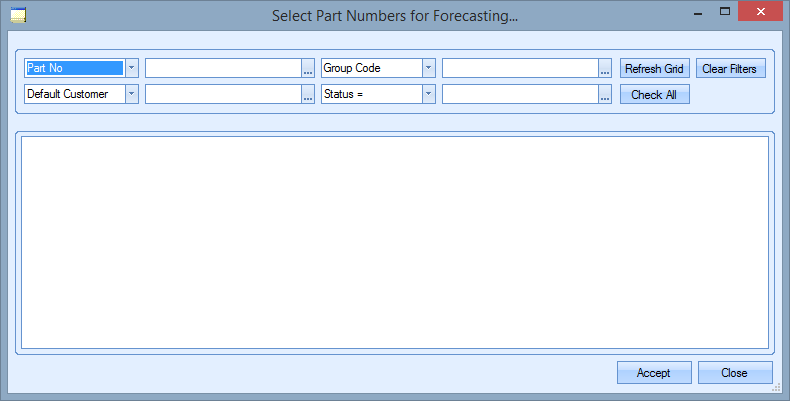
The user can use the filters at the top to identify specific parts(s) required or they can simply click on the REFRESH option to see the full parts list.
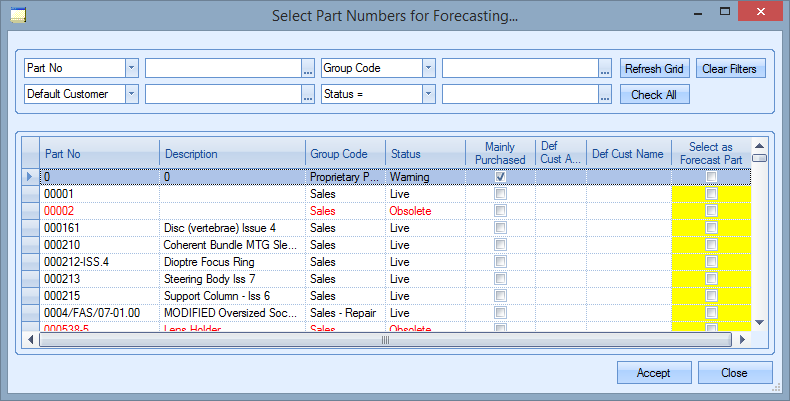
The user can tick the part(s) they wish to add to the forecasting tool by ticking the box on the right-hand side of the screen. Once selected, the user can click the ACCEPT option to add the part(s) to the main forecasting screen. All parts added are listed in the parts list on the left-hand side of the screen.

When a part is selected in this list, their current forecast information is displayed in the Forecast section to the right. Initially this will be blank as shown below.

The forecast information is then added on a customer-by-customer basis, with each monthly requirement quantity added in the appropriate date column.

Once added, the user can simply save the forecast information as entered by clicking the SAVE option, or generate forecast work orders by clicking on the CREATE WORK ORDERS option.
Forecast Work Orders
Once forecast information has been entered, the user can generate forecast WOs. These allow the forecasted information to be considered when looking at future material and labour requirements. The user can create the forecast WOs in a number of ways:
| ALL | This option will create forecast work orders for all forecast parts/customers displayed in the forecast grid for all years/months forecasted. |
| Selected Column Only | This option will create forecast work orders for all the listed parts/customers ONLY for the selected year/month. |
| Selected Row Only | This option will create forecast WOs for only the selected part/customer for ALL the years/months forecasted. |
| Selected Cell Only | This option will create forecast WOs for only the selected part/customer for ONLY the selected year/month. |
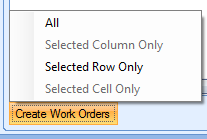
Once the user has decided which forecast information is to be used to generate the forecast work orders, they can select the appropriate option from the CREATE WORK ORDERS option. This will generate the forecast work orders and then list them in the Work Order section below.
The Forecast section is also updated to highlight the Forecast information that has been converted by displaying the converted info in bold.

For manufactured items which have a multi-level BOM, the associated child forecast work orders can be displayed in the Work Order section by ticking the following option.
![]()
This will update the Work Order grid to include all WOs including the associated sub-assy work orders.
Deleting Forecast Work Orders
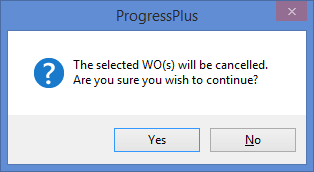
The user also has the option to delete selected forecast WOs too. To do this, the user selects the WOs in question and then clicks the CANCEL option at the bottom of the screen. The system will prompt the user to confirm before deleting the WOs as required.

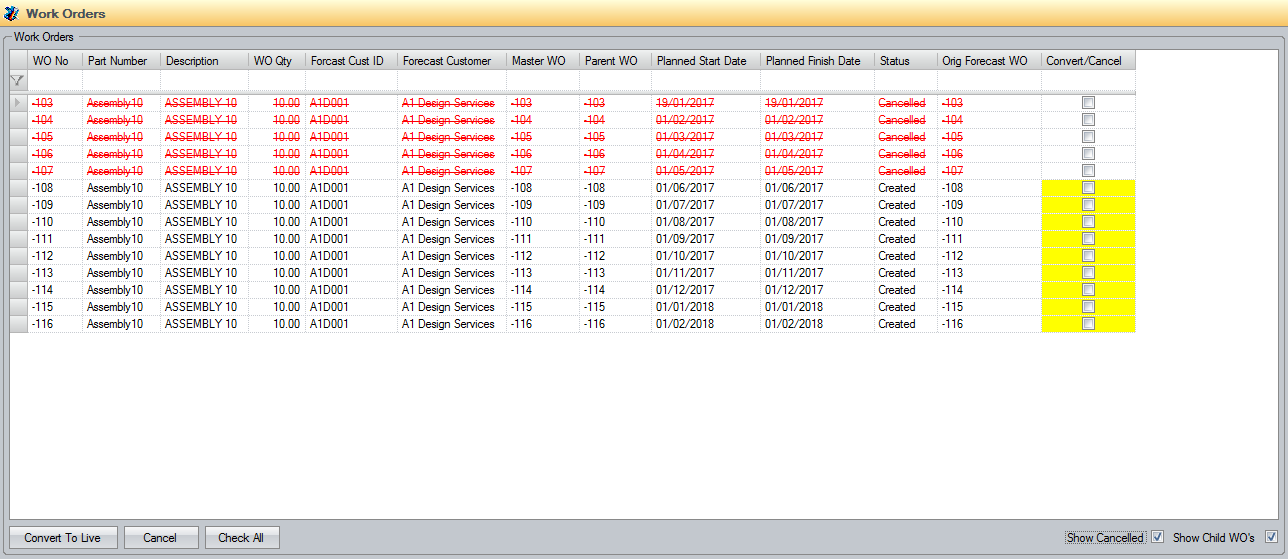
Any forecast WOs that are deleted will drop off the screen, leaving only those remaining, however, the user can see any cancelled WOs by clicking on the SHOW CANCELLED option at the bottom-right of the screen.; Clicking this will refresh the grid to include those cancelled as shown below.
![]()
Amending Forecast Requirements
In the event the forecast information is changed to remove a requirement from a particular month, the system will automatically cancel any associated forecast WOs.


If the requirement is amended to another quantity (up or down), the associated forecast WO will be updated accordingly.


Utilising Forecast Work Order Information
Once forecast work orders have been generated, they can be used when considering future material and labour requirements. For material requirements, there are a few places where the information can be viewed and considered.
Inventory Stock Status
The forecast information regarding the manufactured part itself can be viewed via the part’s Stock Status screen as shown below. This lists the forecast work order information for all forecast work orders currently created.

The user also has an option on this screen to view the part’s current status including the forecast information. This recalculates the current stock status of the part based on the future requirements from the forecasted work orders.
![]()
Material Requirements
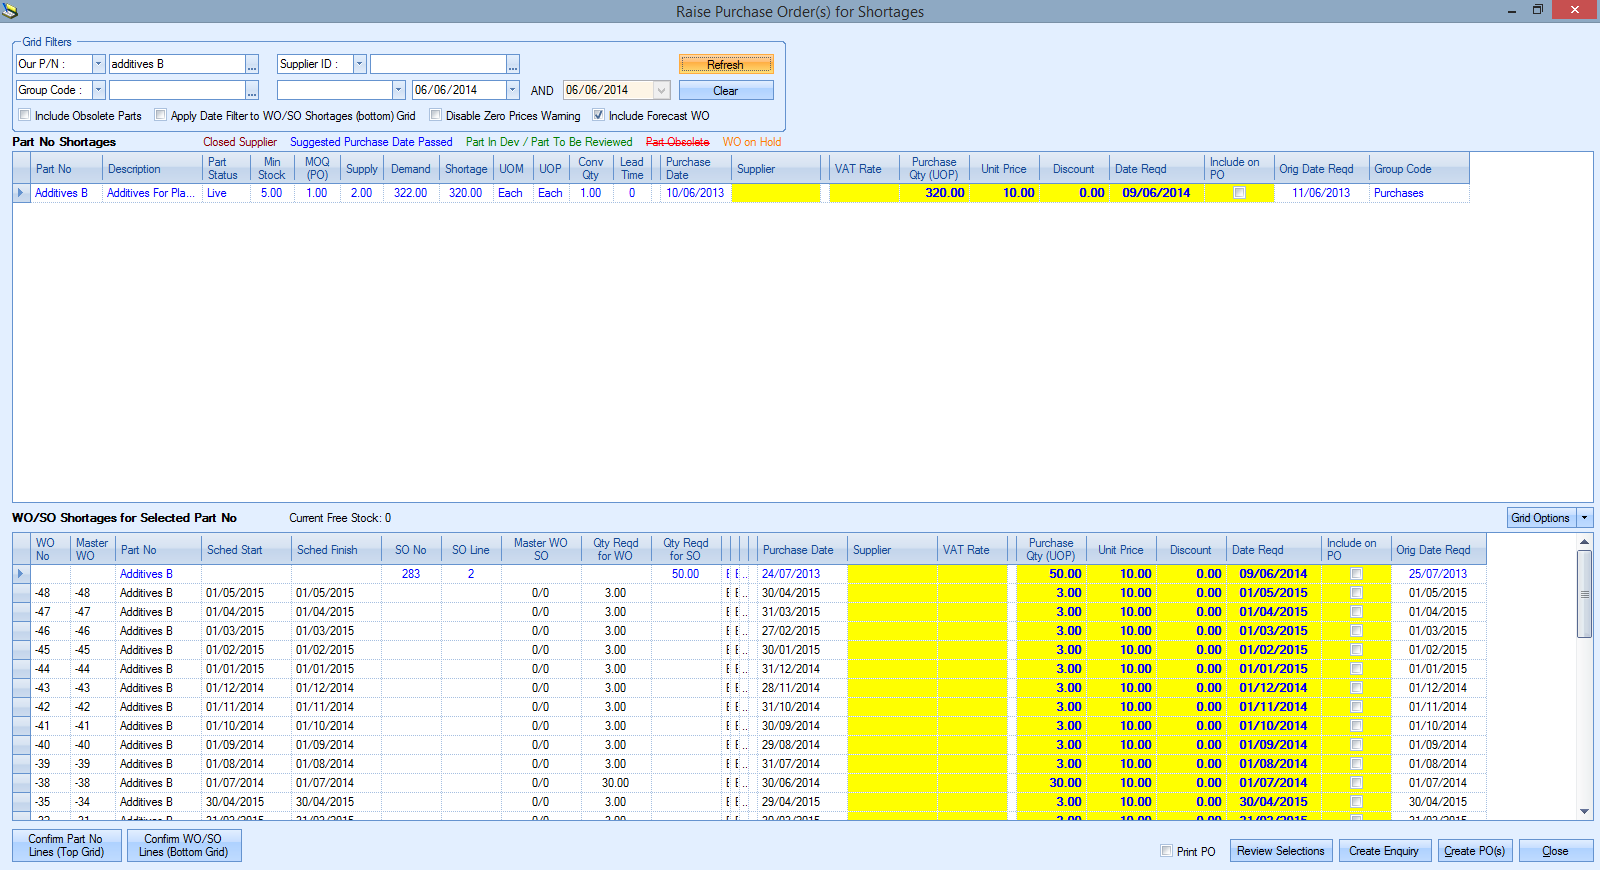
The user can also take the forecast work orders into consideration when looking at the material that currently needs to be purchased. The PO Shortage screen (shown below) typically shows all material shortages which need to be purchased.
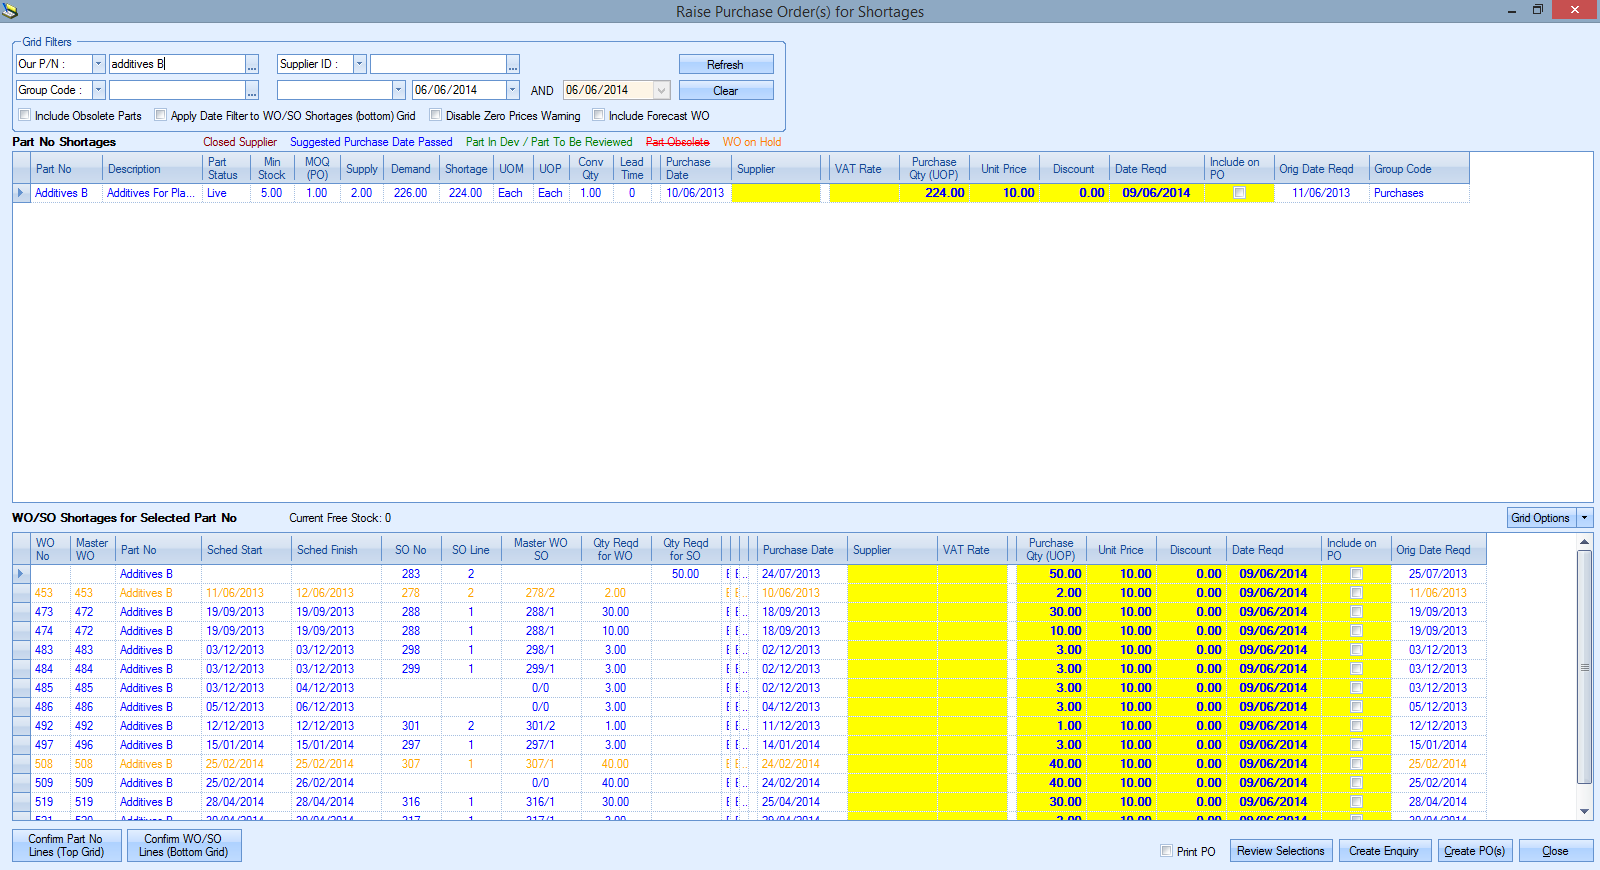
The option at the top of the screen to INCLUDE FORECAST WO will add the forecast requirements to the existing outstanding requirements allowing the user to raise POs against these future requirements.
![]()
Ticking this option and refreshing the screen displays the additional requirements for the parts based on the forecast WOs.
Labour Requirements
The forecast WOs can be taken into account when looking at the future planned labour. The Shop Floor Loading section of Progress, where the labour schedule can be planned, has a similar option to the PO Shortage screen shown above, which allows the user to include the forecasted WOs when viewing the labour for the coming months.
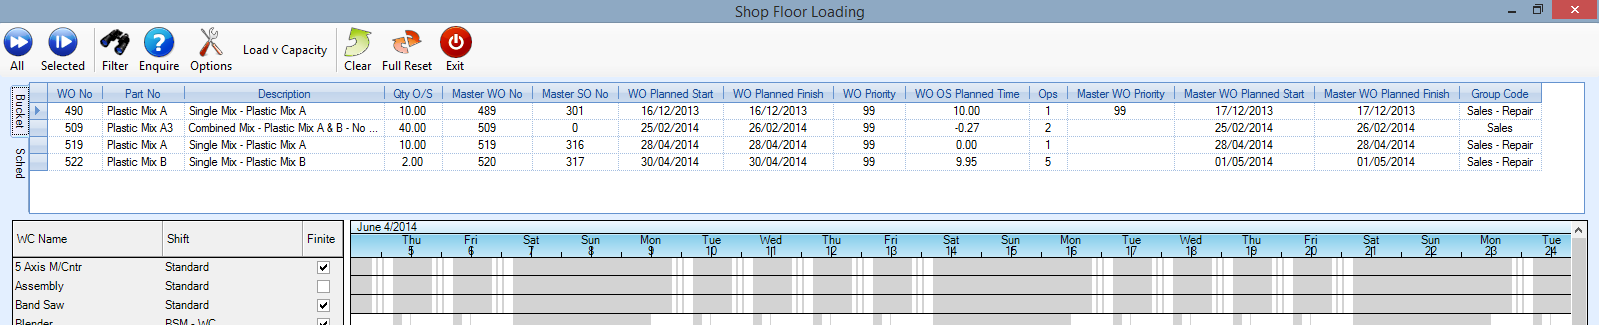
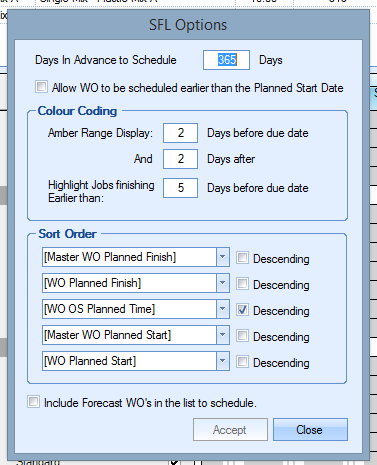
The user can include the forecasted WOs by clicking on the OPTIONS menu option at the top and then clicking the INCLUDE FORECAST WOS IN THE LIST TO SCHEDULE option (shown below),
Once applied, the Shop Floor Loading screen is updated to list the forecasted WOs alongside the standard WOs already in the system. These can then be scheduled and planned just like all standard WOs.

Order Confirmation
Once the customer has confirmed that an order is going ahead, the user can convert a forecast WO into a standard WO for manufacture. This can be done directly from the Forecasting tool using the CONVERT TO LIVE option on the work order section.
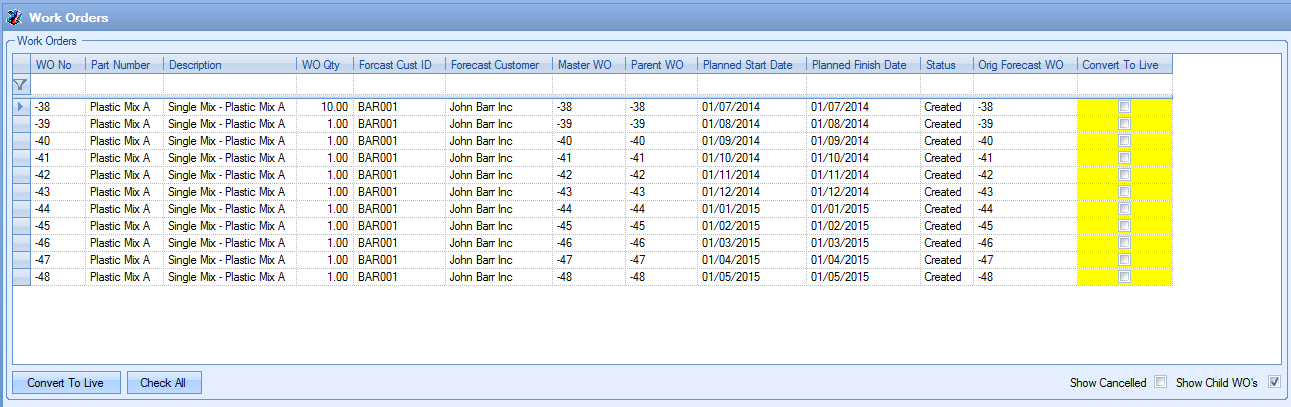
To convert the work orders, the user simply selects the forecast work order(s) to be converted using the CONVERT TO LIVE tick box and then clicks the CONVERT TO LIVE option. This generates the standard work orders for the items and updates the Work Order section to reflect this accordingly.
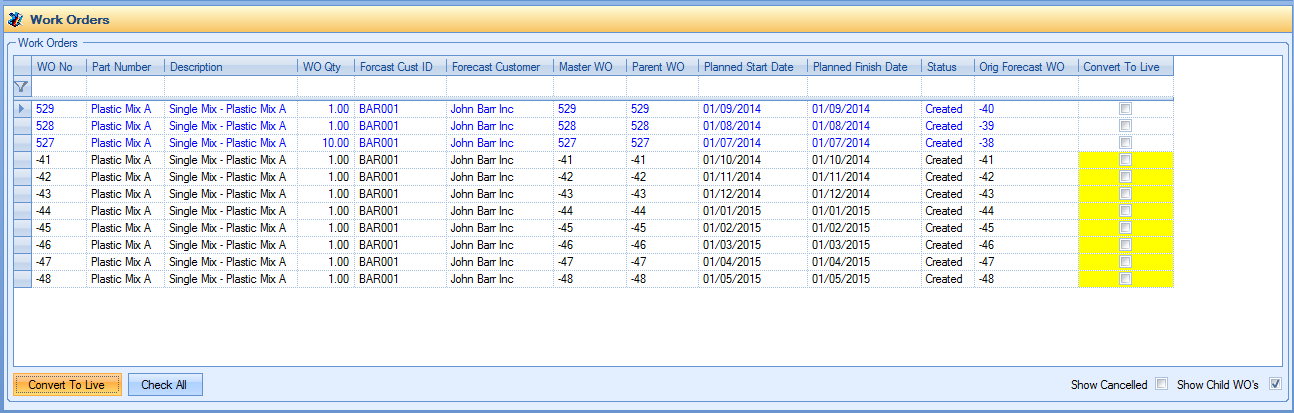
NOTE: For forecast work orders which contain sub-assy parts, the user MUST ensure that the sub-assy work orders are also converted. To do this the user must ensure they have the SHOW CHILD WOs option ticked to allow them to tick these child work orders too. This will ensure the work orders are converted and linked appropriately as standard work orders.