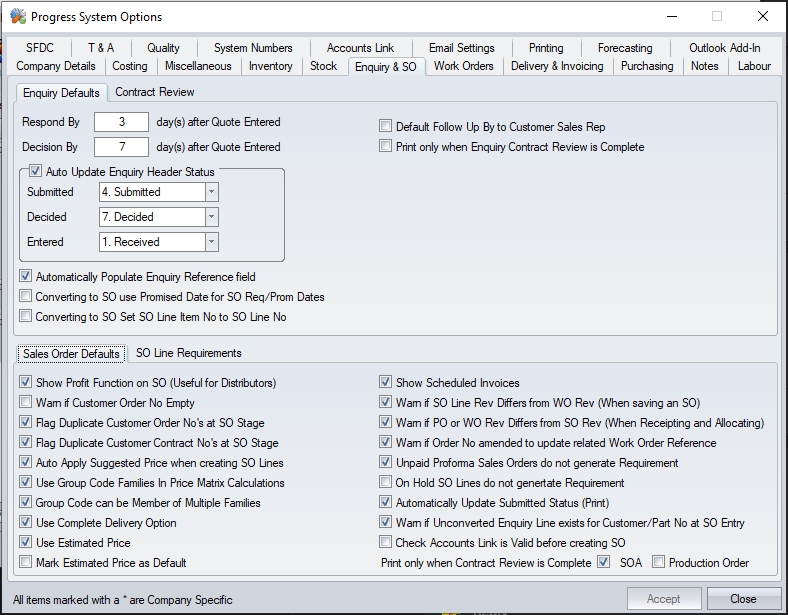
These options relate to the entry and control of enquiries and sales orders, as well as associated contract reviews and also the SO Line Requirements screen.
Enquiry Defaults
These options allow the user to set defaults for the creation and management of enquiries.
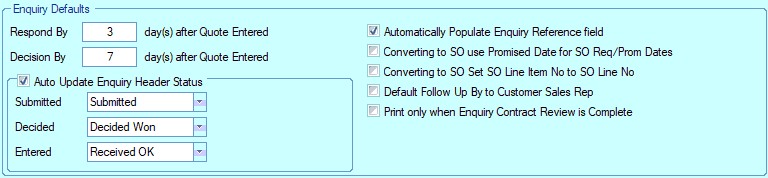
Respond By X day(s) after Quote Entered
This option permits the user to enter a default number of days that can be applied to the Respond By date on an enquiry entered within the Customers section. The Respond By date is the date that the user must reply to the customer with prices etc. for a customer enquiry. The Respond By date can be amended on enquiry by enquiry basis if required.
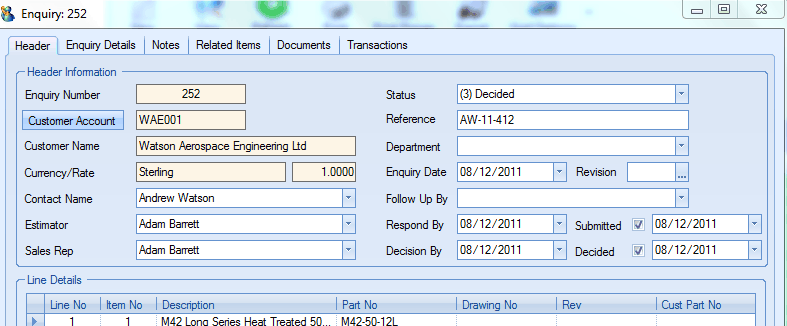
The following screen shot contains an example of a new enquiry form. Please refer to the Customers section of the manual for more information on entering enquiries.
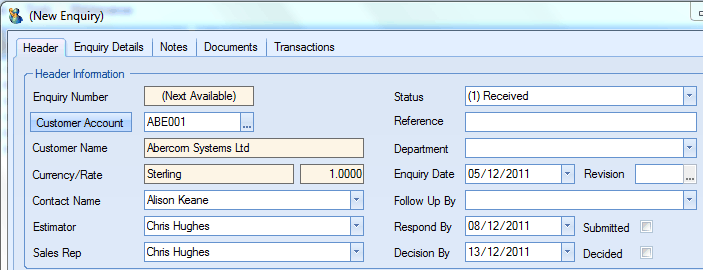
In the above example the Enquiry Date on this screen is 05/12/2011. The Respond By date on this form is based on the Enquiry Date plus the number of days entered into the Respond By X day(s) after Quote Entered field. The number of days entered in the previous screen was 3 so the system has suggested that we reply to the customer by 08/12/2011. If this date is unsuitable the user can change it by simply clicking onto the field and selecting a different date via the pop-up calendar on this field.
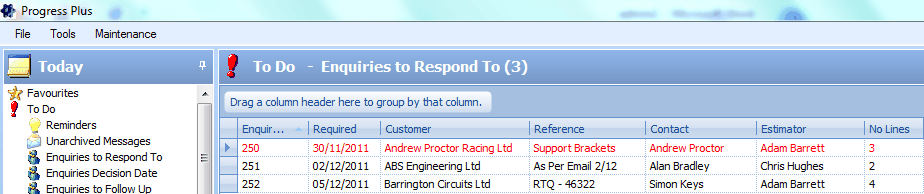
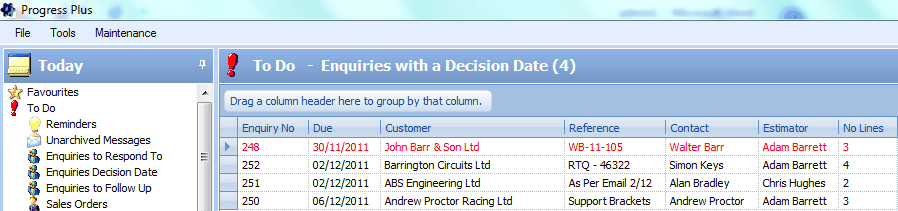
The Respond By date saved against an enquiry is also used on the Today screen on the Enquiries to Respond To option. This facility will display enquiries that have been entered into the system but as of yet have not been submitted to the customer. Enquiries that the user should have responded to before today will be highlighted in red. For more information on the Today screen please refer to the relevant section of the manual.
Decision By X day(s) after Quote Entered
This option permits the user to enter a default number of days that can be applied to the Decision By date on an enquiry entered within the Customers section. The Decision By date is the date that the user expects the customer to acknowledge that he or she has been successful or not with the quotation or can be used as a “chase up” date to contact the customer regarding the status of the quotation. The Decision By date can be amended on enquiry by enquiry basis if required.
In the above example the Enquiry Date on this screen is 05/12/2011. The Decision By date on this form is based on the Enquiry Date plus the number of days entered into the Decision By X day(s) after Quote Entered field. The number of days entered in the previous screen was 7 so the system has suggested that we should expect a decision by or should wish to contact the customer by 13/12/2011. If this date is unsuitable the user can change it by simply clicking onto the field and selecting a different date via the pop-up calendar on this field.
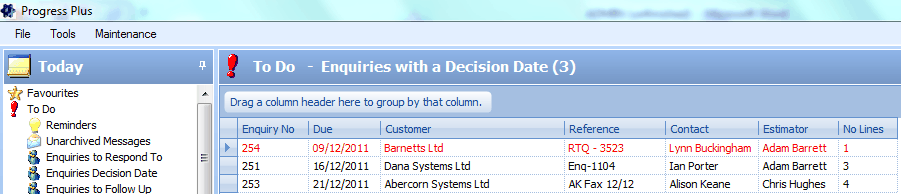
The Decision By date saved against an enquiry is also used on the Today screen on the Enquiries Decision Date option. This facility will display enquiries that have been submitted to the customer but as of yet no decision has been made on their outcome. Enquiries for which the user should have received a decision on before today will be highlighted in red. For more information on the Today screen please refer to the relevant section of the manual.
Auto Update Enquiry Header Status
When enabled this option will update the header status of an enquiry entered within the Customers section based on the action taken by the user.
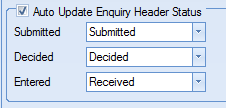
With the settings enabled as shown in the diagram an enquiry when entered onto the system will automatically have a status of Received.
On printing the enquiry this status will be updated to Submitted. Once this quotation has been marked as “lost” or converted in a sales order if successful the status of the enquiry would be changed to Decided.
If the user does not wish to have the enquiry status updated automatically then he or she can choose to amend it manually by choosing the relevant status on the enquiry header. The user may also select dates from the calendar reflecting the relevant Submitted and Decided status.
The status on the enquiry header is also used in the Today screen when listing quotations that require further action to be taken.
For more information on the Today screen functionality or on entering enquiries please refer to the relevant section of the manual.
Automatically Populate Enquiry Reference field
This option will default an enquiry reference on all new enquiries if left blank. The default reference will consist of the current date and time.
Show Enquiry Contract Review when Enquiry Accepted
Having this option ticked will automatically open a new enquiry contract review screen when an enquiry is saved.
Converting to SO use Promised Date for SO Req/Prom Dates
When converting an enquiry into a sales order, this option will use the Promised Date from the enquiry line to set the Required and Promised date of the sales order line.
Converting to SO Set SO Line Item No to SO Line No
When converting an enquiry into a sales order, this option will use the item number from the enquiry line to set the item number of the sales order line.
Default Follow Up By Customer Sales Rep
This option will default the enquiry FOLLOW UP BY contact to the customer accounts's specified sales rep instead of the current user/estimator.
Print Only When Enquiry Contract Review Is Complete
This option will stop the printing of the enquiry if its associated contract review is not marked as complete.
Contract Review Options
These option give the user some additional options when creating either sales order or enquiry contract reviews.

Show Enquiry Contract Review when Sales Order Accepted/Show Contract Review when Sales order Accepted
Contract Reviews can be an integral part of a company’s quality system, ensuring all aspects of the sales order are acceptable and tasks assigned to designated personnel have been completed. When ticked, these options will ensure the Contract Review screen is displayed when an enquiry and/or sales order is created or amended A screen similar to the following will be displayed permitting the user to assign tasks to other employees if required.
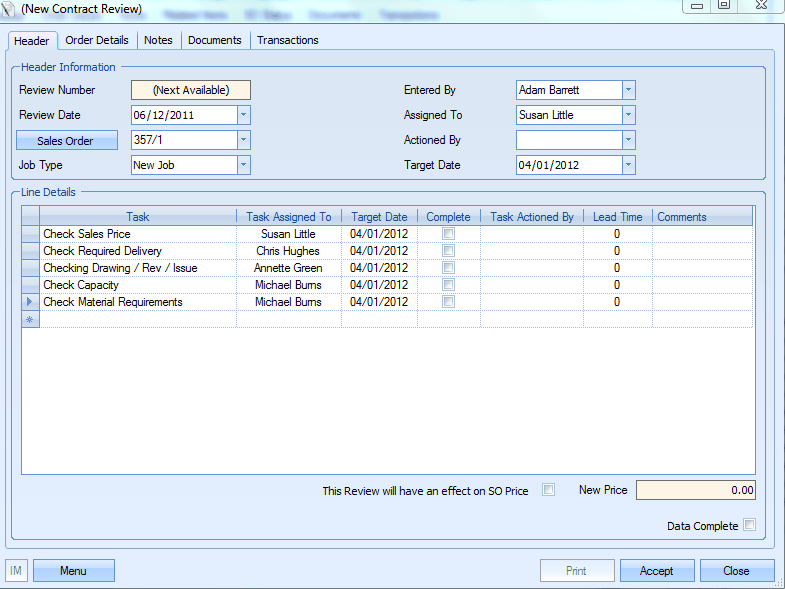
(example Sales Order contract review)
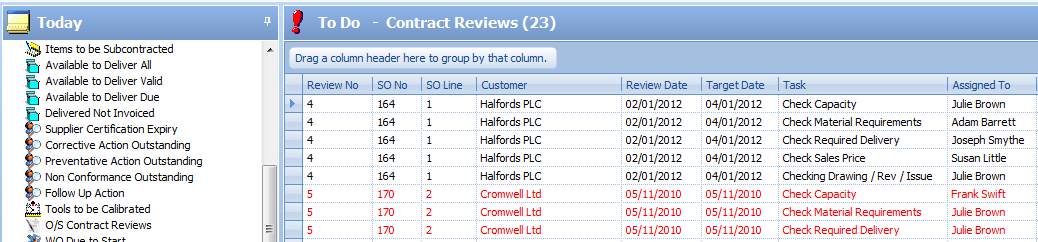
A list of outstanding contact review tasks can then be accessed from the O/S Contact Reviews option in the Today screen. Please refer to the appropriate Customers or Today sections of the manual for more information on this topic.
Users can also create contract reviews from within the Customers section of the system manually without the Contract Review screen being displayed automatically from the enquiry or sales order. Most users who do not create contract reviews or will only raise a contract review for some enquiries or sales orders will not have this option activated by default.
When Entering A Task, force Assigned To/Department to be populated
This option forces the user to select a department or an employee to be assigned to the task. If left unticked, the user will not have to complete this field to continue.
Automatically Add Default Tasks to new Contract Reviews
If this option is ticked, a new contract review will automatically be populated with the pre-defined default task list. The default list is set up in the List Maintenance section of Progress Plus.
Parallel Tasks/Previous Dependent Tasks Must Be Completed First
These options allow contract review tasks to be dependent on others. The Parallel Tasks option will allow the user to specify that tasks are dependent on other tasks, much like the Parallel Operations that can be used for part and WO routings. Ticking this option will add an additional column to the Contract Review tasks grid, which will show and allow the user top set up any dependent tasks.
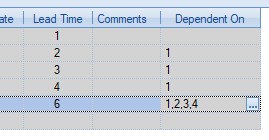
The Previous Dependent Tasks Must Be Complete First option will simply enforce the rule that dependent tasks must be complete before an individual task can be completed.
For more information on setting up dependent tasks, please refer to the Contract Review section of the manual.
Sales Order Defaults
These options allow the user to set defaults for the creation and management of sales orders.
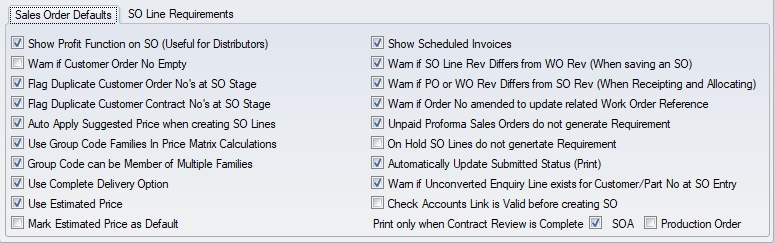
Show Profit Function on SO (Useful for Distributors)
This facility permits the user to view the expected profit within the sales order screen for a mainly purchased item that is being sold on. With this facility activated the user can click on the Menu button at the bottom of the sales order screen to view a list of options.
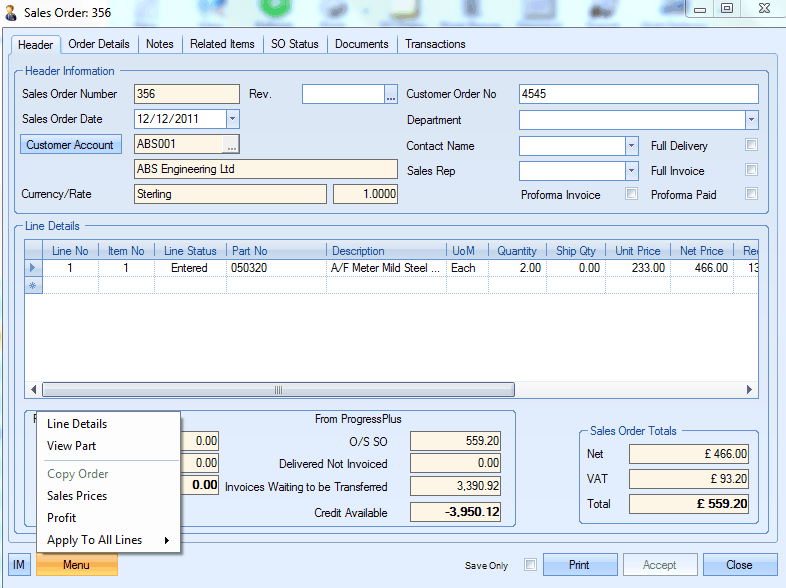
The user can now choose the Profit option from the list displayed. A screen similar to the one on the following page will be displayed. The system will populate the Cost field on this form with figures relating to the Purchasing Cost of the item as held within Inventory
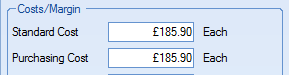

In the above example the Cost is 371.80 – based on a Purchasing Cost of 185.90 as held within the Inventory section x a Quantity of 2. Figures relating to any profit amount and percentage profit – based on the selling price of the items minus the cost - will be displayed, both on a line by line basis and as overall totals for the sales order in the case of a multi-line order.
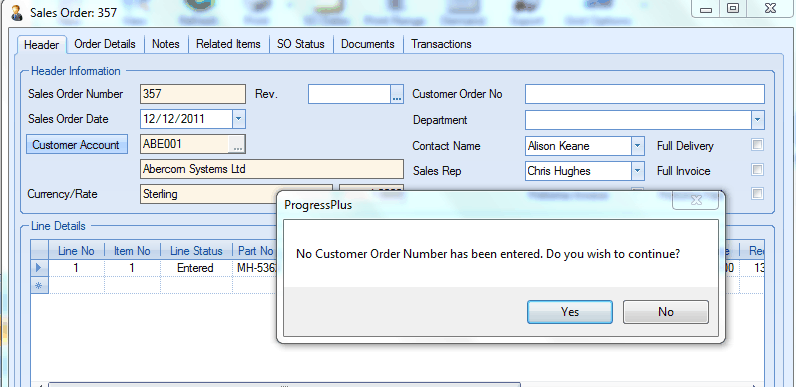
Warn If Customer Order No Empty
If this option is ticked the user will see the following warning message when clicking Accept to save a Sales Order if a Customer Order No has not been entered into the sales order header. The user can however continue with the order without entering a customer order number if desired by clicking the Yes option on the message box.
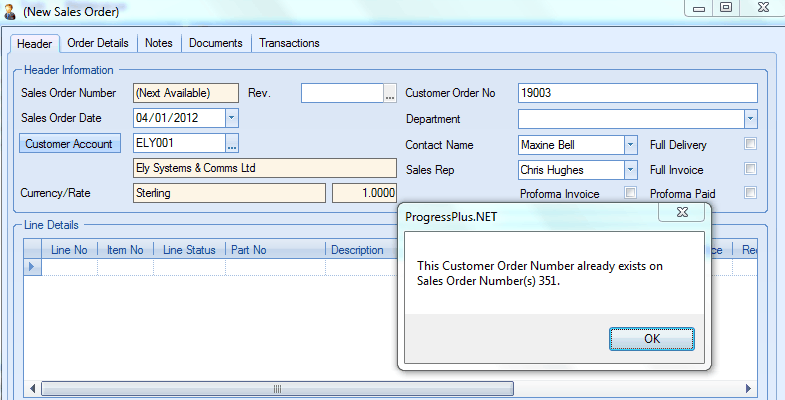
Flag Duplicate Customer Order No’s at SO Stage
When this option is activated the user will see the following warning message when entering a Sales Order if the Customer Order No reference has already been used on a previous sales order for this customer.
This option does not prevent a user entering a duplicate Customer Order Number but will display a message box informing him or her of the previous sales order/s that contain the same reference. The user must click the OK button on the form to continue.
Flag Duplicate Customer Contract No’s at SO Stage
This facility works in a similar fashion to the previous option but relates to Customer Contract references entered into the Order Details within a sales order. When activated the user will see the following warning message when entering a Sales Order if the Customer Contract No reference has already been used on a previous sales order for this customer.
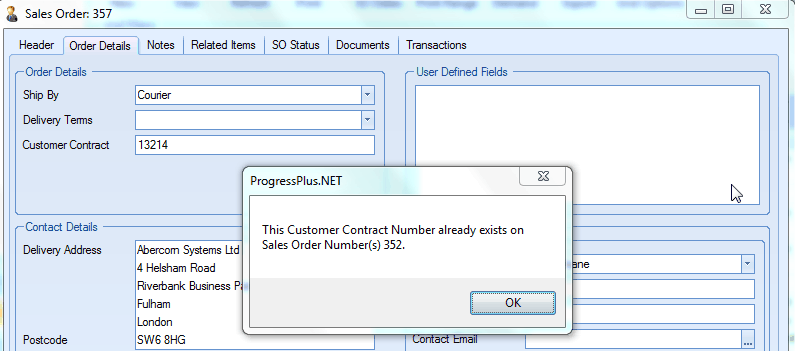
This option does not prevent a user entering a duplicate Customer Contract Number but will display a message box informing him or her of the previous sales order/s that contain the same reference. The user must click the OK button on the form to continue.
Auto Apply Suggested Price When Creating SO Lines
This option automatically populates the unit price in the sales order line based on the information on the system.
Use Group Code Families In Price Matrix Calculations
This option will consolidate parts with individual group codes belonging to the same group code family to use price matrix prices based on the consolidated quantities for those individual parts.
For example:
Part No |
Part Group Code |
Group Code Family |
Qty |
Price Matrix Pricing Based On Qty |
|
1111 |
GC01 |
GCF01 |
1 |
7 |
|
2222 |
GC01 |
GCF01 |
2 |
7 |
|
3333 |
GC03 |
GCF02 |
4 |
4 |
|
4444 |
GC11 |
GCF01 |
4 |
7 |
|
Part numbers 1111, 2222 and 4444 all share the same group code family. As a result, the system will use a total quantity of 7 units to calculate the price break these parts are assigned on the SO or enquiry.
Group Code can be Member of Multiple Families
This option allows a specific group code to be assigned to more than one group code family. With this option unticked, the group code will be unavailable for inclusion in any other group code family once its assigned to one.
Use Complete Delivery Option
This option switches on the ability to specify that customers, individual sales orders or sales order lines need to be delivered in full.
Activating this option will allow the user to specify against the customer that they require their sales orders and/or sales order lines to be delivered in full. The user will have the following options available in the Defaults tab of the customer record.

Ticking the FULL DELIVERY option on the customer record will default all the customer's sales orders to FULL DELIVERY. This means all sales order line items must be delivered together, in full all on a single delivery.
Ticking the COMPLETE DELIVERY (LINE) option will default all the customer's sales order lines to COMPLETE DELIVERY. This means the sales order line itself must be delivered in full on a single delivery.
The user can still use these options on individual sales order themselves even if the customer has no defaults set for these options.
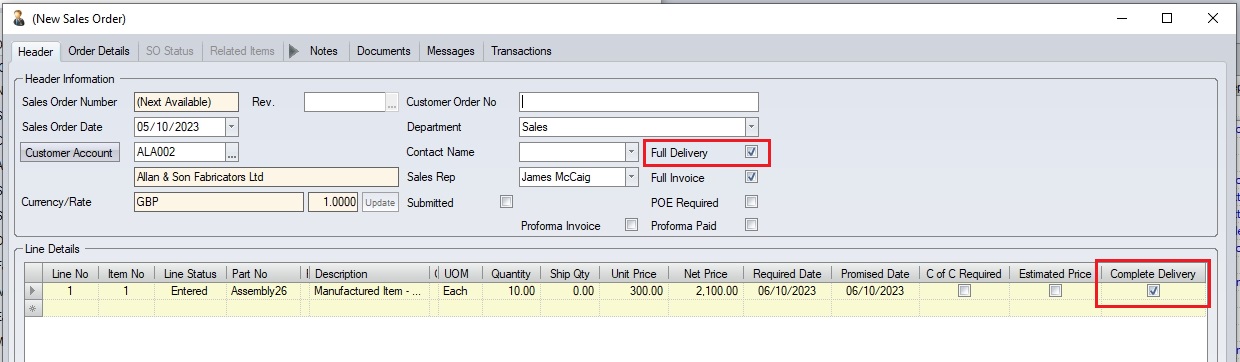
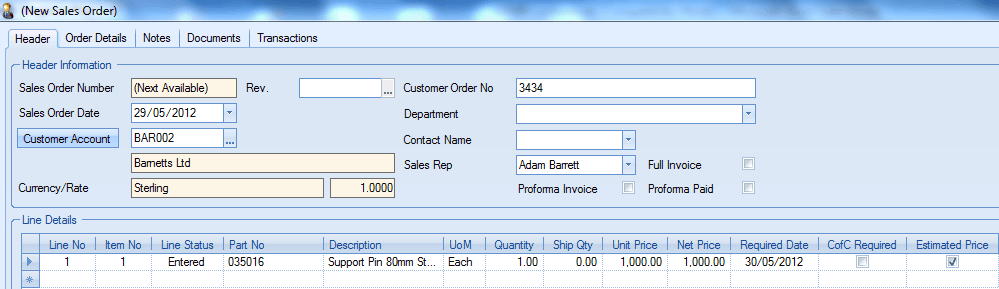
In the following example a sales order has been entered.
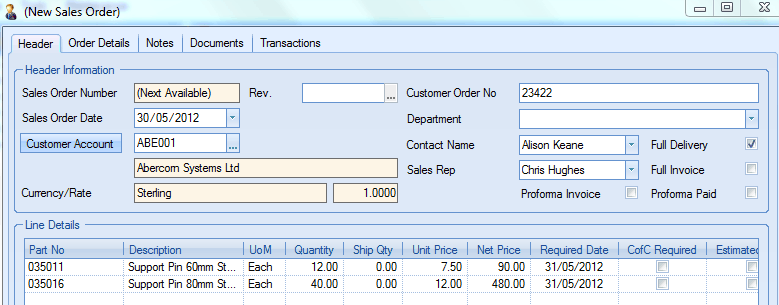
There are 2 lines on the sales order. Line 1 is for a quantity of 12 of a product, line 2 is for a different item and a quantity of 40.
If the user requires that both lines on this order must be delivered together for the full quantity required on each line then the user could click onto the Full Delivery option on the form header as shown above.
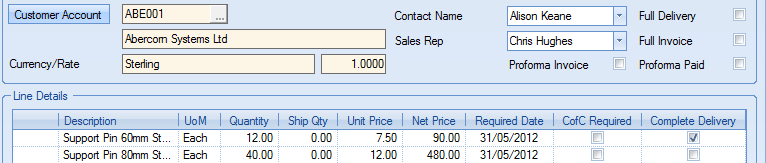
Another scenario that may arise is that the user requires the full quantity of a particular sales order line to be delivered in its entirety but does not necessarily require that all lines on the sales order be delivered together. The user in this case would not tick the Full Delivery option in the header but would instead click on the Complete Delivery field at the extreme right of the sales order line in the Line Details as shown in the next diagram.
If the user should try to create a delivery note for a sales order which has a full delivery requirement either in the header or contained in the line details a message similar to the following detailing any shortages would be displayed to the user if the full order / line quantity is not available for despatch at this moment in time.
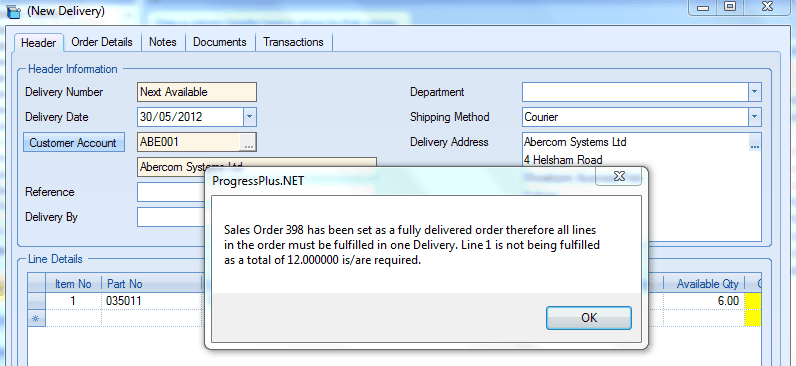
For more information regarding sales orders and deliveries, please refer to the relevant sections of the manual.
Use Estimated Price
With this option activated when entering sales orders within the Customers section of the system the user can mark an item on a sales order as having an Estimated Price set up against the line. Having an item marked on sales order as having an estimated price will stop this item from being invoiced until the restriction has been removed from the sales order line.
This can be a useful option and is commonly used for repair type sales orders or orders where the final price is still to be agreed with the customer. This facility can save invoices being raised in error for the wrong value.
In the event of a user trying to invoice a delivery for a sales order with an item marked as having an Estimated Price a screen similar to the following will be displayed.

When desired, the user can simply open up the required sales order to confirm/amend the Unit Price and uncheck the Estimated Price box to allow the invoicing of the delivery to proceed.
Mark Estimated Price as Default
This option will automatically tick the ESTIMATED PRICE option on any new SO lines created.
The user can amend this if required once the sales order has been created, however, any new sales order lines will have this ticked by default.
Show Scheduled Invoices
This option dictates whether the Today > To Do option for scheduled invoices is displayed. With this option ticked, the SO Line Scheduled Invoices option will be available. If not, then this option will not be available.

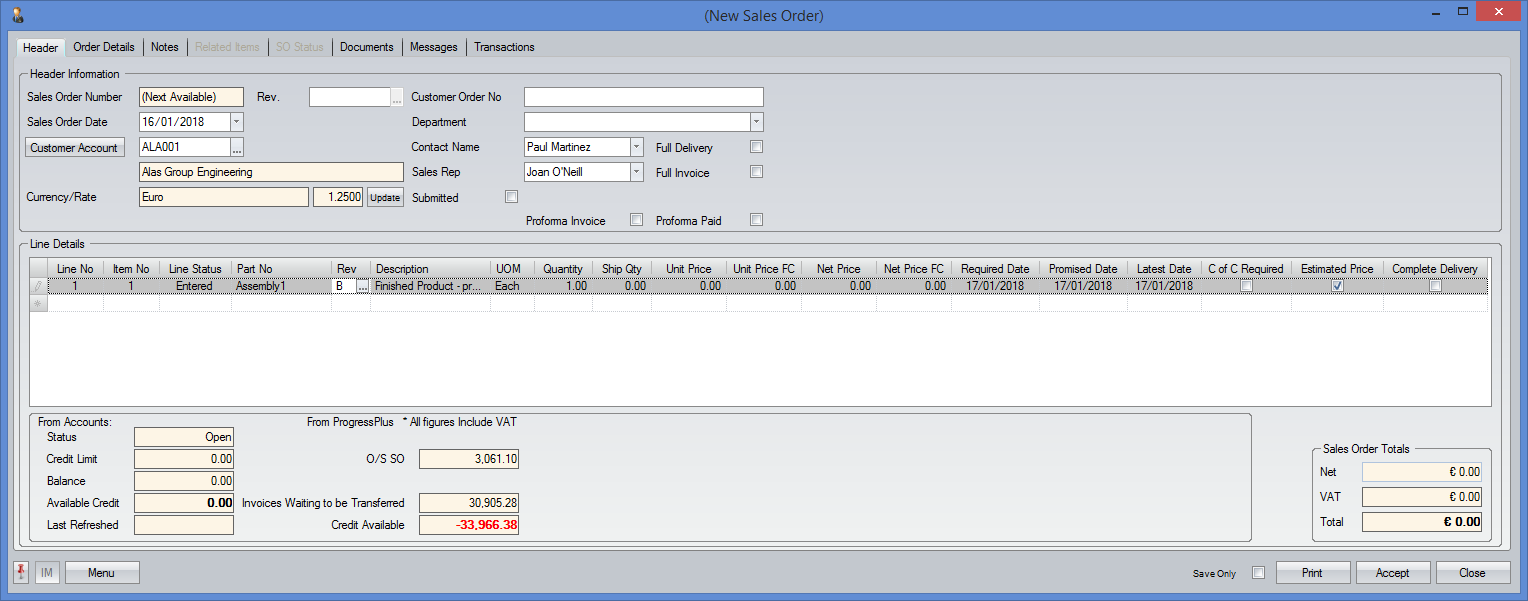
Warn if SO Line Rev Differs from WO Rev (When saving an SO)
This option will result in the system checking to ensure any associated WOs linked to a SO line are for the correct revision of the part being sold on the sales order. If the revisions are not the same, the system, will warn the user accordingly.
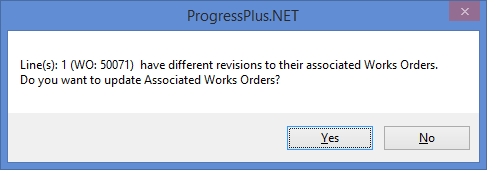
The user can update the revision on the associated work orders from this warning if they wish or they can leave things as they are.
Warn if PO or WO Rev Differs from SO Rev (When receipting and Allocating)
This option works similarly to the SO/WO check described above but does the same check from a PO/SO perspective and a WO/SO perspective when either the PO or the WO is being received into stock. When either the PO or the WO are received, the system checks to ensure the batches received are the same revision that are being sold. If the revisions are not the same, the system, will warn the user accordingly.

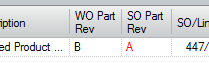
Differences in revision can also be seen on the receipt screens as the the grid highlights where the revisions are not the same as shown below.
Automatically Update Submitted Status (Print)
This option automatically updates the submitted field on the sales order if the sales order acknowledgement has been printed. If left unticked, this needs to be manually updated in the sales order by the user.

Warn If Unconverted Enquiry Line Exists for Customer/Part No at SO Entry
This option highlights any existing unconverted enquiries for the current part/customer combination when creating a new sales order. The user will be shown a message similar to the following to make them aware.
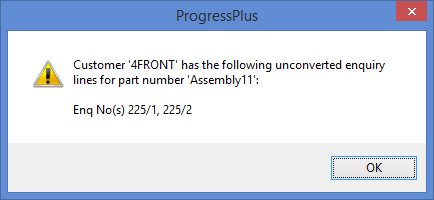
the user can then decide whether the sales order is required on its own or whether the existing enquiry can be converted to a new sales order.
Check Accounts Link is Valid before Creating SO
This option forces Progress to verify the accounts link for the sales order customer prior to the sales order being created. This is most commonly used to ensure the latest credit limit information is available and displayed for the user to see at the bottom of the sales order window.
Warn If Order No Amended To Update Related Work Order Reference
If the user amends the customer order number on a SO, which already has associated WOs, the system will highlight this change and ask the user if they wish to update the WO REFERENCE field (which holds the customer order number) with the new value.
Unpaid Proforma Sales Orders Do Not Generate Requirements
This option will stop the SO Line Requirements screen from appearing if the sales order is a proforma order and has not yet been marked as paid. This option will also not include the SO line quantity in the ON ORDER (SO) total for the part. If this option is ticked, the ON ORDER (SO) total against the part will show the unpaid proforma quantities in brackets, similar to the following.
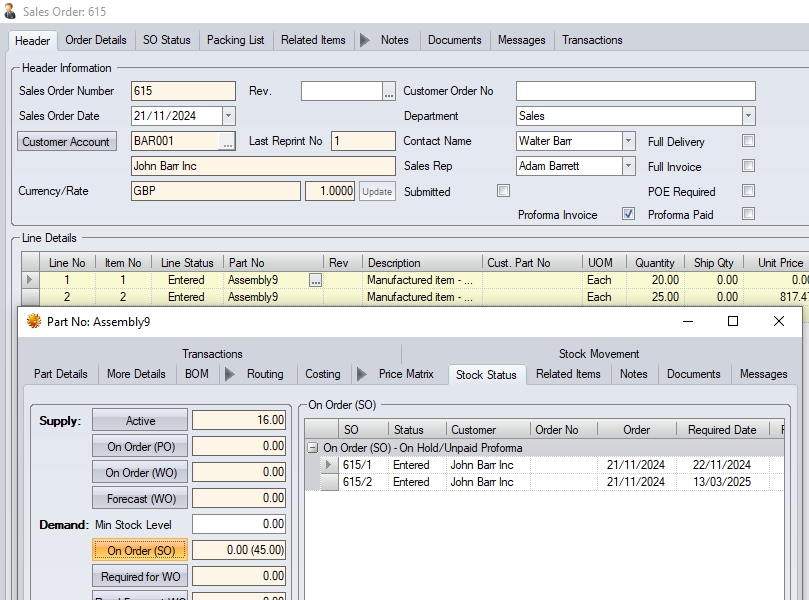
(Example showing unpaid proforma SO and associated ON ORDER (SO) quantities)
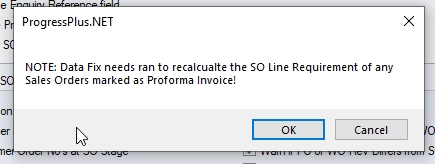
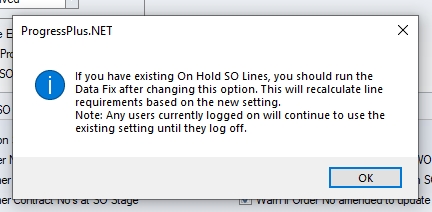
NOTE: If this system option is ticked/unticked, then the system Data Fix must be run to recalculate the ON ORDER (SO) quantity for the part to ensure the ON ORDER (SO) total reflects the system option setting(s). The following message will be displayed to the user when changing this system option to highlight this.
On Hold SO Lines Do Not Generate Requirement
This option will also not include the SO line quantity in the ON ORDER (SO) total for the part if the SO line status is ON HOLD. If this option is ticked, the ON ORDER (SO) total against the part will show the total on hold quantities in bracket, similar to the following.
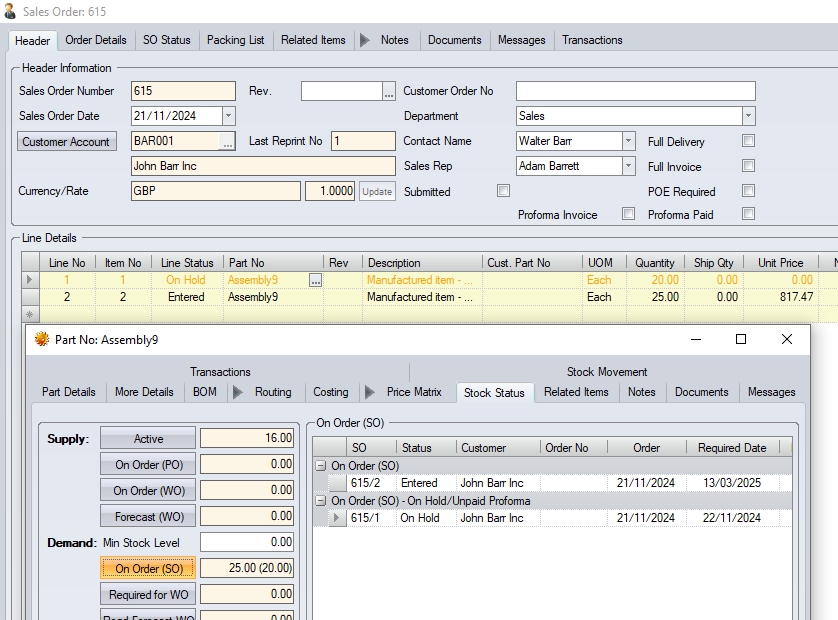
(Example showing on hold SO lines and associated ON ORDER (SO) quantities)
NOTE: If this system option is ticked/unticked, then the system Data Fix must be run to recalculate the ON ORDER (SO) quantity for the part to ensure the ON ORDER (SO) total reflects the system option setting(s). The following message will be displayed to the user when changing this system option to highlight this.
Warn If Credit Available Reached On Order
This option will display a warning to the user if the value of their sales order exceeds the amount of available credit the customer has, based on their accounts credit value and any existing orders and invoices. The credit information is collated at the bottom of the sales order for the user to see.

Once the user adds the required items to the sales order and clicks ACCEPT. the system will highlight if the value of the sales order exceeds the amount of available credit the customer has.
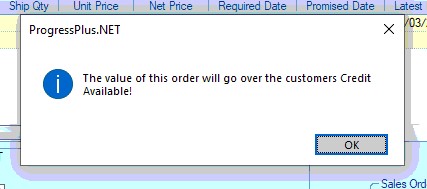
The warning does not stop the creation of the order as it may still be valid (i.e. required date months ahead and current invoices are expected to be paid) so the sales order will be created as usual once the user clears the warning.
Print Only When Contract Review Is Complete
This option allows the user to decide whether the SO Acknowledgment and/or the SO Production Order documents can only be printer after the contract review is complete.
Sales Order Line Requirements Options
These options will determine which documents are printed automatically when creating works orders from the Sales Order Line Requirements screen within the Customers section. The GRID OPTIONS value applies to the number of sub-levels displayed on the screen when creating works orders for multi-level items.
Grid Options
The user can choose to manually override these default display options by amending the number of Levels to be displayed via the Display at the top of the Sales Order Line Requirements screen.
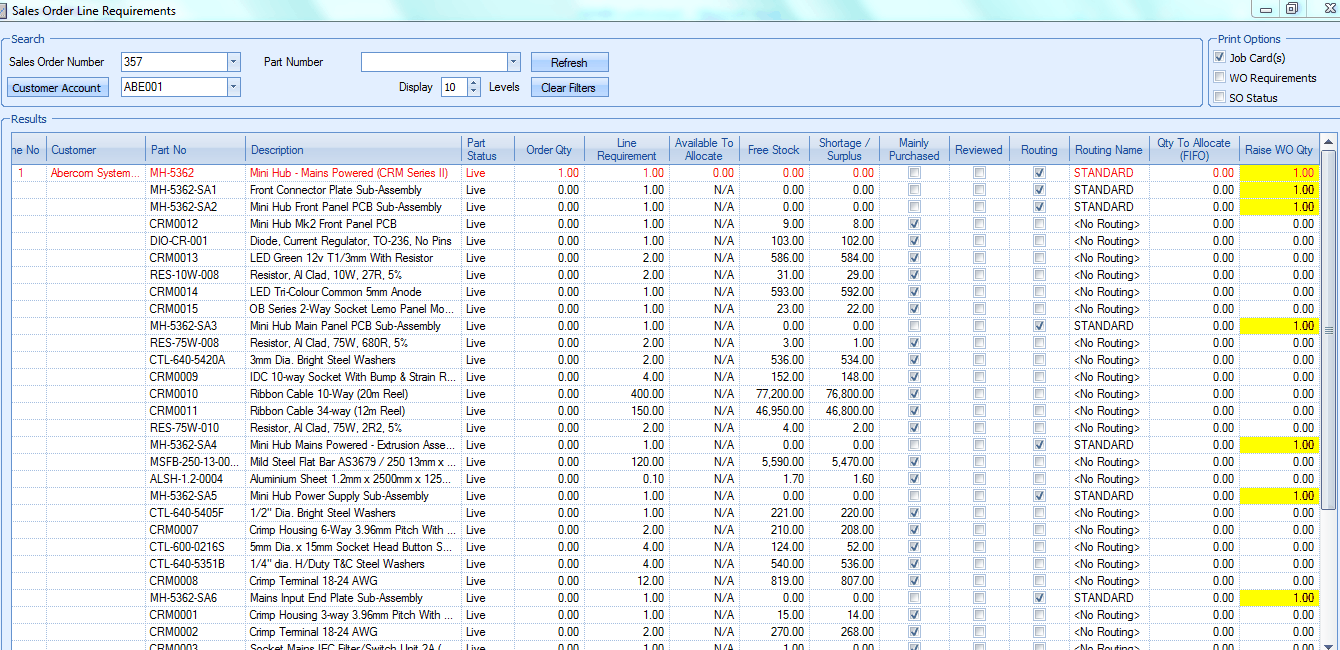
In the above example set to display part information down to 10 sub levels the screen will show all sub levels including any mainly purchased items required for the lower level items.
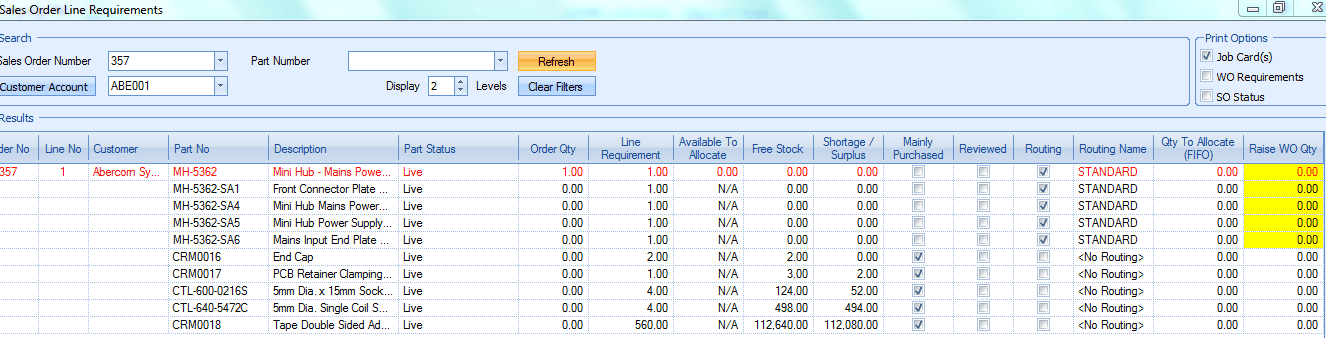
In the above example, using the same part as in the previous example displaying 10 levels, the number of levels to be displayed has been amended to 2. The screen will now only display the final assembly part, the any sub-level items immediately below this level and their immediate requirements. As such the details of parts on any subsequent lower levels are hidden. The user can however choose to amend the number of levels to be displayed as required and on pressing the Refresh button the screen will be updated showing the relevant information.
Print Options
These options set the default documents to be generated from the SO line requirements screen when WOs are generated.. The user can choose to manually override these default print options by selecting / deselecting the required documents via the Print option on the SO Line Requirements screen.
The SHOP DOCS option related to the production related documents. This umbrella covers the work order job card, the material list, the operations list as well as any associated documents and drawings. The default options for these SHOP DOCS are assigned in the Work Order options in the Admin section.

The following page contains some examples of the types of documents that can be printed off via these options.
Job Card

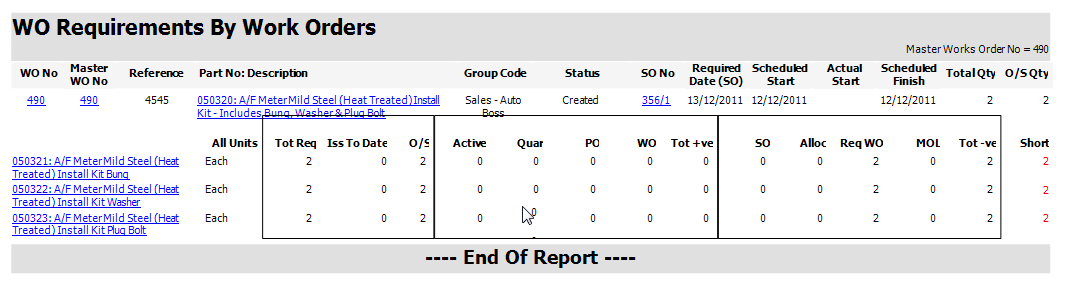
WO Requirements
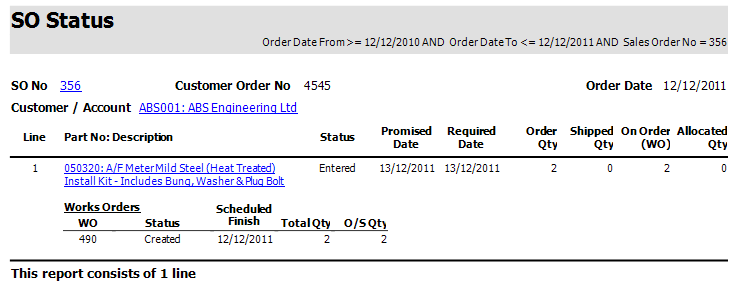
SO Status
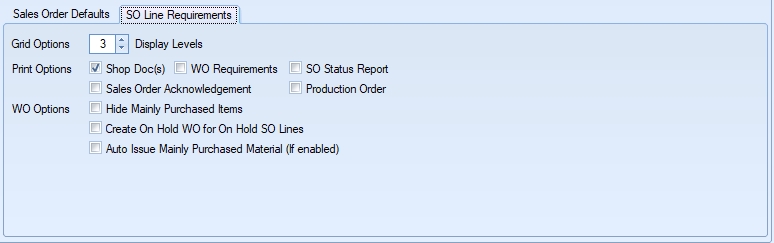
WO Options
These options give the user a few more options relating to work orders generated from the SO Line Requirements screen.
Hide Mainly Purchased Items
This option sets the default value for this option on the SO Line Requirements screen. It can still be changed on the SO Line Requirements screen if the user wishes to.
Create On Hold WO for On Hold SO Lines
Having this option ticked will generate "on hold" work orders if the SO line has an "on hold" status. If this is left unticked, work orders will be generated but they will not be placed on hold.
Auto Issue Mainly Purchased Material (if enabled)
Having this option ticked will result in any available material from the work order BOM to be automatically issued to the generated work order(s). If left unticked, no material issues will be made. This option also considers the EXCLUDE FROM FIFO option set against group codes, group code families, stock locations and stock location families.
For more information on the Sales Order Line Requirements screen please refer to the appropriate section of the manual.