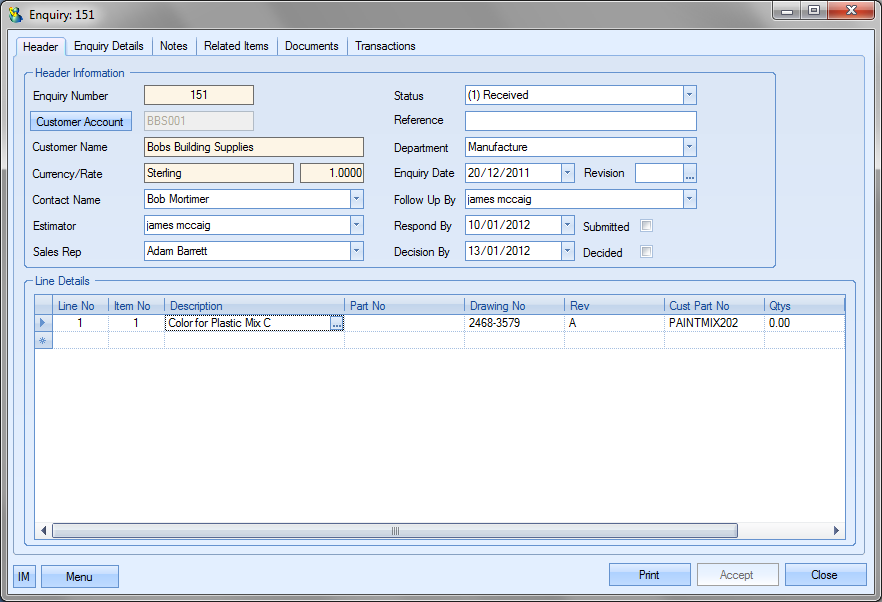
This section allows the user to create and view enquiries for customers who have asked for quotations relating to potential orders. When the user selects the Enquiry option within the Customer section of Progress, they are presented with a screen similar to that shown below.
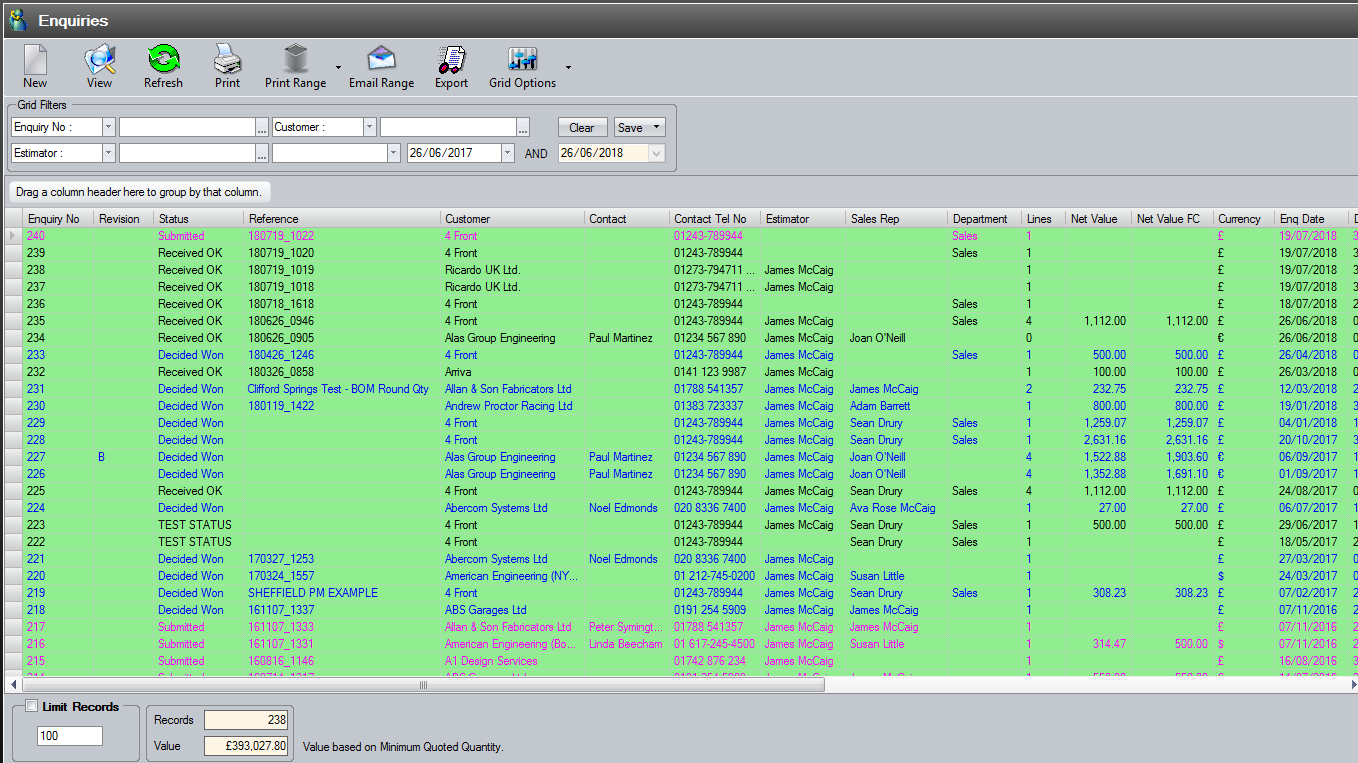
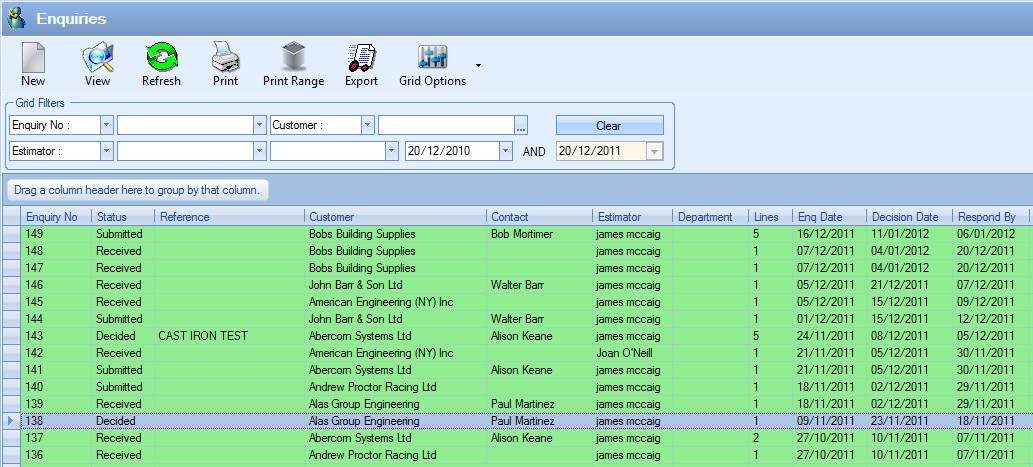
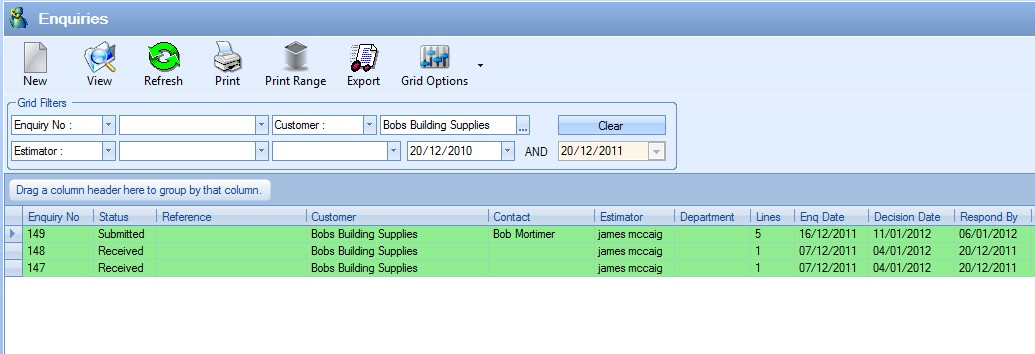
All existing enquiries are listed in the main screen. The user can filter for specific enquiries using the filters at the top of the enquiry screen.

The user can select which pieces of information they wish to filter on using the drop-down lists to select the required field.

The user can then use the associated drop-down list to select the required values for the filters as shown in the next screen.
Once the user has selected the required filter, they can see the result by clicking the REFRESH option at the top of the screen. This will reduce the listed enquiries to only the enquiries that meet the selected filter criteria.
View
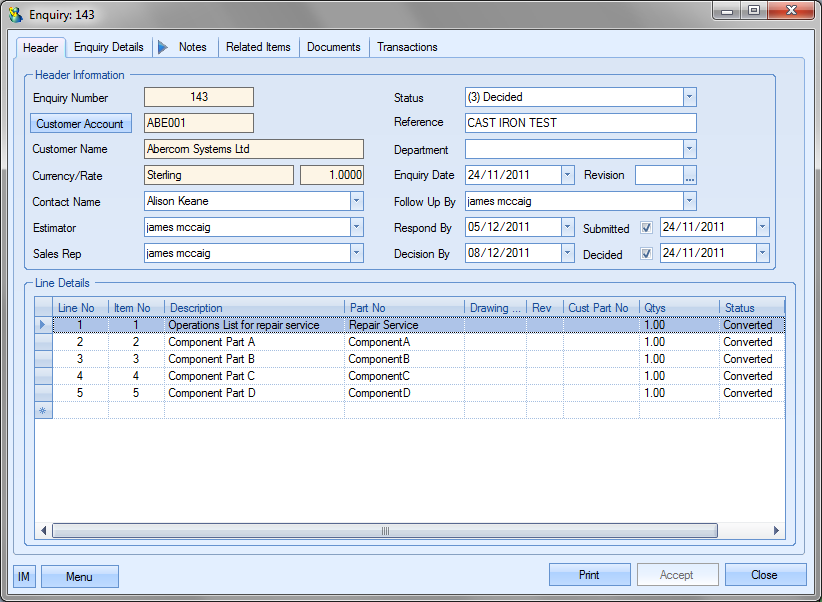
The user can access any of the enquiries by double-clicking on the required enquiry or highlighting the enquiry and clicking the VIEW option at the top of the main screen. Either method will open the selected enquiry and display a screen similar to the following.
Just like the rest of the system, if another user has the enquiry open, or if the user themselves only has READ ONLY access to enquiries, the system will warn and highlight this on screen when they access the enquiry.
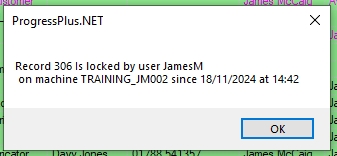
(Warning displayed to user indicating another user has the enquiry open)

(Indication of Read Only access/ACCEPT option not available)
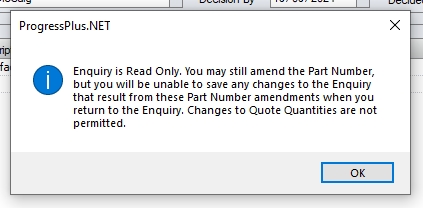
In most cases in Progress this will not be an issue, however, since quoted quantities and some of the details for the parts on the enquiry come via the part's inventory record, users can access the part's details via the enquiry and can make changes to the part. Again, this won't be an issue for users simply viewing details of the enquiry parts, however, if changes are made to the part records, the system highlights that some changes will NOT be applied to the enquiry like they usually would if the user had complete access to the enquiry (i.e. if no other users had it open already, or if the user had FULL ACCESS permissions to the enquiry). As a result, accessing the part details via the enquiry when the user doesn't have full access to the enquiry displays the following warning.
The Sales Prices screen, which opens by default when the user accesses the part details from the enquiry, also highlights that the enquiry is READ ONLY and disables the SAVE QTY and DELETE QTY options too so no changes can be made by the user which would impact the enquiry.
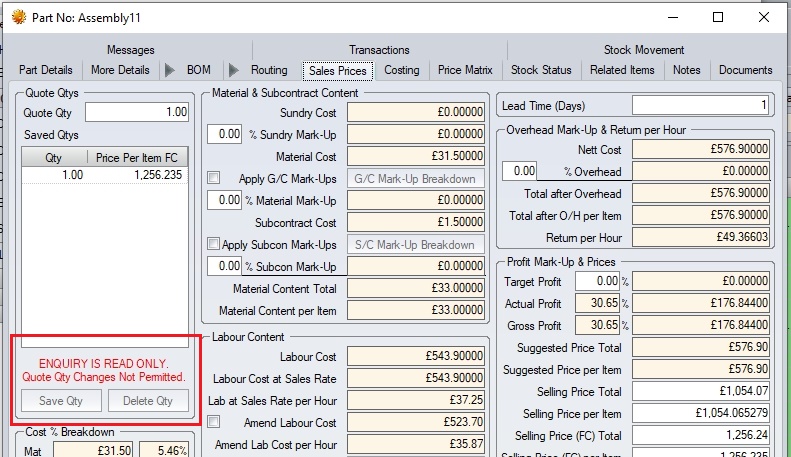
The user accessing the part details will still be able to make changes to the part itself, but nothing will be updated on the enquiry as a result until the user has full access to the enquiry.
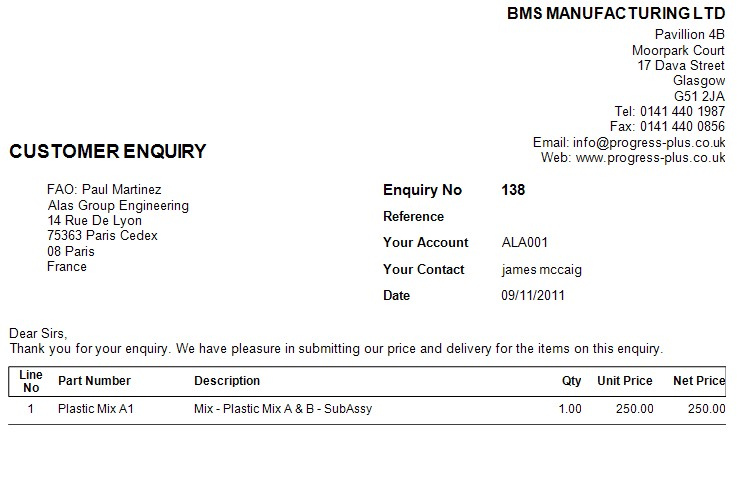
This option allows the user to print out the selected enquiry directly from the Enquiry screen. The user simply has to highlight the required enquiry and then click the Print option at the top of the screen to generate the enquiry document. The screen below shows the selected enquiry and the resulting enquiry document.
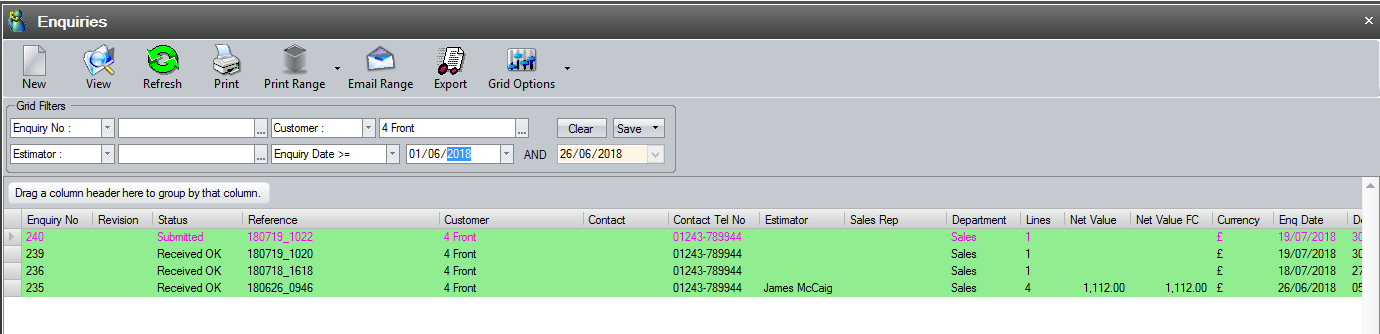
This option allows the user to print a range of enquiries directly from the Enquiry screen. The user can use the filters to select the required range.
Once the required range has been selected, the user can click the Print Range option to generate the selected range of enquiry documents. The user will be prompted to confirm the print before the documents are generated.
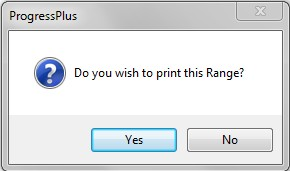
If the user clicks Yes to the prompt, the enquiry documents will be sent to the printer. If they click No, they will be returned to the Enquiry screen.
Email Range
This option allows the user to email multiple enquiries from Progress to their customers. The user can use the main browse screen filters to select the enquiries they are interested in first of all before clicking the EMAIL RANGE option.
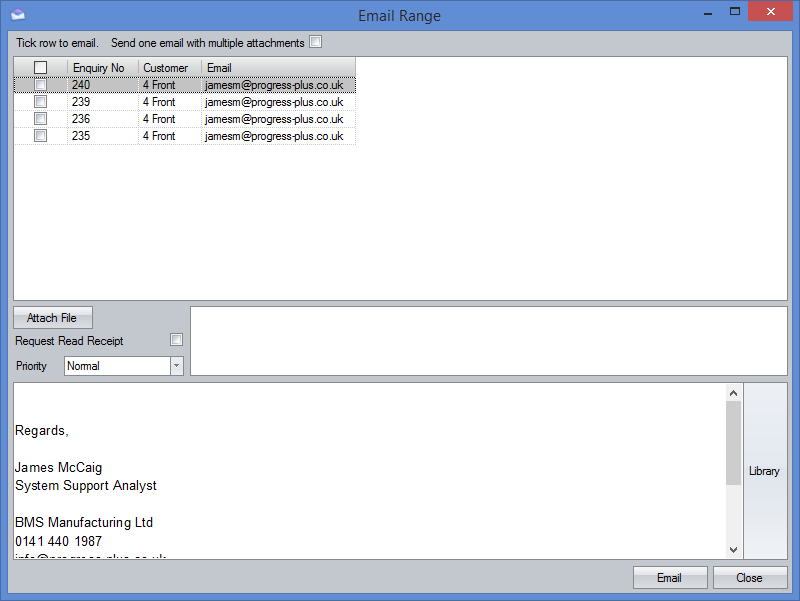
From the window that appears the user can select specific enquiries from the list that are to be emailed to the customer, can add any necessary attachments to the emails as well as add a message to the email or use the LIBRARY option to select a predefined message. Upon selecting the enquiries to be emailed, clicking the EMAIL option will send off the enquiries as emails.
NOTE: Emails will only be sent where a valid email address is specified. If any of the listed emails has no email address shown, then these will not be sent.
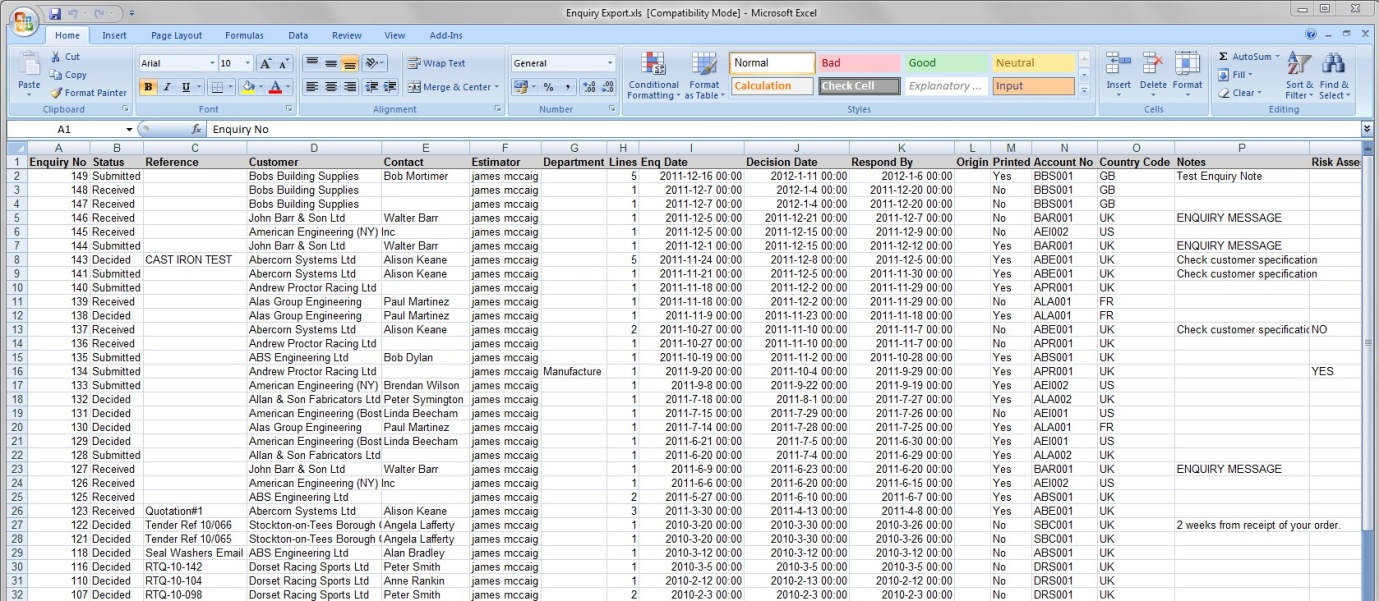
The Export option allows the user to export the current list of enquiries to an Excel spreadsheet for further analysis. This option can be used in conjunction with the filters available at the top of the screen or can be used with the full list of enquiries if required. Clicking the Export option will prompt the user to create an Excel file.
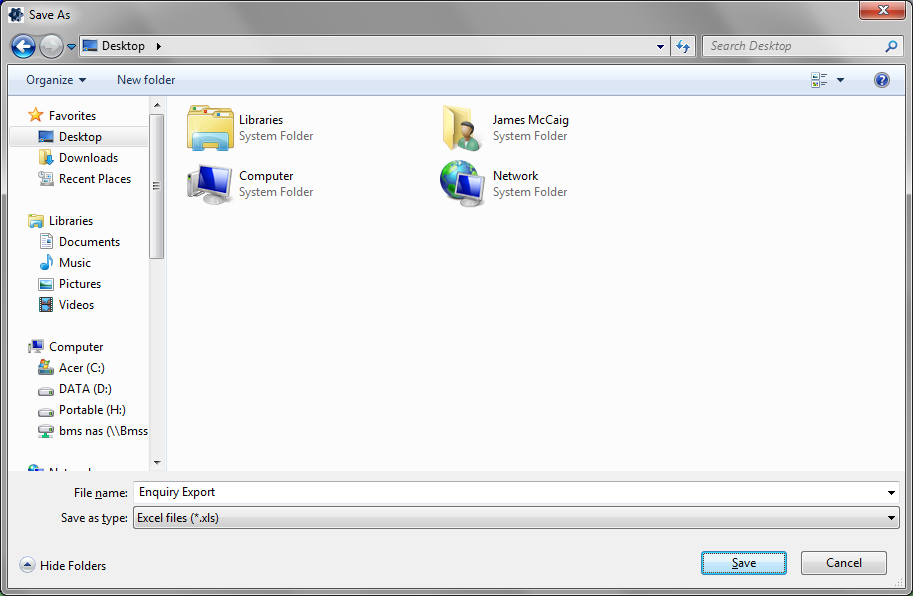
The user can specify the name required and where the exported file is saved. Clicking Save will generate the file. Once created, the user can open the file in Excel.
New Enquiries
The new enquiry option permits the user to create estimates for enquiries placed by customers. Enquiries can be raised for items that have been previously created or for new items that require to be entered and planned.
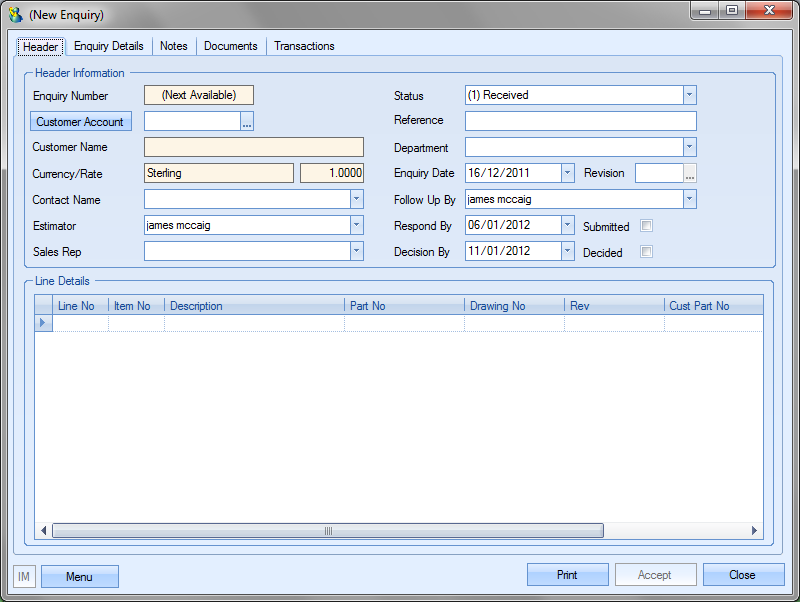
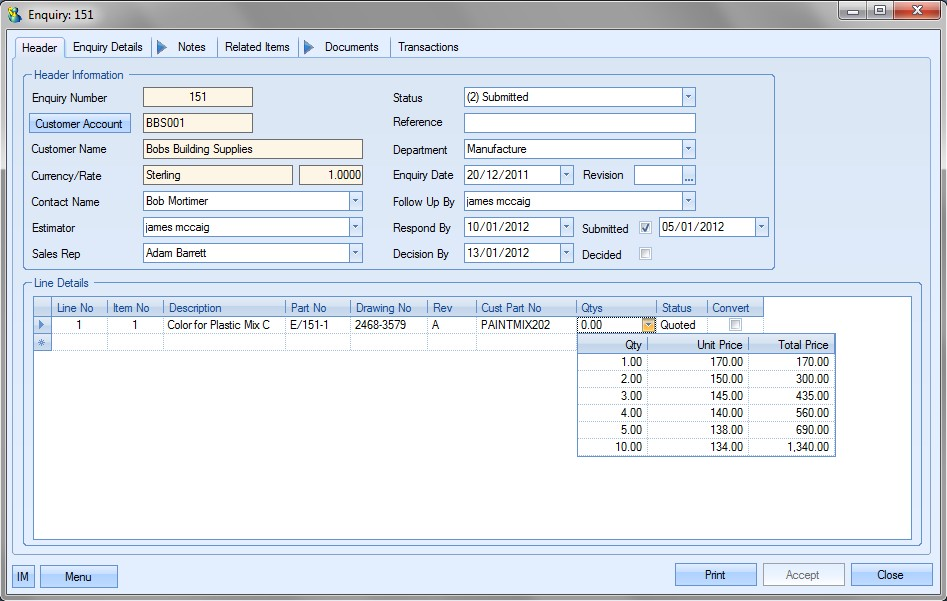
Progress will allocate the (Next Available) enquiry number once the user creates the enquiry. This is allocated when the user clicks the ACCEPT option.
The user must select the customer using the CUSTOMER ACCOUNT field at the top of the form.
![]()
Clicking on the Search option ![]() presents the user with a list of customers to choose from.
presents the user with a list of customers to choose from.
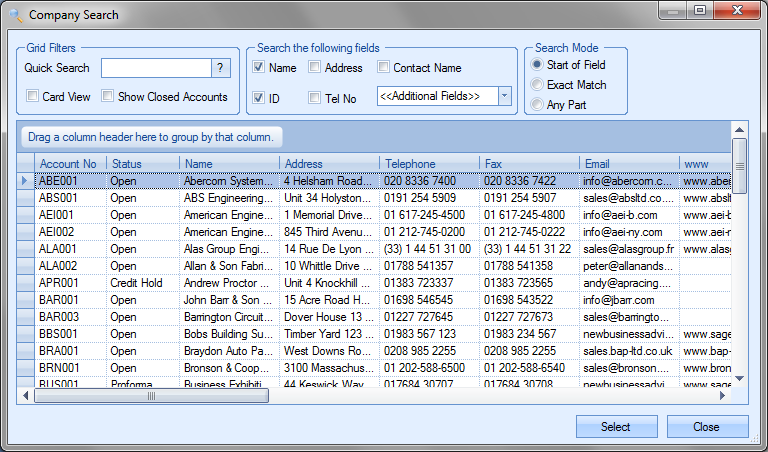
The user can select the customer required from the list by highlighting the customer name and clicking the Select option. This will pull the following customer details through to the enquiry form.
| Customer Account: | Displays the customer account code as held in Progress. |
| Customer Name: | Displays the customer name as entered into Progress. |
| Currency/Rate: | Displays the customer’s default currency and the current currency rate held in Progress. |
| Contact Name: | Displays default contact name for this customer, but can also be selected from the drop-down list if necessary. Alternatively, the default contact can be overtyped with an alternative contact not on the list if desired. Any new contact entered into this field will not be saved in the customer contacts list. To add new contacts to the list please refer to the Customer Contacts section of the manual. It is not essential to complete this field in order to process the enquiry. |
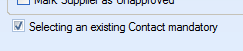
| NOTE: Selection of the contact can be restricted to valid customer contacts using a one of the system options in the Admin section of Progress. This option makes it mandatory to select only from the existing contact list for the customer. The option to switch this on is shown below and is accessible in the Miscellaneous system options. |
 |
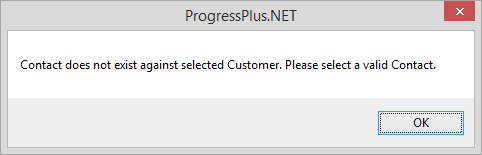
Trying to enter a contact name which doesn't already exist against the customer results in the following warning appearing.
In addition to this information, the following information will also be specified.
| Estimator: | This defaults to the user creating the enquiry, but can also be selected from the drop-down list if necessary. |
| Sales Rep: | This defaults to the default sales rep set up against the customer in the Customer Defaults section. |
| Status: | This defaults to initial status of the enquiry as specified in the Enquiry Header Status list set in the List Maintenance screen. The 3 statuses are: |
| 1. Received – the user has entered the details of this enquiry but has not yet sent a quotation back to the customer |
| 2. Submitted – the user has sent the quotation to the customer and is awaiting notification from the customer on the outcome of the quotation |
| 3. Decided – the user has been informed of the outcome to the quotation either it is to be converted to a sales order or is to be marked as ‘lost’. |
| NOTE: If the system is set to automatically update the overall status of the enquiry, this will update based on the enquiries activity (i.e. quote sent, quote converted to an SO, etc.). The user can manually amend the header status to any other status available if they wish, and the system will update/retain the submitted and decided statuses/dates accordingly. |
| Additional header statuses can be created for use in the enquiries. These are set up in the List Maintenance section of Progress. |
| Reference: | Allows the user to record a reference number or code against the enquiry. |
| Department: | Allows the user to specify a department against the enquiry. |
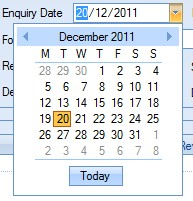
| Enquiry Date: | This defaults to the current date. The user can amend the date displayed by clicking on the arrow |
| Revision: | Allows the user to record a revision for the enquiry. |
| Follow Up By: | This defaults to the user creating the enquiry, but can also be selected from the drop-down list if necessary. |
| Respond By: | Default date for responding to enquiry. Date based on number of days specified in the Enquiry & Sales Order System Admin options. |
| Like the enquiry date above, the user can select a different date if required by using the drop-down calendar. |
| Decision By: | Default date for making a decision on an enquiry. Date based on number of days specified in the Enquiry & Sales Order System Admin option. |
![]()
| Like the enquiry date above, the user can select a different date if required by using the drop-down calendar. |
Once the user has selected the customer and completed the details at the top part of the screen, the user can then specify the part details as required.
Quoting on an Existing Part
The user can select an existing part to quote on by searching for the part in Progress.

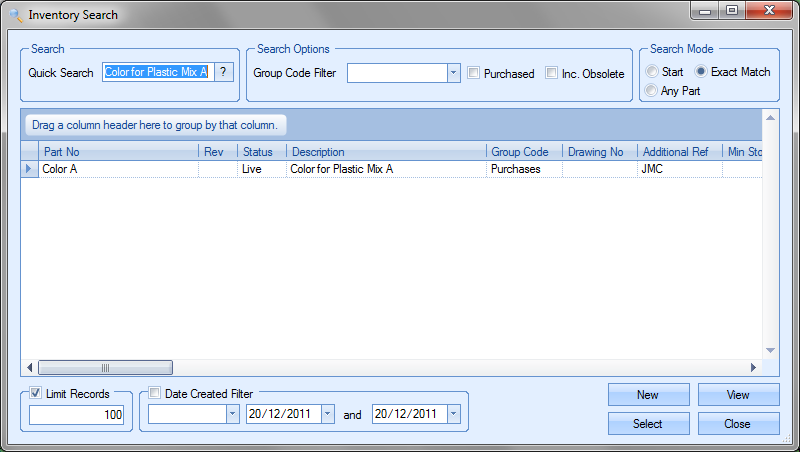
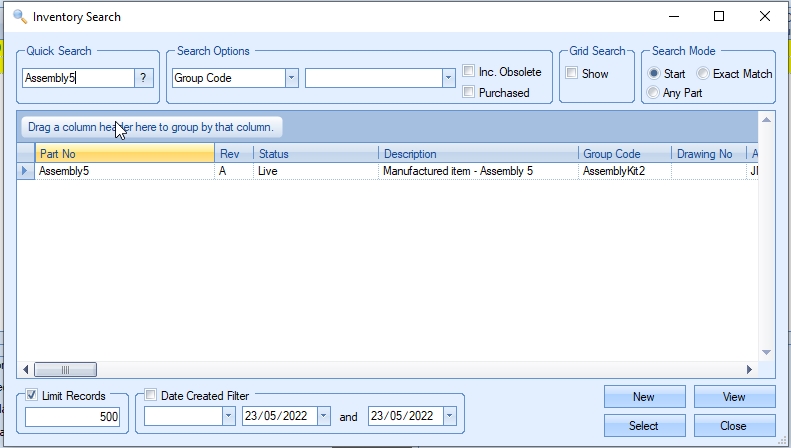
The user can search by clicking on the search box at the end of the Part No field. This will present the user with the standard inventory search box shown below.

The user can use this to filter and select the required part number by highlighting the part and clicking the Select option. This will return the selected part to the enquiry.
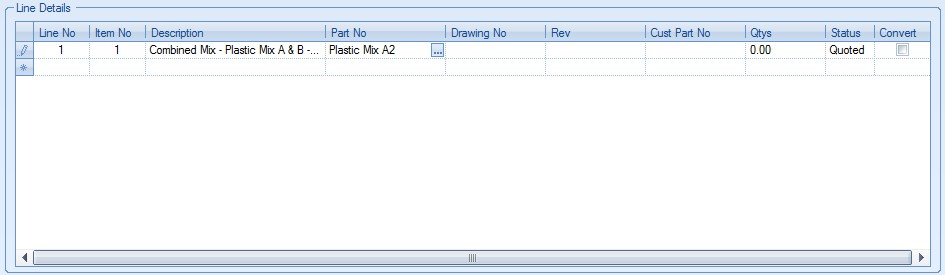
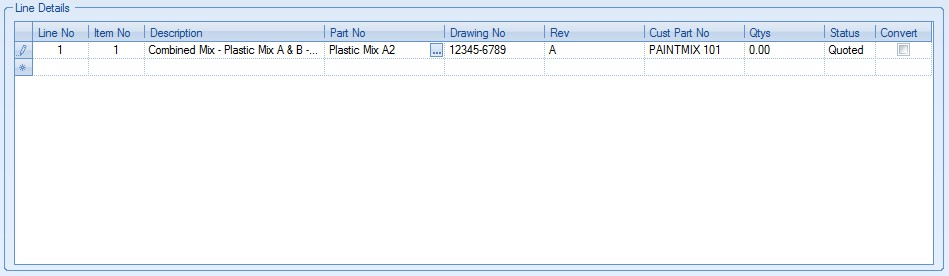
The user can also specify a drawing number, a revision and also a customer part number if known. If this information already exists against the part, it will be pulled through to the enquiry from the part record as shown in the next screen.
Quoting on a New Part
When quoting for a new part that has not been previously entered on the system, the user can simply enter a suitable description. If the user enters a description that has already been used against an existing part, Progress will prompt the user to select the existing part.
The user can then click SELECT to accept the existing part number or select CLOSE to return to the enquiry to change the description.
If the user is quoting on a new part, they can complete the rest of the information on the enquiry if this is known.
Drawing No.
This is the drawing number for the item to be quoted. If the user has selected an item via the Inventory Search Filter then this field will have a drawing number already displayed in this field if one exists for the selected part. If the user wishes to create a new item to be quoted then the user can choose to enter a drawing number as desired.
It is not essential to complete this field in order to process the enquiry.
Rev No.
This is the revision number for the drawing number for the item to be quoted. If the user has selected an item via the Inventory Search Filter then this field will have a revision number already displayed in this field if one exists for the selected part. If the user wishes to create a new item to be quoted then the user can choose to enter a revision number as desired.
It is not essential to complete this field in order to process the enquiry.
Customer Part No.
This is the customer part number for the item to be quoted. If the user has selected an item via the Inventory Search Filter then this field will have a customer part number already displayed in this field if one exists for the selected part. If the user wishes to create a new item to be quoted then the user can choose to enter a customer part number as desired.
It is not essential to complete this field in order to process the enquiry.
Qtys
This field relates to the quantity of this item that is to be converted into a sales order should the quote be successful. On initial entry of an enquiry this field will be left blank.
Status
The current quote status for this line. On initial entry of an enquiry line, this field will default to QUOTED for quoted.
Convert
This field relates to whether this item is to be converted into a sales order should the quote be successful. On initial entry of an enquiry this field will be left blank.
Once the details are entered, the user can save the enquiry by clicking the Accept option. If the user decides they do not want to create the enquiry, they can click the CLOSE option. This will prompt the user for confirmation before returning the user to the main enquiry screen.
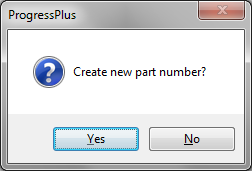
To generate a new part number for this new enquiry, the user must click on the MENU > VIEW PART option. The user will then be prompted to create a new part number.
If the user responds No, Progress will present the user with the inventory search window to allow them to select an existing part number based on the entered description..

If the user responds YES, Progress will open a new part window with all the enquiry details entered. The part number will default to the following format
E / (Enquiry) - (Enquiry Line)
In this example, for enquiry 151, the part number defaults to E/151-1.
From here, the user can complete the remaining details for this new part. For further information on creating parts in Progress please look at the Inventory section of this manual.
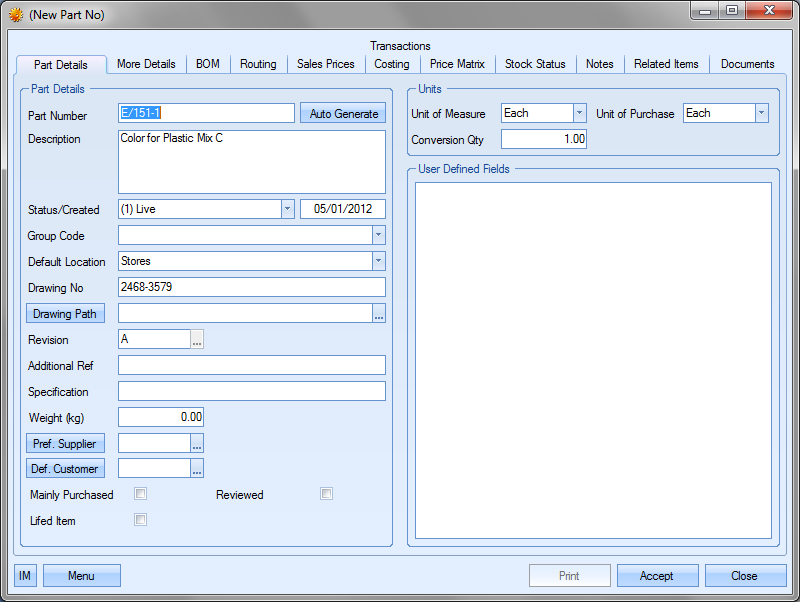
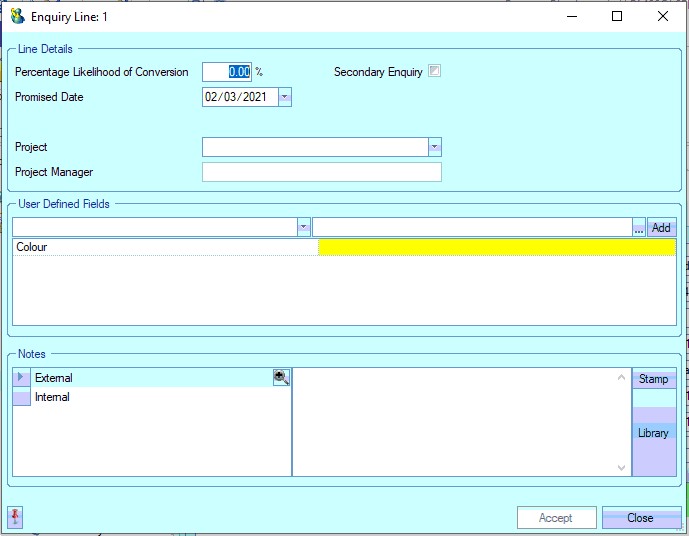
Enquiry Line Details
Further information can be entered for individual enquiry lines. This is accessed by either double clicking on the enquiry line itself or selecting the LINE DETAILS option from the enquiry MENU option. Selecting this option will present the enquiry line screen.
On this screen, the user can link the enquiry line to a project, add notes for display on the enquiry document or for internal reference and record additional information against any User Defined Fields that have been created for the enquiry line. For more information on User Defined Fields and Projects, please see the List Maintenance section of this manual.
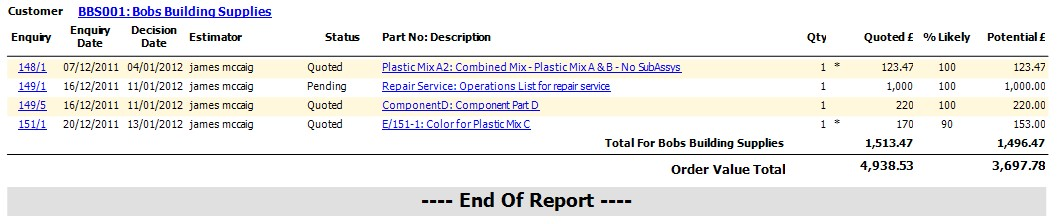
The user can also specify a percentage value for the likelihood that the enquiry will be successfully converted into a sales order. The following enquiry reports use this information.
The following shows an extract from the Enquiry Projected Conversion By Customer report. This shows how the percentage likelihood figure is used to calculate potential revenue.
Enquiry Details
The Enquiry Details section of the enquiry record is used primarily to record the contact information of the enquiry.
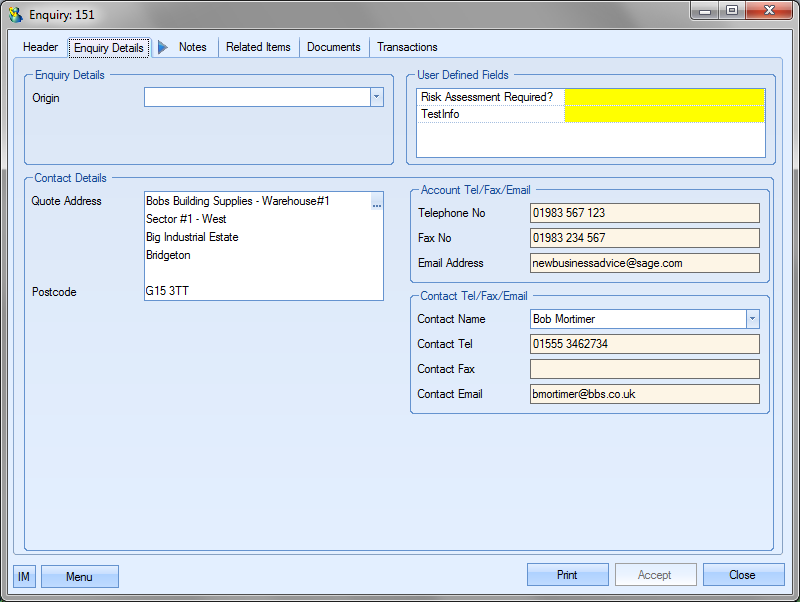
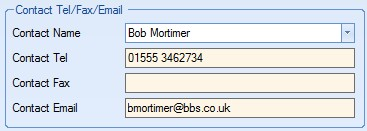
The Quote Address displayed is pulled through from the customer record when the customer is selected at the creation of the enquiry. The telephone, fax and email address info also defaults to that of the customer. The user can select a specific contact from any of the customer contacts set up if required using the drop down list.
Any User Defined Fields that have been set up against the enquiry header are displayed here for the user to complete as necessary.
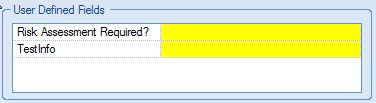
For more information on User Defined Fields, please see the List Maintenance section of this manual.
The user can also specify the Origin of the enquiry i.e. existing customer, referral or trade show. This allows analysis of enquiries at a later date based on how the enquiry came about. The user can select this from the drop down list.
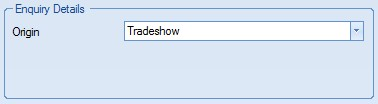
Additional items can be added to the list as required via the List Maintenance section of Progress. For more information on maintaining lists in Progress, please see the List Maintenance section of this manual.
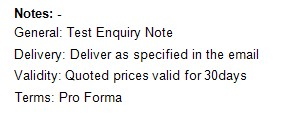
Enquiry Notes
This section of the enquiry allows the user to record notes against different categories for the enquiry.
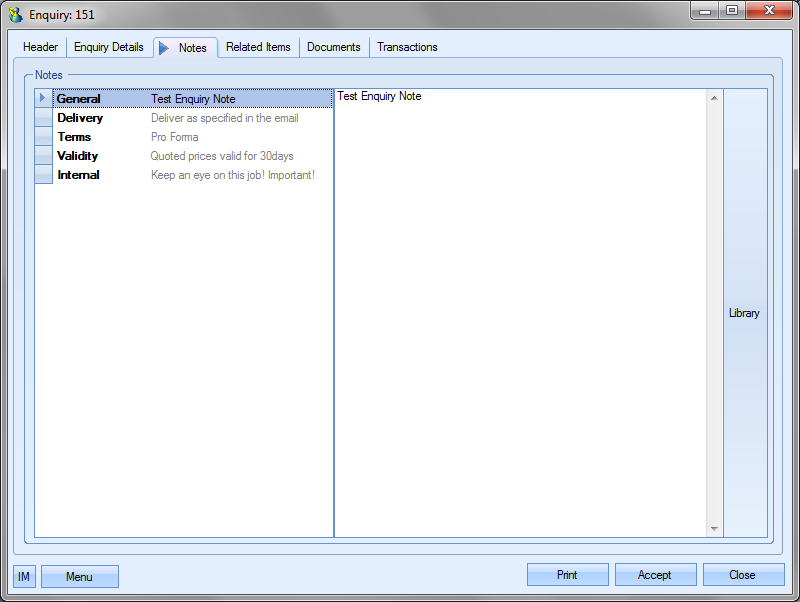
All these notes, with the exception of the Internal note are displayed on the enquiry when printed.
Enquiry Related Items
This section of the enquiry shows any associated sales orders linked to the current enquiry. Sales orders will only appear if they have been created from the conversion of the current enquiry.
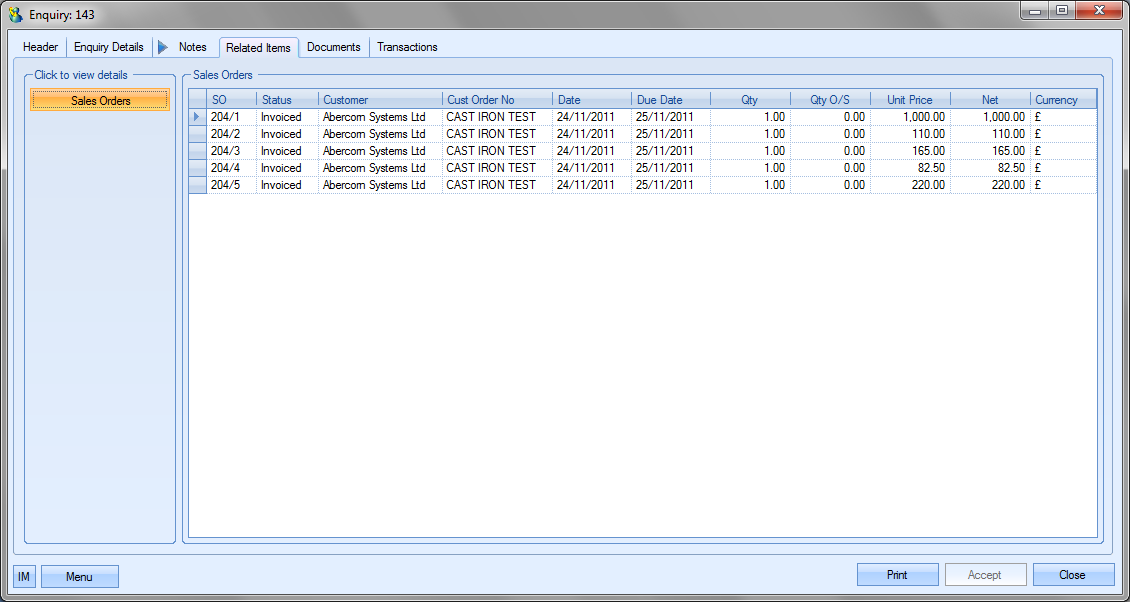
The user can view the listed sales order details if they double click on the sales order line they wish to view. This will present the user with the sales order screen as shown below.
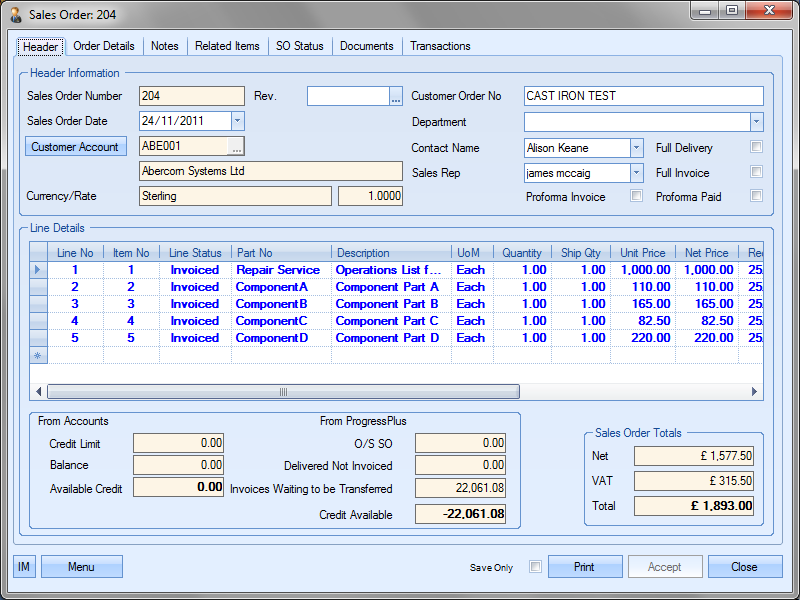
The user may if required change the information contained in this sales order if he or she has permission to do so as determined within the User Access Rights section of the Security section of Progress. For more information on amending sales orders please refer to the Sales Orders section of this manual.
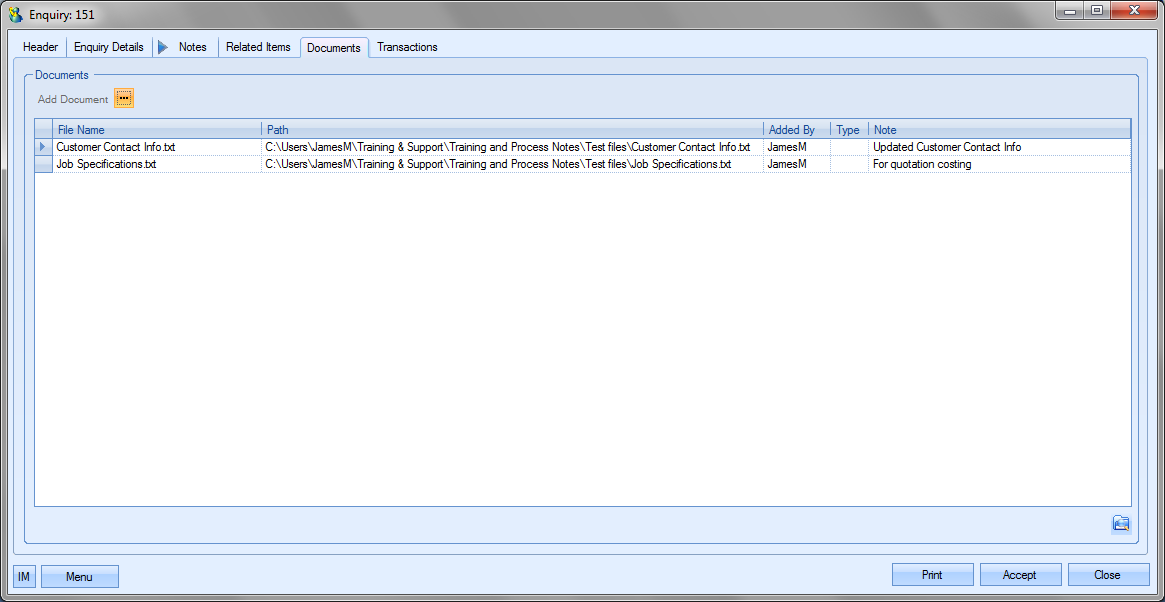
Enquiry Documents
This section of the enquiry allows the user to attach any enquiry-related documents. This can be emails, drawings, specification or anything else related to the enquiry.
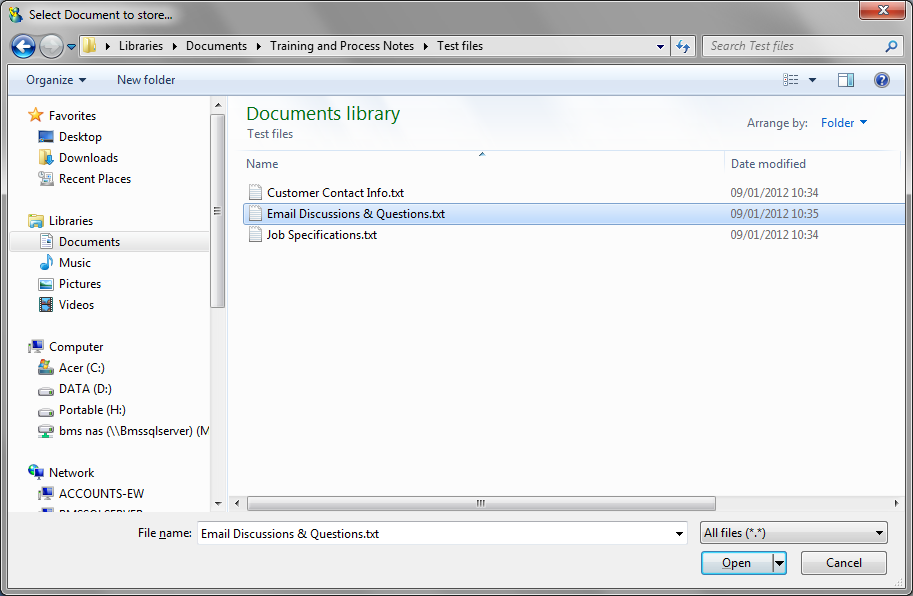
To add a document, the user clicks the ADD DOCUMENT option,![]() , and then simply locates the file they wish to add.
, and then simply locates the file they wish to add.
Once the required document has been selected, it will be listed in the Documents screen with any others that have been added.
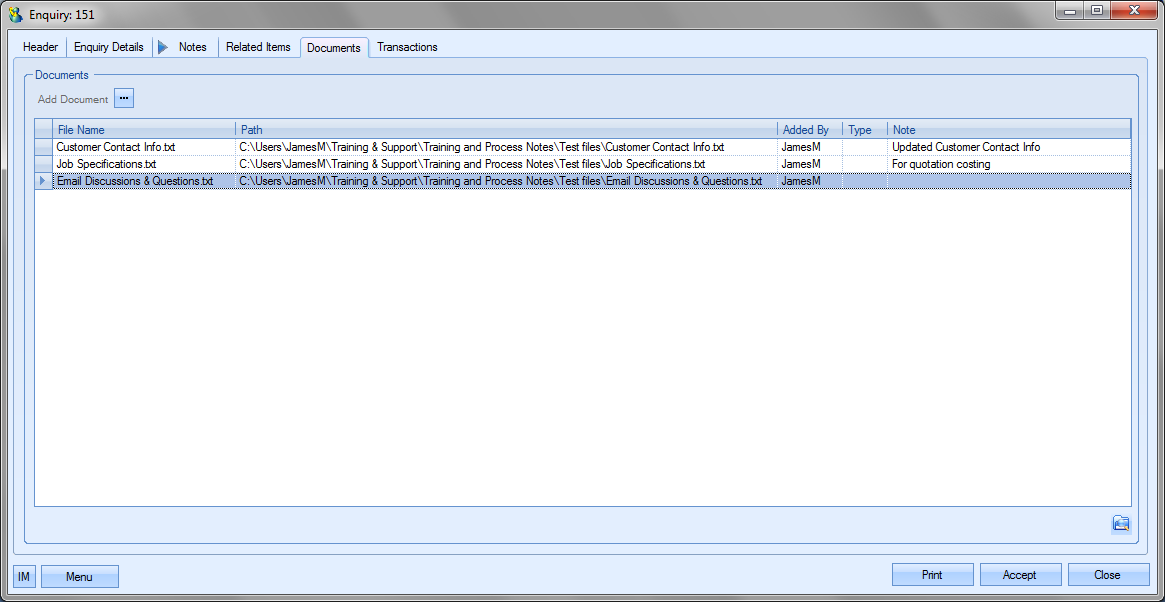
Documents can also be removed from this list by highlighting them and pressing the DELETE key on the keyboard.
NOTE: The documents are not uploaded into Progress when they are attached. Progress only stores the path to the specified file. If the path is to a local folder on the user’s PC, the attached files will not be accessible to any other Progress user. We recommend using a shared network folder for all documents and linking them in Progress to this folder. This ensures that the documents are accessible by all users.
Enquiry Messages
This section shows all associated messages and emails relating to the enquiry.
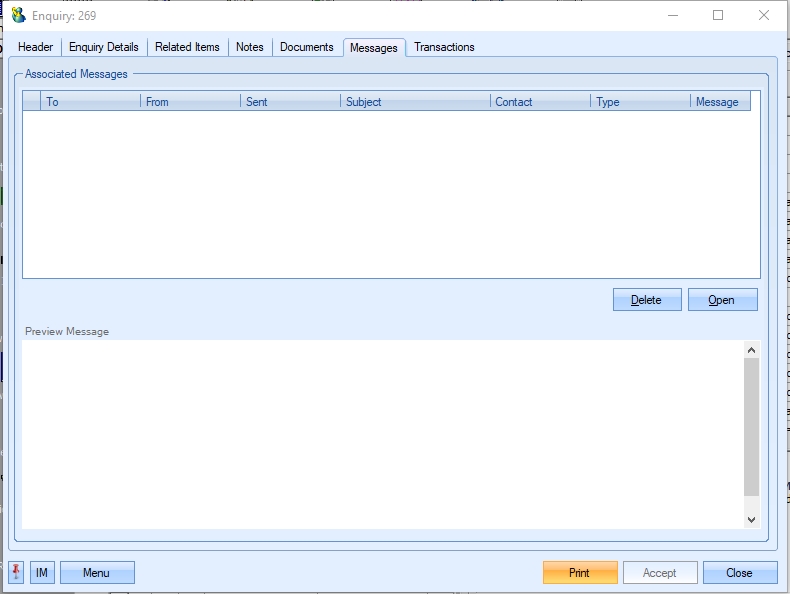
Any communication relating to the enquiry (i.e. emails, instant messages, etc.) will all be listed here for the user to view.
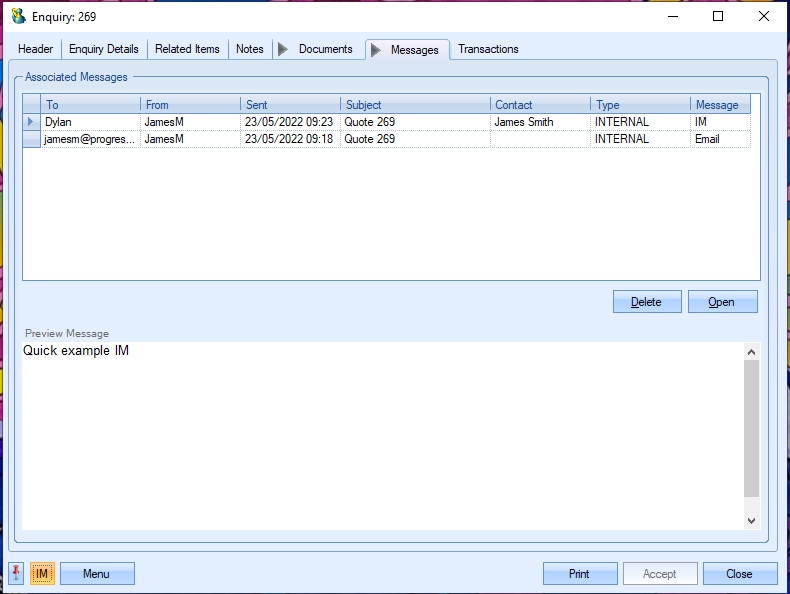
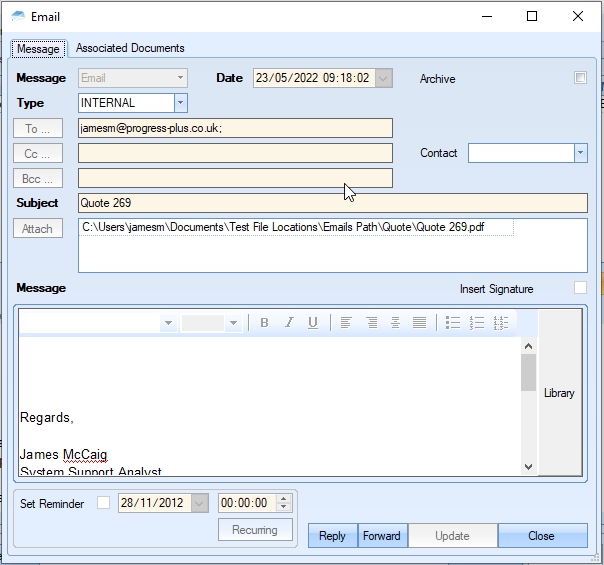
The user can open any of the items listed on this screen but either double-clicking on the listed item or by highlighting and clicking OPEN. The selected item will then be displayed for the user to view.
The user also has the ability remove messages recorded, if permitted. Permission to delete messages is set up against the user permissions. For more information on user permissions, please refer to the Administrator Functions > Access section of the manual. If the user has permission to remove messages, then the DELETE option will be available.
Messages can be deleted by simply highlighting the item and clicking the DELETE option. The user will be prompted to confirm the deletion.
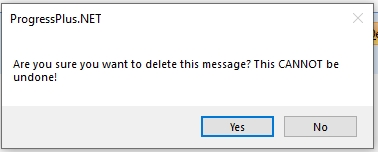
Clicking YES will delete the selected message, and the screen will be updated.
Enquiry Transactions
This section of the enquiry shows all transactions that have been made on the enquiry.
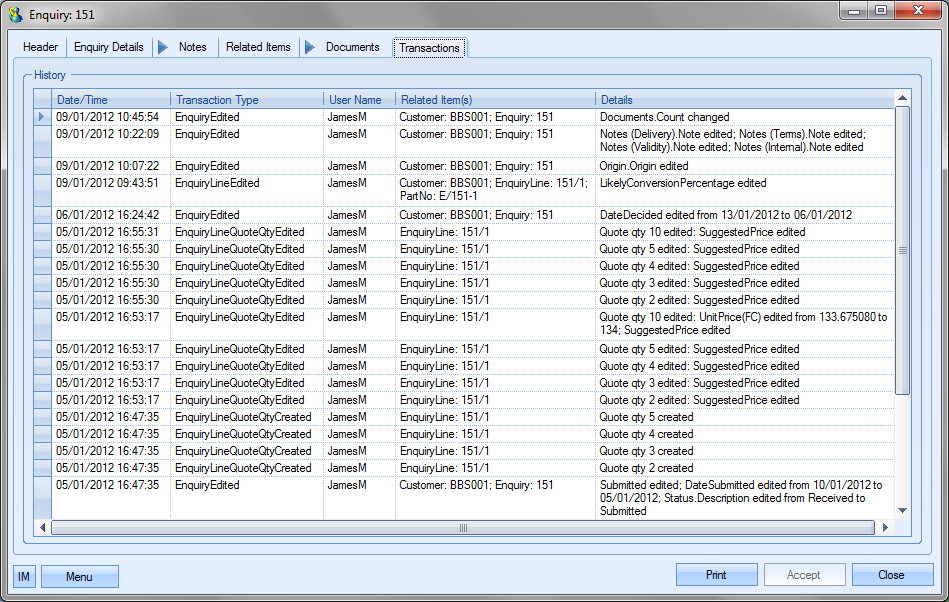
This can be used to trace the historical changes made to the enquiry and includes the user ID, date and time for reference.
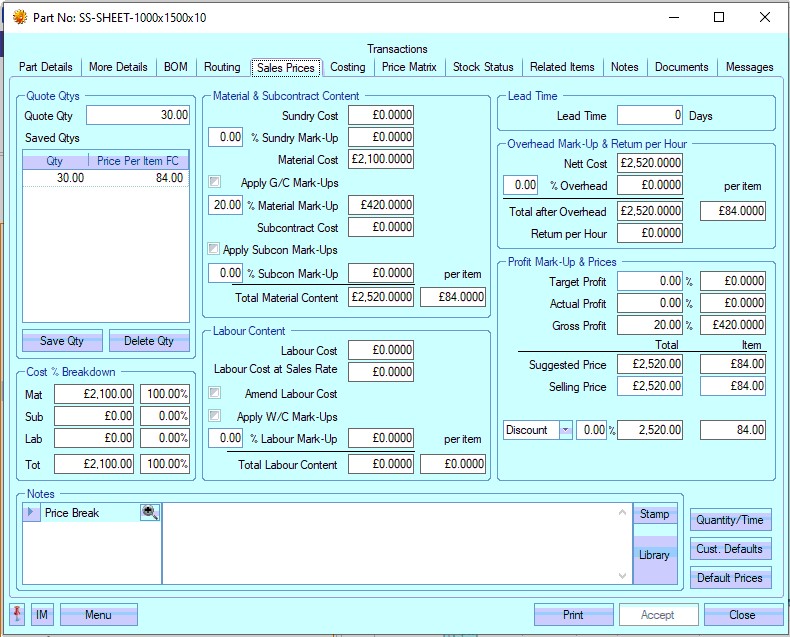
Enquiry Sales Prices
Once the user has planned the routing and BOM for the new part or alternatively if the user had chosen to quote for an existing item, the next task is to determine the price or prices for the different quantities that the user may want to quote for. This is done in the Sales Prices section.
Quote Qty
The user can type in the first quantity they wish to quote for and then press the Tab Key on the keyboard. On initial entry on a quote this figure will default to 1 but the user can simply over type it with the required quantity.
Material Content
This section permits the user to mark-up the total material content of the item (the cost of parts on the BOM including sundry items) sundry and any subcontracts costs by a desired percentage(s). On initial entry of a quote, the default % figure as entered in the Admin section (Admin > Options > Costing Defaults) by the administrator will be used as the overhead mark-up % unless there is a specific mark-up held against the customer record. The calculations are as follows:
Mark-Up Value = Material Total x (Mark-Up Percentage / 100)
Margin Value = Material Total / ((100 – Margin Percentage) / Margin Percentage)
The same calculations would be used for Sundry and Subcon costs if a percentage is applied. The user does have options to set individual percentages for both individual group codes and subcontract codes. Ticking these options will present an additional option for them to complete as is shown below.
![]()
![]()
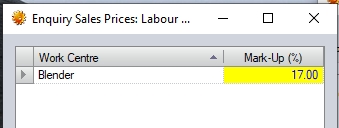
The user can apply mark-ups to the individual material group codes and subcon operations based on the default mark-up set against a group code in the List Maintenance section of Progress. This will show the mark-up as an average percentage and a value.

When the check box is ticked, the user can view the mark-ups applied by selecting G/C Mark-Up Breakdown or S/C Mark-Up Breakdown which presents a window like that shown below..
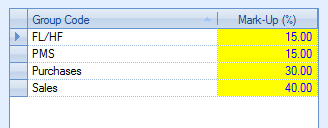
The mark-up percentages will be the default mark-up against that group code or subcon code as set in the List Maintenance section. If no default mark-up is set, this will be set to the default mark-up as set in the admin section of Progress. These can be amended by the user for this enquiry. The average percentage will adjust accordingly.
Labour Content & Lead Time
This section is where the labour element of the final price is calculated. The system uses the planned times of the parts routing operations and the work centre sales sate to calculate a value for the labour element. This screen also allows the user to inflate the labour element of the item (the cost of the operations on the routing) by a desired percentage. On initial entry of a quote, the default % figure as entered in the Admin section (Admin > Options > Costing Defaults) by the administrator will be used as the overhead mark-up % unless there is a specific mark-up/margin held against the customer record. The calculations are as follows:
Mark-Up Value = Labour Total x (Mark-Up Percentage / 100)
Margin Value = Labour Total / ((100 – Margin Percentage) / Margin Percentage)
The LABOUR COST field will display all labour costs associated with the manufacture of the parts according to the charge out rates of work centres. The LABOUR COST AT SALES RATE value shows the labour cost according to the sales rate of the work centres, which is used to calculate the final price.
The user can manually change the labour cost by ticking the AMEND LABOUR COST option. This will display additional information for the Sales rate per hour and the amended labour cost/hourly rate.
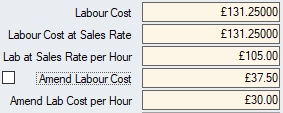
The “per hour” cost can be edited by the user which will update the labour cost. The user can also apply a mark up to individual Work Centres by ticking the check below.

The user can view the breakdown and amend the mark up percentages by selecting the W/C Mark-Up Breakdown button.
Changing the Mark-Up/Margin (%) column will have an impact on the % Av. Lab Mark-Up and the total labour mark-up as shown above.
Cost % Breakdown
This section shows the current cost breakdown of the part into its three main elements; material, labour and subcontract costs with percentages of each element shown.
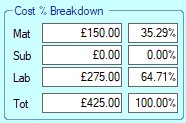
Where multiple quantities have been quoted, highlighted each will update this to show breakdown.
Lead Time
This field permits the user to enter a lead-time in days for the quantity being entered. Each different quantity quoted for this item can have a different lead-time.
Overhead Mark-Up
This field permits the user to mark-up the overheads content of the item (the cost of the operations on the routing and the items on the BOM by a desired percentage. On initial entry of a quote, the default % figure as entered in the Admin section (Admin > Options > Costing Defaults) by the administrator will be used as the overhead mark-up % unless there is a specific mark-up held against the customer record. The user can simply over type this figure with another % if required. The calculations are as follows:
Mark-Up Value = Overhead Total x (Mark-Up Percentage / 100)
Margin Value = Overhead Total / ((100 – Margin Percentage) / Margin Percentage)
Overhead – Return Per Hour
This section of the Sales Prices form will also display a field Return Per Hour. This field informs the user that based on the work centre charges on the routing and any labour mark-up of a projected overall return per hour for this quantity should the user be successful with the quote.
Profit Mark-Up / Prices
This field permits the user to mark-up the target profit of the item (the cost of the operations on the routing + the cost of the parts on the BOM + any overhead mark-up) by a desired percentage. On initial entry of a quote, the default % figure as entered in the Admin section (Admin > Options > Costing Defaults) by the administrator will be used as the profit mark-up % unless there is a specific mark-up/margin held against the customer record. The system will then display a profit per item in % and in value in the Target Profit fields.
The calculations used by the system are as follows:
Mark-Up Value = Net Total x (Mark-Up Percentage / 100)
Margin Value = Net Total / ((100 – Margin Percentage) / Margin Percentage)
Selling Price
Based on the previous calculation Progress will suggest a Total Selling Price for the full quantity being quoted and an Item Selling Price for each individual item. If a quantity of 1 is being quoted for, the Total Selling Price and the Item Selling Price will be the same. The figures displayed in these fields are suggested figures that the user can override if required. Should the user however, choose to quote a value less than the suggested system figure, the Actual Profit fields within the Profit Margin section of the form will be highlighted in red displaying any projected “loss” in % and in value. If the user wishes to charge more than the suggested selling price the effect of this figure will also be reflected in the Actual Profit fields within the Profit Margin section of the form.
Discount/Surcharge %
If required, the user can enter a percentage discount or surcharge that will be applied to the calculated Selling Price.
Other options displayed on this form include:
Customer Defaults
This option will overwrite any user-entered mark-ups with those stored against the default settings in the customer record.
Default Prices
This option will overwrite any planned material and routing costs with the current costs. This is useful if, for example, the work centre charge out rates or material prices have changed since this item was first quoted or created.
Notes Price Break
The user may enter notes regarding the particular quantity being quoted for. These notes can appear on the enquiry layout if desired.
Quantity/Time
Provides the user with an overview of all routing operations involved in the assembly of the product.
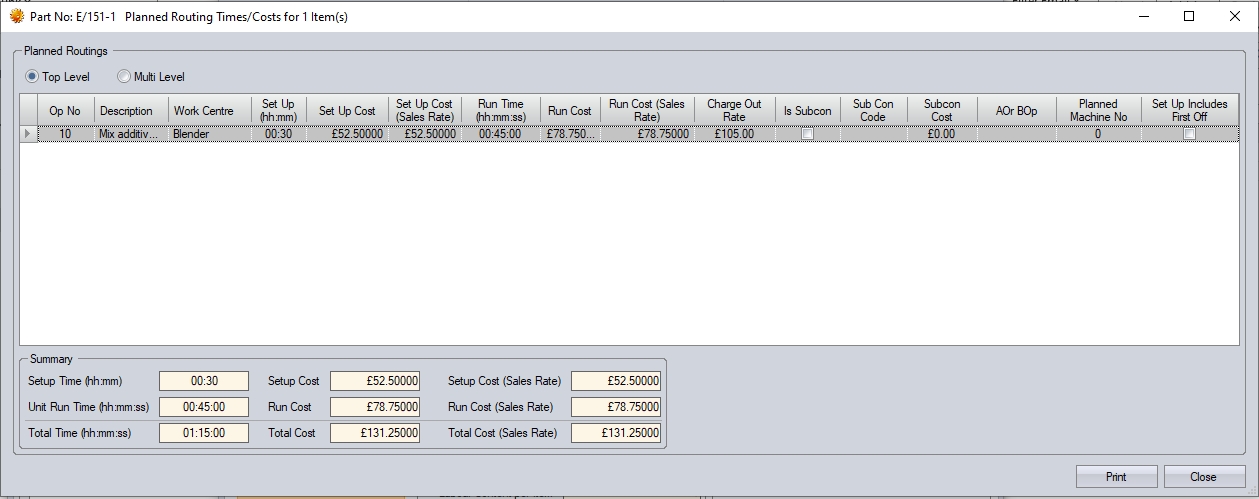
The user has options at the top to see both the immediate routing operations of the manufactured item as well as the option to see operations for all levels of the BOM. This would include any operations listed against any sub-assemblies.
![]()
This option simply provides the user with an easy method of viewing all operations without having to drill into the BOM of each part and sub-assembly to see the associated routing operations.

The summary section displayed at the bottom gives totals for both time and cost depending on whether the user is viewing just the immediate routing operations or the entire BOM’s operations.

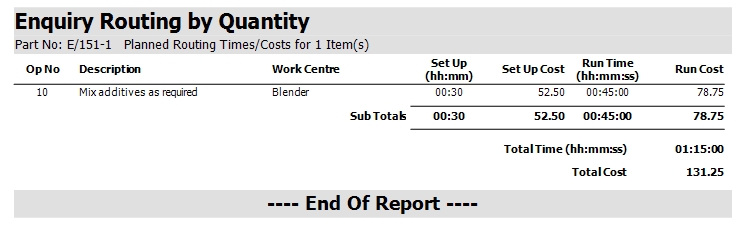
The user also has an option to print out a report of the listed operations using the PRINT option at the bottom of the screen. If the user is viewing the details based on the TOP LEVEL option, the report generated will be as follows:
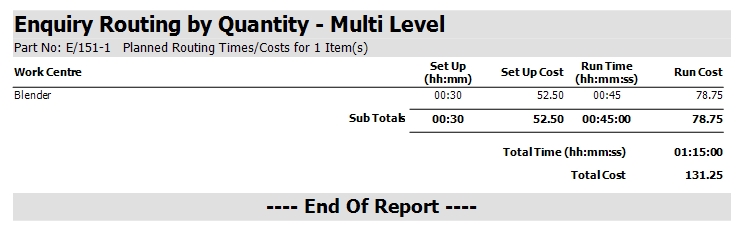
If the user is viewing the details using the MULTI-LEVEL option, the report generated will be as follows:
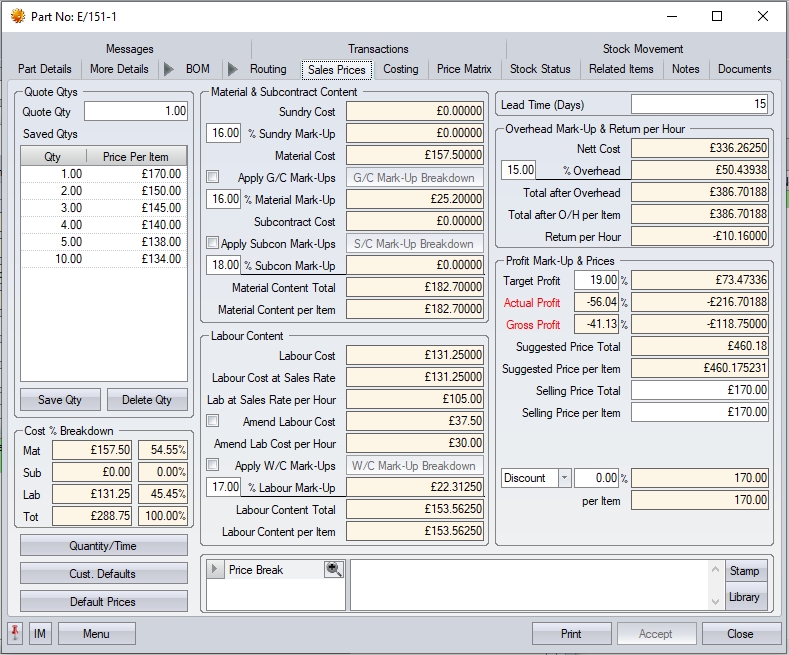
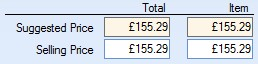
When generating a price for the quoted part, the system pulls all the information regarding material, operations, overheads and any mark-up values to calculate a Suggested Price. The user does not have to use this suggested sales price and can over-type it with one of their own if desired. This section displays a mixture of fields that the user can update or enter data into (white background boxes) and fields that display a calculated figure (grey background boxes). The user cannot amend the figures displayed in the calculated fields.
In the example above, the Selling Price defaults to the Suggested Price automatically. If the user wishes to change the selling price, they can amend either the total (qty x price) or the individual item price. The Selling Price is the one recorded for the quotation.
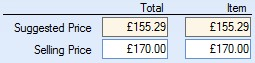
In our example, we will increase the individual selling price for a quantity of 1 to £170.
If the user is happy with the Selling Price, they can save this against the quantity by selecting the SAVE QTY option on the left of the screen. Once the quantity and price is saved, the details are listed in the Saved Qty box on the left of the screen. If the customer requires prices on larger quantities, the same process can be used, with the user simply increasing the QUOTE QTY and letting Progress calculate the new SUGGESTED PRICE. Again, the user can amend as necessary before saving for the enquiry.
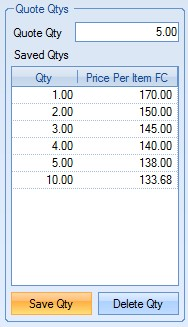
The user can delete any saved quantities too. They simply need to highlight the quantity/price to be removed from the enquiry and click on the DELETE QTY option. Once the user has calculated all the prices for all the quantities required, they can return to the enquiry to generate it for the customer.
Print Options
The PRINT option at the bottom of the enquiry provides the user with a few printing options. These options allow the user to generate and send the enquiry to the customer,and also get costing breakdowns and potential profits of the enquiry lines.
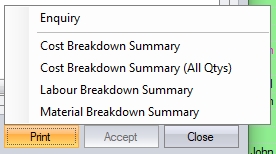
To print the enquiry itself, the user must click the ENQUIRY option from the menu. This will generate the quotation to be sent to the customer, an example of which is shown on the next page.
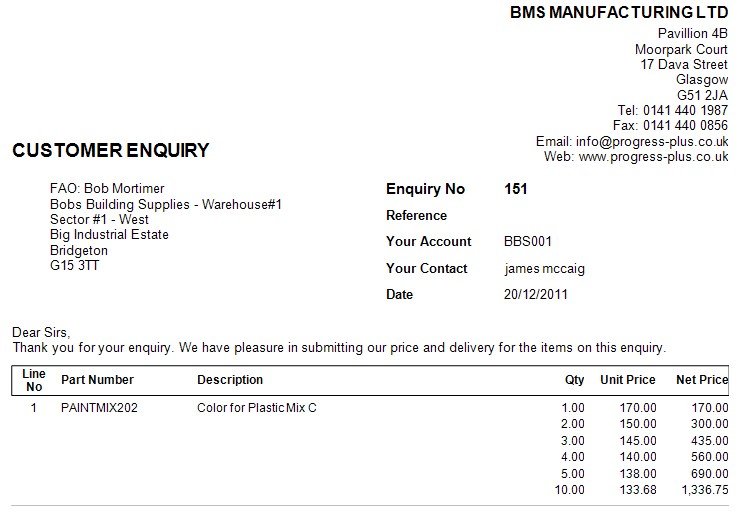
The user can then email this directly to the customer using the EMAIL option at the top of the screen, print directly to a printer using the PRINT option, or save in a variety of formats using the SAVE option. Emailing directly from Progress will generate an email window, with the enquiry attached as a PDF, and with the customer contacts email address if the contact is set up in Progress and selected within the enquiry.
As soon as the user has clicked the PRINT option from the menu, the enquiry status is updated to "submitted". The SUBMITTED tick box and date are also updated to indicate when the enquiry has been sent to the customer.

Cost Breakdown Summary reports
The user also has a number of costing summary reports available from the PRINT menu. These reports give the user a cost breakdown of the current enquiry.
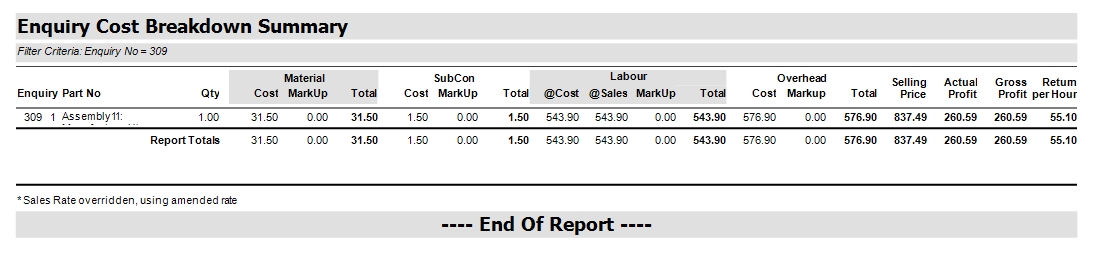
The Enquiry Cost Breakdown Summary report provides a cost breakdown of the selected enquiry quantities (i.e. selected on the enquiry line). If no quantity has been selected on he enquiry line, then the report will be generated based on the lowest quantity quoted on the enquiry line. This report also includes summary totals, providing the user with overall costs, totals, markups/margins, profits, etc. based on the quantities. This can be particularly useful for seeing how profitable the enquiry could be.
The Enquiry Cost Breakdown Summary (All Qtys) report provides a similar cost breakdown as the report above, but does so for all the quantities quoted. This report doesn't have summary totals like the report above as the customer will likely proceed with one of the quoted quantities as opposed to ALL the quoted quantities.

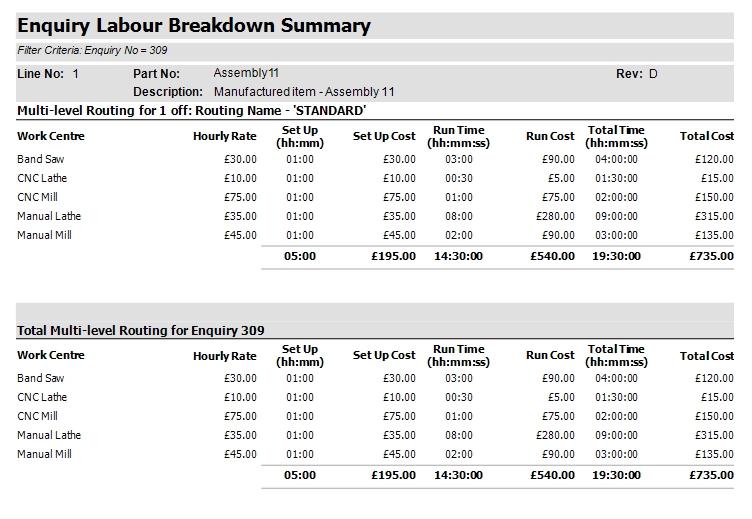
The Enquiry Labour Breakdown Summary report provides a details breakdown of the labour costs, providing summary costs and times for each work centre, and summary totals for each. If the item being quoted for is a multi-level BOM, the system will break down the report for each BOM level.
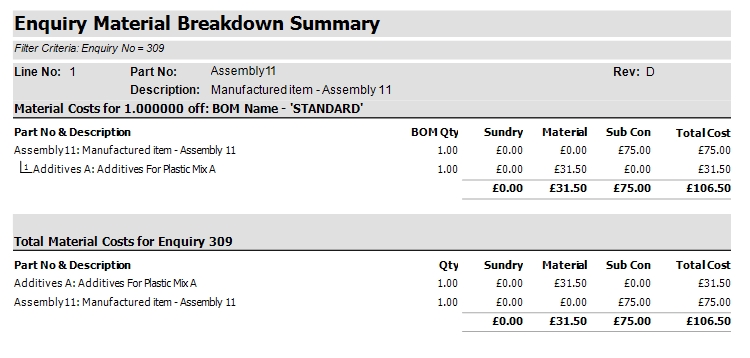
The Enquiry Material Breakdown Summary report provides a detailed breakdown of the material and subcontract costs, as well as summary totals for each part on the BOM.
Converting an Enquiry to a Sales Order
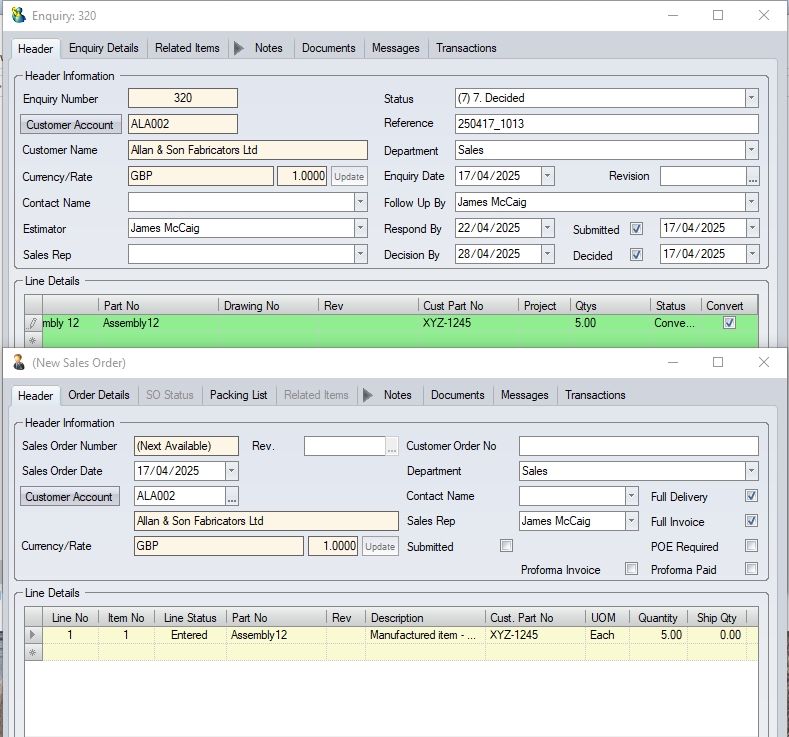
When a customer confirms they wish to proceed with a quotation and wish to place an order, the user can convert the original enquiry into a sales order. This can be a new sales order or additional items for an existing sales order. The user can do this by using the CONVERT TO SO and CONVERT TO EXISTING SO options within the enquiry.
With the enquiry open, the user must select the quoted quantity from those originally sent to the customer. This can be done by selecting the quantity from the drop down list.
Once the quantity has been chosen, the user must click the CONVERT tick box at the end of the enquiry line. For enquiries with multiple lines, the tick box must be ticked for all lines being converted to the sales order.

Once the user has updated all the required enquiry lines, they can click the CONVERT TO SO or CONVERT TO EXISTING SO option within the Menu option at the bottom of the screen.
If the user chooses to create a new sales order, they will be presented with a New Sales Order window with all the details of the customer, part and prices that were previously quoted to the customer.
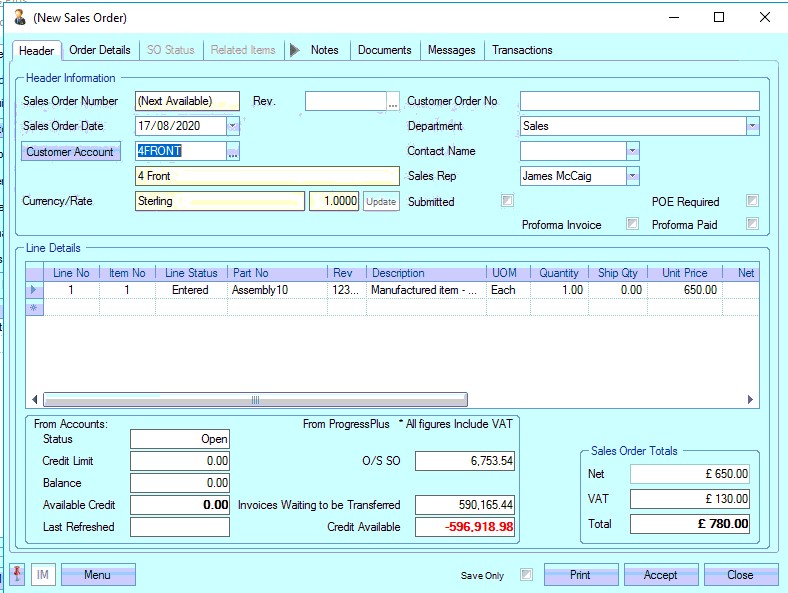
The user can specify a customer order number and/or amend any other details here if necessary. If no changes are necessary, the user simply has to click the Accept option to save the sales order. Progress will then assign the sales order a sales order number. For more information on sales orders, please refer to the Sales Orders section of the manual.
If no default invoice or delivery address exists against the customer account in the Customer List (i.e. a generic customer account), the enquiry address information will pull through to the sales order created.
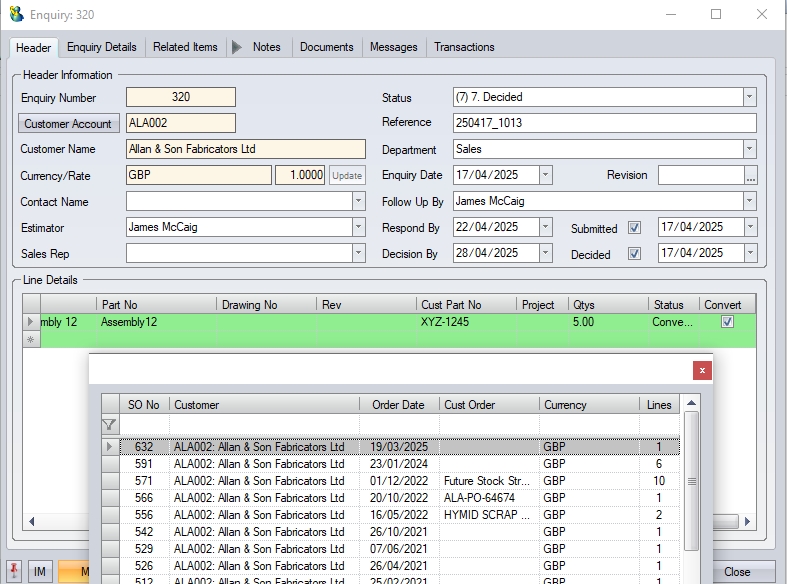
If the user selects the CONVERT TO EXISTING SO, they will be prompted to select an existing sales order for the enquiry customer for the items to be added to.
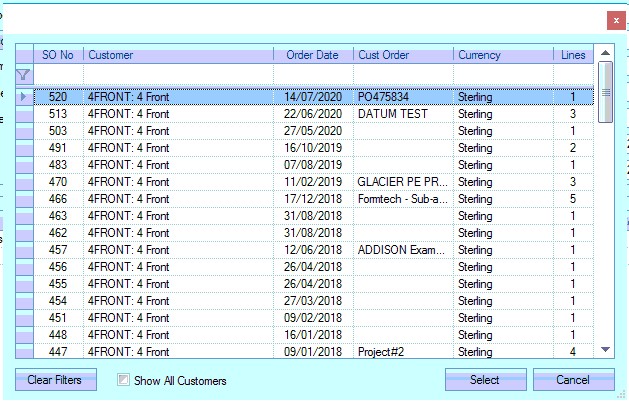
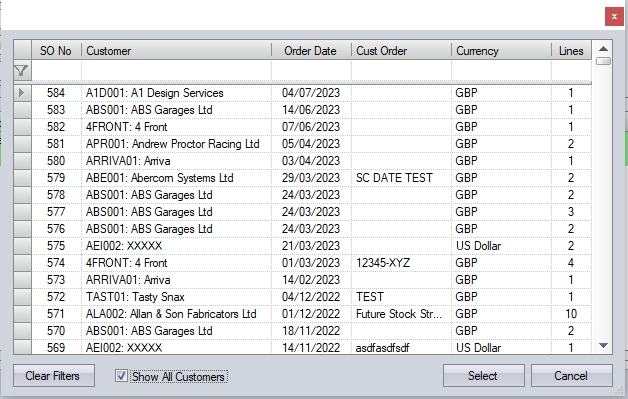
The user can also convert the enquiry to ANY other sales order by selecting the SHOW ALL CUSTOMERS option. This will refresh the list of sales orders to show all customer orders.
If the user chooses to convert the enquiry to a sales order of a different customer/currency, the system will highlight this to the user so they can confirm.
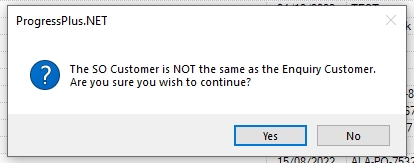
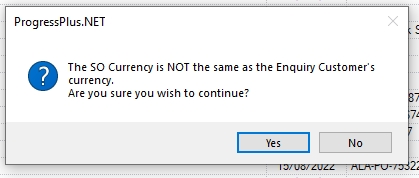
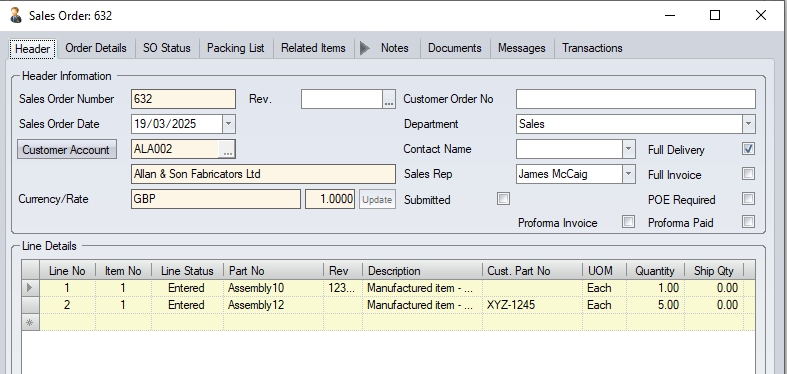
If the user chooses to proceed with their selection, the selected sales order will be displayed with the new line item(s) added with the converted prices. The prices will be based on the base currency value, and the equivalent foreign currency (FC) value calculated based on the rate of the selected sales order.
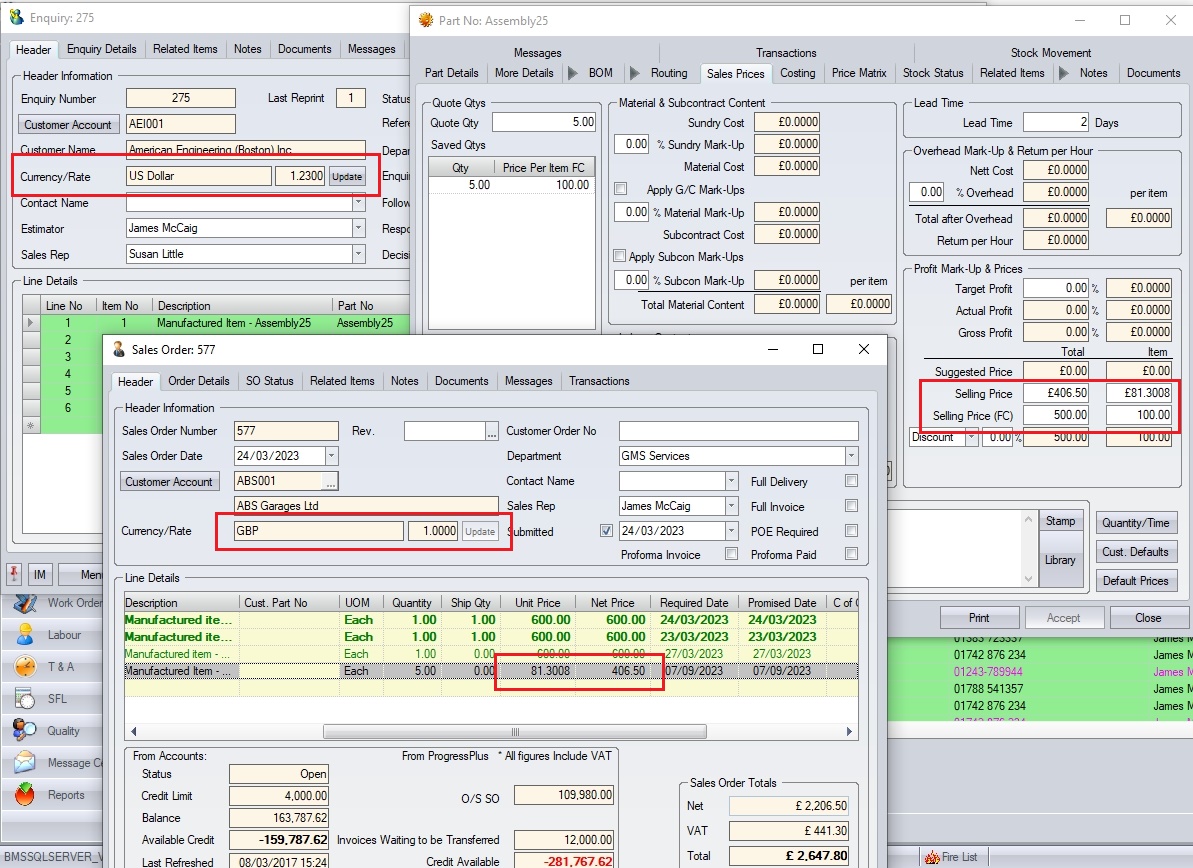
(Example USD enquiry converted to GBP sales order)
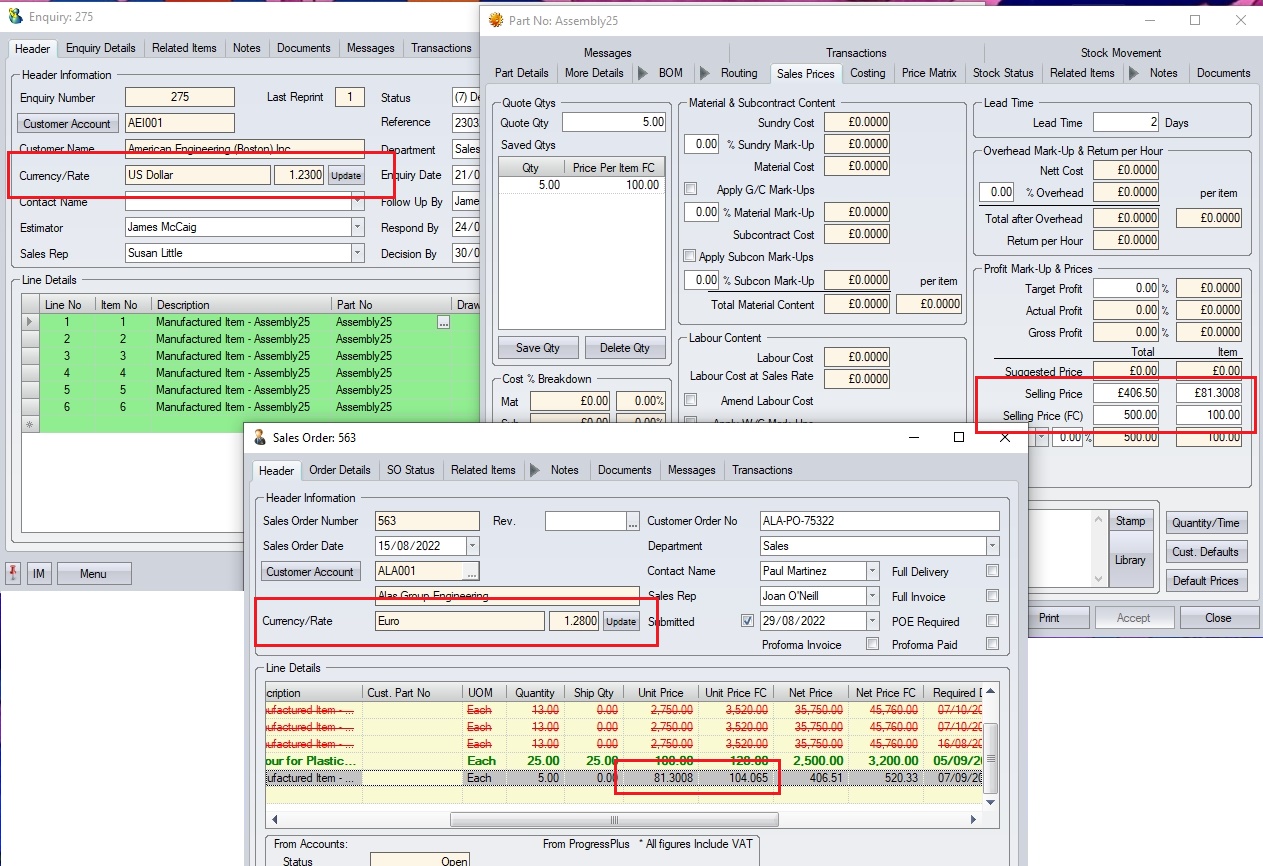
(Example USD enquiry converted to EUR sales order)
Once the relevant sales order has been selected, the enquiry item(s) will be added as additional lines to the selected sales order. For more information on sales orders, please refer to the Sales Orders section of the manual.
Once the enquiry has been converted into a sales order, the enquiry is updated to show that it has been decided and specifies the date that this was done.

Any enquiry lines that were converted to the sales order are also updated to Converted status.

The user can also update lines on the enquiry to another appropriate status. The status on the enquiry line can be changed according to the customer’s response.

If the customer has responded and explained that they are awaiting further information before placing the order, the status can be changed to Pending. This allows the user to open the enquiry line details screen and enter a reason against status.
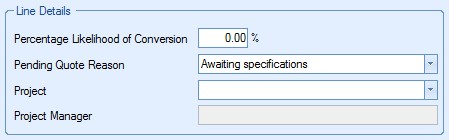
The Pending Quote reasons can be entered into Progress via the List Maintenance screen. For more information on adding items to lists in Progress, please see the List Maintenance section of this manual.
If the customer has responded to the quotation by not proceeding with an order, then the enquiry line can be updated to Lost status. Again, the user can add a reason for this if the customer has provided this in the enquiry line details screen.
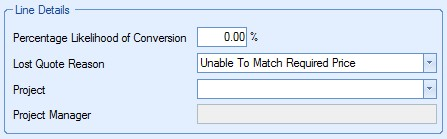
As before, the Lost reason list can be maintained via the List Maintenance screen.
If an internal decision has been made not to provide a quotation for work, but the enquiry has still to be logged in Progress, the enquiry line status can be set to Do Not Quote status. Again, the user can specify a reason for this status in the enquiry line details screen.
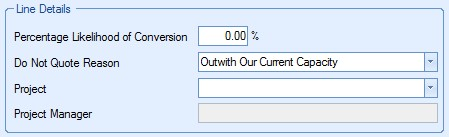
As before, the Do Not Quote reason list can be maintained via the List Maintenance screen.
Any changes to the enquiry line statuses require the user to click Accept to save the changes.
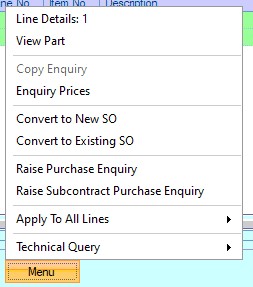
Additional Enquiry Menu options
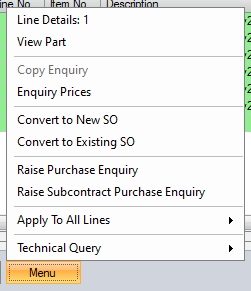
The MENU option provides some additional options for the enquiries. This is also where the options to conversion the enquiry to a sales order can be found.
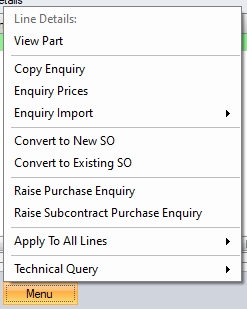
Line Details: #
This option will open the line details of the selected enquiry line, with # showing the currently selected line number.
View Part
This option opens up the selected part inventory screen. This will default to the Sales Prices tab, but the user can view all other tabs simply by selecting the open they want to view.
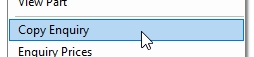
Copy Enquiry
This option allows the user to copy the details from an existing enquiry. This option is only available from within a new enquiry.
When the user opens a new enquiry, they can use this option to select a previous enquiry to pull the details from.
Upon selection, the user will be presented with the following screen.
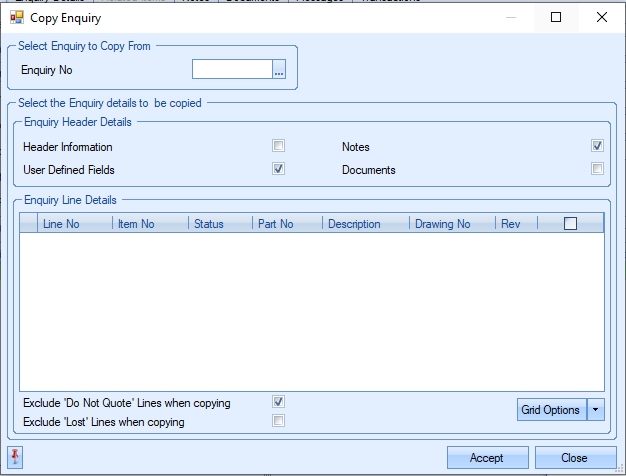
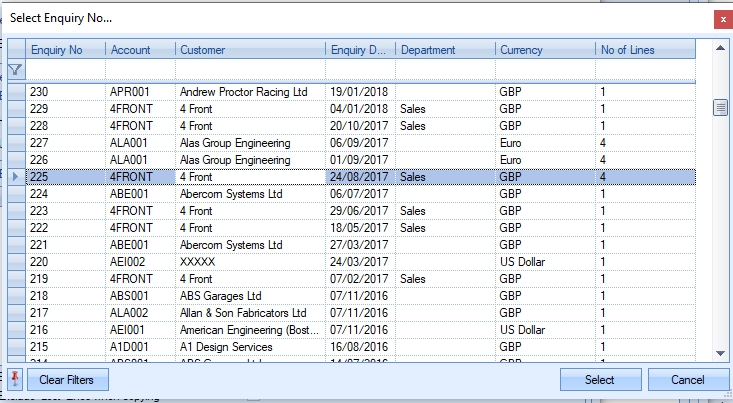
The user can select the previous enquiry from the box at the top of the screen.
Once the enquiry is chosen, the user will see the details from the previous enquiry displayed.
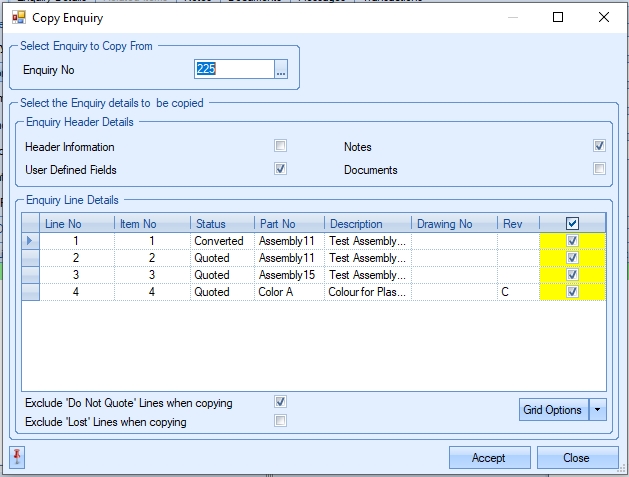
From here, the user can now select the information they wish to copy. Firstly, the have the option of copying the Header, Notes, User Defined Fields and Documents details from the previous enquiry.

The user also has each of the previous enquiry lines listed in the grid below. The user can select either all or a selection of the enquiry lines to pull through to the new enquiry. They can do this by simply ticking/unticking the box against each line.
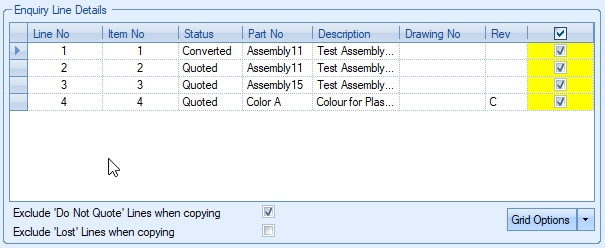
The user also has options to include/exclude any lines that were previously marked DO NOT QUOTE or LOST depending on whether they need to be included on the new enquiry.
![]()
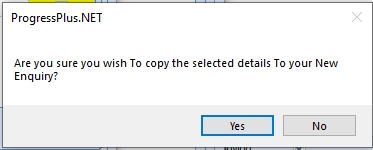
Once the user has selected the relevant details to be copied, clicking ACCEPT prompt the user to confirm the copying and will pull the previous enquiry details through to the new enquiry.

The user can now make further amendments to the new enquiry or click ACCEPT to save the enquiry.
Enquiry Prices
This option provides an alternative method for adding items to the enquiry. This method doesn't calculate the price of the part based on BOMs, routings, etc. and is an alternative way of adding parts, quantities and prices where job costing information is not yet known.
Selecting the option will present the user with the following screen. If its a new enquiry, then the screen will have no information shown. If selecting within an existing enquiry, the enquiry line information will be shown.
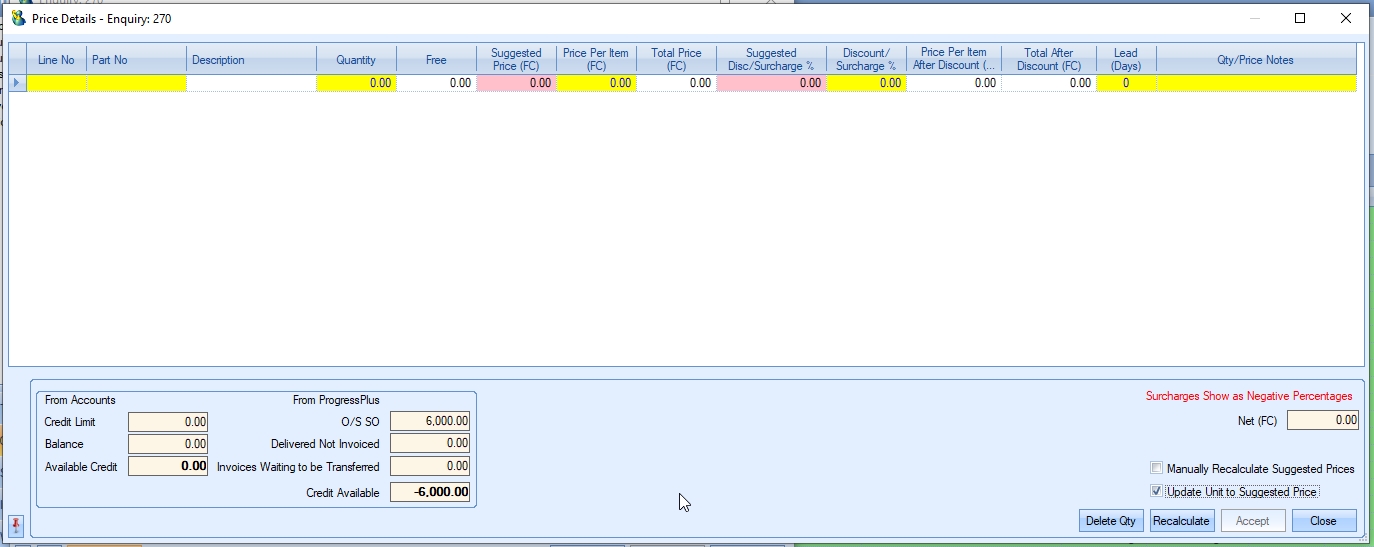
(Enquiry Prices - New enquiry)
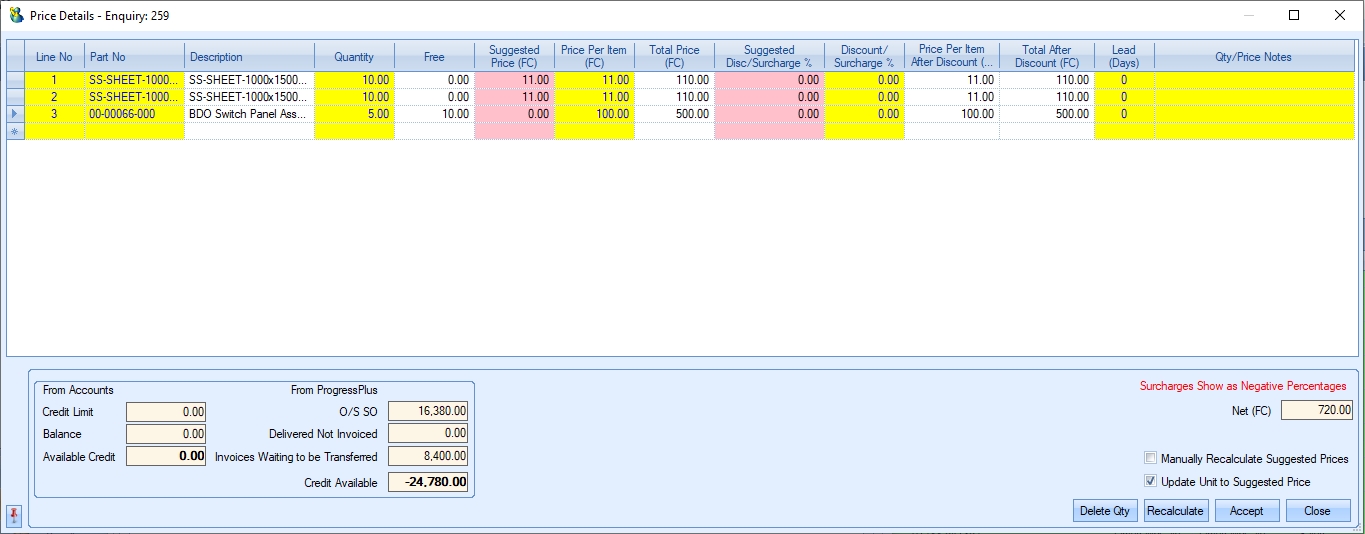
(Enquiry Prices - Existing enquiry)
The customers credit information will be displayed at the bottom of the screen for information purposes.
Adding Enquiry Lines/Quantities
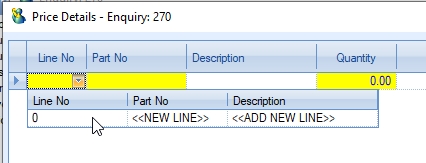
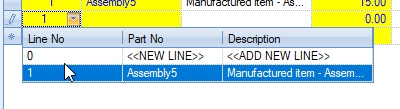
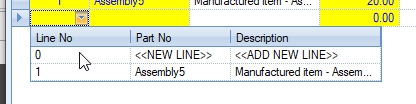
The user can add additional lines to the enquiry from this screen by selecting the <<ADD NEW LINE>> option from the LINE NO drop-down. This will add an additional line to the existing enquiry.
Once the user indicates they wish to add a new line, they can search for the relevant part number in Progress.
Once the part number has been selected, the user can add the required quantity and unit price as required. The system will default the unit price if the part has a selling price or price matrix set up already, hwoever, th euser can amend if necessary.

If additional quantities are to be quoted on for the same part number, the user can add additional quantities/prices to the existing line. TO do this, they can select an existing enquiry line to add the details for from the LINE NO drop down.
The user can then add the additional quantity/price information as required. This can be done as many times as required until all the quantities and prices have been entered.

Separate additional lines can be added to the enquiry by again selecting the <<ADD NEW LINE>> option from the LINE NO drop down.
Selecting this option will set the LINE NO to the next available enquiry line number and allow the user to search for a part number as per the steps highlighted above.

The user can then proceed to add the quantities and pricing as required. Any additional, separate enquiry lines would be added using the same method.
Enquiry Price Options
At the bottom of this screen, the user has a couple of options available. These allow the user to manually recalculate suggested pricing on their enquiry in different scenarios. Both options are used in conjunction with the RECALCULATE option at the bottom of the screen.
![]()
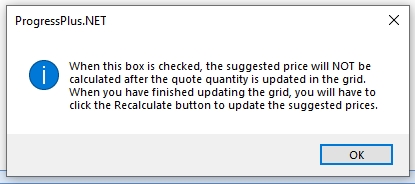
| Manually Recalculate Suggested Prices: | If this option is ticked, the suggested price is not calculated automatically every time you add a line or a quantity, but instead calculates manually when you click the RECALCULATE option. When the option is ticked, the user is shown a message indicating the impact of the option. |
| This option is typically used if using group code families/group code discounts are being additional lines can impact the pricing of previous lines. As a result, this option allows the user to add all the enquiry lines and quantities required and then have the pricing calculated based on all enquiry line items. |
| Update Unit to Suggested Price: | If this is ticked when the RECALCULATE option is clicked, the Price Per Item will be updated to the Suggested Price. This option is useful for those who manually recalculate suggested prices, but can also be used without the manually recalculate check box ticked to simply update the prices if, for example, there were older lines to be updated, or if lines were added before any pricing had been decided (i.e. incomplete costings when added). |
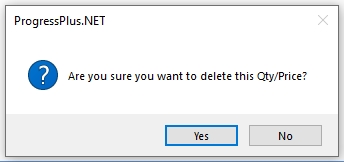
Deleting Enquiry Lines/Quantities
If the user wishes to remove a part and quantity from this screen, they simply have to highlight the row on the grid and then click the DELETE QTY option. The user will be prompted to confirm the deletion, before the part/quantity is removed from the enquiry.
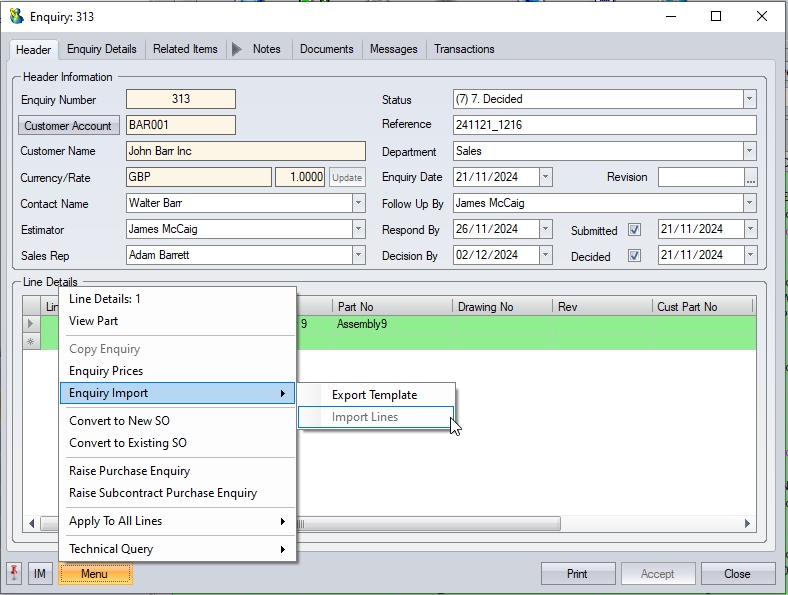
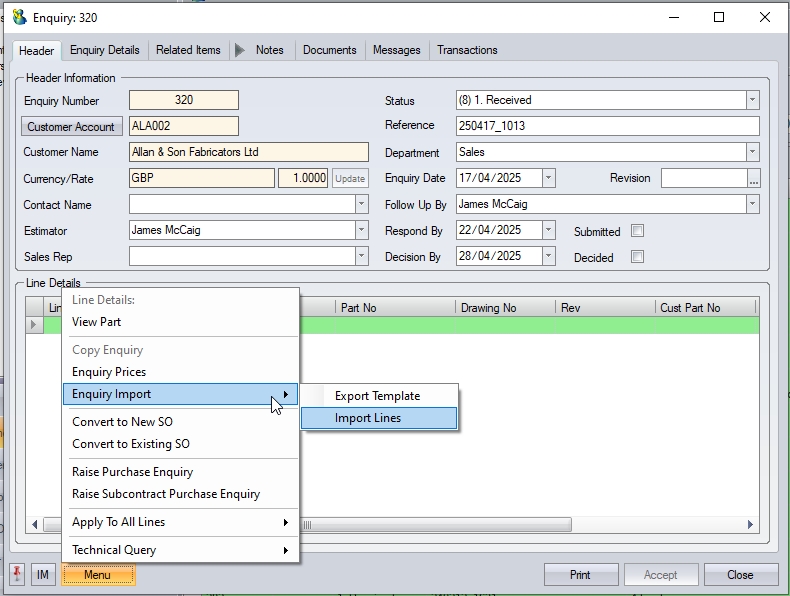
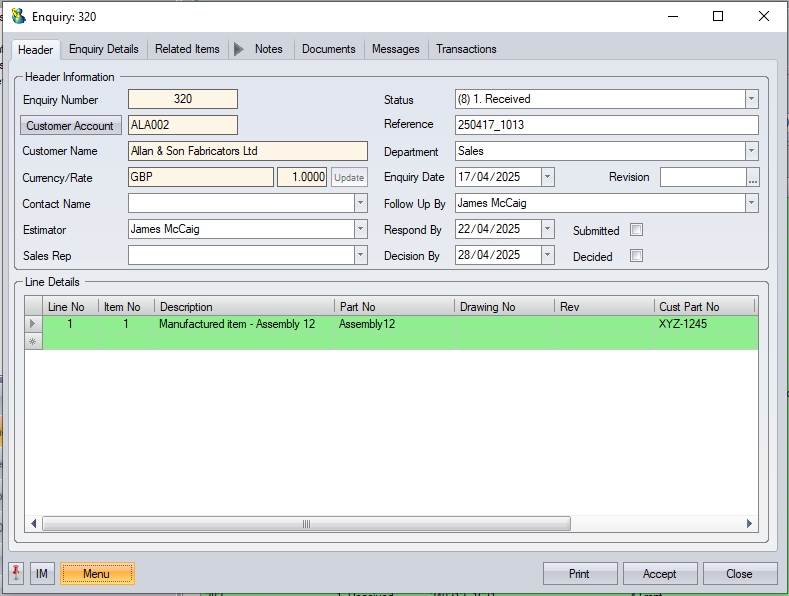
Enquiry Line Import/Export
These options allows the user to export an existing enquiry and import the line details to the enquiry from a spreadsheet. Importing enquiry lines can only be done when an enquiry has no existing lines; existing enquiries, with enquiry lines, will not have this option available, although the import template spreadsheet can be created from any enquiry via the EXPORT TEMPLATE option.

(New enquiry with no lines - import option available)
(Existing enquiry - import option unavailable)
The import spreadsheet can be used to import multiple lines and/or quantities. Like many of the import spreadsheets used in Progress Plus, the enquiry template is a fixed-format spreadsheet (i.e. all columns need to exist in the spreadsheet).

(blank import spreadsheet)

(Populated import spreadsheet)
The main columns required are those with the coloured headings.
| ITEM NO | This is the enquiry line number. If multiple quantities are being quoted for the same line item, this information would be duplicated (like in the example shown above). |
| PART NO | This is the Progress part number (if it exists). If the part doesn't already exist, this can be left blank, and a description can be used initially. |
| DESCRIPTION | If a Progress part number is entered, this can be left blank, as the system will pull the part's description from the inventory record. If the part doesn't already exist, this is required. |
| DRAWING NO | This allows the user to populate a drawing number for the item if known. If the part number exists in Progress, the enquiry will pick up the drawing number from the inventory record. |
| REV | This field allows the user to specify the revision of the part being quoted for. |
| CUST PART NO | This field allows the user to record a customer part number for the item being quoted for. |
| PROJECT | This field allows the user to specify a Progress Plus project that the enquiry line is associated with. The project must be a valid project in Progress. |
| PROMISED DATE | This field allows the user to set a promised date for the item on the enquiry if known. |
| EXTERNAL LINE NOTES | This field allows the user to add additional notes associated with the enquiry line. These EXTERNAL notes will typically be displayed on the generated enquiry document, so are used for relaying additional information relating to the item to the customer. |
| INTERNAL LINE NOTES | THis field allows the user to add additional notes for the enquiry line, however, INTERNAL notes are not included on any of the documents to the customer, so are typically used to record notes that are for internal purposes only. |
| QUANTITY | This is the quantity being quoted for. If multiple quantities are being quoted for the same part/item, then each quantity has its own line on the import spreadsheet (like in the example shown above). |
| DISCOUNT% | Allows the user to enter a discount or surcharge percentage to be applied to the enquiry line value. Surcharges are added as negative percentages (i.e. -10 will be imported as a 10% surcharge). If no discount or surcharge is being applied, this should be set to zero. |
| UNIT PRICE | This is the price being quoted per unit in the system base currency, which will be Sterling in the majority of cases. If the enquiry is for a non-Sterling customer, the system will use the exchange rate to get the currency-specific price from the Sterling value imported. |
| LEAD TIME (DAYS) | This allows the user to set a lead time for each quoted quantity. |
| QTY/PRICE NOTES | This allows the user to enter additional notes relating to the enquiry quantity. |
When importing from a spreadsheet, the user simply needs to select the file to be imported. The system will then process the details and add the lines to the enquiry.
If quantities and prices have also been imported, the user should then be able to simply print the enquiry for submission to the customer. If further details, pricing, etc. is still be be finalised, the user will at least have the enquiry lines created which they can then update as required.
Convert To New SO/Convert to Existing SO
These options allow the user to convert the enquiry, and the selected enquiry lines and quantities to a sales order. The user can convert the enquiry details to an existing sales order for the customer (i.e. add items to an existing order the customer has), or create a new sales order for the customer with the selected details.
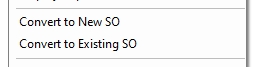
The CONVERT TO NEW SO option will present the user with a New Sales Order window, with the selected enquiry details.
The CONVERT TO EXISTING SO option will prompt the user to select from a list of existing sales orders for the customer, before adding the selected enquiry line items to that order as new lines.
(Converting an enquiry to a new sales order)
(converting enquiry to an existing sales order - prompt to select the SO)
(converting enquiry to an existing sales order - new line(s) added)
Converting the selected enquiry lines to either a new or existing sales order, will proceed to update the enquiry line(s) to CONVERTED status too.
Raise Purchase Enquiry
This option will open the Pick Parts > BOM Requirements screen, filtered for the current enquiry, allowing the user to then raise purchase enquiries for the material requirement for the job.
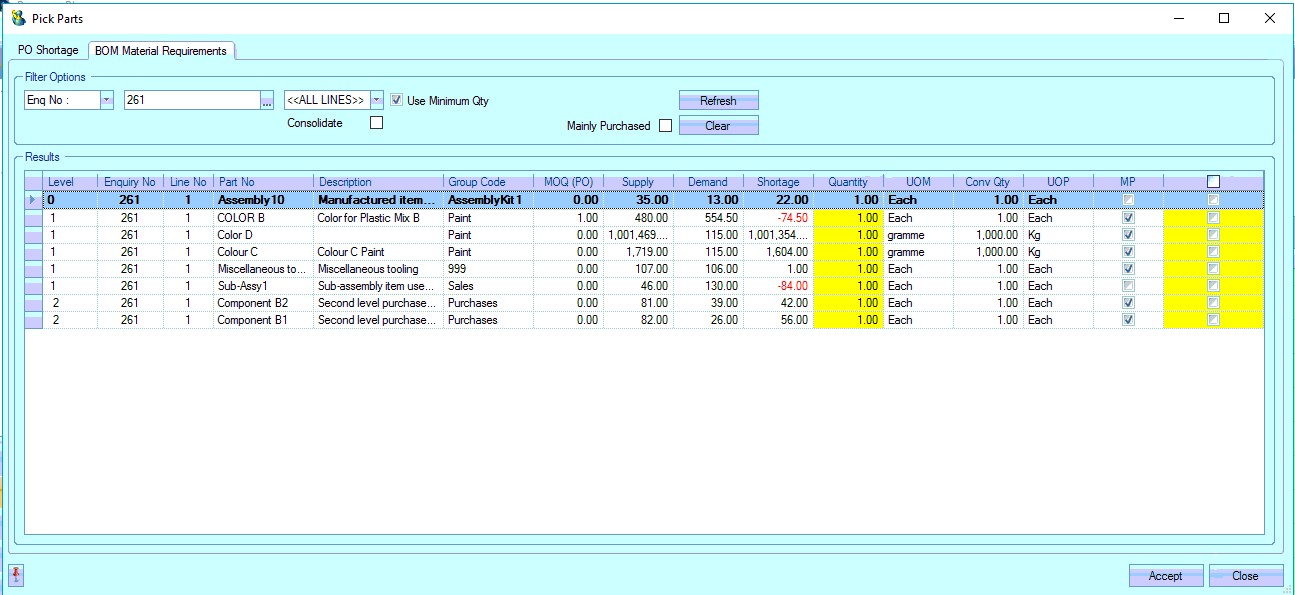
For more information on the Pick Parts screens, please refer to the Purchase Enquiry section of the manual for more information.
Raise Sub-Contract Purchase Enquiry
This option allows the user to create a subcontract enquiry for any subcontract elements involved in the enquiry lines. When selected, the user is presented with the screen below, which lists all the subcontract requirements for the current sales enquiry items. The information is shown at a BOM level by default, highlighting where the sub contract operation exists within the larger assembly.
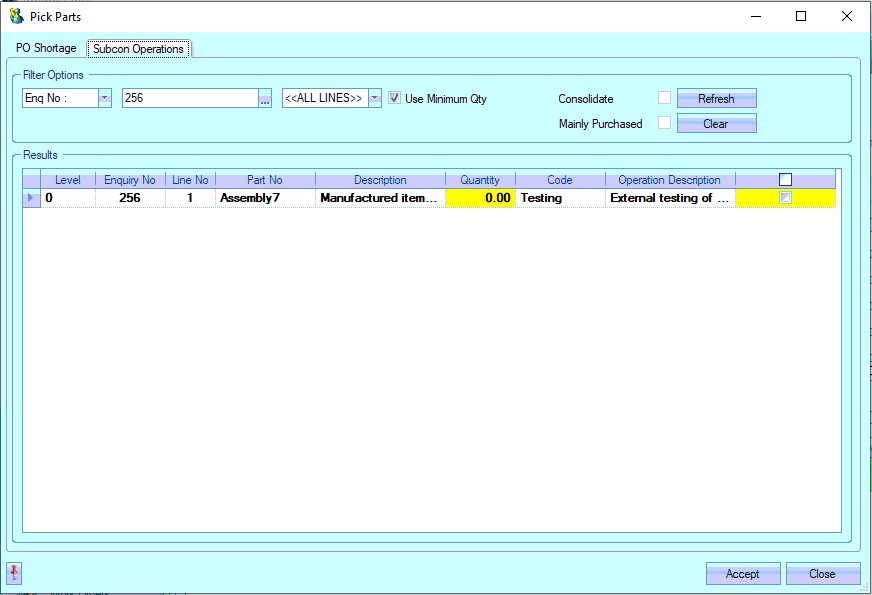
The user has the ability to filter for specific enquiry lines. If the sales enquiry has price breaks, the user also has the ability to chose the lowest quoted quantity using the Use Minimum Qty option.

Where the sales items have multiple instances of a sub contract operation on its BOM, the user can consolidate these using the Consolidate option. This condenses the subcontract items into single requirements for the sales enquiry line.

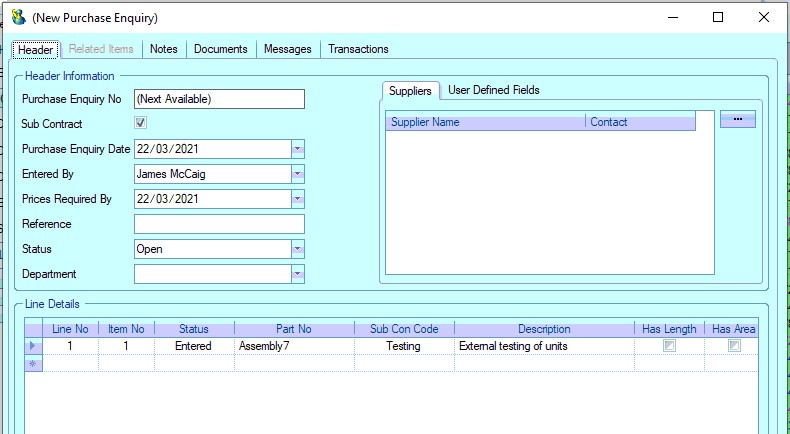
Once the items are selected, the user can click the ACCEPT option to generate the sub contract purchase enquiry, which will then be displayed.
For more information on sub contract purchase enquiries, please refer to the Purchasing section of the manual.
Apply To All Lines
Where the same changes need to be made to multiple enquiry lines, the user can make use of the APPLY TO ALL LINES options accessible from within the enquiry MENU option.

These options allow the user to update aspects of all enquiry lines without having to access them individually, whether its discounts/surcharges, lost quote reasons or assigning a project. When any of the options are selected, the user will be prompted to enter the value to be set against all lines of the enquiry. Once entered, the enquiry lines will be updated accordingly.