This section allows the user to view, create or amend existing customer information in Progress. The main customer grid shows all active customers
The filters allow the user to search for specific information relating to the customers and also provide a selection of specific fields that the user can search to locate the customer required.

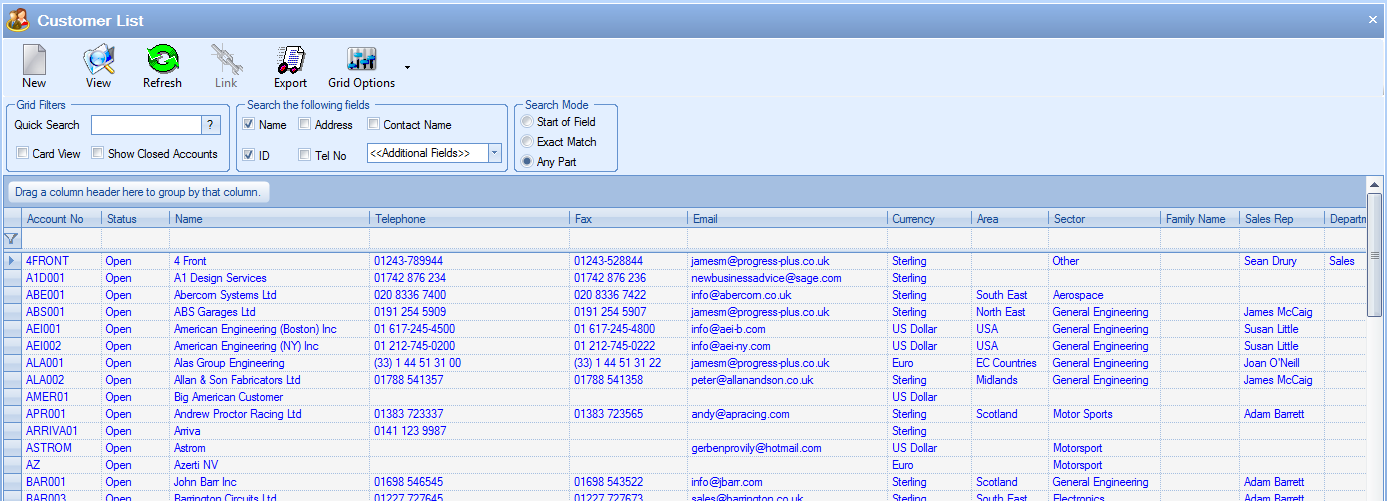
If any filters have been specified, the user must click the REFRESH option at the top of the screen to update the list based on the filters chosen. The user can also filter further using the filter bar across the top of the list.

This allows the user to search further and provides additional search methods for each column shown.
In addition to the filter options, the user can also specify whether “closed” customer accounts are displayed. By default, these are not included but this offers the user a means to show these if necessary.
![]()
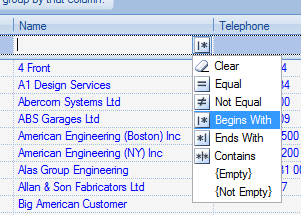
More information regarding the different customer status can be found in the List Maintenance section of this manual. As well as the customer statuses, this screen also highlights any customer who have currently exceeded their credit limit. Any such customer will have their credit limit value shown in red as shown below.
Also available is an option to allow the user to view the customer records in a card view format.
![]()
Selecting this option will display the customer records in the following format.

The user can minimise or maximise the individual customer details by clicking on the arrows ![]() on the name tab of each customer.
on the name tab of each customer.
In either the list or card view, clicking the customer record and then pressing the View menu option will open up the form to permit the user to view or amend details. This will present a screen similar to the following.
The user may if required change the information contained in this record if he or she has permission to do so as determined within the User Access Rights section of the Security section of Progress. For more information on user access rights, please refer to the System options section of the manual.
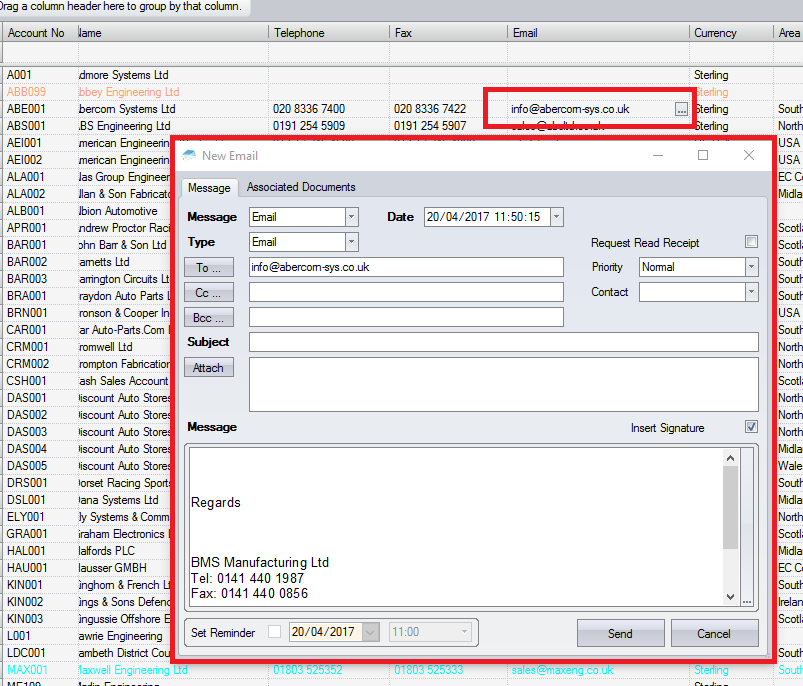
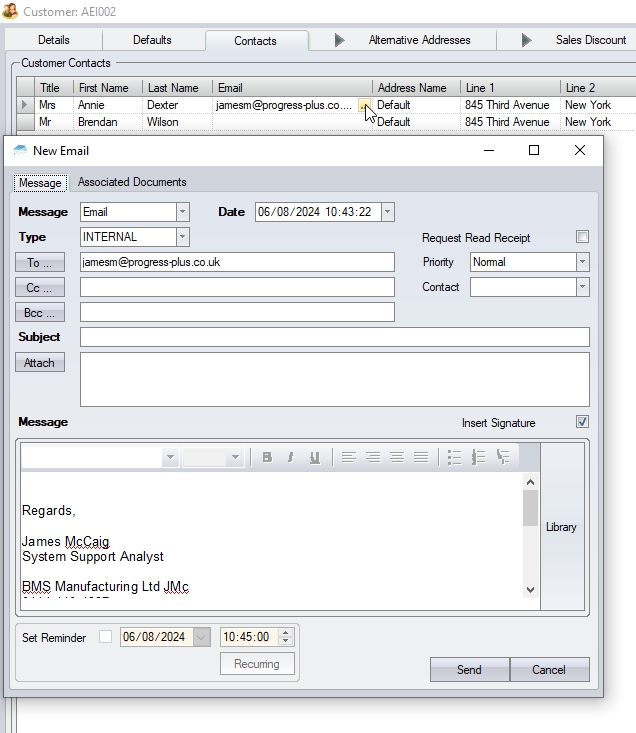
The user can also generate emails directly from the Customer List grid. If the customer record has an email address attached, the user can click in the email box and open a new email window directly as shown below.
View
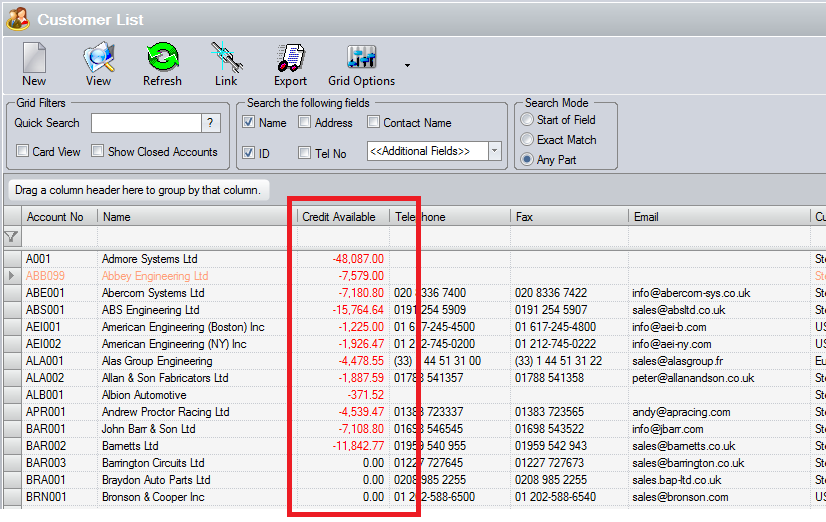
The user can view any of the existing customers by highlighting the required customer and clicking the View option or by simply double-clicking the customer in the grid. This will present the user with the customer record as shown below.
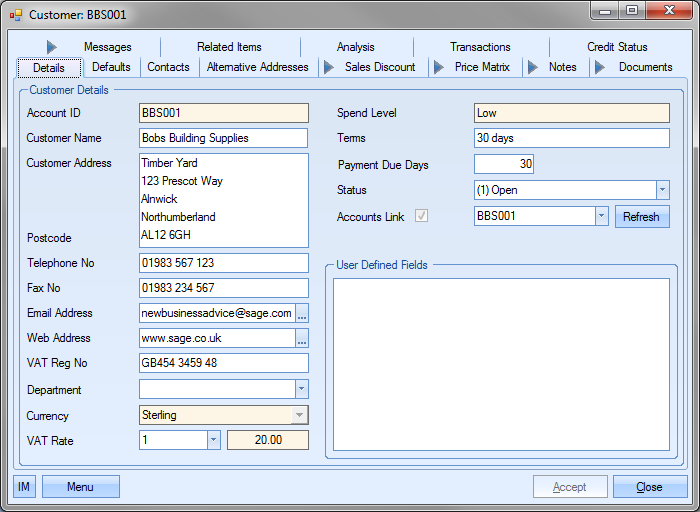
The user may if required change the information contained in this customer if they have permission to do so as determined within the User Access Rights section of the Security section of Progress. For more information on user access rights, please refer to the System options section of the manual.
Link
This option initiates an update of the customer information from the external finance package if the customers are linked to the customer accounts in such a package. Clicking on this option presents the user with the following screen.
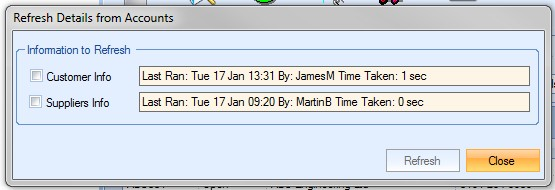
The user can choose to update the customer or supplier information or both if required by ticking the box against what they wish to update.
![]()
The user can initiate the refresh of data by clicking the Refresh option. Once the refresh has been complete, the screen displays the details of the last refresh.
![]()
The user can return the customer screen by clicking the CLOSE option.
Export
This option allows the user to export the displayed customer list to an Excel spreadsheet. When the user selects this option, they are prompted to provide a name for the export file.
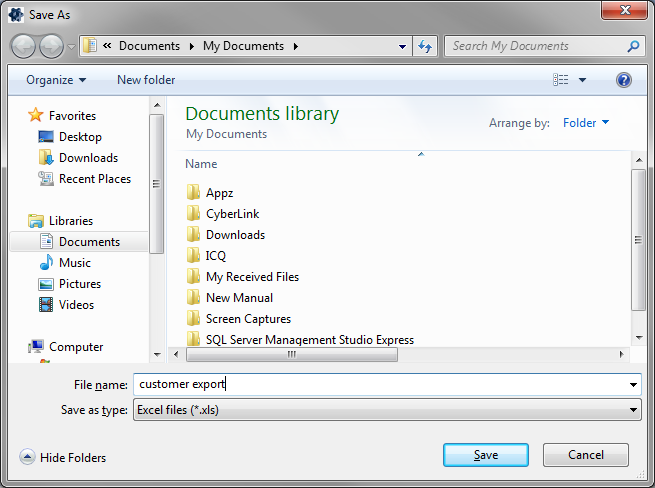
Once the user has entered a filename, the spreadsheet is displayed.

New Customers
To enter a new customer the user must click onto the New option at the top of the screen. The New Customer form will now be displayed.
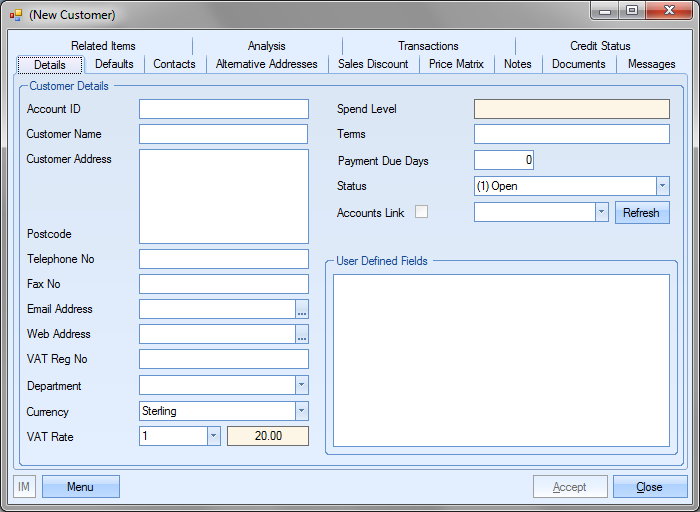
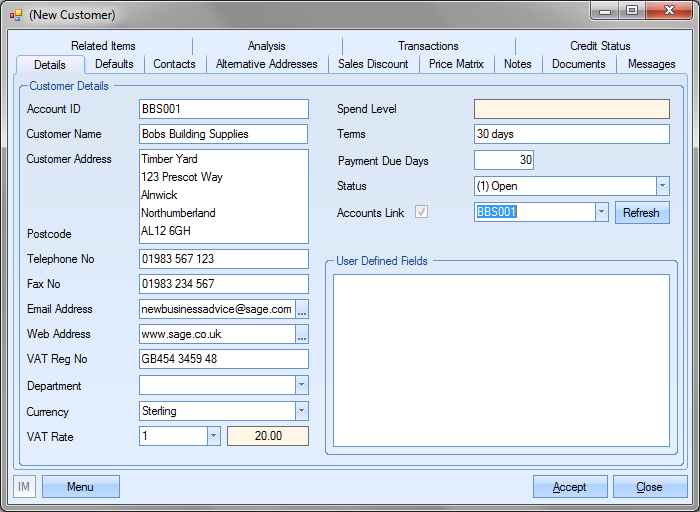
The Details tab is where the main contact information is entered for the customer. The user can enter the appropriate information in the corresponding field header.
Customer Account
The customer account number as per accounts package or a short name if there is no link between Progress and an external accounts package.
Customer Name
The full name of the required customer as to be printed on delivery notes, invoices, etc.
Customer Address
The main invoice address of the customer.
Postcode
The postal code for the above address.
Telephone
The main telephone number of the customer.
Fax No
The main fax number of the customer.
The main Email address of the customer.
WWW
The web site of the customer.
VAT Reg. No.
The VAT Registration No. of the customer.
Department
The department specified for this customer. This can be used if the same customer has multiple sub-divisions or departments. The user can select this from the drop-down list which is populated via the List Maintenance section. For more information on setting up departments, please see the List Maintenance section.
Currency
The currency to be used for the customer. The user can select this from the drop-down list which is populated via the List Maintenance section. For more information on setting up currencies, please see the List Maintenance section.
VAT Rate
The rate of VAT to be used for the customer. The user can select this from the drop-down list which is populated via the List Maintenance section. For more information on setting up VAT rates, please see the List Maintenance section.
Spend Level
Calculated field based on invoices raised against the customer compared against the Spend Levels limits set in the List Maintenance section. For more information on setting up spend levels, please see the List Maintenance section.
Terms
This is the terms on which the user trades with the selected customer e.g. 30 days net, etc
Payment Due Days
Specified number of days set for payment of invoices.
Status
This is the current status of the user’s relationship with this customer. The user can select this from the drop-down list which is populated via the List Maintenance section. For more information on setting up customer statuses, please see the List Maintenance section.
Accounts Link
For users with links between Progress and an external accounts package this option permits the user to link this record with a corresponding record on the accounts package. For users with links to an external accounts package e.g. Sage please refer to the section Adding New Customers via Accounts Link.
If any User Defined Fields have been created for use against the customer records, they will be displayed in the User Defined Fields section. For more information on user defined fields, please see the List Maintenance section of this manual.
Adding New Customers via Accounts Link
For users with links to an external accounts package e.g. Sage or Pegasus, the action of entering a new account is performed differently. After clicking on the New button to add a new customer, the user will see a screen similar to the following.
The user can select the customer required to be set up by clicking on the Accounts Link drop-down list on Customer Details screen.
![]()
The list displayed is a list of all customer accounts from the external finance package not already set up in Progress. If the desired account is not displayed, and it has not already been used in Progress, the user can update the list by selecting the <<REFRESH>> option at the top of the list.
![]()
Once the account has been selected, and the user clicks the ![]() option, the customer’s details will be pulled through to Progress from the external finance package and will populate the fields on the Detail screen.
option, the customer’s details will be pulled through to Progress from the external finance package and will populate the fields on the Detail screen.
The user may see some additional messages when they refresh the customer details. These relate to information coming from the external finance package and how it’s translated into information in Progress. The three areas included in this are as follows:
- Currency
- VAT Rates
- Status
If these are not set up correctly in Progress, then the system will display the following messages.
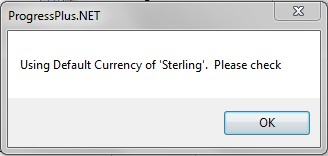
The above message displays if the Progress currency is not mapped to the appropriate currency in the external finance package. For more information on setting up currencies, please see the List Maintenance section.
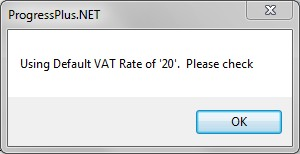
The above message displays if the Progress VAT code is not mapped to the appropriate VAT code in the external finance package. For more information on setting up VAT codes, please see the List Maintenance section.
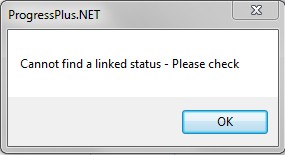
The above message displays if the Progress customer status is not mapped to the appropriate status in the external finance package. For more information on setting up statuses, please see the List Maintenance section.
Any spelling mistakes, etc that the user may identify must be amended within the external accounts package as Progress refreshes the data link between itself and the external accounts package and any corrections performed within Progress such as address or telephone number would be overwritten with the information contained within the accounts package. Once any corrections have been made in the external finance package, the user simply has to click the Refresh option on the customer record to pull through the updated details.
Once the details have been pulled through to the customer record, the user must click Accept to save the customer in Progress.
Customer Defaults
After entering the basic customer details as described above, the user must now enter the Customer Defaults required by the system. By clicking on the Defaults tab in the customer record, information can now be entered appropriate to the corresponding field header.
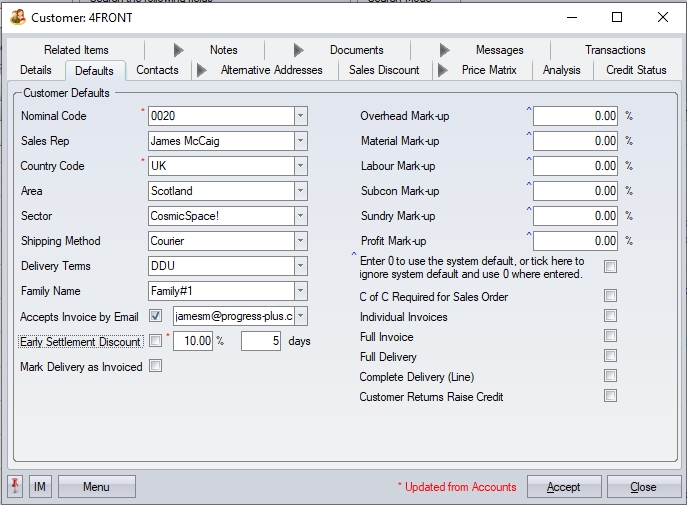
Nominal Code
This is the default nominal accounts code set up for the customer. This is populated based on the default code set in the external finance package. For customers not linked to an external finance package, the user can select a nominal from the drop-down list. The list will present the user with a list of nominal codes set up within Progress. For more information on setting up nominal codes in Progress, please see the List Maintenance section.
Sales Rep
This is the default Sales Rep for this customer. This will be displayed on any enquiries or sales orders created for this customer in Progress. The user can specify a default Sales Rep by selecting an employee from the drop-down list. For more information on setting up employees in Progress, please see the Maintenance section.
Country Code
This is the default country code for this customer. This is populated based on the country code set in the external finance package. For customers not linked to an external finance package, the user can select a country code from the drop-down list. The list will present the user with a list of country codes set up within Progress. This field is used when compiling Intrastat (Intra EC Trade Statistics) reports for Customers & Excise for those users who buy from or sell to EC countries. For more information on setting up country codes in Progress, please see the List Maintenance section.
Area
This is the default area for this customer. The user can select an area for this customer from the drop-down list. The list will present the user with a list of areas set up within Progress. This field is used when compiling the Invoice Analysis report for those users interested in breaking down turnover by area. For more information on setting up country codes in Progress, please see the List Maintenance section.
Sector
This is the default sector for this customer. The user can select a sector for this customer from the drop-down list. The list will present the user with a list of sectors set up within Progress. This field is used when compiling the Invoice Analysis report for those users interested in breaking down turnover by sector. For more information on setting up sectors in Progress, please see the List Maintenance section.
Shipping Method
This is the default shipping method for this customer. The user can select a shipping method for this customer from the drop-down list. The list will present the user with a list of shipping methods set up within Progress. This field is used when entering sales orders for this customer though the shipping method can be changed for each order if required. For more information on setting up shipping methods in Progress, please see the List Maintenance section.
Delivery Terms
This is the default delivery terms for this customer. The user can select terms for this customer from the drop-down list. The list will present the user with a list of terms set up within Progress. This field is used when entering sales orders for this customer though the delivery terms can be changed for each order if required. For more information on setting up delivery terms in Progress, please see the List Maintenance section.
Customer Family
This is the associated customer family of the customer. Typically, this will be used to ring-fence customers by a common family. This can be useful when reporting if you want to look at that group of customers in isolation. The user can select the family for the customer via the drop-down list, which is populated via the List Maintenance section. For more information on setting up customer families in Progress, please see the List Maintenance section.
Accepts Invoice By Email
This option allows the user to set a specific email address to be used when emailing invoices to the customer. The user can select the main email address of the customer, or any of the contacts set up, as the email to be used. This will be used when emailing invoices individually or when emailing a range of invoices to the customer via the Invoice section in Progress.
Early Settlement Discount
The user can set up an Early Settlement Discount for a customer.
![]()
This is just a note against the customer and can be displayed on the layouts for that customer, if requested.
Mark Deliveries As Invoiced
This option will automatically mark all of the customer's deliveries as "INVOICED". This stops the deliveries appearing on the Delivered Not Invoiced screen. This option is used when a sister company is buying goods/services from the company using Progress and where there is no invoicing being done between them.
Default Mark-Up/Margin Percentages
Progress permits the user to enter default mark-up/margin percentages that are used when calculating sales prices in enquiries. These can be entered on a global basis for all customers (refer to company set-up in the System options) or on an individual customer basis. If no individual customer mark-ups/margins are entered, Progress will use the default company percentages as determined within the Admin options when calculating selling prices for the customer. The options listed will reflect the system configuration of MARKUP/MARGIN as set in the Admin options. For more info on the system options, please refer to the Administrator Functions section of the manual.
Overhead Mark-up/Margin %
Default percentage mark-up/margin used when calculating total overhead costs as part of an enquiry for this customer. The set % will be used to inflate the overhead costs associated with the part.
Material Mark-up/Margin %
Default percentage mark-up/margin used when calculating total material costs as part of an enquiry for this customer. The set % will be used to inflate the material costs associated with the part.
Labour Mark-up/Margin %
Default percentage mark-up/margin used when calculating total labour costs as part of an enquiry for this customer. The set % will be used to inflate the labour costs associated with the part.
SubCon Mark-up/Margin %
Default percentage mark-up/margin used when calculating total subcontract costs as part of an enquiry for this customer. The set % will be used to inflate the subcontract costs associated with the part.
Sundry Mark-up/Margin %
Default percentage mark-up/margin used when calculating total sundry costs as part of an enquiry for this customer. The set % will be used to inflate the Sundry costs associated with the part.
Profit Mark-up/Margin %
Default percentage mark-up/margin used when calculating target profit as part of an enquiry for this customer.
System defaults Vs Zero-value %
The user can also set the % values to zero to use the system default percentages, or tick the option to apply a % value of zero if preferred. This option is immediately below the customers default % values. Ticking this option will allow the user to enter a zero-value percentage and have a zero-value % applied to the selected element. If this is unticked and the user enters a zero-value %, the system will use the company default percentage from the Admin settings.
![]()
NOTE: All of the above mark-up and margin percentages can be amended on individual enquiries if required. These are simply the default values used for the selected customer. For more information on sales prices and enquiries, please the Customer Enquiry section of this manual.
CofC Required For Sales Order
This option allows the user to default the CofC Required flag on sales order for this customer. If this option is ticked, then all sales order lines raised for the customer will automatically have the CofC Required option ticked. This allows the user to specify whether the customer ALWAYS requires a CofC with their items. If this option is unticked, the system will default the CofC Required option based on the part selected, and/or allow the user to set this manually on the sales order line.
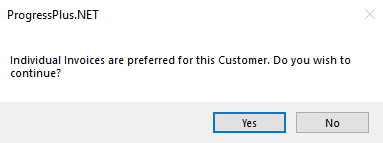
Individual Invoices
This option defaults the flag for Individual Invoices on the SO when created for the customer. Any invoice raised for multiple delivery lines will check this option and advise the user accordingly.
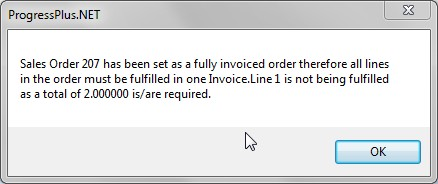
Full Invoice
This option defaults the flag for Full Invoice on the SO when created for the customer. This setting enforces the invoicing of all SO lines on a single invoice. Multiple deliveries can be made until all the SO line item quantities are completely delivered, but only then can the sales order be invoiced. If the user tries to invoice the sales order or any deliveries prior to all items being delivered, the following message is displayed.
Full Delivery
This option defaults the flag for Full Delivery on the SO when created for the customer. This setting enforces the complete delivery of ALL SO lines on a single delivery. No deliveries can be made until all the SO line item quantities are complete. If the user tries to raise a delivery against the SO prior to all items being ready for delivery, the following message will be displayed. The system will then stop the creation of the delivery.
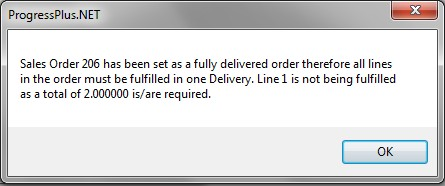
In addition to the above, the Available To Deliver Valid option on the Today>To Do screen will not show this SO as being available to deliver due to it not being ready to deliver in its entirety as specified by the Full Delivery flag.
Complete Delivery (Line)
This option allows the user to specify whether any sales order lines are automatically marked as COMPLETE DELIVERY (i.e. the full quantity of the SO line must be delivered together, no partial deliveries allowed). Similar to the FULL DELIVERY option above for the entire order, but this is for the individual SO line.
Customer Returns Raise Credit
This option allows the user to specify that ALL customer returns for this customer require a credit note to be raised by default. This option will result in the RAISE CREDIT option being automatically ticked on the Customer Return screen when a user does a customer return for the customer.

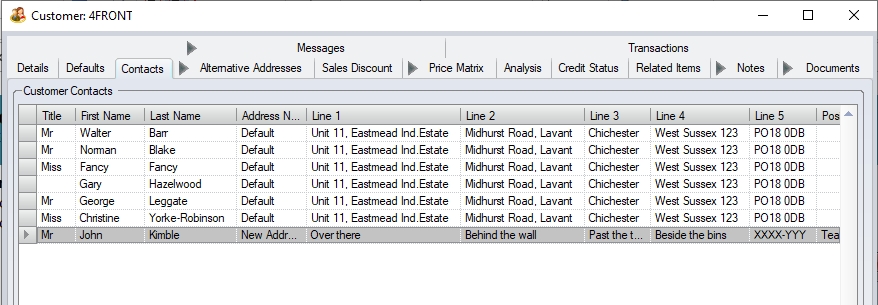
Customer Contacts
This section allows the user to create a library of customer contacts for the customer account. These contacts can be selected when entering sales orders, enquiries, etc. in Progress Plus. There is no limit to the number of contacts that can be entered against a company.
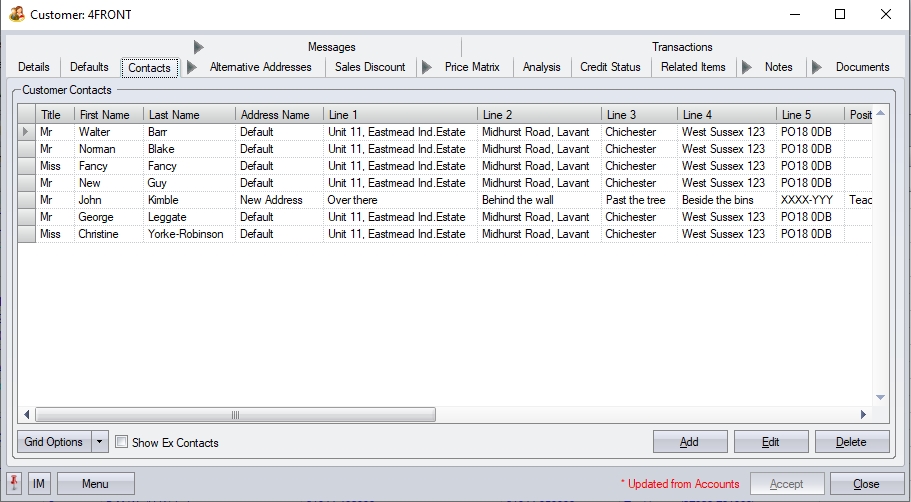
The contact list will, by default, only show "active" contacts. If the user wishes to see contacts that are no longer active, they can click the SHOW EX CONTACTS option, which will update the grid to show any contacts previously marked as "Ex Contact".
![]()
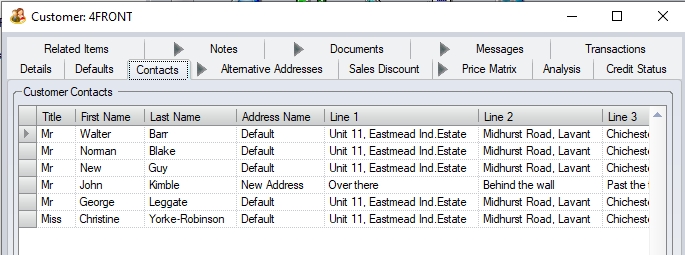
(List of active contacts)
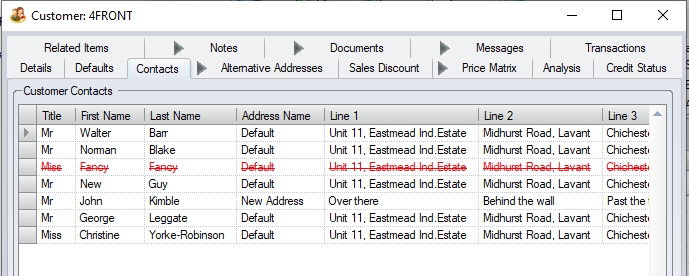
(List of contacts, including "EX" contacts)
Adding Contacts
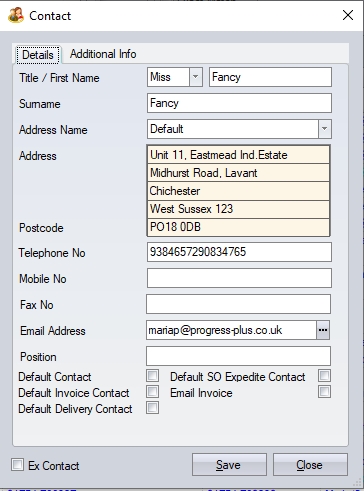
To add contact information for a customer, the user must click the ADD option. The user will be presented with the form to complete the contact details.
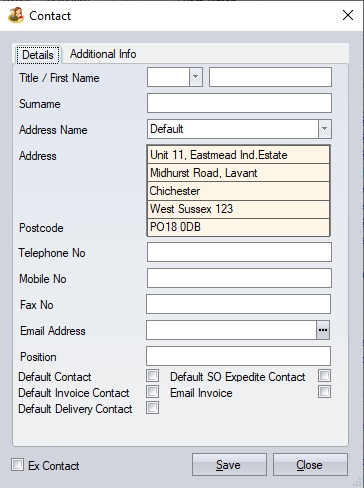
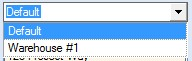
The user can now complete the information required. The address will default to the customer’s address. If alternative addresses have been set up, these can be selected from the drop-down list against ADDRESS NAME.
The contact can also be set as the default contact for a number of areas in Progress. These can be set using the tick boxes at the bottom of the form.

Default Contact
This option sets the contact as the default contact for the customer generally. This will be set automatically when raising enquiries, sales orders, etc.
Default Invoice Contact
This option will set the contact as the default contact for invoices. This will only be applied to invoices.
Default Delivery Contact
This option will set the contact as the default contact for any deliveries raised. This will only apply to deliveries.
Default SO Expedite Contact
This option will include the contact when expediting sales orders for this customer. This will only apply when using the SO Expedite option on the main SO Browse screen.
Email Invoice
This option will include the contact when emailing invoices to the customer.
Additional Info
The user also has the ability to record some additional information for the contact. This information is based on a set of pre-defined questions, where the user can record further information that can be used when communicating with the contact.
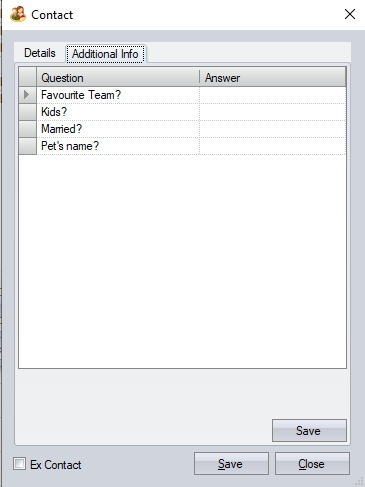
The user can select the pre-defined questions via the drop-down list and complete the ANSWER as required.

The pre-defined questions can be set up in the List Maintenance section of Progress, under the Contact Questions category. For more information on the List Maintenance section, please refer to the relevant section of the manual.
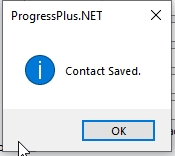
Once all the contacts details have been entered, the user can click the SAVE option to save the contact. The user will get confirmation that the contact has been added, and the contact will appear in the customer contact list.
Similar to the main Customer List email field, the user can email any of the listed contacts by clicking on the email field of any listed contact. This will open an email window to the selected contact.
Editing Contacts
To edit the details of an existing contact, the user can double-click on the contact in the grid, or highlight the contact and select the EDIT option. Both methods will open the contact details form.
The user can amend any of the details required as well as mark the contact as an "Ex Contact" which will remove them from the active list of customer contacts. Once amended, the user can save the changes using the SAVE option. Again, the user will get confirmation of the changes.
Deleting Contacts
Contact information can be deleted by selecting the contact required and clicking on the DELETE option. The user will be prompted to confirm the deletion.
Once confirmed, the customer contact will be deleted and removed from the contact list.
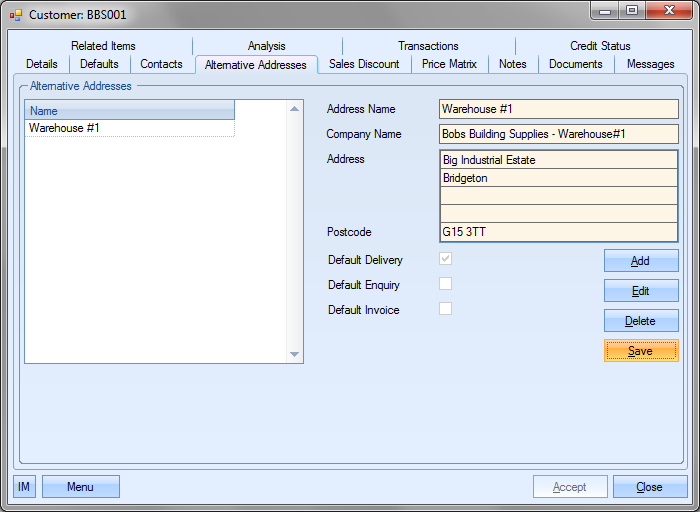
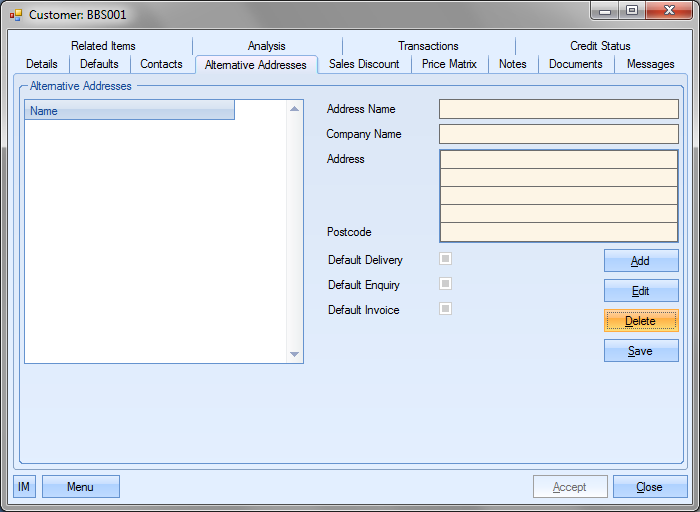
Customer Alternative Addresses
After entering the basic details and default information has been entered the user can now construct a table or library of Customer Alternative Addresses if desired. These addresses can be selected when entering sales orders in Progress. These addresses can be selected when delivering goods or services to the customer at an address other than the main customer location. There is no limit to the number of alternative addresses can be entered against a company.
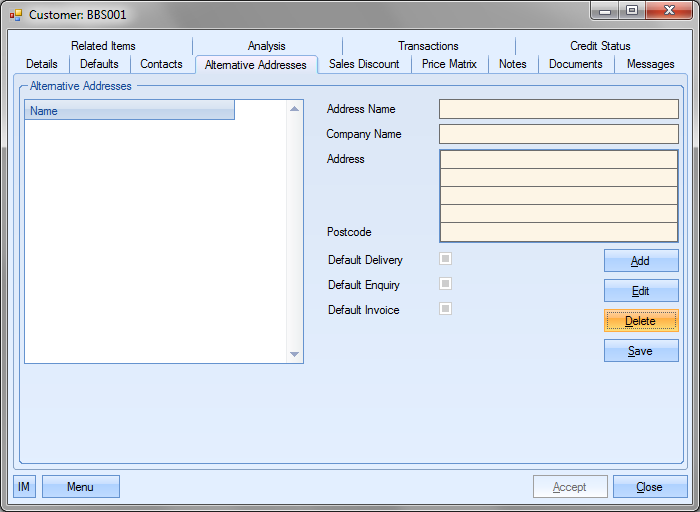
Adding Alternative Addresses
The user can add alternative addresses by clicking on the Add option. This will allow the user to edit the fields listed.
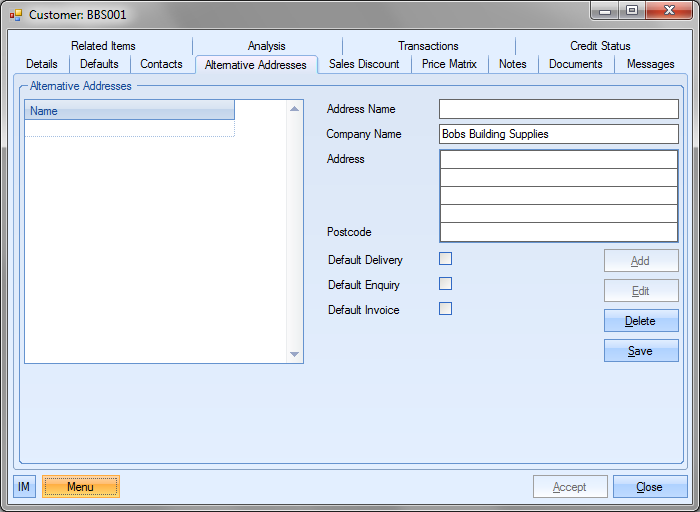
The user must provide a name for the address. This is just to identify the alternative address. The Company Name will default to the name of the current customer, but this can be amended if required.
Once the address has been entered, the user has some default options they can use.
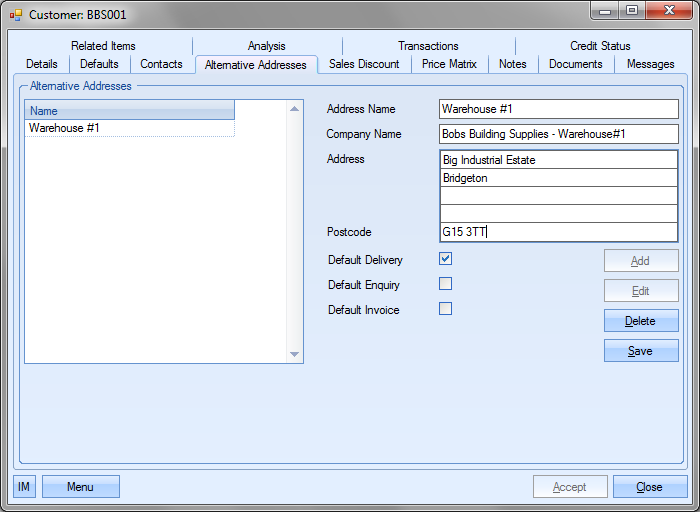
Default Delivery
If this address is the main one used by the user for delivery of orders to then this should be highlighted by clicking onto this field. This address will then automatically appear when entering sales orders for this customer. The user can however, change the delivery address on the sales order to an alternative entry if required.
Default Enquiry
If this address is the main one used by the user for sending quotations to then to this should be highlighted by clicking onto this field. This address will then automatically appear when entering quotations for this customer. The user can however, change the quote address on the enquiry to an alternative entry if required.
Default Invoice
If this address is the main one used by the user for sending invoices to then to this should be highlighted by clicking onto this field. In no alternative address is selected as the default invoice address then the address entered in the Details screen will be used. This address will then automatically appear when entering invoices for this customer. The user can however, change the invoice address on the invoice to an alternative entry if required.
If the user wishes to use any of these options, they simply have to click the tick box.
Once all the details have been entered, the user must click the Save option to record the address details. The alternative address will be listed on the left hand side of the screen.
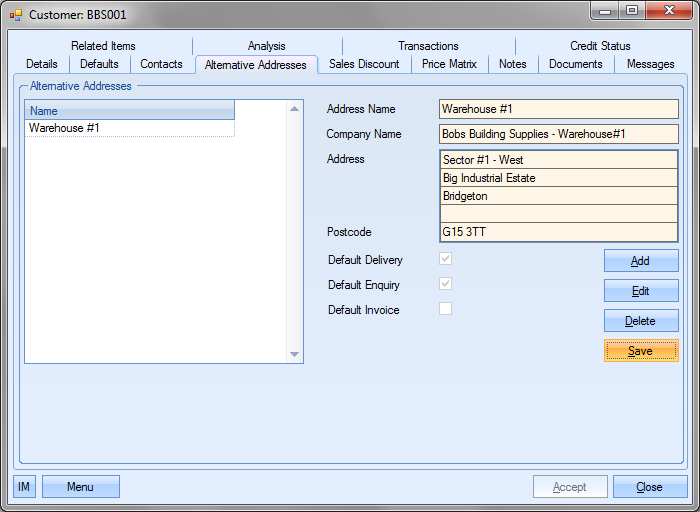
Editing Alternative Addresses
The user can edit any of the existing alternative addresses by selecting the required address from list on the left of the screen and clicking on the Edit option.
The user can now edit any of the information of this address. Once any amendments have been made, the user can save the new details using the Save option.
Deleting Alternative Addresses
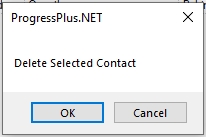
The user can delete any existing alternative address by simply selecting the required address from the list on the left and clicking the Delete option.

The user will be prompted to confirm the deletion.
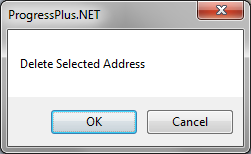
Clicking OK will delete the selected address, while Cancel will return the user to the alternative address screen.
Customer Sales Discount
The Sales Discount options are intended for use by those customers who make or distribute their own products as opposed to make to order.
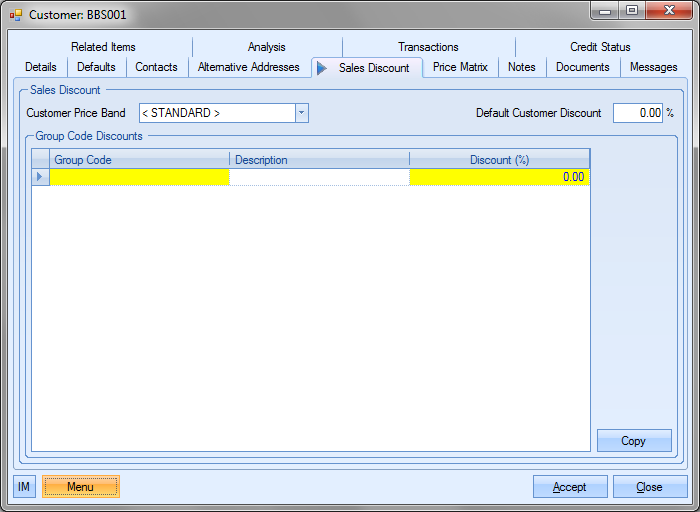
There a number of different ways that a customer can have a sales discount record set up for it. The first option is the Customer Price Band option. This allows the user to assign a discount band to this particular customer from the list of Customer Price Bands entered in the Maintenance section.
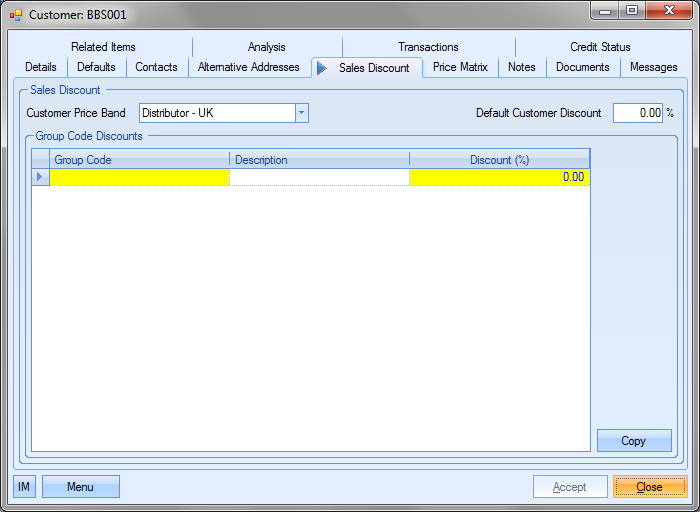
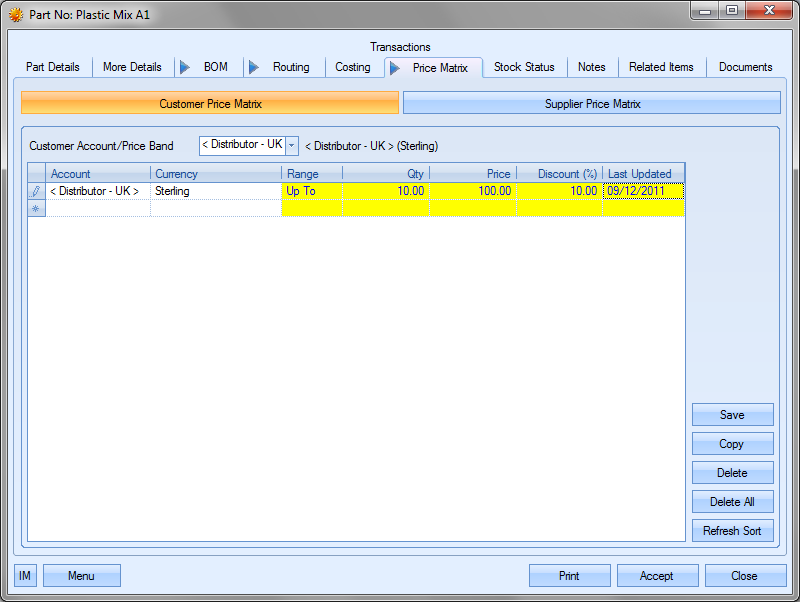
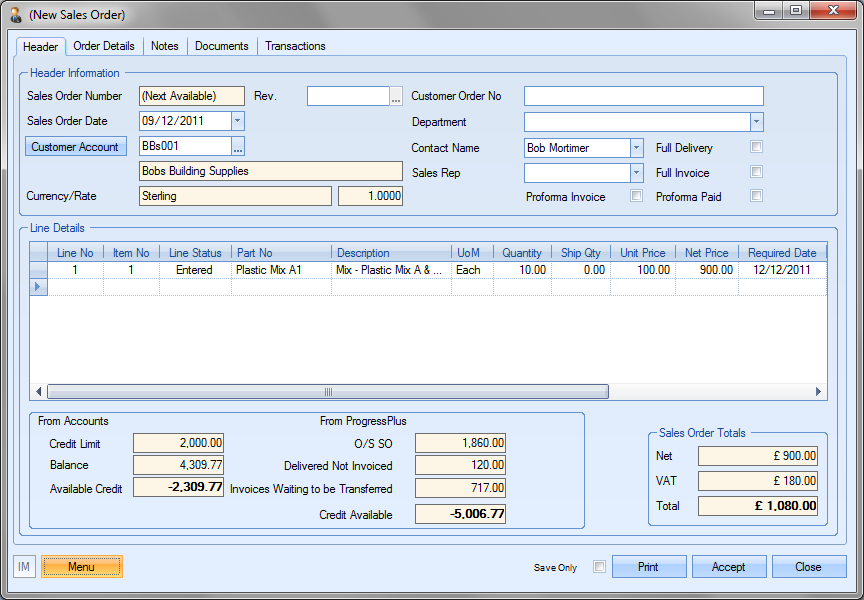
Once the customer is set to a specific price band, all part price matrices set up against the specified price band would apply to the customer. For example, the part below is set up with a customer price matrix for the Price Band our customer is set to. This basically says that any customers within the selected Price Band are charged £100.00 per unit and have a 10% discount applied.
Therefore, when a sales order is raised for this customer and this part number, the appropriate price and discount is applied to the sales order based on the values entered for the Price Band for the part. This is shown below.
For more information on price matrices, please refer to the Inventory section of this manual.
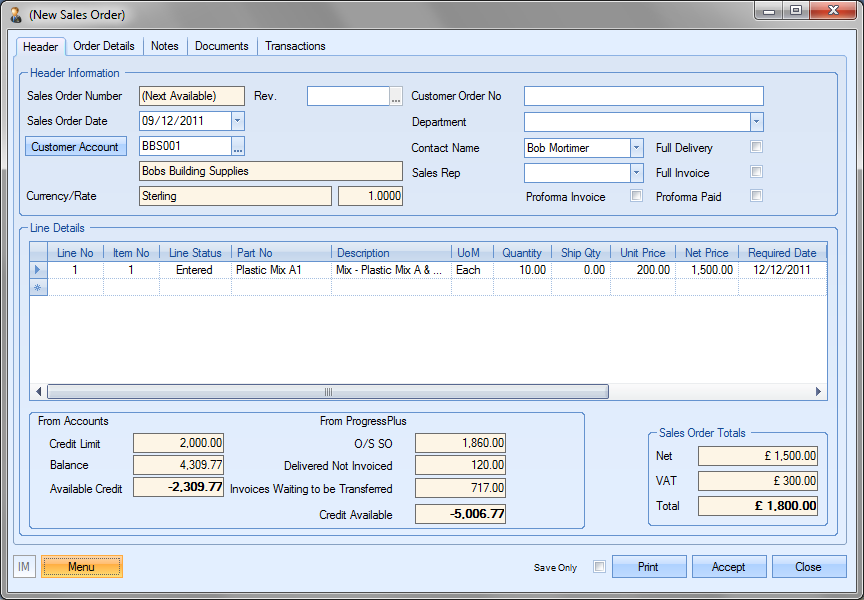
Another way of discounting customer sales orders is by use of the Default Customer Discount field. This option permits the user to enter a % discount that can be applied to all this customer’s sales orders.

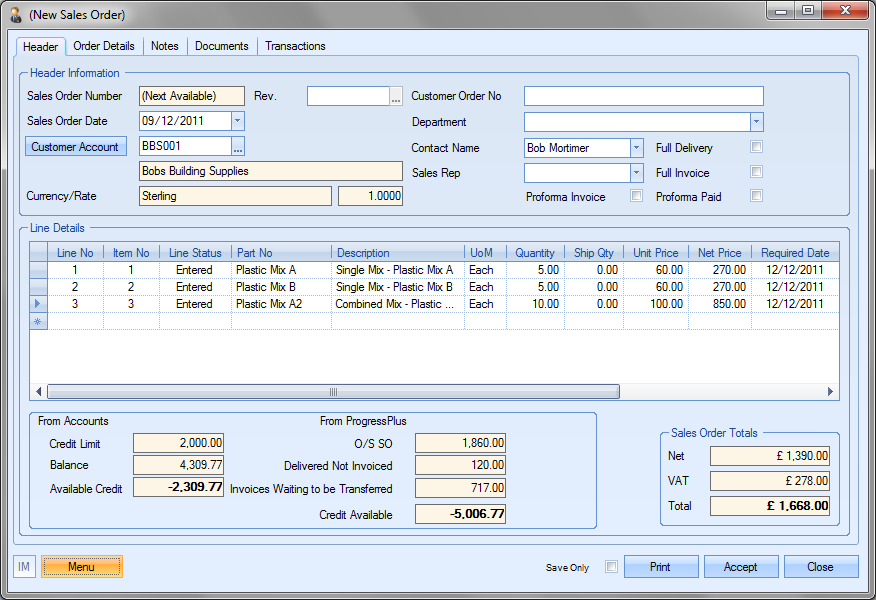
Therefore, when a sales order is raised for this customer, the default customer discount is applied to the entire SO NET value as shown next.
Finally, the other method of applying a customer discount is by setting the discount against the group code. This will apply the appropriate discount to any product which is a member of any of the specified group codes.
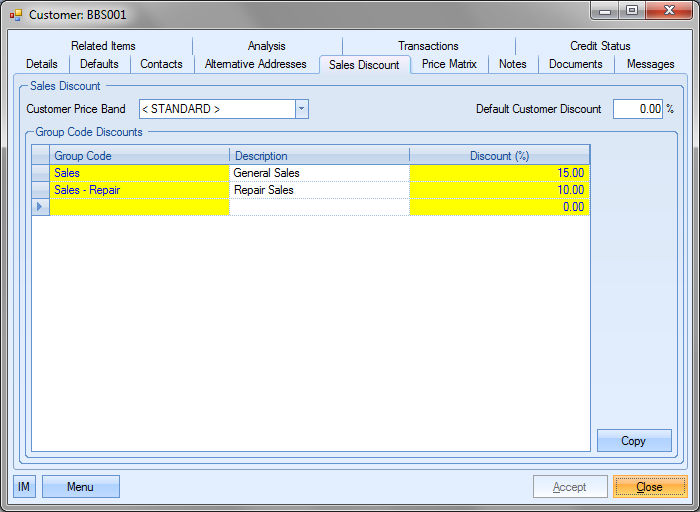
Therefore, when raising a sales order for the customer, with items from any of the specified group codes, the appropriate discount is applied. This is shown in the next example.
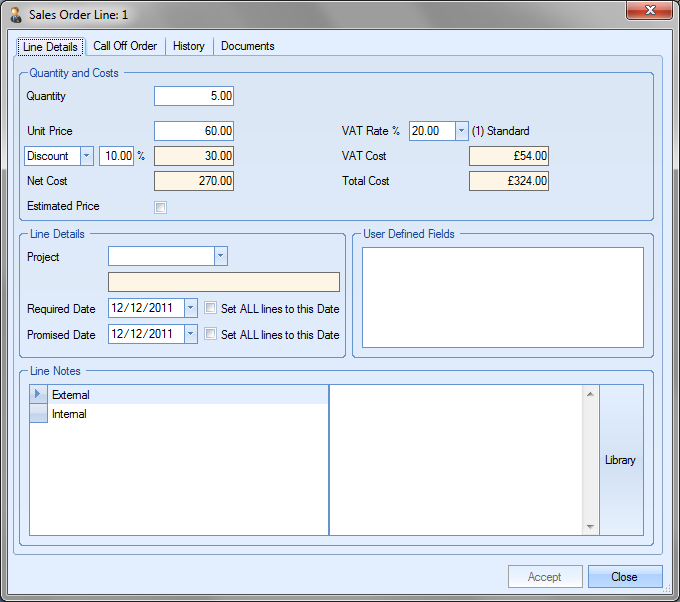
Sales order line 1 (Group code Repair – Sales)
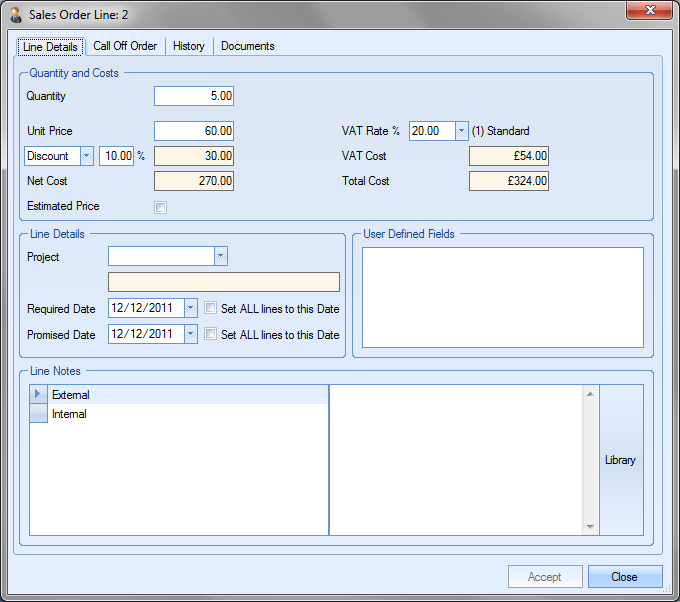
Sales order line 2 (Group code Repair – Sales)
Sales order line 3 (Group code Sales)

Specific part discounts can also be applied within Progress. These are set up against the part number in the part’s Price Matrix tab of the inventory record. For more information on inventory price matrices and part specific discounts, please refer to the Inventory section of this manual.
The user also has the ability to copy an existing group code sales discount structure from another customer record. The user can do this by clicking on the Copy option at the bottom of the screen.
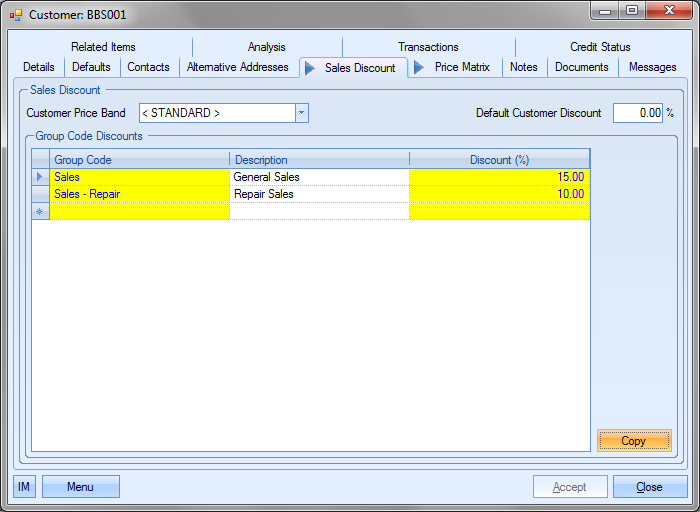
Selecting this option will present the user with a list of all customers that current have group code sales discounts set up.
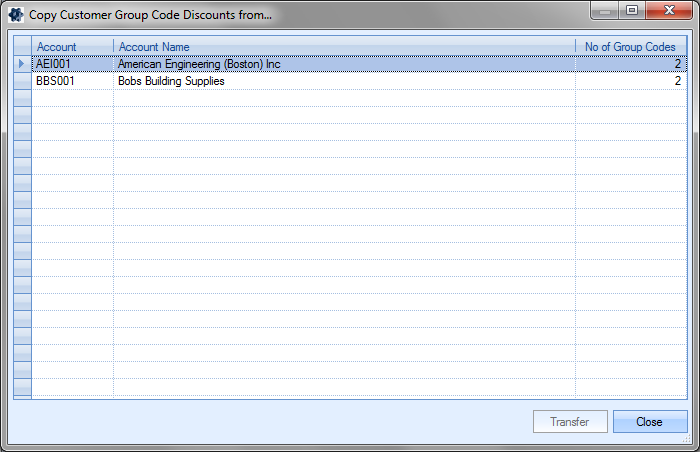
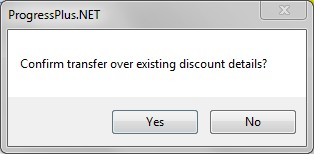
The user can select the customer they wish to copy and then select the Transfer option. This will copy the discounts to the current customer after the user confirms the action.

The user can save the new group code discounts by clicking the Accept option.
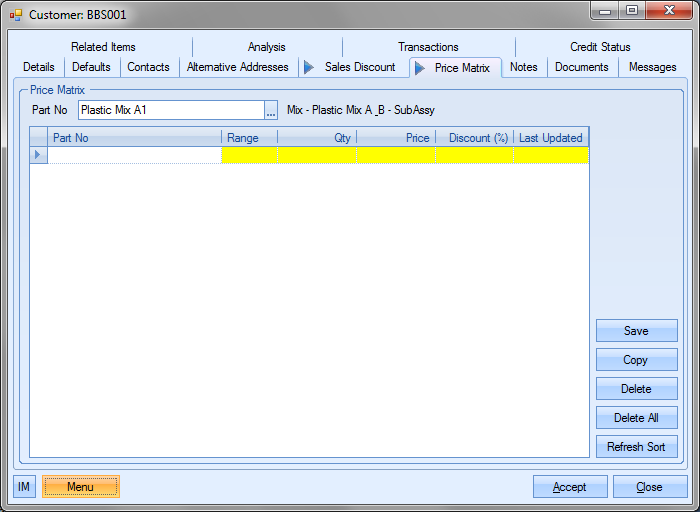
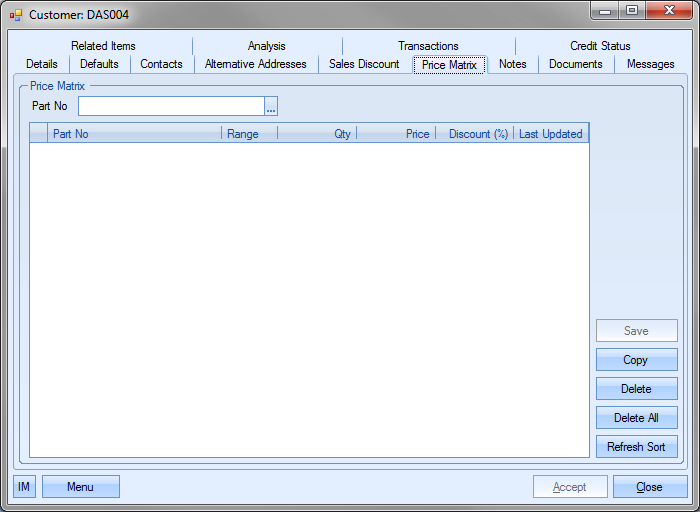
Customer Price Matrix
The Price Matrix section of the customer record allows the user to set up price breaks and discounts for specific products for the customer in question.
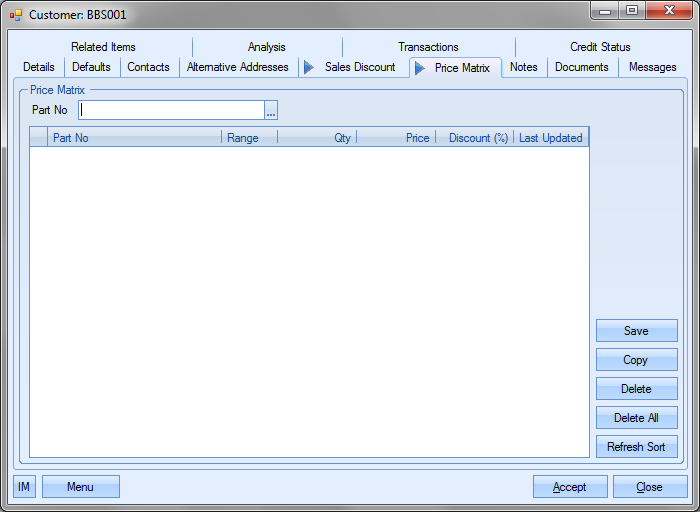
Adding Price Matrix Details
The user can select the products required using the Part No search option at the top of the screen. The ![]() button at the end of the Part No field opens up the inventory search screen.
button at the end of the Part No field opens up the inventory search screen.
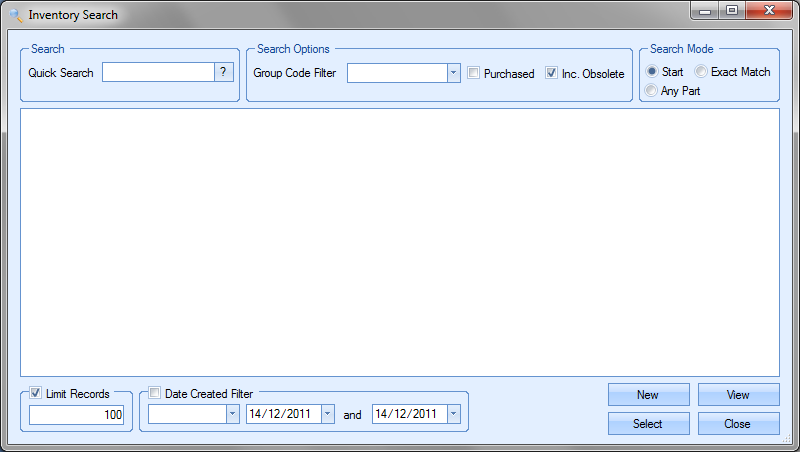
Once the user has selected the part required, they can click the Select option to return to the Price Matrix screen.
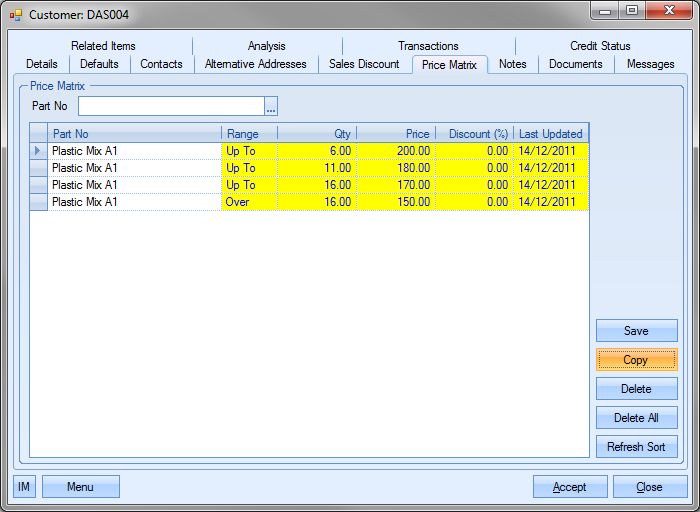
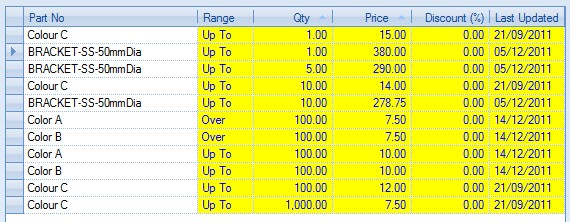
Once the part has been selected, the user can set the rules for the price matrix. First of all, the user must specify the Range value; this can be either OVER or UP TO.
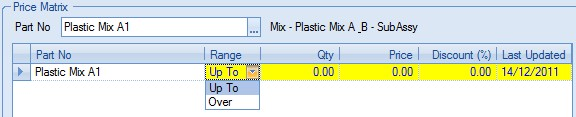
The UP TO option is inclusive of the value entered where as the OVER option is exclusive of the value entered. The following shows some Price Matrix entries for a part for the selected customer.
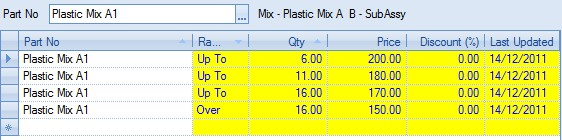
Once the details have been entered, the user can save the details by clicking on the Save option. Based on the information set up in the price matrix, the following logic would apply for this part and this customer:
Sales order qtys of 1 – 6 would have a price of £200
Sales order qtys of 7 – 11 would have a price of £180
Sales order qtys of 12 – 16 would have a price of £170
Sales order qtys over 16 would have a price of £150
When the sales order is initially created, the sales price defaults to the Selling Price set up against the part.
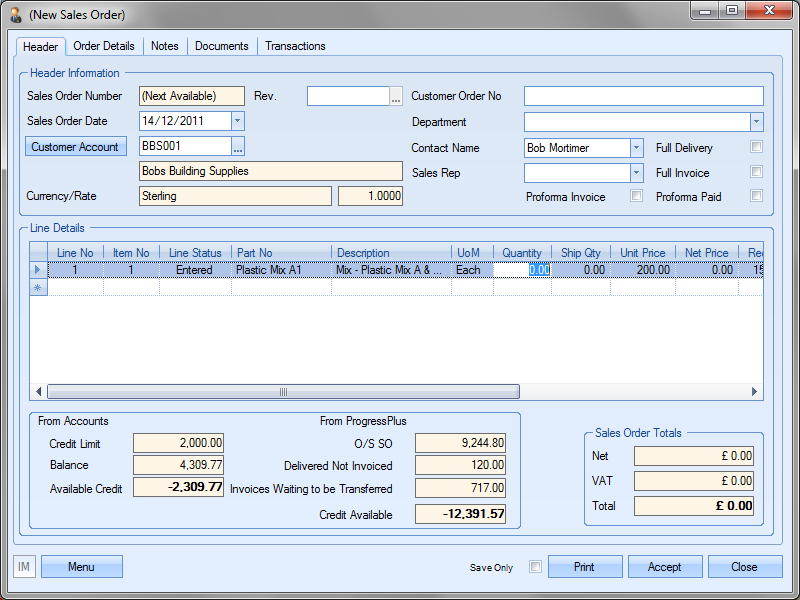
As soon as the user enters the quantity required, the sales order is updated with the correct price based on the Price Matrix rules created. Example sales order lines are shown to demonstrate the price changes.
QTY: 5

QTY: 8

QTY: 11

QTY: 12

QTY: 16

QTY: 17

Copying Price Matrix Details
The user also has the ability to copy the price matrix details from another customer if required. To do this, the user must click on the Copy option.
This will display a list of customers for the user to select from.
The user can select the customer to copy the details from and click the Select option. The price matrix details of the selected customer will be copied to the current customer.
Deleting Price Matrix Details
The user can also remove any existing details by using the Delete and Delete All options.
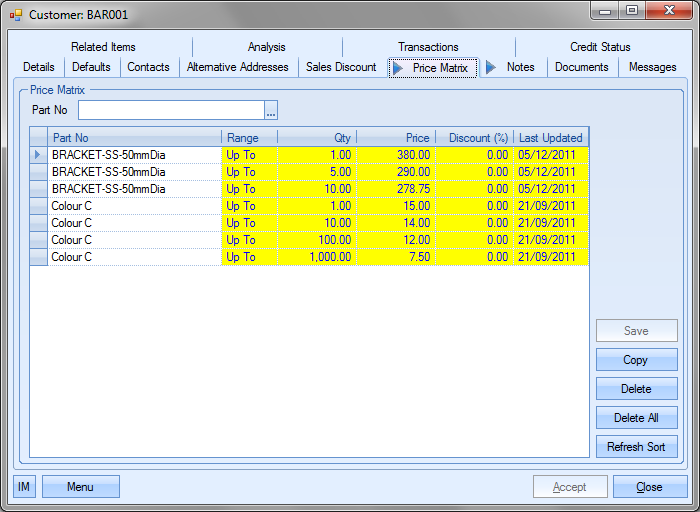
To delete individual records, the user must highlight the record to be removed and then click the Delete option. The user will be asked to confirm the deletion.
Once confirmed, the screen will be updated to remove the deleted entry. To save the updated list, the user must click the Save or Accept options.
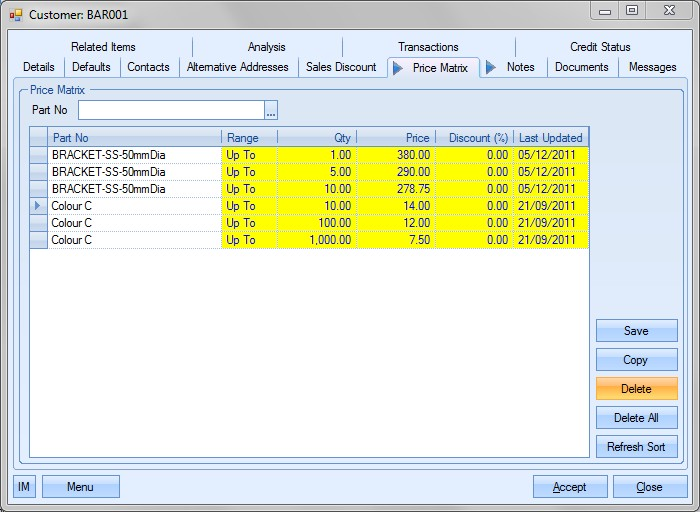
The user can also delete ALL entries by clicking on the Delete All option. Again, the user will be asked to confirm the deletion.
Once confirmed, the screen will be updated to reflect the change made. Again, the changes need to be recorded by clicking on either the Save or Accept options.

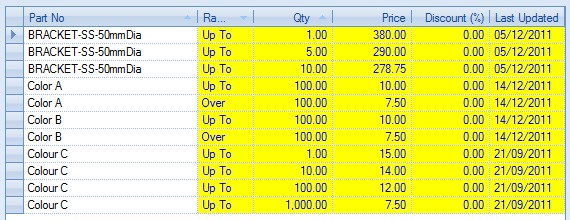
Resorting Price Matrix Details
The Refresh Sort option allows the user to resort the Price Matrix list. This resets the list back to the default ordering sequence of part number, range and quantity. The screen below shows the price matrix details sorted by quantity and price.
If the user clicks on the Refresh Sort option, the list is reset to the default sequence stated above.
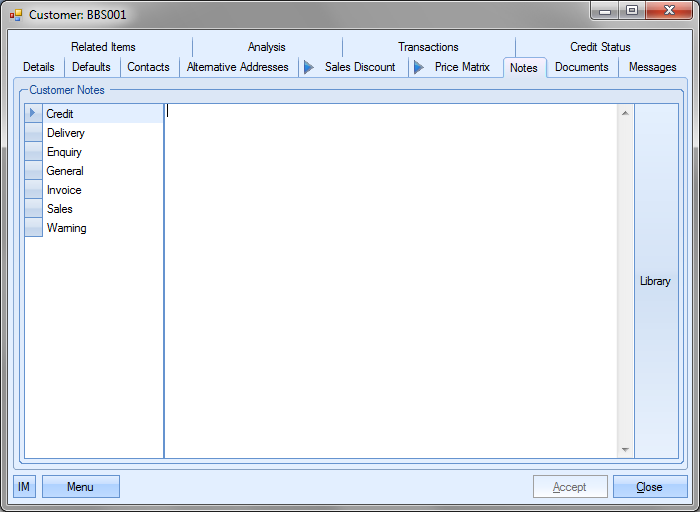
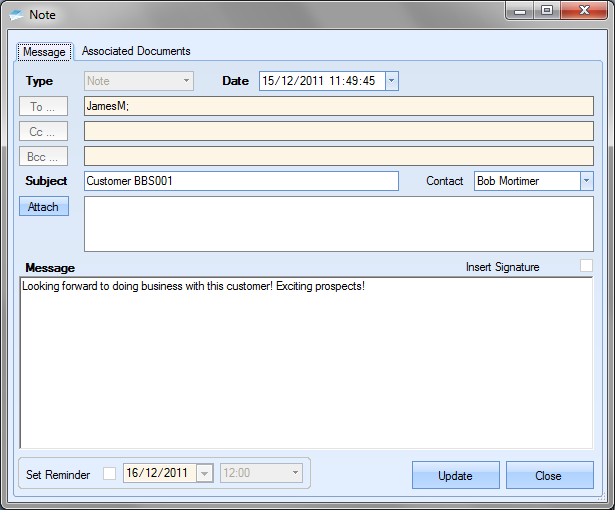
Customer Notes
The user can specify default notes or comments against a customer to be recorded against various order types. These are set up in the Notes screen as shown below. This shows all the categories that the user can record notes against.
The user can manually enter a comment as required by simply typing the comment in the main part of the screen.
Alternatively, the user can select from the Library of notes held within Progress using the Library option on the right hand side of the screen. Selecting the Library option will present the user with the Library list of comments to select from as shown in the screen below.
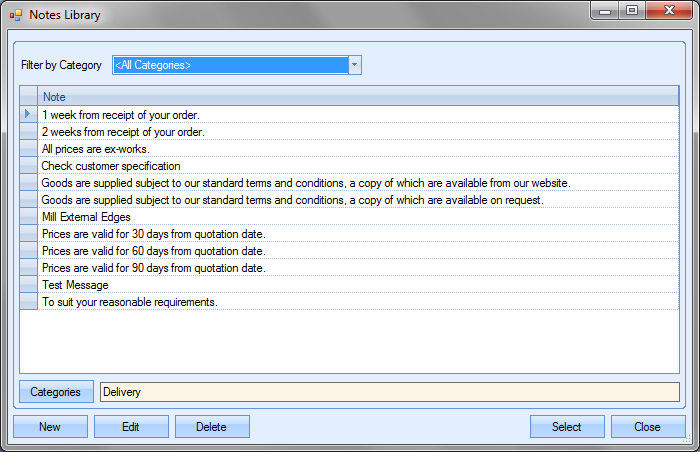
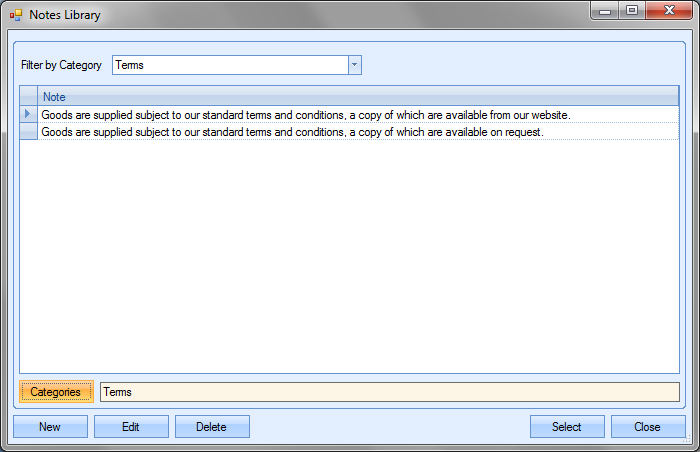
The list presented shows all comments recorded in Progress. These can be filtered by category using the drop-down list at the top.
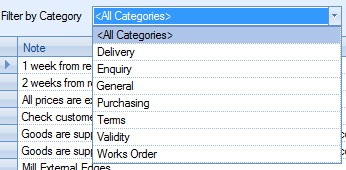
By choosing a particular category, the list is reduced to only show the entries from that category.
Once the user selects the desired comment, the comment will be added to the selected section of the Notes screen.
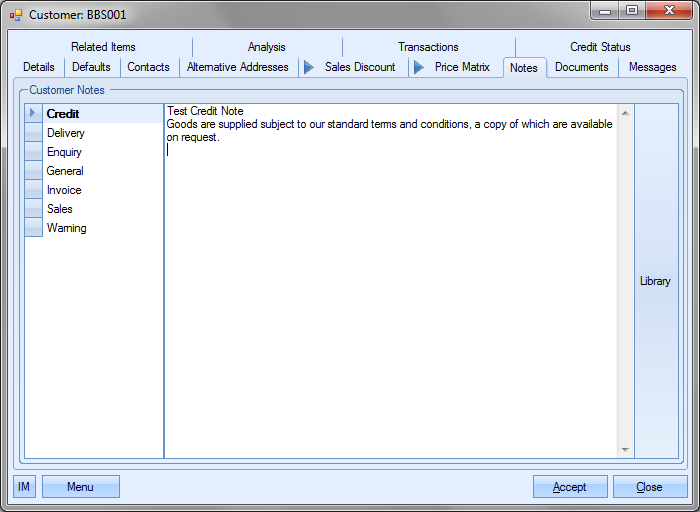
As can be seen above, once a comment has been added, the section name is highlighted in bold to indicate content. Once comments have been added to the required sections in the Notes screen above, these comments are duplicated through to the relevant sections of Progress. The following screens show examples of where these comments appear once added to the customer Notes section.
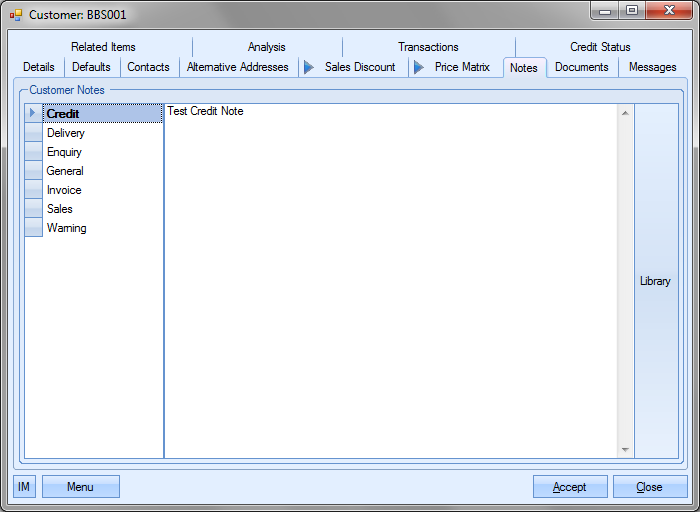
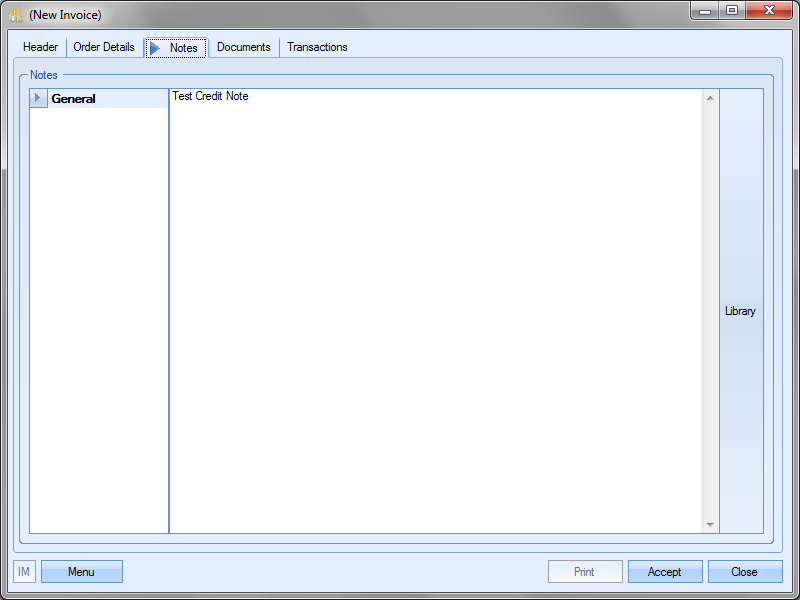
Credit Notes
If the user has entered a comment against the Credit section of the customer Notes, the comment is pulled through to the Notes screen of any credit notes created in Progress for this customer. The screen below shows a credit note created for this customer.
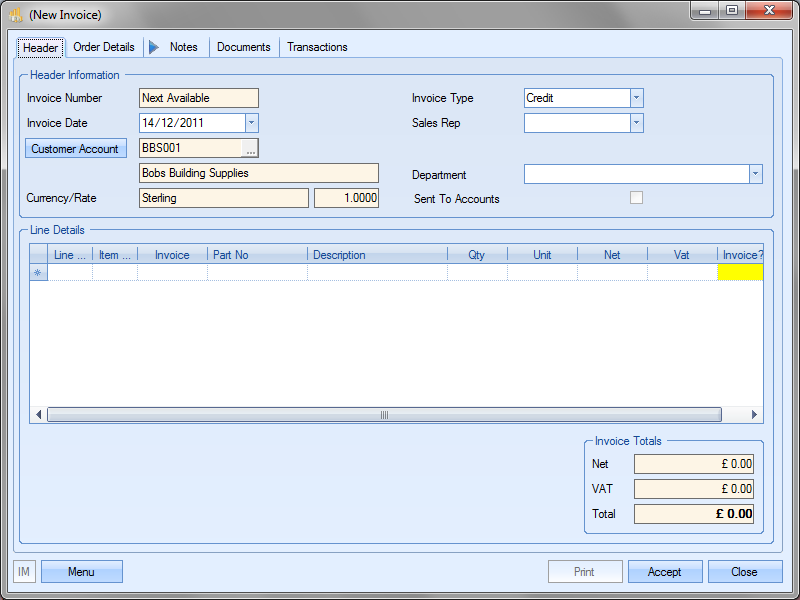
Clicking on the Notes section shows the comment that has been pulled through from the customer details.
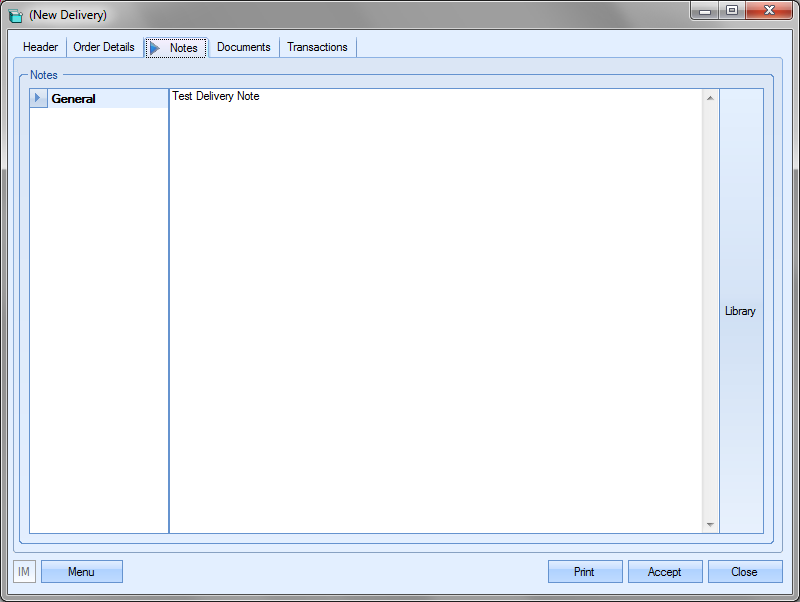
Delivery Notes
If the user has entered a comment against the Delivery section of the customer Notes, the comment is pulled through to the Notes screen of any deliveries created in Progress for this customer. The screen below shows a delivery created for this customer.
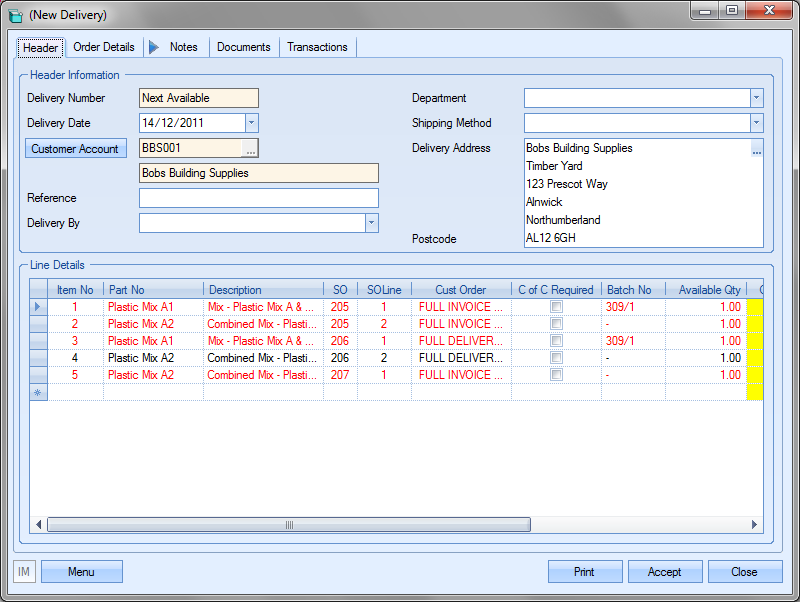
Clicking on the Notes section shows the comment that has been pulled through from the customer details.
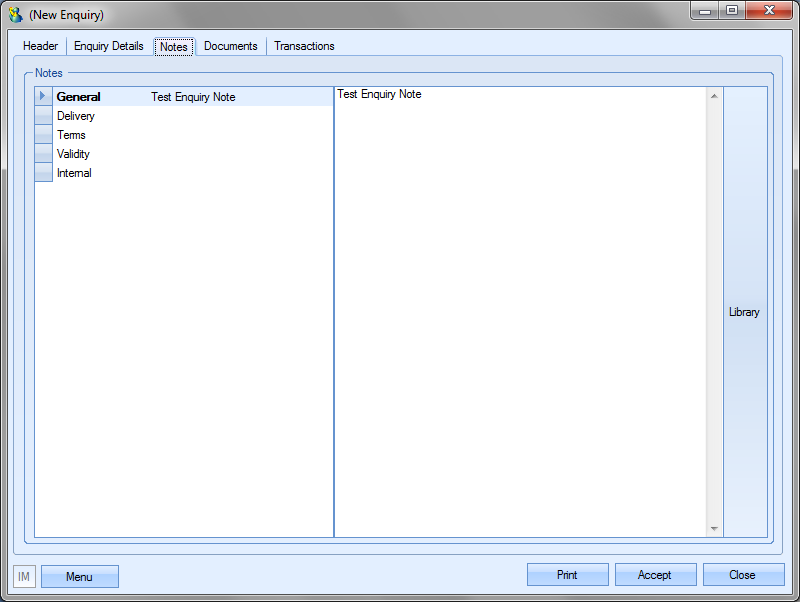
Enquiry Note
If the user has entered a comment against the Enquiry section of the customer Notes, the comment is pulled through to the Notes screen of any enquiries created in Progress for this customer. The screen below shows an enquiry created for this customer.
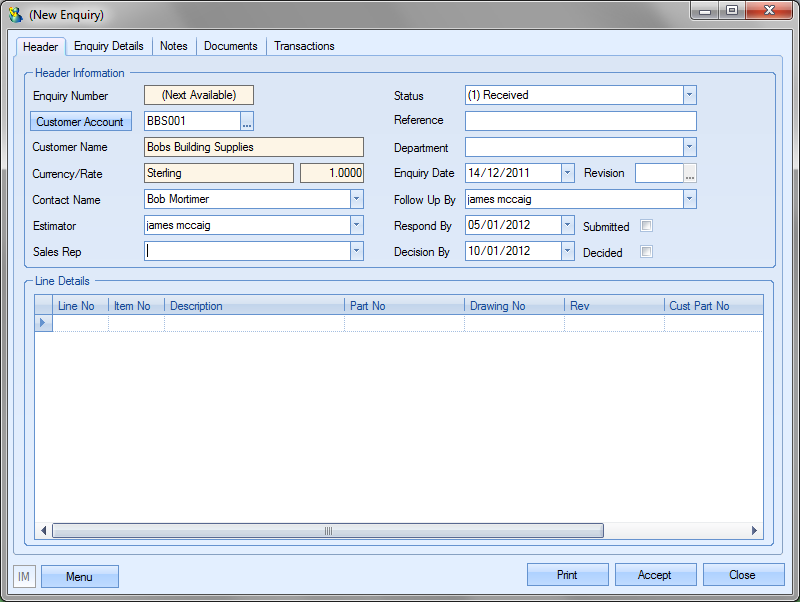
Clicking on the Notes section shows the comment that has been pulled through from the customer details.
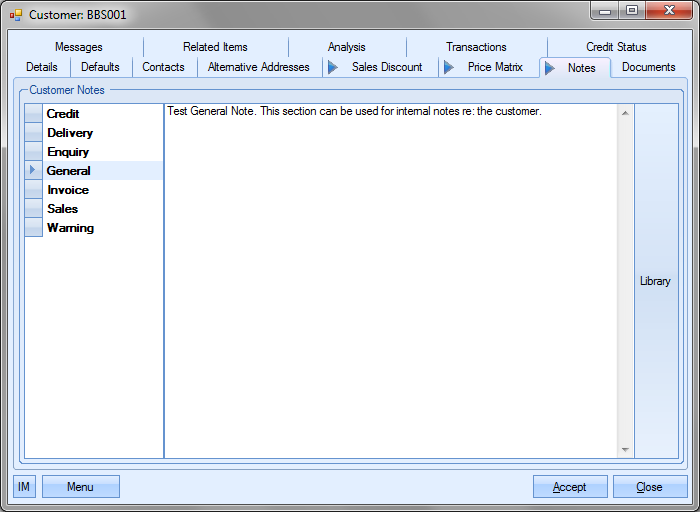
General Notes
This section is not used elsewhere in Progress but is for use within the customer record for adding notes regarding the customer themselves. This can be used for recording internal notes. This information does no replicate anywhere else within Progress.
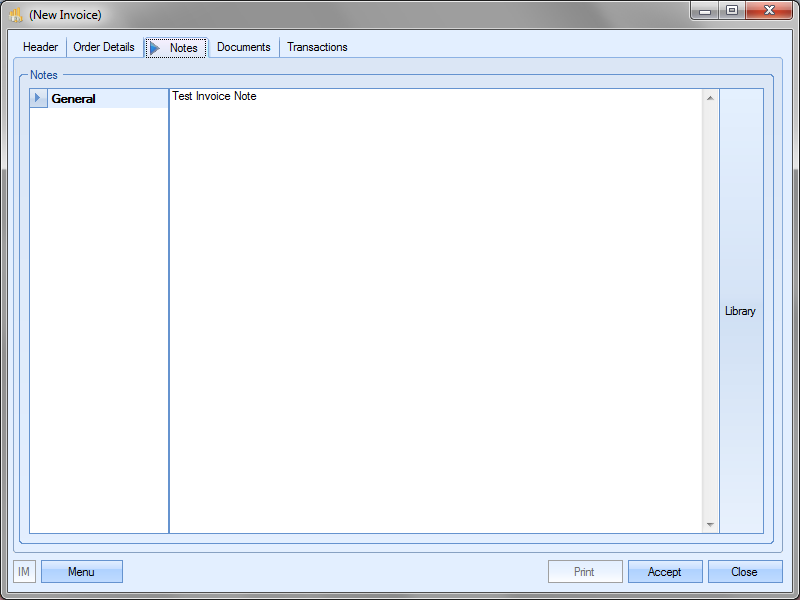
Invoice Notes
If the user has entered a comment against the invoice section of the customer Notes, the comment is pulled through to the Notes screen of any invoices created in Progress for this customer. The screen below shows an invoice created for this customer.
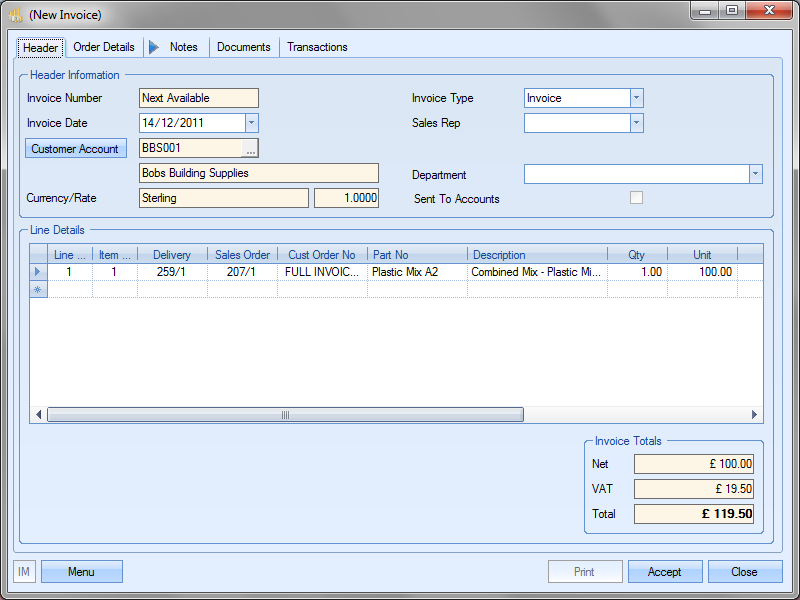
Clicking on the Notes section shows the comment that has been pulled through from the customer details.
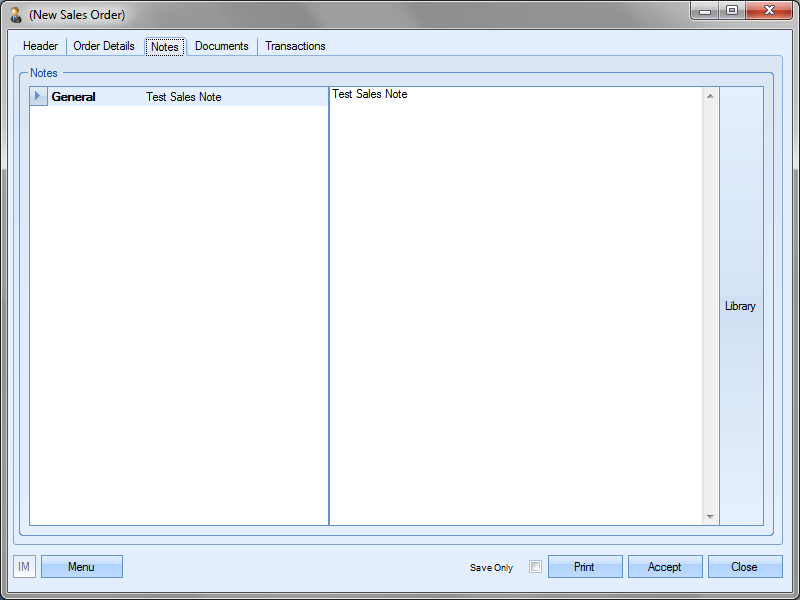
Sales Notes
If the user has entered a comment against the sales section of the customer Notes, the comment is pulled through to the Notes screen of any sales orders created in Progress for this customer. The screen below shows a sales order created for this customer.
Clicking on the Notes section shows the comment that has been pulled through from the customer details.
Warning Message
This section of the Customer Notes can be used to display a warning message to any user who tries to create or attempts to open an existing record associated with the customer.
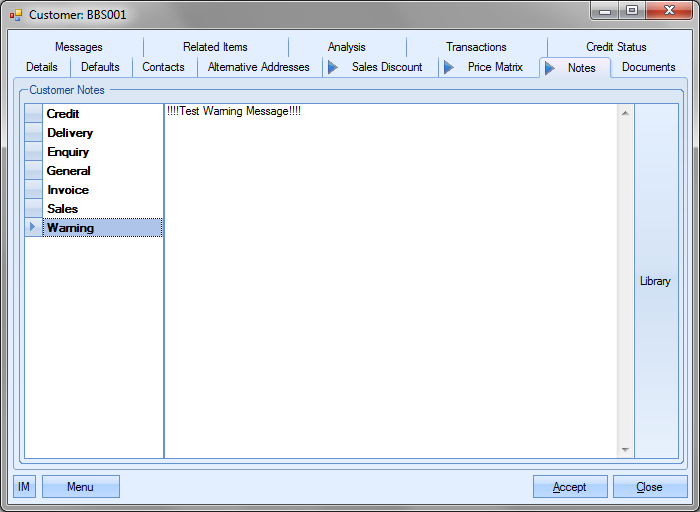
The admin settings allow the system administrator to set whether the warning message is displayed upon the creation of new orders/invoices/etc or whether the message is displayed when users access existing orders/invoices/etc. The screen below shows the options available to the system administrator.
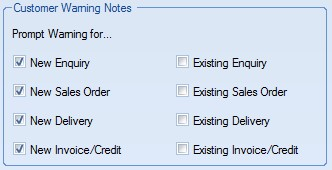
For more information on the customer warning options, please refer to the System options section of this manual.
The warning message is displayed upon creation of or access to the following (depending on how the system is configured): Enquiry, Sales Order, Delivery, Invoice or Credit. The following screen shows how the warning is displayed to the user.
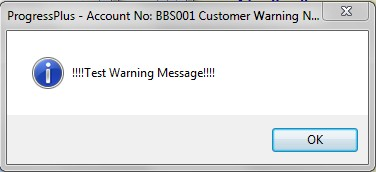
Clicking the OK option will remove the warning from the screen and return the user to the screen they were in.
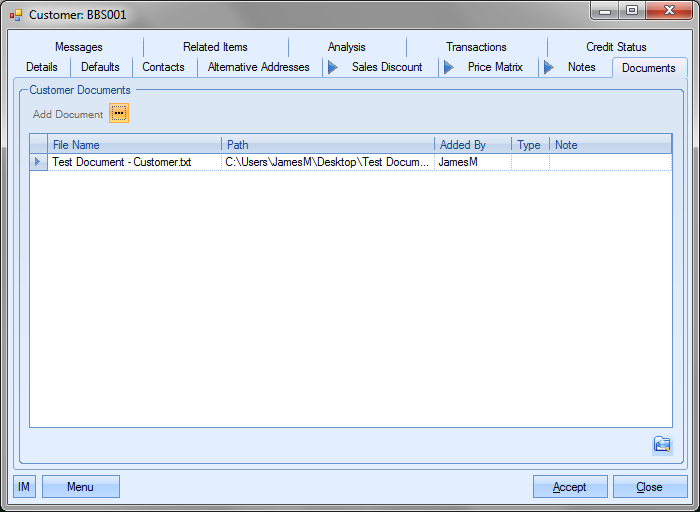
Customer Documents
This section allows the user to save specific documents against the customer. These may be general customer correspondence emails or any other document relating to the customer that user wishes to record in Progress.
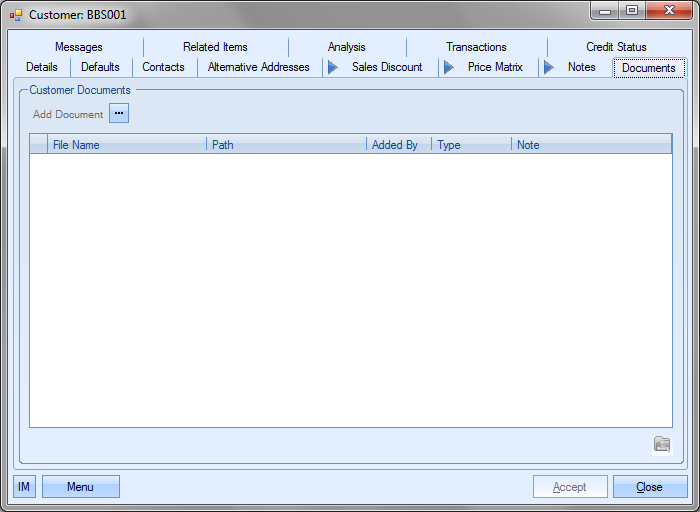
To record documents in Progress, the user simply clicks on the Add Document option to select the file required.
![]()
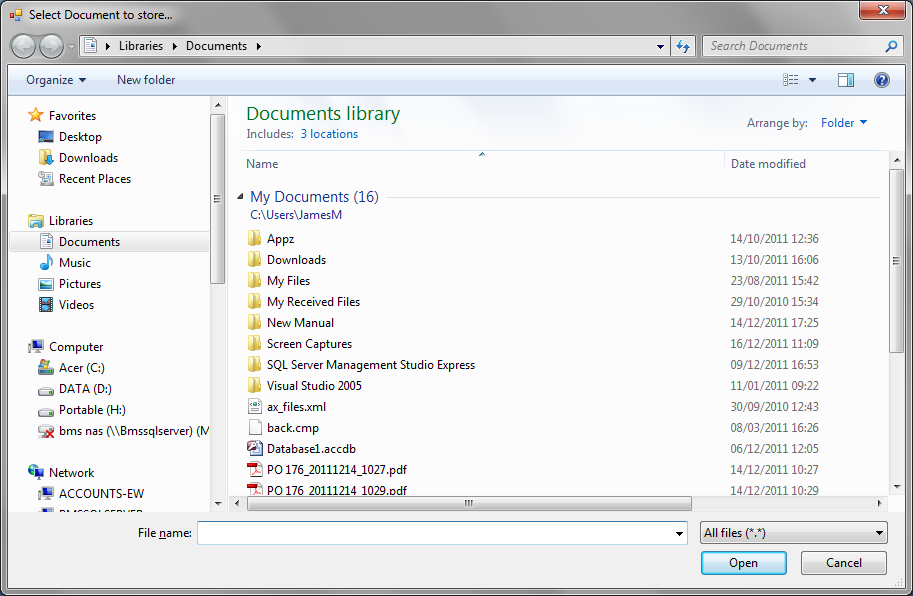
This will open a standard Windows explorer window to allow the user to search for the file to be attached.
Once the user has selected the file required, Progress will return the user to the documents screen and list the selected file.
NOTE: To allow access for other users to the files added to the customer record, the user must ensure that these files are held in a folder accessible by all users. Typically a shared network folder would be created for this purpose.
Once the file(s) have been added, the user can specify a file type or comment associated with the document. The Type can be chosen from the drop-down list.
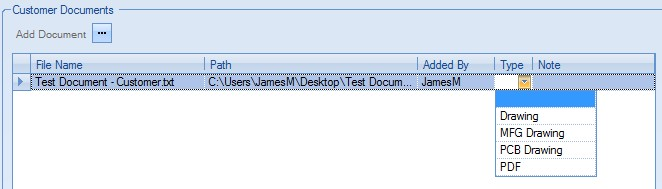
This drop-down list can be populated from the List Maintenance section of Progress in the Document Types list as shown in the screen below.
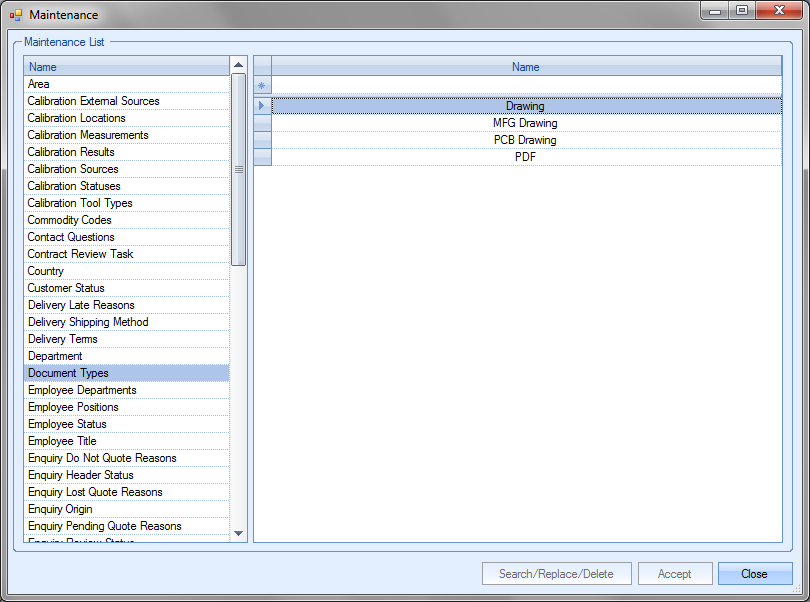
For more information on maintaining lists and the List Maintenance section of Progress, please refer to the List Maintenance section of this manual.
A note for the document can be added directly to the Note field as shown.

Once all documents and details have been added, the user can save the changed by clicking on the Accept option.
Customer Messages
This section gathers all the messages that have been created which reference the customer.
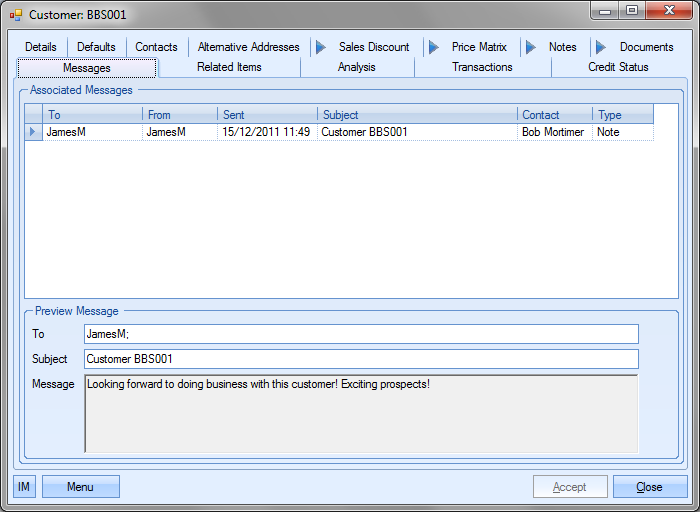
Any of the messages listed can be viewed by the user by simply double-clicking the message.
Customer Related Items
This section allows the user to view all the customer related items within Progress. These sections show all historical related items in Progress for the customer, allowing quick access to all elements of the customer's activity.
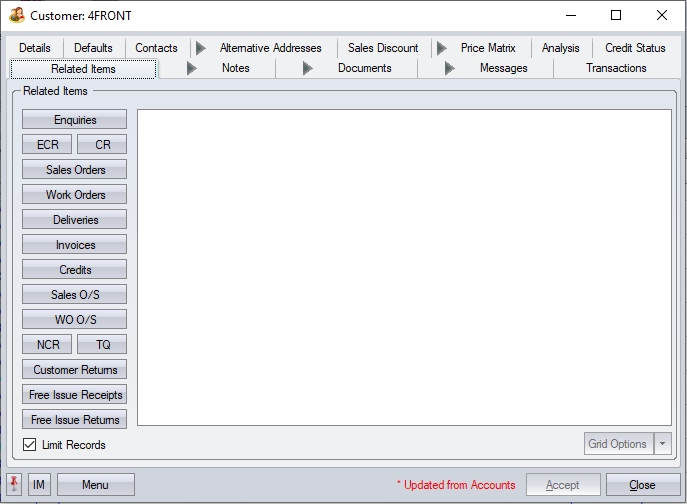
The categories listed on the left hand side of the screen can be selected by the user resulting in the appropriate information being displayed as shown in the next screens.
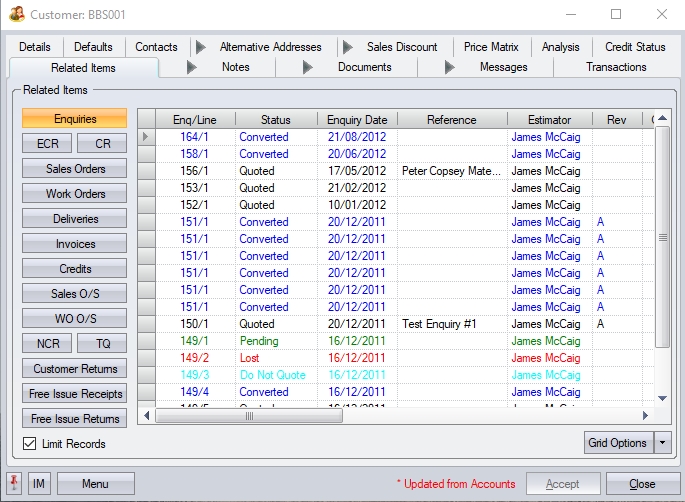
(Enquiries)
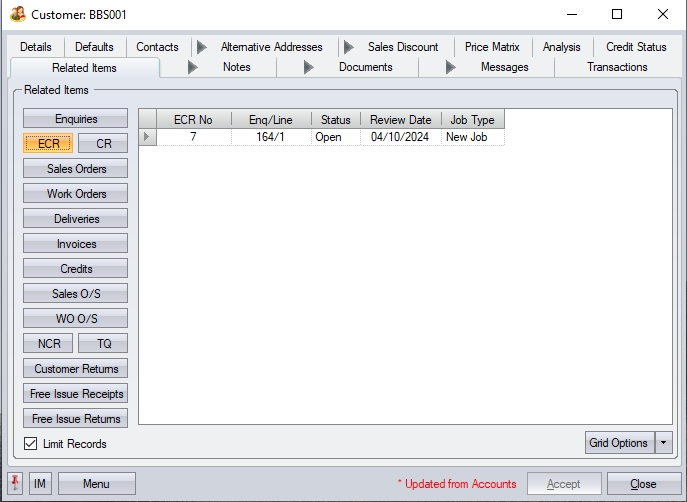
(Enquiry Contract Reviews)
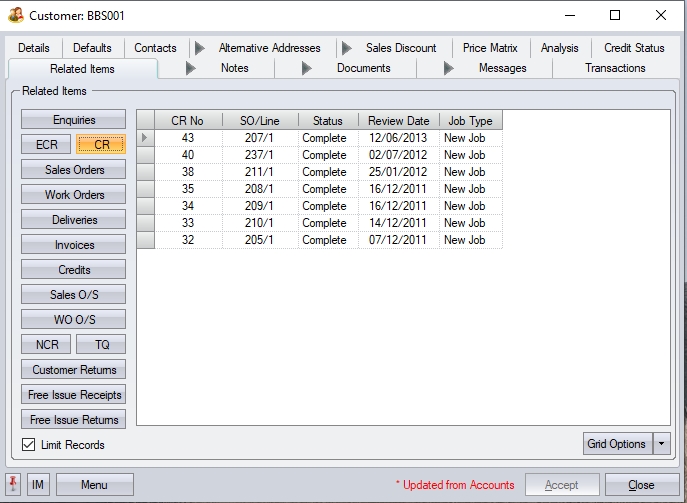
(Contract Reviews)
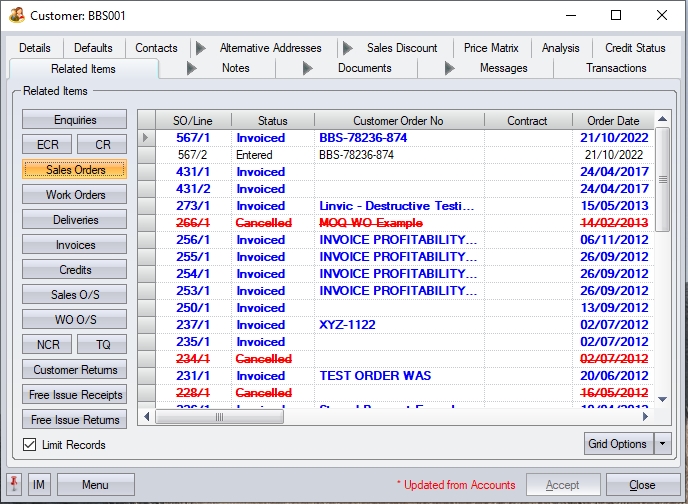
(Sales Orders)
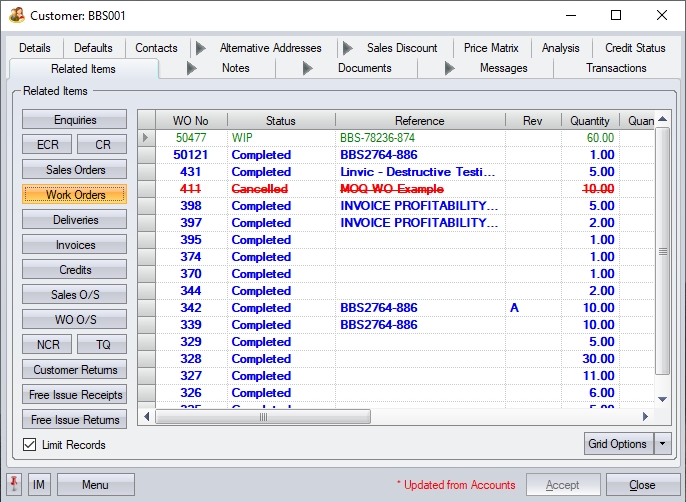
(Work Orders)
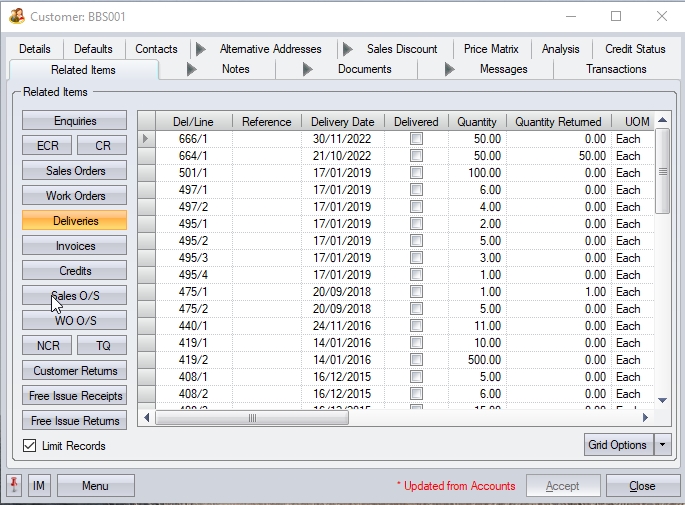
(Deliveries)

(Invoices)
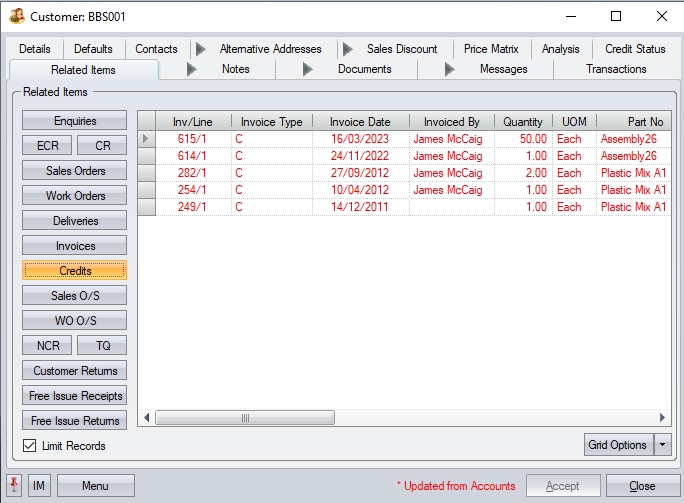
(Credits)
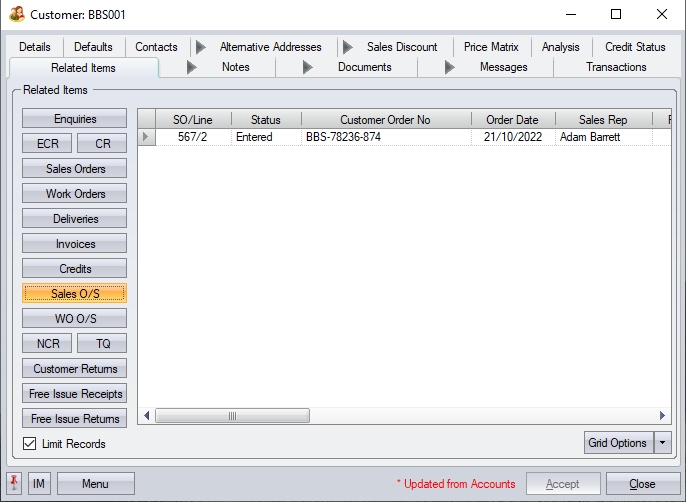
(O/S Sales Orders)
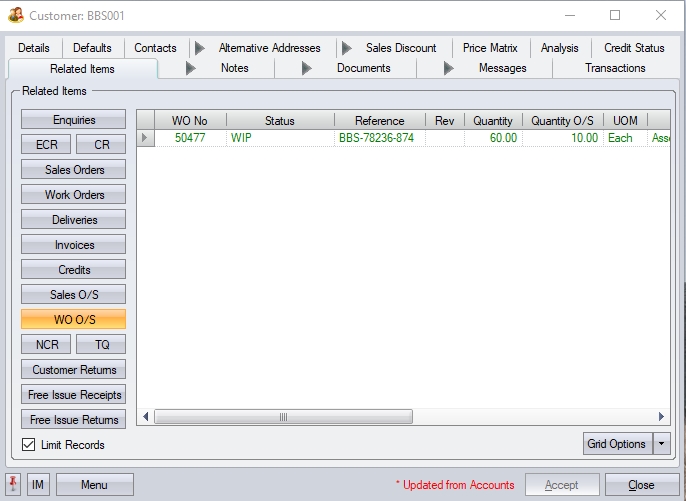
(O/S Work Orders)
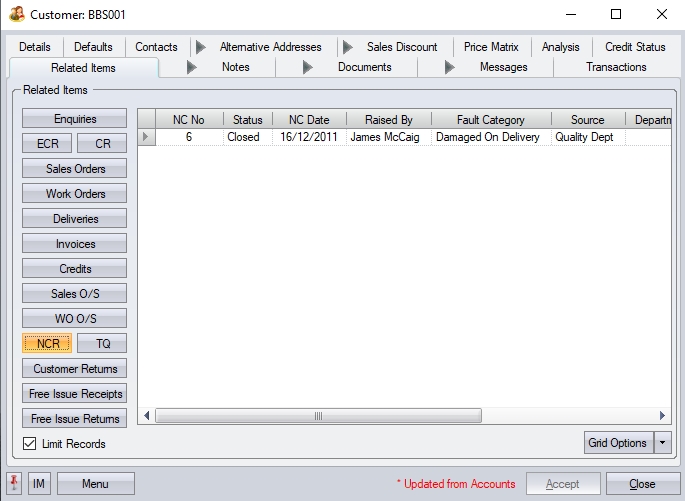
(Non-Conformances)
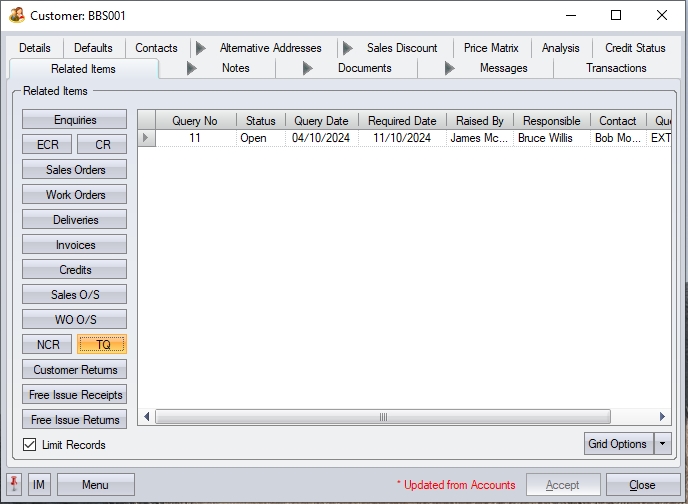
(Technical Queries)
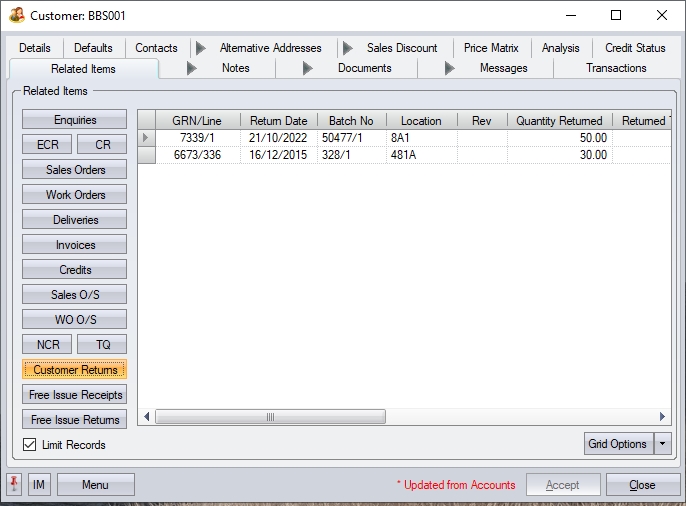
(Customer Returns)
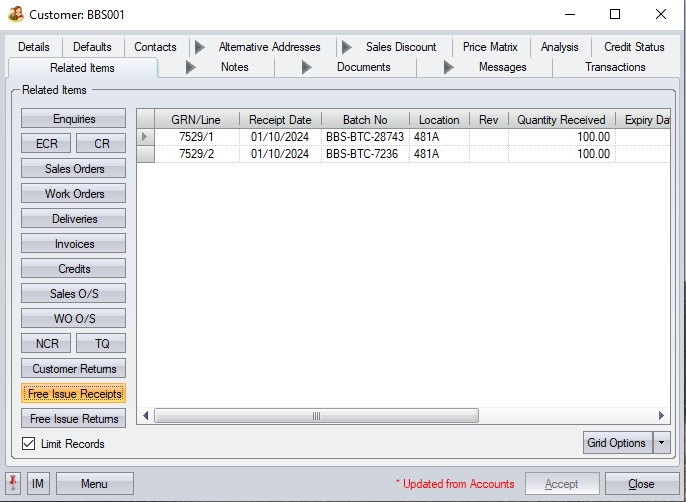
(Free Issue Receipts)
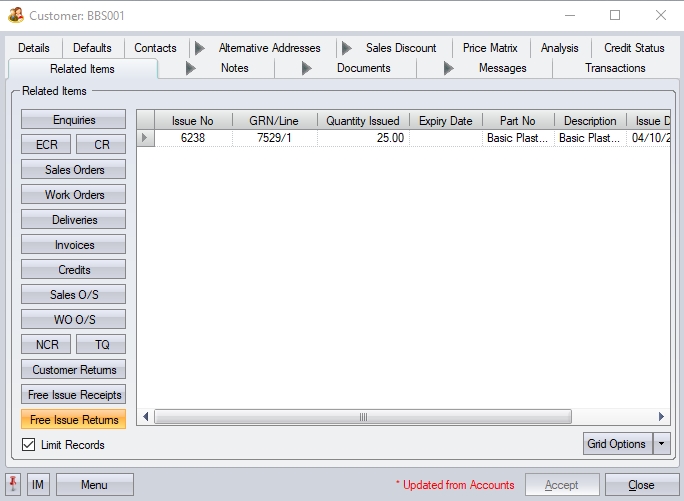
(Free Issue Returns)
To view all the order information contained for an order the user may simply ‘double click’ on the required line.
Customer Analysis
This section allows the user to see various customer metrics with regards historical activity.
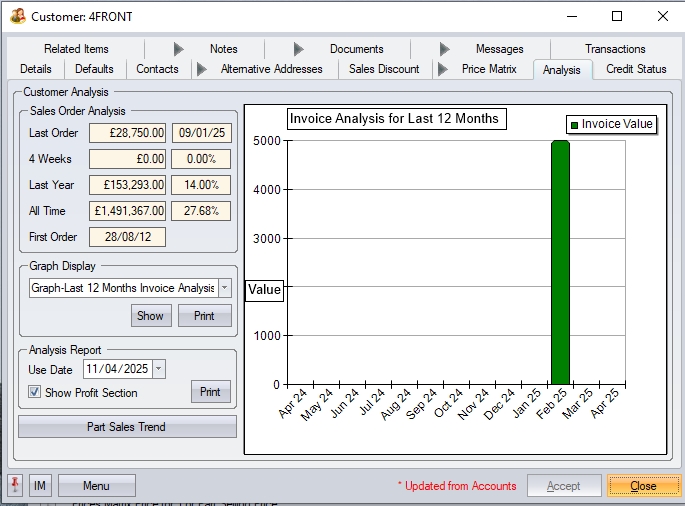
The user can view sales order analysis information as well as choose specific graphical representations of customer data. They can also set the date to be used for the customer analysis report.
The Sales Order analysis section shows the following:
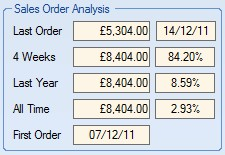
| Last Order: | Last sales order value as well as the date it was created on. |
| 4 Weeks: | Total value of this customer’s orders over the last 4 weeks and the percentage of the total order value this customers orders represent over this period. |
| Last Year: | Total customer’s order value for the last year and the percentage of the total order value this represents over this period. |
| All Time: | Total order value of customer’s sales order ever along with the percentage of the total order value ever this represents. |
| First Order: | Date of this customer’s first ever sales order. |
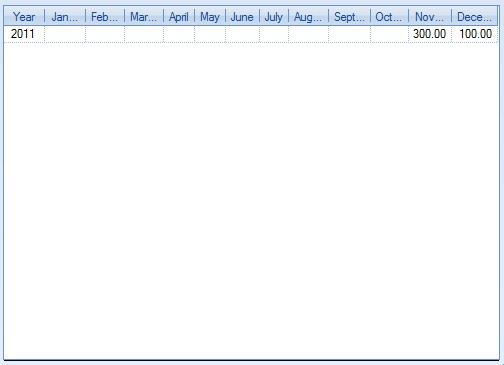
The Graph Display section provides the user with a selection of graphical representations of the customer’s activity. The screen below shows the options available for the user to choose.
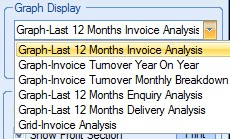
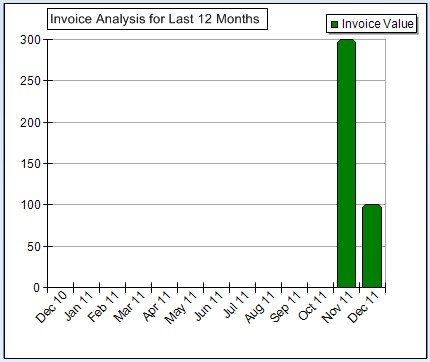
Each of these options generates a graph which is displayed to the right of the screen. Examples of the graphs are shown below.
Last 12 Months Invoice Analysis:
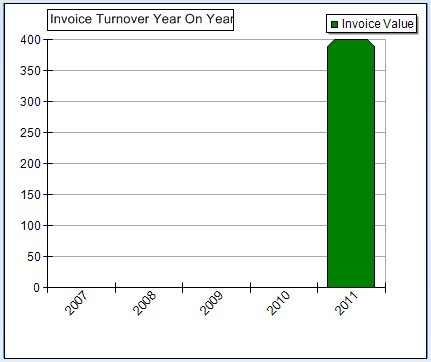
Invoice Turnover Year on Year Analysis:
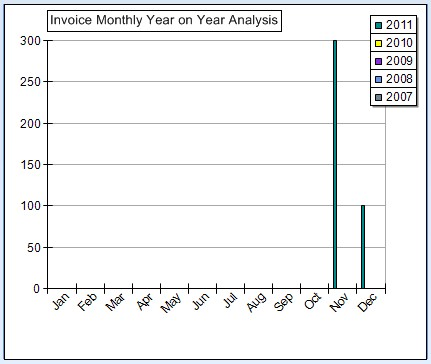
Invoice Monthly Year on Year Analysis:
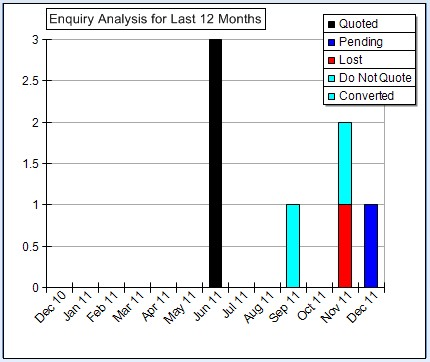
Last 12 Months Enquiry Analysis
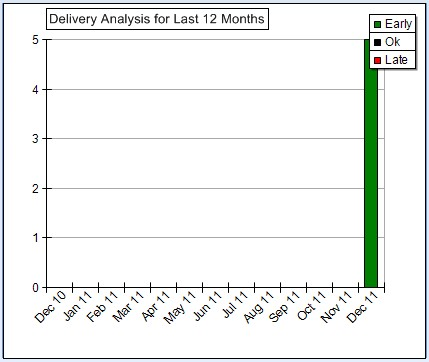
Last 12 Months Delivery Analysis:
Grid-Invoice Analysis:
The PRINT option under the drop-down list for the graphs allows the user to print a hard copy of the selected graph.
The next option available to the user on this screen is the ANALYSIS REPORT option. This allows the user to generate the Customer Analysis report showing a variety of graphs and details relating to the customers activity based on a specified date. Example report is displayed in the following screens.
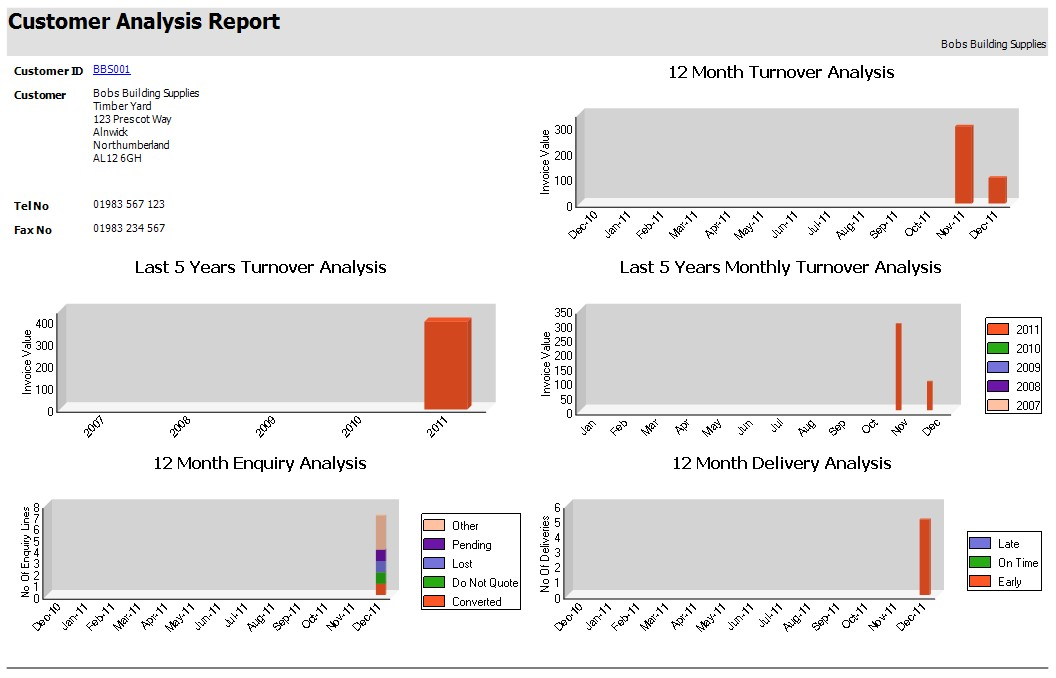
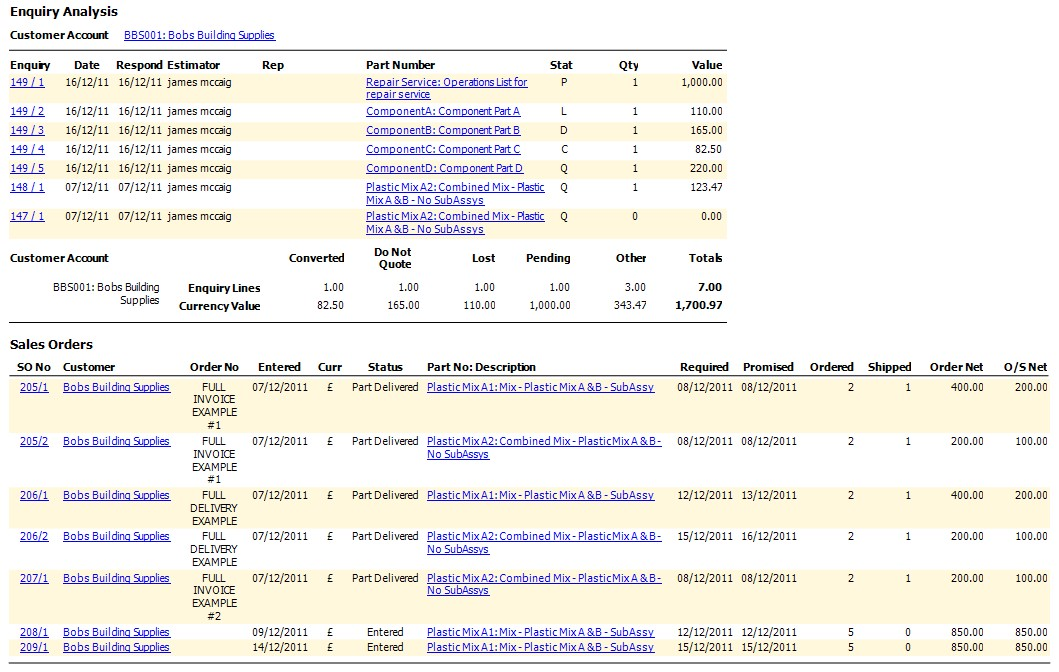
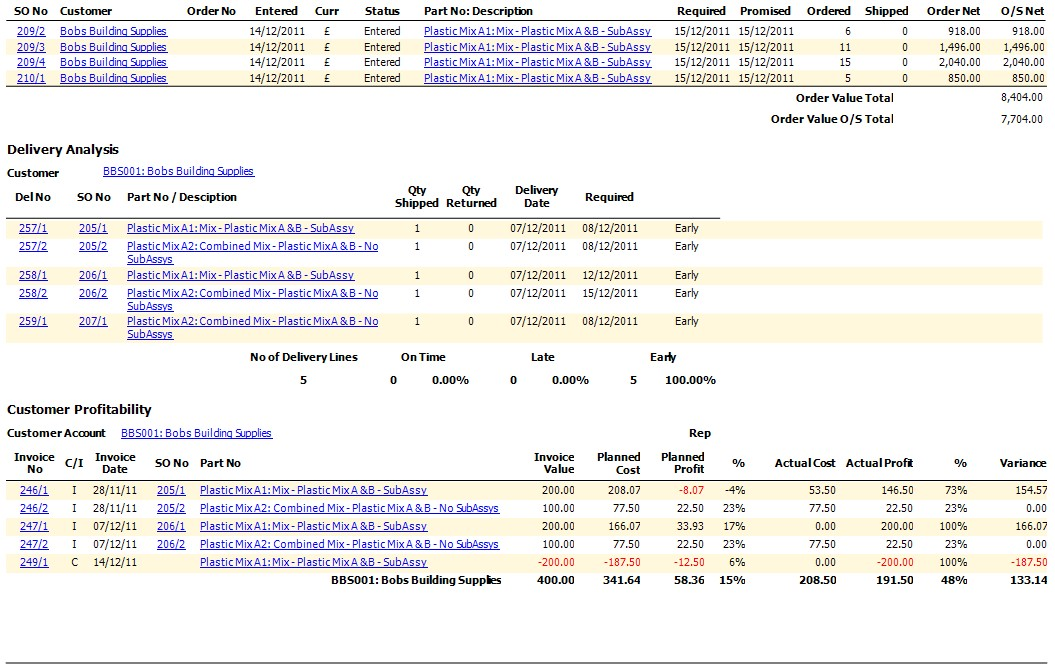
The user can print a hard copy of this report by clicking the PRINT option beside this part of the customer analysis screen.
The last option available on this screen is the PART SALES TREND option. This screen provides the user with a historical look at the selected customers orders and prices paid. This screen is the same one accessible from the Inventory section, but is simply filtered by the current customer and shows all parts bought by the customer within the date range.
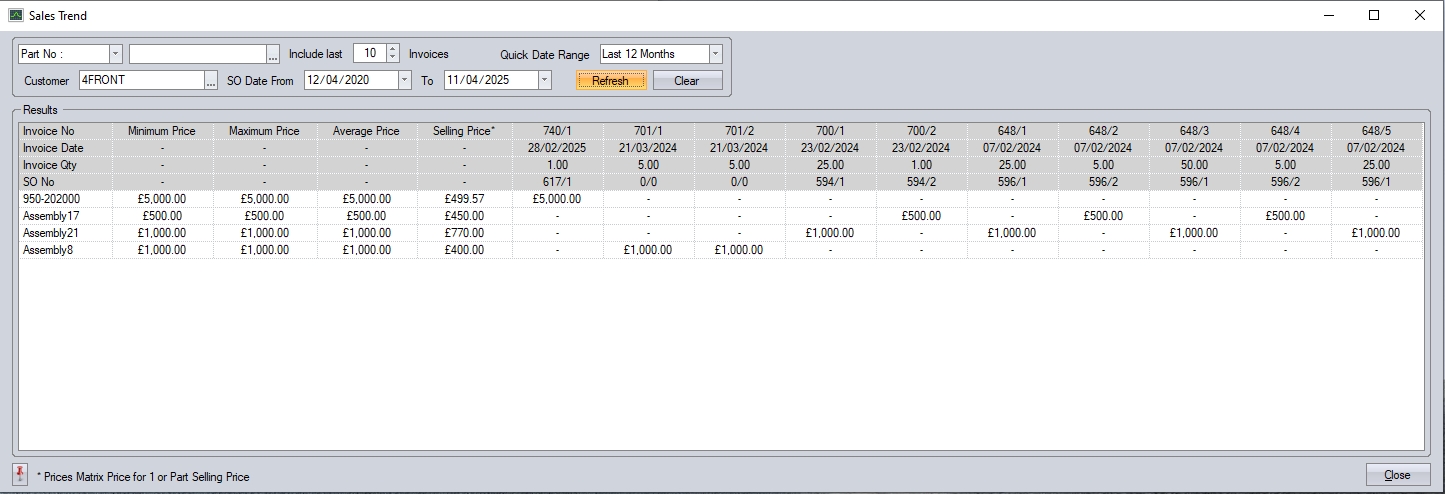
For more information on this screen, please refer to the Inventory > Sales Trend section of the manual.
Customer Transactions
This section of the customer details shows a complete list of transactions made in Progress by the users which relate to this customer.
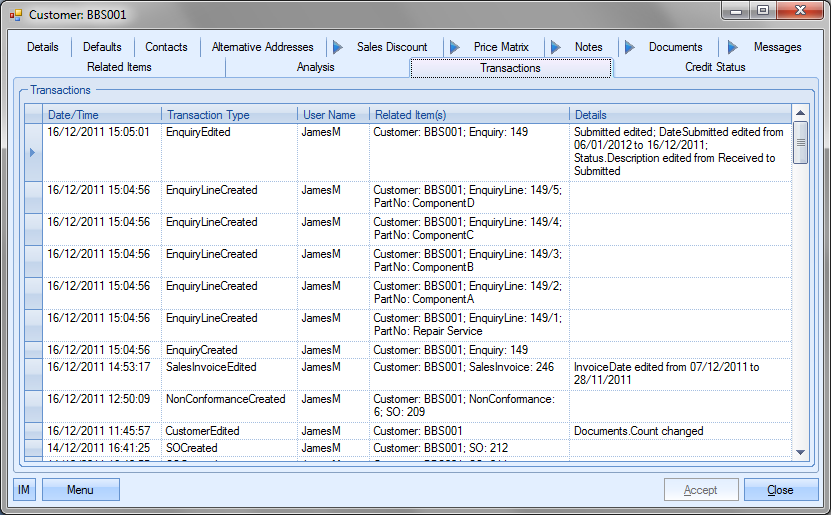
The user can see what transactions have occurred as well as details on the changes made. This is often very useful when trying to find out why something has changed unexpectedly or if the user needs to find out who made a particular change.
| Date/Time: | The date and time that the transaction occurred. |
| Transaction Type: | This field names the type of transaction recorded. This references both the area of Progress and the action, i.e. Enquiry Edited – change made to an enquiry, SOCreated – new SO created, etc. |
| User Name: | User who made the transaction. |
| Related Item(s): | Reference information on the exact record that was amended, i.e. SO No/SO line, Customer, Part No, etc |
| Details: | Brief explanation of edited information. |
Customer Credit Status
This section shows the details of the selected customer’s credit status. The information displayed is refreshed each time the user accesses this screen based on the current Progress data and the details from the external finance package. If no external finance package is linked to Progress Plus, this section of the customer’s details will not be visible.
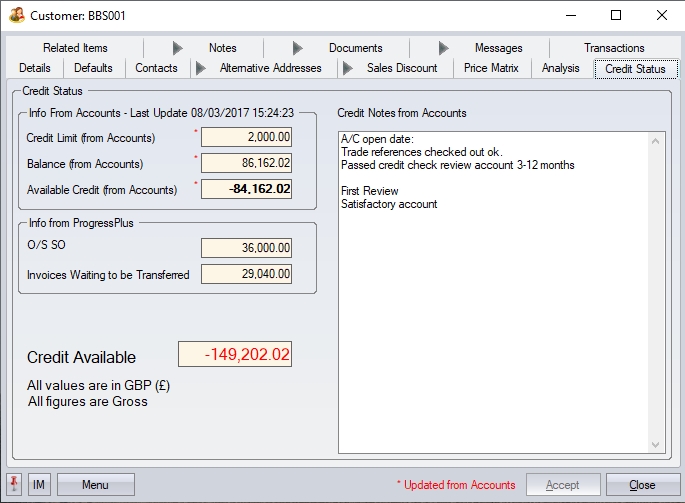
| Credit Limit: | Current customer credit limit (from external finance package). |
| NOTE: This information will be pulled from the external accounts package, except if that is Xero, as this doesn't allow this information to be accessed. If Xero is the one linked to Progress, authorised users will be able to manually enter a credit limit into this field so it has a figure that can be used in the system, and can only be maintained by authorised users in Progress (i.e. via user access permissions). |
| Balance: | Current account balance (from external finance package) |
| Available Credit: | Credit Limit – Account Balance (from external finance package) |
| O/S SO: | Current outstanding sales order value. |
| Delivered Not Invoiced: | Value of deliveries still to be invoiced. |
| Inv. Waiting to be Transferred: | Value of invoice raised, but not yet transferred to external finance package. |
| Credit Available: | Total credit available to the customer. This value is calculated as follows: |
| (Credit Limit) – (Balance + O/S SO + Del. Not Inv. + Inv. To Be Trans) |