This section of Progress allows the user to record employee records for the company. These employees can be used throughout the system for recording names against orders, contacts, etc. as well as allowing them to clock in/out of the system via the T&A module and job on/off work orders via the SFDC module. This section combines both personal information such as home address and emergency contacts with business information such as payroll number and worker category. The user can also record employee skills and certifications, and also set security levels in relation to accessing individual SFDC options via the additional menu options.
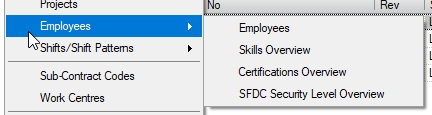
Access to employee records, their skills, certifications and SFDC security requires the relevant user permissions.
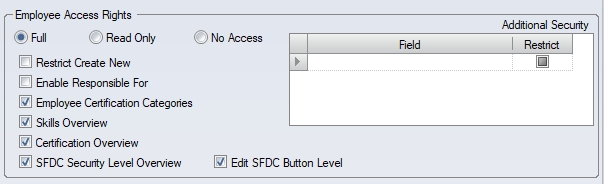
These can be set in the user's permissions in the Admin section of Progress shown above. For more information on user permissions, please refer to the Administrator Functions section of the manual.
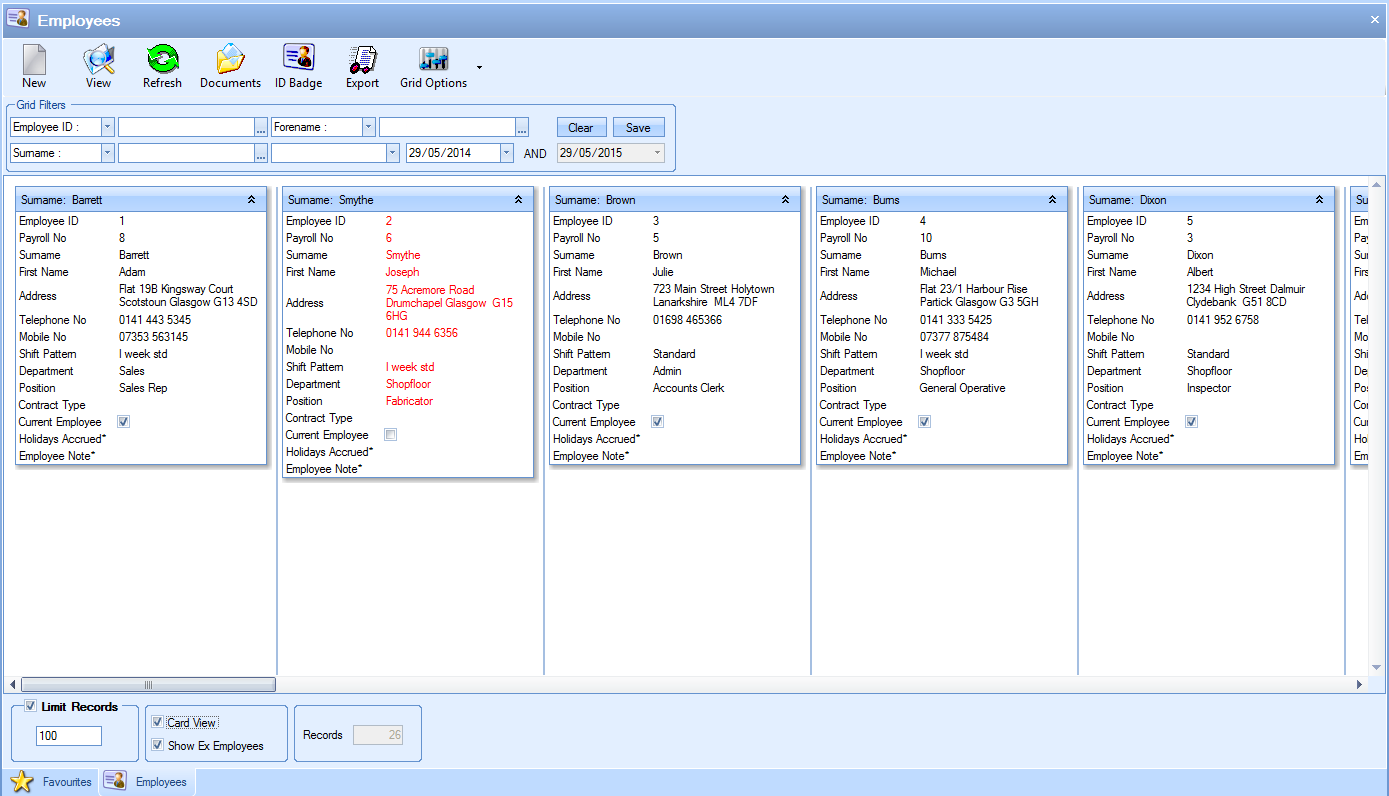
Employees
This is the main employees section. This lists all employees and their associated details.
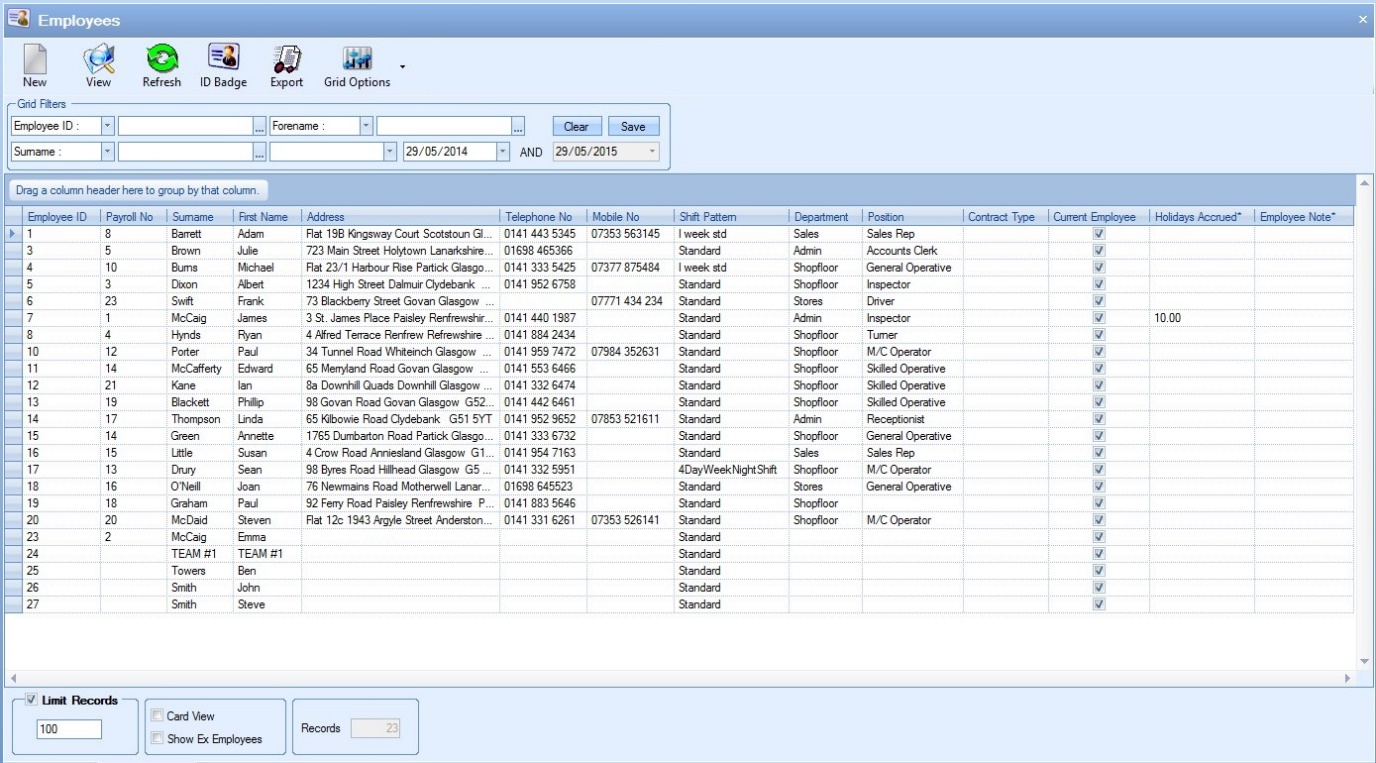
All existing employees are displayed in the main grid with the option to filter by a variety of means at the top using the grid filters (like most of the other Progress screens).

The options at the top allow the user to create new employees, view/amend existing employees, print employee ID badges as well as export the list of projects out to Excel for further use out with Progress.

The main grid only shows active employees by default but the user can view inactive or “ex-employee” records by ticking the SHOW EX EMPLOYEES option at the bottom of the screen.
![]()
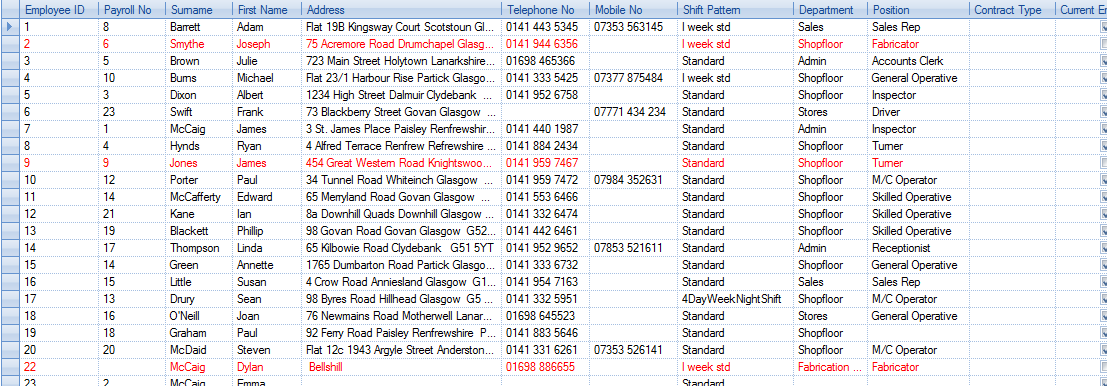
Ticking this and refreshing the screen will update the main grid to include records for ex-employees, who are displayed in red as shown below.
The way the employee information is displayed can also be changed by ticking the CARD VIEW option at the bottom of the screen. This changes the view to the following.
Adding New Employees
New employees can be added to the system by clicking on the NEW option at the top of the screen. This will present the user with the new employee window shown below.
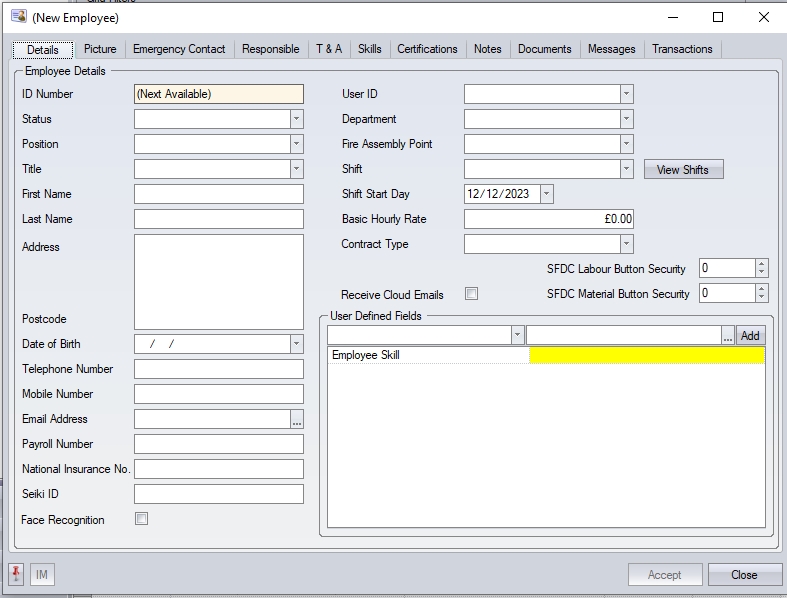
The user can then fill in the details of the new employee. The Details tab is the main employee details section and includes the following fields.
ID Number
This is s system generated number and will be assigned based on the next sequential number in the system.
Status
This is the employee status. This works in conjunction with the list created in the List Maintenance section and dictates whether the employee is an active or “ex” employee. This also determines whether their name appears in drop-down lists throughout the system.
Title
This is the employee title and works in conjunction with the Employee Title list in the List Maintenance section.
First Name/Last Name/Address/Postcode/Date of Birth/Telephone Number/Mobile Number/Email
Self-explanatory. These are the employee’s main personal details. Only the first/last name fields are mandatory when creating a new employee. The remaining information can be added at a later date.
Payroll Number/National Insurance No.
This is the employee’s payroll ID and national insurance details.
User ID
This is the login ID of the employee if they have one for Progress Plus. This is only applicable if the employee is a user of the Progress Plus system. Employees who will only use SFDC for recording time against work orders do not require a login ID, and therefore would not need this completed.
Position
This field is the employee’s position within the company. This field works in conjunction with the Employee Position list created in the List Maintenance screen.
Department
This field is the employee’s department within the company. This field works in conjunction with the Employee Department list created in the List Maintenance screen. This is used when filtering the timesheet information.
Fire Assembly Point
This field is the employee’s designated fire assembly point. This field works in conjunction with the Employee Fire Assembly Point list created in the List Maintenance screen. This is used when printing the Fire List report.
Shift
This is the employee’s shift pattern. This field work in conjunction with the shift patterns created in the Shifts/Shift Patterns section of Progress. This field will determine the employees working hours and breaks. The VIEW SHIFTS option allows the user to view the individual shifts of the selected pattern. Clicking this option will display the following window which shows the details behind the selected pattern.
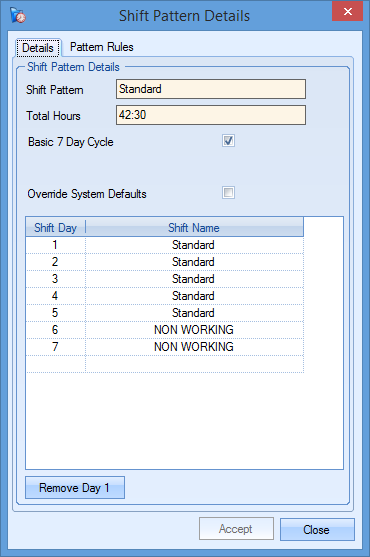
If the selected shift is not a standard 7-day cycle, then the user must also specify the start date of the shift pattern so the system knows what the hours are for any given date. This is often used when there is a rolling shift pattern which covers multiple weeks (for example, a shift pattern that’s one week days, one week evenings and one week nights). If an employee starts midway through this shift cycle, this date will determine whereabouts in the shift cycle the employee will be on the current date.

Basic Hourly Rate
This allows the user to record an hourly rate against the employee. This is only used for the WO Costs In Date Range report for calculating a labour cost based on the employee rate.
Contract Type
This allows the user to specify a contract type for the employee. This works in conjunction with the Employee Contract Type list created in the List Maintenance section.
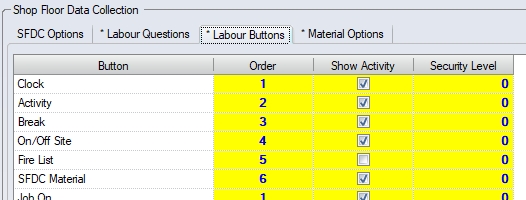
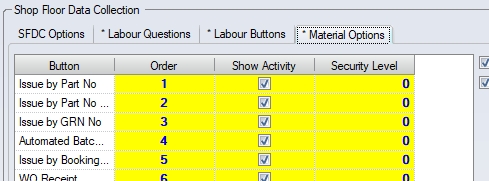
SFDC Labour Button Security/SFDC Material Button Security
These options allow the user to set individual security levels for the SFDC and SFDC Material modules within Progress. This allows individual SFDC option to be restricted by employee.
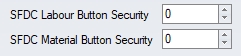
The user can enter a security value (0-100) for the employee, which will restrict any SFDC buttons that have a higher security level. When the employee uses either of the SFDC modules, the system cross-references their security level against the security level of the individual buttons to display only those the employee is authorised to use.
The security level of the buttons is set in the Admin section of Progress, under the SFDC system options as shown below.
(SFDC Labour Button Security Levels)
(SFDC Material Button Security Levels)
For more information on the Admin section of Progress and the SFDC system options, please refer to the Administrator Functions section of the manual
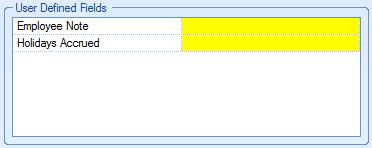
User Defined Fields (UDFs)
If any UDFs have been created for use against employee records then they will be displayed here for the user to complete.
For details on how to create UDFs, please refer to the User Defined Fields section of this manual.
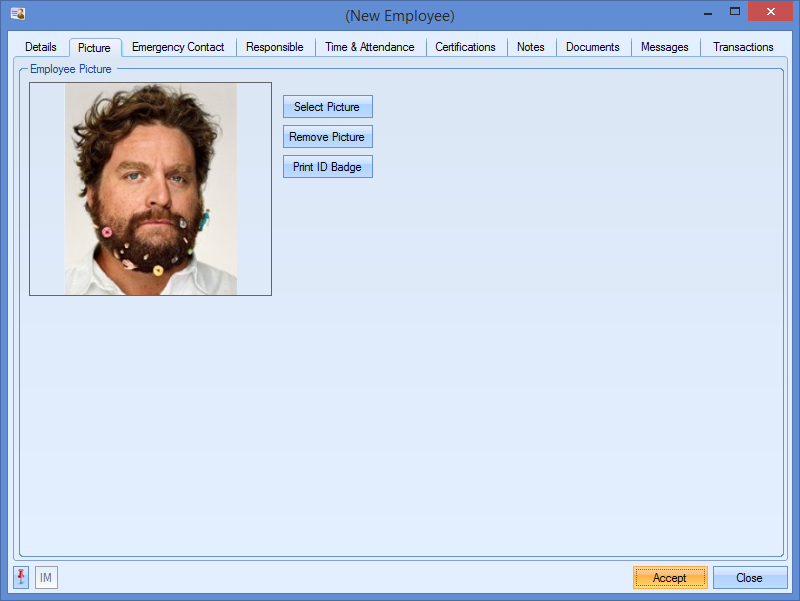
Adding an Employee Image
A picture can also be uploaded to the system against the employee in the picture tab as shown below. This is used in conjunction with the T&A module when the employee clocks in.
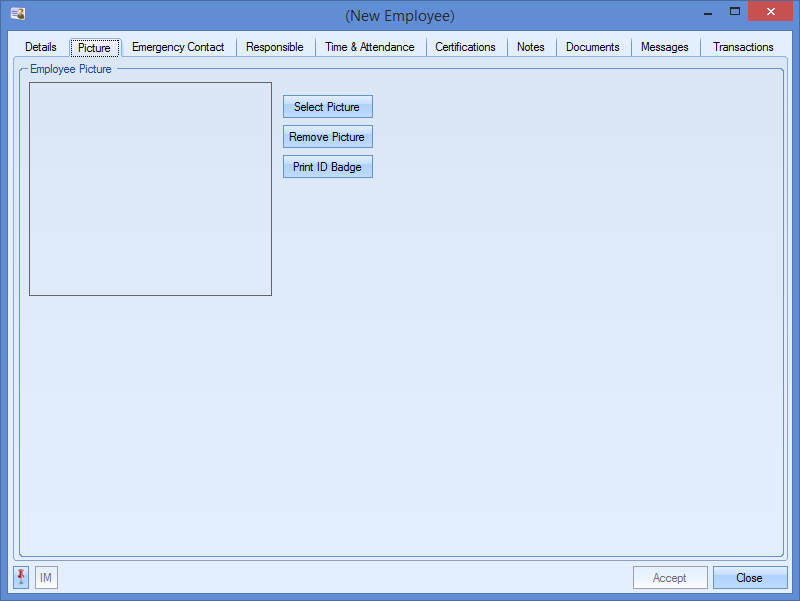
An image can be loaded by selecting the SELECT PICTURE option and simply selecting the appropriate image file. Once selected the employee’s image will be displayed here.
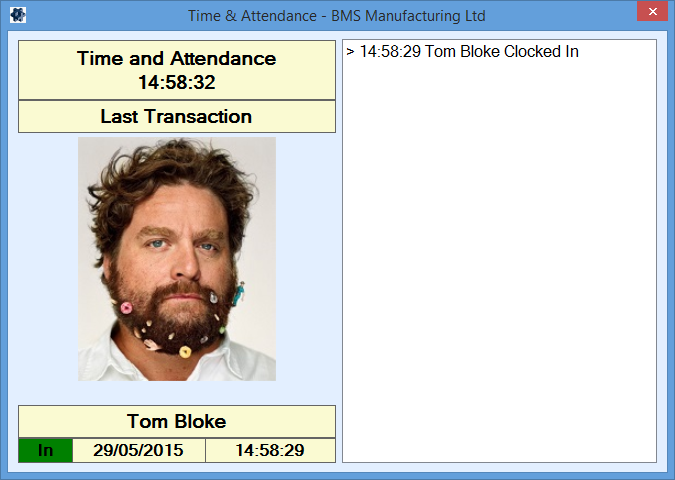
If the T&A module is in use and the employee clocks in using the clock in screen, the image will be displayed as follows.
Removing an Employee Image
The employee image can be removed from the employee record by clicking the REMOVE PICTURE option. This will remove the image from the system.
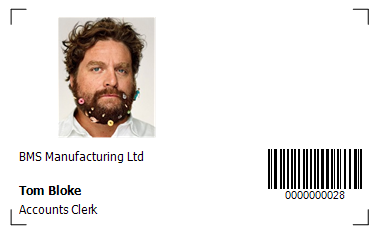
Printing Employee ID Badge
The user can generate an employee ID badge from the picture section by clicking the PRINT ID BADGE option. The user will be prompted to preview the badge on screen and can subsequently print the badge if required.
If the system is configured to use the face recognition functionality for employees to clock in/out, the user will have an additional section below the employee's image where they can view and add further images to the employee's record.
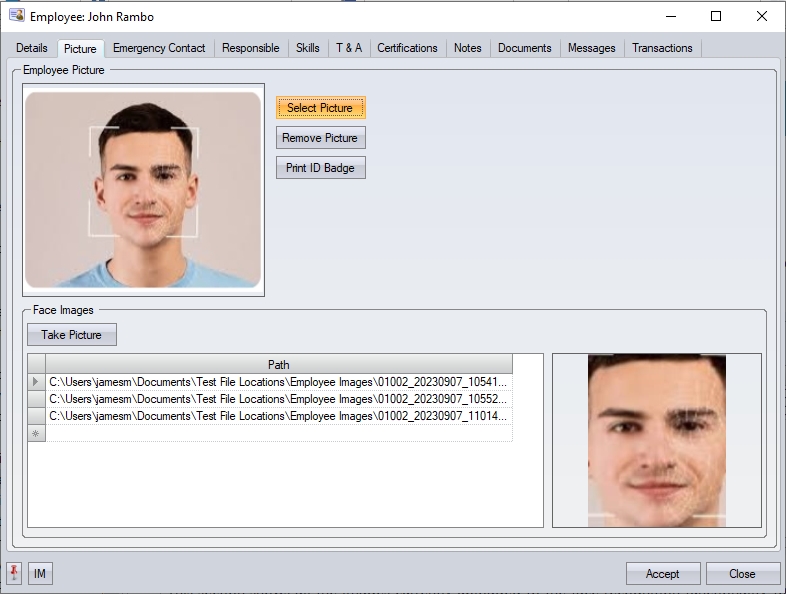
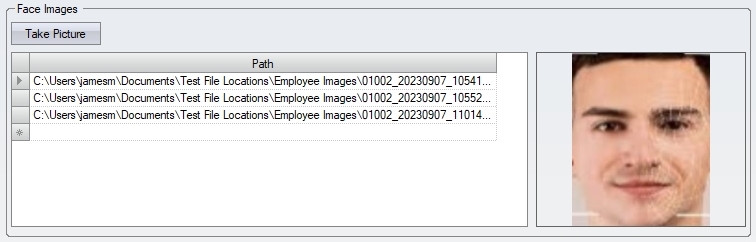
This section shows all the images currently uploaded to the face recognition functionality for the selected employee. The user can add additional images to the employee using the TAKE PICTURE option.
![]()
Clicking the TAKE PICTURE option will open the image capture screen for the face recognition functionality and let the user capture additional images as required.
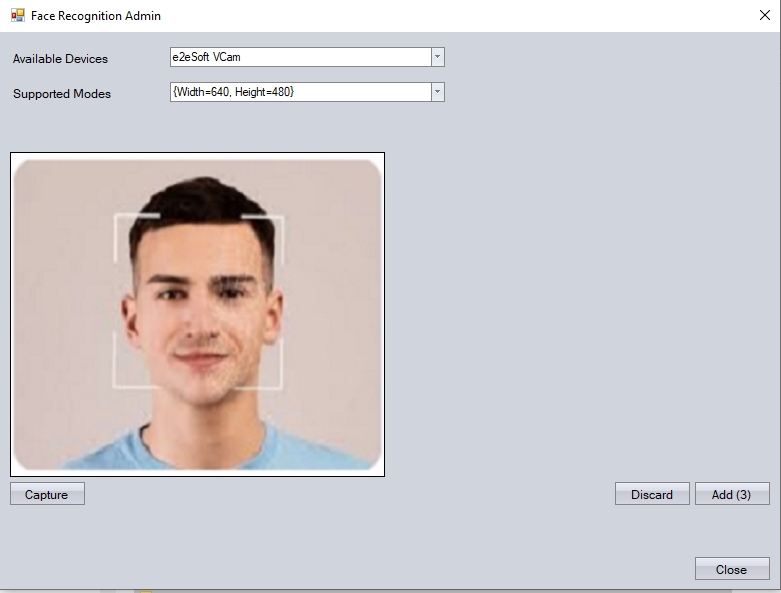
This will simply record additional images against the employee. These images will be uploaded the next time the employee images are uploaded via the Face Admin section. When done, the user can return to the employee record by clicking the CLOSE option.
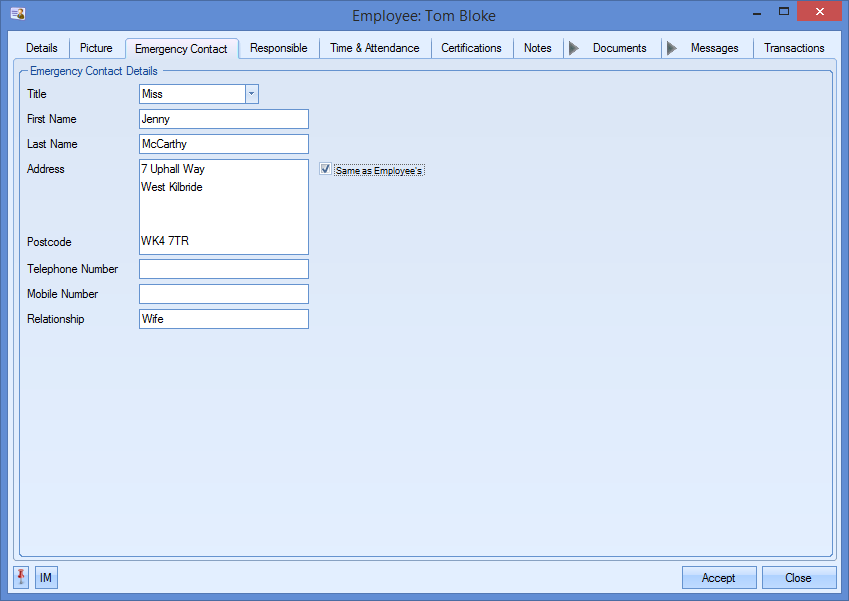
Emergency contact details can be recorded for all employees in this section of the employee record. The user can complete this information for reference.
If the contact shared the same address information, the SAME AS EMPLOYEE’S tickbox will automatically populate this information.
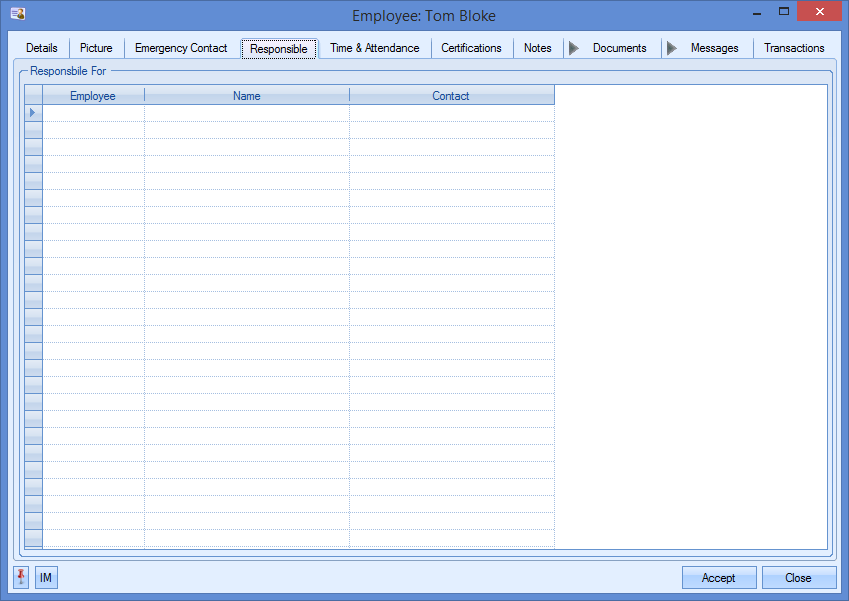
Responsible
This section allows you to indicate which other employees the current employee is responsible for e.g. the people this employee is a supervisor for. This also applied to the holiday, T&A and SFDC Status sections where the user will only be able to see and maintain details for the employees they are responsible for.
This comes into play when the employee/user is set up to manage other employees. This is done via the ENABLE RESPONSIBLE FOR user access right.

To add employees to this list, the user simply selects the employee ID in the first column and repeats this process until all employees are added.
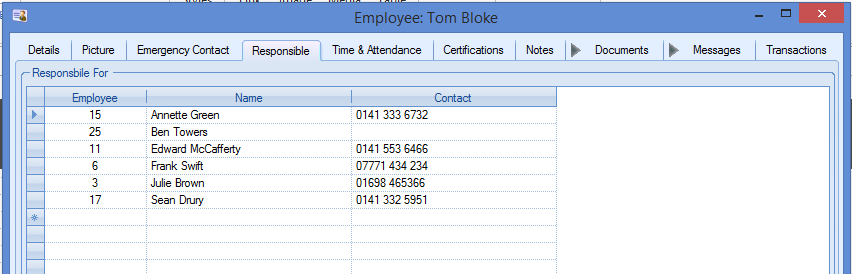
Once added, the user can click ACCEPT to save the changes.
For more information on the effect this has on holidays, SFDC and T&A sections, please refer to the relevant sections of the manual.
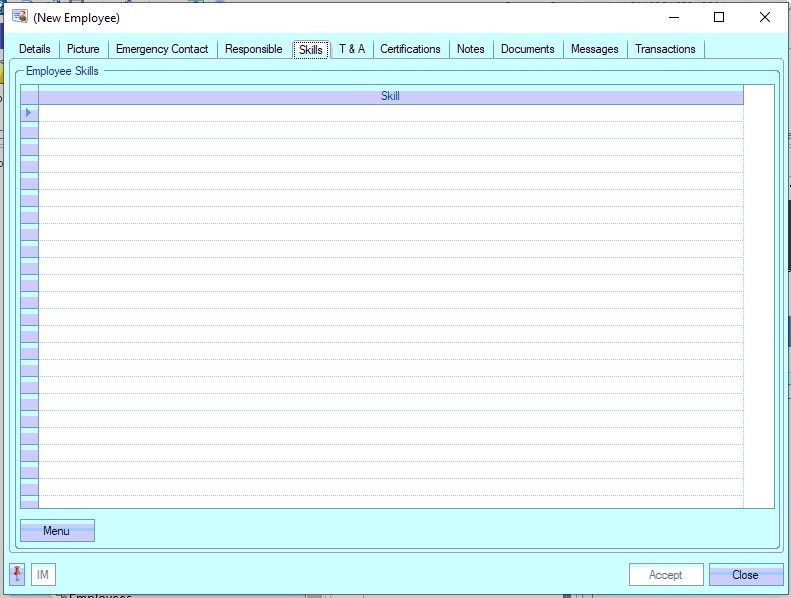
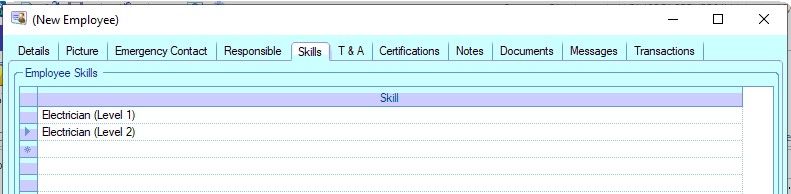
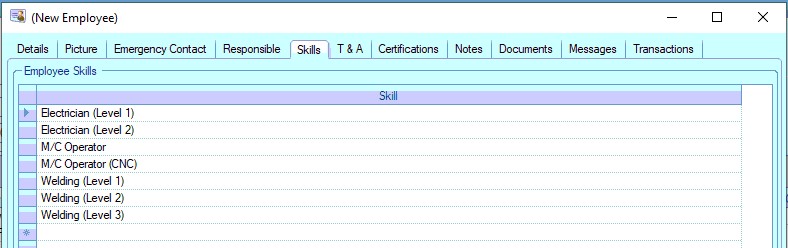
Skills
This section of the employee record allows skills/abilities to be recorded against the employee. These skills are used in conjunction with routing operations to ensure only employees with the relevant skills can carry out the work.
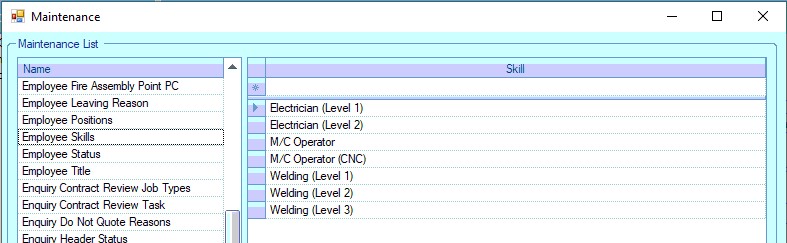
The list of skills that can be applied to employees is set up in the List Maintenance section of Progress, under the Employee Skills category.
Once the skill list has been set up, the individual skills can be selected against the employee from the drop-down list.
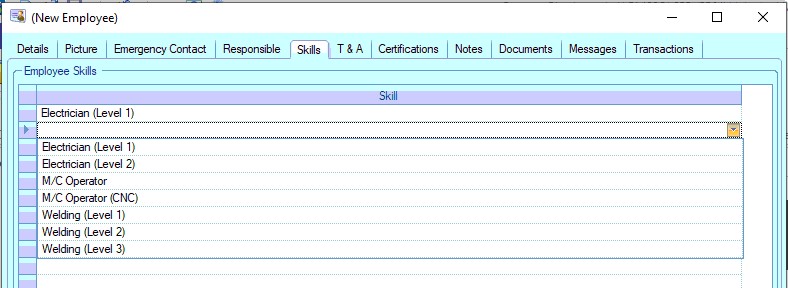
NOTE: ALL applicable skills should be assigned to the employee. If an employee is able to carry out multiple skill levels, ALL should be added to their skill set.
In addition to manually selecting the skills, the MENU option allows the user to copy a skill set from another employee and also add/remove individual or multiple skills.
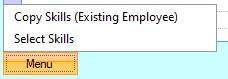
Copy Skills (Existing Employee)
Upon selecting this option, the user will be presented with a drop-down list to select the employee the skills are to be copied from.
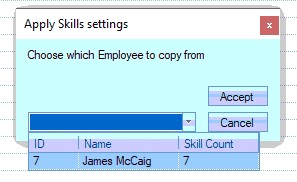
Once the employee has been selected and the user clicks ACCEPT, the selected skills will be applied to the employee record.
Select Skills
Upon selecting this option, the user will be presented with a form to allow them to select individual or multiple skills to be added to the employee record.
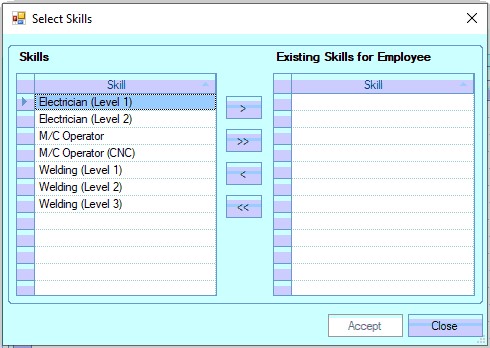
The user can use the single arrows (>, <) to transfer the selected skills on/off the employee record. The double arrows (>>, <<) will add/remove all skills.
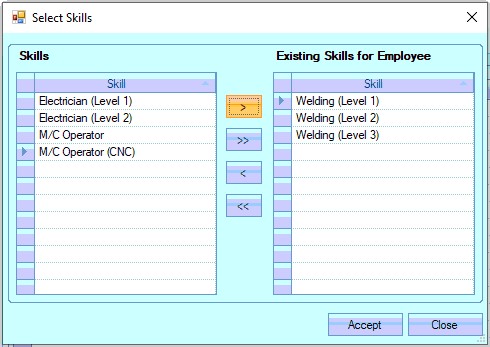
Once all the skills have been selected, the user can click ACCEPT to add/remove the skills to the employee record.
For more information on how the employee skills work with routing operations, please refer to the Inventory > Parts List section of the manual.
Time & Attendance
This section of the employee record contains details of the employee’s employment dates, their holiday entitlement as well the ability to run reports for the current and previous year’s employment.
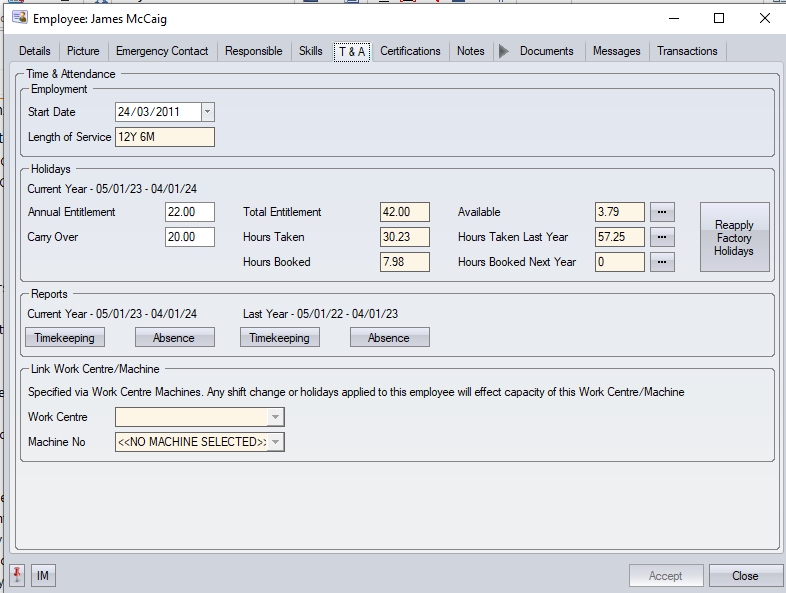
The information on this tab is as follows. The holiday information will be displayed in either hours or days depending on how the holidays are being applied in the system Admin options.

Start Date
This is the date the employee started. This field will default to the current date when a new employee is created.
Length of Service
The length of service field shows the period the employee had been employed for. This is the difference between the start date and the current date.
Terminated
This is the date the employee’s employment was terminated.
Reason
If the employee has a status of “EX”, the user will be able to record a reason for why the employee left. This field works in conjunction with the employee leaving reason list in the List Maintenance section.

Annual Entitlement
This is the number of days/hours holiday that the employee is entitled to. |This will default to the value set up in the Admin settings as the default employee entitlement value, but can be amended if necessary.
Carry Over
This field allows the user to add any holiday entitlement that’s been carried over from a previous period.
Total Entitlement
This is the total number of days/hours entitlement the employee has and is a calculated field. This is the sum of both the annual entitlement and the carry over field.
Hours/Days Taken
This shows the number of days/hours taken by the employee in the current entitlement year and is a calculated field based on the holidays recorded in the system dated before the current date.
Hours/Days Booked
This shows the number of days/hours recorded in the system in the current entitlement year and is calculated based on the holidays recorded in the system that are dated after the current date.
Available
This is the total number of days/hours the employee has left remaining from the total entitlement and is a calculated field based on the total entitlement and the hours/days taken and booked. The ![]() option to the right of the field generates the employee’s holiday report which shows all the current holidays for the current year.
option to the right of the field generates the employee’s holiday report which shows all the current holidays for the current year.
Hours/Days Taken Last Year
This shows the total number of hours/days holiday taken by the employee in the previous year. The ![]() option to the right of the field generates an employee holiday report which shows all the holidays for the previous year.
option to the right of the field generates an employee holiday report which shows all the holidays for the previous year.
Hours Booked Next Year
This shows the total number of hours/days holiday booked by the employee for the next year. The ![]() option to the right of the field generates an employee holiday report which shows all the holidays for the next year.
option to the right of the field generates an employee holiday report which shows all the holidays for the next year.
Reapply Factory Holidays
This option allows the user to apply the Factory Holidays to a new employee or reapply the factory holidays to an employee that has had them removed.

Reports - Timekeeping
The user has the option to generate a timekeeping report for both the current and previous years. This is the same report that can be generated for all employees in the T&A section of Progress.
Reports – Absence
This option allows the user to generate an Absence report for the current employee for both the current and previous years. This is the same report as the one available for all employees on the T&A screen.
Link Work Centre/Machine
If the system is configured to allow employees to be linked to a specific work centre machine, and the employe is linked named against one of the machines, the details will be displayed. The details cannot be changed here, and require the work centre to be amended, however, the system does highlight to the user that changes to the employee shifts and/or holidays will impact the capacity of the linked work centre machine.

For more information on linking employees to machines on work centres, please refer to the Maintenance > Work Centres section of the manual.
Certifications
Certifications can be recorded against each employee. This can be used to detail certifications gained by the employee, the renewal date required and any relevant documents. This can be accessed in the Certifications tab of the employee.
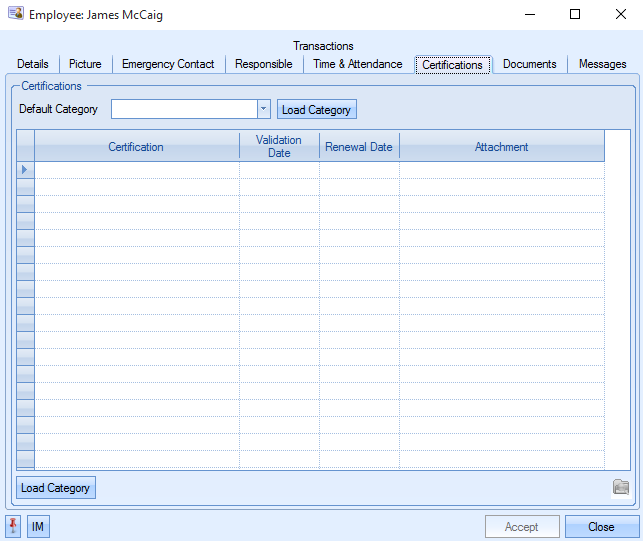
The user can select the different certifications that apply to that employee using the drop down box. This will display all certifications within Progress.
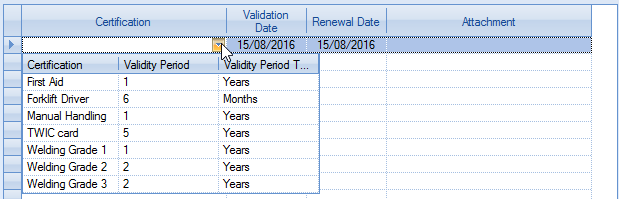
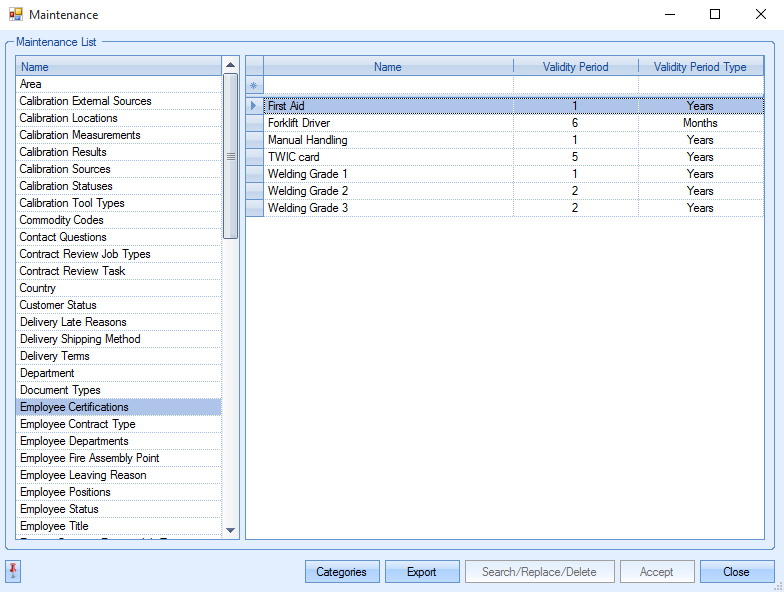
The certifications are created in the List Maintenance > Employee Certifications section of Progress.
The time that the certification is valid for is set using the Validity Period and Validity Period Type columns.
Categories allow certifications to be grouped together so that an employee can be given a group of certifications. To categorise the certifications, the user can use the Categories button.
![]()
The following screen will appear.
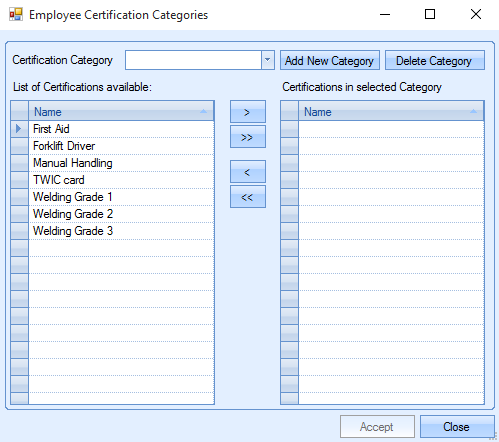
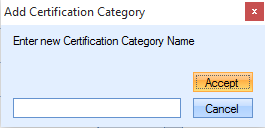
New categories can be created and deleted. Selecting Add New Category allows the user to enter a new category name.
Once this has been accepted, the user can add certification to that category by highlighting the certification and using the arrow buttons.
![]()
The single arrow will add just the highlighted certification. The double arrow will add all the available certifications to the category.
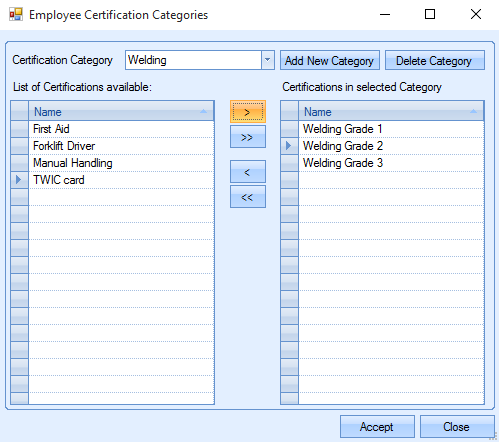
The user can select ACCEPT to confirm the changes made.
When the categories are set up the user can select the category from the drop down box in the certifications tab of the employee.

This will populate the screen as shown below. If there are already certifications against that employee, using the Load Categories will add the certifications to the list, rather than replacing the ones already there. Certifications can be deleted by highlighting the line and pressing the DELETE key on the keyboard.
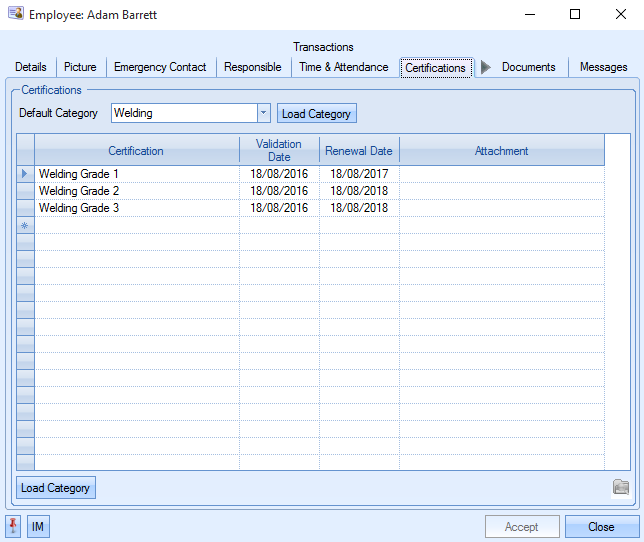
The Validation Date will default to today’s date but can be changed to suit the certification. The Renewal Date will always show the Validation Date plus the Validity period of the certification. The renewal date can only be changed by changing the Validity Period or the Validation Date.
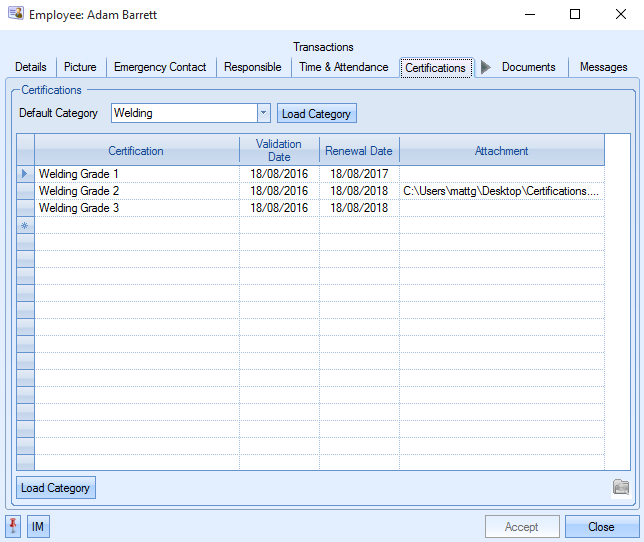
Certifications can have a related document, such as a digital copy, attached. Selecting the ![]() icon in the attachment column will display the file browser screen. A file can be selected and the open button used to attach it. Documents can be viewed by highlighting the certification and selecting the
icon in the attachment column will display the file browser screen. A file can be selected and the open button used to attach it. Documents can be viewed by highlighting the certification and selecting the ![]() icon in the bottom left corner or by double-clicking the row.
icon in the bottom left corner or by double-clicking the row.
Certifications due for Renewal
The user can view which certificates are due to expire within a certain time period. To view this the user must go to Today > To Do > Employee Certification Renewal. The following screen will appear.
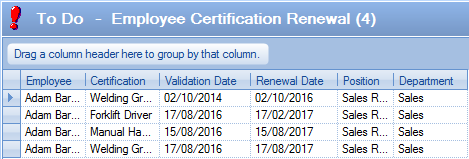
The user can change the number of days displayed by changing the DUE NO OF DAYS and selecting REFRESH.
![]()
In this example, the screen will display all certifications with a renewal date in the next 400 days. Double-clicking on any listed certification will open that employee record and display their certifications.
Employee Certification Report
The user can view information about employee certificates by running the Employee Certification report. This can be found in Reports > Misc > Employee Certification. The following screen will appear.

The user can select a renewal date, specify whether all certificates should be displayed and whether the report is grouped by employee or certificate. The user must then select the View option to display the report.

The report will display all certificates according to the data selected. The user can click on the employee to view that employee. The “Missing” column will display a tick in the box if an employee has had a category of certificates assigned to them and one has been deleted.
Notes
This section of the employee record allows additional notes to be added for reference.
Documents
The user has the ability to record/link documents against the employee record. This could be particular training records that are relevant to the employee’s position or simply general identification documents (for example, scan of passport, driving license, etc.)
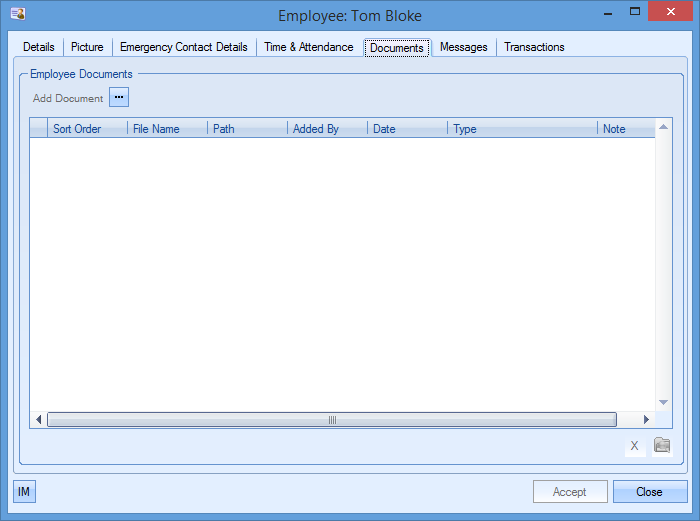
This screen works identically to all the other similar screens in Progress in that the user can add, view and delete linked files from the employee record.
To add files, the user can click on the Add Document ![]() option at the top and then select the file required.
option at the top and then select the file required.
To view any of the linked documents, the user can highlight a document and click on the View File option ![]() at the bottom right hand corner. This will open the selected file for view.
at the bottom right hand corner. This will open the selected file for view.
To delete any linked documents, the user can highlight a document and then click on the Delete option ![]() to remove the document from the record.
to remove the document from the record.
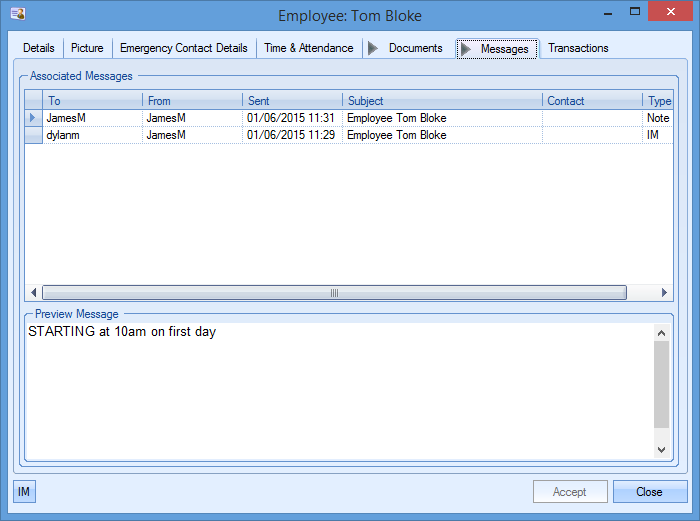
Messages
The messages section of the employee record allows the user to view any messages, notes, emails or reminders that have been linked to the employee record. These could be in relation to numerous things (discussions on a new employee’s training plan or could be related to absenteeism or timekeeping concerns) but are all visible in this one screen. Viewing any item listed here can be done by double clicking on the item in the top half of the screen. The bottom half simply shows a preview of the message.

New messages can be added to the employee’s record by clicking on the IM option ![]() at the bottom left of the employee window. This will present the user with a new IM window from which the user can select the type (email, note, instant message or reminder) and who any recipients are.
at the bottom left of the employee window. This will present the user with a new IM window from which the user can select the type (email, note, instant message or reminder) and who any recipients are.
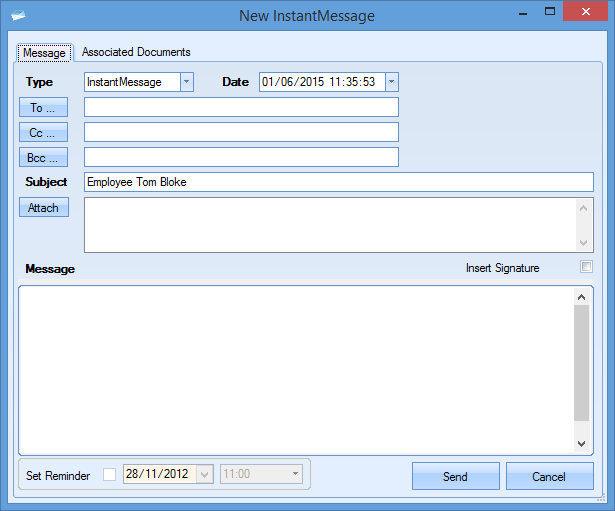
Once all the details have been entered, the user can click the SEND option to send/save. Once created, the item will be displayed in the main Messages screen.
Transactions
The transactions tab shows all the activity against the employee, along with which employee did it and the date and time of the activity. Details are also provided of what the changes were in the Details field.
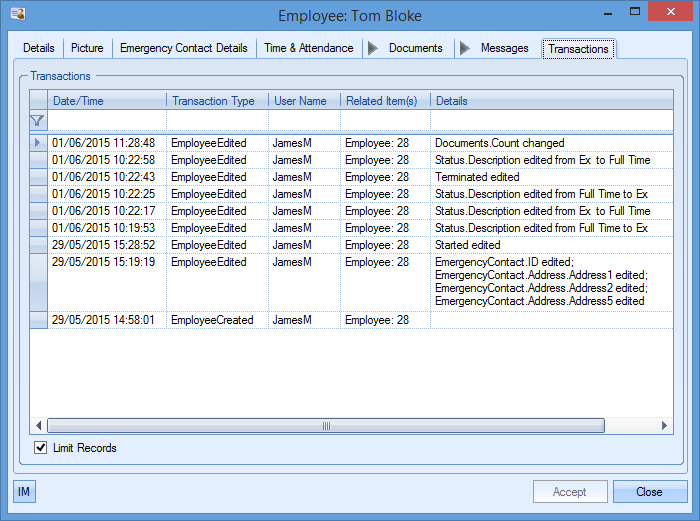
The user can also search/filter the transactions screen for particular activities using the filter row along the top of the grid.
Skills Overview
This option allows the user to amend the employee skills without the need to access the employee records themselves due to the sensitive nature of the employee information.
Clicking this option presents the user with a list of employees, their current skills, and a list of skills available to add to the employee.
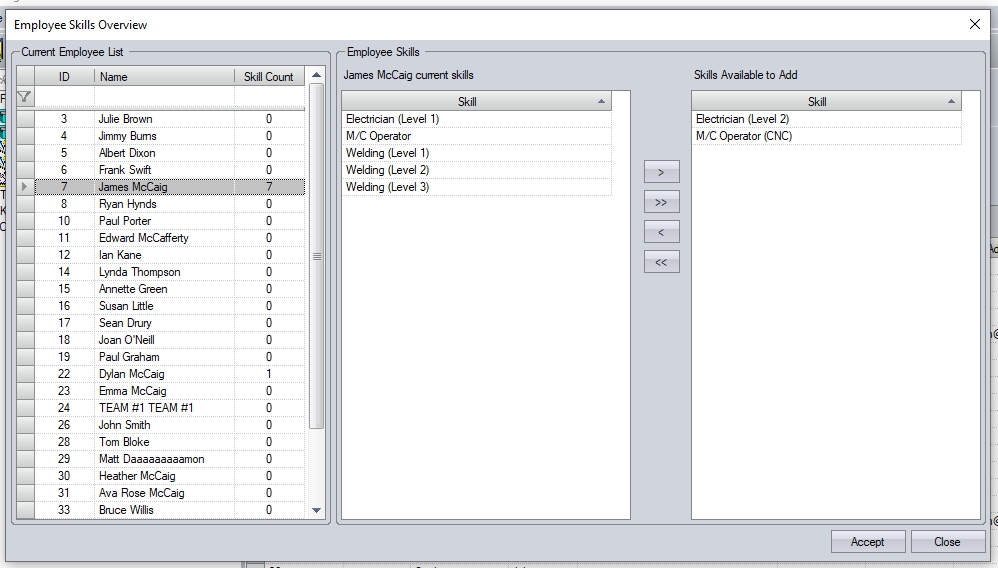
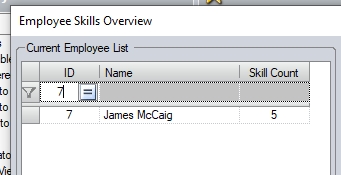
The user can select any of the employees listed to see their current skills. They can also use the filter row at the top of the list to search for employees if required.
The list of skills on the right-hand side are those that can be added to the employee's skills.
The user can select any of the current/available skills and add/remove them to/from the employee using the </> provided. They can also use the <</>> options to add/remove all skills to/from an employee.
Once the employee's skills have been amended as required, the user clicks ACCEPT to save the changes.
Certification Overview
This option allows the user to amend the employee certifications without the need to access the employee records themselves due to the sensitive nature of the employee information.
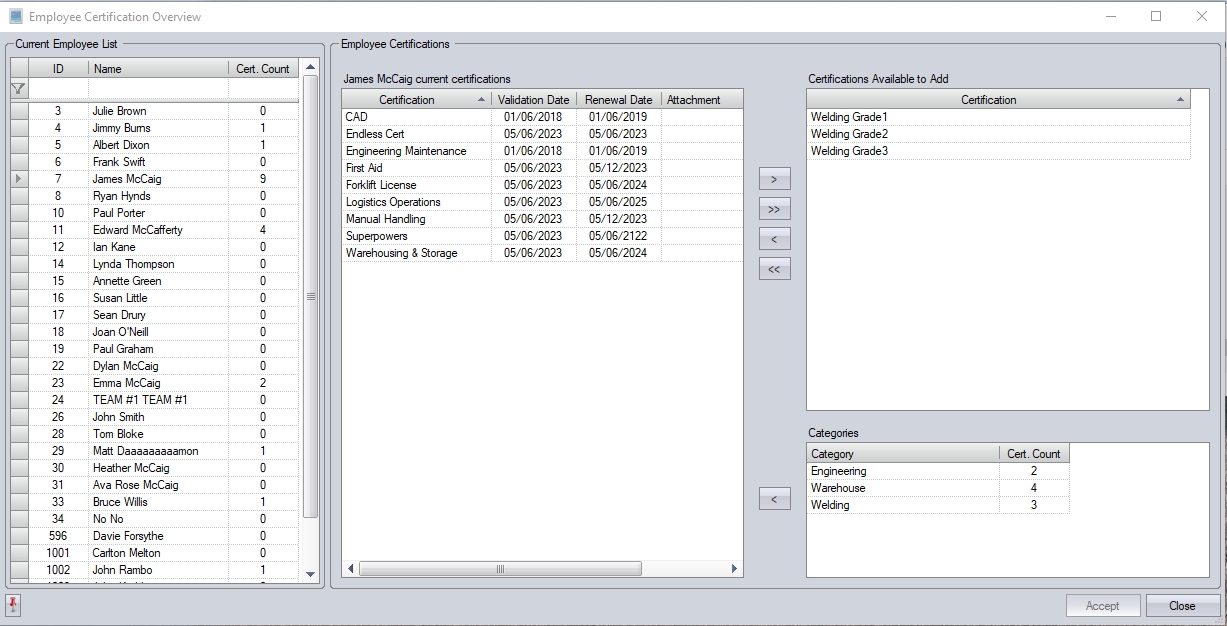
Clicking this option presents the user with a list of employees, their current certifications, and a list of certifications available to add to the employee. Also listed is a list of certification groups that can be assigned (if used).
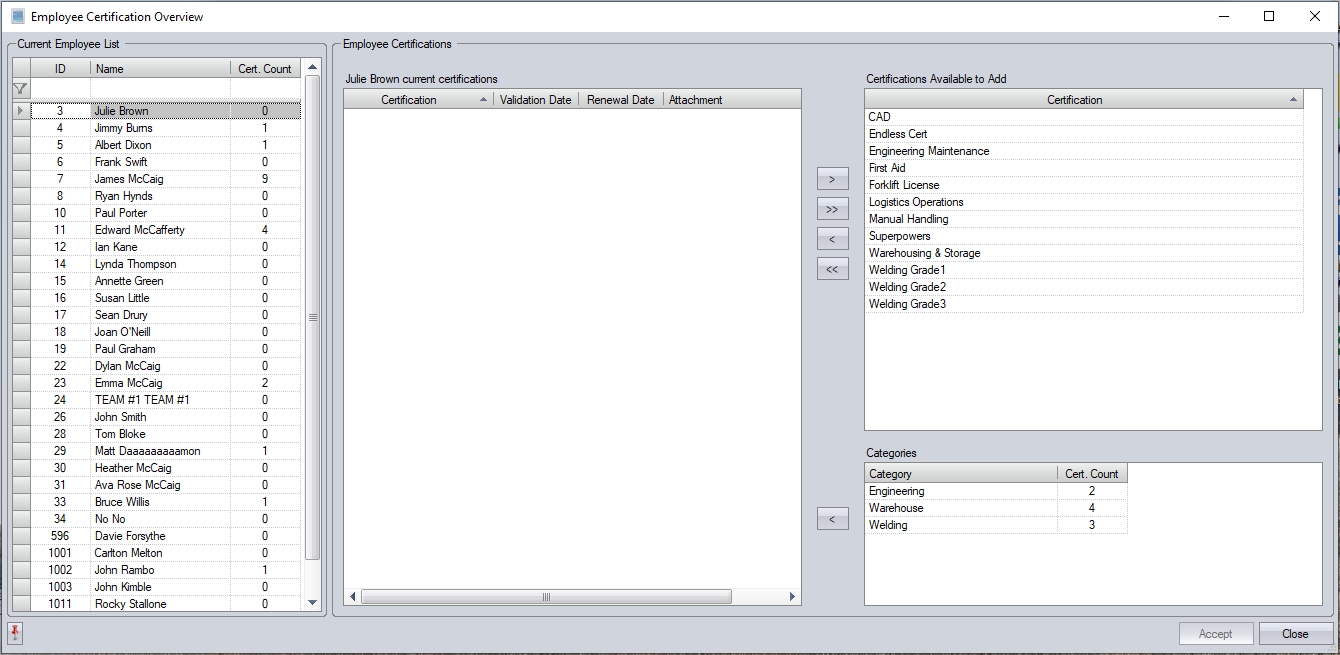
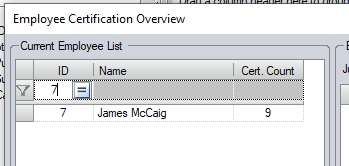
The user can select any of the employees listed to see their current skills. They can also use the filter row at the top of the list to search for employees if required.
The list of individual certifications on the right-hand side are those that can be added to the employees. Any certification groups are also listed. These allow groups of individual certifications to be added together.
For more information on setting up certification groups, please refer to the Maintenance > List Maintenance section of the manual.
To amend the employees certification records, the user can add/remove the individual certifications by selecting an existing employee skill or one they wish to add using the </> arrows. The user can also add/remove all certifications using the <</>> options.
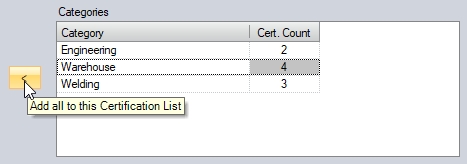
If certification categories are being used, the user can select the category to be added to the employee and click the < option to add the associated certifications to the employee.
Once the employee's certifications have been amended as required, the user clicks ACCEPT to save the changes.
SFDC Security Level Overview
This option allows the user to amend the employee SFDC security without the need to access the employee records themselves due to the sensitive nature of the employee information.
The security levels for the individual SFDC options are all set in the Admin section of Progress, under the SFDC system options.
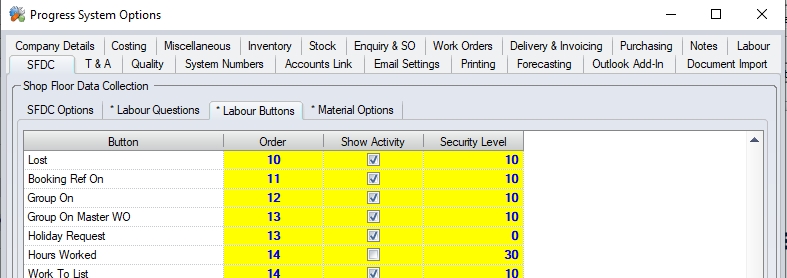
(SFDC Labour security levels)
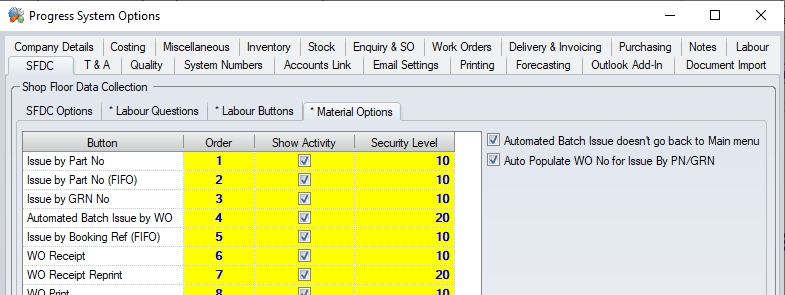
(SFDC Material security levels)
NOTE: If SFDC security levels are not in use, then all employees and the individual SFDC options will have a default security level of 0 (shown below). Anything other than 0 against the SFDC options will initiate the security validation and restrict any option with a level higher than the employees.
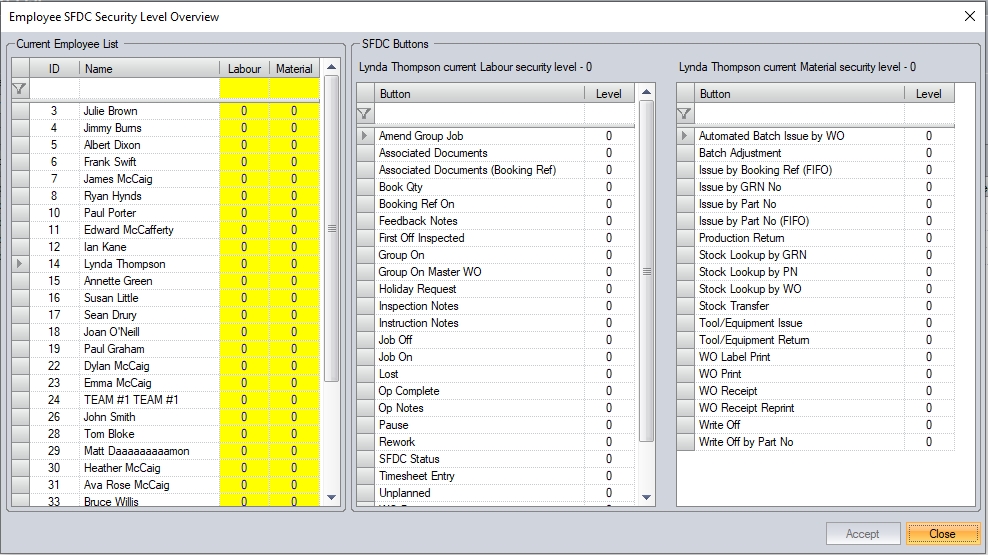
If the SFDC security levels are in use, clicking this option presents the user with a list of employees, their current security levels for the SFDC Labour and Material options, and a list of the SFDC Labour and Material options and their assigned security level. Selecting an employee highlights the options the user has access to, and shows those outwith their security level in grey. This allows the user to easily identify the options available to the employee.
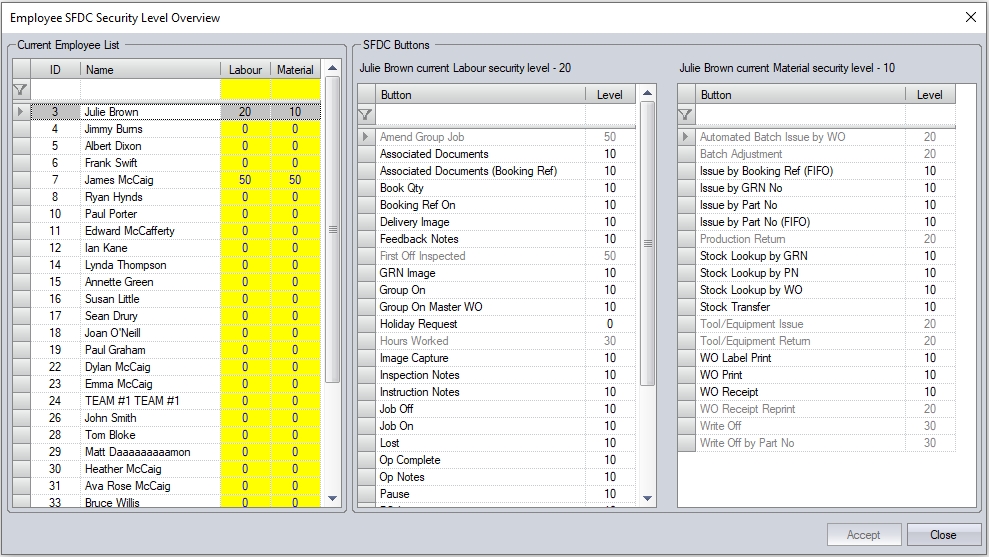
The user can amend an employee's security levels from this screen by amending the values in the yellow fields for Labour and Material. Making changes to the values will update the options available for the user.
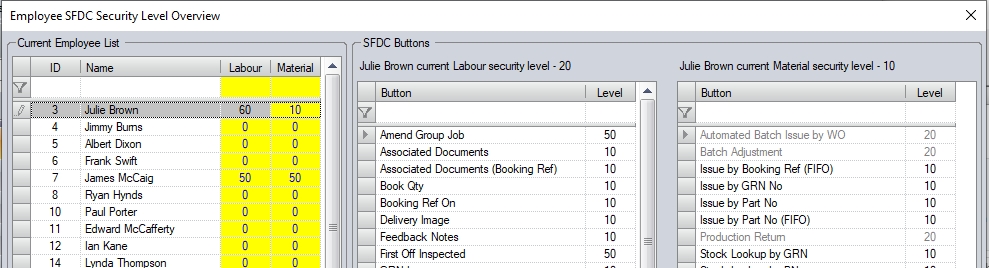
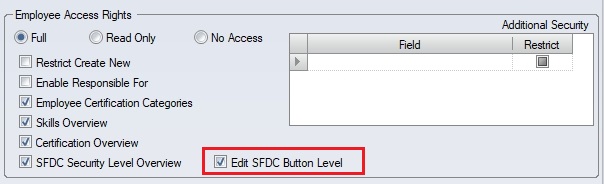
If the user has elevated permissions, they may also be able to amend the security level of the individual SFDC options from this screen too. This requires the ability to edit the security levels of the individual options, and is set against their user permissions.

Once the user has made the relevant changes to the employee(s), and/or option security levels, they can click ACCEPT to save the changes.