This section determines different options that are used mainly within the Customers and Today sections of the system and relate to the entry and control of delivery notes and invoices for sales orders.
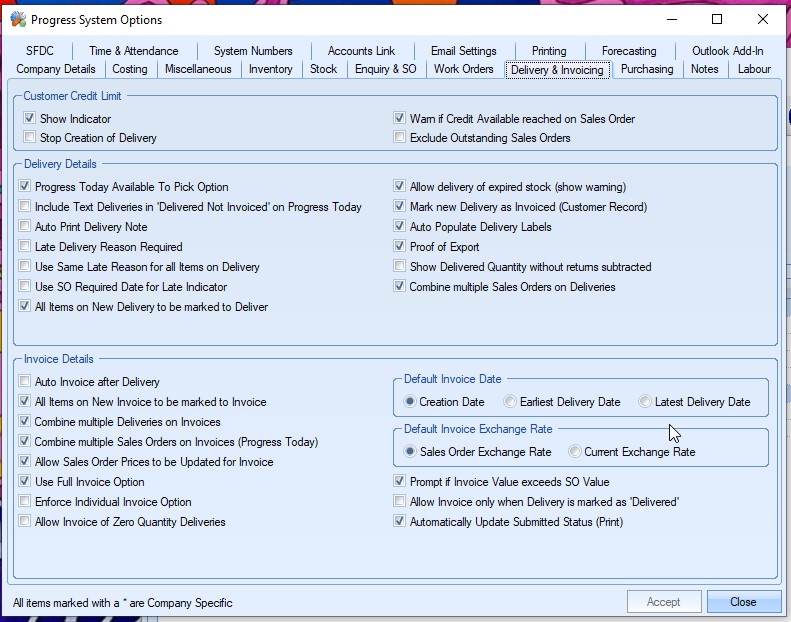
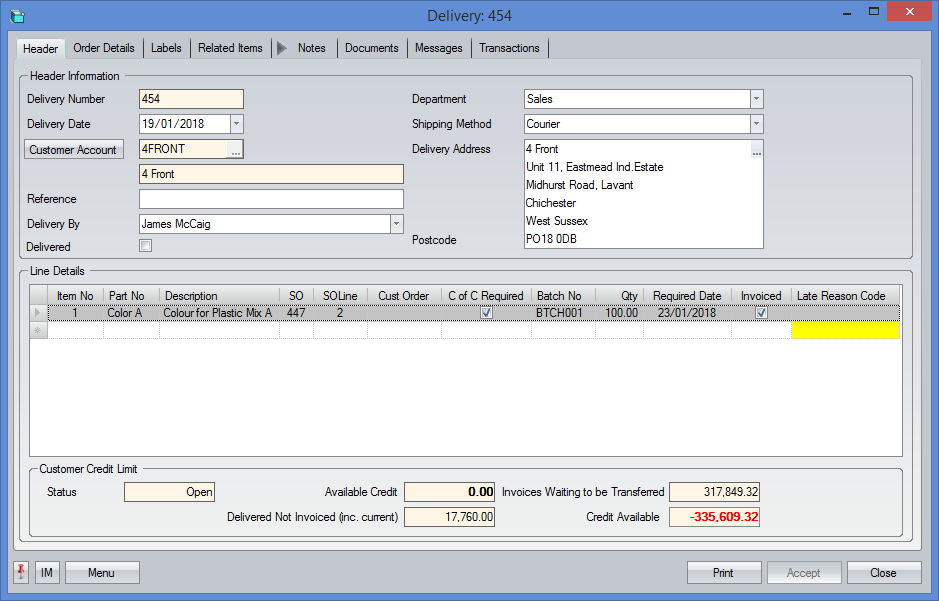
Customer Credit Limit Options
These options determine how the customer credit limit

Show Indicator
This option allows the user to specify whether the customer credit limit details are displayed at the foot of the delivery.

Stop Creation of Delivery
This option determines whether the user is able to create the a new delivery if the customer has exceeded their credit limit.
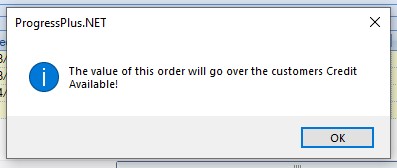
Warn if Credit Available Reached on Sales Order
This option will highlight to the user if the customer has reached their credit limit when the sales order is saved. The user will see the following warning to highlight this.
Exclude Outstanding Sales Order
This option works alongside the warning above and allows the system to exclude existing outstanding sales order value from the credit limit check when adding a new sales order. This will then only compare the current delivery value against the Credit Available value instead of including all other outstanding sales order values.
Delivery Details Options
These options allow the user to determine which delivery options are applied to the system.
Progress Today Available To Pick Option
This option determines whether the AVAILABLE TO PICK option is shown on the Today > To Do screen. This option introduces an additional step prior to delivery which allows the users to indicate that items have been picked and prepared for delivery. If this option is switched on, then the items must be picked after allocation before they can be delivered; when switched off, the goods can be delivered immediately after being allocated.
Include Text Deliveries in 'Delivered Not Invoiced' On Progress Today
This option determines whether text delivery items (i.e. no part numbers) are included on the Today > To Do > Delivered Not Invoiced screen.
Auto Print Delivery Note
This option permits a Delivery Note created via the Customers or Today sections to be automatically printed off on creation without the user having to press the Print button on the screen.
Late Delivery Reason Required/Use Same Late Reason For All Items On Delivery
On sales orders that should have been delivered to the customer before today with this facility activated the user must choose from a list of reasons created within the Maintenance section of why the goods are going out late.
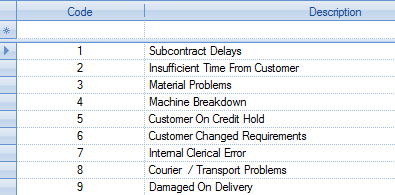
This diagram contains examples of the type of reasons that the user may wish to enter into the List Maintenance: Delivery Late Reasons section that is maintained within the Maintenance area.
There is no limit to the number of late reasons the user can enter into this form. With this option activated the user must choose a reason from the list before the delivery note can be created.
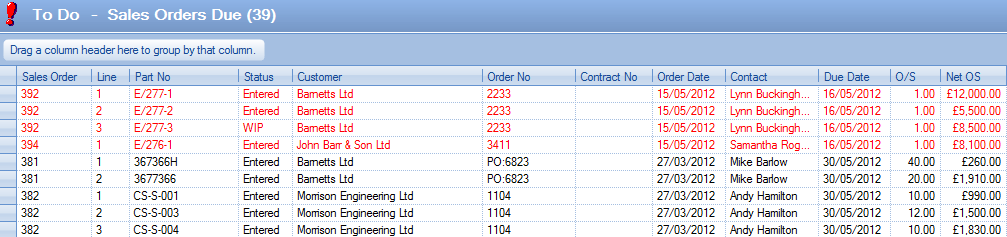
Sales Orders that have exceeded their required with be highlighted in red on forms such as the To Do – Sales Order Due or Available To Deliver screens within the Today section as well as being highlighted in the Delivery entry screen itself.
With this option activated if the user should try and create a delivery note for an item that is late going to the customer a screen similar to the following will be displayed.
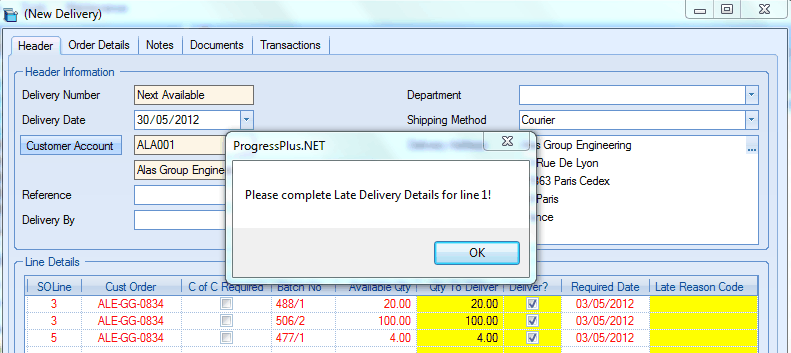
After the user has selected a late delivery reason in the Late Reason Code field for all affected lines the delivery note can be saved.
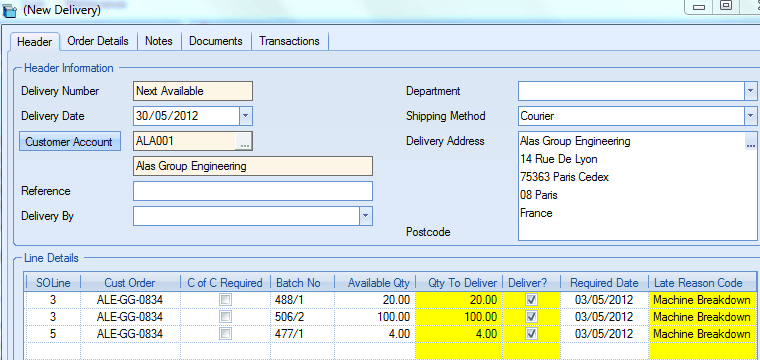
The Use Same Late Delivery all items on Delivery option when activated will automatically complete the Late Reason Code field on a new delivery with the same reason for all affected lines though the user can choose to amend the reasons on a line by line basis if desired.
The All items on New Delivery to be marked to Deliver option when activated will automatically tick the Deliver? field (as in the above diagram) against all lines on a new delivery to indicate that the line is to be included on this delivery note though the user can choose to amend this on a line by line basis.
Use SO Required Date for Late Indicator
This option allows the user to set which date is used when measuring whether a delivery is late or not. With this option ticked, the system will use the SO line Required Date value; with this option unticked, the system will measure it based on the Promised Date value.
All Items On New Delivery To Be Marked To Deliver
This option determines whether all items on a new delivery are automatically ticked to be included on the new delivery.

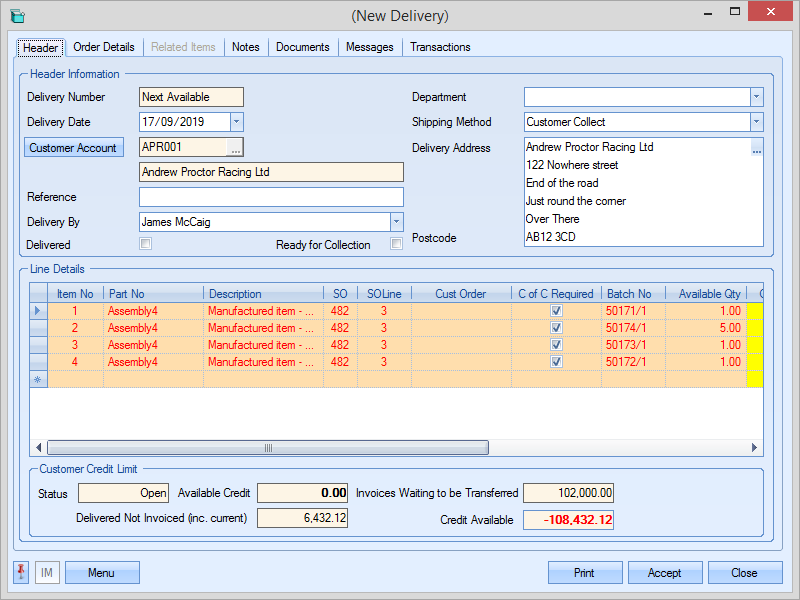
Combine Multiple Sales Orders On Deliveries
In the scenario that the user has a number of different sales orders to be delivered to the same customer at the same address this facility can permit the user to combine these different orders onto the one delivery note. This option is not suitable for all users as some customers may insist on having separate delivery notes for each order.
In the following example on the To Do – Available to Deliver All screen within the Today section there a number of different sales order items that require to be delivered to a customer – Dorset Racing Sports Ltd.
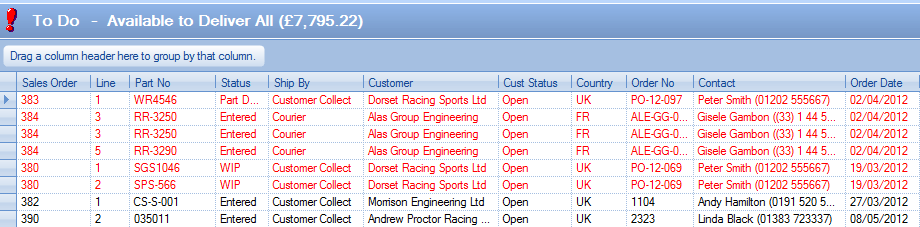
With the Combine Multiple Sales Orders On Deliveries option activated by clicking on anyone of the lines that require to be delivered to Dorset Racing Sports Ltd will bring through all available items into the new Delivery form regardless of what sales order they are required for as shown in the following example.
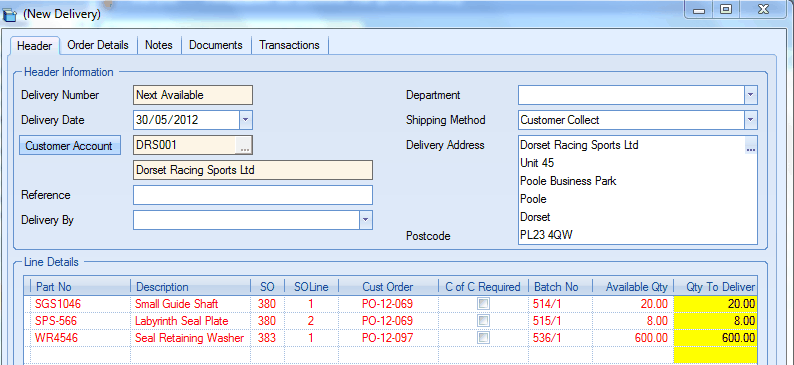
The user can still choose what lines and quantities are required to be delivered on this delivery on a line by line basis.
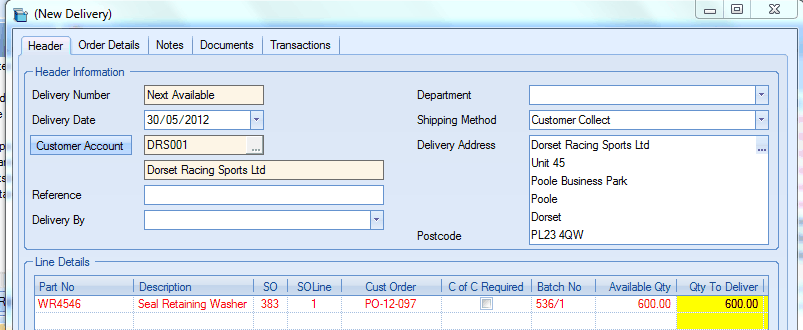
With the Combine Multiple Sales Orders On Deliveries option disabled clicking on anyone of the lines that require to be delivered to Dorset Racing Sports Ltd will only bring through all available items into the new Delivery form that are related to the sales order chosen as shown in the following example.
Show Delivered Quantity without returns subtracted
This option deals with the way a delivery that has had a customer return processed against is displayed on screen when viewing previously created deliveries in the Customers section. This option does not recalculate any fields on the delivery but will display information in a different way. This is option is merely down to the user’s own preference.
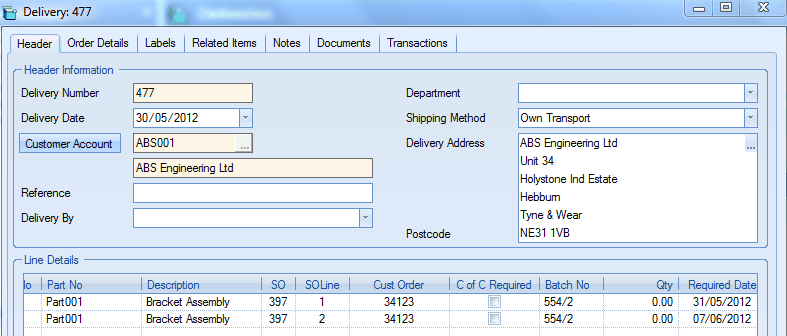
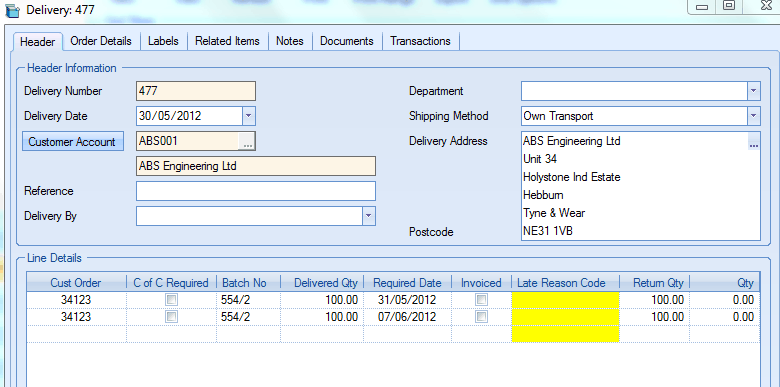
In the following example a Delivery (No.477) has been created for a customer. This delivery contained 2 lines, each for a quantity of 100 items. Both of these lines were subsequently fully returned from the customer so therefore a net Qty of 0 was delivered against each line.
With the Show Delivered Quantity without returns subtracted option not activated the system would display only the net Qty delivered.
With the Show Delivered Quantity without returns subtracted option activated the system would display more information regarding this delivery namely, the original Delivered Qty, Return Qty and the net Qty delivered.
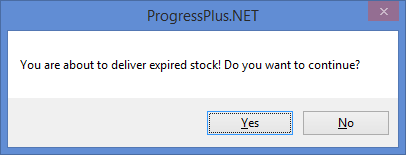
Allow Delivery Of Expired Stock (show warning)
If stock is configured to use expiration dates/perishable stock, there can be instances where expired stock needs to be shipped. This could be at a reduced price as its still useable or could be for disposal purposes. Typically deliveries cannot be created for perishable stock which has expired, however with this option ticked, this will allow deliveries to be created after a warning is displayed to highlight this to the user.
Mark New Delivery As Invoiced (Customer Record)
This option allows new deliveries to automatically be marked as invoiced. This option would typically be used by companies who are not using Progress to generate their invoices. This tickbox makes available an option on the customer record (Defaults tab) to allow the user to specify whether an invoice is to be raised for new deliveries for specific customer.
This would typically be used for inter-company orders - where sales order and deliveries must be generated, but no invoicing will take place. When a new delivery is created for a customer which has this option applied, the INVOICED option is automatically ticked. This stops the system flagging the delivery for invoicing.
Auto Populate Delivery Labels
This option automatically populates the LABELS tab of a new delivery with one label for each delivery line, for the full quantity. The example below shows this.
Upon clicking ACCEPT to create the delivery, the LABEL tab appears and populates as follows:
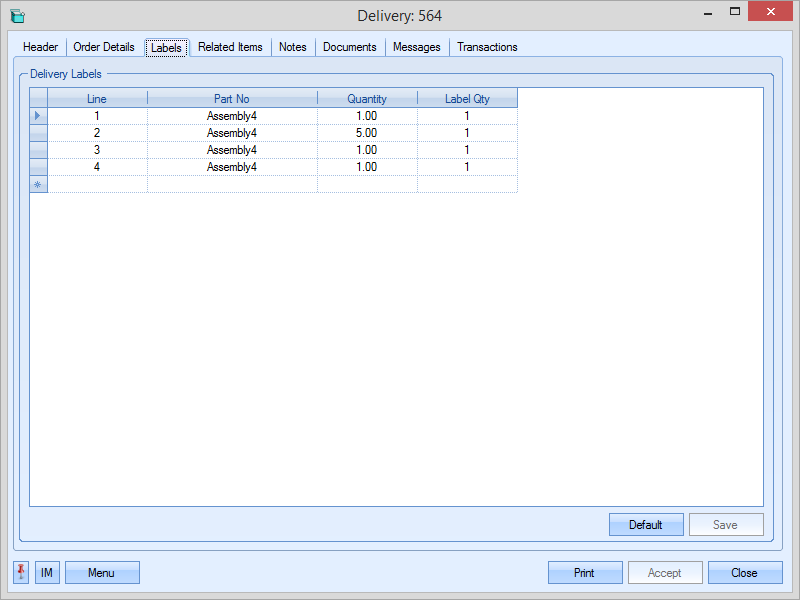
The user can still make further adjustments to the label quantities and the number of labels if required.
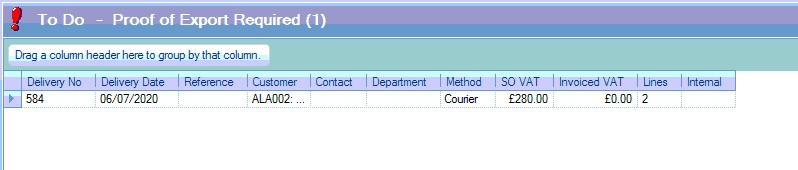
Proof Of Export (POE)
This option switches on some additional functionality relating to proof of export for sales orders. This option adds the following to the system:
•POE Required flag against the sales order header. This allows the user to indicate that a proof of export is required for the sales order in question.
![]()
•POE Required and POE Received flags on the delivery header. The POE Required is to indicate that a POE is required for this order and reflects the POE Required flag on the SO header. The POE Received flag is manually updated by the user once POE has been received.
![]()
•Additional Proof Of Export Required screen added to the Today > To Do section of Progress showing all deliveries that are awaiting confirmation that a POE has been received.
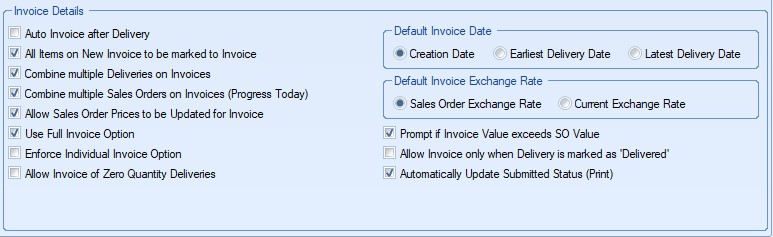
Invoice Details Options
These options relate to the manner in which progress plus will deal with the creation of invoices after a delivery note has been raised.
Auto Invoice After Delivery
This option permits the user to raise an Invoice immediately after a Delivery Note has been created. If this option is activated after a delivery note has been created the New Invoice screen will appear.
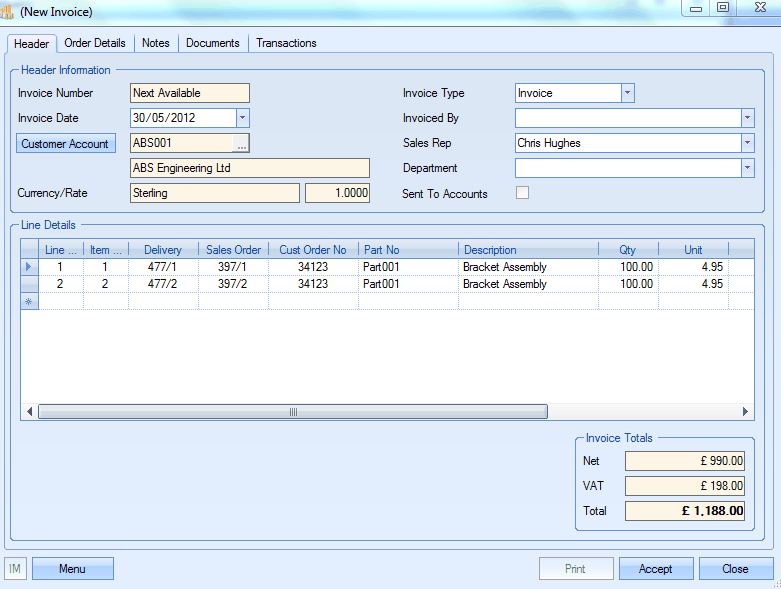
The user can however simply click the Close button at the bottom of this screen if the invoice does not require to be raised at this moment in time. The delivery can then be invoiced at a later date via the Today or Customers section. For more information regarding Invoicing please refer to the relevant sections of the Customers and Today manual.
All Items On New Invoice To Be Marked To Invoice
The All items on New Invoice to be marked to Invoice option when activated will automatically tick the Invoice? field (as shown in the following diagram) against all lines on a new invoice to indicate that the line is to be included on this invoice though the user can choose to amend this on a line by line basis.
Combine Multiple Deliveries On Invoices
In the scenario that the user has a number of different deliveries to be invoiced to the same customer this facility can permit the user to combine these different deliveries onto the one invoice. This option is not suitable for all users as some customers may insist on having a separate invoice for each delivery.
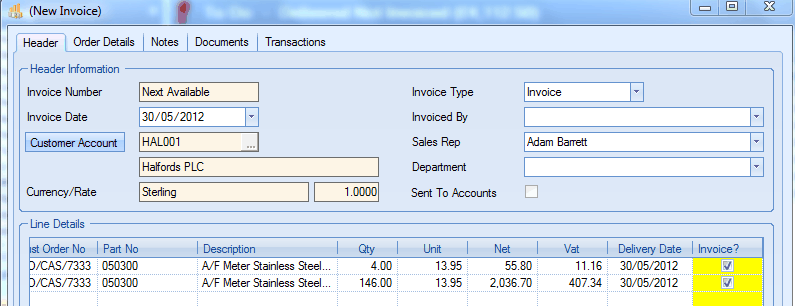
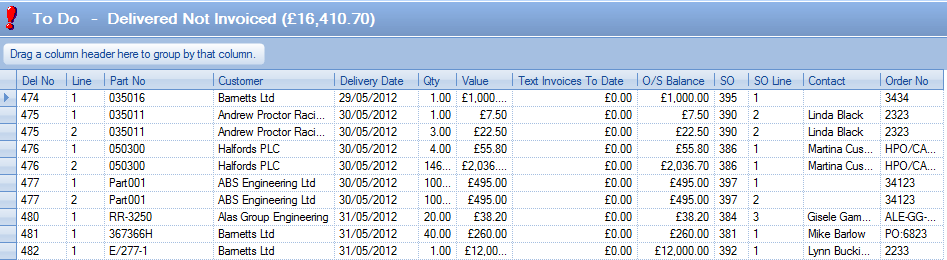
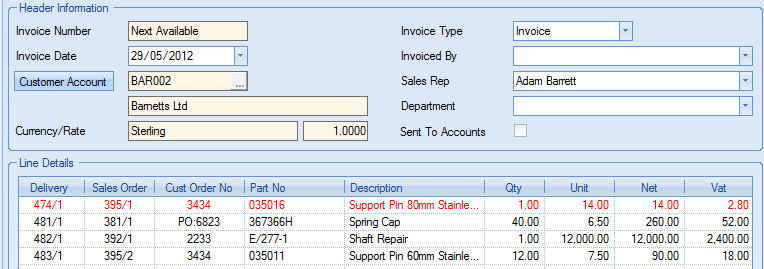
In the following example on the To Do – Delivered Not Invoiced screen within the Today section there a number of different deliveries that require to be invoiced to a customer – Barnetts Ltd.
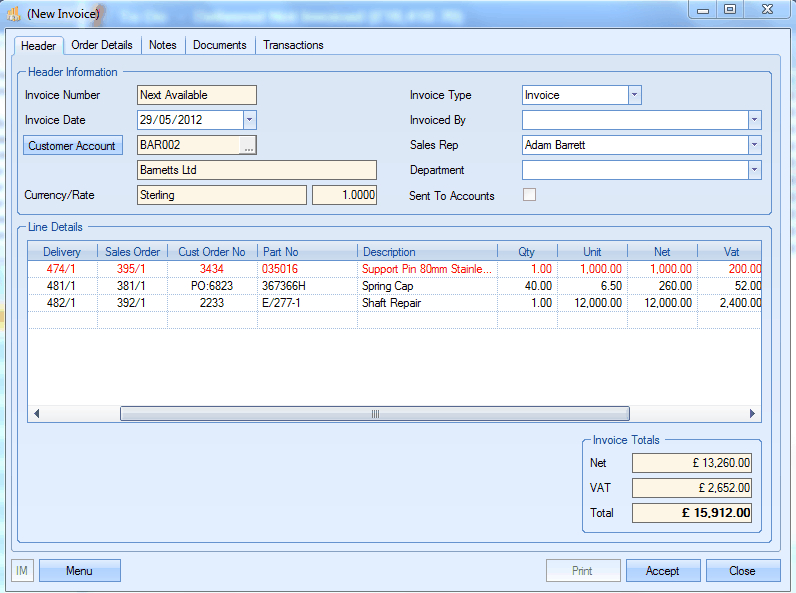
With the Combine Multiple Deliveries On Invoices option activated by clicking on anyone of the lines that require to be invoiced to Barnetts Ltd will bring through all available items into the new Invoice form regardless of what delivery note they were raised on or what sales order they are required for as shown in the following example.
The user can still choose what lines are to be invoiced together on this invoice on a line by line basis by ticking / unticking the Invoice? field as required.
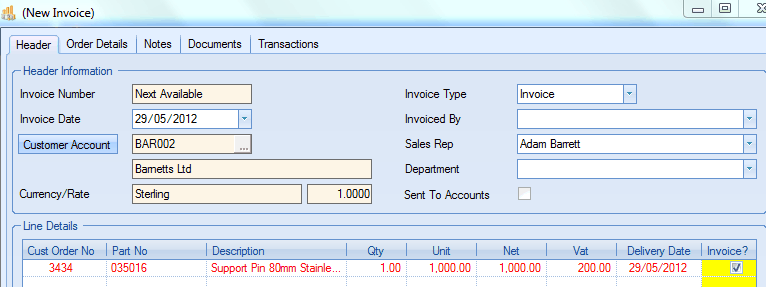
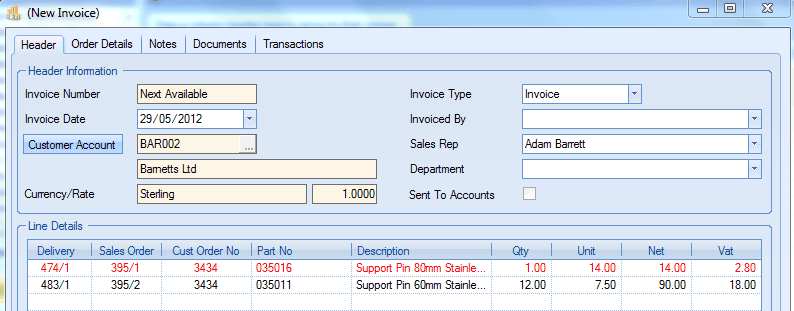
With the Combine Multiple Deliveries On Invoices option disabled clicking on anyone of the lines that require to be invoiced to Barnetts Ltd will only bring through items on the selected delivery note into the new Invoice form as shown in the following example.
Combine Multiple Sales Orders On Invoices (Progress Today)
This facility permits the user to combine multiple deliveries for a customer onto an invoice but limit this choice to deliveries raised for the same sales order. In the following example on the To Do – Delivered Not Invoiced screen within the Today section there a number of different deliveries that require to be invoiced to a customer – Barnetts Ltd.

With the Combine Sales Orders On Invoices (Progress Today) option activated by clicking on anyone of the lines that require to be invoiced to Barnetts Ltd will bring through all available items into the new Invoice form regardless of what delivery note they were raised on or what sales order they are required for – similar to what can be achieved with the previously described Combine Multiple Deliveries On Invoices option.
The user can still choose what lines are to be invoiced together on this invoice on a line by line basis by ticking / unticking the Invoice? field as required.
With the Combine Sales Orders On Invoices (Progress Today) option disabled clicking on anyone of the lines that require to be invoiced to Barnetts Ltd will only bring through delivery note items related to the selected sales order into the new Invoice form as shown in the following example.
The user can still choose what lines are to be invoiced together on this invoice on a line by line basis by ticking / unticking the Invoice? field as required.
For more information regarding Invoicing please refer to the relevant sections of the Customers and Today manual.
Allow Sales Order Prices to be Updated for Invoice
This facility permits the user to amend the sales order prices that is to be charged to a customer from the Invoice screen without the need to return to the Sales Order screen and update the prices in the normal manner.
In the following example there is a delivery to be invoiced. The current Unit price for the items being sold as previously entered on Sales Order 390 is 7.50.
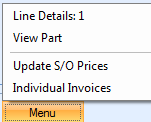
The user may however choose to amend this 7.50 charge to an alternative value. This can be achieved by clicking onto the Menu button at the bottom of the screen and choosing the Update S/O Prices option.
A screen similar to the following would be displayed permitting the user to enter a New Unit Price that will be charged for the selected lines.

For more information regarding Invoicing please refer to the relevant sections of the Customers manual.
Use Full Invoice Option
On a sales order that all items on the order must be invoiced together (no part invoices) the Use Full Invoice Option can stop invoices for individual deliveries for this order less than the full amount being raised in error.
A customer can have the Full Invoice option turned on as a default setting by clicking onto the required field available in the Defaults tab within the record in the Customers section or can choose to apply the Full Invoice option on an order by order basis.

In the following example a Sales Order has been entered via the Customers section of progress plus.
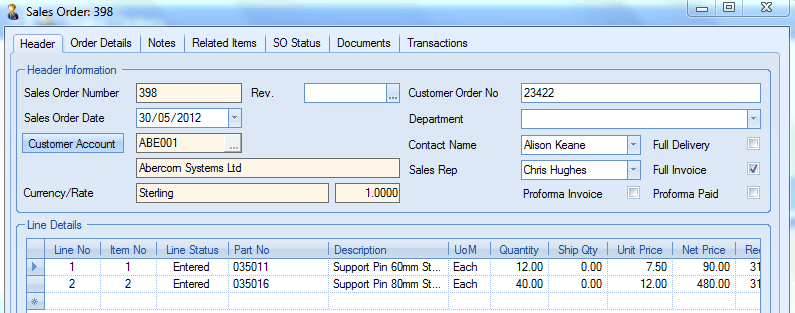
There are 2 lines on the sales order. Line 1 is for a quantity of 12 of a product, line 2 is for a different item and a quantity of 40.
If the user requires that both lines on this order must be invoiced together for the full quantity required on each line then the user could click onto the Full Invoice option on the form header as shown above.
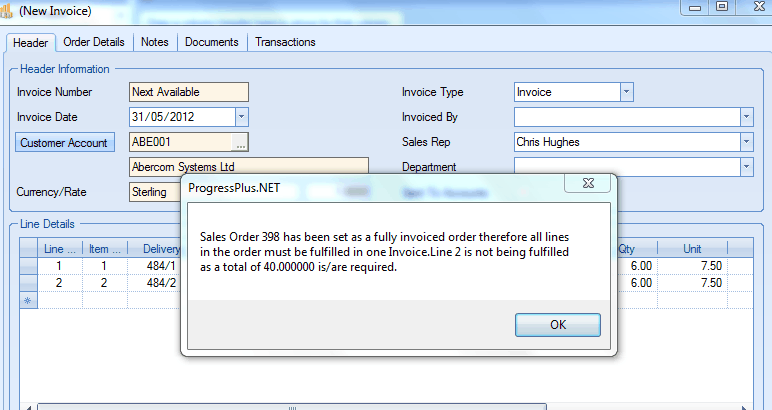
If the user should try to create an invoice for a sales order which has a full invoice requirement a message similar to the following detailing any shortages would be displayed to the user if the full order is not available for invoicing at this moment in time.
Allow Invoice Of Zero Quantity Deliveries
This setting determines if deliveries that have been made to customers but have subsequently been fully returned appear on the To Do - Delivered Not Invoiced screen within the Today section. In the following example a delivery note has been raised for a quantity of 20 items.
If these items should be returned by the customer and have not yet been invoiced with this option unselected (normally the preferred setting) the delivery note will not be displayed as waiting to be invoiced.

With option activated details of the delivery will be shown on the To Do - Delivered Not Invoiced screen.
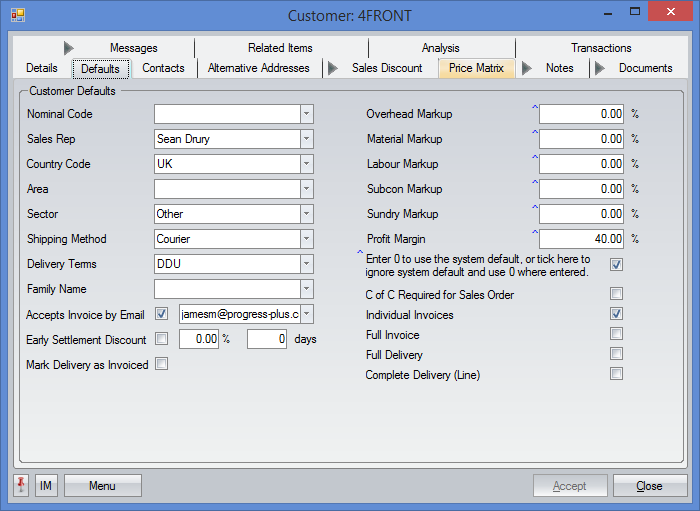
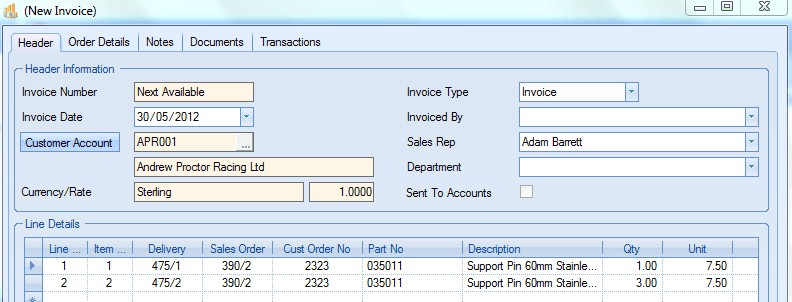
Enforce Individual Invoice Option
A customer if required can have the Individual Invoices option turned on as a default setting by clicking onto the required field available in the Defaults tab within the record in the Customers section if they require a separate invoice every time for each items on a delivery note. The Enforce Individual Invoice Option will ensure that this setting is used for the customer for every sales order. The user can still choose to raise individual invoices for items on a delivery note on delivery by delivery basis if required without having a default setting against the customer.
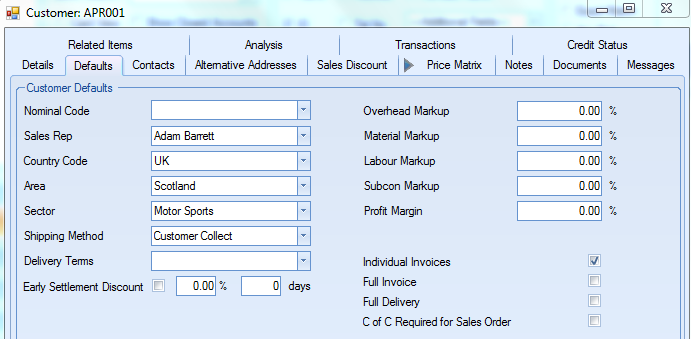
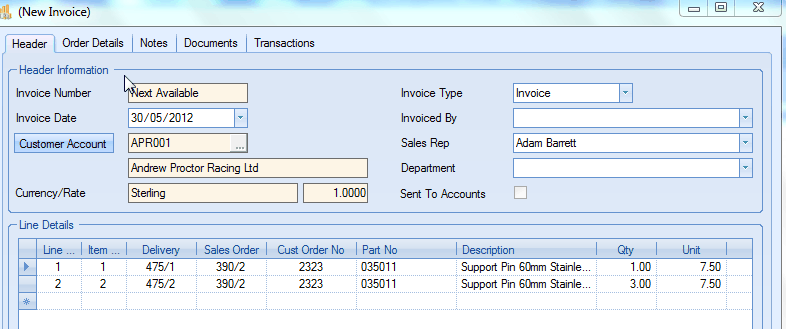
In the following example a Delivery Note (No.475) has been raised been and is required to be invoiced. The customer in question – Andrew Proctor Racing Ltd – has had the Individual Invoices option ticked in their customer default settings as shown in the above diagram.
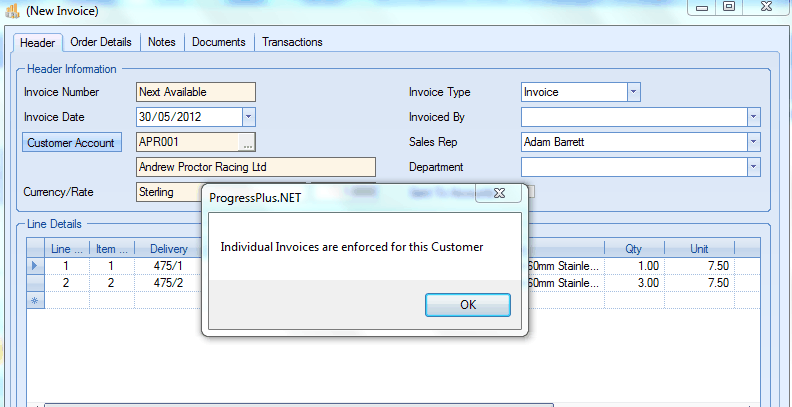
When the user tries to create an invoice for this delivery a message will appear similar to that shown in the following diagram.
The user must click on the OK button to continue. A further message box will appear asking the user if he or she wishes to create individual invoices for this delivery.
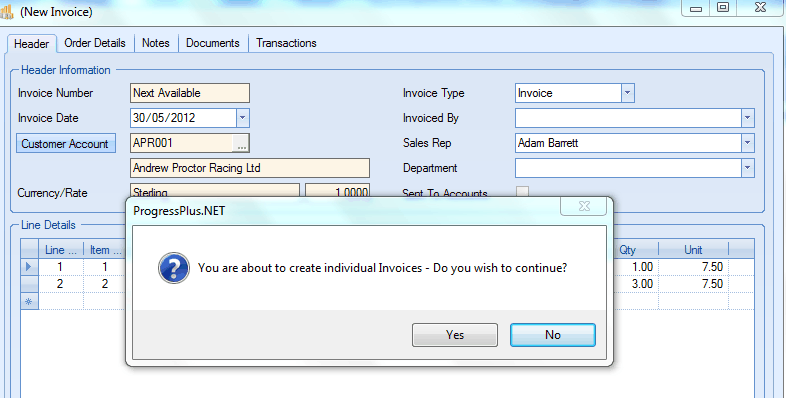
Clicking Yes to this message will in this instance create 2 separate invoices for this delivery.
Prompt If Invoice Value Exceeds SO Value
This option will allow the system to generate a message to indicate that the invoice value if greater than the SO line value.
Allow Invoice only when Delivery is marked as "Delivered"
This option stops creation of an invoice is the associated delivery has not had its DELIVERED tick box updated to confirm delivery.
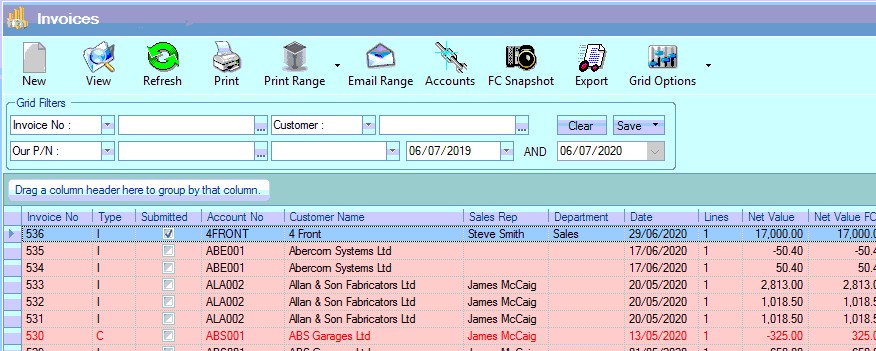
Automatically Update Submitted Status (Print)
This option allows the user to determine whether the SUBMITTED flag on the invoice is automatically populated when the invoice is printed, emailed or previewed. With this option ticked, printing the invoice, even just to preview it, will mark the invoice itself as "submitted" and will update the flag and set the date. An example is shown below.
(Before Print: SUBMITTED flag is unticked)
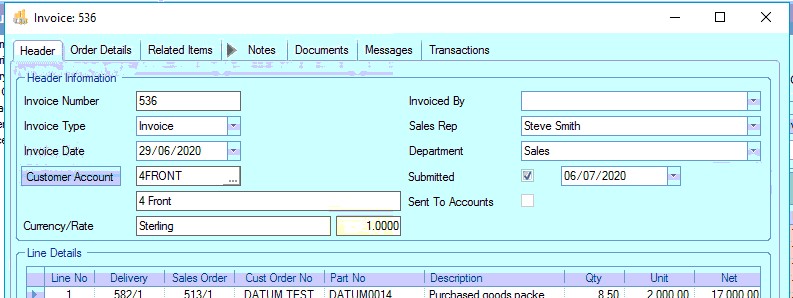
(After Print: SUBMITTED flag ticked and the date set)
If the user is likely to want to preview the invoice prior to sending, then you may want to consider leaving this option unticked. Leaving this option unticked would require the user to manually update the SUBMITTED flag. This approach may be preferred so the invoice is only marked as "submitted" when the invoice has been physically sent or emailed to the customer. This would allow the user to preview the invoice as many times as they like.
The SUBMITTED flag is also included on the main Invoice Browse screen which is useful for seeing which invoices have been submitted at a glance.
Default Invoice Date
This option allows the user to set what the default date will be on new invoices. The user has three options as shown below.

Creation Date This is the date the invoice is created
Earliest Delivery Date In the case where multiple deliveries have been made against the SO line(s), the earliest delivery date will be used
Latest Delivery Date In the case where multiple deliveries have been made against the SO line(s), the latest delivery date will be used
Default Invoice Exchange Rate
This option determines what exchange rate the system uses when new invoices are created. The user has two options to choose from.

Sales Order Exchange Rate This will default the invoice exchange rate to that of the associated sales order
Current Exchange Rate This will default the invoice exchange rate to that of the current rate in the system
For more information regarding Invoicing please refer to the relevant section of the Customers manual.