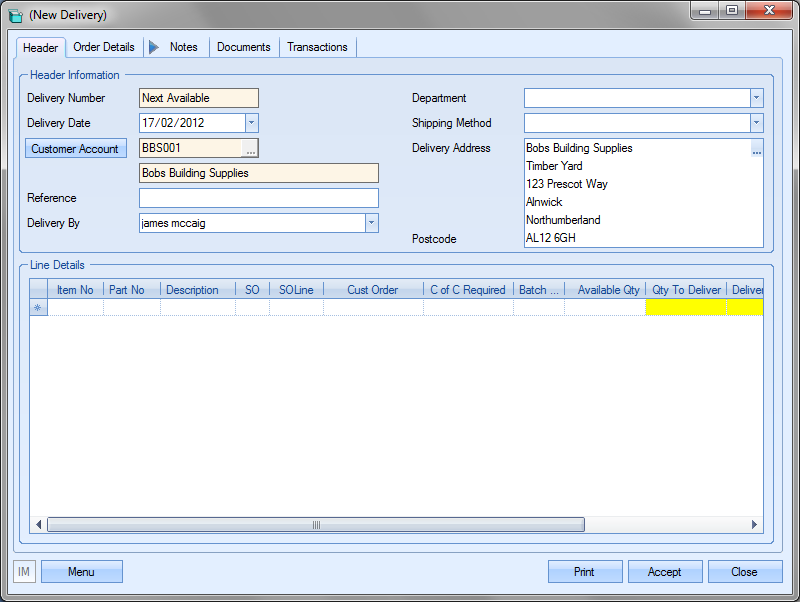
This section allows the user to create and view deliveries against customer orders. When the user selects the Deliveries option within the Customer section of Progress, they are presented with a screen similar to that shown below.
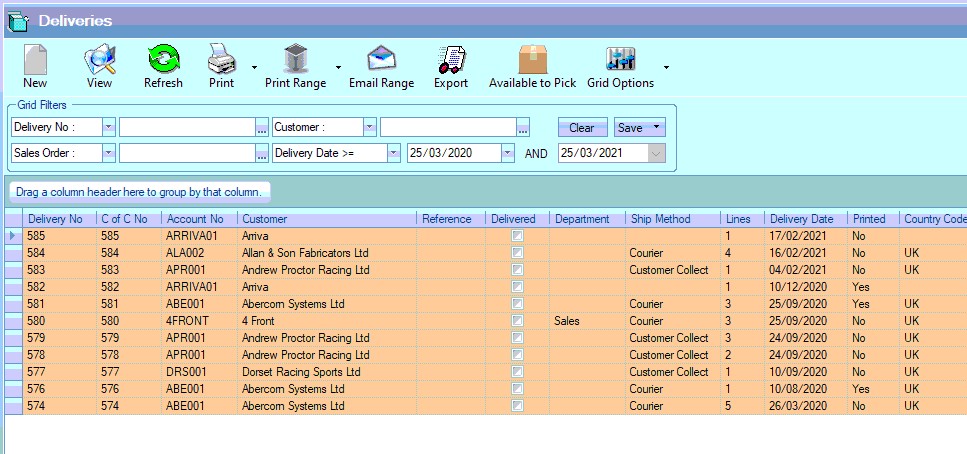
This screen will show all deliveries currently in Progress. The total number of deliveries listed is shown at the bottom. This total is the number of deliveries listed based on the current filters. If no filters have been applied then Progress will show the last X number of records where X is the value in the Limit Records box at the bottom.
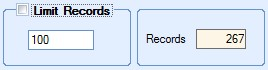
If the Limit Records option is not ticked, then all existing deliveries will be displayed. The user can filter the listed using the grid filters displayed at the top of the screen.

The user can filter this screen by selecting the appropriate filter from the drop-down list and then entering the value required. Clicking the REFRESH option at the top will then refresh the list of deliveries based on the filters entered as shown in the next screen.

View
If the user wishes to see the content of any delivery record listed on screen, the user simply has to highlight the record in question and then click the View option at the top of the screen. This will open the delivery for the user to see. Alternatively, double clicking on the required record in the grid will also open the delivery.
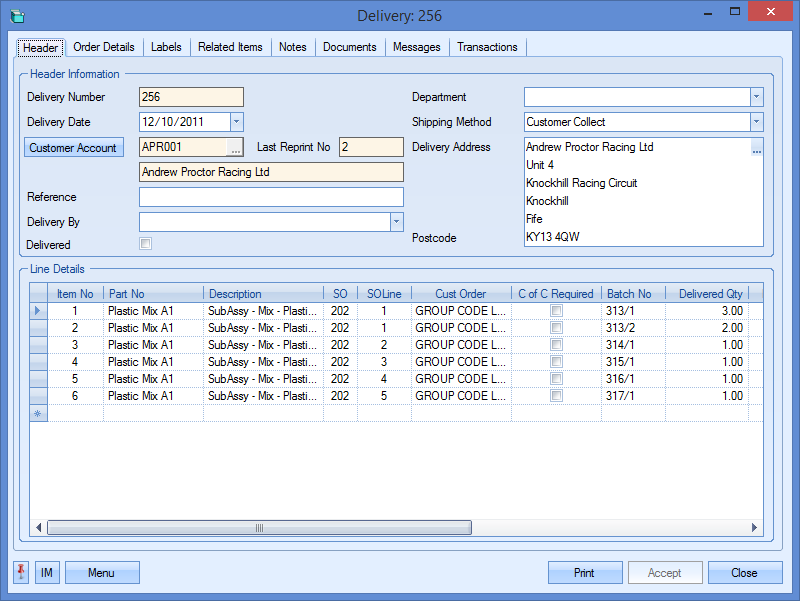
The user may if required change the information contained in this delivery if they have permission to do so as determined within the User Access Rights section of the Security section of Progress. For more information on user access rights, please refer to the System options section of the manual. Clicking Accept or Close will return the user to the Deliveries screen.
This option allows the user to print out the delivery note or CofC without accessing the record itself. To print the document, the user must highlight the delivery required and then click the PRINT option.

Clicking the PRINT option generates the delivery note.
The user can also generate an associated certificate of conformity (CofC) from the main Deliveries screen. This can be done by clicking the arrow on the PRINT option and selecting the CofC option.

The system will then generate the associated CofC document for the selected delivery.
Print Range
This option allows the user to print or save a specified range of delivery notes or CofCs. The user can use the grid filters to generate the list of deliveries they wish to print/save and simply choose the relevant option to generate the documents. Clicking the PRINT RANGE option itself will prompt the user to confirm before printing the delivery notes of all deliveries listed on the main Deliveries screen.
The user can also save the range of delivery notes, and also print and save a range of CofCs too, using the additional PRINT RANGE options. These can be access by clicking the arrow on the PRINT RANGE option.
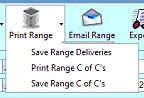
Both the SAVE options will generate and save the selected document for the range of deliveries selected to the folder specified in the Admin section for the Documents path.

Email Range
This option allows the user to email a range of delivery note documents to the relevant contact for the selected customers.
NOTE: This option is ONLY available to users who have their email set up to send directly from within Progress.
Like the PRINT RANGE option above, the user can use the grid filters to select the range of deliveries they wish to email. Once selected, clicking the EMAIL RANGE option will open a window similar to the following.
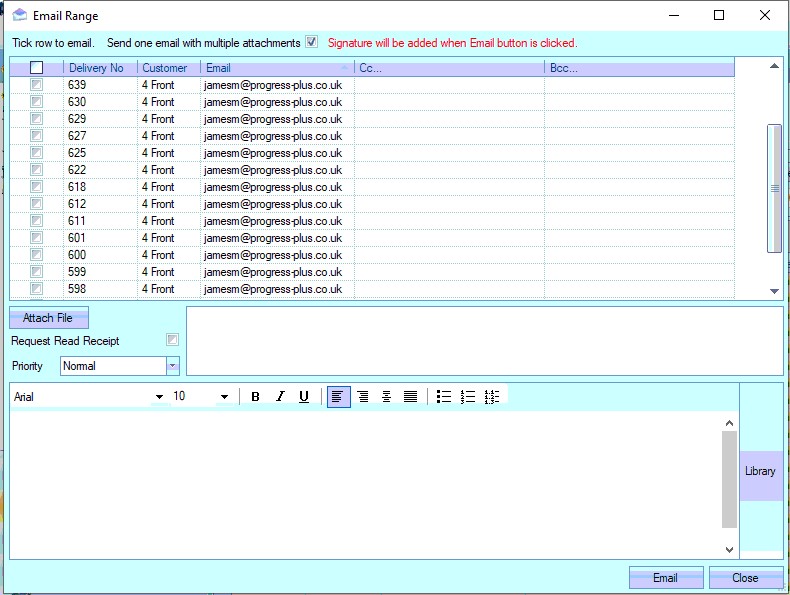
The top of this window shows the selected list of deliveries along with the contact email address set up against the order. The user can select the deliveries they wish to send using the tick box along side each delivery or, if all are being sent, clicking the column heading will tick all listed deliveries. If they wish to add additional email contacts, they can be added to the CC and BCC fields against each delivery listed.
The user also has an option to send the selected deliveries as one email with multiple attachments. This is the default option, but the user can untick this if they wish to send individual emails for each selected delivery.
![]()
The user can also attach files using the ATTACH FILE option as well as request a read receipt and set a suitable priority for the email being sent. An suitable email message can be added via the bottom half of the window. This text will be the same across all emails being sent.

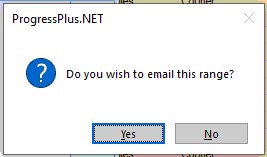
Once the user has selected the orders to be sent and filled in the rest of the details, they can click the EMAIL option to send the emails. The system will prompt the user for confirmation.
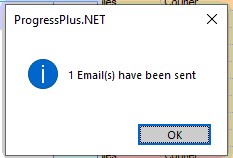
Once sent, the system will confirm with a message similar to the following.
Export
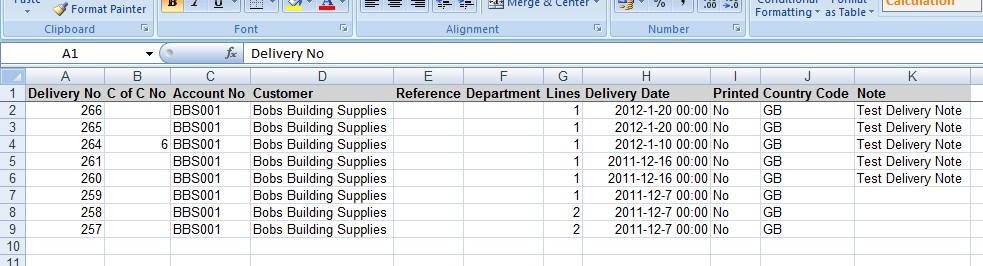
This option allows the user to export out the current list of deliveries to a spreadsheet for further analysis. The exported data is based on the deliveries listed in Progress. The user can filter the deliveries as required and then use the Export option to create them in a spreadsheet.
Clicking the Export option will present the user with a window for choosing the location and name of the exported file. Once the file has been specified, Progress creates the export file and automatically opens it in Excel for the user to see. An example is shown in the next screen.
NOTE: The Available to Pick option is only displayed on the Deliveries screen if this option has been ticked in the systems options in the Delivery & Invoicing section by the administrator.
This is the same screen that is accessed from the Today > To Do > Available To Pick screen. This option is primarily used for companies that may hold in stock orders for customers that are not due to be despatched for a certain time and cannot be delivered too early. Is also provides a picklist and picking receipt document that can be used by employees to "pick" the goods for delivery.
On selecting this option, a screen similar to the following will appear.
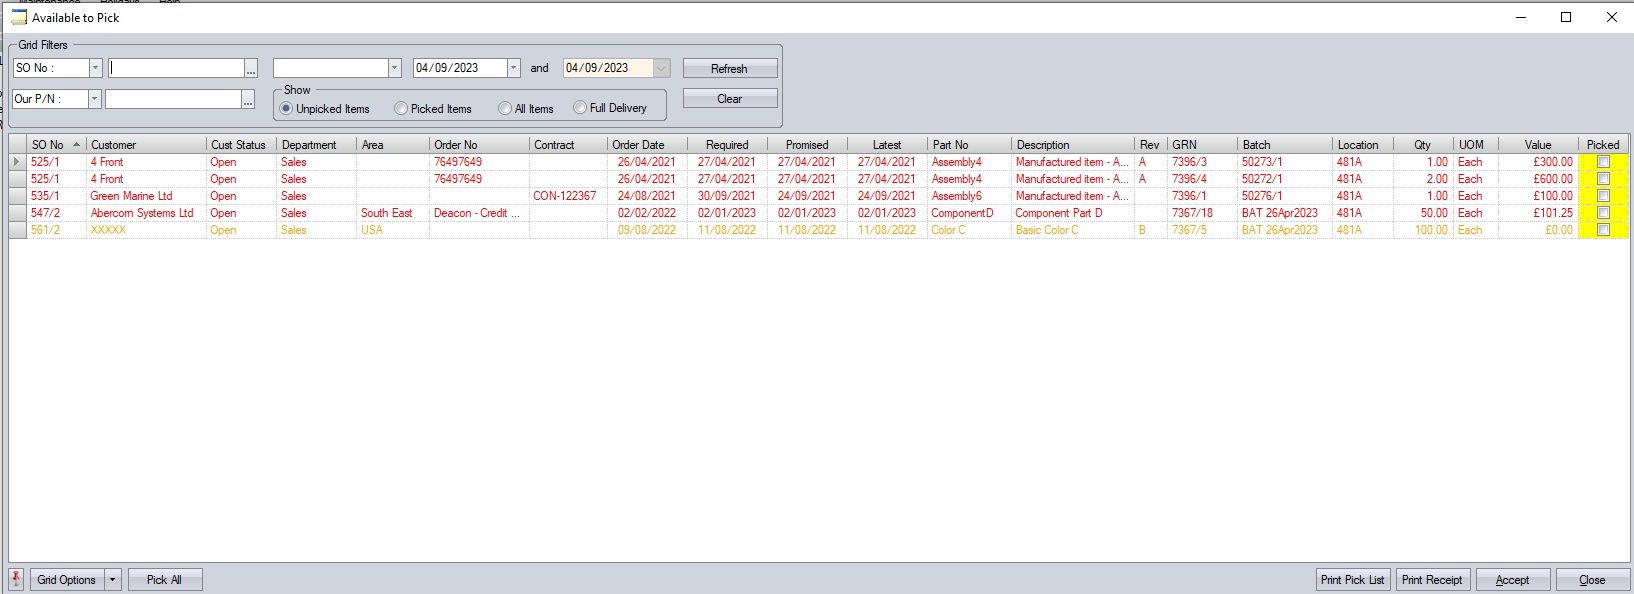
The filters at the top of the window permit the user to filter down the list of items to be picked based on the selection criteria they choose to use. The user can select from the following fields from the drop down box.

The user can also filter by a number of date options, including SO Order Date, Required Date, Promised date and Latest Date.
The user can also filter this screen based on the Show filters.
![]()
Unpicked Items - Shows all items waiting to be picked before being delivered.
Picked Items - Shows all items that have already been picked and are waiting to be delivered.
All Items - Shows all items with inventory allocated that are already picked or are waiting to be picked.
Full Delivery - Shows items where the complete SO is ready for delivery.
Once the user has selected any filters, clicking REFRESH will filter the data shown. This will show all the items that meet any filters applied.

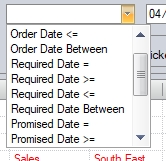
The PRINT PICK LIST option will generate a report of all the items currently available to pick. An example of which is shown below.
Once the goods have been physically picked, the user must mark the relevant items as "picked" on the Available To Deliver screen. This is done by ticking the PICKED option, highlighted in yellow. The user can select the individual items, or use the PICK ALL option at the bottom, which will select all the items for picking as follows.

After the PICK ALL button has been pressed the label on the button will now change to CLEAR ALL. This allows the user to reverse the ticks placed in the PICKED field for each item as follows.
![]()

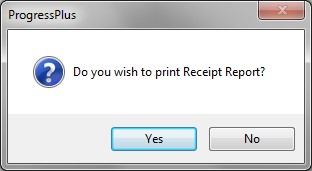
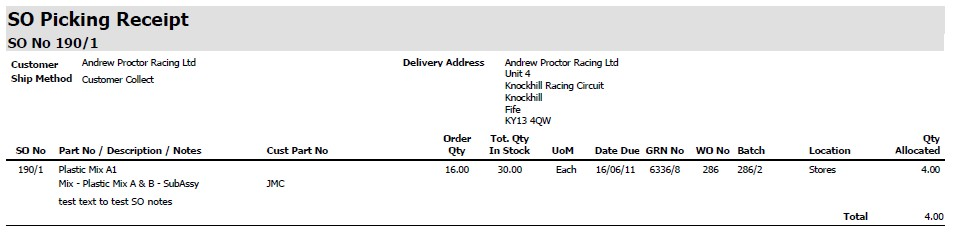
After all required items have been marked as "picked", the user must click on to the ACCEPT button on the form. The user will then be asked if they wish to generate a Receipt Report. This will list the details of all the items picked by the user.
An example of the report is shown below
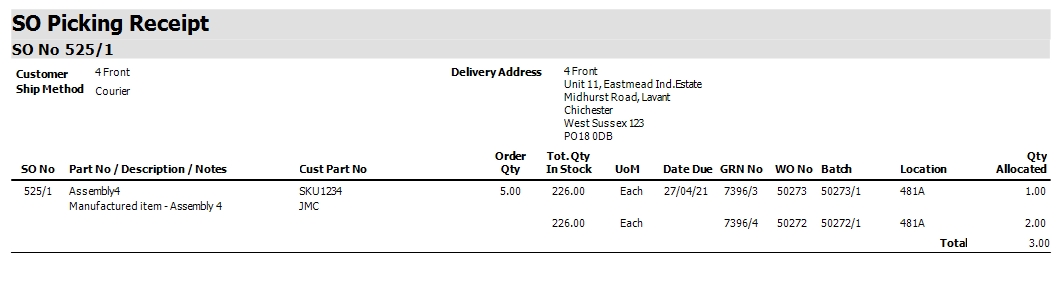
Receipt reports can also be generated retrospectively for any items already picked but not yet delivered. To generate this report, change the filter options to show Picked Items.
![]()
This will show all items currently picked.

Clicking the PRINT RECEIPT option here will generate the receipt report for all the items listed.
Once items have been marked as “picked”, they will then appear in the Available to Deliver section.
New Deliveries
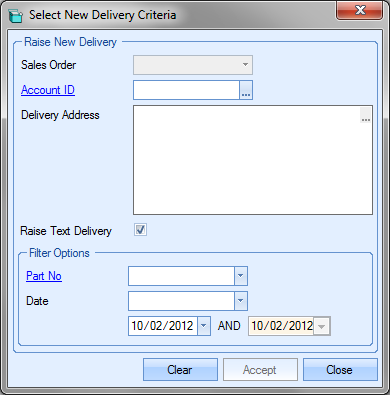
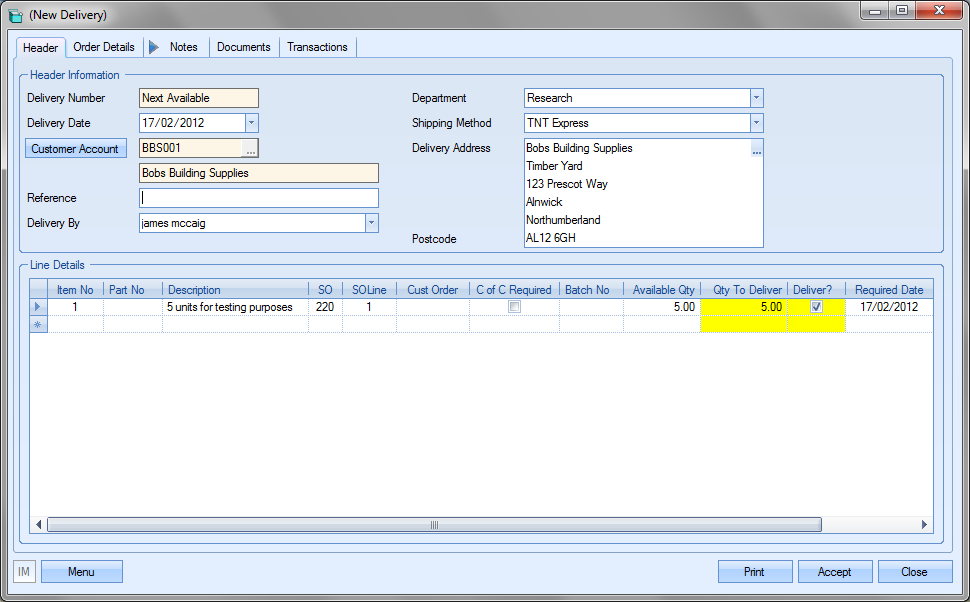
This option allows the user to create new deliveries. Once the New option is selected, the user is presented with the following screen.
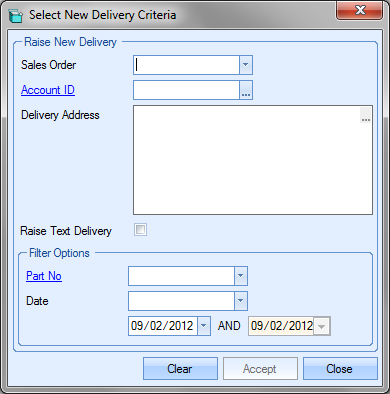
Progress can be configured to allow either single sales order deliveries or multiple sales order deliveries. This option determines whether the user can deliver items from only a single sales order or from multiple sales orders on a single delivery. The system administrator can set this option using the following option in the delivery options in the system option.
![]()
For more information on the delivery system options, please refer to the System options section of this manual.
If Progress has been configured to allow multiple sales orders on a single delivery, then the user will have the options to raise a delivery by both sales order and customer account ID. If Progress has been configured to only delivery against single sales orders per delivery, the user will not have the option to select an customer account at this stage; only a sales order.
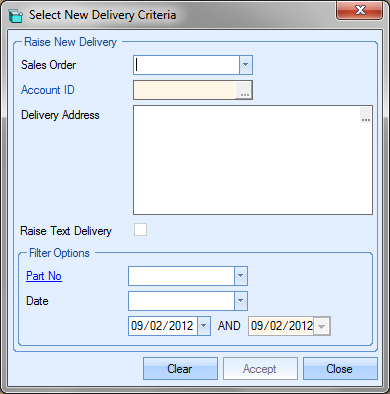
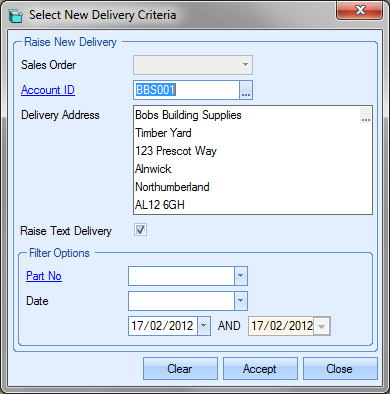
The user can select the criteria for the delivery on this screen. If they choose either the sales order or the customer account ID, the delivery address will be populated based on the selection made. Choosing the sales order will display the delivery address of the specific sales order. Choosing the customer account will display the default delivery address set up for this customer.
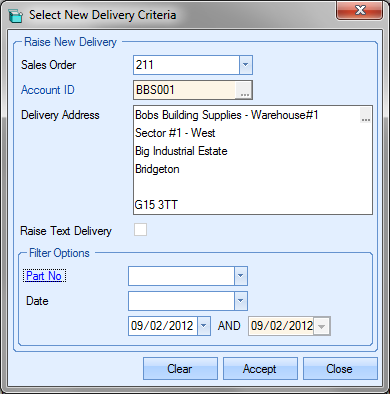
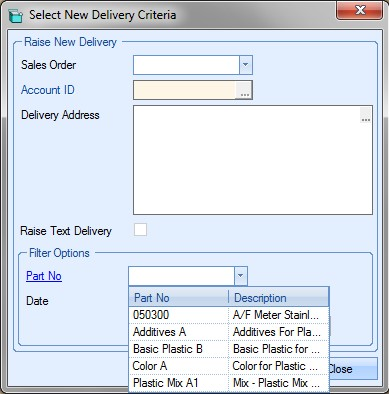
The user also has the ability to reduce the list of sales orders listed for delivery by filtering the list of sales order using the Filter options at the bottom of the window. By selecting a part number from the list, Progress reduces the sales order listed above to only those containing the selected part number.
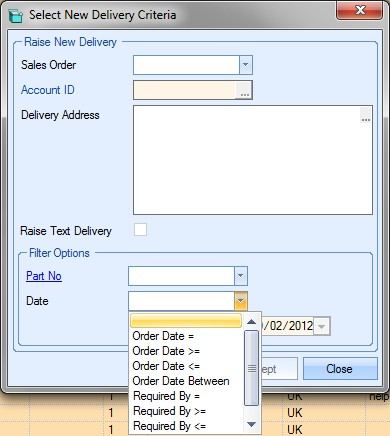
The date filter option allows the user to filter the sales order by a variety of date options, each of which filter the list of sales orders similar to the part number filter.
Once the user has selected the sales order or customer account required, clicking the ACCEPT option will present the user with the following delivery screen.
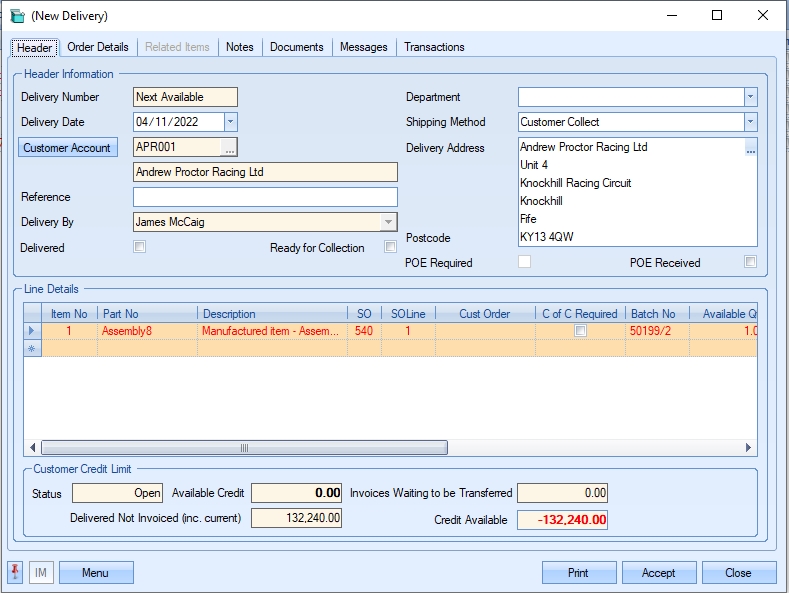
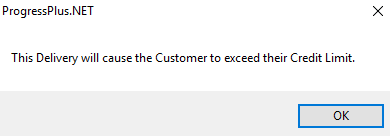
If the system has been configured to show the customer credit information, then the following details will be displayed at the bottom of the new delivery window.

Visibility of this information is dictated by the system delivery options shown below.

If the option STOP CREATION OF THE DELIVERY is ticked, the system will stop the user creating a new delivery if the customer is over their credit limit and highlight this.
When the user creates a delivery from the customer account or from a specific sales order, all items available for delivery which are common to the selection will be listed here. If the system option to automatically mark all items on a new delivery as ready to delivery is set, then the Deliver? tick box will automatically be ticked for all lines listed.
![]()
This can be changed on individual delivery lines if there are any items that are not being despatched on this delivery by simply unticking the Deliver? tick box.

When the user creates a new delivery, the system automatically pulls through information from the sales order or customer, depending on how the delivery has been created.
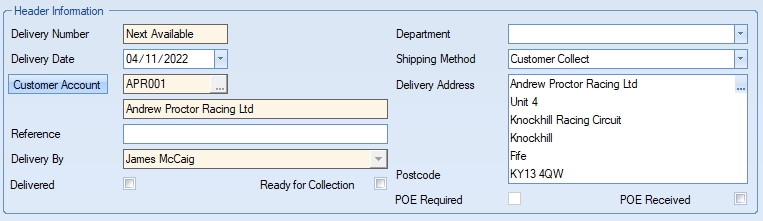
| Delivery Number | System generated number. Allocated when the delivery is saved. |
| Delivery Date | Defaults to the current date, but can be changed by the user if necessary. |
| Customer Account | Defaults to the customer selected by the user. |
| Reference | Allows the user specify a reference for the delivery. This can be anything the user wishes to enter. |
| Delivery By | Defaults to the user who created the delivery, but can be changed if necessary. |
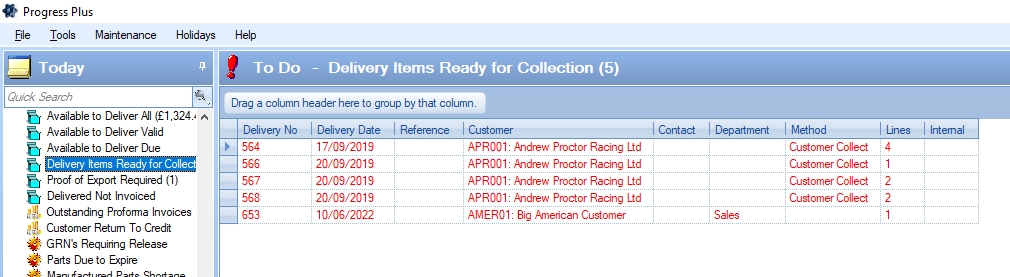
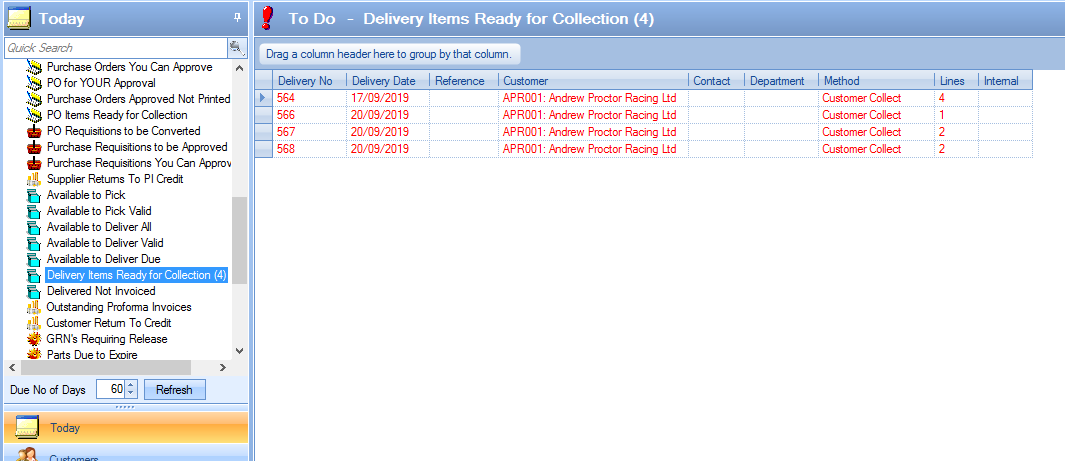
| Delivered | This tick box allows the delivery to be marked as physically delivered or collected. If the delivery was marked for collection by the customer, ticking this will remove the delivery from the Delivery Items Ready For Collection screen in the Today > To Do section. |
| Ready For Collection | This option allows the delivery to be marked as "Ready For Collection". This can be used if the customer is collecting the goods themselves. If this option is ticked, the delivery will be highlighted on the Delivery Items Ready For Collection screen in the Today > To Do section. This can then be used to inform customers that their goods are ready to be collected. |
| Department | Defaults to the department entered on the sales order, but can be selected from the drop-down list if necessary. |
| Shipping Method | Defaults to the shipping method specified in the sales order, but can be selected from the drop-down list if necessary. |
| Delivery Address | Defaults to the delivery address set on the sales order. If the delivery is being created based on the customer account, this will be the default delivery address entered against the customer. |
| POE Required | This option indicates whether the customer requires proof of export for the order. This is based on the associated sales order option of the same name and cannot be amended on the delivery itself (i.e. controlled by the sales order itself) |
| POE Received | This option works in conjunction with POE Required option and indicates whether the required proof of export has been received. Ticking this option on the delivery will remove the delivery from the Proof of Export Required screen in the Today > To Do section. |
The delivery lines themselves will be automatically populated based on the items ready for delivery and the method by which the delivery was created. If the delivery is created from a sales order, the delivery lines will consist of only items from that sales order. If the delivery is created based on a customer account, the delivery lines will consist of all items available for delivery for that customer. Delivery lines will be displayed in black text, however, overdue items will be highlighted in red.

Most of the line details will be populated based on the details of the sales order line. The fields highlighted in yellow are those available for the user to change.
| Qty To Deliver | This defaults to the quantity allocated to the sales order line. This can be amended by the user if necessary |
| Deliver? | This field allows the user to select/deselect items for inclusion on the delivery. All lines can be marked for delivery by default using the following system option. |
![]()
| Late Reason Code | In the event that a delivery is being made after the sales order line requirement date has passed, Progress recognises that this order is late and allows the user to enter a reason why the delivery is late. This can be enforced by using the following system option. |
![]()
| This will force the user to record a late reason before they can create the delivery. If the delivery has multiple lines that are all late, the user can set the same late reason code to be applied to all late delivery lines using the following system option. |
![]()
The user can select the late reason from the list presented.
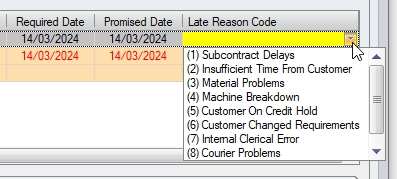
The list of Late Reason codes is maintained in the List Maintenance section of Progress (Maintenance > List Maintenance > Late Delivery Reasons). If the user tries to create the delivery without specifying a late reason, and the system is configured to have a late reason, the user will be presented with the following message.
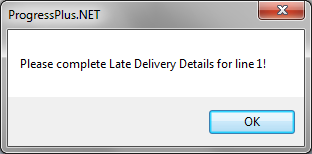
This forces the user to complete the relevant information as part of creating the delivery. Once a Late Reason code has been selected, the delivery line will change from red to black.
Associated NCRs
If the system includes the Quality module, the delivery will also highlight any associated NCRs that exist for the delivered items. The delivery line shows an OPEN NCs field which indicates the number of NCRs raised against material used on the goods being delivered. The user can drill into this further by clicking on the number to see a summary form showing the NCR details.

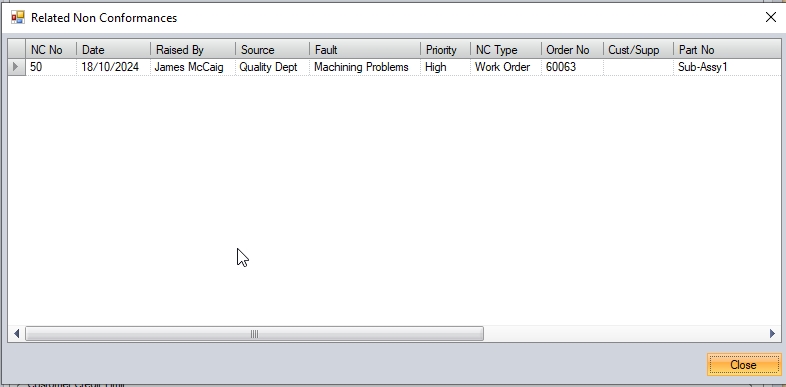
If the user has access to the Quality > Non-Conformance section of the system, they can open the NCRs directly from this screen by clicking on the NCR number as shown.

As well as showing the NCR count, and allowing the user to see and access the NCR details from the delivery, the system can also be configured to display a warning regarding the NCRs when the delivery is created. This can be switched on in the Quality system options in the Admin section, and will display a warning to the user when they click ACCEPT to save the delivery. This doesn't stop the creation of the delivery; its just to highlight them to the user.
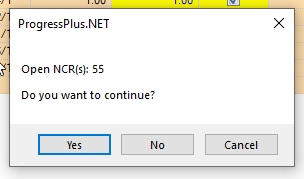
Clicking YES will continue to create the delivery, while NO and CANCEL will return the user to the delivery.
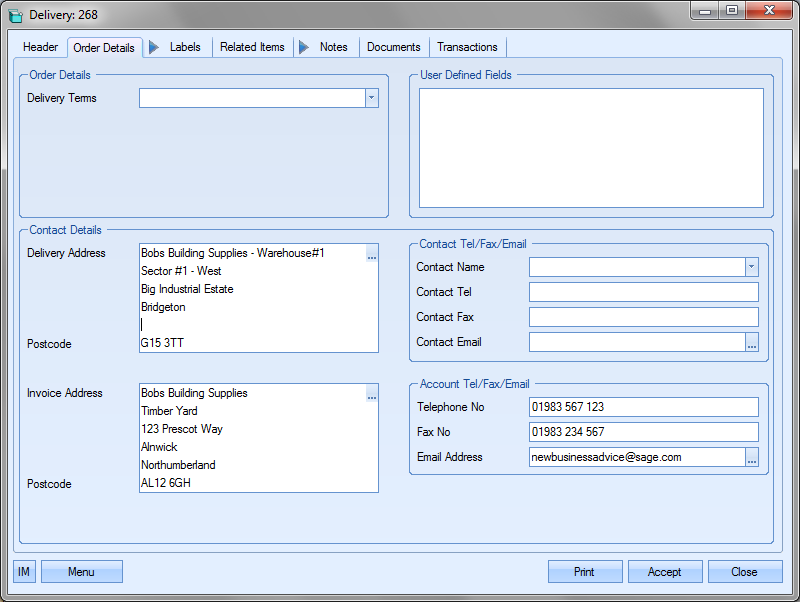
Order Details
The delivery Order Details tab allows the user to specify further information for the delivery.
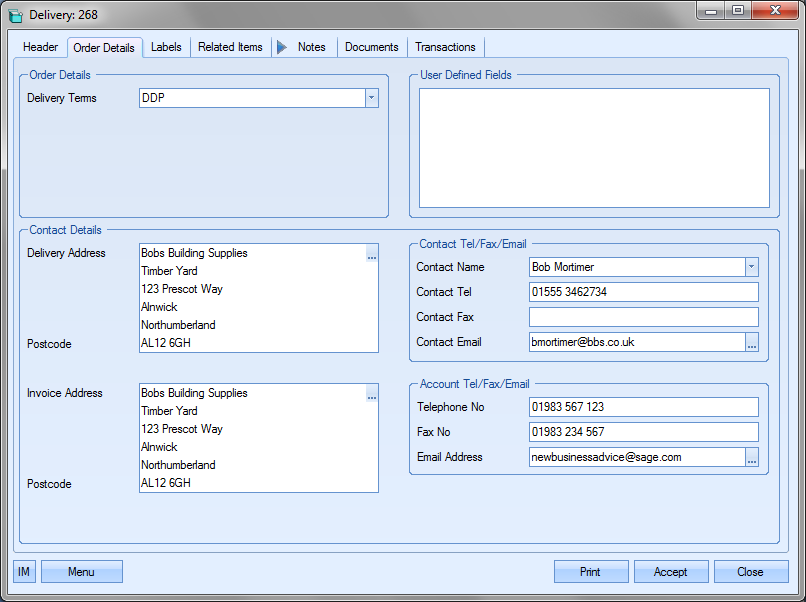
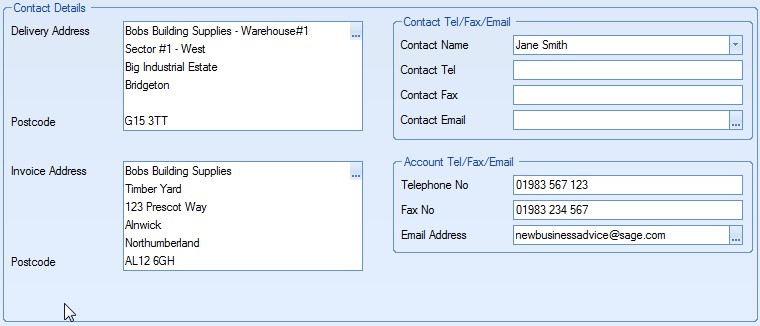
The DELIVERY TERMS field is populated from either the sales order or customer details, depending on how the delivery has been created, as are the delivery and invoice addresses displayed at the bottom of the screen.
If any user defined fields have been defined for use with deliveries, these would appear in the User Defined Fields section at the top-right of the screen.
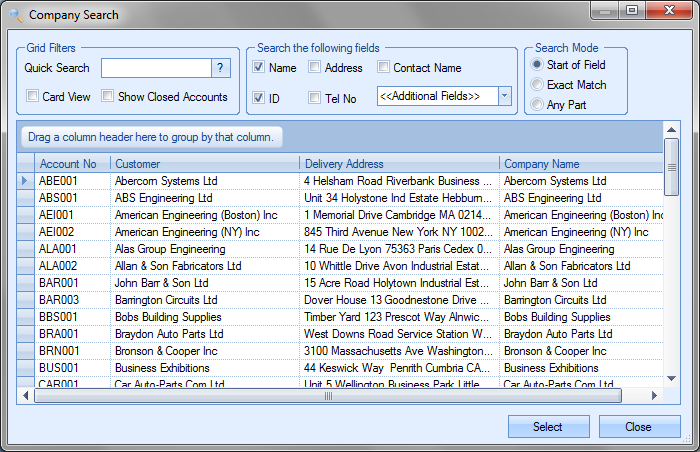
Delivery and invoice addresses will be detailed as per the sales order details or the customer’s default details as is the contact information. All of this information can be changed by the user if required. The addresses can be amended by the user by clicking on the ![]() option against each address. This presents the user with a list of all the available addresses set up for the customer.
option against each address. This presents the user with a list of all the available addresses set up for the customer.
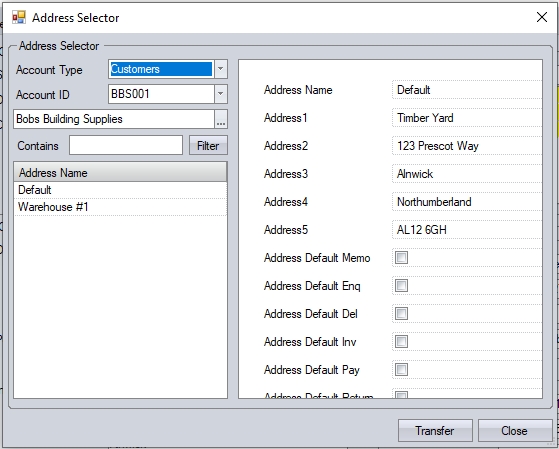
The user can select a different address from those provided and click the TRANSFER option to use this address on the delivery. Once selected, the address is updated on the delivery.
Alternatively, choosing a specific contact from the list of customer contacts will also update the delivery address based on the address of the contact. The user can select the required contact name from the drop-down list.
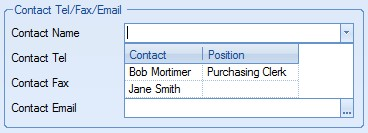
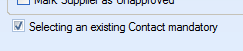
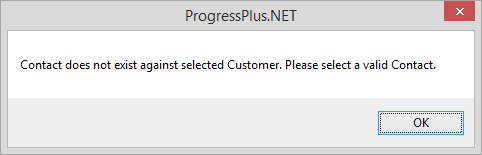
NOTE: Selection of the contact can be restricted to valid customer contacts using a one of the system options in the Admin section of Progress. This option makes it mandatory to select only from the existing contact list for the customer. The option to switch this on is shown below and is accessible in the Miscellaneous system options.
Trying to enter a contact name which doesn't already exist against the customer results in the following warning appearing.
The delivery address will change as soon as the contact is selected.
The user can also manually amend the date if the required address is not set up in the system. Once the user has finished making changes on this screen, they can save any changes by selecting the ACCEPT option.
Labels
This section of the delivery allows the user to specify a number of labels to be produced.
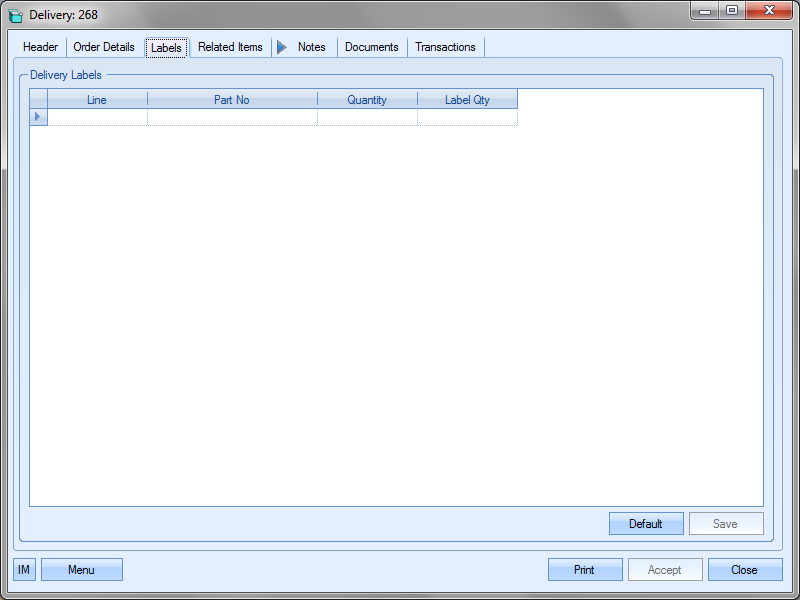
The user can specify the number of labels required for any of the delivery lines by entering the information required on the grid.
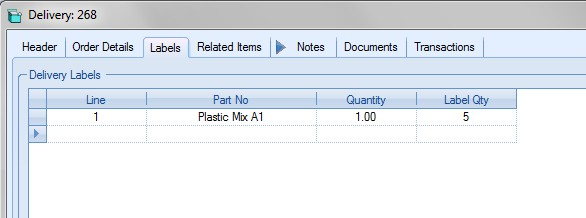
| Line | This is the line number of the delivery. |
| Part No | This is the part number of the delivery. This defaults when the user selects the delivery line number. |
| Quantity | This is the quantity to be printed on the label. For large delivery quantities that contain many smaller, box quantities, this would allow you to specify the quantity in each box. |
| Label Qty | This is the number of labels you wish to print. |
Once the label details have been entered, the user can save the details by clicking on the Save option at the bottom of the grid. The user can repeat this process for any additional delivery lines that require labels. If the user requires labels for all delivery lines, clicking the Default option will generate label details for every delivery line, for the full delivery quantity and on a single label. The default option will also overwrite all label settings previously entered for this delivery.
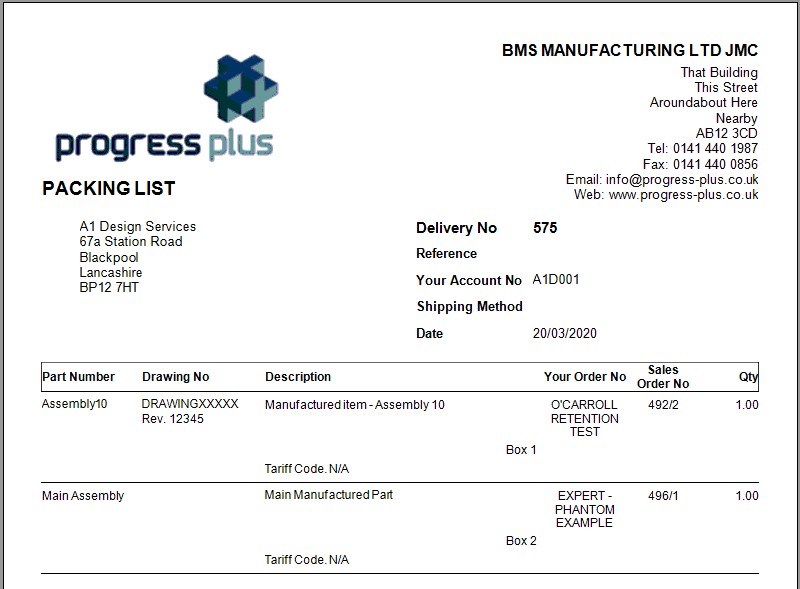
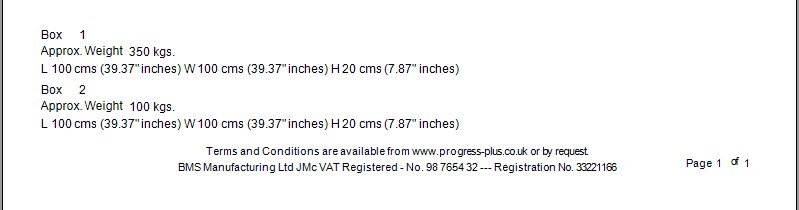
This section allows the user to record shipping and packaging for the delivery which can be printed out on the system's packing list document. This option is not switched on by default and requires Progress to enable it. Once enabled, this tab will be visible within the delivery.
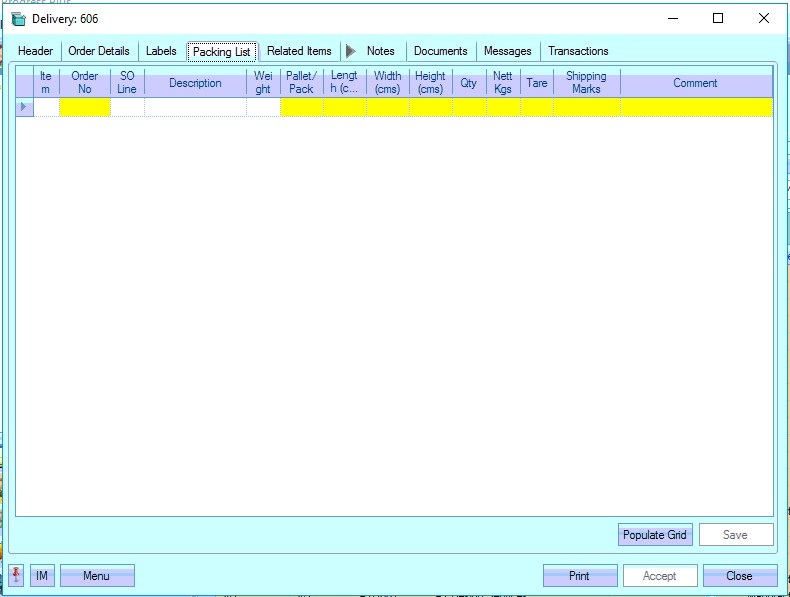
The user can manually fill in the relevant information in the highlighted boxes for each pallet/package that's included in the delivery. The POPULATE GRID option will default the grid with basic information relating to the delivery items. This can be a quick way to populate the grid allowing the user to only made any necessary adjustments.
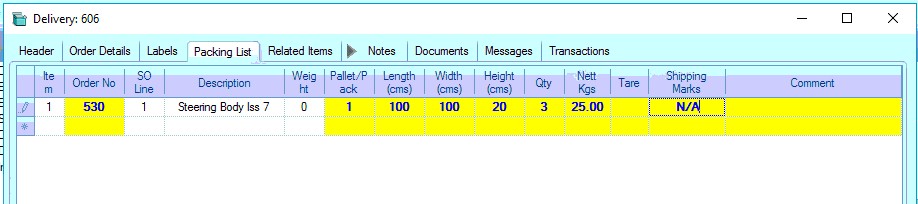
Once the user has completed the details, clicking the SAVE option will save the details entered. This information will then be used to generate the packing list document available via the PRINT option.
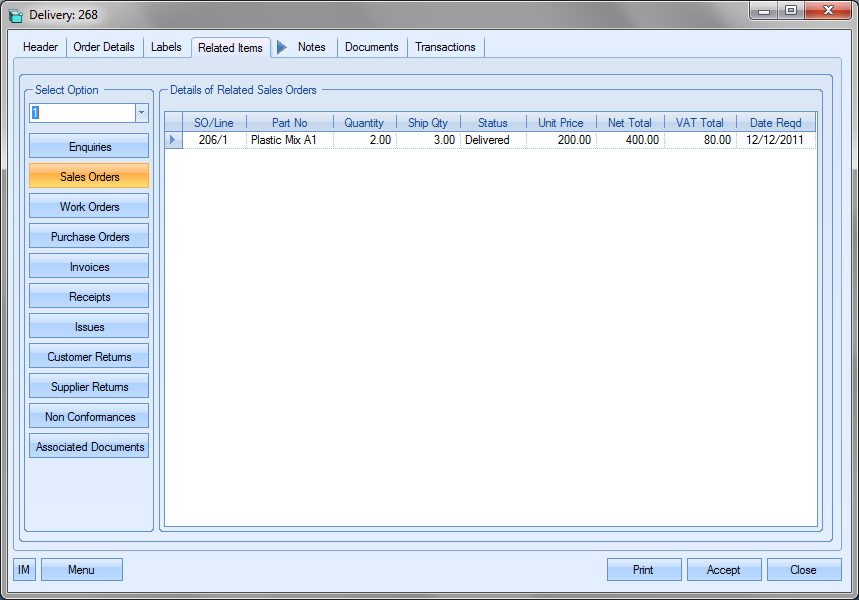
Related Items
This section shows all order and information within Progress related to this delivery. By clicking on the different categories listed, all information related to the selected delivery line is shown. The user can select the delivery line number from the drop-down list at the top of the screen.
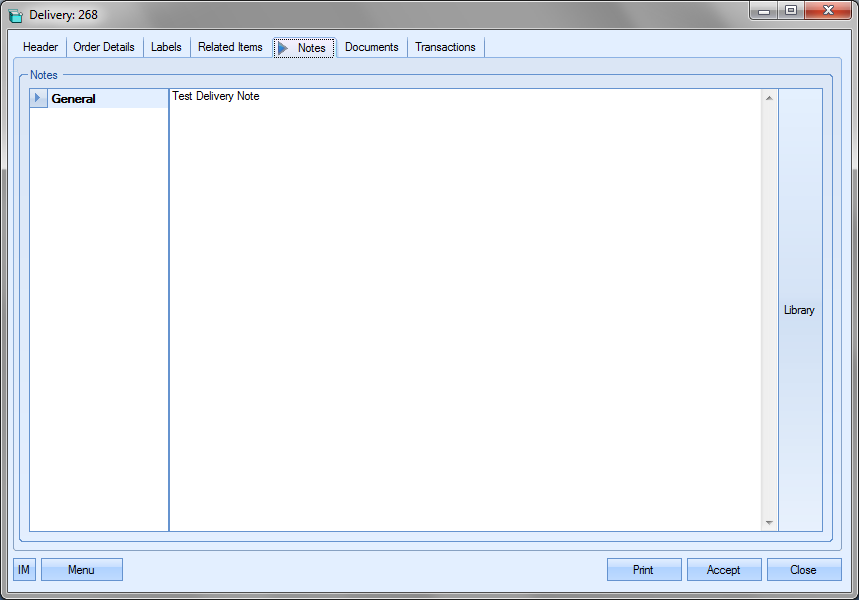
Notes
This section allows the user to record any general notes against the delivery. This screen will automatically be populated with any notes recorded against customer delivery notes section of the customer record. Further notes can be added by simply typing in the notes required.
Documents
If the user requires linking any external documents to the delivery, they can do so from the Documents section.
Clicking on the Add Document option ![]() will present the user with a screen to allow them to select the files to be added. The user can specify document types and add any additional notes required against each document.
will present the user with a screen to allow them to select the files to be added. The user can specify document types and add any additional notes required against each document.
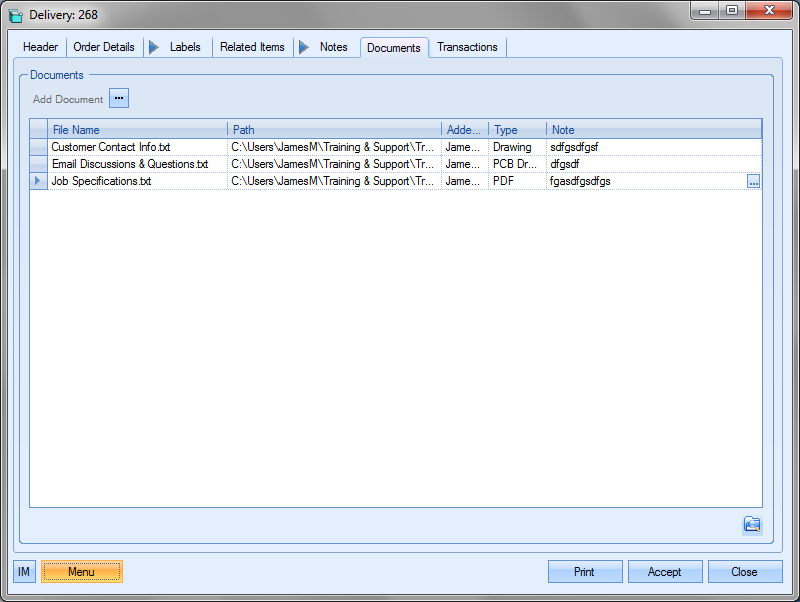
If the user needs to delete one of the listed documents, they simply have to highlight the document and press the DELETE key on their keyboard to remove it from the attached document list. If the user wishes to view any of the listed documents, they can do so by highlighting the required document and clicking on the View Document option ![]() or by simply double-clicking the listed document. Once the files have been finalised, the user can save the documents by clicking the Accept option.
or by simply double-clicking the listed document. Once the files have been finalised, the user can save the documents by clicking the Accept option.
Messages
This section shows all associated messages and emails relating to the delivery.
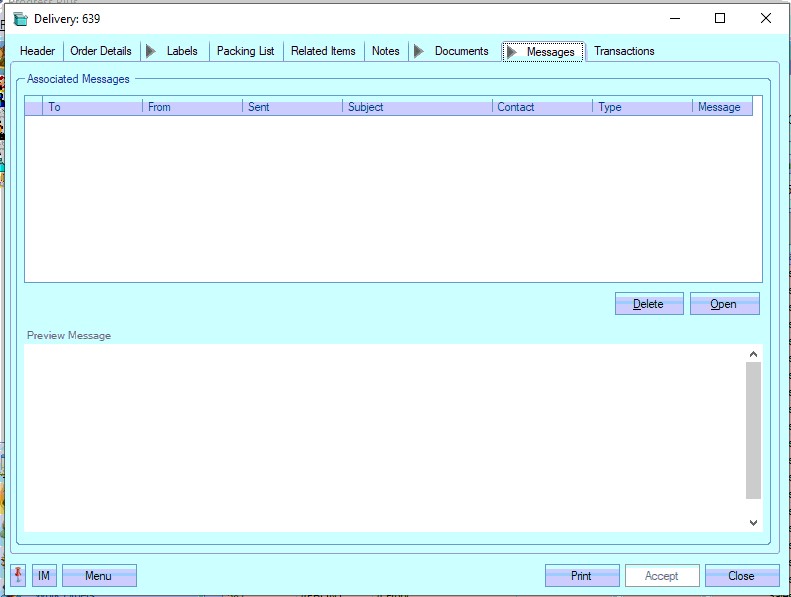
Any communication relating to the delivery (i.e. emails, instant messages, etc.) will all be listed here for the user to view.
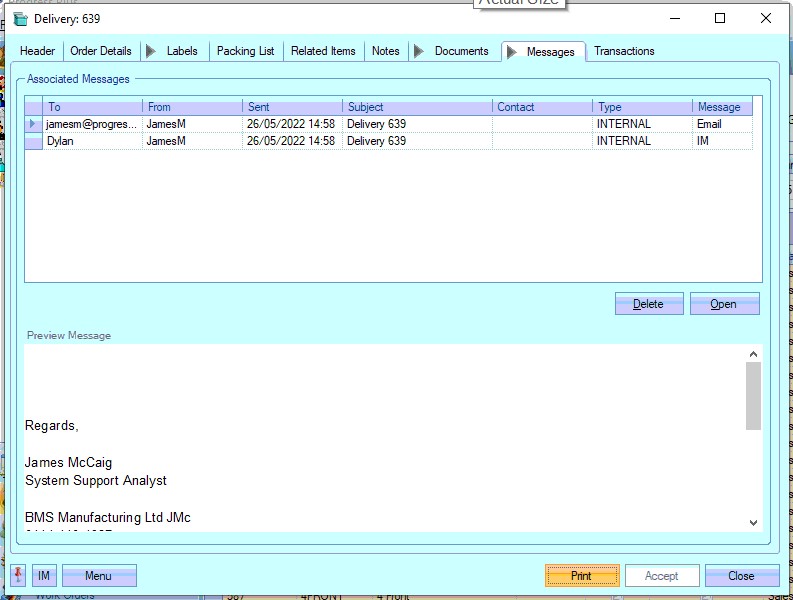
The user can open any of the items listed on this screen but either double-clicking on the listed item or by highlighting and clicking OPEN. The selected item will then be displayed for the user to view.
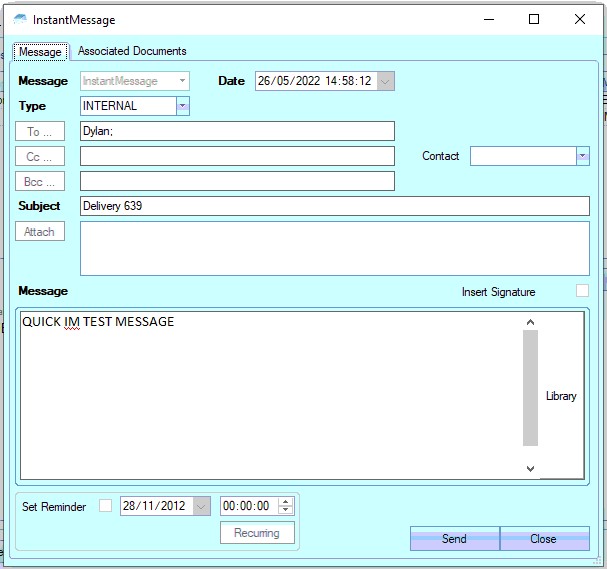
The user also has the ability remove messages recorded, if permitted. Permission to delete messages is set up against the user permissions. For more information on user permissions, please refer to the Administrator Functions > Access section of the manual. If the user has permission to remove messages, then the DELETE option will be available.
Messages can be deleted by simply highlighting the item and clicking the DELETE option. The user will be prompted to confirm the deletion.
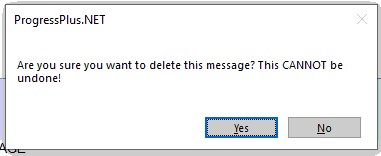
Clicking YES will delete the selected message, and the screen will be updated.
Transactions
The transactions section of the delivery allows the user to see all the actions and changes that have been made against the delivery since it was created.
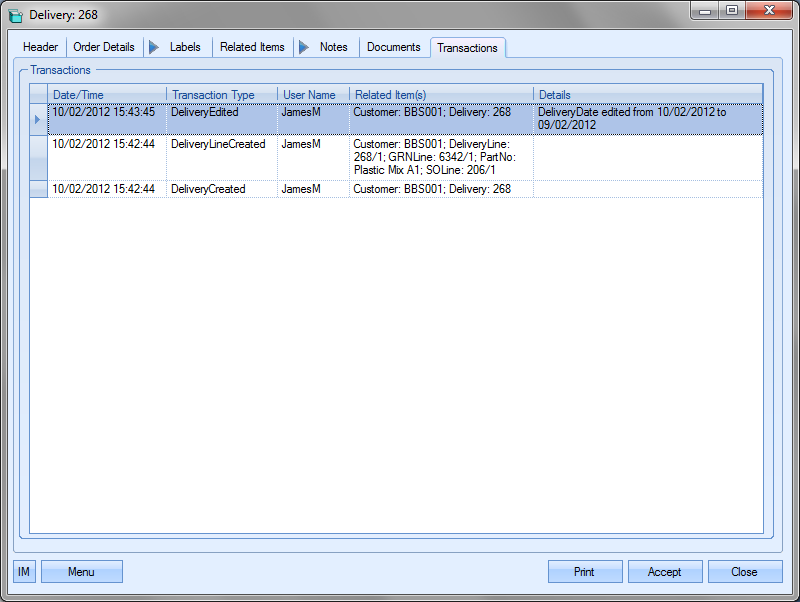
This screen is useful for tracking changes and also looking at the deliveries’ timeline.
Additional Menu Options
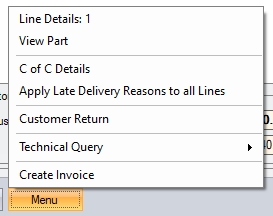
The MENU option at the bottom of the delivery screen provides the user with further options regarding the delivery.
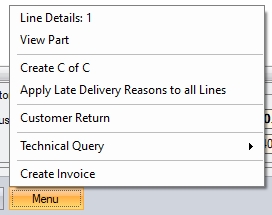
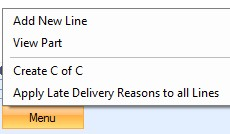
The delivery lines themselves have further options. These can be accessed by double clicking on the delivery line or by highlighting the delivery line and selecting the Line Details option from the Menu at the bottom. When accessed, the user is presented with the following screen.
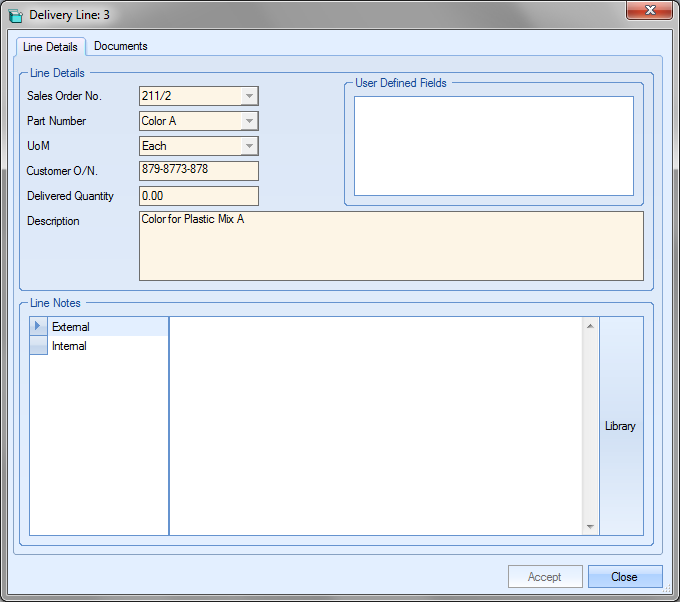
Most of the information displayed is taken directly from the delivery line itself and cannot be edited. If user defined fields have been set up for use against the delivery lines, they will be displayed in the User Defined Fields section at the top of the window. Additional notes can also be added in the Internal and External notes section at the bottom. Any information added to the line details screen can be saved by the user by clicking the Accept option. Clicking the Close option will return the user to the main delivery screen.
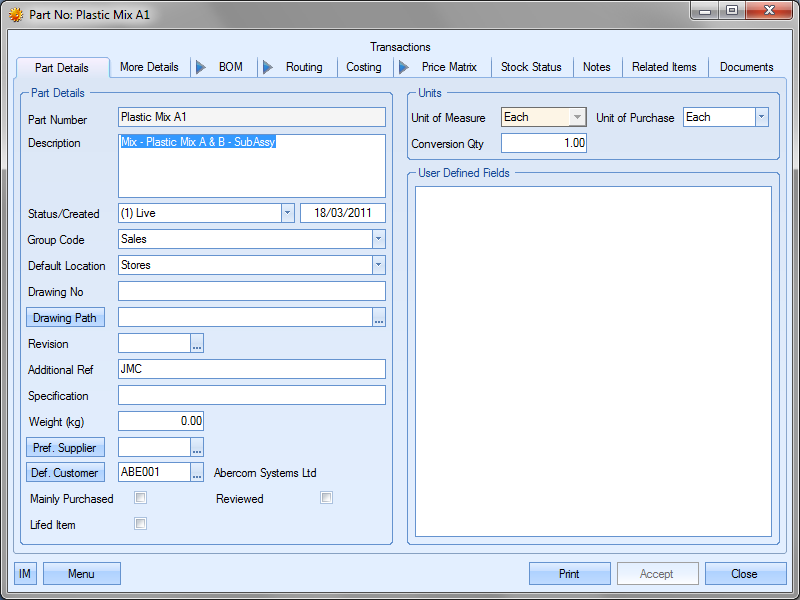
View Part
The VIEW PART option opens the inventory record for the delivery line part number. This allows the user to look at the part in question in more detail. If the user has access to make changes to the part, then they can be made here.
Create CofC/CofC Details
The CREATE CofC option generates a certificate of conformity record for the delivery. If the system is configured to have a separate numbering system for CofCs, then the user must first "create" the CofC. This assigns the CofC its unique number ID, and then updates the MENU to provide a CofC DETAILS option (shown below).
Clicking the CofC DETAILS option now presents the user with a new window for recording relevant information.
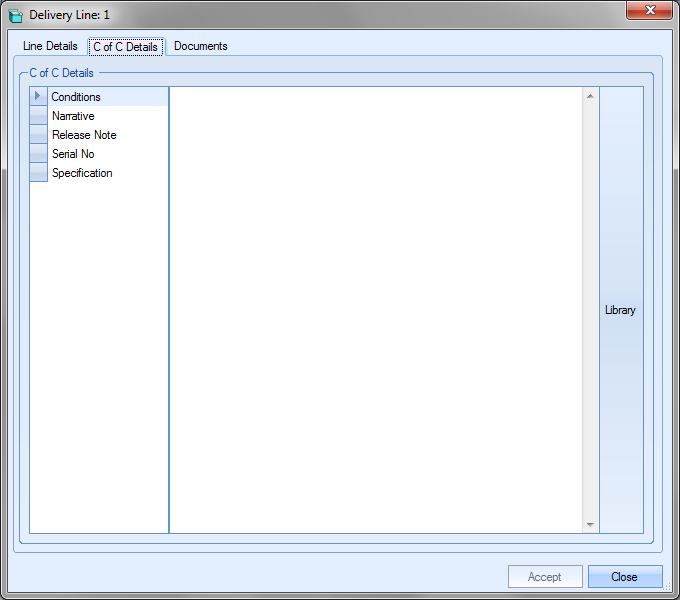
The user can then complete the sections listed as required for this information to be printed onto the certificate of conformity. Once all the details have been added, the user can click the ACCEPT option to record the information entered.
Apply Late Delivery Reasons To All Lines
The penultimate option available from the MENU option is the APPLY LATE DELIVERY REASONS TO ALL LINES option. This option presents the user with the list of late reasons before updating every late delivery line with the selected reason. When selected, the user is presented with the list to choose from.
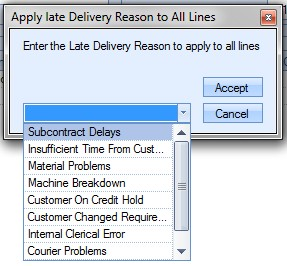
Once selected, all late delivery lines are updated accordingly.
Customer Return
Finally, the user also has the option to do a customer return against the selected delivery. This option will open the inventory Customer Return screen, and automatically filter for the selected delivery number. From here, the user can reverse delivery lines, indicate credits are required for the returns, raise NCRs, etc.

For more information on customer returns, please refer to the Inventory > Receipts section of the manual.
Creating Text Deliveries
By default, the new delivery window above lists only the sales orders that have items ready for delivery, i.e. allocated inventory, but the user can also create text deliveries. This is where the user wants to create a delivery for something that is not a sales order item or a non-stock item, but is linked to an existing sales order.
To create a text delivery, the user must click the Raise Text Delivery option before selecting the customer account.
By indicating that the delivery being created is a text delivery, the user can select the customer account from the full customer list.
Once the customer is selected, the customer details are pulled through to the New Delivery window.
The user can now click accept to go to the New Delivery window.
The user can now add details of the item being delivered. To create a new delivery line, the user can either double-click on the blank line in the Line Details grid or can select the Add New Line option from the Menu options.
Either action will present the user with the Delivery Line Detail screen.
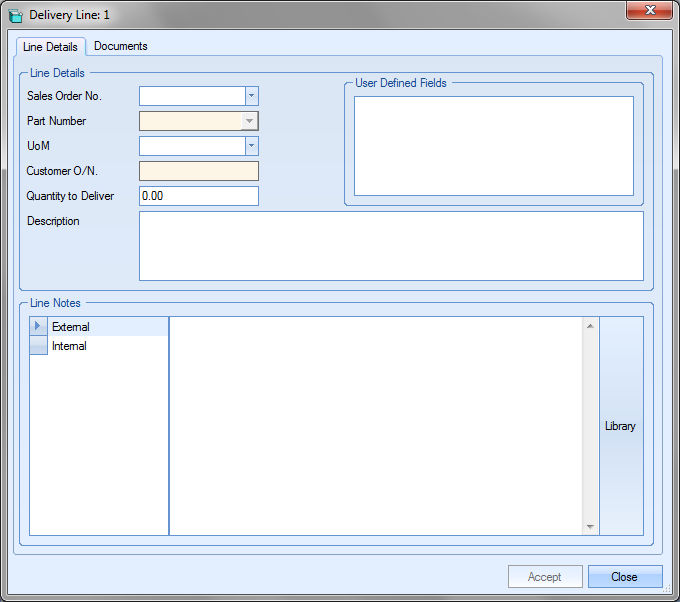
The user can now select the sales order this delivery is related to from the list and complete the rest of the details. If any user defined fields have been set up for use with delivery lines, the user can complete these in the User Defined Fields section, as well as add any notes at the bottom of the window.
Once the details have been added, the user can save the details by clicking the Accept option.
Once the details have been saved, the user will be returned to the main delivery window with the newly added details shown.
If the user needs to, they can create further text delivery lines using the same process. Once all delivery lines have been added as required, the user can create the delivery by clicking the Accept option.
Print options
The user has a number of printing options available via the PRINT option.
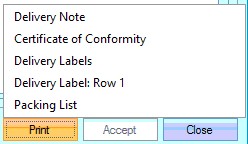
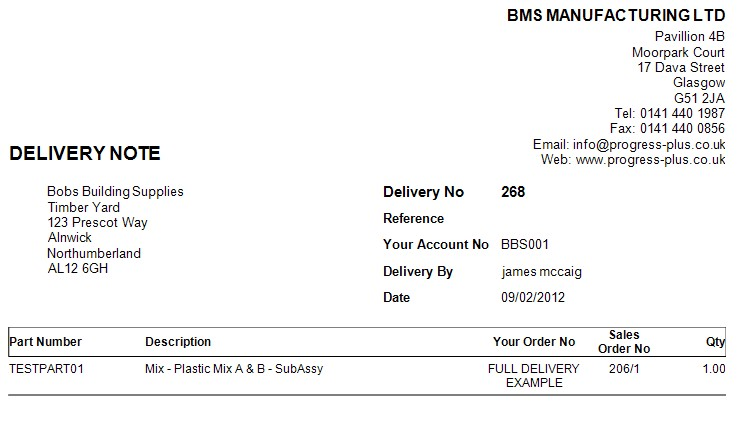
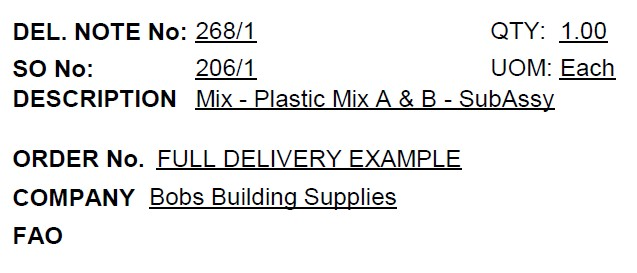
Delivery Note
This will generate the delivery note for the user to send with the shipped items or for their own records.
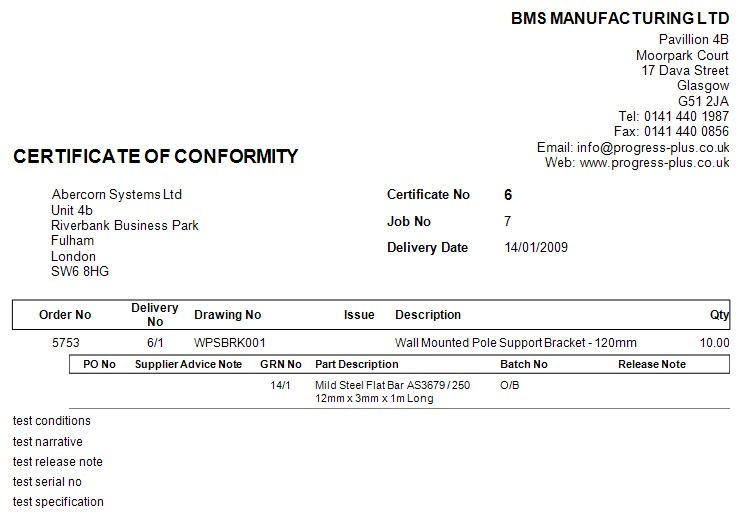
Certificate Of Conformity
The user also has the ability to generate a Certificate of Conformity (CofC) document for the items being delivered. If the user has already created the CofC record and added any details via the CofC Details option in the Menu options, choosing the Certificate of Conformity print option will generate the CofC document.
Delivery Labels
The user can use this in conjunction with the Labels tab to generate any delivery labels they may wish to send with the goods The user must firstly set up the labels in the Labels tab section of the delivery . Once set up, selecting this option will print the all labels.
Delivery Labels: Row X
If the user would like to print an individual set of labels from all those set up in the Labels tab (i.e. for reprint), this option will print the delivery labels for the selected row in the Labels section.

Selecting this print option will print the selected labels.
Packing List
This option allows the user to generate a packing list/commercial invoice document for the delivery. This option is only available if the packing list system option is switched on. This is not on by default and requires Progress Plus to enable it. This document works in conjunction with the Packing List tab and the information entered by the user re: shipping and packaging.
Additional Delivery System Options
The following are some additional system options that can be set to tailor how the delivery section works for the user.
Auto Print Delivery Note
This option automatically generates the Delivery Note document when the user clicks the Accept option to generate the new delivery or save any changes that have been made.
![]()
Use Full Delivery Option
This option determines whether SO lines have the Complete Delivery option ticked by default. This enforces the rule that sales order line quantity can only be delivered in full. No partial quantities can be delivered prior to the full quantity being ready for delivery.
![]()
Show Delivered Quantity without Returns Subtracted
This option determines how the delivery quantities are show with respect to any return quantities. If this option is ticked, the delivery quantity will always show the original delivery quantity regardless of any returns made against the delivery. If the option is unticked, the Progress will show the overall delivery quantity taking into account any returns made against the delivery.
![]()
Example:
Option ticked

Option unticked

Marking Deliveries As Physically Delivered
Once a delivery has been created, the goods will be sent to the customer along with the paperwork. Although the system has reduced inventory levels and updated the sales order line status accordingly, the user might want to indicate when the delivery has actually been received by the customer. This can be done manually using the DELIVERED option on the delivery.
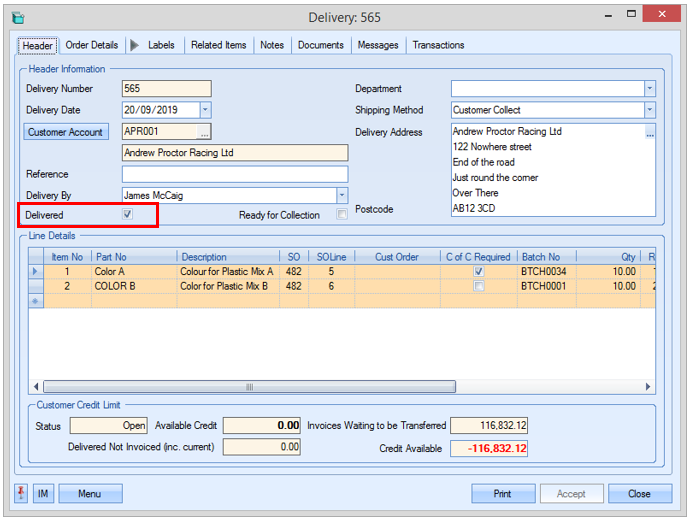
This option is shown on the main delivery browse screen and also on the Today > To Do > Delivered Not Invoiced screen so its clear which deliveries have been physically delivered.
Ready For Collection
In the event that the customer is collecting the goods, the delivery can be marked as ready for collection. This option highlights the delivery on the Today screen, allowing someone to notify the customer that the goods can now be collected.
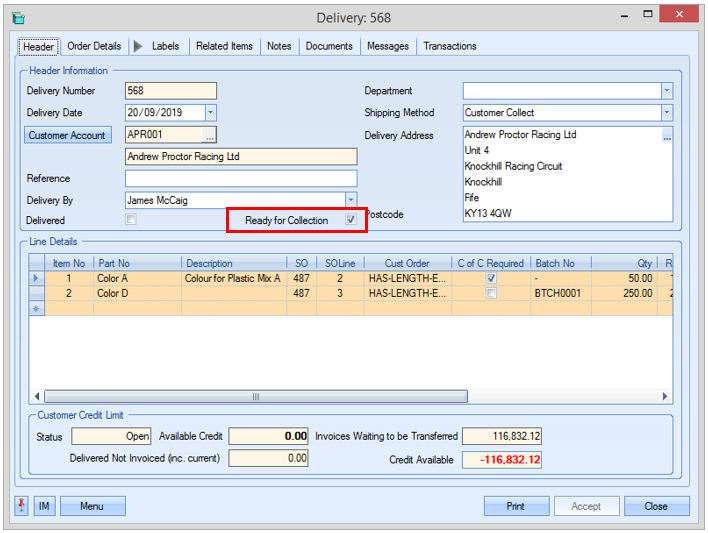
Once the goods have been collected by the customer, the delivery can be marked as delivered to remove it from the Today screen.