This section of Progress permits the user to enter an invoice for goods that have been delivered to customers or to raise a text invoice for a charge such as delivery or certification. To raise an invoice for goods that have been delivered to customers the delivery note must be currently on the system and not have been previously invoiced. This section also permits the user to create a credit note for invoices that have been raised in error. When the user selects this option, the following screen is displayed.
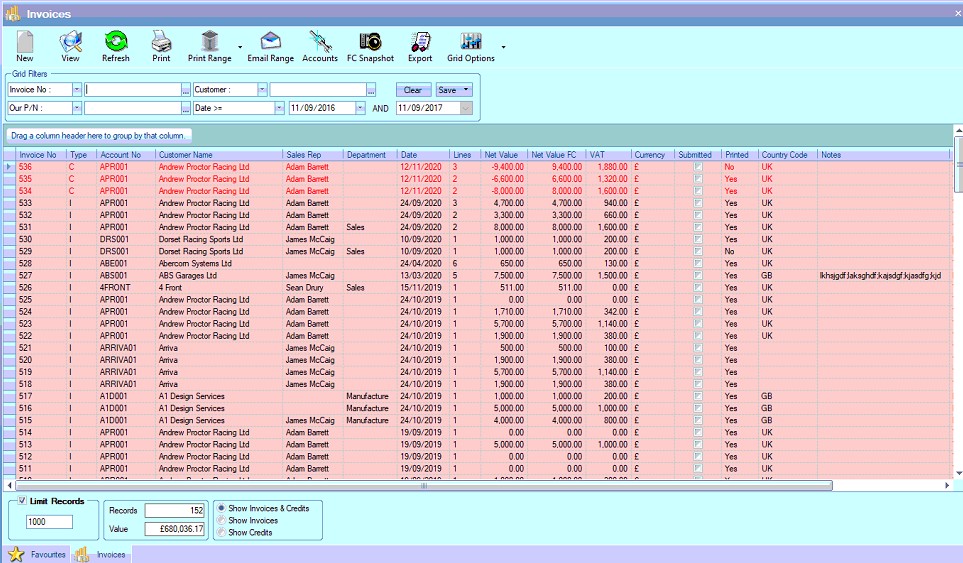
This screen will show all invoices and credit notes currently in Progress. The total number listed is shown at the bottom along with the total value of all records listed. This total is the number of deliveries listed based on the current filters. If no filters have been applied then Progress will show the last X number of records where X is the value in the Limit Records box at the bottom.
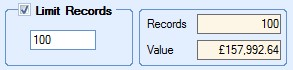
If the Limit Records option is not ticked, then all existing invoices and credits will be displayed. The user can filter the listed using the grid filters displayed at the top of the screen.

The user can filter this screen by selecting the appropriate filter from the drop-down list and then entering the value required. Clicking the REFRESH option at the top will then refresh the list of invoices and credits based on the filters entered as shown in the next screen.

View
If the user wishes to see the content of any invoice listed on the screen, the user simply has to highlight the record in question and then click the VIEW option at the top of the screen. This will open the invoice for the user to see. Alternatively, double clicking on the required record in the grid will also open the invoice.
The user may, if required, change some of the information within an invoice after its been created if they have permission to do so as determined within the User Access Rights section in the Admin section Progress. For more information on user access rights, please refer to the Administrator Functions section of the manual.
NOTE: When an invoice is created, most of the information becomes unchangeable. This is to ensure data integrity is maintained between Progress and the accounts package being used by the customer.
This option allows the user to print out the invoice document without accessing the record itself. To print the document, the user must highlight the invoice required and then click the PRINT option.

Clicking the PRINT option generates the invoice.
Print Range
This option allows the user to print a specified range of invoices. The user can use the grid filters to generate the list of invoices they wish to print and simply click the PRINT RANGE option to generate the documents. The user will be prompted to confirm the printing before the invoices are printed.
If the user wants to save the range of invoices, they can select the SAVE option available in the PRINT RANGE option.
Selecting the SAVE RANGE option will save the range of invoices selected to the Documents folder specified in the Admin settings.
If the system is configured to automatically update the SUBMITTED flag and date of each invoice/credit, then this will be done once they are printed.
Email Range
This option allows the user to email a number of invoices to customers based on the filters applied at the top of the screen all at once.
Clicking this option presents the user with the Email Range window, listing all the invoices selected for emailing, along with the customers' default invoice email address and any contact email addresses that are set to receive invoice emails. For more information on setting up invoice email addresses and contacts, please refer to the Customer List section of the manual.
From here, the user can finalise the emails to be sent with any additional text and attachments.
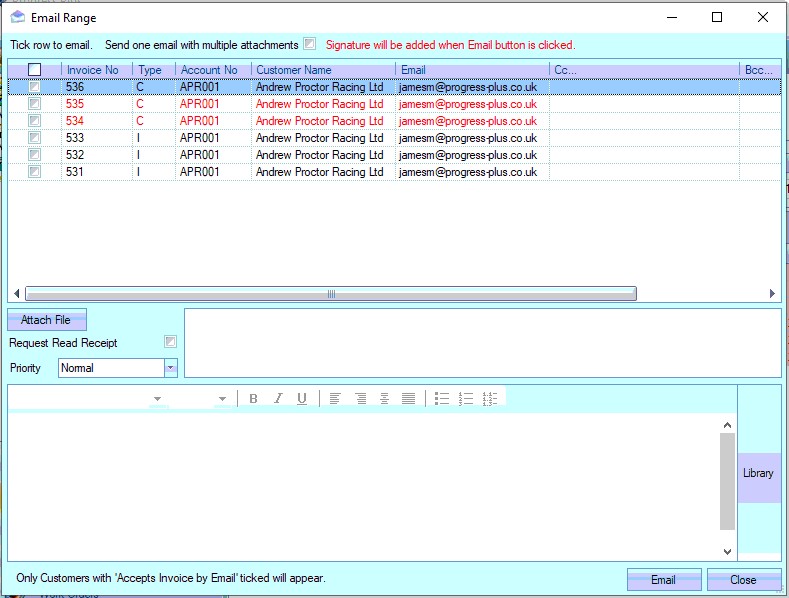
Once all information has been entered and the relevant invoices/credits have been selected, clicking the EMAIL option will sent the emails off to the customers. By default, the system will send one email per invoice/credit, however, the use can condense this into a single email with multiple invoices/credits by clicking the option shown below.
![]()
If the system is configured to automatically update the SUBMITTED flag and date of each invoice/credit, then this will be done once they have been sent.
Accounts
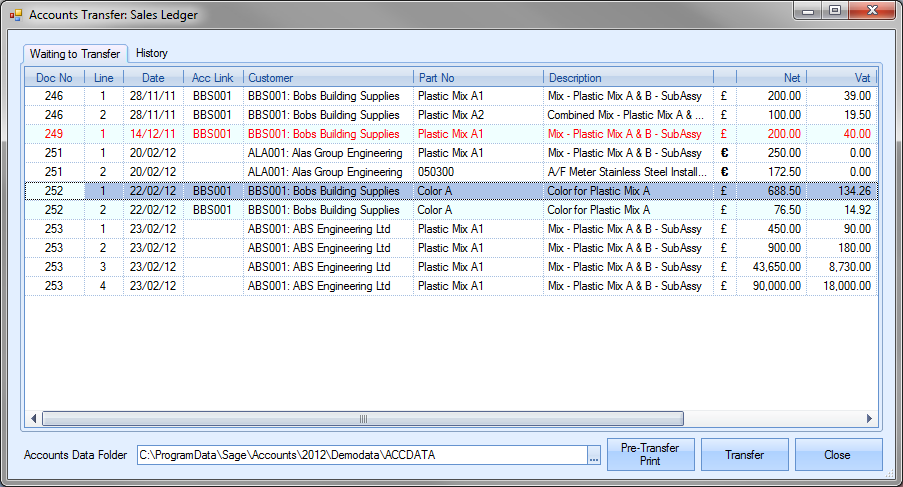
This option is used when transferring invoices and credits over to the linked accounts package. Clicking this option presents the user with a complete list of all invoices and credits that have not already been transferred over to the accounts package.
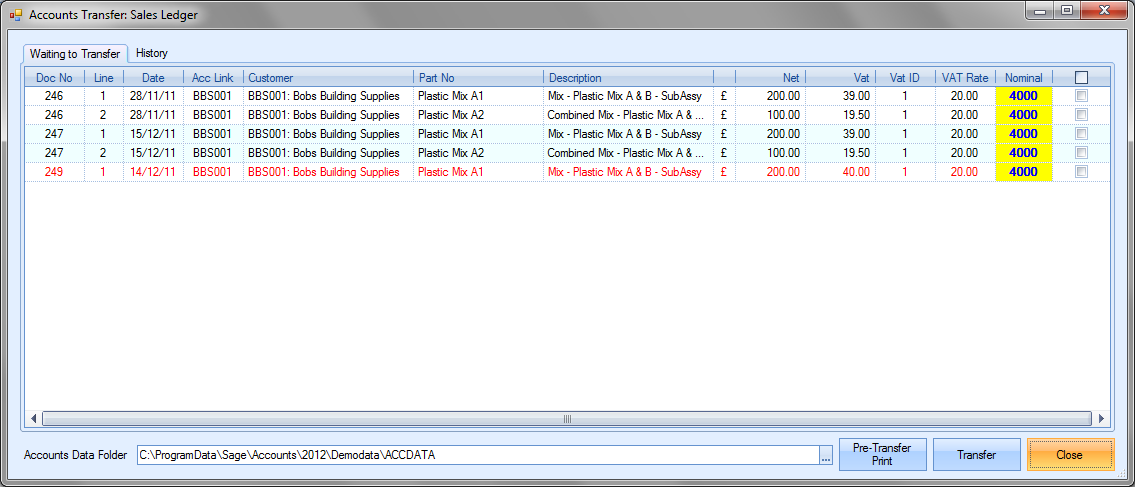
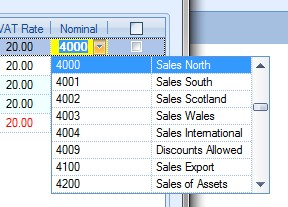
The list presented will have all the details from the invoices. The nominal code shown will be based on the group codes, customers and default nominals set up in Progress already, but this can be changed if required. Clicking on the nominal code field presents the user with the nominal code list to choose from.
The tick boxes at the end of each invoice line are used to mark which invoices are to be transferred to the external accounts package.
Once the invoices have been selected, the user can generate a pre-transfer report. This is generated by clicking on the PRE-TRANSFER PRINT option.
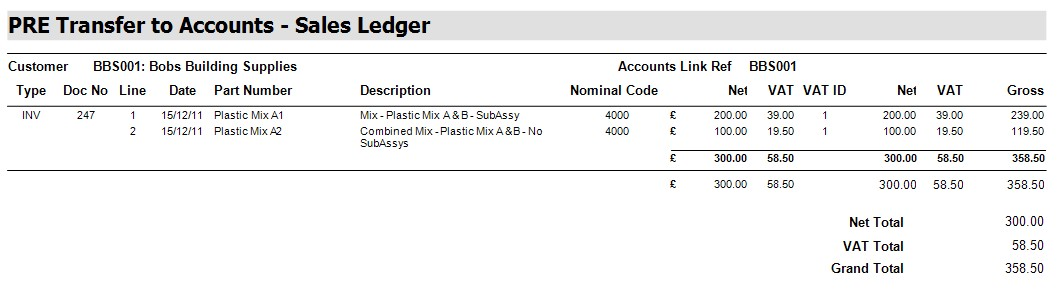
If the user is happy with the totals and the items selected, they can proceed with the transfer by clicking on the Transfer option. This will create the necessary transactions within the accounts package used or create an appropriate file for importing into the finance package used. Once the transfer has been complete, the user is presented with a transfer report. This, again, summarises the information transferred.
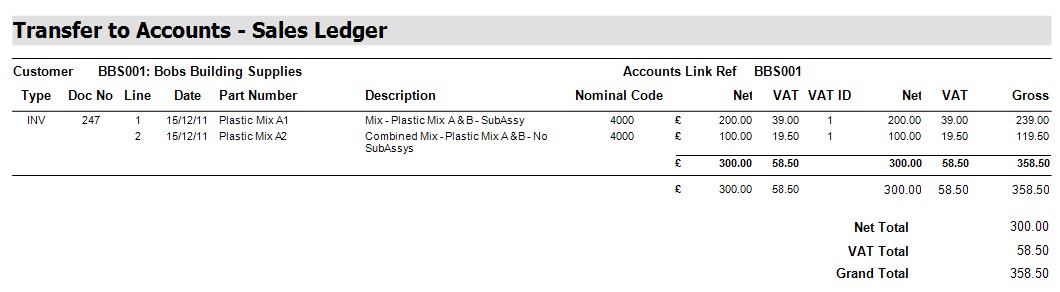
The user should then be able to view the invoice information in their accounts package under the customer’s activity. Any invoices not transferred will remain on this screen. All invoices transferred will disappear from this list, but can still be viewed on the main invoice screen.
The user can also use this screen to view historical transfers. To do this, the user needs to click on the History section of the transfer screen. When selected, the user is presented with the following screen.
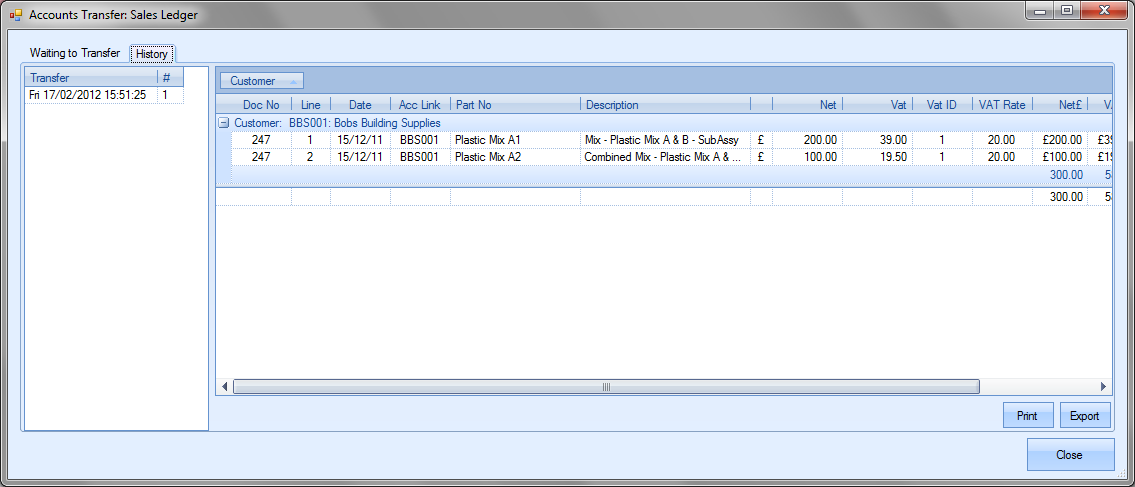
The list on the left hand side shows each transfer made, along with the date and time of the transfer and a count of the number of invoices transferred in that transfer. Highlighting any of listed transfers presents the user with the details of the invoice lines transferred. The user can reprint any of the previous transfer reports by selecting the date and time of the transfer and clicking the Print option. The Export option allows the user to export the transfer details out to Excel for further analysis.

FC Snapshot option
This option presents the user with a financial summary snapshot of Progress based on a selected date range. The user is presented initially with a blank screen.
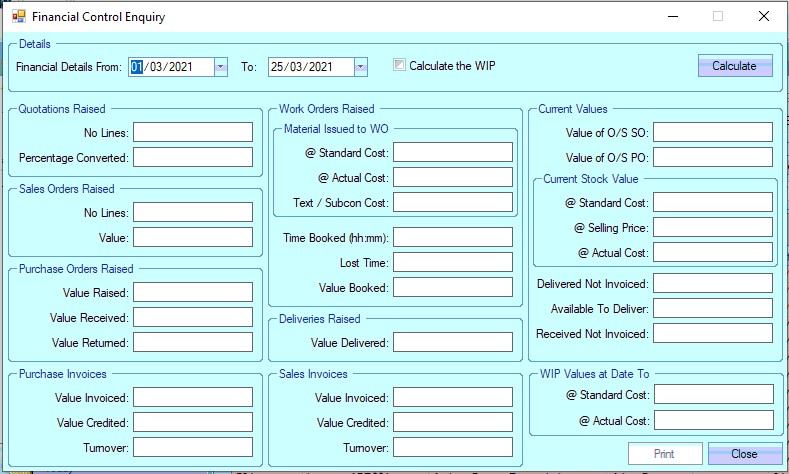
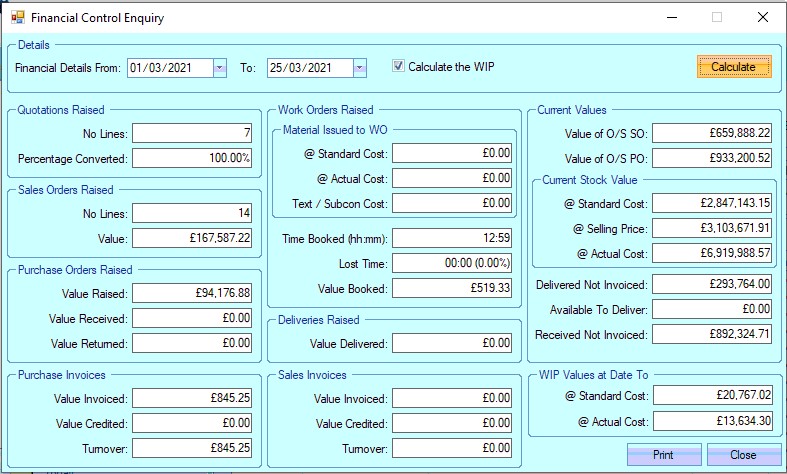
The user can then specify the date range they wish to analyse and decide whether they wish to also see calculations for any WIP materials. The tickbox for the option Calculate the WIP determines whether the WIP values are calculated or not. If the user does not include WIP, the CURRENT WIP section of this screen will remain blank. If they choose to see this, the values for WIP will be displayed.
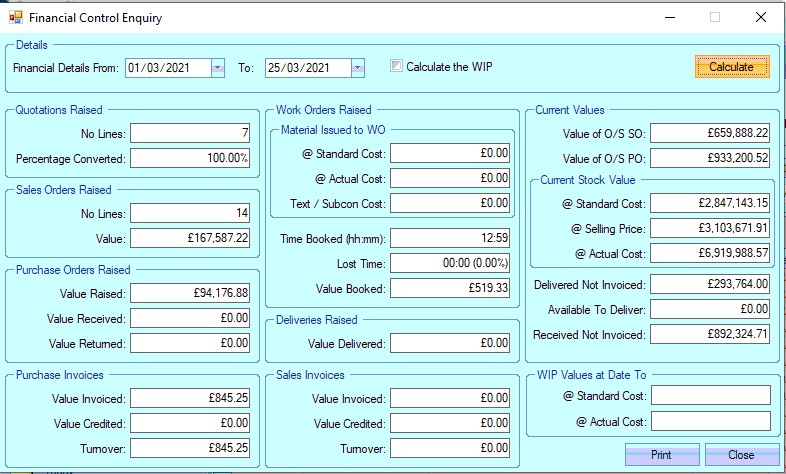
The user can calculate the values on this screen by clicking on the Calculate option. The following screens show the results when the WIP values are included and excluded using the option at the top.
Excluding WIP:
Including WIP:
| Quotations Raised | This section shows the total number of enquiry lines created within the date range and the percentage of those lines which have been converted to sales orders. |
| Sales Order Raised | This shows the total number of sales order lines created within the specified date range and the total value of those lines in the default currency. |
| Purchase Orders Raised | This shows the total value of POs raised within the specified date range, the total value of all material received within the date range and the total value of material returned to suppliers. |
| Purchase Invoices | This shows the total value of purchase invoices raised within the specified date range, the total value of credits raised within the date range and the overall combined total (Invoice Tot. – Credit Tot.) |
| Material Issued to WO | Cost of all material issued to WOs based on the part’s standard cost. |
(@ Standard Cost)
| Material Issued to WO | Cost of all material issued to WOs based on the GRN’s actual cost. |
(@ Actual Cost)
| Text/SubCon Cost | Total cost of all text and SubCon items issued to WOs. |
| Time Booked | Total time booked against WOs during specified date range. |
| Lost Time | Total time recorded as “lost” in timesheets during the specified date range. |
| Value Booked | Total value of time booked against WO operations. This is calculated based on WC Hourly Rates. |
| Value Delivered | Total value of items delivered between during specified date range. |
| Value Invoiced | Total value of invoices raised during the specified date range. |
| Value Credited | Total value of credits raised during the specified date range. |
| Turnover | Total overall value of invoices after taking credit note value into account (Total Value Invoiced – Total Value Credited) |
| Value of O/S SOs | Total value of all outstanding SO lines regardless of date range specified. |
| Value of O/S POs | Total value of all outstanding PO lines regardless of date range specified. |
| Current Stock Value | Total value of all inventory based on standard cost value. |
(@ Standard Cost)
| Current Stock Value | Total value of all inventory based on selling price value. |
(@ Selling Price)
| Current Stock Value | Total value of all inventory based on GRN cost value. |
(@ Actual Cost)
| Current WIP | Total value of WIP material based on GRN cost value. |
(@ Actual Cost)
| Current WIP | Total value of WIP material based on standard cost. |
(@ Standard Cost)
| Delivered Not Invoiced | Total value of deliveries made but not yet invoiced. |
| PO Received Not Invoiced | Total value of POs received but not yet purchase invoice matched. |
| Available To Deliver | Total value of SO lines currently ready for delivery. This includes Sales Order lines with a status of On Hold. |
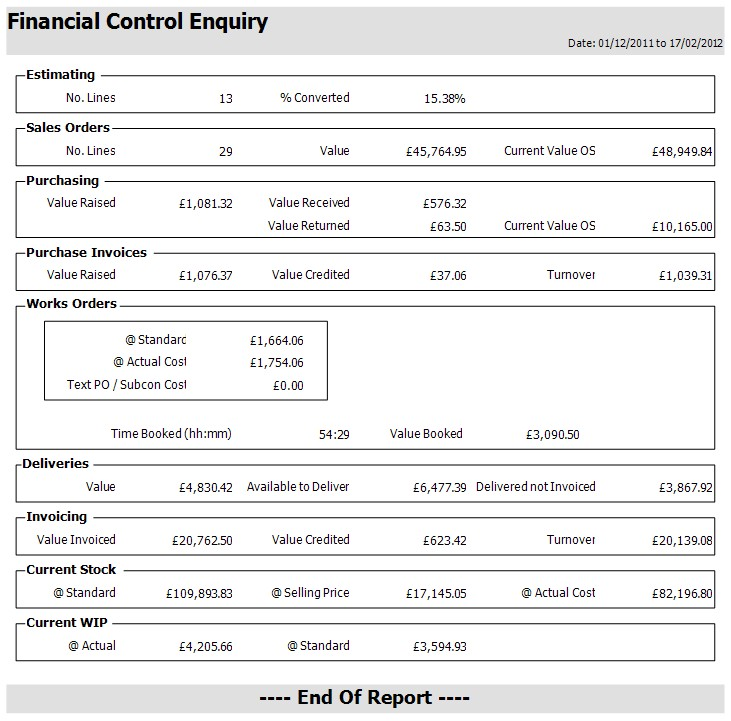
The user can print off a hard copy of this information by clicking the PRINT option at the bottom of the screen. An example of this report is shown below.
Export
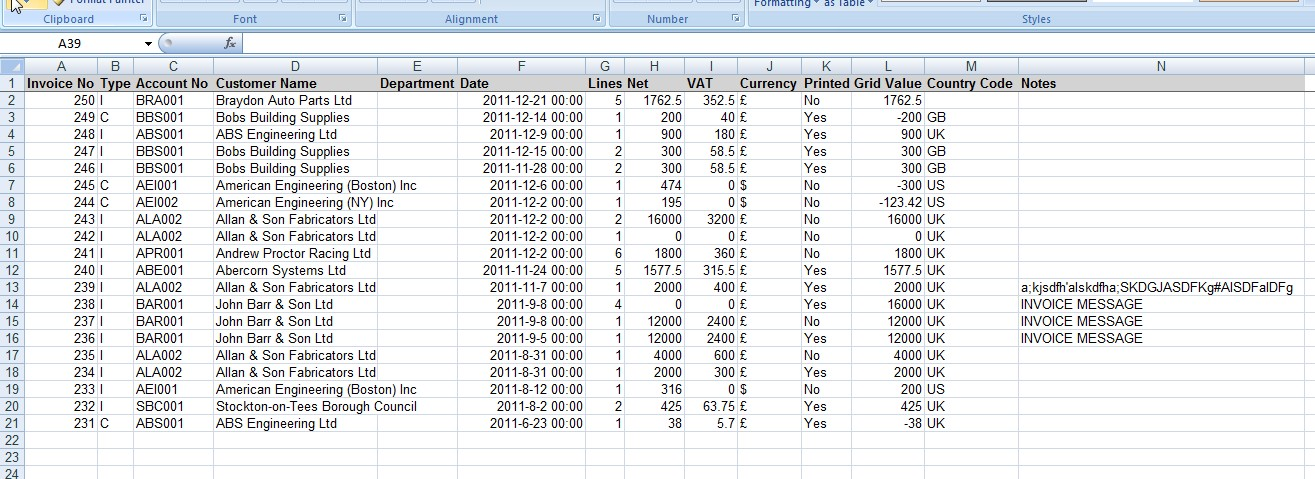
This option allows the user to export out the current list of invoices to a spreadsheet for further analysis. The exported data is based on the invoices listed in Progress. The user can filter the invoices as required and then use the EXPORT option to create them in a spreadsheet.
Clicking the EXPORT option will present the user with a window for choosing the location and name of the exported file. Once the file has been specified, Progress creates the export file and automatically opens it in Excel for the user to see. An example is shown in the next screen.
New Sales Invoice
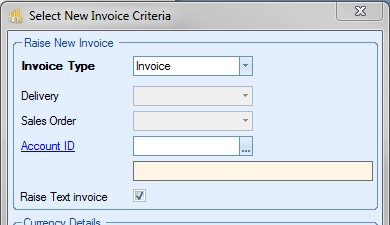
The user can create a new invoice by clicking on the NEW option. This will present the user with the following window. This screen allows the user to raise the invoice based on a variety of options.
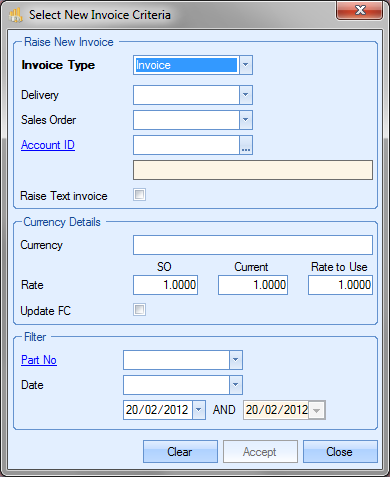
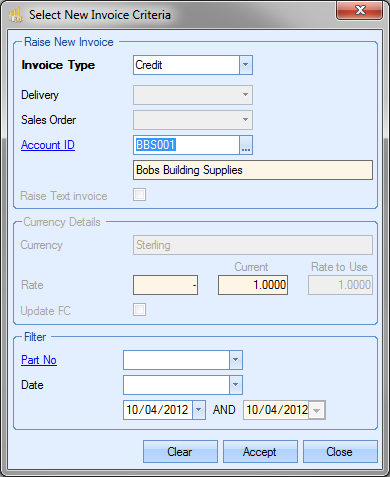
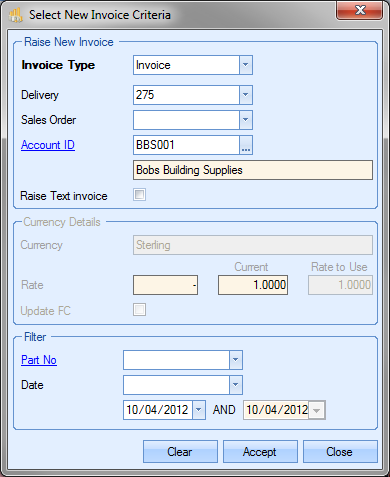
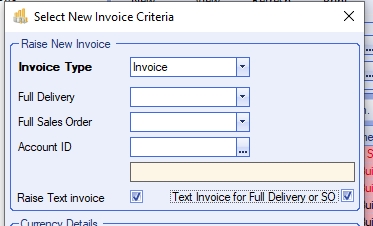
Select New Invoice Criteria
From the New Invoice Criteria screen, the user can specify what information they want to base the invoice on. Most commonly, the user will be raising invoices based on a delivery number. In this case, the user can select the delivery they wish to invoice by selecting the delivery number from the drop-down list.
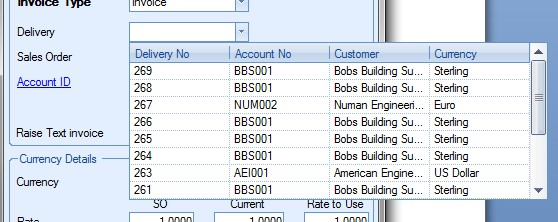
This will generate an invoice based only on the items delivered on the specified delivery.

This rule can be enforced by setting one of the Invoicing system options.
![]()
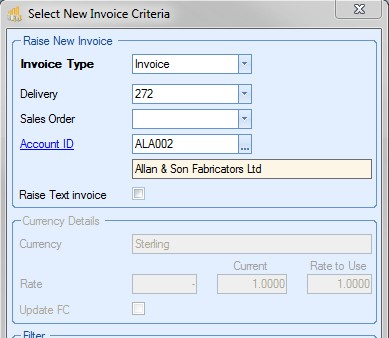
If the above option is left unticked, the user will be restricted to only creating their invoices based on delivery numbers. The initial screen will appear as follows.
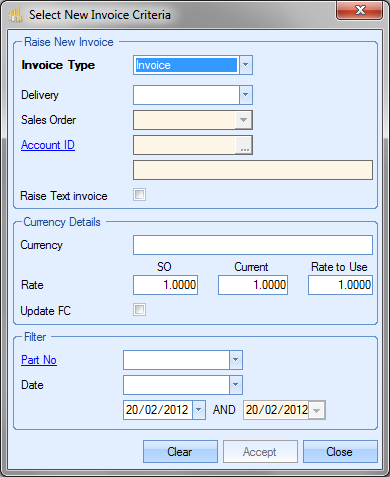
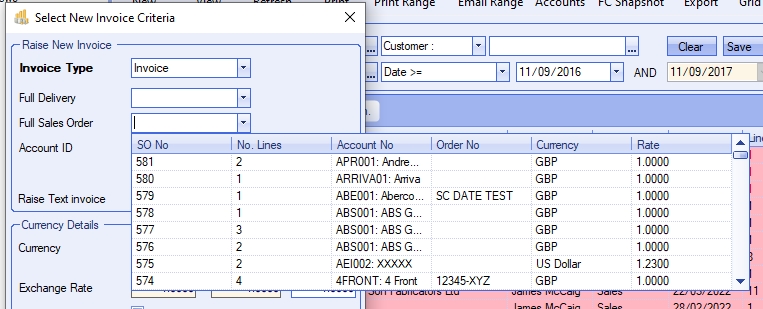
This restricts the user by removing access to the sales order and customer options from the above screen. If Progress has been configured to allow grouping of deliveries and sales orders on invoices, the user will be able to create the invoice based on a sales order or customer ID. The user can select either of these from the drop-down lists available. Choosing a sales order will group multiple deliveries for the same sales order together in an invoice.

Choosing a customer ID will group multiple sales orders and deliveries in a single invoice.
If the user is creating an invoice for a foreign currency customer, the user can change the exchange rate used on the invoice from that recorded against the sales order. For example, on orders which span several months, the user may wish to invoice based on the current exchange rate as opposed to the older one recorded against the sales order when it was first created.
To change the exchange rate, the user must specify the rate to use in the Currency Details section. If the user selects a delivery, sales order or customer account that is set up with a foreign currency, the Currency Details options are made available for the user to change if necessary.
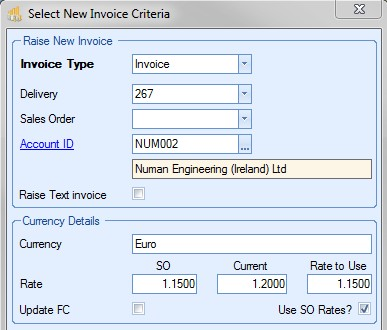
Progress displays the currency name, the rate recorded against the sales order, the current system exchange rate and a RATE TO USE value. The RATE TO USE field defaults to the rate of the sales order, but can be changed by the user to whichever rate they wish to use. The UPDATE FC option allows the user to update the rate used in the invoice to the rate manually entered in the RATE TO USE field. The USE SO RATES option allows the user to specify whether the original SO exchange rates are used.
Once the user has amended the exchange rate, they can click the ACCEPT option to proceed to the New Invoice screen. Any changes to the exchange rate will be visible on the New Invoice screen.
If the user selects a delivery, sales order or customer account that is NOT set up with a foreign currency, the exchange rate options are unavailable.
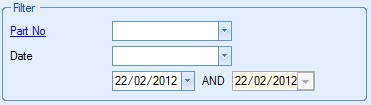
The last section of this screen allows the user to filter the available deliveries, sales orders and customers by selecting either a part number or a date range. This will reduce all the drop-down lists at the top of this window to only display the deliveries, sales order and customers which have the selected part number available to invoice, or fall within the specified date range.
Once the user has selected the details they wish to invoice and clicked Accept on the criteria screen, they will be presented with the New Invoice screen with all the details as per their selections.
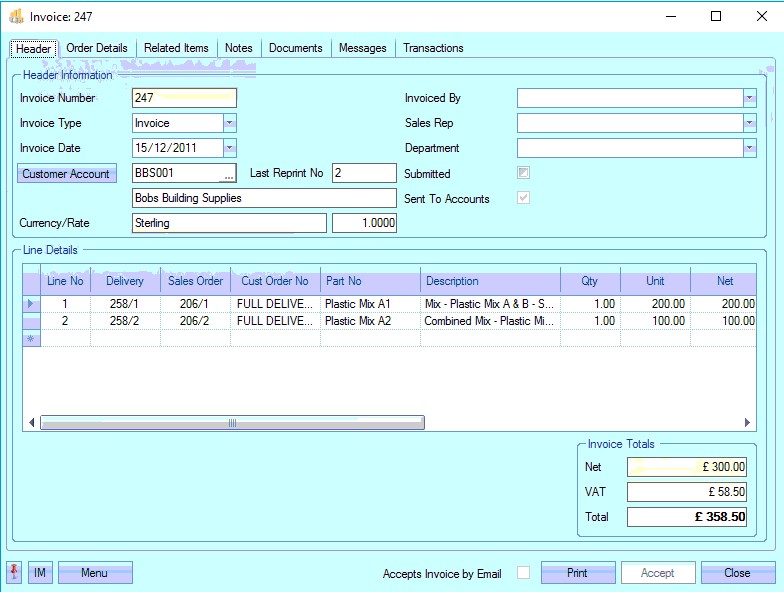
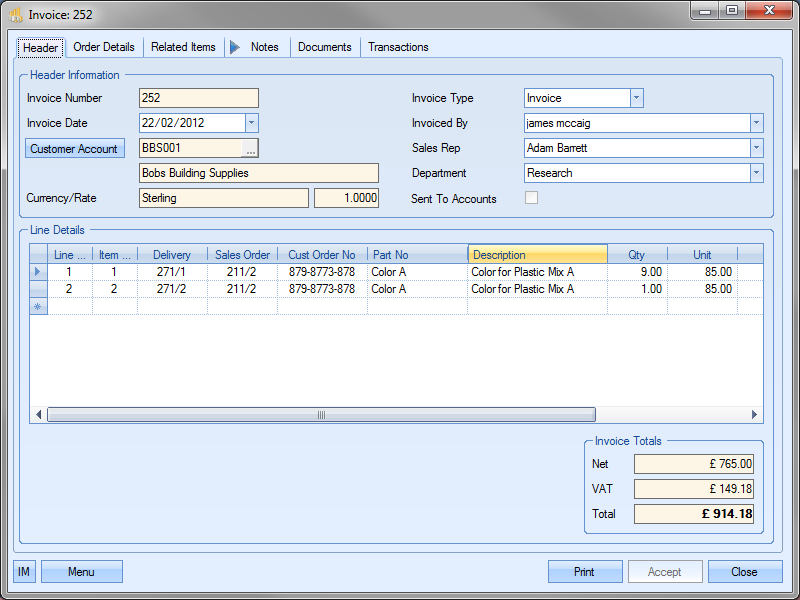
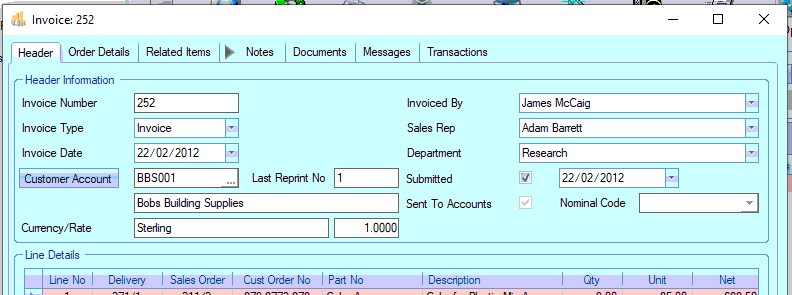
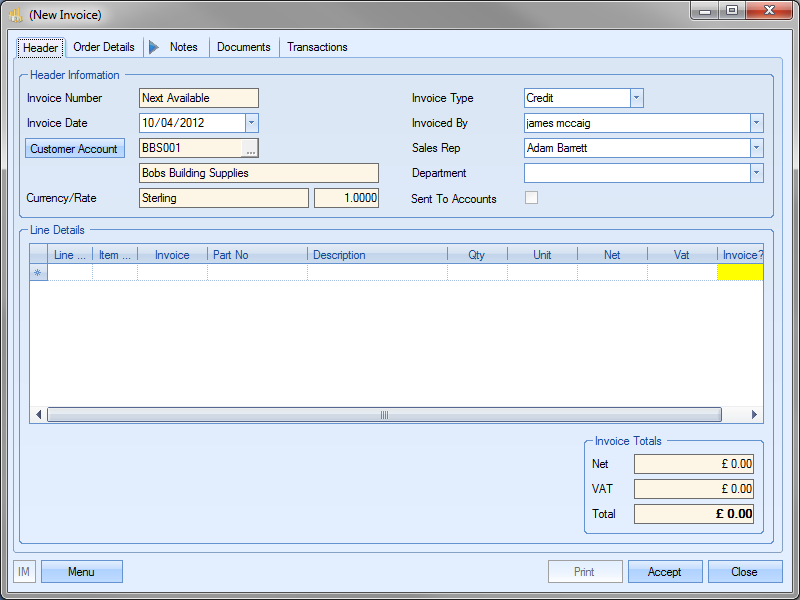
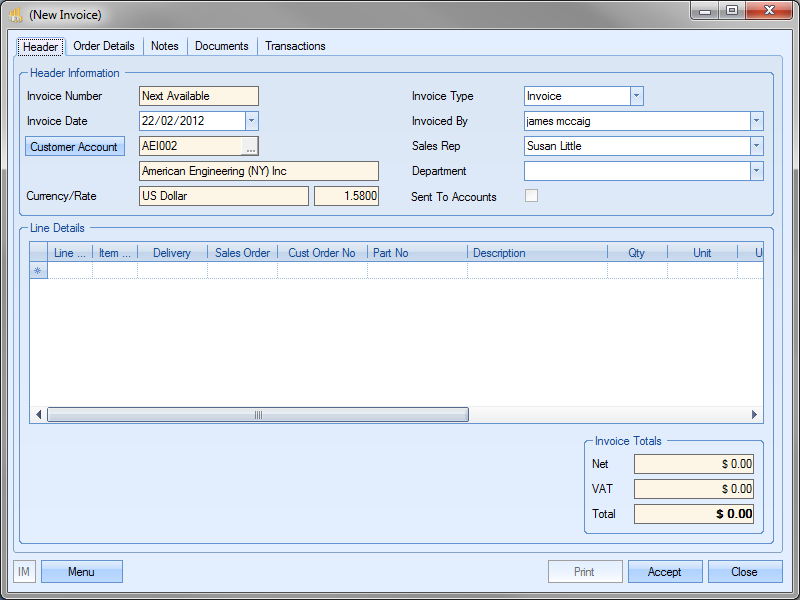
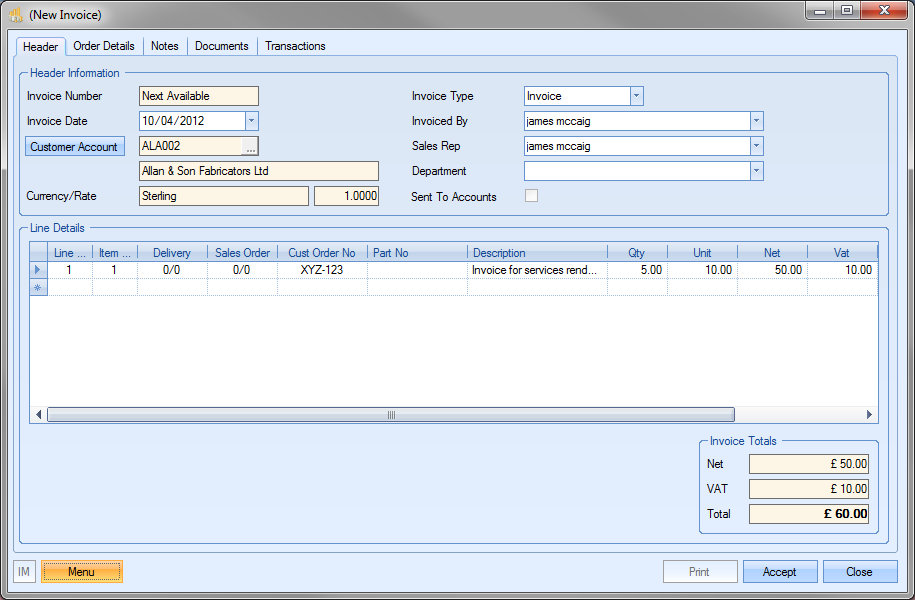
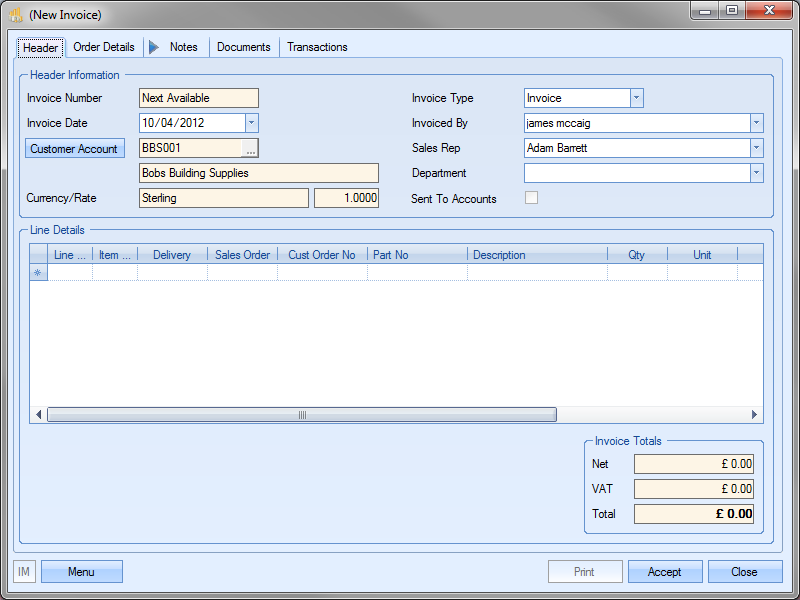
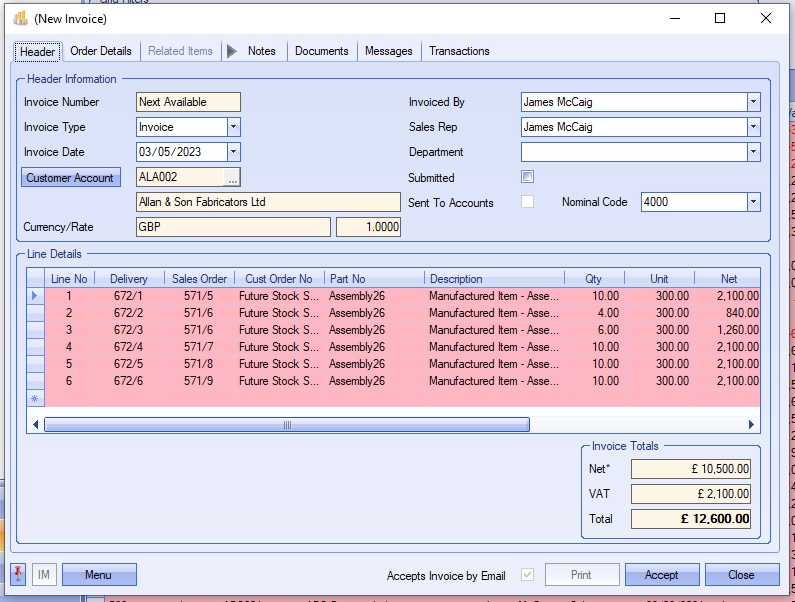
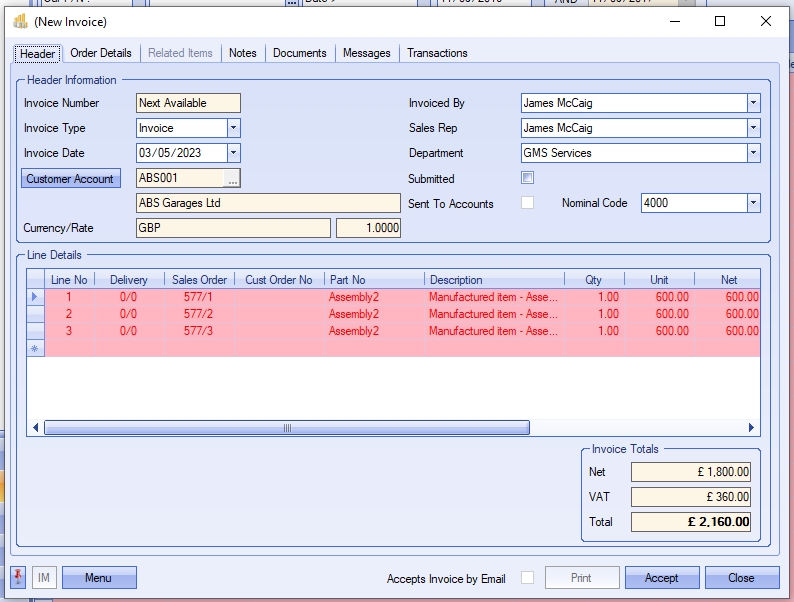
Once the user has selected the information for their invoice, they will be presented with a screen similar to the following.
The top part of the screen shows all the main invoice information. Most of this information is pulled through from the sales order details.
| Invoice Number | Will show the system generated invoice number. If new, then the field will show NEXT AVAILABLE until the user clicks Accept and the invoice is allocated the next system number. |
| Invoice Date | Defaults to current date, but can be changed by the user if necessary using the drop-down calendar. |
| Customer Account | Account ID and name of customer being invoiced. |
| Currency/Rate | Shows currency of the invoice along with the invoice exchange rate. |
| Invoice Type | Allows the user to select whether they create an invoice or credit note. |
| Invoiced By | Name of user creating the invoice. The user can change this by selecting a name from the drop-down list. |
| Sales Rep | Defaults to the name of the sales rep recorded on the sales order. The user can change this by selecting a name from the drop-down list. |
| Department | Defaults to the department set on the sales order. The user can change this by selecting a department from the drop-down list. |
| Submitted | This flag indicates whether or not the invoice has been sent to the customer and is, based on the system settings, automatically populated when the invoice is printed or manually updated by the user. |
| Sent To Accounts | Flag indicating whether the invoice has been transferred to the external finance package (e.g. Sage, etc). |
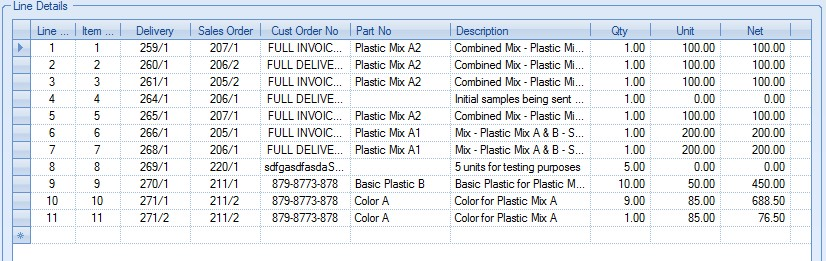
The bottom half of the screen displays all the individual item information. Most of the information will be pulled through from the sales order line details
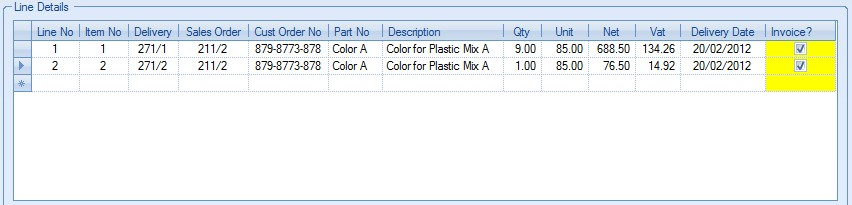
| Line No | This is the system generated invoice line number. |
| Item No | This is the sales order item number. |
| Delivery | This is the delivery and delivery line number associated with the invoice. |
| Sales Order | This is the sales order and sales order line associated with the invoice. |
| Cust Order No | This is the customer order number recorded against the sales order. |
| Part No | This is the part number for the item being invoiced. |
| Description | This is the part description for the item being invoiced. |
| Qty | This is the invoice quantity. |
| Unit | This is the unit price entered on the sales order for this item. |
| NET | This is the NET value of the invoice line. |
| VAT | This is the VAT value of the invoice line. |
| Delivery Date | This is the date of the delivery associated with this invoice. |
| Invoice? | This is a tick box that allows the user to select which items are to be included in the invoice. There is a system option which determines whether this tick box is ticked or unticked by default. |
![]()
If this option is ticked, all items will be marked for invoice when new invoices are created. If unticked, all lines will not be marked.
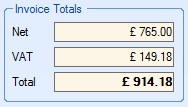
The invoice total is displayed at the bottom of the window for the user to check. This is calculated based on all the information pulled through from the sales order or the information entered directly into the invoice.
If all the details and values are correct, the user can click the ACCEPT option to create the invoice.
NET Total
The NET figure will show the total value of the invoice created. If a discount has been applied to any of the invoice lines, the NET figure will have an asterisk (*) shown against it to highlight this.
![]()
![]()
VAT Total
When an invoice is created, the individual lines will default to the VAT rate specified against the SO line. However, if the SO/invoice contains a mix of VAT rates across the different line items, the system will highlight this by showing an asterisk (*) against the VAT total figure shown at the bottom right corner of the sales order.
![]()
![]()
Order Details
The Order Details section of the invoice shows all the relevant contact information that has been pulled through from the sales order.
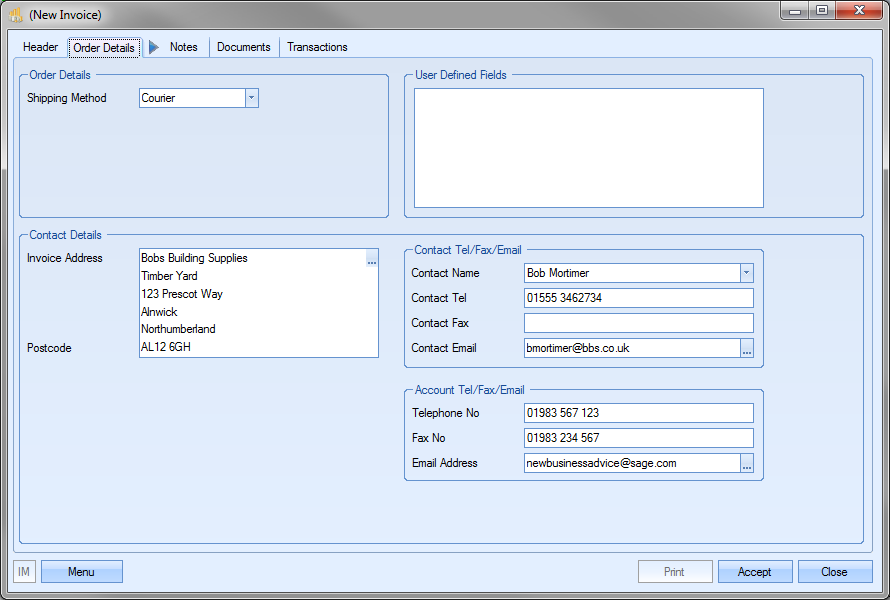
The Shipping Method field is populated based on the information entered against the sales order. If any User Defined Fields have been created for use against invoices, then these will be displayed in the appropriate section of this screen. The contact information displayed at the bottom of the screen is also pulled through from the sales order information, although it can be changed, like most of the information on this form, by the user if required.
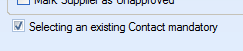
NOTE: Selection of the contact can be restricted to valid customer contacts using a one of the system options in the Admin section of Progress. This option makes it mandatory to select only from the existing contact list for the customer. The option to switch this on is shown below and is accessible in the Miscellaneous system options.
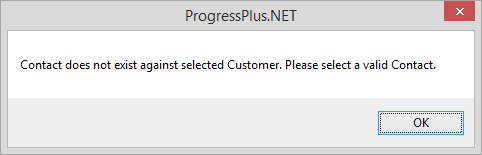
Trying to enter a contact name which doesn't already exist against the customer results in the following warning appearing.
Related Items
This section can be used to view any related records to do with the current invoice.
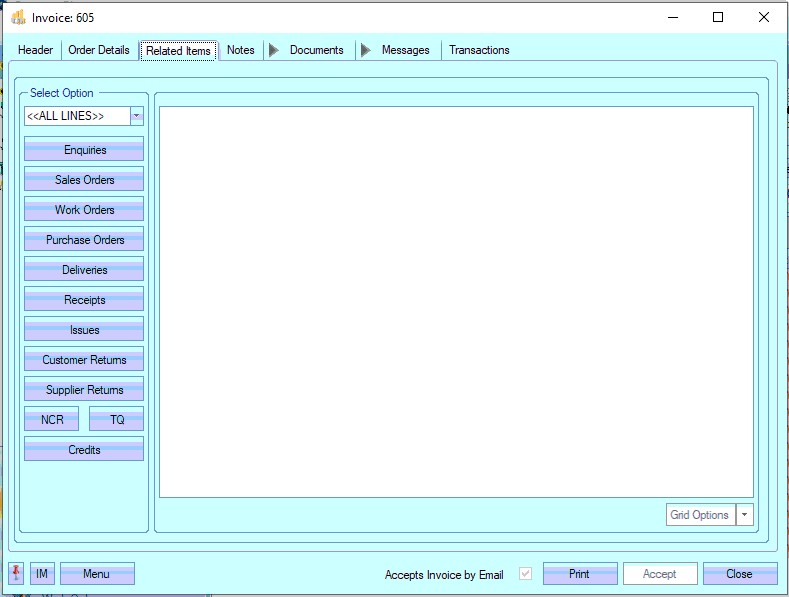
By default, the system will show related items for all invoice lines, however, the user can filter for a specific line number using the drop-down list at the top. This selects the criteria to be used for showing the related information.
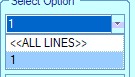
Some examples of these are as follows:

(Associated enquiry details)

(Associated sales orders)
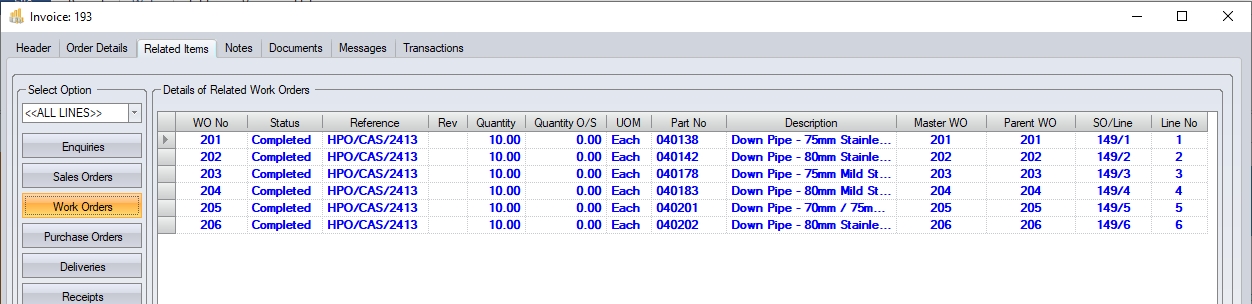
(Associated work orders)

(Associated purchase orders)

(Associated deliveries)
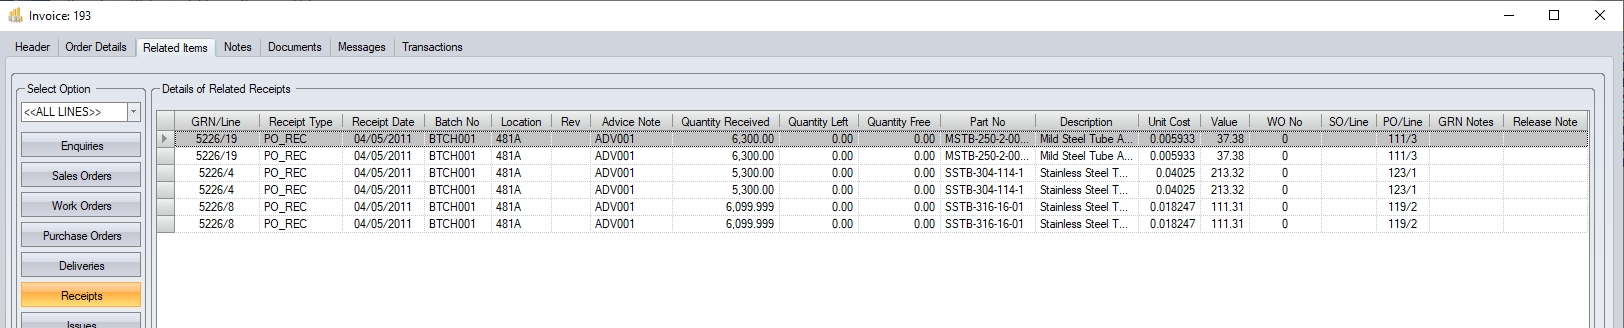
(Associated receipts)
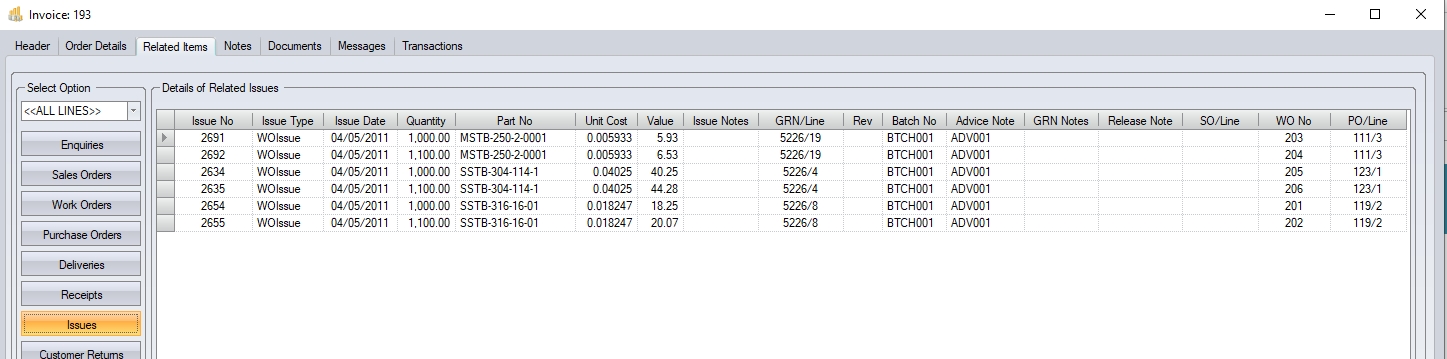
(Associated issues)
Any information displayed under any of the options above can be accessed directly by clicking on the ![]() option against the displayed items as shown below.
option against the displayed items as shown below.
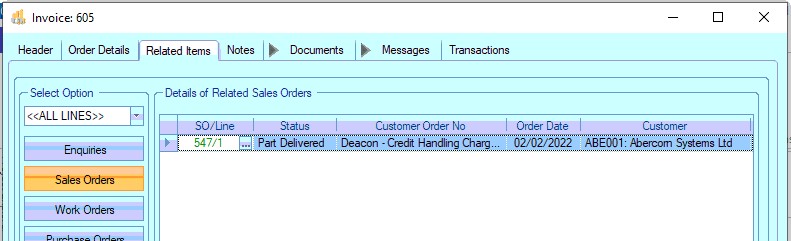
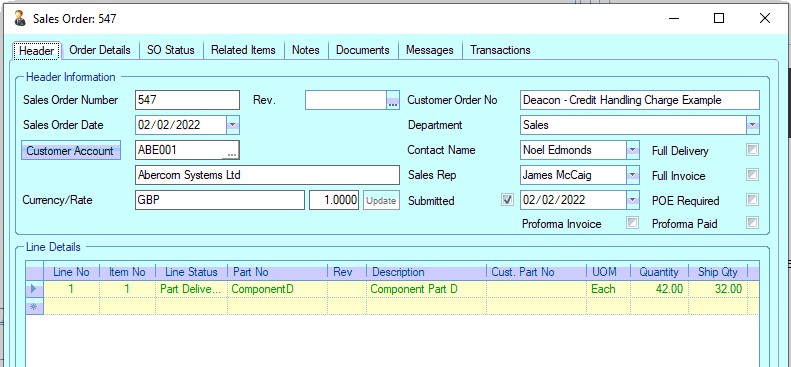
(Associated Sales Order)
Notes
The notes section of the invoice allows the user to add any comments to the invoice. By default, any customer invoice notes will be pulled through from the customer record, but additional text can be added by the user if required.
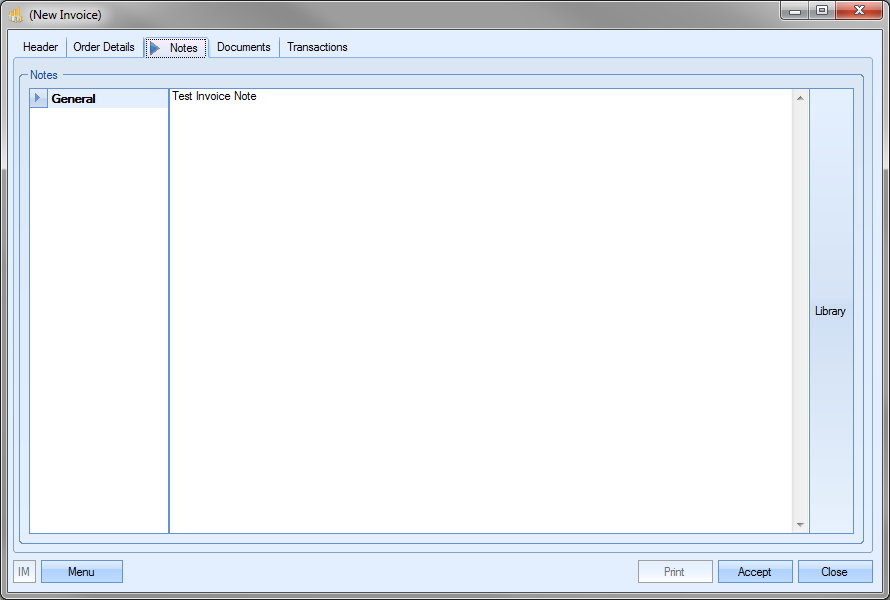
The user can select comments from the Notes Library by clicking on the LIBRARY option on the right of the screen. This will present the user with the library list to select from.
Documents
This section of the invoice allows the user to attach any documents. This can be emails, specific payment instructions or anything else related to the invoice.
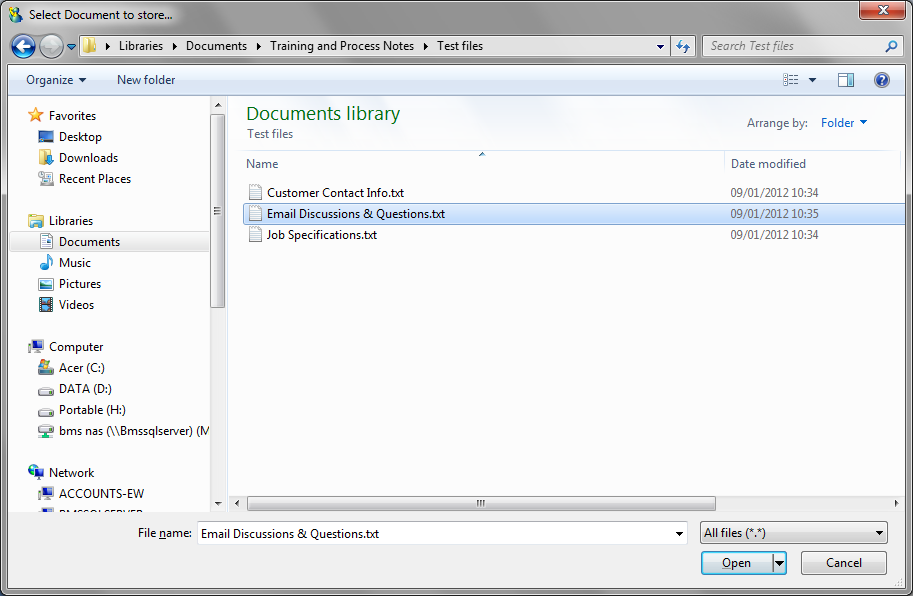
To add a document, the user clicks the ADD DOCUMENT option, and then simply locates the file they wish to add.
Once the required document has been selected, it will be listed in the Documents section with any others that have been added.
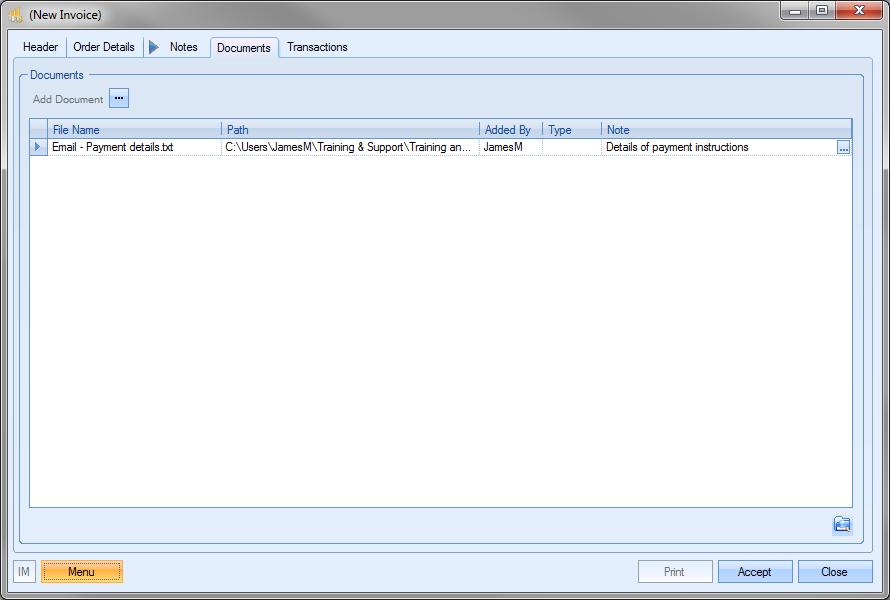
Documents can also be removed from this list by highlighting them and pressing the DELETE key on the keyboard.
This section shows all associated messages and emails relating to the invoice.
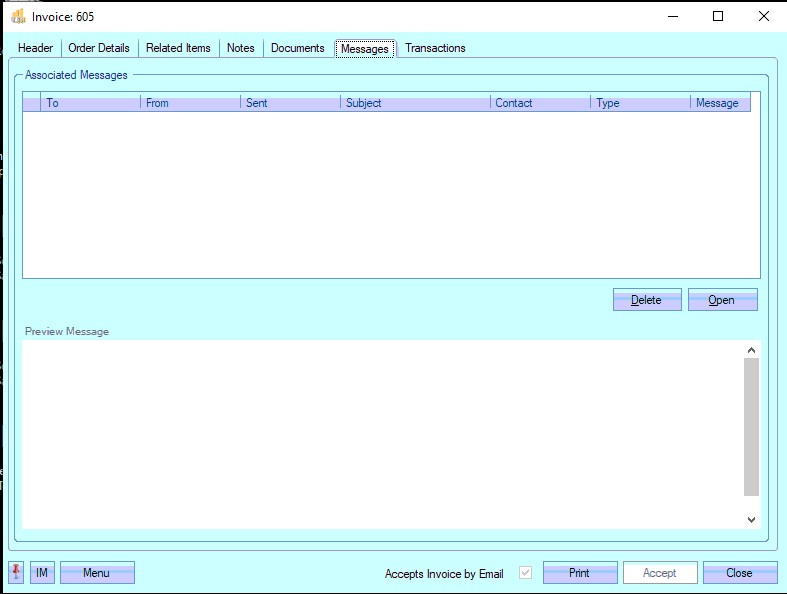
Any communication relating to the invoice (i.e. emails, instant messages, etc.) will all be listed here for the user to view.
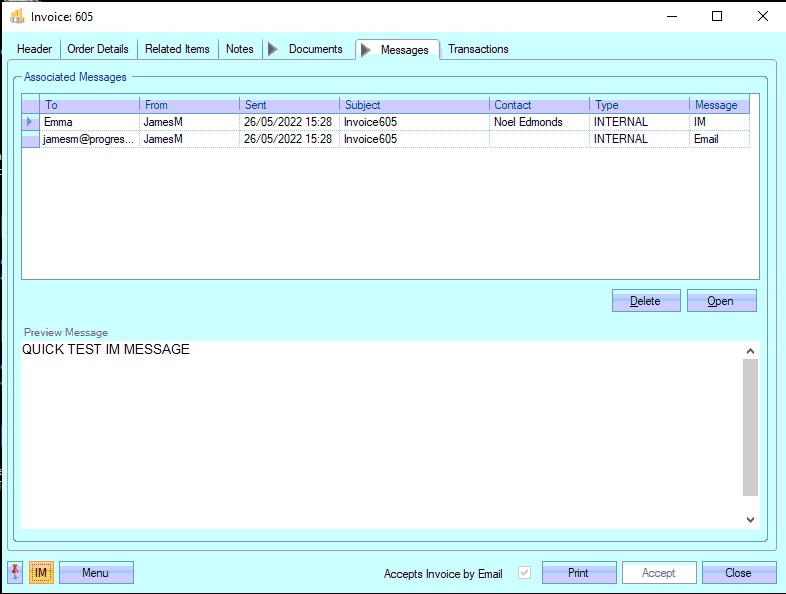
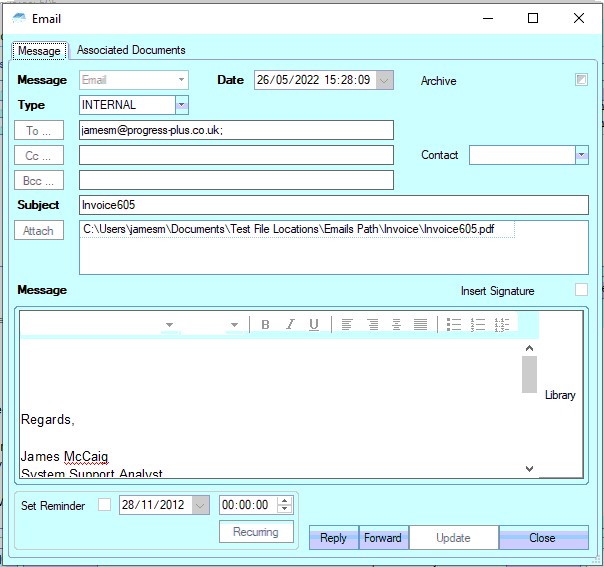
The user can open any of the items listed on this screen but either double-clicking on the listed item or by highlighting and clicking OPEN. The selected item will then be displayed for the user to view.
The user also has the ability remove messages recorded, if permitted. Permission to delete messages is set up against the user permissions. For more information on user permissions, please refer to the Administrator Functions > Access section of the manual. If the user has permission to remove messages, then the DELETE option will be available.
Messages can be deleted by simply highlighting the item and clicking the DELETE option. The user will be prompted to confirm the deletion.

Clicking YES will delete the selected message, and the screen will be updated.
Transactions
This section of the invoice screen shows all transactions made against the selected invoice. When initially creating the invoice, this screen is blank. Once the invoice is created, all actions and changes are then recorded.
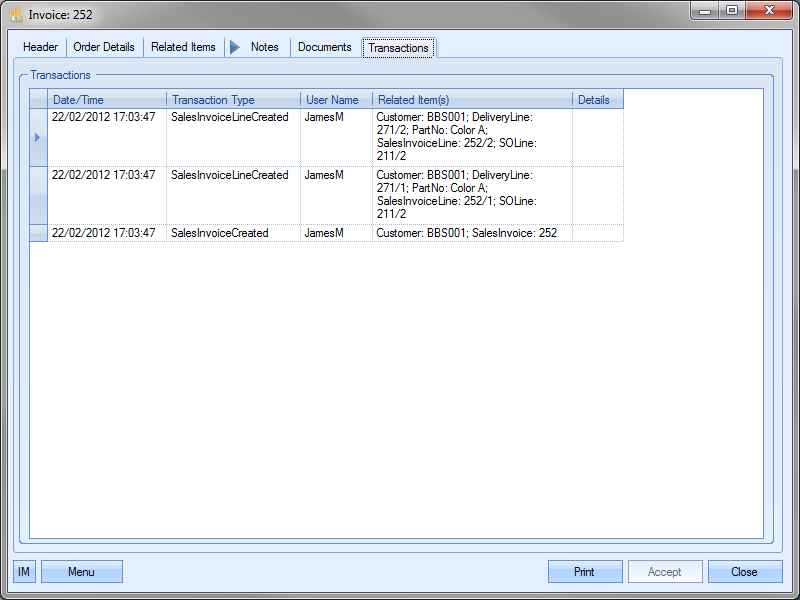
This screen is useful for tracking changes and also looking at the invoice’s timeline.
Invoice Line Details
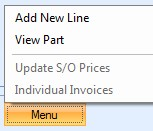
Each invoice line shown also has its own details. These details can be accessed by selecting the Menu > Line Details option.
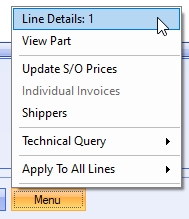
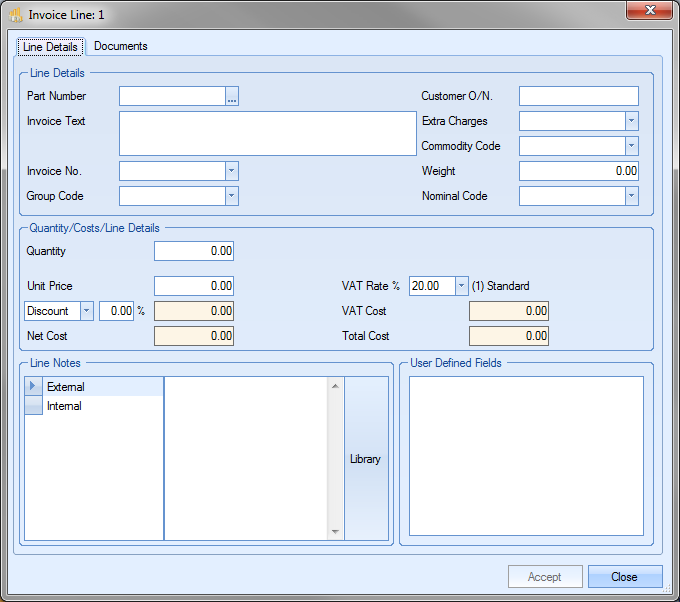
Selecting this option will present the user with the details specific to the selected invoice line.
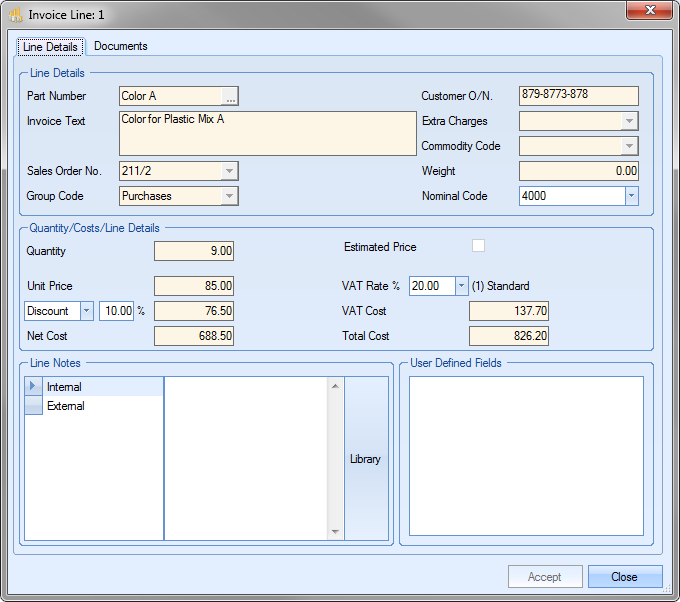
For existing invoice lines, most of the information displayed is restricted with only the nominal code, discount and VAT rates editable by the user. Line notes can be added at the bottom using both the INTERNAL and EXTERNAL notes fields and any user defined fields information can be entered or amended in their own section where they will be displayed.
If the user is adding a new line to an invoice, the MENU option available will be ADD NEW LINE. This will present the user with the same screen as above, but with no information present.

The user will be able to add all the details required for this invoice line manually. This is most commonly used for invoice lines covering non-inventory, carriage or additional cost charges or for raising text/staged invoices. For more information on text invoicing and staged payments, please see the Text Invoice section of this manual.
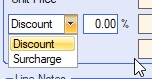
The user can also apply a discount or surcharge to the invoice line if applicable. This will default based on any discounts or surcharges applied to the associated sales order line, however, the user can apply a % value for the invoice line itself (if none are applied) or override the value pulled through from the sales order line.
NOTE: Once an invoice has been transferred to an external finance package, only the notes and user defined fields are available for edit.
Any changes made on this screen can be saved by clicking the ACCEPT option, or the user can return to the main invoice screen by clicking the CLOSE option.
Once all the invoice details have been entered, the user can verify the overall invoice total at the bottom right corner.
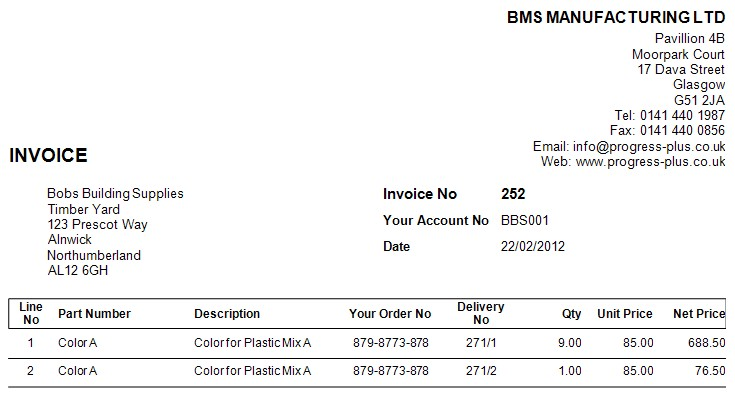
If the user is happy with the details and totals, they can click ACCEPT to finalise invoice. The invoice to be sent to the customer can be produced using the Print option. This will present the user with the invoice.
If the system is configured to automatically update the SUBMITTED flag and date of each invoice/credit, then this will be done once the invoice/credit has been printed.
With the invoice now created, the invoice is now ready to be transferred to an external and will appear in the Accounts Transfer screen.
Credit Notes
In the event a credit note has to be created, the user can select the CREDIT option from the INVOICE TYPE option
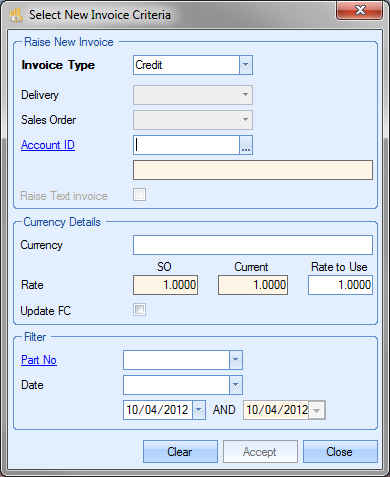
Once the user has selected the CREDIT invoice type, the Delivery and Sales Order options are made unavailable and the user has to select the customer required from the list.
Once the customer is selected, the user can select ACCEPT to proceed with the credit note.
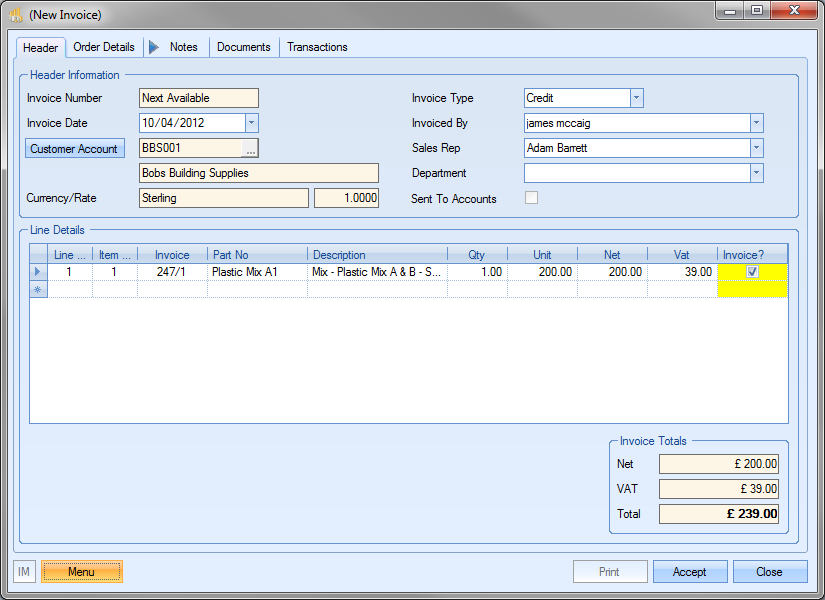
This will present the user with the New Invoice screen but configured for credit notes.
Next step is to add the credit details for the original invoice to be credited. To do this, the user must select the Add New Line option from the menu. This will present a blank line details screen.
The user can choose the original invoice from the Invoice No list. This will be limited to the invoices for the selected customer.
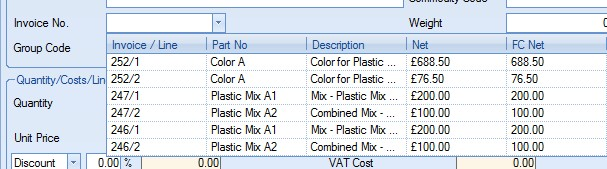
Once selected, the original invoice details are pulled through to the credit note.
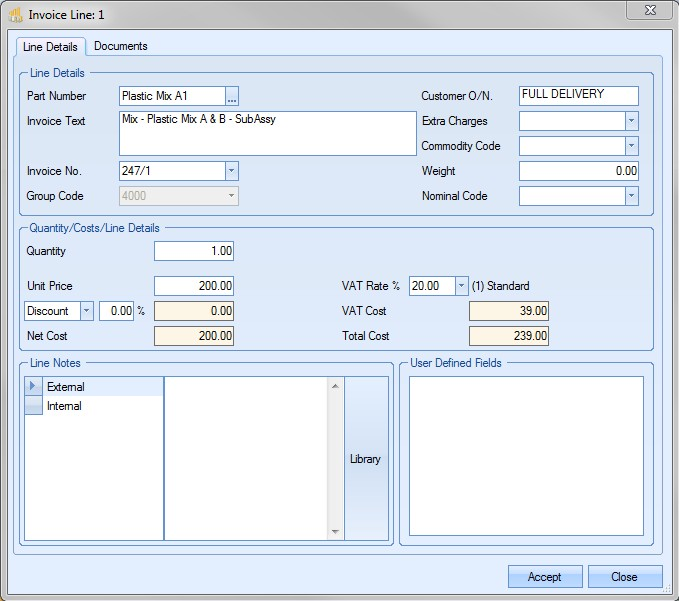
The QUANTITY and UNIT PRICE information defaults to the full value of the selected invoice line. If only a partial quantity is being credited, the user can amend the quantity to amend the value of the credit note line. Alternatively, if it’s a value that’s being credited due to an over charge or incorrect price, the user can set the quantity to 1 and set the unit price to the value being credited. Both these methods allow the user to specify the total value being credited.
Once the details have been verified, the user can save the line detail by clicking on the ACCEPT option. This will return the user to the main credit note screen with the details of the new line visible.
If the user has additional lines to be added to the credit note, they can repeat the above process by selecting the ADD NEW LINE option from the MENU again. If all items have been added and the totals verified, the user can click ACCEPT to save the credit note. The user can print the credit note using the PRINT option.
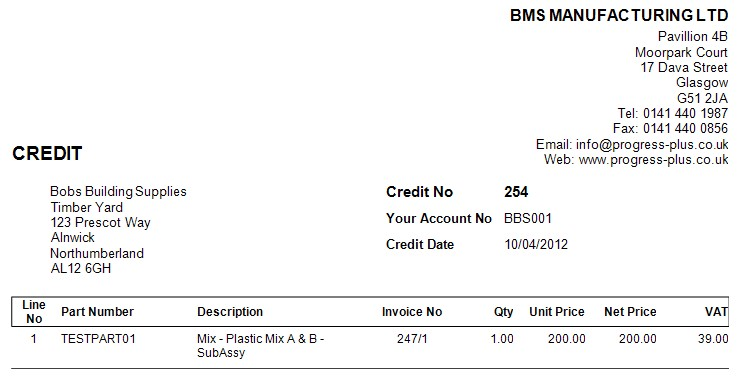
The credit note will now also appear in the Accounts Transfer screen ready for transfer to an external accounts package.
Text Invoices
In Progress Plus, the user has the ability to raise a text invoice. This allows the user to create an invoice for a sale which has no sales order, for example, non-inventory items or a service item or to process partial/staged payments for existing sales orders. It can also be used to recreate invoices previously raised for sales orders and deliveries which is useful if a credit has been raised and the customer needs to be reinvoiced.
To raise a text invoice, the user must indicate this by ticking the RAISE TEXT INVOICE option on the initial invoice screen.
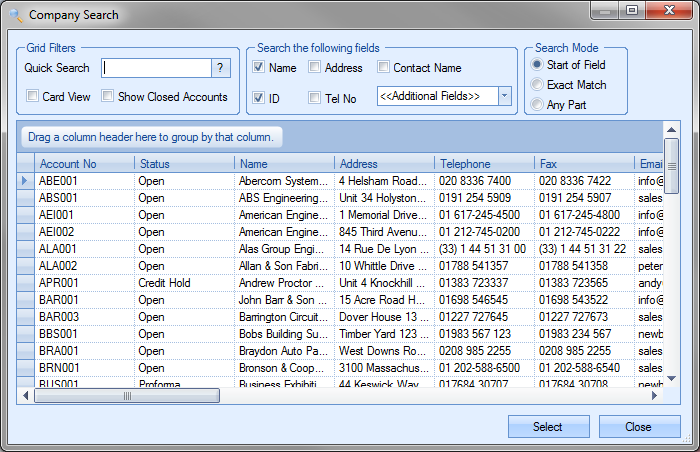
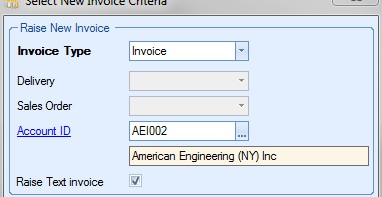
This will remove access to the delivery and sales order drop-down lists and force the user to select an account ID for the customer required. When the user clicks on the customer list, they are presented with the full list of customers to choose from.
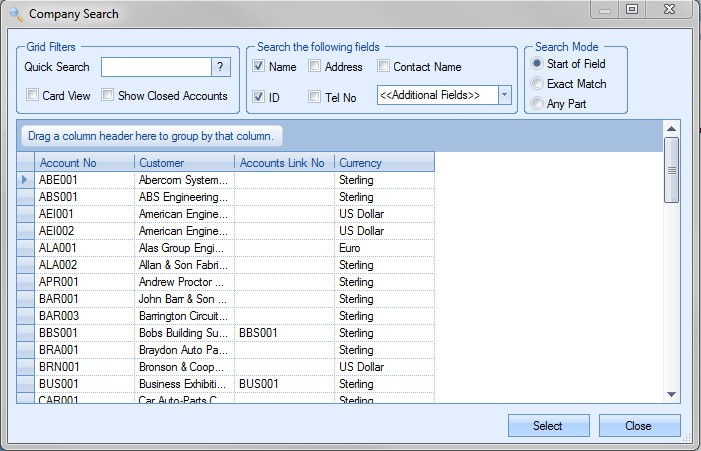
Once the customer is selected, the details will be displayed for the user to see.
Clicking the ACCEPT option will then take the user to a blank invoice screen to allow them to enter the necessary details.
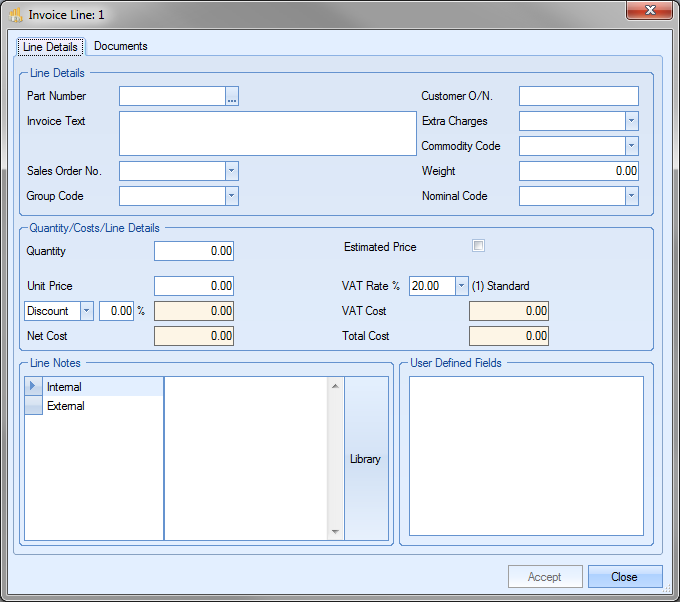
The user can then proceed to enter the text invoice details by selecting the ADD NEW LINE option from the MENU option. Once the invoice line detail screen appears the user can specify details required.
Example – Text Invoice for Non-Inventory/Service Items
Once the blank Invoice Line Detail screen is displayed, the user can manually enter the details of the item/service being invoiced.
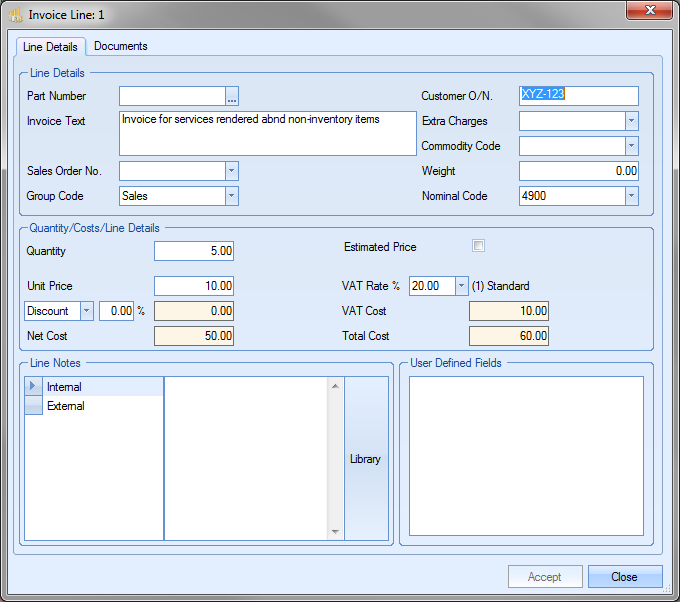
Once the details have been added and verified, the user can click ACCEPT to return to the main invoice screen. This will now display all the details added by the user.
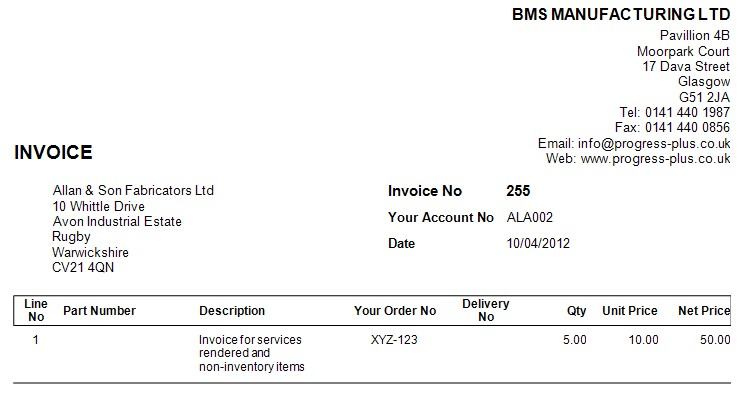
The user can add any additional items by repeating the steps above for all non-inventory/service items required on the invoice. Once complete, the user can print the invoice by clicking on the PRINT option.
Once the invoice has been accepted, it will then appear for transfer on the Accounts transfer screen just like any other invoice.
Example – Text Invoice for Staged Payments
It may be the case that agreements are made with customers with regards to spread payments for items bought. Progress allows invoices to be raised against sales orders without the need for a delivery being made, and results in final invoices taking into account any payments made up to the point of delivery.
For this example, we will use the following scenario:
20% payment on placement of order
50% payment completion of work
30% payment on delivery
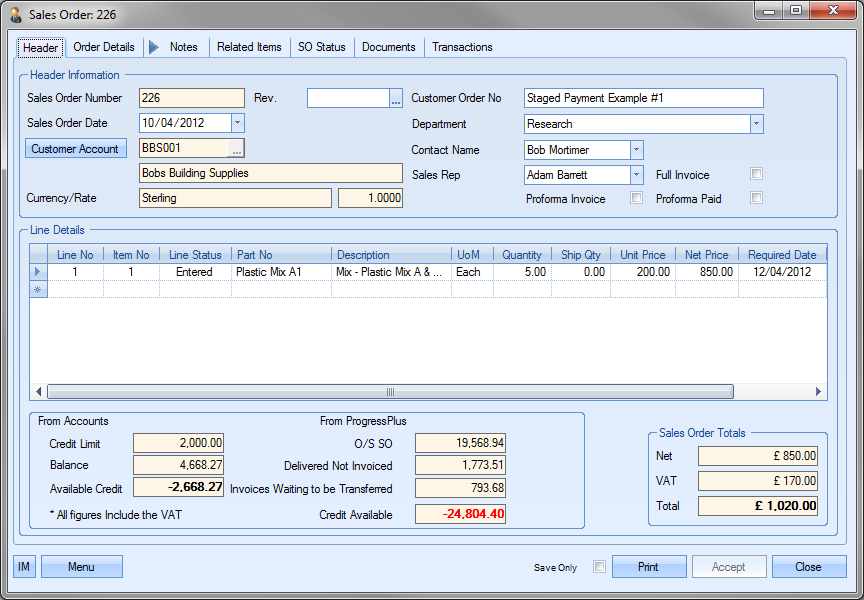
Once the sales order has been created, the user can then raise the invoice for the first payment. The sales order below will be used for this example.
To create the first staged invoice for this order, the user must go through the process already mentioned above with regards to creating a new invoice, marking it as a text invoice and selecting the customer from the list. Once this is done, the user should have a blank New Invoice screen in front of them.
To add the sales order details, the user must select the ADD NEW LINE option from the MENU options. This will present a blank Invoice Line Details window.
From this screen, the user will choose the sales order number from the SALES ORDER NO list. In this example the user would choose sales order 226.
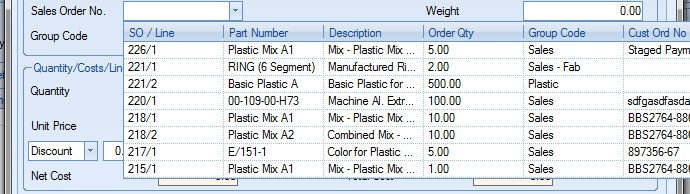
Once selected, the details of the sales order line are displayed.
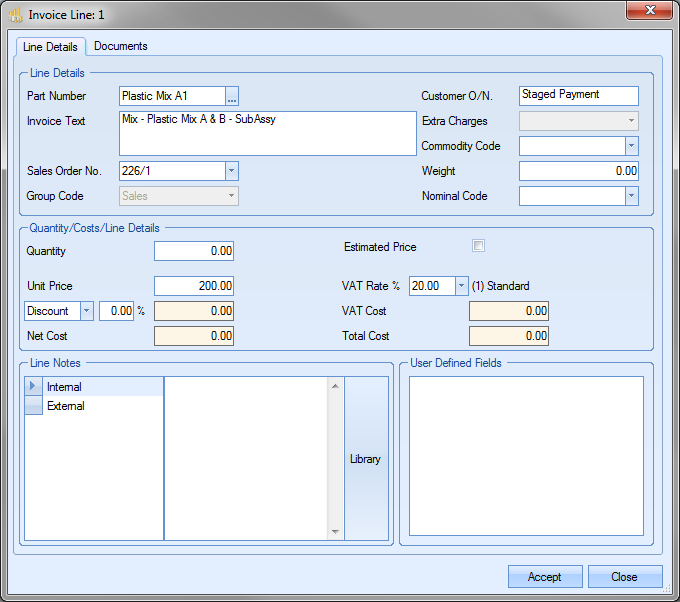
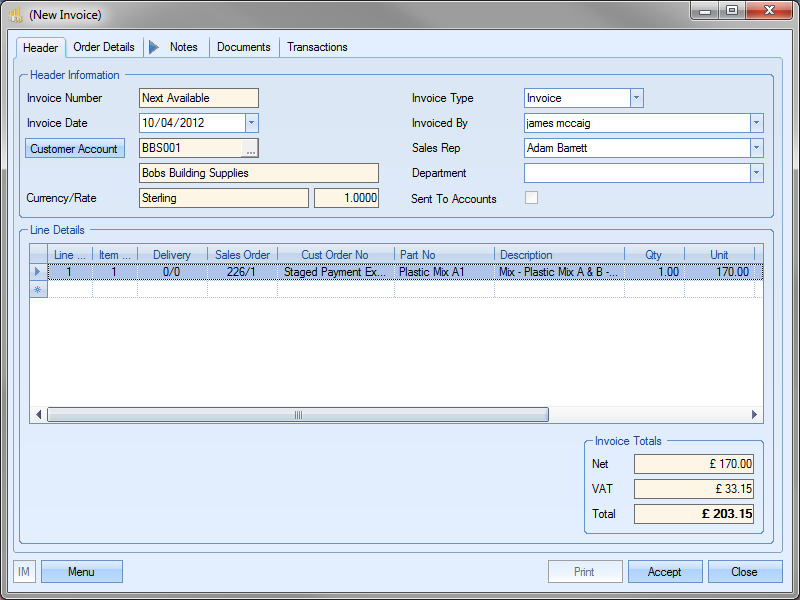
The user can now enter the value of the payment required. For this, the QUANTITY value should be set to 1. The UNIT PRICE should then be set to the value to be invoiced. In this example, the initial payment is for 20% of the sales order value. So the invoice line detail screen should look like the following:

NOTE: It often helps to add an additional comment to the description field indicating the staged payment percentage as shown above.
Clicking ACCEPT will return the user to the main invoice screen with the details added now showing.
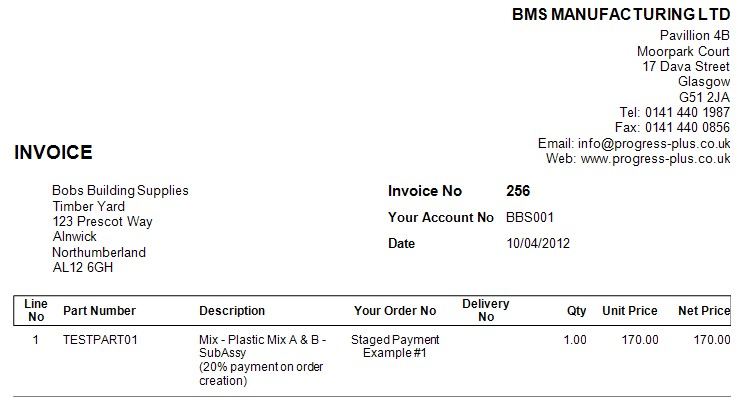
If the sales order has multiple lines and the customer has to pay the same percentage on all the sales order items, the user can repeat the steps above for adding invoice lines for each of the sales order lines. Once the user has added all the required items, they can save the invoice by clicking the ACCEPT option. The user can print the invoice created by clicking the PRINT option.
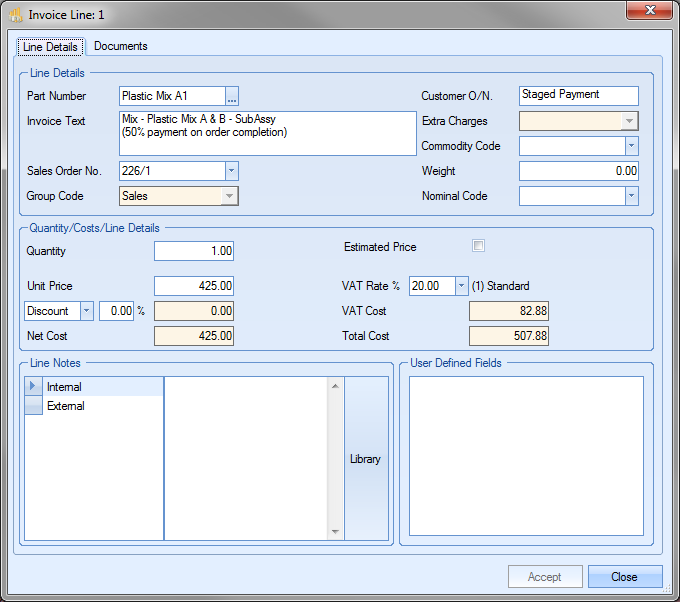
The invoice can then be sent off to the customer as required. When the time comes for the next staged payment, the user can follow the exact same process above for the next payment percentage as agreed with the customer. In this example, a 50% payment is due on completion of the work but prior to delivery. So our next invoice, following the process above will look like the following:
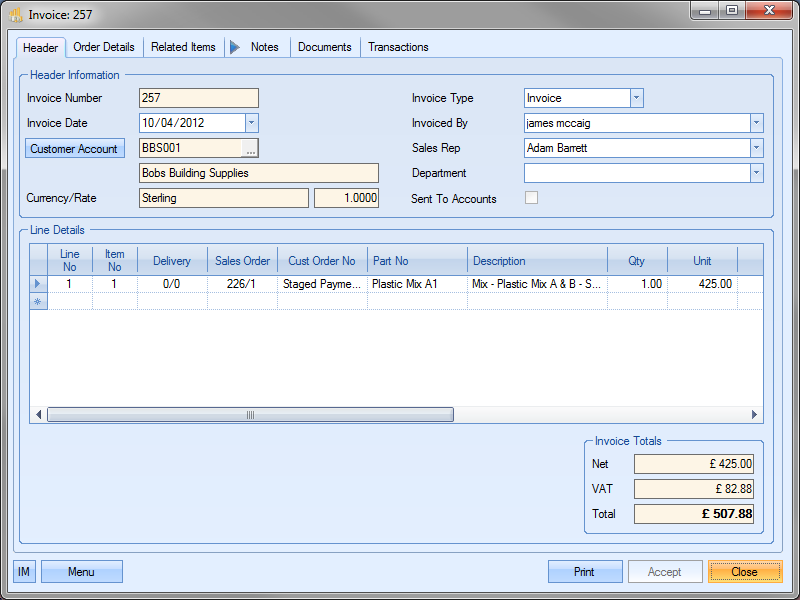
Again, if any additional lines need to be invoiced, the user can add them as before using the ADD NEW LINE option from the MENU options. Once complete, the user can print the invoice and send it off to the customer as required.
Once the goods have been delivered, the user will be looking to raise the final invoice. This will be for the final staged payment and will be raised based on the delivery. This will NOT be a text invoice, but a standard invoice based on the delivery of the sales order items. To create the invoice, the user will select the delivery number from the list of deliveries. In this example, delivery was made on delivery number 275.
Clicking ACCEPT will present the user with the new invoice with all the details populated.
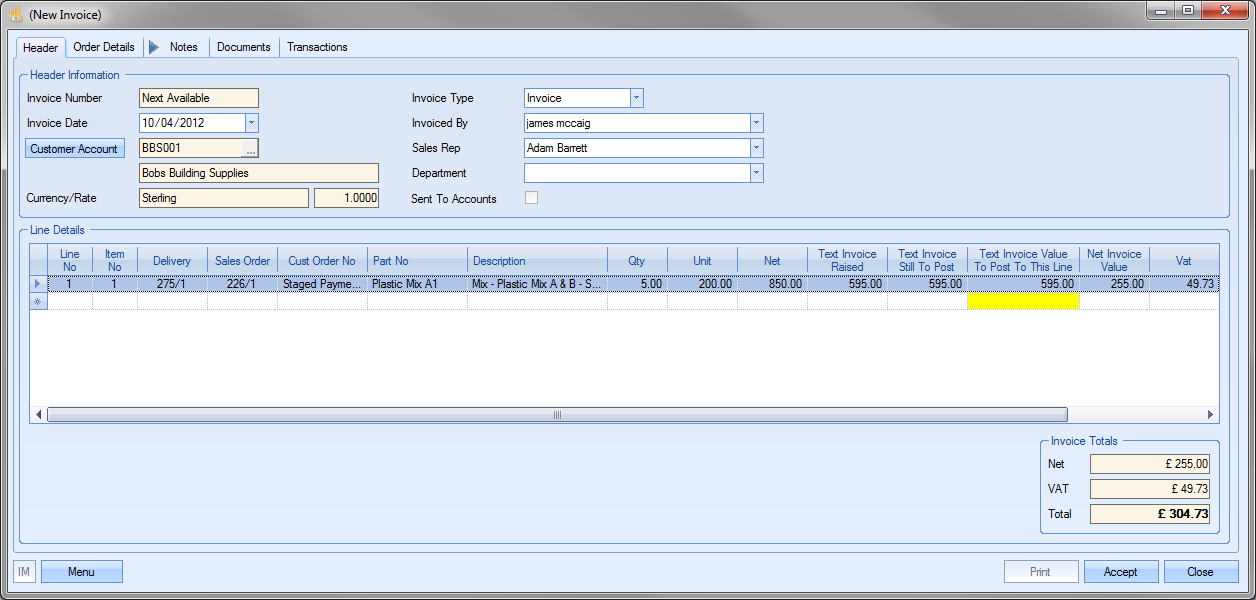
As can be seen above, Progress recognises that invoices have already been created against this sales order (the TEXT INVOICE RAISED column) and has totaled up the previous invoice values (the TEXT INVOICE STILL TO POST column). The column TOTAL INVOICE VALUE TO POST TO THIS LINE is where the user can allocate a value from all previous invoices toward the overall total. Since we have already invoiced the customer for 70% of the sales order total, we can allocate those payments against this invoice, resulting in this invoice, the final invoice, being only for the outstanding balance of the sales order’s value. In this example, the final invoice is for 30% of the total sales order value (£255) which is exactly what Progress has calculated. If any other items were delivered on the same delivery, the user can allocate any previous invoice payments to those lines too.
Once all the details have been verified and the totals checked, the user can click Accept to finalise the invoice. Clicking the Print option provides the user with the final invoice for the customer for only the outstanding balance due.
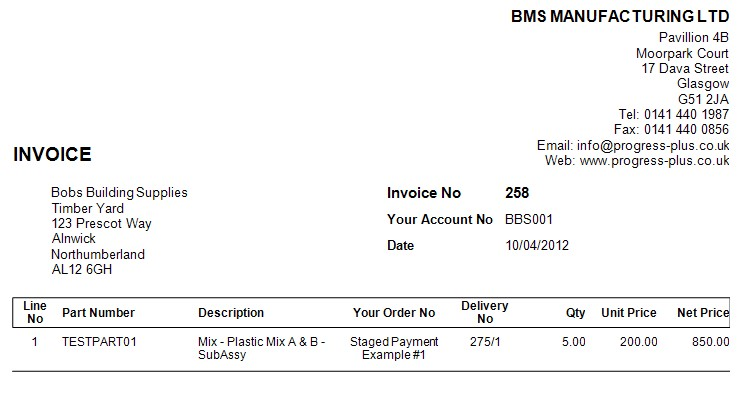
The details on the invoice will detail the items and quantities ordered (as shown above) but the invoice total will only show the outstanding balance due (as shown below).

This can then be sent off to the customer as per usual process.
NOTE: For sales order with multiple lines, the process requires a little more consideration when the staged invoices are created. Each line needs to be treated uniquely and must be individually itemised on each staged invoice to ensure that the final invoice correctly represents any previous payments that have been made against the sales order line items.
NOTE: For sales orders raised in non-Sterling currencies, the system will always calculate the Sterling figures based on the INVOICE exchange rate and the foreign currency values. This can result in varying sterling figures, however, this will ensure the total value invoiced matches the sales order foreign currency value given to the customer when the order was placed. The calculations are explained below.
UNIT = Unit FC / Exchange rate
UNIT FC = Sales Order Unit FC
NET = Net FC / Exchange rate
NET FC = Sales Order Net FC
TEXT INVOICE VALUE RAISED = SUM of all previous Invoice (Sterling Value)
TEXT INVOICE VALUE RAISED FC = SUM of all previous Invoice (Foreign Currency Value)
TEXT INVOICE STILL TO POST = Text Invoice Still To Post FC / Exchange rate
TEXT INVOICE STILL TO POST FC = SUM of all previous Invoice (Foreign Currency Value) LESS SUM of all previous deductions (Foreign Currency Value) LESS SUM of all previous Credits (Foreign Currency Value)
TEXT INVOICE STILL TO POST TO THIS LINE = Editable of Text Invoice Still To Post
TEXT INVOICE STILL TO POST TO THIS LINE FC = Editable of Text Invoice Still To Post FC
NET INVOICE VALUE = Net Invoice Value FC / Exchange rate
NET INVOICE VALUE FC = Net FC – Text Invoice Still To Post to this Line FC
The only exception to this is if the user has ticked the UPDATE FC option on the initial SELECT NEW INVOICE CRITERIA screen (shown below) as this maintains the Sterling values and calculates the equivalent foreign currency values.
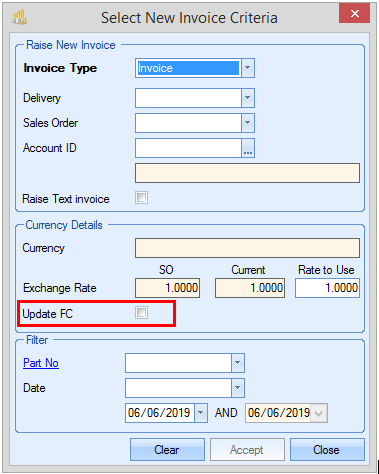
The calculations would then be as follows:
UNIT = SO Unit Price
UNIT FC = SO Unit Price * Exchange rate
NET = Net
NET FC = Sales Order Net * Exchange rate
TEXT INVOICE VALUE RAISED = SUM of all previous Invoice (Sterling Value)
TEXT INVOICE VALUE RAISED FC = SUM of all previous Invoice (Foreign Currency Value)
TEXT INVOICE STILL TO POST = SUM of all previous Invoice (Sterling Value) LESS SUM of all previous deductions (Sterling Value) LESS SUM of all previous Credits (Sterling Value)
TEXT INVOICE STILL TO POST FC = (SUM of all previous Invoice (Sterling Value) LESS SUM of all previous deductions (Sterling Value) LESS SUM of all previous Credits (Sterling Value)) * Exchange rate
TEXT INVOICE STILL TO POST TO THIS LINE = Editable of Text Invoice Still To Post
TEXT INVOICE STILL TO POST TO THIS LINE FC = Editable of Text Invoice Still To Post FC
NET INVOICE VALUE = Net - Text Invoice Still To Post to this Line
NET INVOICE VALUE FC = Net Invoice Value * Exchange rate
Example - Text Invoice for a delivery or sales order
If the user needs to recreate an invoice previously raised for a delivery, or needs to be able to raise a staged payment against an entire sales order, the user can raise the text invoice based on an existing delivery or sales order.
When the user selects the RAISE TEXT INVOICE option, an additional option will be displayed, RAISE TEXT INVOICE FOR FULL DELIVERY OR SO. Ticking this option will reactivate the delivery and sales order drop-down menus to allow the user to select the item they want.
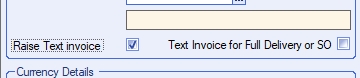
(Additional option displayed)
(Drop-down menus available)

(Selecting a delivery)
(Selecting a sales order)
Once the user makes their selection, clicking ACCEPT will open the new invoice form with the details.
(Details from a selected delivery)
(Details from a selected sales order)
Typically, creating a text invoice based on a delivery is for when a credit has been raised and the user needs to "re-invoice" the customer. Selecting the original delivery note allows the user to create a new invoice for the customer, but also include the original delivery details without the need to customer return and redeliver the goods before invoicing afresh.
Creating a text invoice for a sales order is useful when the user needs to raise a staged payment against the full sales order. Selecting the sales order allows the user to pull all the details of the sales order lines into a new invoice without having to add the individual sales order lines manually. Once the new invoice is presented to the user, they can amend the quantity and/or unit prices against each line to create the staged payment invoice for the value required.