This section allows the user to create and maintain work orders in Progress.
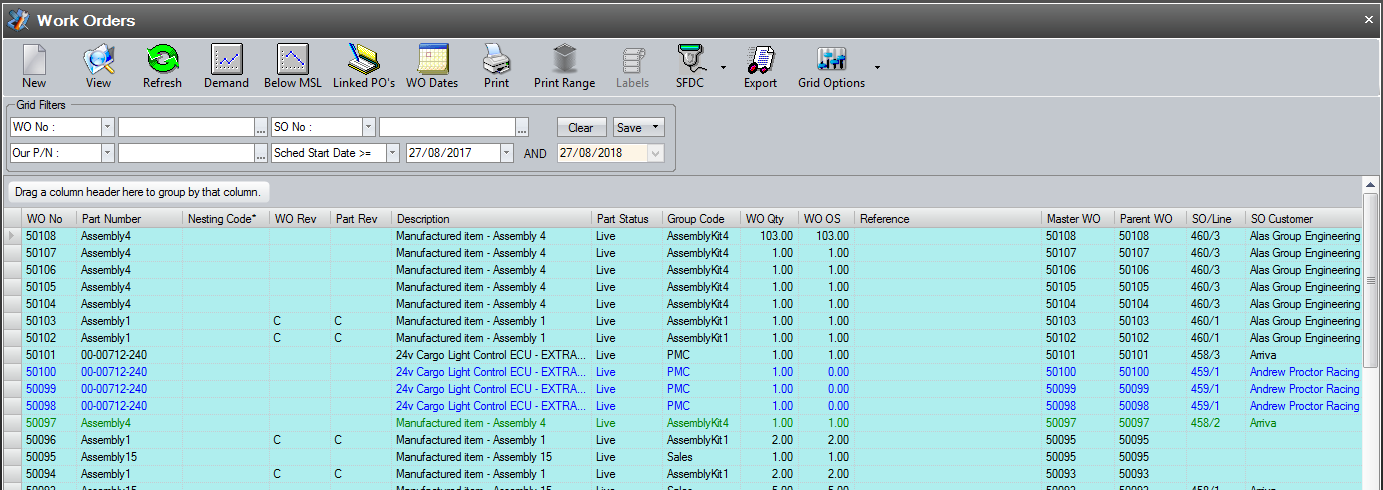
The filters at the top of the screen allow the user to search and display all work orders based on the search criteria entered.

The user can apply a variety of filters to their search including a range of work order numbers and statuses as well as by customer, part number and sales order. The user can also set the maximum number of part records to be displayed on the grid using the LIMIT RECORDS option at the bottom of the screen.
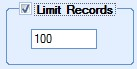
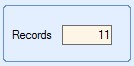
The default value of this option is set in the system options and is useful when large amounts of data are held in Progress as this limits the amount of data being displayed. The limit can be removed by the user if necessary by simply unticking the option, or they can simply increase the limit quantity to a more suitable value. The number of parts shown in the grid is also summarised at the bottom of the screen. This gives a total count of the parts shown.
Once filters and record limits have been selected, the user can view the work orders which meet the selected criteria by clicking the REFRESH option.
The work orders displayed in the grid are colour coded depending on their status. The legend at the bottom of the screen explains the meaning of each.

This gives the user an idea of a work order’s status at a glance.
View
The user can view the details of any selected work order by highlighting the work order required in the grid and clicking the VIEW option. Alternatively, the user can view the details of a work order by double-clicking on the required work order directly on the grid. Either method will present the user with the following screen.
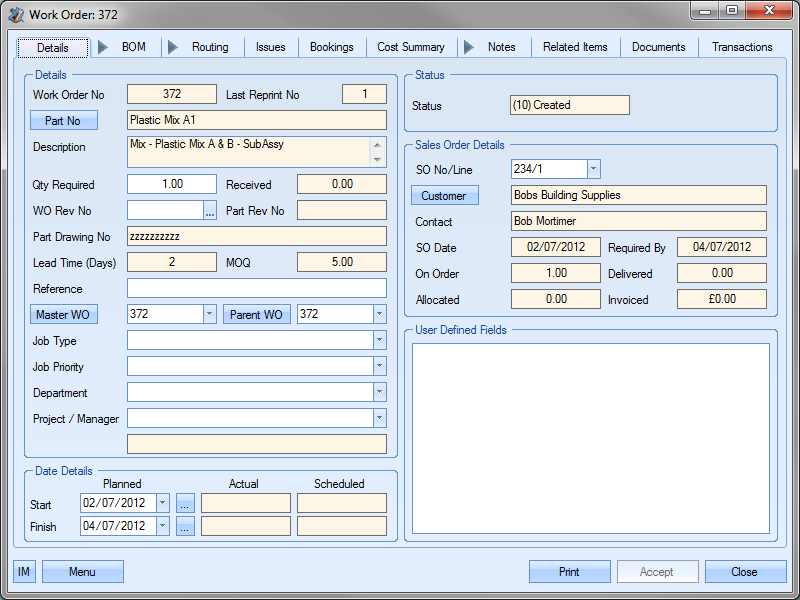
The user can now view or amend the details of the selected work order as required. Clicking the CLOSE or ACCEPT options will return the user to the Work Order screen.
WO Demand
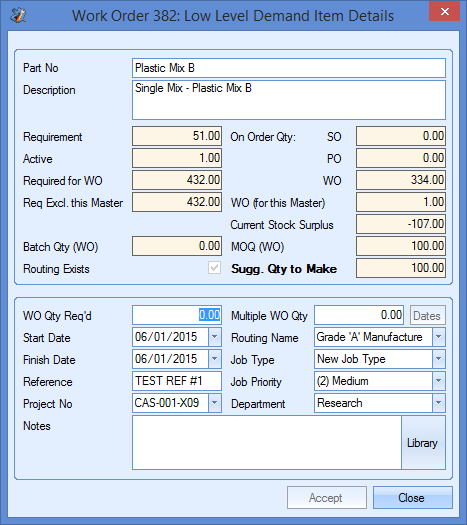
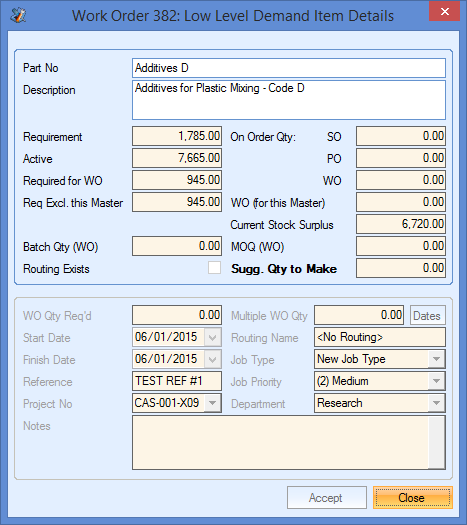
This option allows the user to view any lower level demand for a selected work order. Sub-assembly requirements are highlighted, allowing the user to create the additional work orders necessary for the selected work order. When the user clicks on the DEMAND option, the following screen is displayed.
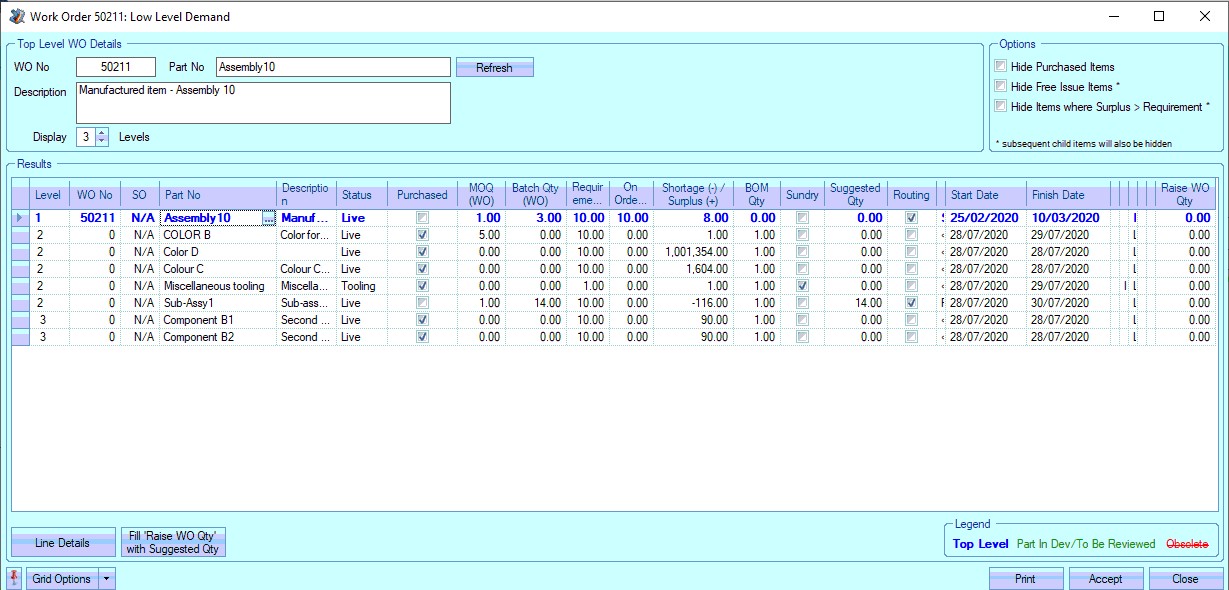
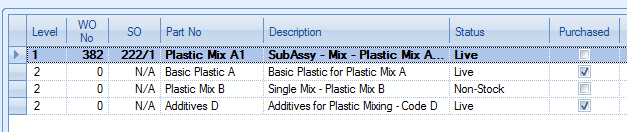
This screen presents the user with the details of the selected work order, part number and description, as well as a breakdown of the BOM for the selected work order and highlights any sub-assembly parts. The BOM levels are indented to show the multiple levels of the BOM.
The user can specify the number of levels shown using the DISPLAY X LEVELS option at the top of the screen.
![]()
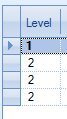
Reducing the number of levels to below the number of BOM levels of the work order reduces the number of visible component parts as shown below. Any changes to the number of levels can be applied by clicking the REFRESH option.
As well as the BOM levels, the screen displays the following information.
| WO No | This is the selected WO and is the work order the requirements are being calculated for. |
| SO | This is the associated sales order for the selected work order. This only shows against the top level work order if the work order and sales order are linked. Stand alone work orders, like their component parts, are not linked to sales orders directly so show “N/A”. |
| Part No | Associated part number. For the top level work order, this is the work order part number, i.e. the part being manufactured. The top level part number and all its information are highlighted in blue. |
| Description | Inventory description recorded against aforementioned part number. |
| Status | Current part number status. If any part number has an inventory status that does not have the “Show In Drop Down” option ticked in the Inventory Status screen, the part will be shown in red with a line through it. |
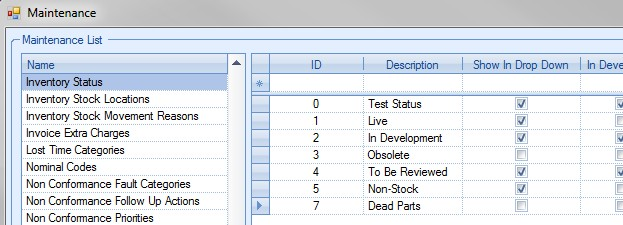
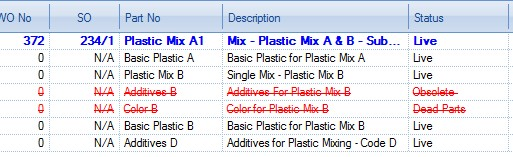
| Similarly, any parts with an inventory status which is marked as “In Development” are shown in the grid in green. The legend describing the colours used on the grid is shown at the bottom of the screen. |
![]()
| For more information on inventory statuses and the List Maintenance screen, please refer to the Inventory section of the manual. |
| Purchased | Tickbox to indicate whether the part number is flagged as a purchased part or manufactured part set in the parts inventory record. |
| FI | Tickbox to indicate whether the part number is flagged as aa "free issue" part number. |
| Active Stock | This shows the number of units of the part number currently in stock. |
| MOQ (WO) | Minimum work order quantity. This is the minimum quantity manufactured for work orders for the part. |
| Batch Qty (WO) | This shows the specified batch quantity set up against this part number in the inventory record. |
| Requirement For This Master WO | This is the quantity of each part required for the selected work order. This is calculated based on the work order quantity and the BOM quantity. |
| On Order (WO) For This Master WO | This is the total quantity already planned for manufacture on work orders linked to the selected work order. Any parts listed which are not manufactured parts will have a value of 0. |
| Shortage (-) / Surplus (+) | This is the current inventory level of the part. This is based on the current stock levels, orders and requirements for the part. Shortages are shown as negative quantities while surplus stock is shown as positive quantities. These values are the same shown on the inventory part’s Stock Status screen. |
| Lead Time | This is the manufacturing lead time of the part. If the part is not a manufactured item (i.e. it has no routing) then this will be left blank. |
| BOM Qty | This is the individual component quantity on the BOM of the manufactured item. |
| Sundry | Tickbox which shows whether the component part is a sundry item or not. |
| Suggested Qty | This is the quantity Progress suggests should be ordered for the currently selected work order. For purchased parts this will be the quantity that needs to be ordered from a supplier. For manufactured parts, including sub-assembly parts, this is the suggested work order quantity. |
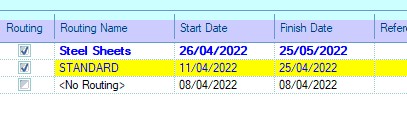
| Routing | Tickbox to indicate whether part number has a routing set up. Purchased parts do not have this ticked. |
| Routing Name | This displays the name of the routing currently selected on the part. If the part number has multiple routings recorded, the user can choose an alternative routing from the highlighted drop-down list. |
| If the user chooses to create work orders for any of the highlighted sub-assembly parts, the work orders will be created using the routing selected on this screen. |
| Start Date | This is the proposed start date of any work order created for the sub-assembly part from this screen. This field defaults to the current date. The user can change the date using the drop-down calendar. |
| Finish Date | This is the proposed finish date of any work order created for the sub-assembly part from this screen. This field defaults to the current date PLUS any manufacturing lead time set up against the part number. Again, the user can change this date if required using the drop-down calendar. |
| Reference | This field allows the user to record a reference for the work order being created. If the top-level work order has an existing reference, all lower level parts will share the same reference. |
| Job Type | This field allows the user to record a job type for the work order being created. If the top-level work order has an existing job type, all lower level parts will share the same job type. If no job type is specified, the user can select a value from the drop-down list if required. |
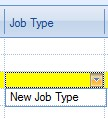
| This drop-down list can be populated from the List Maintenance section of Progress in the WO Job Type list as shown in the screen below. |

| For more information on maintaining lists and the List Maintenance section of Progress, please refer to the List Maintenance section of this manual. |
| Priority | This field allows the user to record a priority for the work order being created. If the top-level work order has an existing priority, all lower level parts will share the same priority. If no priority is specified, the user can select a value from the drop-down list if required. |

| This drop-down list can be populated from the List Maintenance section of Progress in the WO Priority list as shown in the screen below. |

| For more information on maintaining lists and the List Maintenance section of Progress, please refer to the List Maintenance section of this manual. |
| Department | This field allows the user to record a department against the work order being created. If the top-level work order has an existing department, all lower level parts will share the same department. If no department is specified, the user can select a value from the drop-down list if required. |
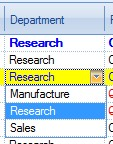
| This drop-down list can be populated from the List Maintenance section of Progress in the Department list as shown in the screen below. |

| For more information on maintaining lists and the List Maintenance section of Progress, please refer to the List Maintenance section of this manual. |
| Project | This field allows the user to record a project against the work order being created. If the top-level work order has an existing project, all lower level parts will share the same project. If no project is specified, the user can select a value from the drop-down list if required. |
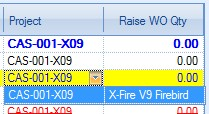
| This project list can be populated from the Maintenance section of Progress in the Project section as shown in the screen below. |
| For more information on projects, please refer to the Projects section of the manual. |
| Raise WO Qty | This field allows the user to specify the quantity for the work order to be created. |
WO Demand Options
The user has a couple of options regarding the information shown. These options allow the user to remove certain parts from the demand grid to help focus on what they need to consider.
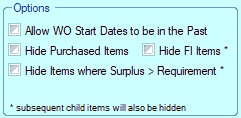
Allow WO Start Dates to be in the Past
This option allows the calculated work order dates to be prior to the current date. By default, the system would typically raise work orders with dates based on current date, however, back-dating work orders can be done using this option.

(Option unticked - system calculates WO dates based on current date)
(Option ticked - system calculates dates based on parent WO dates)
Hide Purchased Items
The user can also remove purchased parts (MP ticked) from the grid by ticking this option. Refreshing the grid removes all purchased items, leaving on manufactured parts shown.
UNTICKED (Show all parts)
TICKED (Hide all purchased parts)

Hide FI Items*
This option allows the user to hide any part that is marked as an free issue part (FI ticked). If the part marked as FI has a BOM, the lower-level parts will also be hidden.

(Option unticked - FI items shown with lower-level BOM items)

(Option ticked - FI items hidden, along with the lower-level BOM items)
Hide Items Where Surplus > Requirement
This option allows the user to hide parts where there is sufficient supply already planned. This effectively highlights parts where there is a current shortfall in supply.

(Option unticked - All parts shown regardless of surplus/shortage)

(Option ticked - Only parts with overall shortage shown)
Line Details
The user can further enquire into the inventory status of any component or sub-assembly by clicking on the LINE DETAILS option at the bottom of the screen. This presents the user with a more detailed view of the part in question as shown below.
When viewed for a purchased part, the screen shows a more detailed view of the stock status of the selected component, much like can be seen on the parts Stock Status screen. The bottom half of the screen is locked down as this is only for use with non-purchased parts. An example for a non-purchased part is shown below.
Again, a more detailed look at the stock status of the selected part can be seen at the top half of the screen. The bottom half of the screen allows the user to specify details to be used in creating a work order.
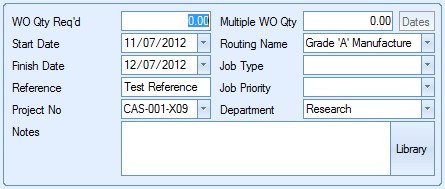
The user can specify the required work order quantity as well as a batch quantity if required. This would create multiple work orders, each for the specified batch quantity, to the total quantity required.
![]()
For single sub-assembly work orders, the user only need add the WO QTY REQ’D value.
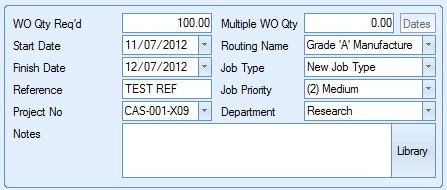
The user can then specify the rest of the details, including dates, using the fields displayed. If the user wanted to create the work order quantity of 100 units in batches of 10 units, the user could set up the details as follows.
As can be seen, the option to choose START and FINISH dates are now locked. The user can now use the DATES option to specify the dates for each individual batch.
![]()
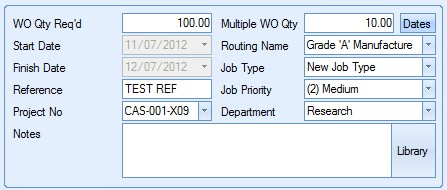
Clicking on the DATES option presents the user with the following window.
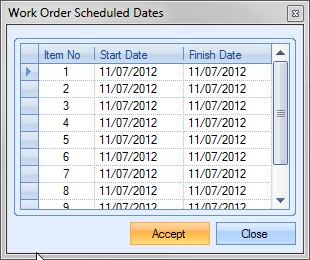
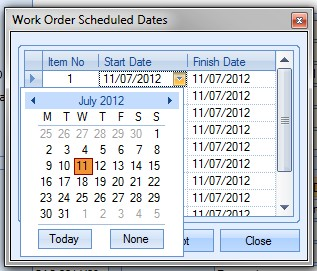
Both dates will default to the current date. The user can change the dates using the drop-down calendar for each item (work order) listed.
Once all the dates have been amended accordingly, the user can click ACCEPT to save the dates and return to the work order details screen. Once all the details have been entered, clicking ACCEPT will return the user to the initial work order Demand screen, where any details selected will now be shown.
Alternatively, the user can have Progress plus generate work ordered based on a “suggested quantity”. This quantity is calculated and shown in the main grid above.
If the user wishes to proceed with the suggested quantity, the user can click the FILL ‘RAISE WO QTY WITH SUGGESTED QTY option.
![]()
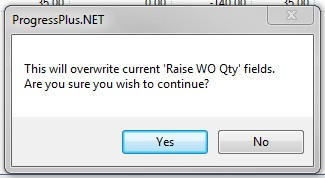
This will populate the RAISE WO QTY field with the suggested quantity calculated by Progress. The user will be prompted to confirm that they wish to proceed.

Once confirmed, the screen will be updated to show the suggested quantity in the RAISE WO QTY field.

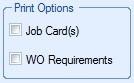
Once the user has entered the work order quantities required, they can choose whether they wish the paperwork associated with the new work orders printed upon creation. This can be specified using the printing options at the top right of the screen.
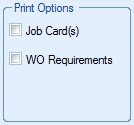
Selecting the Job Card(s) option will automatically generate and print the job card documentation for the new work orders. Selecting the WO Requirements option will generate the WO Requirements By WO report for the new work order. This will highlight any outstanding requirements for the work order as well as show a summary of the component stock status.
Once the work order quantities have been decided and the printing requirements selected, the user can generate any work orders by clicking the ACCEPT option. The system will create the specified work orders and then produce the selected paperwork. Once the user has finished generating the required work orders, they can return to the main work order screen by clicking the CLOSE option.
Below MSL
This screen allows the user to see current shortages of manufactured parts. This works in a similar way to the PO Shortage screen, but for manufactured parts as opposed to purchased parts. Clicking on this option presents the user with the following screen.
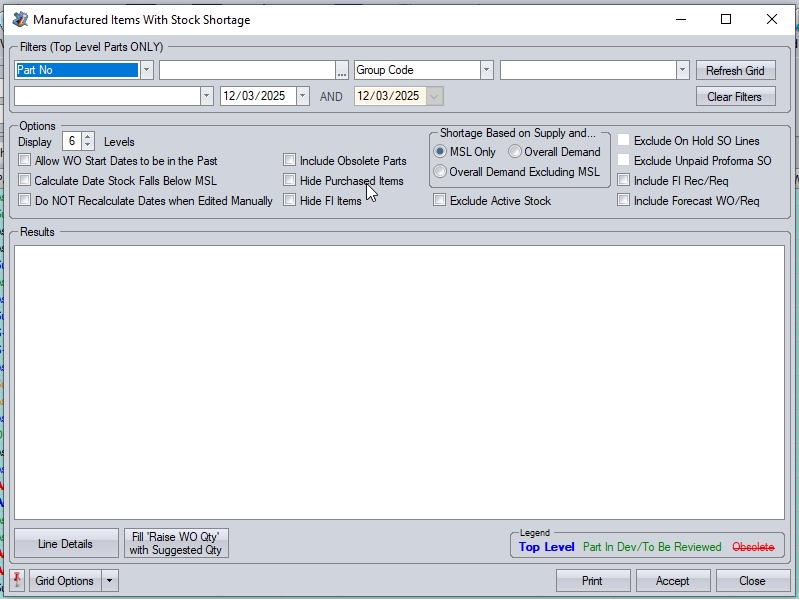
The user can filter this screen using the grid filters at the top of the screen if they know the part number or group code they wish to view.

If specific details are not known, the user can simply click the REFRESH option to view all current manufactured shortages. The user can clear any existing filters using the CLEAR FILTERS option at the top.
The user has some additional options which can be applied to the calculations.

Display X Levels
This allows the user to set how many BOM levels they wish to consider in the calculations.
Calculate Date Stock Falls Below MSL
This option will calculate the date the stock will fall below the part number's minimum stock level (MSL). The system will look at the dates of all incoming supply and dates of demand to determine a date when the stock level will breach the set minimum stock level. This only applied to the top-level items; does not get calculated for lower-level items.
NOTE: Applying this option may cause a refresh of the Below MSL screen to take longer due to the additional calculations being carried out.
Do NOT Recalculate Dates when Edited Manually
If the user decides to manually edit the start or finish dates of the WO they wish to create, the system will, by default, calculate the other date based on the default WO Dates settings in the Admin. For example, changing the start date would recalculate the finish date, and vice versa. Having this option ticked would NOT recalculate the dates. This would allow the user to amend either of the dates without recalculating the other.
Hide Purchased Items/Hide FI Items
These options simply remove any parts that are marked as mainly purchased or free issue. This is useful when working with large BOMs and where the user is only interested in manufactured parts that require work orders.
Shortage Based on Supply and...
This section allows the user to determine what constitutes the demand to be considered. The user has three options:
oOverall Demand - Includes all demand (On Order (SO), Req for WO, MSL and potentially forecast requirements if option ticked)
oOverall Demand Excluding MSL - All demand (see above), excluding the part's minimum stock level.
oMinimum Stock Level Only - Only considers part's minimum stock level figure for demand.
Exclude Active Stock
This option removes any current active stock from the supply calculation. The supply calculation will then be based on outstanding POs and WOs only.
Exclude On Hold SO Lines
This option removes any outstanding SO line quantities if the SO line has a status of ON HOLD. This is useful if you only want to consider confirmed sales orders. This option will only be available if the system is configured to NOT exclude these lines by default. If the system is configured to exclude these SO lines in the system options, the option will not be available on the Below MSL screen, as the SO lines will automatically be excluded from the demand calculations.
![]()
(Options unavailable due to ON HOLD SO lines automatically being excluded due to system options)
![]()
(Options available as ON HOLD SO lines not automatically excluded by system options)
Exclude Proforma Unpaid SO from Demand
This option removes any outstanding SO lines quantities if the SO is a proforma order and has not yet been paid. This is useful if you only want to consider confirmed sales orders. Like the Exclude On Hold SO Lines option above, this option will only be available if the system is configured to NOT exclude these lines by default. If the system is configured to exclude these SO lines in the system options, the option will not be available on the Below MSL screen, as the SO lines will automatically be excluded from the demand calculations.
![]()
(Options unavailable due to Unpaid Proforma SO lines automatically being excluded due to system options)
![]()
(Options available as Unpaid Proforma SO lines not automatically excluded by system options)
Include FI Receipts/Reqs
This option removes all free issue (FI) receipts and requirements from the supply and demand calculations. This is useful if the user only wants to consider requirements which are not being fulfilled by a third party.
Include Forecast WO/Req
This option allows the user to include forecast WOs in the supply and demand calculations. This option is only available if the Forecast functionality is activated.
NOTE: Any changes to the filters, options or BOM levels to be displayed require the user to click the REFRESH option to update the screen accordingly.
Looking at an example, the following shows how these options influence the calculations.
Supply And Overall Demand Example (Including available stock)

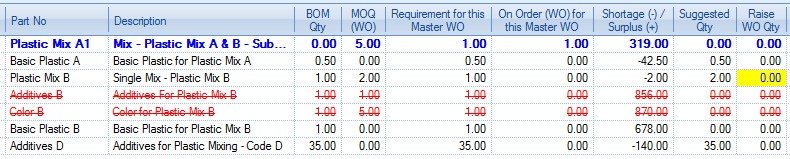
The MOQ (WO) value is the minimum order quantity for the part. This value is displayed for the top level part as well as any lower level manufactured parts. Purchased parts would not normally have a MOQ (WO) value recorded so typically show zero.
The SUPPLY figure shown for the top level item is calculated based on current available inventory (active and in quarantine) and existing work orders and purchase orders already on the system. The same calculation is used for any lower level manufactured items. The SUPPLY figure can be confirmed looking at the part’s stock status screen as shown below.
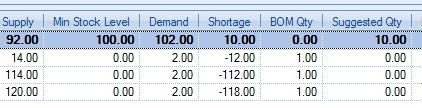
SUPPLY = ACTIVE + QUARANTINE + ON ORDER (WO) + ON ORDER (PO) = 90 + 0 + 2 + 0 = 92

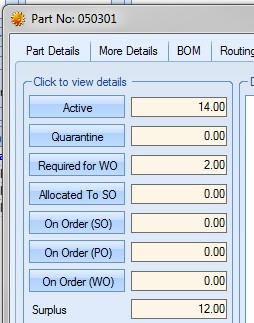
The SUPPLY figure for any PURCHASED component parts is calculated based on outstanding purchase orders and any available inventory currently in Progress. Again this can be confirmed looking at the component part’s stock status screen.
SUPPLY = ACTIVE + QUARANTINE + ON ORDER (PO) = 14 + 0 + 0 = 14
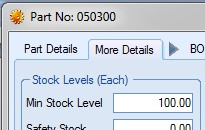
The MIN STOCK LEVEL (MSL) value is the minimum stock level recorded against the part record.

The DEMAND value is calculated based on the current requirements for the part. This is calculated based on the MSL value of the part, any requirements from existing work orders or sales orders. For the top level part in this example, the DEMAND is calculated as follows.
DEMAND = MSL + REQUIRED FOR WO + ON ORDER (SO) = 100 + 1 + 1 = 102
The same calculation is used for any lower level manufactured components and components marked as PURCHASED.
The SHORTAGE value shown is calculated as the difference between the DEMAND and the SUPPLY. This is the same calculation for all parts listed. For our top level part example, the calculation is as follows.
SHORTAGE = SUPPLY – DEMAND = 92 – 102 = 10
Shortages shown as negative numbers, like the component parts in this example, indicate that sufficient stock is available. Shortages shown as positive number are where there are shortages.

The BOM QTY value shown is the quantity required in the manufacture of the top-level part. This value is the value recorded against the top level part’s BOM and only shows for lower level items, both manufactured and purchased.
The SUGGESTED QTY shown is calculated based on the shortage value and the MOQ (WO) value. In the example shown here, the total shortage is 10. As the MOQ (WO) value is 1, the system suggests raising a work order for the total shortage quantity of 10.

If the MOQ (WO) quantity is set to 100, then the SUGGESTED QTY is 100 as shown below.

The suggested quantity will be the total shortage quantity, unless it's less than the MOQ (WO) in which case the suggested quantity will be the MOQ (WO).
Supply And Overall Demand Example (Excluding available stock)

The SUPPLY figure shown for the top level item is calculated based only on existing work orders and purchase orders already on the system. The same calculation is used for any lower level manufactured items. The SUPPLY figure can be confirmed looking at the part’s stock status screen as shown below.
SUPPLY = ON ORDER (WO) + ON ORDER (PO) = 2 + 0 = 2

The SUPPLY figure for any PURCHASED component parts is calculated based only on outstanding purchase orders currently in Progress. Again this can be confirmed looking at the component part’s stock status screen.
SUPPLY = ON ORDER (PO) = 0

As before, the MIN STOCK LEVEL (MSL) value is the minimum stock level recorded against the part record.

The DEMAND value is still calculated based on the current requirements for the part. This is calculated based on the MSL value of the part, any requirements from existing work orders or sales orders. For the top level part in this example, the DEMAND is calculated as follows.
DEMAND = MSL + REQUIRED FOR WO + ON ORDER (SO) = 100 + 1 + 1 = 102
The same calculation is used for any lower level manufactured components and components marked as PURCHASED.
The SHORTAGE value shown is calculated as the difference between the DEMAND and the SUPPLY. This is the same calculation for all parts listed. For our top level part example, the calculation is as follows.
SHORTAGE = SUPPLY – DEMAND = 2 – 102 = -100
As before, the parts shown with positive shortages are those which have insufficient stock.

The SUGGESTED QTY shown is calculated based on the shortage value and the MOQ (WO) value. In the example shown here, the total shortage is 100. As the MOQ (WO) value is 1, the system suggests raising a work order for the total shortage quantity of 100.
Supply And Min. Stock Level Only Example (Including available stock)

The SUPPLY figure shown for the top level item is calculated based on current available inventory (active and in quarantine) and existing work orders and purchase orders already on the system. The same calculation is used for any lower level manufactured items. The SUPPLY figure can be confirmed looking at the part’s stock status screen as shown below.
SUPPLY = ACTIVE + QUARANTINE + ON ORDER (WO) + ON ORDER (PO) = 90 + 0 + 2 + 0 = 92

The SUPPLY figure for any PURCHASED component parts is calculated based on outstanding purchase orders and any available inventory currently in Progress. Again this can be confirmed looking at the component part’s stock status screen.
SUPPLY = ACTIVE + QUARANTINE + ON ORDER (PO) = 14 + 0 + 0 = 14

As before, the MIN STOCK LEVEL (MSL) value is the minimum stock level recorded against the part record.
The DEMAND value is calculated based on the current requirements for the part. For this option, this is calculated based on the MSL value of the part. For the top level part in this example, the DEMAND is therefore calculated as follows.
DEMAND = MSL + REQUIRED FOR WO + ON ORDER (SO) = 100 + 1 + 1 = 102

The same calculation is used for any lower level manufactured components and components marked as PURCHASED.
The SHORTAGE value shown is calculated as the difference between the SUPPLY and the MSL value. This is the same calculation for all parts listed. For our top level part example, the calculation is as follows.
SHORTAGE = SUPPLY – DEMAND = 92 – 100 = -8
As before, the parts shown with positive shortages are those which have insufficient stock.

The SUGGESTED QTY shown is calculated based on the shortage value and the MOQ (WO) value. In the example shown here, the total shortage is 8. As the MOQ (WO) value is 1, the system suggests raising a work order for the total shortage quantity of 8. If the MOQ (WO) was 10, then the system would suggest raising a WO for a quantity of 10 as shown below.

SUPPLY AND MIN. STOCK LEVEL ONLY EXAMPLE (Excluding available stock)

The SUPPLY figure shown for the top level item is calculated based on existing work orders and purchase orders already on the system. The same calculation is used for any lower level manufactured items. The SUPPLY figure can be confirmed looking at the part’s stock status screen as shown below.
SUPPLY = ON ORDER (WO) + ON ORDER (PO) = 2 + 0 = 2

The SUPPLY figure for any PURCHASED component parts is calculated based on outstanding purchase orders currently in Progress. Again this can be confirmed looking at the component part’s stock status screen.
SUPPLY = ON ORDER (PO) = 0

As before, the MIN STOCK LEVEL (MSL) value is the minimum stock level recorded against the part record.

The DEMAND value is calculated based on the current requirements for the part. For this option, this is calculated based on the MSL value of the part. For the top level part in this example, the DEMAND is therefore calculated as follows.
DEMAND = MSL + REQUIRED FOR WO + ON ORDER (SO) = 100 + 1 + 1 = 102

The same calculation is used for any lower level manufactured components and components marked as PURCHASED.
The SHORTAGE value shown is calculated as the difference between the SUPPLY and the MSL value. This is the same calculation for all parts listed. For our top level part example, the calculation is as follows.
SHORTAGE = SUPPLY – DEMAND = 2 – 100 = -98

As before, the parts shown with positive shortages are those which have insufficient stock.

The SUGGESTED QTY shown is calculated based on the shortage value and the MOQ (WO) value. In the example shown here, the total shortage is 98. As the MOQ (WO) value is 1, the system suggests raising a work order for the total shortage quantity of 98. If the MOQ (WO) was 100, then the system would suggest raising a WO for a quantity of 100 as shown below.

The user can further enquire into the inventory status of any component or sub-assembly by clicking on the LINE DETAILS option at the bottom of the screen. This presents the user with a more detailed view of the part in question as shown below, as well as the calculated shortage and suggested quantities.
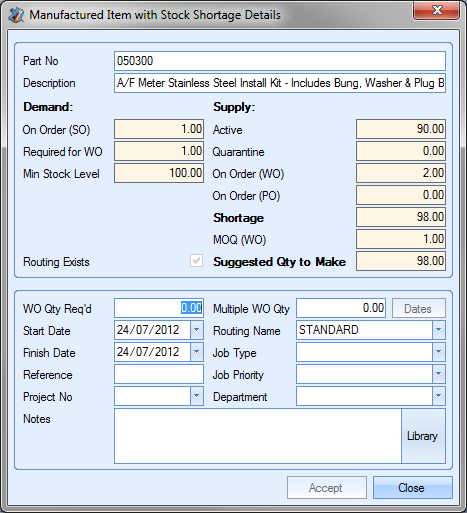
When viewed for a purchased part, the screen shows a more detailed view of the stock status information for the selected component, much like can be seen on the parts Stock Status screen. The bottom half of the screen is locked down as this is only for use with non-purchased parts. An example for a purchased part is shown below.
For a manufactured part, a more detailed look at the stock status of the selected part can be seen at the top half of the screen. The bottom half of the screen allows the user to specify details to be used in creating the required work orders.

The user can specify the required work order quantity as well as a batch quantity if required. This would create multiple work orders, each for the specified batch quantity, to the total quantity required.
![]()
For single sub-assembly work orders, the user only need add the WO QTY REQ’D value.
![]()
The user can then specify the rest of the details, including dates, using the fields displayed. If the user wanted to create the work order quantity of 10 units in batches of 2 units, the user could set up the details as follows.
As can be seen, the option to choose START and FINISH dates are now locked. The user can now use the DATES option to specify the dates for each individual batch.
![]()
Clicking on the DATES option presents the user with the following window.
Both dates will default to the current date. The user can change the dates using the drop-down calendar for each item (work order) listed.
Once all the dates have been amended accordingly, the user can click ACCEPT to save the dates and return to the work order details screen. Once all the details have been entered, clicking ACCEPT will return the user to the Below MSL screen, where any details selected will now be shown.
Alternatively, the user can have Progress plus generate work ordered based on a “suggested quantity”. Based on the method of calculation chosen by the user initially, this quantity is calculated and shown in the main grid.
If the user wishes to proceed with the suggested quantity, the user can click the FILL ‘RAISE WO QTY WITH SUGGESTED QTY option.
![]()
This will populate the RAISE WO QTY field with the suggested quantity calculated by Progress. The user will be prompted to confirm that they wish to proceed.
Once confirmed, the screen will be updated to show the suggested quantity in the RAISE WO QTY field.

Once the user has entered the work order quantities required, they can choose whether they wish the paperwork associated with the new work orders printed upon creation. This can be specified using the printing options at the top right of the screen.
Selecting the Job Card(s) option will automatically generate and print the job card documentation for the new work orders. Selecting the WO Requirements option will generate the WO Requirements By WO report for the new work order. This will highlight any outstanding requirements for the work order as well as show a summary of the component stock status.
Once the work order quantities have been decided and the printing requirements selected, the user can generate any work orders by clicking the ACCEPT option. The system will create the specified work orders and then produce the selected paperwork. Once the user has finished generating the required work orders, they can return to the main work order screen by clicking the CLOSE option.
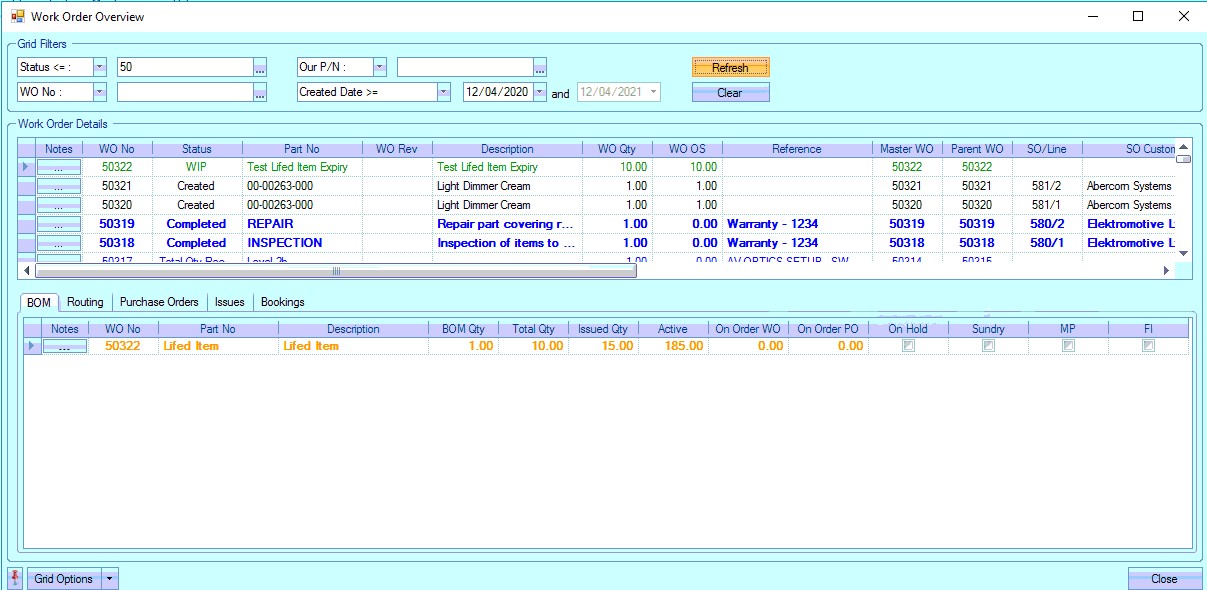
WO Overview
This option presents the user with an overview of the active work orders. The user can select a range of work orders and see all the associated information in one place, as well as allow them to add notes quickly to any associated item. Details of the WO BOM, routing, material issues, labour bookings and non-conformances are also visible when a WO is highlighted.
When the user selects this option, they will be presented with the following screen.
The grid filters at the top of the screen allow the user to filter for the work orders they wish to view, including by any work order user-defined fields (UDFs) set up against the work orders.. By default, the screen will display any WOs with a status less than "complete", however, the user can use the filters to search as required.

Once the relevant filters have been applied, the user can click the REFRESH option to display the work order information.
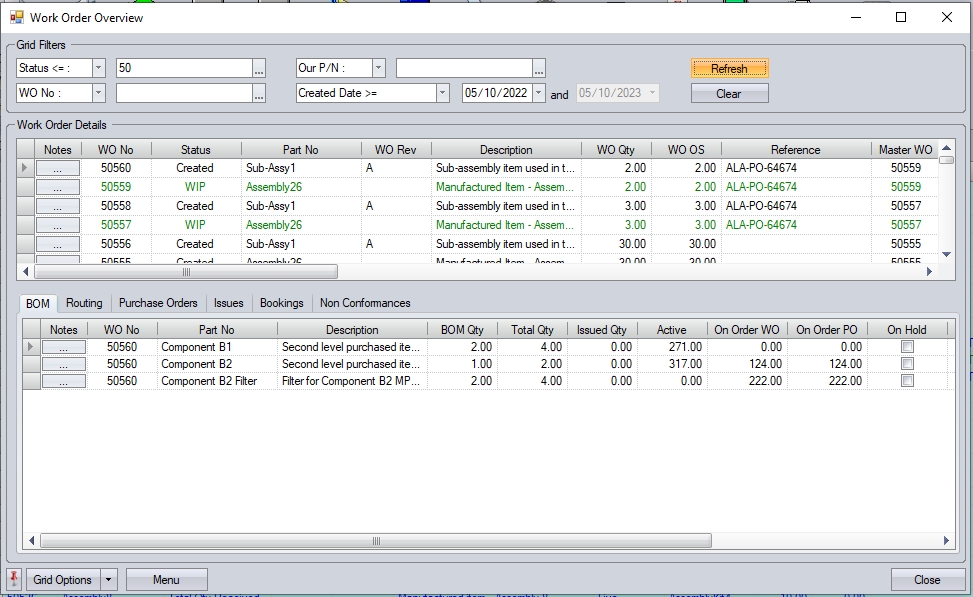
The first section of this screen shows the work order details.

The grid also has summary totals for WO QTY and TIME O/S columns, which can be viewed at the bottom of the list.
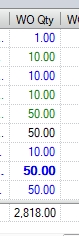
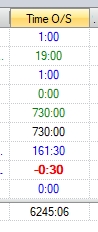
(Summary totals for WO quantity and time outstanding)
Not only does this section allow the user to see all the relevant details for each work order, but also allows them to access the WO notes sections directly using the ![]() option at the start of each line. Clicking this option presents the user with the Notes Editor window, which allows them to add comments/notes in relation to the selected work order.
option at the start of each line. Clicking this option presents the user with the Notes Editor window, which allows them to add comments/notes in relation to the selected work order.
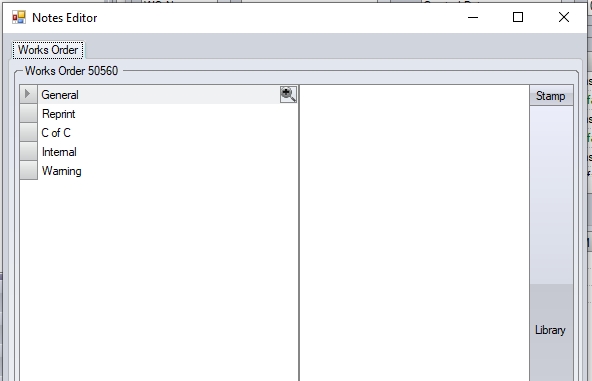
Once any notes have been added, the user can click ACCEPT to save the details. CLOSE will return them to the main Overview screen.
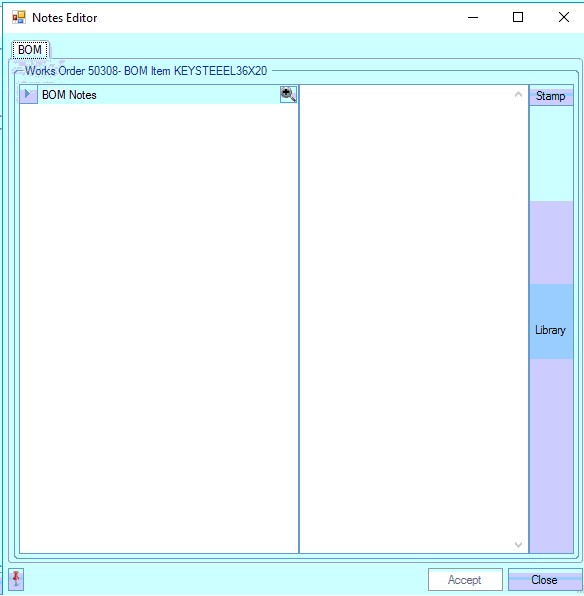
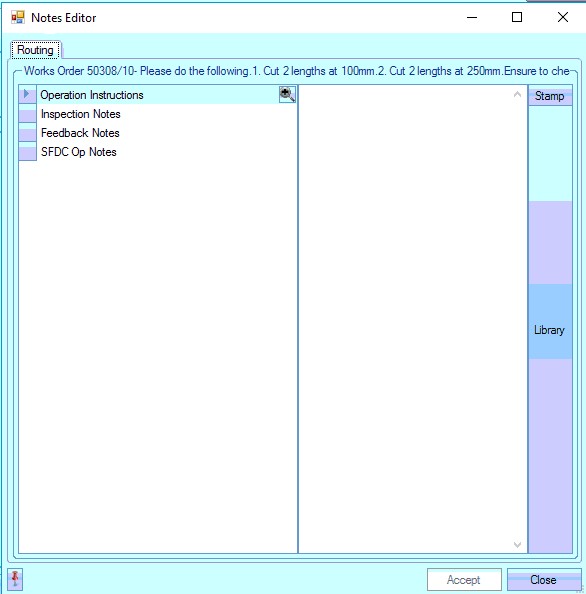
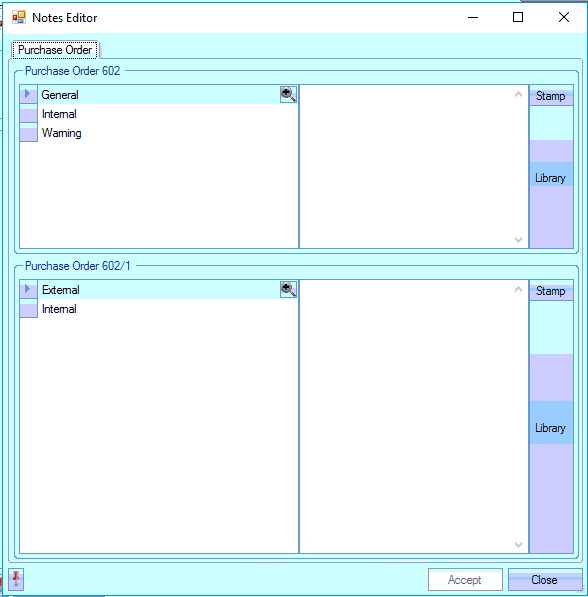
The bottom section of the Overview screen shows the associated BOM, routing, purchase orders, issues, bookings and non-conformances for the selected work order in the first section. To flip between each of these sections the user simply clicks on the relevant tab.

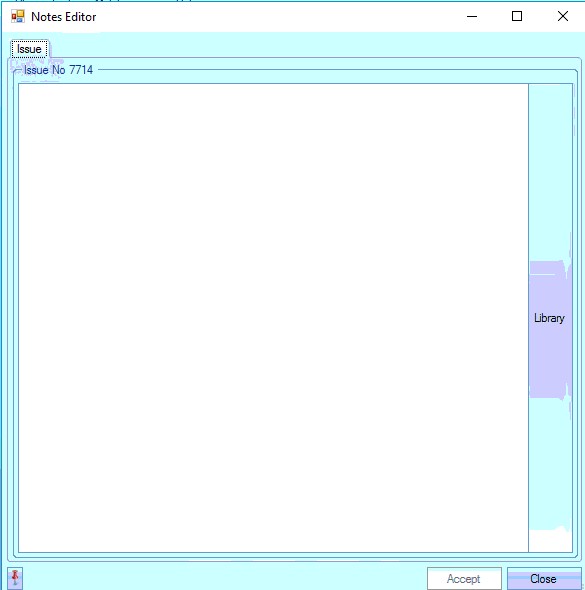
Again, like the first section, the user can click on the notes option ![]() , to access the Notes Editor window and add notes to any items as required. This will present the user with the relevant notes sections for the selected item. The examples below show some examples of the different items that can be added to via the Notes Editor.
, to access the Notes Editor window and add notes to any items as required. This will present the user with the relevant notes sections for the selected item. The examples below show some examples of the different items that can be added to via the Notes Editor.
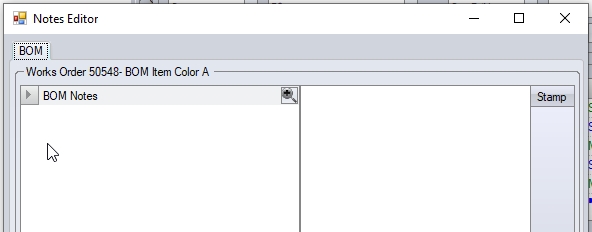
(WO BOM Notes Editor)
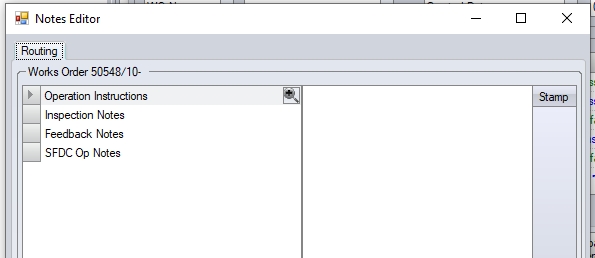
(WO Routing Notes Editor)
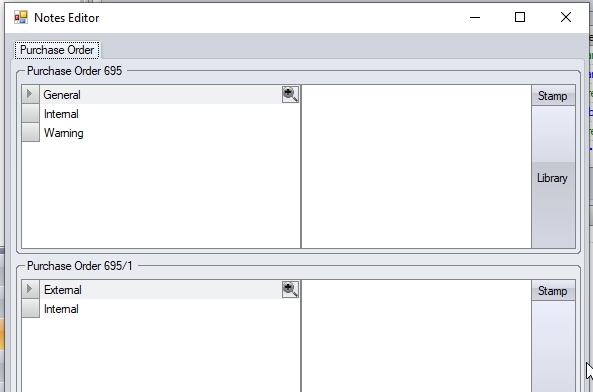
(Purchase Order Notes Editor - header and line notes)
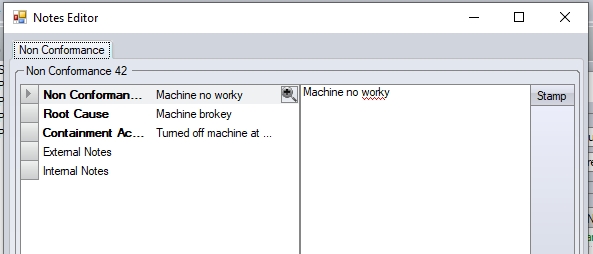
(Non-Conformance Notes Editor)
Selecting the BOM tab allows the user to see the WO's BOM. This allows the user to see what was required, issued, any PO quantities as well as the current active stock of the part. The colour coding shows the current issue status of the BOM part, as per the WO BOM screen legend.
Selecting the Routing tab allows the user to see the associated routing information for the work order selected. This will include both internal and external (i.e. sub-contract) operations and their current status as per the WO routing legend.


Selecting the Purchase Orders tab allows the user to see the associated purchase order information for the work order selected in the top section of the screen. This will display any details of the purchase orders that are directly linked to the work order selected in the top section of the screen. The colour coding indicates the status of the PO line as per the main PO status legend.


Selecting the Issues tab will display any material issues that have been made to the work order selected in the top section. This includes all batch and supplier information where applicable, as well as the issue date.

Selecting the Bookings tab will display any information for labour bookings against the work order selected in the top section of the screen.

Selecting the Non-Conformances tab will display the details of any non-conformances that have been raised against the work order selected in the top section of the screen.

The user also has the ability to export the Overview details to Excel for further analysis if desired. The MENU option at the bottom of the screen allows the user to export the full list of WOs (i.e. all WO details from top-grid) or all the details of the selected WO (i.e. top and bottom grid of selected WO).
Both of these options will create a spreadsheet with the relevant details, based on the option selected. Selecting the first option will create a spreadsheet with the details of all WOs listed in the top-grid.

(Export of WO details - top grid)
Selecting the second option will create a spreadsheet of the selected WO's details, with additional tabs for the different items shown in the bottom-grid.

(Tabs showing different associated details of the selected WO)

(WO details)

(WO BOM details)

(WO routing details)

(WO PO details)

(WO issue details)

(WO bookings details)

(WO non-conformance details)
Linked POs
This option allows you to see the various dates associated with open WOs not yet fully received, and update the EARLIEST START DATE of the WO based on the dates on any linked POs.
The user can use the filter options at the top of the screen to identify the work orders they are after. Here, the user can also set tolerances in relation to the number of days early and/or late, as well as select the PO and WO dates to be used for comparison. The user can also filter by WO start or finish date.

Once any filters have been applied, or if the user simply wants to see all work orders, they can click REFRESH to populate the screen.

The top-half of the screen lists all WOs which are not yet fully received and shows the latest PO date associated with the selected WO. The user can include subcon POs in the list of POs shown by ticking the relevant option.
![]()
The screen also highlights a summary total for POs arriving late and early, with the associated POs being colour coded in the bottom grid to also highlight their status, along with whether the item is required to start the WO based on the WO BOM settings for the parts.

(POs arriving early are shown in green)

(POs arriving on time are shown in black)

(POs arriving late are shown in red)
The screen also provides direct access to notes fields associated with the WOs and POs as highlighted below.
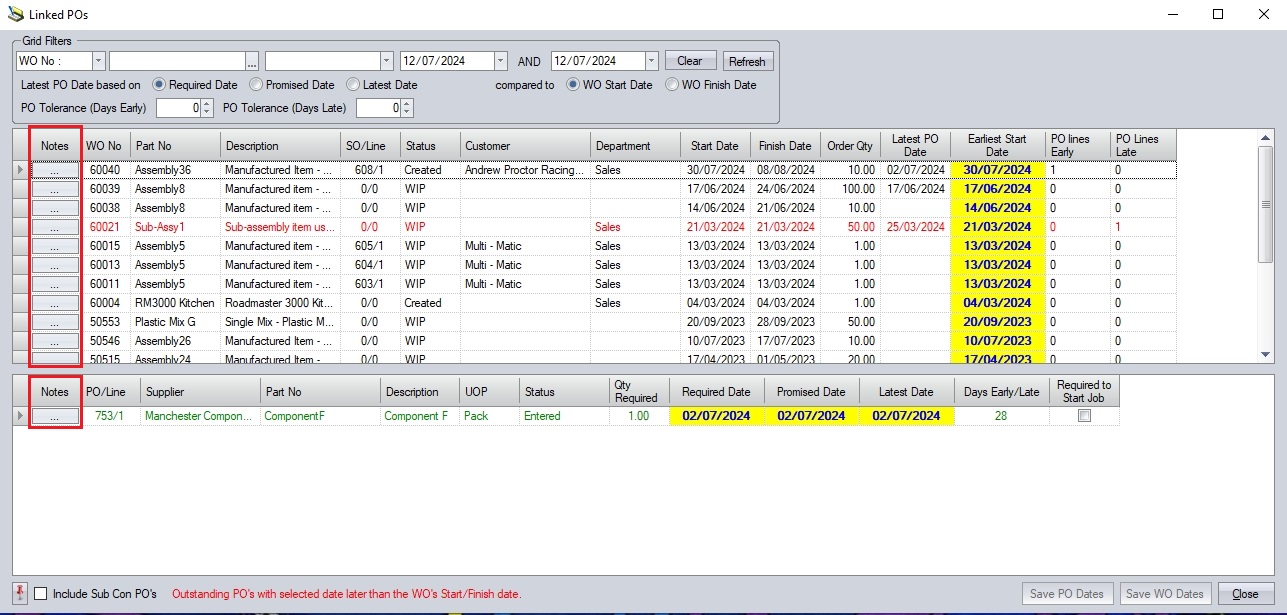
Clicking on these options will present the user with the associated notes fields for review/completion.
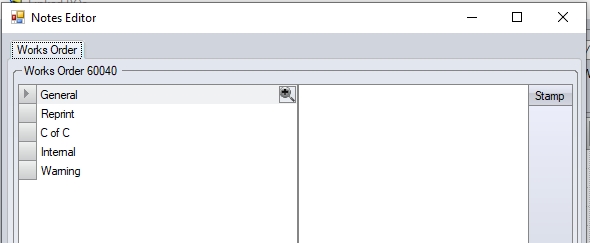
(WO notes option)
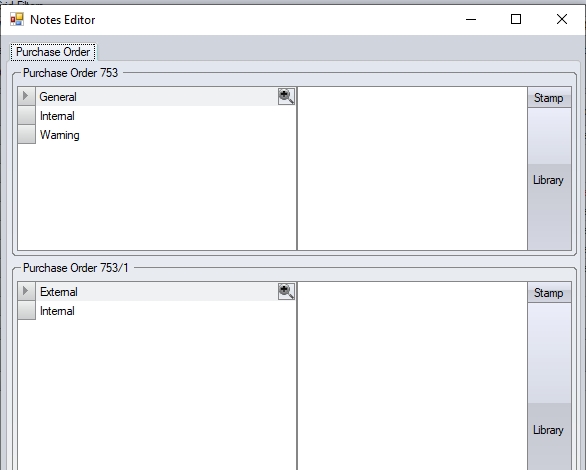
(PO notes option)
When the user refreshes the details on the screen, the system suggests the Earliest Start Date for the WO based on the dates. Clicking ACCEPT will update the WOs with the suggested Earliest Start Date. The Earliest Start Date is then used by the Shop Floor Loading (SFL) section of Progress to ensure the WOs are scheduled accordingly. Changes to the PO dates can also be made on this screen with the user updating the PO using the SAVE PO DATES option.
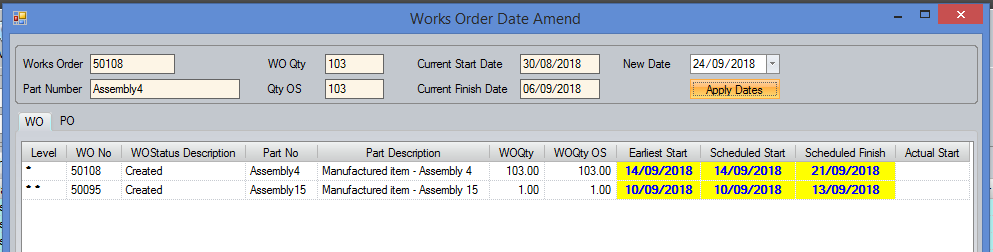
This option allows the user to view and amend the dates of a WO, updating the selected WO dates as well as the dates of any associated work orders (sub-assys) and purchase orders relating to the purchase of material for the job. To use this option, the user simply highlights the work order in question and clicks on the WO DATES option. This will open a screen similar to that shown below, showing a list of all the work orders associated with the selected work order and also a list of associated purchase orders (under the PO tab).
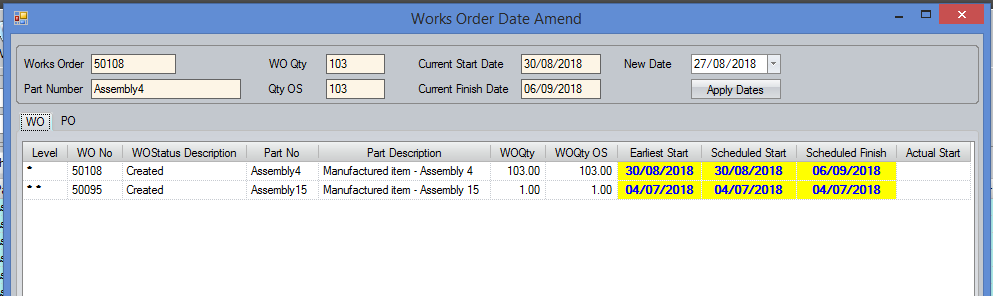
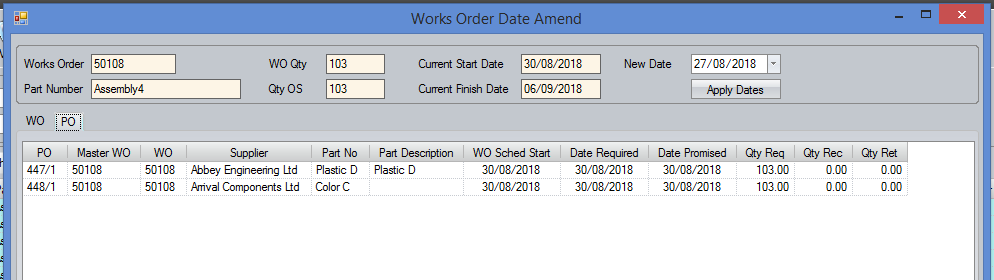
The screen shows the current work order dates at the top and provides a field to allow the user to select the new date required. Clicking the APPLY DATES option will update the work order(s) listed below.
The PO tab will be updated to highlight any existing purchase orders which may now be affected by the date change by highlighting their dates in red to draw the users attention to the purchase orders which will be due to arrive AFTER the associated WO has started. If the associated purchase order dates need to be amended, the user can drill into them using the ![]() option against the PO number to allow any changes to be applied.
option against the PO number to allow any changes to be applied.
Any existing PO which is now due early as a result of the date changes to the WO will be highlighted in green, based on the specified number of days in the option at the foot of the window.


If the existing POs are going to arrive late compared to the start of the WO, then the PO dates will be highlighted in red.

This option allows the user to print work order documentation directly from the main WO grid. The user can select the required work order and click the PRINT option. This presents the same print window as used within the individual work order screen.
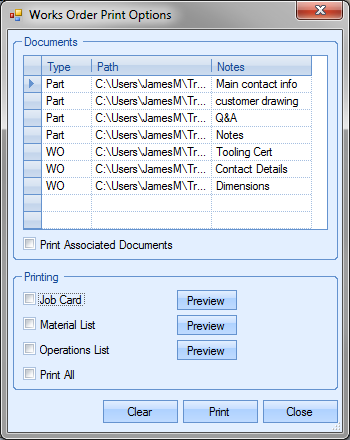
The user has the option of printing any of the work order’s associated documents from this screen along with the required work order documents. The grid at the top of the screen shows all the associated documents, their relationship with the work order and the file path. The option under the grid allows the user to choose whether these documents are printed.
![]()
If the user ticks this option and clicks the PRINT option at the bottom of the print options screen, each of the associated documents will be printed.
If the user only wants to print the work order documents, they can select the required document(s) from the options at the bottom of this screen.
The Job Card is the most comprehensive work order document as this typically contains the work order, sales order, material and operation details for the current work order. The Material List document typically focuses on the material requirements for the job, while the Operations List focuses on the routing operations to be carried out for the work order.
The user can tick the box next to the documents they wish to print, be it one or all three. The PREVIEW options to the right of each work order document allows the user to view the document on screen as opposed to printing a hard copy. Ticking the PRINT ALL option automatically ticks all of the document options, including the associated documents. This is just a quick way to select all documents. Once the user has selected the required documents, they can click the PRINT option to print hard copies. The CLEAR option will remove all selections already made and allow the user to reselect as required. The user can return to the main work order screen at any time by clicking the CLOSE option.
Print Range
This option allows the user to print the work order documentation for a range of work orders. The user can specify the work orders required using the grid filters on the main work order screen, for example, by date or master work order number. Once the user has the required work orders showing on the screen, they can click the PRINT RANGE option to generate the documents.
Firstly, the user is prompted to confirm that they wish to print the documents for the selected range.
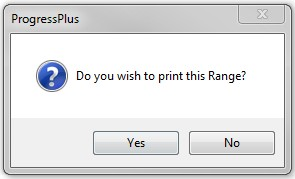
If the user clicks NO, the user is returned to the main work order screen with no documents printed. If the user clicks the YES option, the user is then prompted to confirm which documents they wish to print. The prompts are as follows.
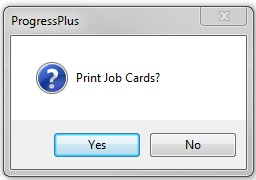
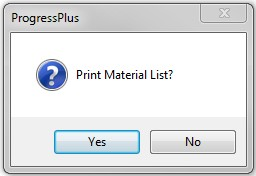
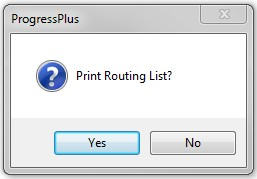
Once the user has responded to each of the prompts, Progress sends the requested documentation directly to the printer. If the system is configured to prompt user before updating printed status, the user will be asked to confirm.
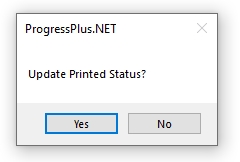
Selecting YES will update the PRINTED status of all the work orders in the range selected to 'Yes'. Selecting NO will leave the work orders PRINTED status as 'No'.
This option allows the user to generate work order labels for the work orders currently displayed on the main work order grid. Clicking this option presents the user with the following screen.
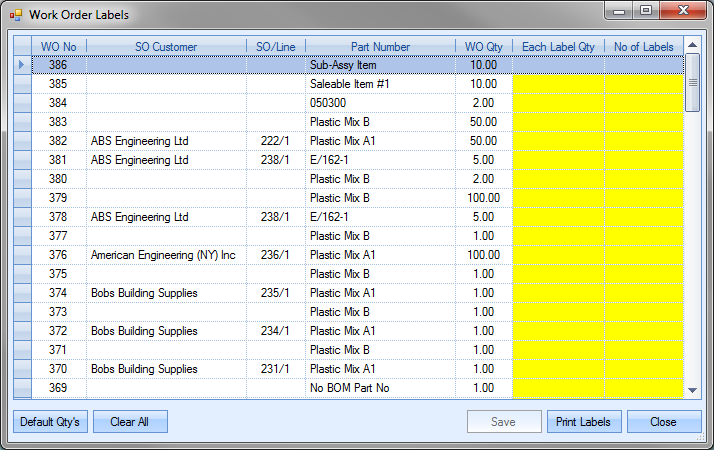
The user is presented with a list of work orders based on the orders listed on the main work order screen. If the user has filtered the main work order screen to view specific orders, clicking the LABELS option will present the same list in the labels screen as is shown below.
The label screen displays some basic information regarding each work order and allows the user to specify the quantity to be printed on each label as well as the number of labels to be printed. These fields are highlighted in yellow. The user can manually enter these values as required of they can user the DEFAULT QTYS option. Clicking this option will default the label quantity to the work order quantity and the number of labels to 1.

If the user wishes to produce more labels, they can amend the details as required. For example, if they are receiving the 50 units from the first work order shown above in boxes of 10 units, they may wish to print 5 labels of 10 units. To do this, the user simply has to change the details as follows.
Once the user has entered the required label quantities, they can print the labels by clicking the PRINT LABELS option. This will automatically print the labels off on the specified printer. If the user wishes to remove the specified quantities, they can either manually replace with zero, or can click the CLEAR ALL option to remove all label quantities displayed on the screen. The user will be prompted to confirm this
Clicking YES will return the label screen to its initial state without quantities.

If the user has specified label quantities for a range of work orders in preparation for printing the labels, they can save the entered quantities by clicking on the SAVE option. This will record the details entered allowing the user to return to the label screen at a later date without having to re-enter all the label quantities again.
Once the user has printed the required labels or has saved the label quantity details as required, they can return to the main work order screen by clicking on the CLOSE option.
Overview
This option present the user with an overview of the selected work orders. The user can select a range of work orders and see all the associated information in one place as well as allow them to add notes quickly to the WOs and/or POs and also see the details of associated WO's BOM, routing, associated purchase orders and any issues or booking that have been made to the works orders.
When the user clicks this option, they will be presented with the following screen.
The grid filters at the top of the screen allow the user to filter for the works orders they wish to view.

Once the relevant filters have been applied, the user can click the REFRESH option to display the works order information.
The upper section of this screen shows the works order details.

This allows the user to see all the relevant details for each works order but also allows them to access the NOTES section using the ![]() option at the start of each line. Clicking this option presents the user with the Notes Editor window, which allows them to add comments/notes in relation to the selected works order.
option at the start of each line. Clicking this option presents the user with the Notes Editor window, which allows them to add comments/notes in relation to the selected works order.
The bottom section of the Overview window allows the user to see the BOM, routing, associated purchase orders and any bookings and issues that are linked to the selected works order. for the selected work order in the middle section. Clicking on the relevant tab will display the associated info. Examples of these are shown below.


Again, like the previous sections, the user can click on the Notes option, ![]() , to access the Notes Editor window to add notes to the any of the items listed as required. The screen below shows some examples of the notes sections available.
, to access the Notes Editor window to add notes to the any of the items listed as required. The screen below shows some examples of the notes sections available.
(BOM item notes)
(Routing Operation notes)
(PO and PO Line notes)
(Issue note)
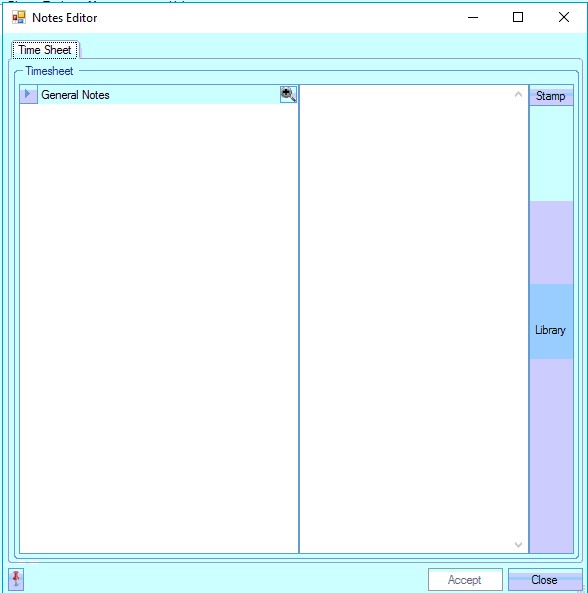
(Booking/Timesheet note)
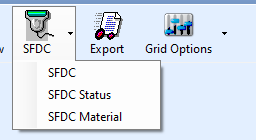
SFDC (Shop Floor Data Capture)
This option allows the user to start up the SFDC modules. There are Labour ("SFDC") and Material ("SFDC Material) modules which are additional modules for the system, and can be purchased for Progress. When the user clicks on the SFDC icon they will be presented with the following options.
The Labour ("SFDC") module allows employees to record labour times against work order operations, as well as record time and attendance information if the module is used in conjunction with the additional Time & Attendance module of Progress.
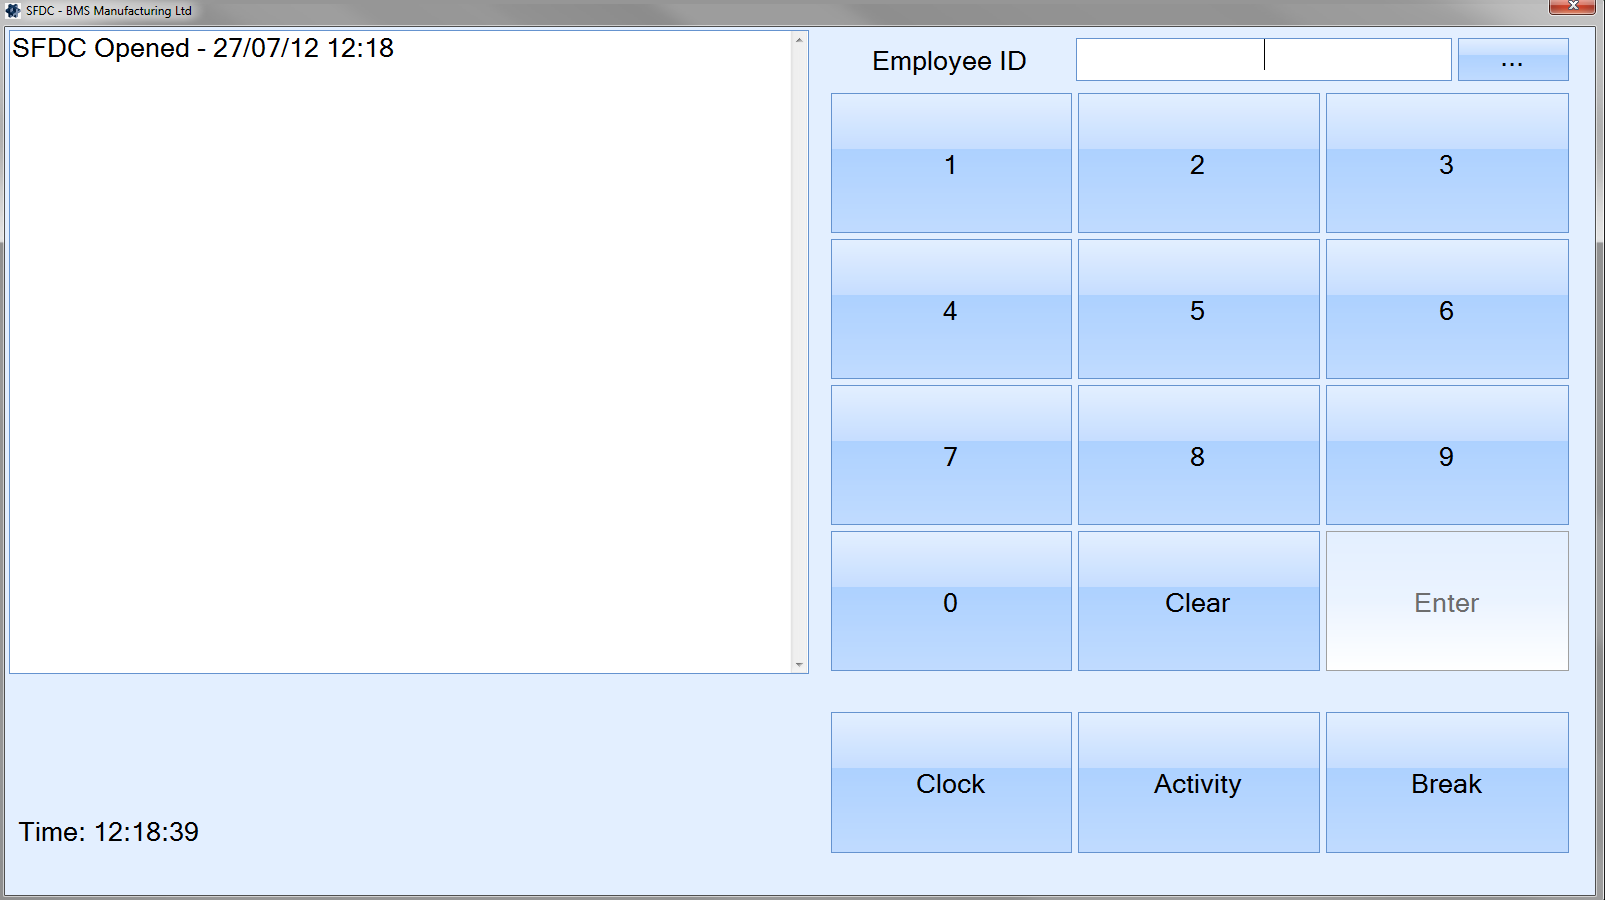
The SFDC Material module will allow the user to do a variety of things such as batch adjustments, issuing to work orders, production returns, stock look ups, work order receipts and some other options. The user will be presented with the following screen.
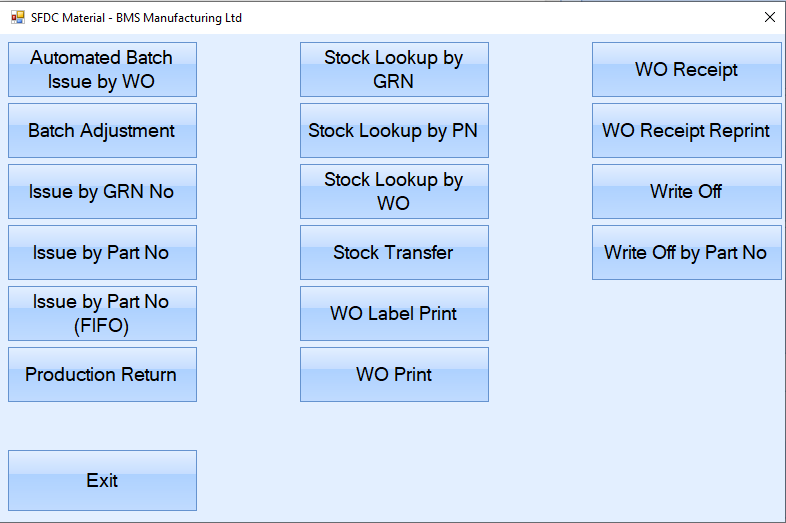
For more information on the user of the SFDC modules, please refer to the SFDC section of the manual.
In addition to allowing the user to directly access the SFDC module, the user also has an option to view the SFDC STATUS screen. This is available from the drop-down list attached to the SFDC option. More information on this can be found in the next section.
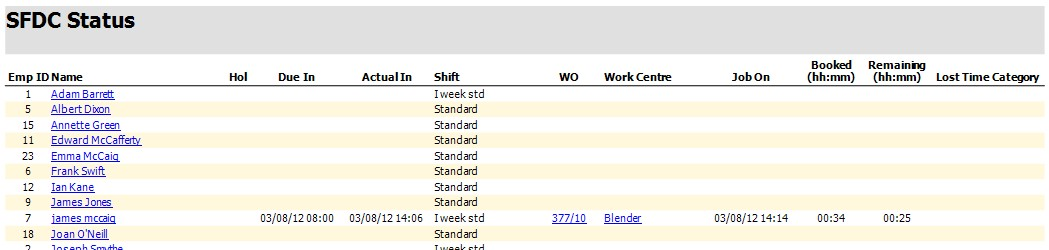
SFDC Status
Clicking on the SFDC STATUS option presents the user with the following screen.
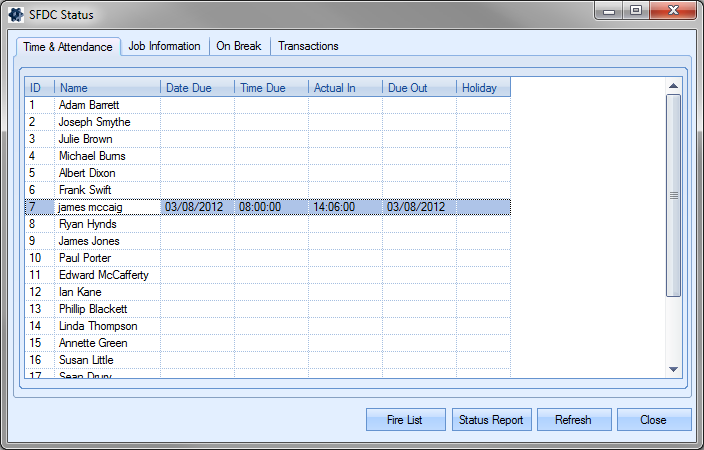
The SFDC Status screen shows a variety of information in relation to employees, their clocking information, job information, break information and the individual transactions recorded on the system and allows the user to see whats going on real-time.
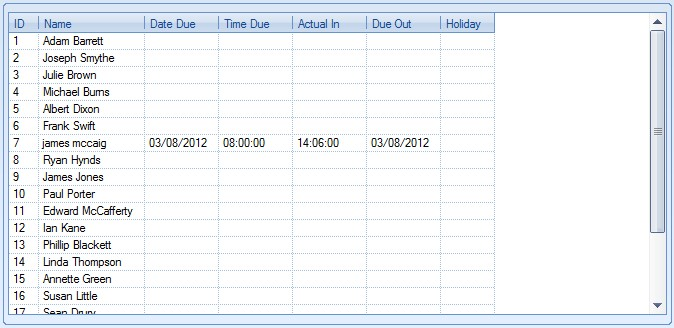
This section shows the clocking times for each employee. The shift times for the current date and the actual clocking in times are both shown. This gives the user the ability to quickly see who’s clocked into the system and the time they clocked in at.
The user can refresh the screen to display the latest information using the REFRESH option at the bottom of the screen. The CLOSE option will close the SFDC Status screen and return the user to the main work order screen.
This section shows the current jobs being worked on by the employees.
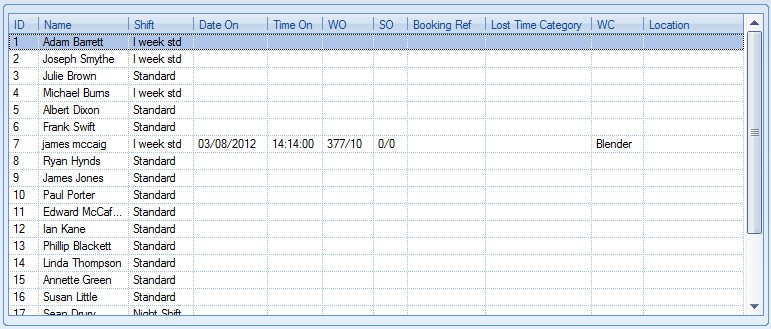
This screen provides the details of when the employee started the job as well as some other associated job information. The user can refresh the screen to display the latest information using the REFRESH option at the bottom of the screen. The CLOSE option will close the SFDC Status screen and return the user to the main work order screen.
This screen shows all employees who are currently on a break as well as when their break is due to finish.

If the employee has went onto a break manually, no Break Finish time will be present. If the employee has went onto a break automatically due to a predefined break set up against their shift, the time they are due off break is shown.
The user can refresh the screen to display the latest information using the REFRESH option at the bottom of the screen. The CLOSE option will close the SFDC Status screen and return the user to the main work order screen.
This screen shows all the SFDC transactions made by all employees as well as system messages relating to SFDC.
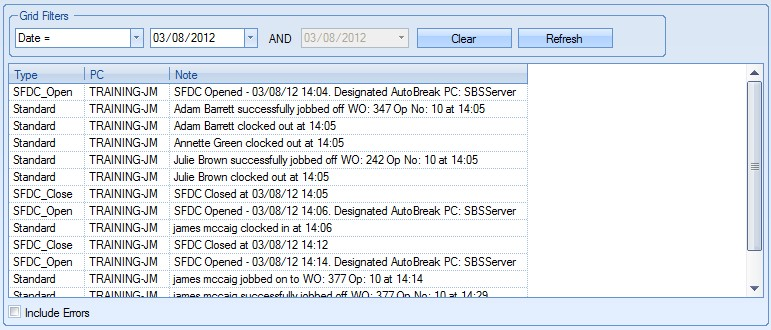
The user can use the grid filters at the top of the screen to filter the transactions by date and also has an option to select whether error transactions are visible. This option is useful for determining if there are any issues with SFDC, auto-breaks or why employees are not clocked in to the system as expected. The number of day’s history held by the SFDC module is specified in the SFDC system options.
![]()
For more information on the SFDC system options, please refer to the System Administrator Functions section of the manual.
The user can refresh the screen to display the latest information using the REFRESH option at the bottom of the screen. The CLOSE option will close the SFDC Status screen and return the user to the main work order screen.
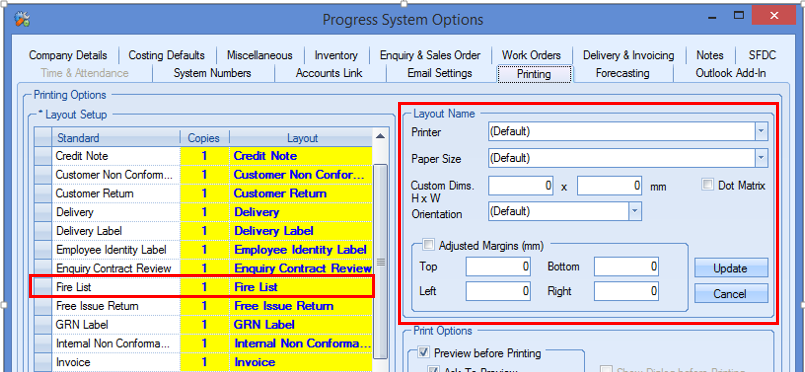
Fire List
The user has an option on this screen to generate a Fire List report. This report provides a complete list of all employees currently clocked into the system. In the event of an emergency, the user can generate a full list of employees expected to be present in the building and ensure everyone can be accounted for.
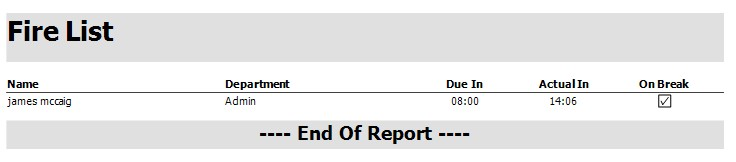
The fire list document can also be set up to be sent to a specific printer just like any of the other layouts in Progress. This can be set up in the Admin settings under the printing options.
Status Report
The user has an option on this screen to generate a SFDC Status report. This report provides a complete list of all employees currently clocked into the system, the jobs they are working on and the times spend on the jobs so far. This report summarises the information shown on the SFDC Status screens.
Export
The Export option allows the user to export the current list of work orders to an Excel spreadsheet for further analysis. This option can be used in conjunction with the filters available at the top of the screen or can be used with the full list of work orders if required. Clicking the Export option will prompt the user to create an Excel file.
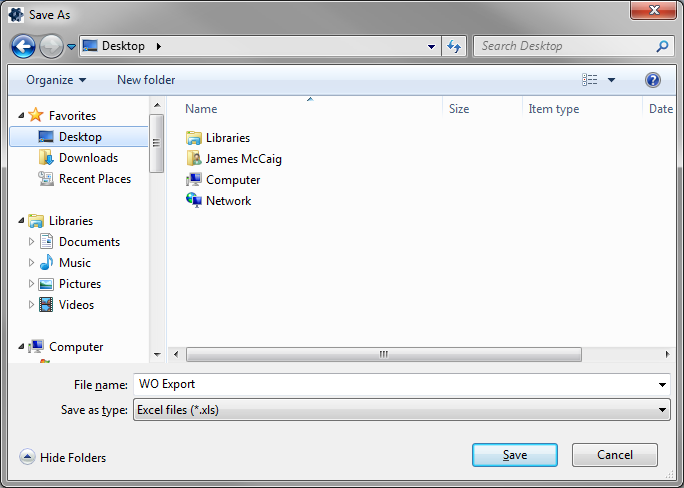
The user can specify the name required and where the exported file is saved. Clicking SAVE will generate the file. Once saved, the spreadsheet will be automatically opened for the user to view, an example of which is shown below.

Export - WO Planned Dates
This option allows the user to export out the planned work order dates from the system. These can be amended in the spreadsheet and re-imported to update the work orders and their operations accordingly.
NOTE: This option is only available if the system option has been enabled. The system option can be found in the Work Orders section of the system options (Admin > Options > Work Orders).
![]()
As per the standard export process, this option will create a spreadsheet of information based on the work orders list on the main screen. The user can apply any filters they wish to identify the work orders they need to export. Once the work orders have been selected, clicking the Planned Dates export option will prompt the user to save a spreadsheet with the details.
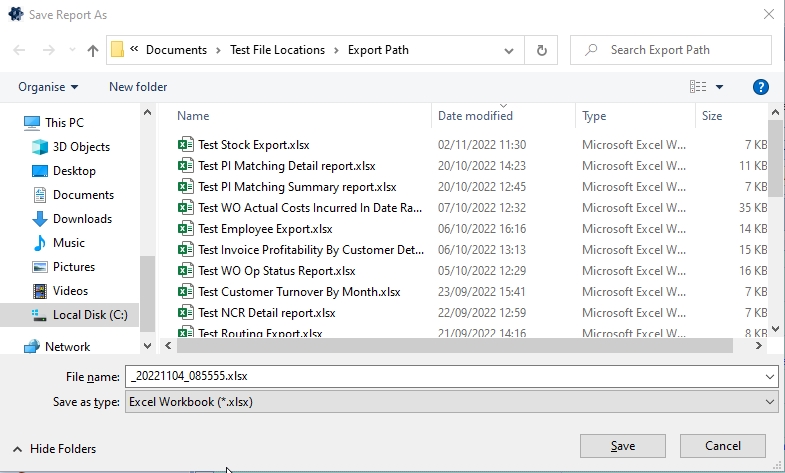
Once saved, the spreadsheet should appear (example below).

NOTE: The highlighted columns are the main pieces of information on this spreadsheet. Part No, Description, Status, etc. are all included just for reference and cannot be amended and re-imported to update the system.
Once the user has amended the Planned Start Date and/or Planned Finish Date of any work orders in the spreadsheet, they can import the new details to Progress to update the planned work order dates and the associated operation dates. The highlighted work order below has had its dates amended

The option to import the new details can be found in the Tools menu (Tools > Import/Export Data > Import).
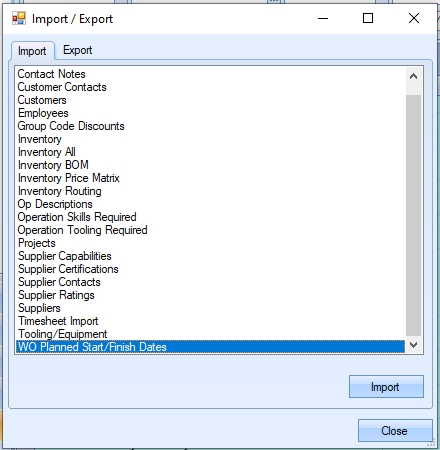
Clicking the IMPORT option when selected will prompt the user for the import file.
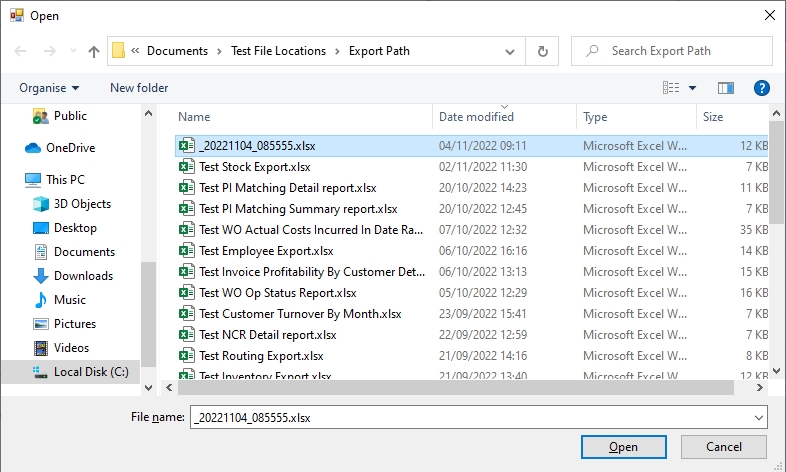
The user can select the file and click OPEN to start the import. Upon completion of the import, the system will present the user with a report on the import's success.
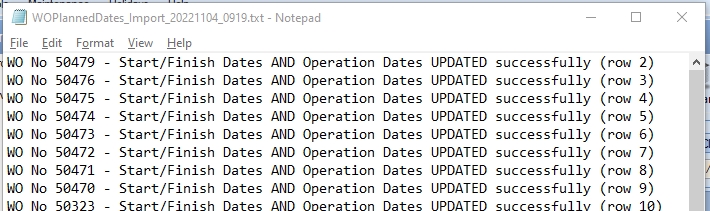
If the work order planned dates and the associated operation dates are successfully updated, the report will show this as:
WO No xxxx – Start/Finished Dates AND Operation Dates UPDATED successfully (row xxx)
If the work order status is COMPLETED or CANCELLED, neither the work order nor the operation dates will be updated. This will be shown on the report as:
WO No xxxx – Status is Completed/Cancelled – NO CHANGES MADE (row xxx)
If the work order is currently loaded into the shop floor loading schedule, only the work order planned dates will be update. Operation dates will not be updated. This will be shown on the report as:
WO No xxxx – Start/Finish Dates UPDATED, but WO is Scheduled, so operation dates NOT updated (row xxx)
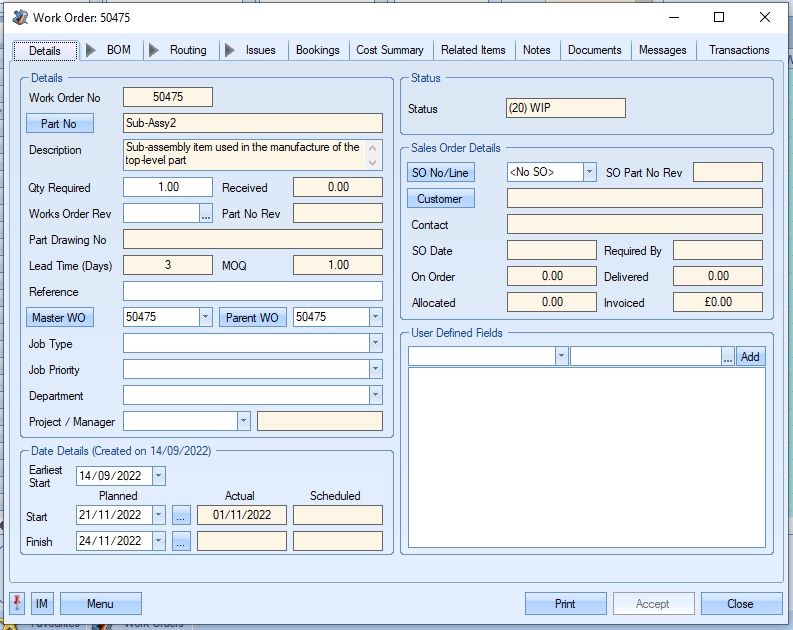
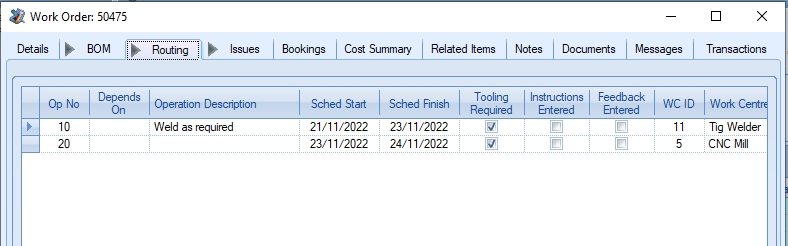
Once the import is done, the updated work orders and operations should reflect the new dates. Looking at the example from above, you can see the new planned dates and operation dates.
The work order's operation dates will be updated based on the system configuration. These options can be found in the Inventory system options.
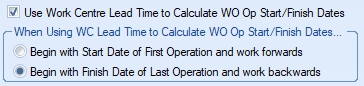
This will work in two ways:
•If the system is configured to use the individual work centre lead times (i.e. option ticked), the system will calculate the operation dates based on either the planned start date of the work order, working forwards, or based on the planned finish date of the work order and work backwards (based on the method selected in the system options above).

(Using work centre lead times)
•If the system is not configured to use the individual work centre lead times (i.e. option unticked), the system sets the operation dates to match the work order dates
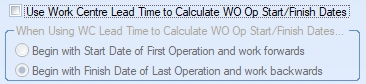

(Not using work centre lead times)
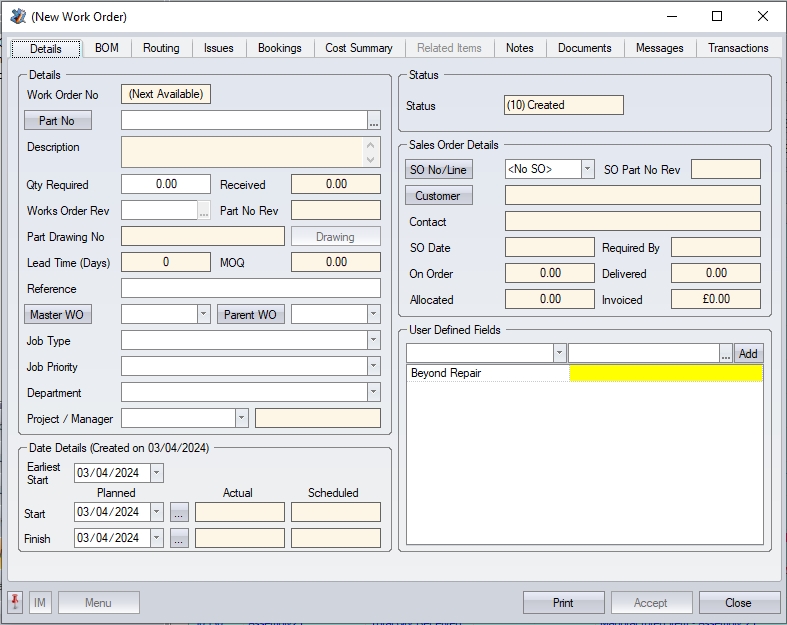
This option allows the user to manually create work orders. Clicking this option presents the user with the following screen.
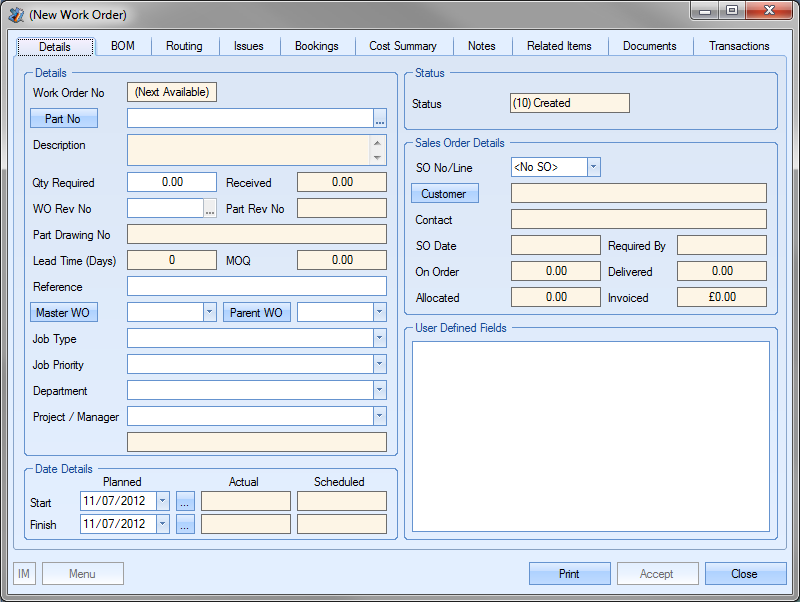
The user can create a work order by completing the information required on these screens. The following sections detail the different subsections of the work order screen.
WO Details
This is the main section of the work order screen and is the default view for the work order when opened. Fields that can be edited by the user are shown as white. All non-white fields are calculated or automatically populated by the system.
The system generates a work order number upon creation of the works order and allocates the next number in the work order number sequence. The fields shown are as follows:
| Part No | This is the part number being manufactured by the work order. This can be the top-level part or can be a sub-assembly linked to another work order. For works orders linked to a sales order, this will be the sales order line item that the work order is linked to. The user can also access the inventory record of the selected part number by clicking on the PART NO option to the left of this field. |
| Description | This is the description recorded against the aforementioned inventory part number. |
| Qty Required | This is the planned work order quantity, i.e. the quantity to be manufactured. This will default to the minimum order quantity of the selected part if one has been entered. |
| Received | This is the quantity of completed items received into stock so far. |
| WO Rev No. | This field allows the user to specify a revision for the work order. Once the work order has been created, the user can add details against the revision or change the revision by clicking on the |
| Part Rev No. | This field shows the revision of the part at the point the work order was created. This is recorded against the work order when the work order is recorded and remains with the work order even if revision changes are made against the part itself. |
| Part Drawing No. | This is the drawing number recorded against the part. This is recorded against the work order when the work order is recorded and remains with the work order even if revision changes are made against the part itself. The user can open the drawing from the WO itself by clicking on the DRAWING option to the right of the drawing field. This option will only be available if the part itself has a drawing path specified, otherwise the option will be unavailable. |
![]()
| Lead Time (Days) | This is the selected part’s manufacturing lead as recorded in the parts inventory record. |
| MOQ | This is the selected part’s minimum work order quantity. |
| Reference | This field allows the user to record a reference against the WO if required. If the work order is created from a sales order line, this field will default to the customer order number entered against the sales order. |
| Master WO | This is the master work order number that the work order is associated with. In the manufacture of an item containing a multi level BOM, this will be the work order number of the top level part. If the work order created is not linked to a master work orders then this field will reference the current work order number. The user can link the current work order to an existing work order by selecting from the drop down list. |
| If a master work order has been specified, the user can view the master work order directly from this screen by clicking on the MASTER WO option to the left of this field. |
| Parent WO | This is the parent work order number that the work order is associated with. In the manufacture of an item containing a multi level BOM, this will be the work order number of the part immediately above in the BOM. If the work order created is not linked to a parent work order then this field will reference the current work order number. The user can link the current work order to an existing work order by selecting from the drop down list. |

| This list will only show active work orders where the current part is on the BOM. |
| If a parent work order has been specified, the user can view the master work order directly from this screen by clicking on the PARENT WO option to the left of this field. |
| Job Type | This field allows the user to specify a job type for the work order. The user can select a value from the drop-down list. |
![]()
| This drop-down list can be populated from the List Maintenance section of Progress in the WO Job Type list as shown in the screen below. |

For more information on maintaining lists and the List Maintenance section of Progress, please refer to the List Maintenance section of this manual.
| Job Priority | This field allows the user to specify a job priority for the work order. The user can select a value from the drop-down list. |
| This drop-down list can be populated from the List Maintenance section of Progress in the WO Priority list as shown in the screen below. |

For more information on maintaining lists and the List Maintenance section of Progress, please refer to the List Maintenance section of this manual.
| Department | This field allows the user to specify a department associated with the work order. The user can select a value from the drop-down list. |
| This drop-down list can be populated from the List Maintenance section of Progress in the Department list as shown in the screen below. |

For more information on maintaining lists and the List Maintenance section of Progress, please refer to the List Maintenance section of this manual.
| Project / Manager | This field allows the user to specify a project associated with the work order. The user can select a value from the drop-down list. |
![]()
| This project list is populated based on the live projects currently recorded in Progress. The listed projects can be maintained via the Projects section, which can be accessed from the Maintenance menu. |
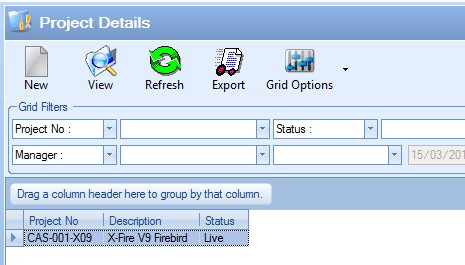
| Once the user selects a project from the drop-down list, the associated project manager is displayed below the project field. |

For more information on projects, please refer to the Maintenance > Projects section of the manual.
| Earliest Start | This field is the earliest date that the WO can be started. By default this will be the same as the Start Date (Planned) however this can be amended manually and via the LINKED POs option on the main WO screen. Typically this is updated to reflect any delays in material which result in the WO not being able to start on the planned start date, which the LINKED POs option will do based on the dates of any linked POs. |
| Start Date (Planned) | This field is the date that the user wishes the work to begin on this job. When raising a works order to satisfy a sales order demand this field is the Works Order Start Date and will be set based on how the following system options have been configured. |
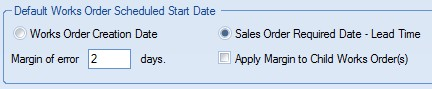
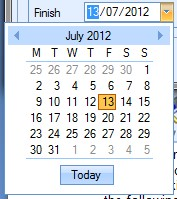
| The user may change this date by clicking on the drop-down calendar that is at the end of this field. |
| The user also has the option of calculating the planned start date based on a planned finish date that may have been set. To do this, the user can click on the |
| For more information on the work order start date options, please refer to the work order options in the System Options section of the manual. |
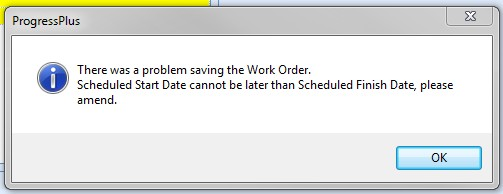
| If the user attempts to set a start date after the finish date, the user will be prompted to correct the dates. |

| Finish Date (Planned) | This field is the date that the user plans to finish working on this order. When raising a works order to satisfy a sales order demand this field is the Works Order Finish Date and will be set based on how the following system options have been configured. |
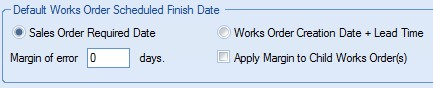
| The user may change this date by clicking on the lookup box that is at the end of this field. |
| The user also has the option of calculating the planned finish date based on a planned start date that may have been set. To do this, the user can click on the |
| For more information on the work order finish date options, please refer to the work order options in the System Options section of the manual. |
| If the user attempts to set a finish date prior to the start date, the user will be prompted to correct the dates. |
| Start Date (Actual) | This calculated field shows the date when the work order was actually started. This date is the date when either labour was first booked against the work order or the date that material was first issued to the job. |
| Finish Date (Actual) | This calculated field shows the date when the work order was recorded as finished. This date is calculated based on how the system options for work order finished date have been set. |
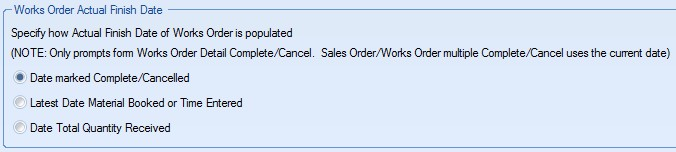
| For more information on the actual work order actual finish date options, please refer to the System Options section of the manual. |
| Start Date (Scheduled) | This field shows the current scheduled start date of the work order as scheduled in the Shop Floor Loading section of Progress. For more information on scheduling work orders within the Shop Floor Loading section of Progress, please refer to the Shop Floor Loading section of the manual. |
| Finish Date (Scheduled) | This field shows the current scheduled finish date of the work order as scheduled in the Shop Floor Loading section of Progress. For more information on scheduling work orders within the Shop Floor Loading section of Progress, please refer to the Shop Floor Loading section of the manual. |
| Status | This field shows the current work order status. This field defaults to CREATED status when a new work order is created. As the work order progresses, the status is updated accordingly. The work order statuses used in Progress are as follows. |
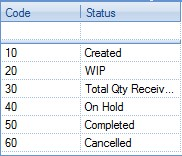
| Created - Initial status of any new work order. Work order will remain at this status until the work order is started, placed on hold or cancelled. |
| WIP - Work In Progress (WIP). This status indicates that the work order has been started. This status is triggered when either labour is booked against the work order or material is issued to the work order. |
| Total Qty Rec - This status indicates that the full work order quantity has been booked into stock. |
| On Hold - This status is the result of someone manually placing the work order on hold. If the work order is placed on hold, no transactions can be made against the work order. |
| Completed - This status is the result of someone manually marking the work order as complete. This status would be used when all labour and material issues have been made against the work order. Once the work order is set to this status, no further transactions can be made against the work order. |
| Cancelled - This status is the result of the work order being cancelled. This can be done manually by the user or as the result of an associated sales order line being cancelled (user is prompted to decide when sales order line is cancelled). Once the work order is set to this status, no further transactions can be made against the work order. |
| SO No/Line | This is the associated sales order and sales order line number that this work order is linked to. This information can be set manually by the user using the drop down list. |
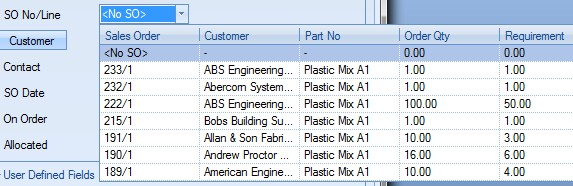
| If the work order is created from a sales order line requirement, this information will be automatically populated by Progress when the work order is created. If the work order is being created to create stock, then no sales order information will be populated. Once the user selects a sales order from the list, the following fields are populated based on the sales order information |
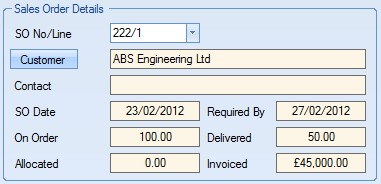
| Customer | This field is populated based on the sales order/sales order line selected in the drop-down list above. This is the customer from the selected sales order. |
| Contact | This field is populated based on the sales order/sales order line selected in the drop-down list above. This is the contact name from the selected sales order. |
| SO Date | This field is populated based on the sales order/sales order line selected in the drop-down list above. This is the date the selected sales order was created. |
| Required Date | This field is populated based on the sales order/sales order line selected in the drop-down list above. This is the customer required date recorded against the sales order line. |
| On Order | This field is populated based on the sales order/sales order line selected in the drop-down list above. This is the quantity ordered by the customer and the quantity on the sales order line. |
| Delivered | This field is populated based on the sales order/sales order line selected in the drop-down list above. This is the quantity already delivered to the customer against this sales order line. |
| Allocated | This field is populated based on the sales order/sales order line selected in the drop-down list above. This is the quantity currently allocated to the selected sales order line, ready for delivery. |
| Invoiced | This field is populated based on the sales order/sales order line selected in the drop-down list above. This is the total value already invoiced against the selected sales order line. |
| If user defined fields have been created in Progress for use on against work orders, these will be displayed in the section below as shown. |
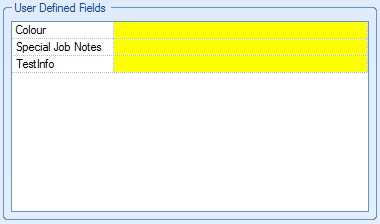
| The user can populate these fields as required. |
| Once all the details have been entered for the work order, the user can save the work order by clicking the ACCEPT option. This will allocate a work order number to the order and save the order in the system. If the work order part number has a sub-assembly part on its BOM, the system will prompt the user to review lower level requirements the new work order has to decide on whether associated work orders need to be created for the lower level requirements. |
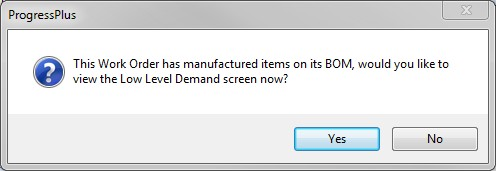
| If the user clicks YES, they will be taken to the work order demand screen to review the requirements. If the user clicks NO, the user will remain on the work order screen. The user can click CLOSE to return to the main work order screen. For more information on the work order demand screen, please refer to the WO Demand section of this manual. |
WO BOM
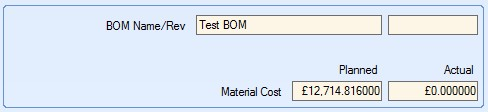
This section of the work order shows the BOM set up against the work order. This will default to the current BOM selected against the master part number. The name and revision of the BOM is shown at the bottom of the screen, along with the planned and actual material costs. The planned material cost is the total of all the total costs of each component part listed in the BOM. The actual cost shown is the total cost of material issued to the work order based on the individual GRN costs associated with the batches issued to the work order.

The top half of the screen displays a list of all the component parts required for this work order.

The information shown is as follows. Most of this information will default based on the master part's default BOM, although the user can amend these on the individual work order to allow for exceptions.
| Seq No | BOM sequence number. This is the sequence number specified against the component part on the manufactured parts BOM. |
| Component Part No | Part number of component part. |
| Description | Inventory part description as recorded against part number. |
| Free Issue | Indicates that the component part is a free issue part for this work order. This is typically used when the customer is providing material for the job. |
| BOM Qty | Quantity of component part required to make one unit of the manufactured part as recorded on the manufactured part’s BOM. |
| Total Qty Required | Total quantity of component part required to manufacture the work order quantity. This is calculated based on the BOM quantity of the component multiplied by the work order quantity. |
| UOM | Component unit of measure |
Surplus(+)/Shortage(-) Current snapshot of component part's stock status. Colour coding indicates whether there is a current surplus (green) or shortage (red) of the part.
| Single Comp Cost | This is the costs associated with a single unit of the component part. For purchased parts, this is the costs of a single unit of measure (UoM). For manufactured parts this is the cost of manufacturing one unit. |
| Total Cost | Total cost of each component part required based on the Single Comp Cost and the total quantity of each component required and is calculated based on the Total Qty Required multiplied by the Single Comp Cost. Also used to calculate the Planned Material Cost at the bottom of the screen. |
| Sundry | Flag indicating whether the component is a sundry item (fixed cost regardless of work order quantity). |
| Round Qty | Flag that indicates whether the cost of the component part is rounded to the nearest UOP value. |
| Required To Start | Flag indicating that the component part must be issued to the job before work can commence. |
| Qty Issued | Quantity of component part that has been issued to the work order. |
| Cost of Qty Issued | Value of component part issued to the work order. |
| On Hold | This flag indicates whether the component part has been placed on hold in the current work order. This can only be set against purchased parts. Placing a purchased part on hold with this flag removes the requirement for this part on this work order. Any overall requirements for this component part will not include any requirements for this work order. |
| BOM Notes | Notes recorded against component parts on manufactured part’s BOM. This pulls through from work order part’s BOM. |
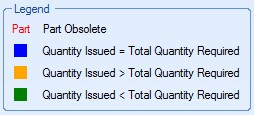
| The BOM component grid uses a colour coding to indicate the status in relation to material issues. The colour coding used is shown in the legend displayed at the bottom of the screen. Initially items are shown in black as no material has been issued. |
BOM Maintenance
The user has a few options available here in relation to the work order BOM. These options are as follows.
Get Latest
![]()
This option updates the work order BOM with the latest BOM from the work order part. The existing work order BOM will be overwritten with the current BOM against the part.
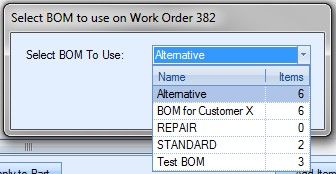
Use Alternate
![]()
This option allows the user to select an alternative BOM from those set up against the work order part. When the user selects this option, they are prompted to select an alternative BOM to use.
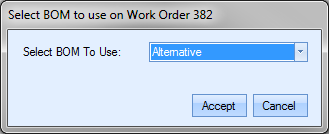
The user can then select an alternative BOM from the drop down list.
Once the alternative BOM has been selected, the user can update the work order BOM to the selected alternative by clicking the ACCEPT option. The work order BOM will be updated accordingly.
Apply To Part
![]()
This option allows the user to update the work order part’s inventory record with the WO BOM. When this option is clicked, the user is prompted to choose between creating a new BOM against the part or to update an existing BOM. They can also specify whether the new or updated BOM is used as the default BOM.
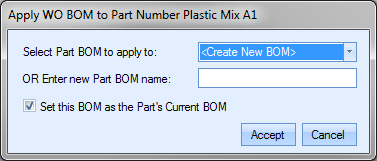
Once the user has selected the BOM to update or entered the new BOM name, the user can click ACCEPT to save the BOM as required.
In addition to the above options, the user has options to amend the details of the work order BOM items themselves. These options only allow changes to the current BOM items and do not impact any BOM details recorded against the part itself. The options available are as follows.
Add Item
![]()
This option allows the user to add parts to the work order BOM. This option can be used if there are custom or additional components that need to be used on the job. Clicking this option presents the user with the following screen.
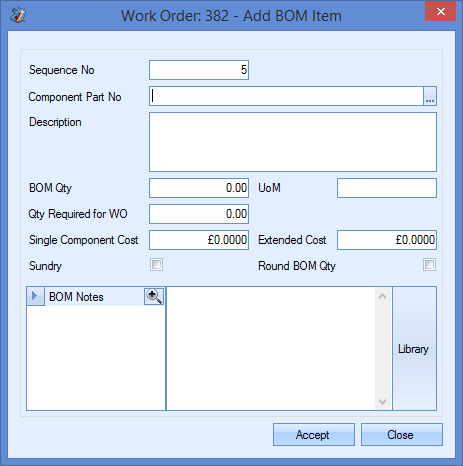
The user can complete this screen to add the required part number to the existing BOM. The information required is as follows.
| Sequence No | BOM sequence number. This is a numerical sequence number. This defaults to the next number in the BOM sequence. |
| Component Part No | Part number to be added to the BOM. The user can select the part number required from the inventory parts list by clicking on the |
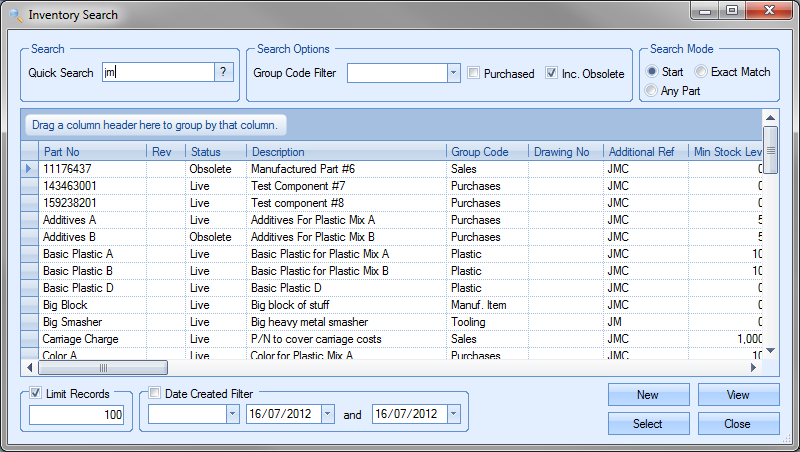
The user can create a new part number if required by selecting the NEW option. If the part already exists, the user can search and select the part required by clicking the SELECT option. This will return the part to the Add BOM Item screen.
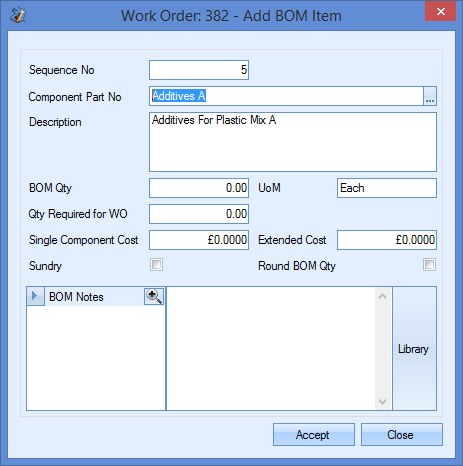
| Description | Defaults to the inventory description once user has selected the part number required. |
| BOM Qty | The quantity required for making one unit of the manufactured item. |
| UoM | Unit of measure of the selected part. Defaults to the unit of measure set against the selected part in the inventory record. |
| Qty Required For WO | Calculated field which defaults to the total quantity required based on the work order quantity and the BOM quantity specified. |
| Single Component Cost | Value of one unit of the selected part. For purchased parts, this is the current purchasing cost of the part. For manufactured items, this is the calculated as the manufacturing costs associated with the full BOM quantity (material, sub-contract costs, labour (setup & run time)) divided by the BOM quantity to give the individual unit cost. |
| Example manufactured part cost: |
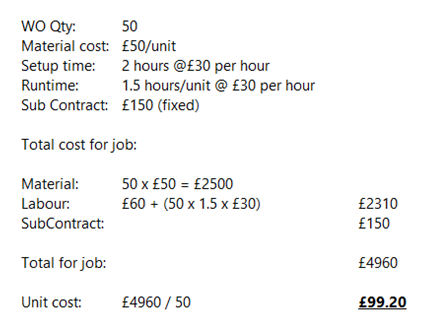
| This calculation is the same calculation made by the Quick Batch Calculator on the Costing section of the inventory record. |
| Extended Cost | This is the total cost of the selected part number based on the single component cost value and the total quantity required for the work order. |
| Sundry | This tickbox allows the user to indicate whether the component being added is to be considered a sundry item (fixed quantity/cost) or one that is based on the work order quantity. |
| Round BOM Qty | This tickbox allows the user to indicate whether the component costings are rounded to use the nearest UoP cost. For example, if half a bag of screws is required, the BOM costings would be based on having to buy a full bag of screws. |
| BOM Notes | This field allows the user to enter comments or notes against this item in relation to the work order BOM. This is a text field. |
The user can enter manual notes or select a pre-defined note from the Notes Library using the LIBRARY option to the right of the field. For more information on the Notes Library, please refer to the Maintenance section of the manual.
Once all the details have been entered, the user can click on the ACCEPT option to return to the work order BOM screen with the new part added. Clicking the CLOSE option would return the user to the BOM screen without the additional part being added.
Edit Item
![]()
This option allows the user to edit existing component parts on the work order BOM. This option can be used if there are custom changes that need to be made for the job. To edit an existing component part, the user simply has to highlight the part on the BOM grid and then click the EDIT ITEM option. The user will be presented with the following screen.
The user is presented with the current BOM details for the selected component part. The user can now edit the details as required. The LATEST COSTS option allows the user to update the Single Component Cost and Extended Cost fields based on the selected part’s current costs. Clicking this option automatically updates the BOM details based on the latest costs.
Once the user has made the required changes, they can click the ACCEPT option to save the changes and return to the work order BOM screen.
Remove Item
![]()
This option allows the user to remove component parts from the work order BOM. This option can be used if custom changes need to be made to the BOM for the job. Clicking this option will remove the selected part from the work order BOM.
Component parts which have had material issued against them to the work order cannot be removed. If the user tries to remove such an item, they will be notified by the following message.
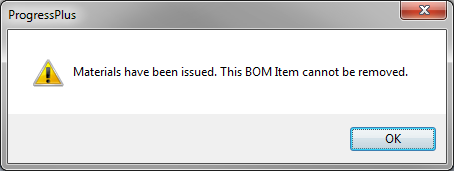
WO Routing
This section shows the work order operations set up against the work order. The operations list will default to the current routing list set against the work order part number when the work order is created.
The planned operations list is shown in the grid at the top of the screen. This grid provides the user with the following information.

| Op No | Operation number. Typically used to identify the sequencing of the operations to be carried out. |
| Operation Description | Short description of the routing operation. |
| WC ID | Unique ID of the work centre selected for the operation. |
| Work Centre | Name of work centre selected for operation. |
| Charge Out Rate | Hourly charge out rate of the selected work centre. |
| Qty Booked | Total quantity of units booked against this operation by the employees through timesheets. |
| Scrap | Total quantity of units recorded as scrap against this operation by the employees through timesheets. |
| Planned Setup (hh:mm) | Planned setup time for the operation. |
| Actual Setup (hh:mm) | The total time recorded as setup time against this operation by employees through timesheets. |
| Planned Runtime (hh:mm:ss) | Total planned run time for the operation. This is calculated on the planned runtime for one unit multiplied by the work order quantity. |
| Actual Run Time (hh:mm) | The total time recorded as booked time against this operation by employees through timesheets. |
| Planned Setup Cost | Total cost associated with the planned set up time based on the work centre’s hourly charge out rate. |
| Actual Setup Cost | Total cost incurred so far in relation to time recorded as setup time against this operation by employees through timesheets. |
| Planned Run Cost | Total cost associated with the planned run time based on the work centre’s hourly charge out rate. |
| Actual Run Cost | Total cost incurred so far in relation to time recorded as booked time against this operation by employees through timesheets. |
| % Complete (Time) | Calculated based on the amount of time recorded against the operation by employees through timesheets. Calculation is as follows. |
| Time booked/Planned Time x 100% |
| % Complete (Qty) | Calculated based on the quantity recorded against the operation by employees through timesheets. Calculation is as follows. |
| Quantity booked/WO Quantity x 100% |
| Op Complete | This tickbox indicates whether the operation is complete. The user can manually mark the operation as complete by ticking this box. If the operation is updated as complete via the SFDC module, this tickbox would be updated by the system. |
| SubContract | This tickbox indicates whether the operation is a subcontract operation or not. |
| SubCon Code | This shows the sub contract code of the operation if this is an external operation. Only shown for subcontact operations. |
| Run Time Per Cycle (hh:mm:ss) | This is the run time associated with this operation for one unit of the manufactured item. |
| SubCon Type | This is the costing type for the subcontract operation. The value shown is based on the costing type selecting against the operation. |
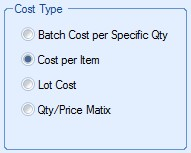
| SubCon Cost | This is the individual unit costs associated with the subcontract operation. |
| SubCon Lead | Lead time of subcontract operation as specified in the operation. |
| Sched Start | Scheduled start date of operation. Defaults to planned start date of the work order but can be updated by scheduling work order through Shop Floor Loading section of Progress. |
| Sched Finish | Scheduled finish date of operation. Defaults to planned finish date of the work order but can be updated by scheduling work order through Shop Floor Loading section of Progress. |
| The legend at the bottom of the screen explains the colour coding used on the routing operations grid with regards to the status of the current operation. Any items shown in black have not been started yet. |

| The name and revision of the current routing is also shown at the bottom of the screen, along with the total outstanding job time based on both the quantity produced and the time booked so far. These are calculated as follows. |
| O/S Job Time by Qty Produced | This outstanding time is calculated based on the time taken to manufacture each unit against the total planned time of the job. For every unit booked against the labour timesheet for this work order, the outstanding time is reduced as shown in the following example. |
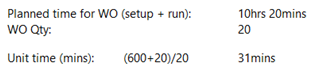
| Therefore, each unit should theoretically take 31mins to manufacture. So, for every unit booked against the labour timesheets, the outstanding time is reduced by 31mins. |
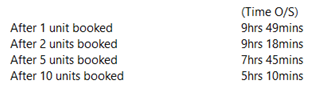
| Once the full quantity has been booked against the timesheets, the outstanding time would be zero. |
| O/S Job Time by Time Booked | This outstanding time is calculated based on the time booked against the work order. |
| Planned time for WO (setup + run): 10hrs 20mins |
| As the employees start to record time against the job, the outstanding time reduces based on the time spent so far as shown below. |
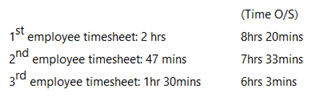 |
| Once employees have recorded a total time of at least the planned time, the outstanding time would be zero. |
The user is also presented with a summary of the work order’s planned and actual operations costs so far. This is shown at the bottom right of the screen.
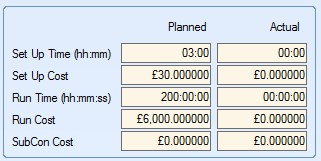
The planned values shown in the above fields are calculated based on the operation times and charge out rates of the work centres in the work order routing list. Once the employees start to record times against timesheets, the actual values are updated to reflect the actual time spent on the job with the actual costs being based on the booked times and the charge out rates of the work centres the time has been recorded against.
The user has a few options available here in relation to the work order routing. These options are as follows.
Get Latest
![]()
This option updates the work order routing with the latest routing from the work order part. The existing work order routing will be overwritten with the current routing against the part.
Use Alternate
![]()
This option allows the user to select an alternative routing from those set up against the work order part. When the user selects this option, they are prompted to select an alternative routing to use.
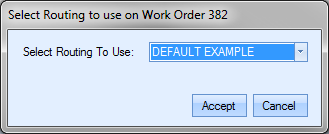
The user can then select an alternative routing from the drop down list.
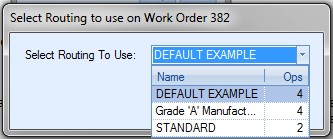
Once the alternative routing has been selected, the user can update the work order routing to the selected alternative by clicking the ACCEPT option. The work order routing will be updated accordingly.
Apply To Part
![]()
This option allows the user to update the work order part’s inventory record with the WO routing. When this option is clicked, the user is prompted to choose between creating a new routing against the part or to update an existing routing. They can also specify whether the new or updated routing is used as the default.
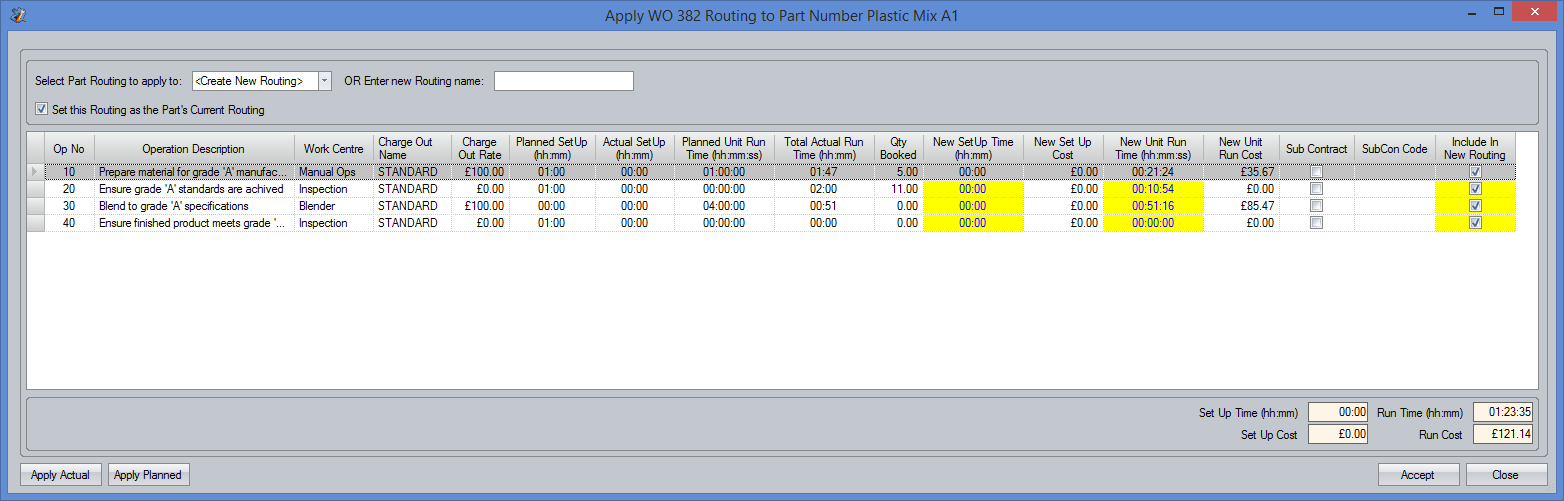
The user can select whether they apply the ACTUAL or PLANNED times from the WO routing operation back to the selected routing of the part. Selecting either of these options updates the new times shown in the grid above accordingly. The user will be informed of the change via on screen message before the grid is updated.
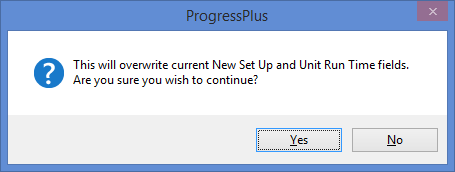
Once the user has selected the times to be used, the user can click ACCEPT to save the routing to the part as required.
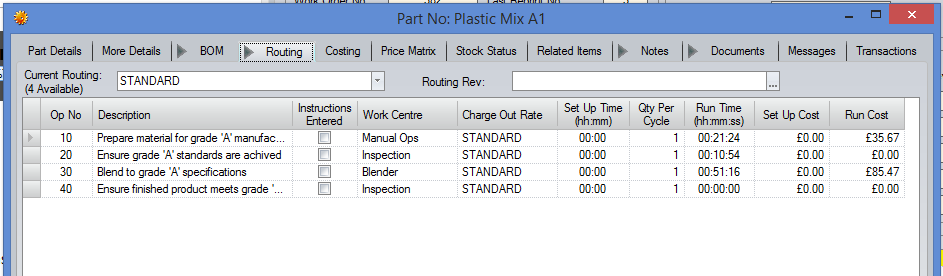
In addition to the above options, the user has options to amend the details of the work order routing items themselves. These options only allow changes to the current routing operations and does not impact any routing details recorded against the part itself. The options available are as follows.
Add Op
![]()
This option allows the user to add operations to the work order routing. This option can be used if there are custom or additional operations that need to be used on this specific job. Clicking this option presents the user with the following screen.
Operation Details
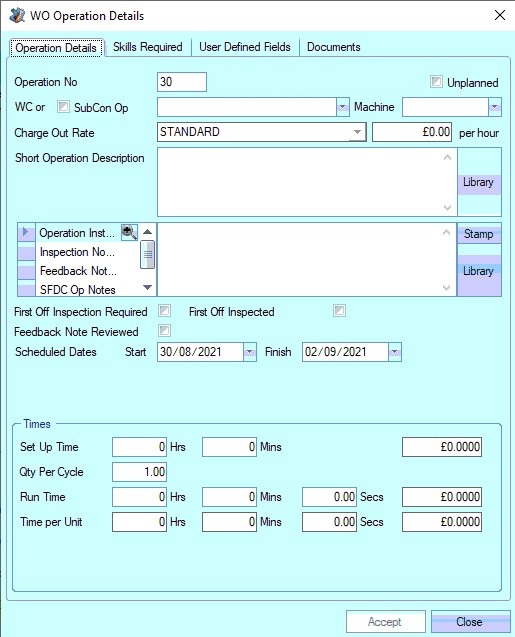
The user can then proceed to complete the information regarding the operation on this screen.
Adding New Internal Operations to a Routing
If the user wishes to add an internal operation to a routing, they can specify the details of the operation here.
| Operation No | This is the routing operation number. This defaults to 10 for the first operation and then increases in multiples of 10 for subsequent operations, however, this number can be edited by the user. |
| Unplanned | Tickbox to allow the user to specify whether the additional operation is an unplanned operation. |
| WC or SubCon Op | This is where the user specifies whether the operation is an internal or external operation. For internal operations, the user must select the existing work centre associated with the required operation from the drop-down list. |
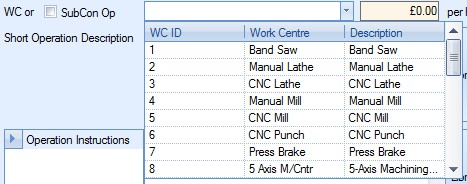
| This drop-down list is populated from the Work Centres section of the Maintenance options and lists all work centres currently listed with a LIVE status. For more information on work centres and their creation, please refer to the Maintenance Menu section of the manual. |
| Once the user selects an existing work centre for an internal operation, the work centres, the associated hourly rate is displayed to the right of the work centre drop-down list. |
![]()
| Short Operation Description | This field allows the user to provide a short operation description regarding the operation. The user has the option of choosing a description from the Notes Library section of Progress, or manually entering the details. |
| If the user manually enters a description not currently held in the Notes Library, Progress will prompt the user |
| To use the Notes Library, the user can click on the LIBRARY option. This will present the user with the Notes Library window, from which they can choose the required description. For more information on using the Notes Library section of Progress, please refer to the Notes Library section of the manual. |

| Operation Instructions | This field allows the user to enter more detail instructions relating to the operation. If the part routing operation had Operation Instructions set, then these will pull through to the WO operation automatically. The user can then edit the text further if they so wish. Again, the user has the option to select notes from the Notes Library if they require, or manually enter the details. To use the Notes Library, the user can click on the LIBRARY option. This will present the user with the Notes Library window, from which they can choose the required description. For more information on using the Notes Library section of Progress, please refer to the Notes Library section of the manual. |
| Inspection Notes | This field allows the user to enter inspection notes against a specific operation. If the part routing operation had Inspection Notes set, then these will pull through to the WO operation automatically. The user can then edit the text further if they so wish. Again, the user has the option to select notes from the Notes Library if they require, or manually enter the details. To use the Notes Library, the user can click on the LIBRARY option. This will present the user with the Notes Library window, from which they can choose the required description. For more information on using the Notes Library section of Progress, please refer to the Notes Library section of the manual. |
| SFDC Op Note | This field allows the user to enter specific SFDC notes against a specific operation. If the part routing operation had an SFDC Op Note set, then these will pull through to the WO operation automatically. The user can then edit the text further if they so wish. When the employee jobs onto the operation via the SFDC station, the note is displayed on screen for the employee to see.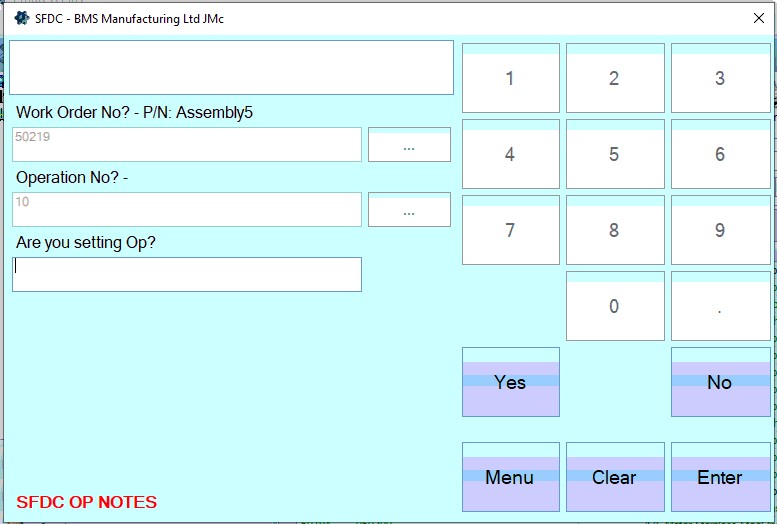 Again, the user has the option to select notes from the Notes Library if they require, or manually enter the details. To use the Notes Library, the user can click on the LIBRARY option. This will present the user with the Notes Library window, from which they can choose the required description. For more information on using the Notes Library section of Progress, please refer to the Notes Library section of the manual. |
| Set Up Time | These fields allow the user to specify the set up time in hours and minutes for the operation. This is the initial set up or preparation time required before the operation can start. |
![]()
| Once the user enters a time, Progress calculates the associated cost based on the work centre’s hourly rate. An example is shown below. |
| Work Centre: BLENDER |
| Hourly Rate: £30 p/h |
![]()
| Qty Per Cycle | This field allows the user to specify the number of units that can be done in a single run time period. |
![]()
| Run Time Total | This is the total run time required to produce the quantity specified in the Qty Per Cycle field above. The user can enter the run time in hours, minutes and seconds |
![]()
| Once the user enters a time, Progress calculates the associated cost based on the work centre’s hourly rate. An example is shown below. |
| Work Centre: BLENDER |
| Hourly Rate: £30 p/h |
![]()
| Time Per Unit | These fields are calculated based on the Qty Per Cycle and Run Time Total values entered by the user. These fields show the individual run times per unit. Typically, where the Qty Per Cycle has a value of 1, the Run Time Total and Time Per Unit will match. |

| Where the Qty Per Cycle has been entered as a value greater than one, Progress will calculate the run time per unit and display it in these fields. |

| Once all the details have been entered, the user can save the new operation by clicking the ACCEPT option. The user will be returned to the routing screen with the new operation now displayed in the operations list. |
Tooling Required
This section lists all tooling required for the operation. These will default based on the tooling set up on the part's routing operation, but can be amended on the individual WO operation where required, simply by amending the tooling via the drop-down list.
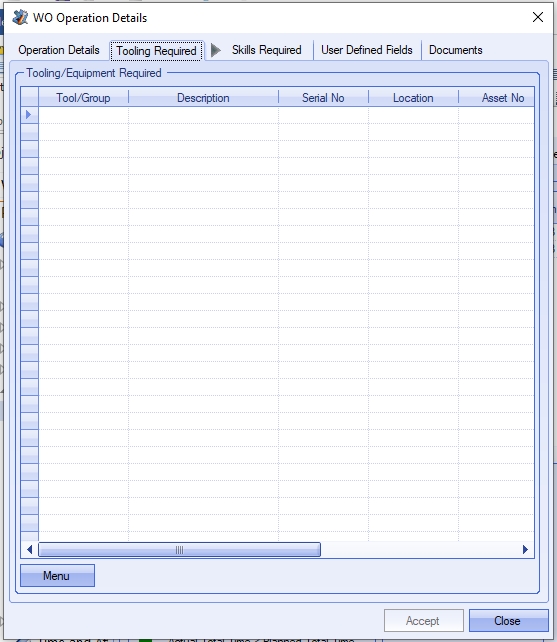
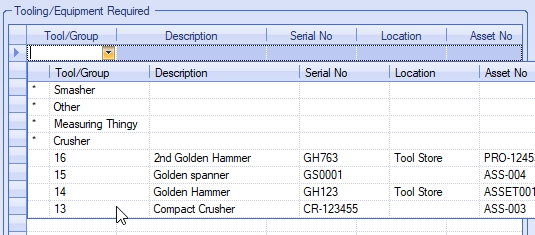
Once any changes are made, the user can click ACCEPT to save.
The user can also add tooling to the operation via the MENU > TOOL SEARCH option. This will present the user with a list of all tooling, allowing them to select multiple tooling to be added to the routing operation.
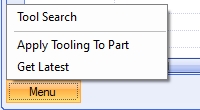
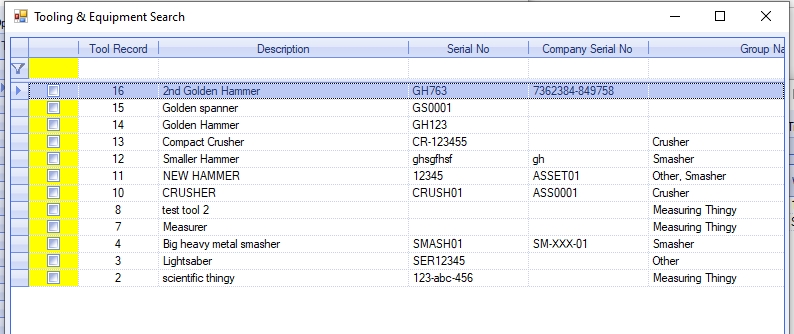
The user can tick all the tooling items required, before clicking ACCEPT to add them to the current routing operation.
The user also has an option to update the master part number with the current routing operations tooling. This can be done via the MENU > APPLY TOOLING TO PART option.
Selecting this option will prompt the user to confirm the update before updating the routing operation on the master part routing operation.

The user also has an option to update the current work order routing operation with the latest tooling details from the master part routing operation. This is useful if the master part has been updated after the work order was created. Selecting this option will update the current operation with the tooling information from the master part routing operation details.
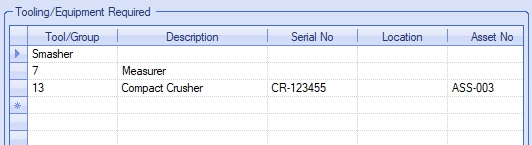
Skills Required
This section lists all required employee skills for the operation. These will default based on the skills set up on the part's routing operation, but can be amended on the individual WO operation where required, simply by selecting the additional skills via the drop-down list or via the MENU > SELECT SKILLS option.
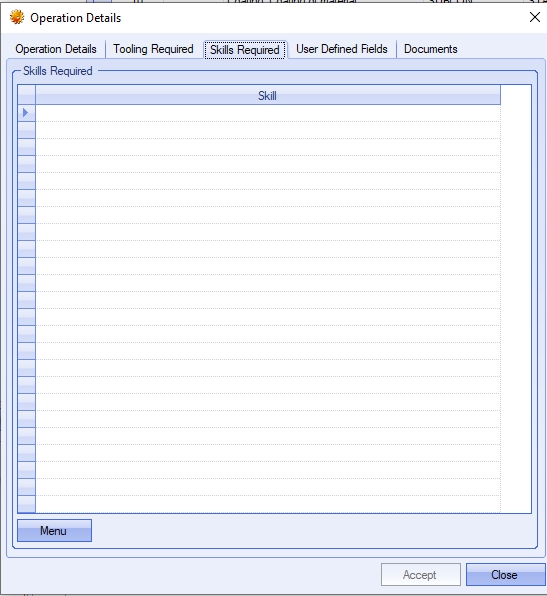
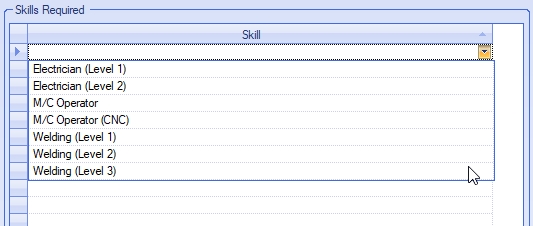
The user can also select multiple skills to be edited using the MENU > SELECT SKILLS option.
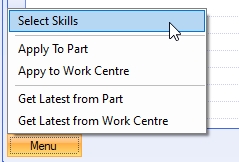
This presents the user with a list of all skills and allows them to be added/removed individually or as multiples, using the single and double arrows respectively.
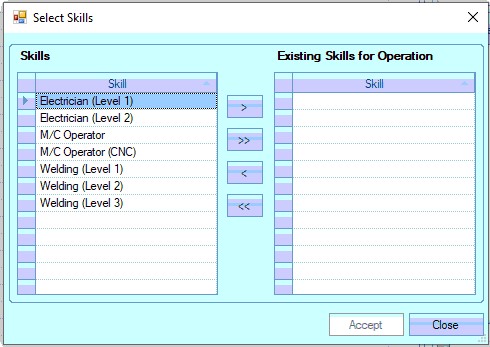
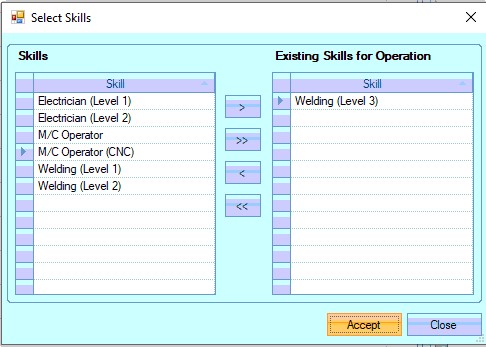
Once selected, the user can click ACCEPT to add the selected skills to the routing operation.
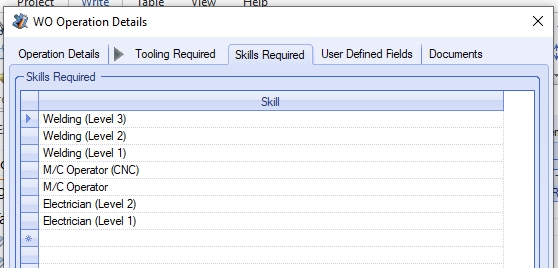
Once all skills have been added, clicking ACCEPT will save the skills. These skills will then become a default requirement of the employee to ensure only the correct employees carry out the operation on this specific work order..
The user also has options to update both the master part record and the master work centre record with skills set in the work order routing operation. These options are available via the MENU option at the bottom of the screen.
Selecting either the APPLY TO PART or APPLY TO WORK CENTRE will prompt the user for confirmation before updating the part or work centre as required.
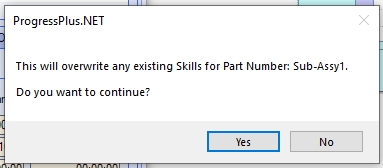
(Applying to part)
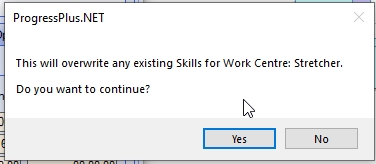
(Applying to work centre)
Clicking YES on either message will proceed to update the part or work centre respectively.
The user also has options to update the current work order operation with the latest skills from the master part record or the master work centre record. The options are also available in the MENU option at the bottom of the screen.
Selecting either the GET LATEST FROM PART or GET LATEST FROM WORK CENTRE will prompt the user for confirmation before updating the current work order operation with the details from the master part or work centre as required.
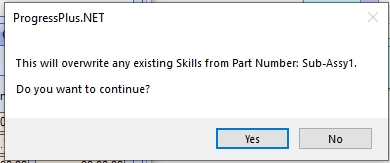
(Getting latest from part)
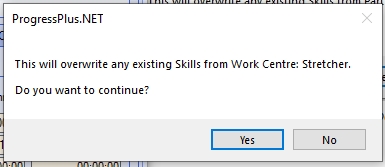
(Getting latest from work centre)
Clicking YES on either message will proceed to update the skills on the current work order operation from the master part or master work centre record respectively.
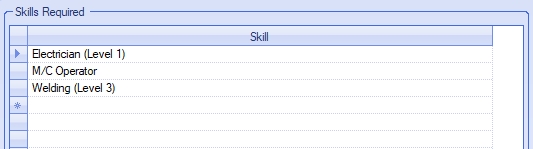
The user can save all changes by clicking ACCEPT.
User Defined Fields
This section lists all the user-defined fields (UDFs) that have been set up against the operation. These will default based on the values recorded against the part routing operation but can be independent to the WO operation if required.
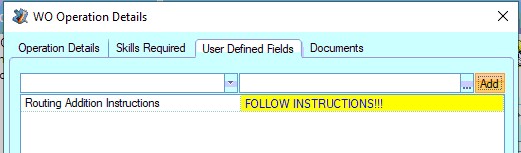
Once any changes are made, the user can click ACCEPT to save.
Documents
This section will list any documents, folders, captured images, etc. for the WO operation. Again, these will default based on the part's routing, but can be amended within the specific WO if required.
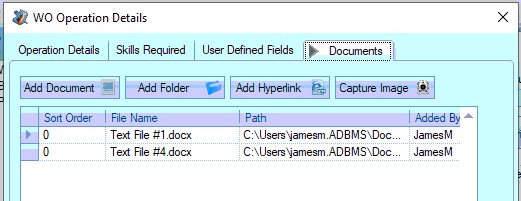
Once any changes are made, the user can click ACCEPT to save.
Adding New Sub-Contract Operations to a Routing
If the user wishes to add a sub-contract operation to a routing, they can add the operation using this same option.
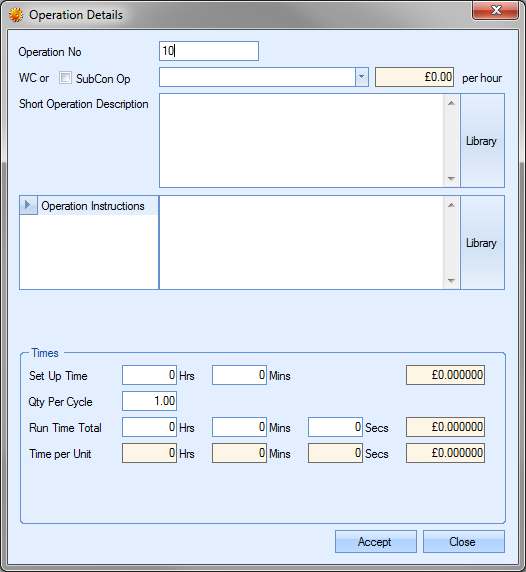
The user can then proceed to complete the information regarding the external operation on this screen.
| Operation No | This is the routing operation number. This defaults to 10 for the first operation and then increases in multiples of 10 for subsequent operations, however, this number can be edited by the user. |
| Unplanned | Tickbox to allow the user to specify whether the additional operation is an unplanned operation. |
| WC or SubCon Op | This is where the user specifies that the operation is a sub-contract operation. For sub-contract operations, the user must tick the SubCon Op tickbox. This changes the drop-down list from a list of internal work centres to a list of external sub-contract codes. |
| This drop-down list is populated from the Sub-Contract Codes section of the Maintenance options and lists all sub-contract codes currently listed with a LIVE status. For more information on sub-contract codes and their creation, please refer to the Maintenance Menu section of the manual. |
| Once the user selects the sub-contract code required, the operation screen changes to accommodate the details of the sub-contract requirement. |
| Short Operation Description | For sub-contract operations, this field defaults to the description entered against the selected code in the Sub-Contract Code record. This field cannot be changed by the user. |
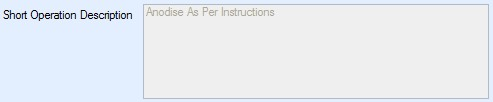
| Operation Instructions | This field allows the user to enter more detail instructions relating to the operation. If specific instructions have been recorded against the sub-contract code, these will be pulled through from the sub-contract code record. Again, the user has the option to select notes from the Notes Library if they require, or manually enter the details. |
| To use the Notes Library, the user can click on the LIBRARY option. This will present the user with the Notes Library window, from which they can choose the required description. For more information on using the Notes Library section of Progress, please refer to the Notes Library section of the manual. |
| Default Supplier | This field allows the user to specify the supplier who will carry out the sub-contract task. If a supplier has already been specified against the sub-contract code, this will be pulled through to the operation screen. The user can specify the supplier if known at this stage or can leave this blank for the supplier to be specified at the purchase order stage. |
![]()
| Lead Time | This field allows the user to specify the lead time of the sub-contract operation. If the lead time is specified against the sub-contract code, this field will default to that lead time. The user can change this value if a different lead time is to be applied. |
![]()
| The next section allows the user to specify how the sub-contract operation is to be costed. The user has 4 options available to choose from. |
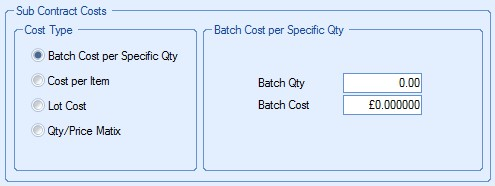
| Again, the costing method will default to the selection made against the sub-contract code, but can be changed if necessary by the user. The options available are as follows: |
| Batch Cost per Specific Qty | This option permits the user to enter a batch size and cost for that specific batch. The following example has a Batch Qty of 50 and a Batch Cost of £20. |
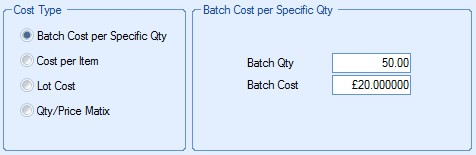
| If the user were to send a batch of 200 items for subcontract work the cost would therefore be £80 (200/50 x £20). |
| Cost Per Item | This option allows the user to enter a cost per item for the sub-contract cost and can be used in conjunction with a specified minimum order quantity. The following example has a Cost Per Item of £1.25 with a minimum charge of £75. |
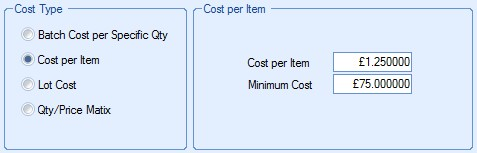
| The system would cost any quantity up to 60 (£75/£1.25 = 60) as costing the minimum charge of £75 i.e. to plate 1 item = £75, 15 = £75, 42 = £75 etc as these quantities do not fulfil the minimum charge. Any quantity greater than 60 would be costed at Minimum Charge + Cost per Item e.g. a quantity of 80 would be costed at £100 (£75 + 20 x £1.25). |
| Lot Cost | This option allows the user to enter a single cost for the sub-contract requirement. This is used when a fixed fee has been agreed with the supplier. The example below shows a fixed fee of £100. This would be the same whether the quantity being sub-contracted was 1 or 1000. |
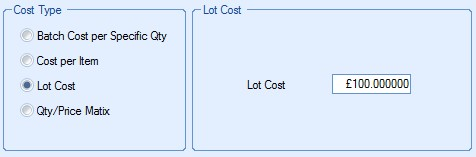
Qty/Price Matrix
This option allows the user to record price breaks against different quantities.
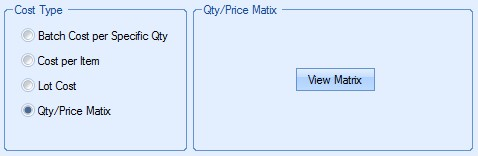
The user can add the price breaks for this sub-contract operation by clicking on the VIEW MATRIX option. The user will then be presented with the following screen.
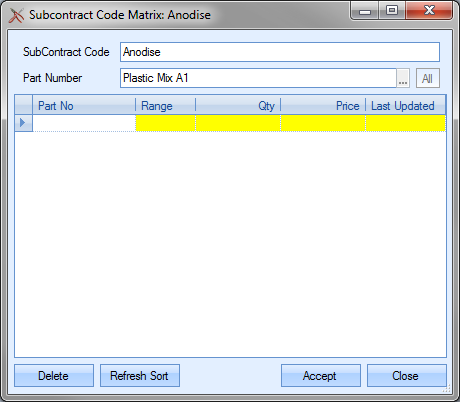
The user may then click onto the Range field (in yellow) and choose either “Over” or “Up To”. A “Qty” and “Price” each may also be entered into the appropriate yellow fields. An example is shown below.
e.g. for a Qty (quantity) “Up To” 10, the Price is £10.00 each,
for a Qty (quantity) “Up To” 20, the Price is £9.00 each, etc
until a maximum quantity is reached e.g. 49. The user may then choose the “Over” option from the Range field i.e. any quantity required greater than 49 would cost £5.50 as shown in the next screen.
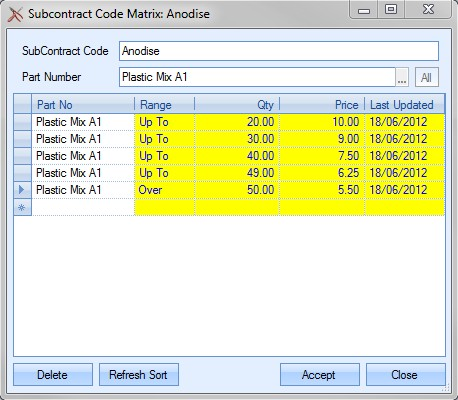
If any price breaks are entered in error, the user can delete them by highlighting the erroneous entry and click the DELETE option. The user will be prompted to confirm the deletion.
Clicking YES will complete the deletion. Clicking NO will return the user to the Matrix screen.
The REFRESH SORT option allows the user to refresh the entries by quantity sequence. This can be used after changes have been made to reorder the information entered.
![]()
Once the user has made the required changes, they can save the changes by clicking on the ACCEPT option. The costing of the sub-contract operation would then use the price matrix details entered for calculating the planned costs associated with the sub-contract operation.
Once all the details have been entered, the user can save the new operation by clicking the ACCEPT option. The user will be returned to the routing screen with the new sub-contract operation now displayed in the operations list.
Editing Routing Operations
The user can edit any existing operations, whether internal or sub-contract, by clicking on the EDIT OP option.
![]()
This presents the user with the operation details screen as described above. The user can then make any changes required. Once the changes have been made the user can click the ACCEPT option to save the changes.
Deleting Routing Operations
The user can remove any existing operations from the routing by highlighting the operation to be removed and clicking on the DELETE OP. This will remove the operation from the routing list.
![]()
Once any changes have been made to the routing screen, the user can click the ACCEPT option to save the changes made.
WO Issues
This section of the work order shows the detail of any material or subcontract items that has been issued to the work order as well as a summarised total cost. The screen below shows the material details view of the issues screen.

The grid shown provides the following information for the user.
| Part No | This is the inventory part number that has been issued to the work order. |
| Description | This is the description recorded against the inventory part number. |
| Date Issued | This is the transaction date of the material issue. |
| GRN | This is the GRN number of the specific batch issued to the work order. |
| Batch No | This is the batch number recorded against the GRN issued to the work order. |
| Supplier | This is the supplier from whom the material was received. |
| PO No | This is the purchase order number the material was received on. |
| Adv No | This is the advice note number recorded against the GRN receipt. |
| Qty | This is the quantity of the GRN which has been issued to the work order. |
| Unit Cost | This is the unit cost of the issued GRN. This is the unit cost recorded against the GRN record. For purchased parts this will be the PO unit cost or the confirmed purchase invoice cost (if different from the PO unit cost). For manufactured parts, this will be the manufacturing cost of the batch. |
| Total Cost | This is the total cost of the material issued based on the unit cost and the quantity issued. |
| Issue Note | This is the comment or note recorded against the material issue transaction for this GRN batch. |
| GRN Note | This is the GRN note recorded at the point of receipt of the GRN batch. |
| Release Note | This is the release note recorded against the GRN batch that was issued. |
The user can view the material issue information using alternative viewpoints which can be selected using the options at the bottom of the screen.
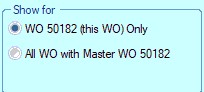
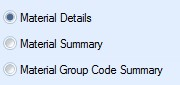
By default, only the material issued to the current WO is displayed, but the user can see all material issues for all WOs that are associated with the same Master WO. This gives quick access and summary costing information across the entire job from this screen.
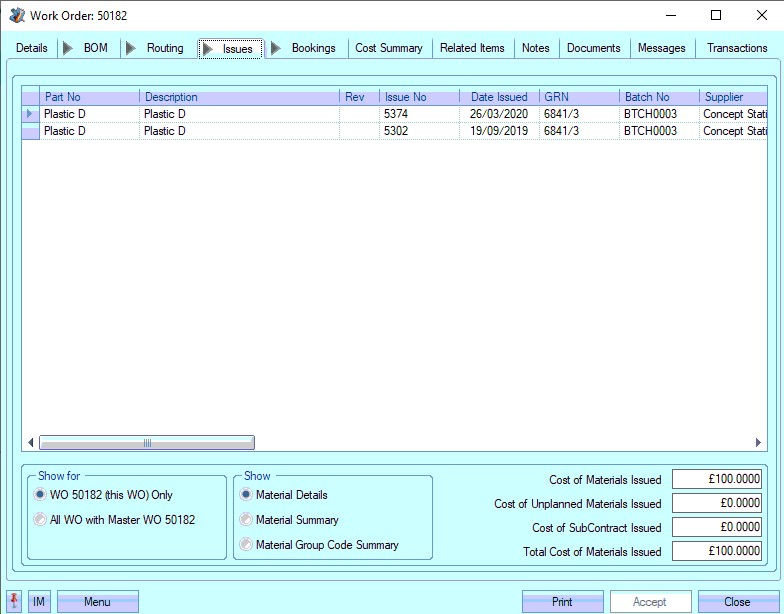
(Default view - Current WO issues)
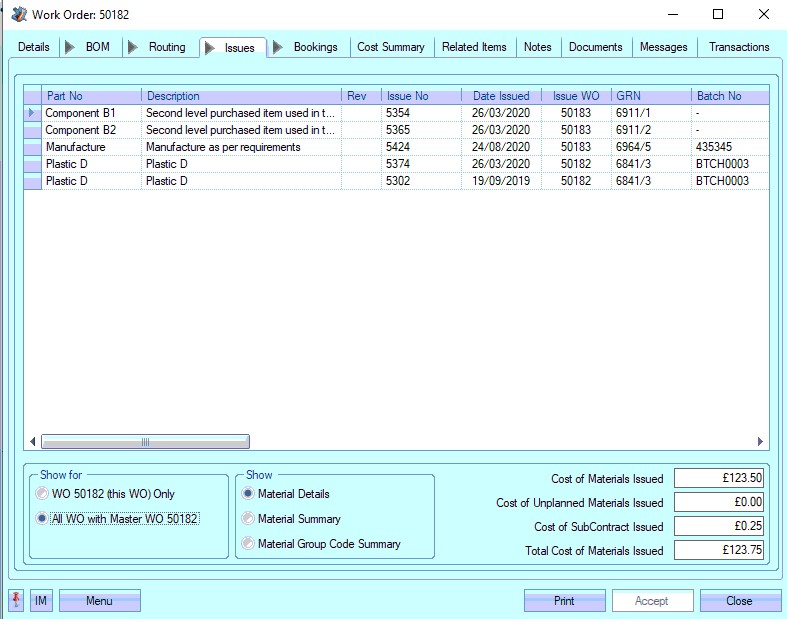
(All material issues associated with Master WO)
While the MATERIAL DETAILS option shows the individual material issues, selecting the MATERIAL SUMMARY option will change the view to the following. This summarises the material issues by part number and totals the cost based on the GRN unit cost.

Selecting the MATERIAL GROUP CODE SUMMARY option will change the view to the following. This summarises the material issues by group code and totals the GRN unit cost for each group code shown..

Both the individual and Master WO options can be used in conjunction with the material summary options too.
Another cost breakdown of the materials issued is shown at the bottom of the screen. This breaks down the cost of component materials and the value of subcontract operations also issued against the work order as well as a combined total. There is also a breakdown of the cost of unplanned materials that have been issued to the job.
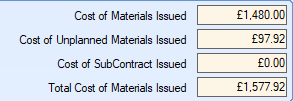
WO Bookings
This section of the work order lists all the labour booking recorded against the work order.
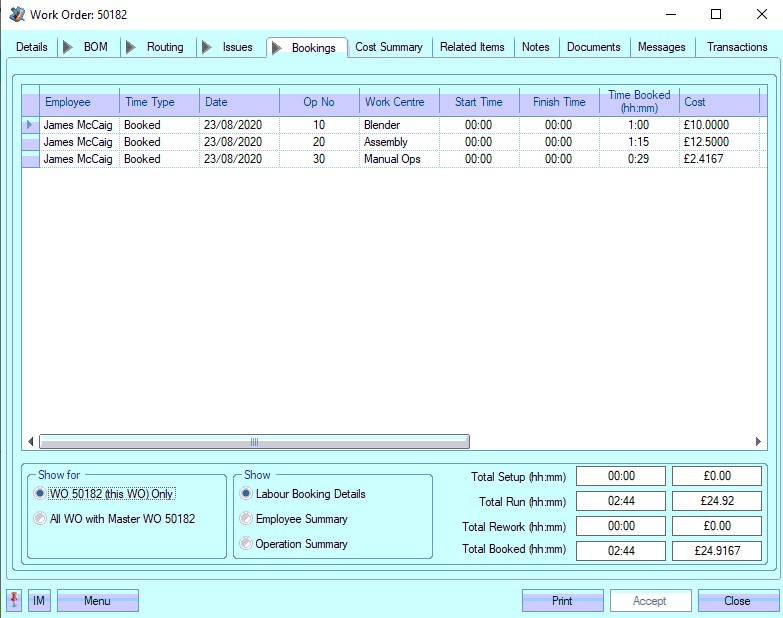
If the WO is currently jobbed onto by an employee, the BOOKING tab will show a green indicator to highlight this as shown below.
![]()
The grid shown provides the following information for the user.
| Employee | Name of employee who booked time against the work order. |
| Time Type | This is the type of time being recorded against the work order. This can be any of the following: |

| Date | Date timesheet was recorded against work order. |
| Op No | Work order operation number time has been recorded against. |
| Work Centre | Work centre of the operation that the time has been recorded against. |
| Start Time | Starting point of period of time recorded against timesheet. If timesheet record has been manually entered, this can be 00:00 as long as Time Booked (hh:mm) field has been populated. If timesheet has been generated from SFDC module in Progress, this field will hold the time the employee jobbed onto the work order. |
| Finish Time | End point of period of time recorded against timesheet. If timesheet record has been manually entered, this can be 00:00 as long as Time Booked (hh:mm) field has been populated. If timesheet has been generated from SFDC module in Progress, this field will hold the time the employee jobbed off the work order. |
| Time Booked (hh:mm) | Period of time recorded against timesheet. This can either be manually entered when the timesheet is manually created or automatically calculated by the SFDC module when the employee jobs on and off a work order. |
| Cost | This is the total cost of the time period booked against the work order operation by this employee based on the work centre’s hourly charge out rate. |
| Quantity | This is the quantity booked as complete through this operation by the employee. This quantity can be manually entered against the timesheet record or recorded as part of the job off process when the employee jobs off the work order operation. |
| Notes | This field shows any timesheet notes recorded manually against the timesheet. |
| No. of Scrap Entries | This field shows the number of recorded scrap records against the labour booking but also allows the user to record additional scrap entries against the WO operation. Clicking on this field will present the user with an |
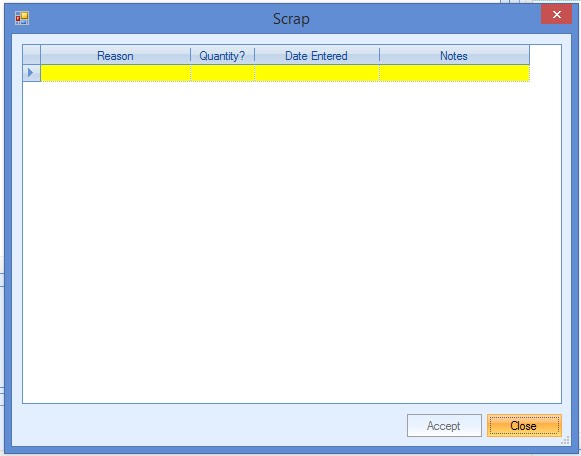
| The user can now enter the details of any scrap units recorded against the employee’s recorded time period. The user can select a scrap reason from the predefined list, enter the quantity being scrapped, the date and also any other additional notes. |
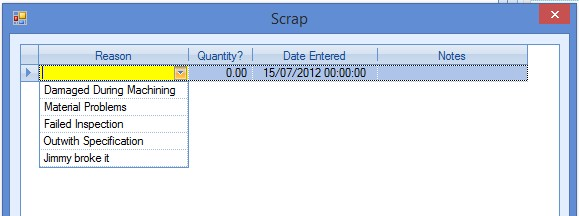
| Once entered, the user can click ACCEPT to save the details. |
| Total Scrap Qty | This shows the total scrap quantity recorded so far against the WO operation and employee based on the scrap records recorded. |
The information shown in the grid can also be viewed by employee or operation using the options at the bottom of the screen, as well as viewing all labour bookings for the Master WO.
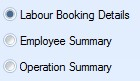
Just like the work order's Issues tab, the user can view either just the labour bookings associated with the current WO, or they can view all labour bookings for all WOs associated with the Master WO. By default, only the current WO bookings are displayed.
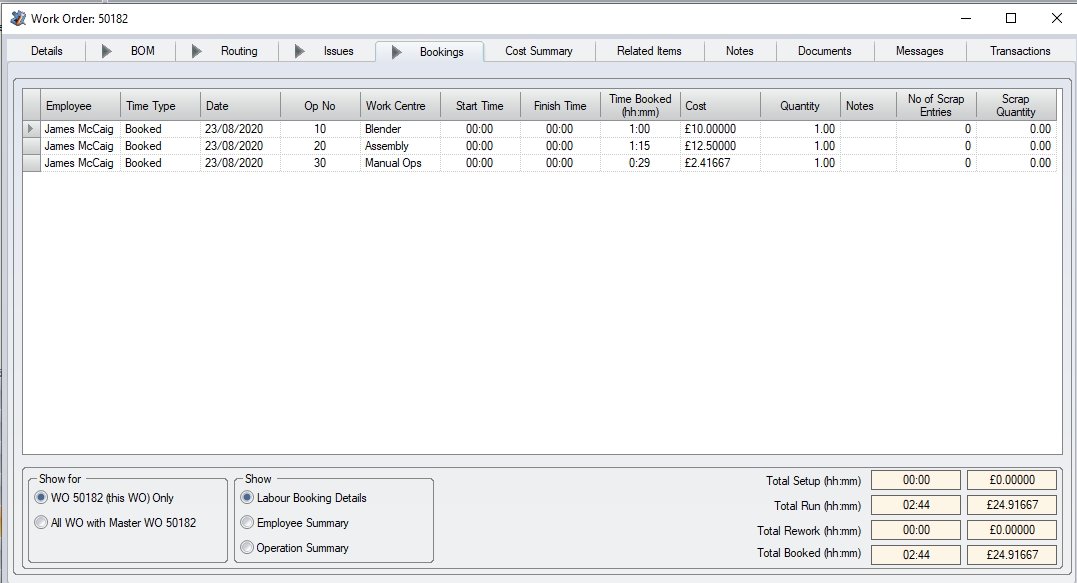
(Default - Current WO bookings)
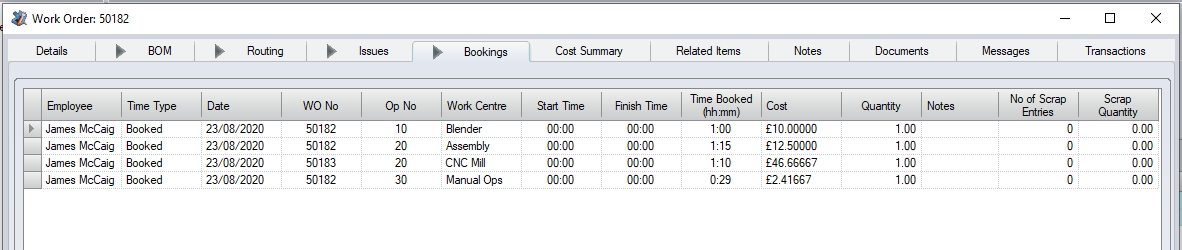
(All labour bookings associated with Master WO)
Choosing the Employee Summary option presents the user with the following grid view which summarises the times recorded by employee regardless of the operation the time was booked against.

Choosing the Operation Summary option presents the user with the following grid view which summarises the times recorded by operation regardless of the employee who booked the time.

Both the individual and Master WO options can be used in conjunction with the labour summary options too.
The labour bookings are also summarised at the bottom of the screen. This is broken down into four categories of Total Setup, Total Run, Total Rework and Total Booked. These fields show the total time booked against the work order and the associated cost of this time.
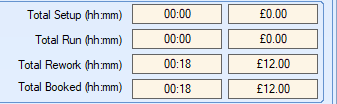
WO Cost Summary
This section of the work order allows the user to view the current costing of the work order by comparing both the planned and actual costs as well as any associated sales order value.
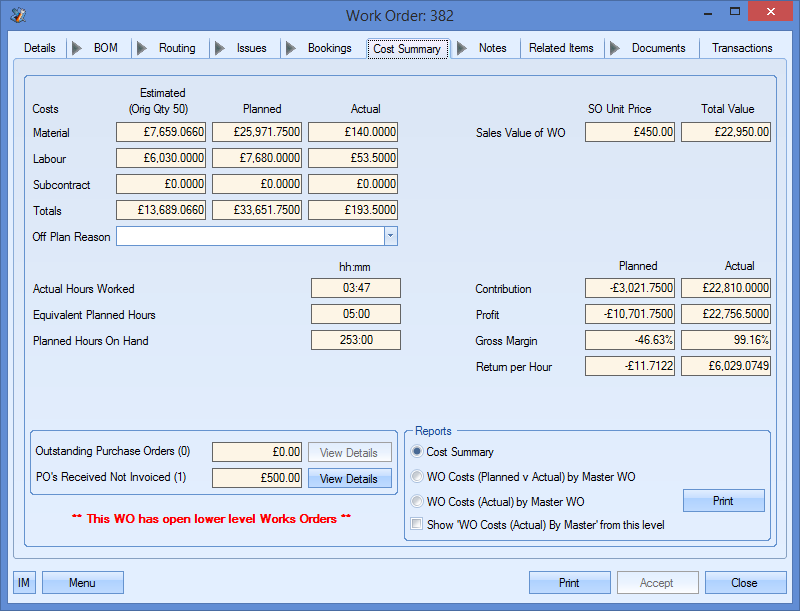
All of the information shown on this screen is calculated based on the information recorded in the work order and its associated orders. The main information shown here are the work order costs.
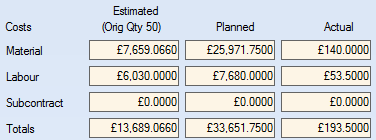
The values above show the estimated, planned and actual costs for material, labour and subcontract operations for the work order.
| Estimated costs | This is calculated based on the initial work order quantity, default BOM and the default subcontract and internal routing operations that were assigned at the point the work order was created. |
| Planned costs | This is calculated based on the current work order quantity, BOM and both subcontract and internal routing operations. These values would take into account any changes made to BOMs, quantities and routing operations since the work order was created. |
| Actual costs | This is calculated based on the value of actual material issues, subcontract purchase orders and labour bookings that have been made against the work order. If the current work order contains sub-assembly items on its BOM which have not yet been complete, this screen displays a message at the bottom highlighting this. |
![]()
Since the costs associated with the lower level work orders can impact the costs associated with the current work order, this message is displayed to highlight this.
If the actual costs of the work order exceed or are looking to exceed the planned costs, the user can specify a reason for this using the drop-down list provided.
![]()
The user can select a reason from the drop-down list to provide an explanation as to why the job has or is likely to exceed the planned costs.
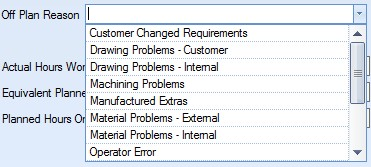
This drop-down list can be populated from the List Maintenance section of Progress in the Department list as shown in the screen below.
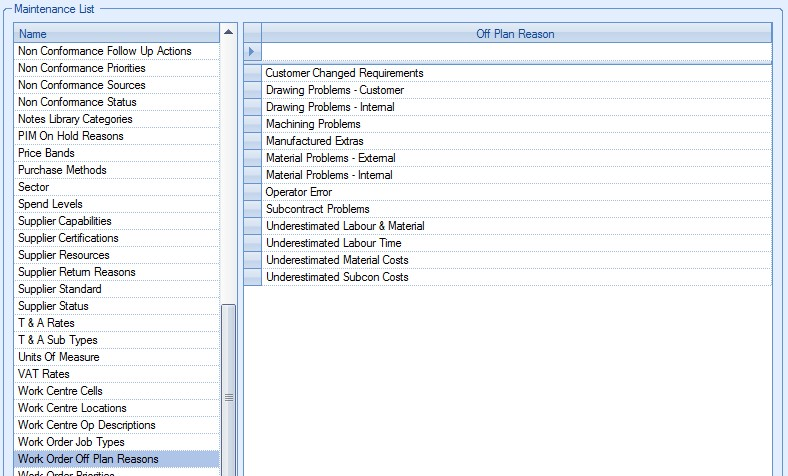
For more information on maintaining lists and the List Maintenance section of Progress, please refer to the List Maintenance section of this manual.
If the work order is associated with a specific sales order line requirement, this screen also shows the sales order unit price and the total value of the sales order line including any applied discount.

If no sales order line is associated with the work order, then the SO Unit Price shows as zero and the Total Value shows as the total planned cost of the work order.
![]()
The Cost Summary screen also provides the user with a summary comparison of the labour bookings against the planned times.
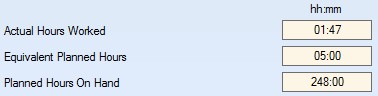
The Actual Hours Worked total is the total time recorded against the work order. This value will match the value shown on the Bookings section of the work order.
The Equivalent Planned Hours value is calculated differently depending on if the actual setup time is greater or less than the planned setup time. For each operation as the following is used:
If Actual Set Up Time Booked < Planned Set Up Time then
Equivalent Planned Hours = (Actual Qty Booked x Planned Unit Run Time) + Actual Set Up Time Booked.
If Actual Set Up Time Booked >= Planned Set Up Time then
Equivalent Planned Hours = (Actual Qty Booked x Planned Unit Run Time) + Planned Set Up Time.
The values for each operation are then totalled to give the overall WO value.
The Planned Hours On Hand value is calculated for each operation as follows:
Planned Hours On Hand = ((WO Qty - Actual Qty Booked) x Planned Unit Run Time) + (Planned Set Up Time - Actual Set Up Time)
Again, the values for each operation are then totalled to give the overall WO value. If the actual booked quantity or the actual hours exceed the work order quantity or planned hours respectively, then the Planned Hours On Hand will be shown as zero. The Planned Hours On Hand can never be less than zero.
Also featured on the Cost Summary screen is a calculation of contribution, both planned and actual. This is the company’s contribution to the overall selling price. This is shown along with the profits, planned and actual and the return per machine shop hour (MSH).
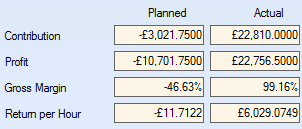
The contribution values are calculated as follows:
Planned Contribution = Total Sales Value - (Planned Material Cost + Planned SubCon Cost)
Actual Contribution = Total Sales Value - (Actual Material Cost + Actual Subcon Cost)
The profit values are calculated as follows:
Planned Profit = Total Sales Value – Total Planned Costs
Actual Profit = Total Sales Value – Total Actual Costs
The Gross Margin values are calculated as follows:
Planned Gross Margin = Planned Profit / Total Sales Value
Actual Gross Margin = Actual Profit / Total Sales Value
The machine shop hour (MSH) values are calculated as follows:
Planned Return Per MSH = Planned Contribution / (Planned Set Up Time + Planned Run Time)
Actual Return Per MSH = Actual Contribution / (Actual Set Up Time + Actual Run Time)
The Cost Summary screen also gives the user a summarised view of any purchase orders linked to the work order. The user can see the number and value of any purchase orders still to be received as well as any purchase order receipts that have yet to be invoiced.

The Outstanding Purchase Orders value is the total value of all purchase orders still to be received that are on order specifically for the current work order. The number shown in brackets relates to the number of purchase orders that are outstanding. The VIEW DETAILS option allows the user to see the detail behind these values. Clicking this option presents the user with the following screen.
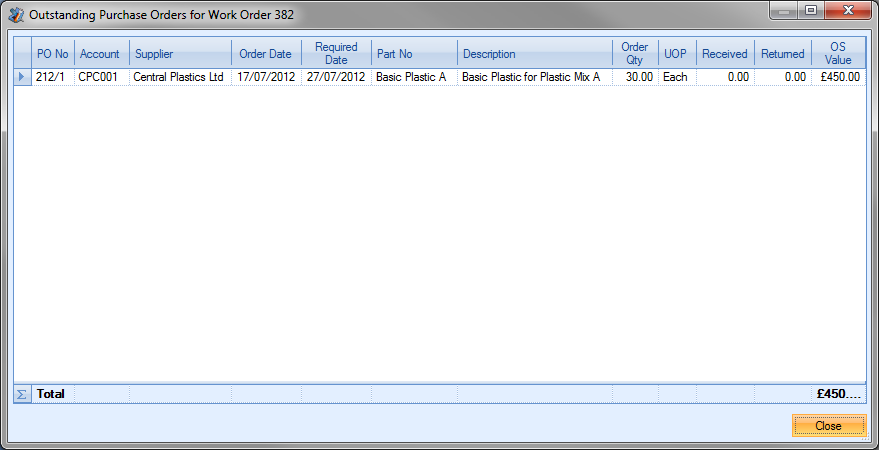
This screen gives the user an overview of all the purchase orders that are linked to the current work order as well as their receipt status and individual value. Clicking the CLOSE option return the user to the Cost Summary section of the work order.
The POs Received Not Invoiced value is the total value of all purchase orders that have been received into stock, but have not yet been invoiced for the current work order. Again, the number shown in brackets relates to the number of individual purchase orders that have still to be invoiced. The VIEW DETAILS option allows the user to see the details behind these values. Clicking this option presents the user with the following screen.
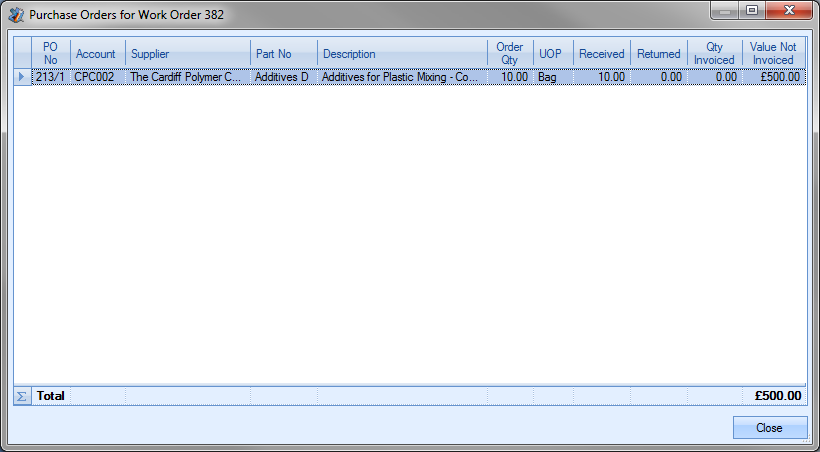
This screen gives the user an overview of all the purchase orders that are linked to the current work order as well as their invoice status and individual outstanding value. Clicking the CLOSE option return the user to the Cost Summary section of the work order.
The Cost Summary screen also provides the user with some reporting options that can also be used to view the work order costs. The report options are shown at the bottom of the screen.
The user can generate any of the reports listed by simply highlighting the report required and clicking the PRINT option. The reports will be displayed on screen for the user and can be saved in various formats or printed out if required. The bottom tick box allows the user to view the WO Costs (Actual) by Master WO No in a couple of ways; as part of the top-level master WO or as its own master WO with all its lower level costings. Examples of all reports are shown below.
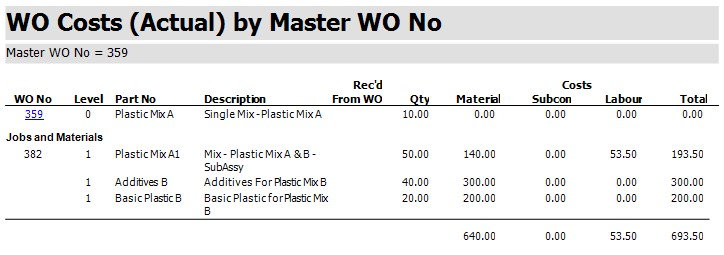
WO Costs (Actual) By Master WO (based on the overall Master WO – option unticked)
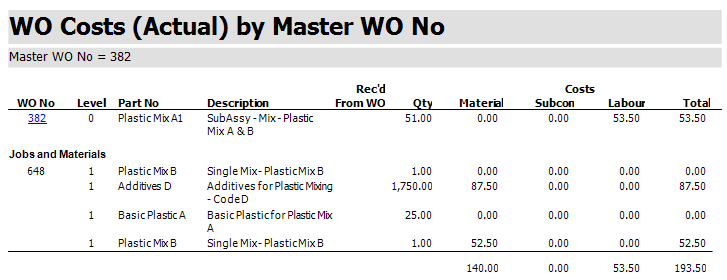
WO Costs (Actual) By Master WO (based on the current WO being the Master WO – option ticked)
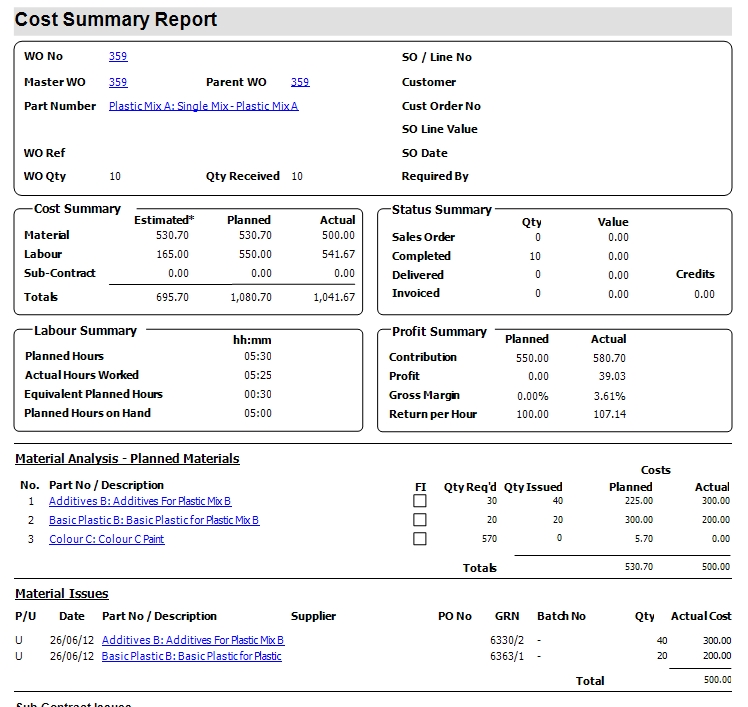
(Cost Summary Report)
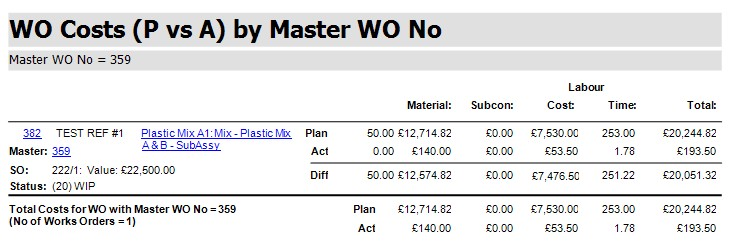
(WO Costs (Planned V Actual) By Master WO)
WO Notes
This section allows the user to enter both general and specific notes against the current work order.
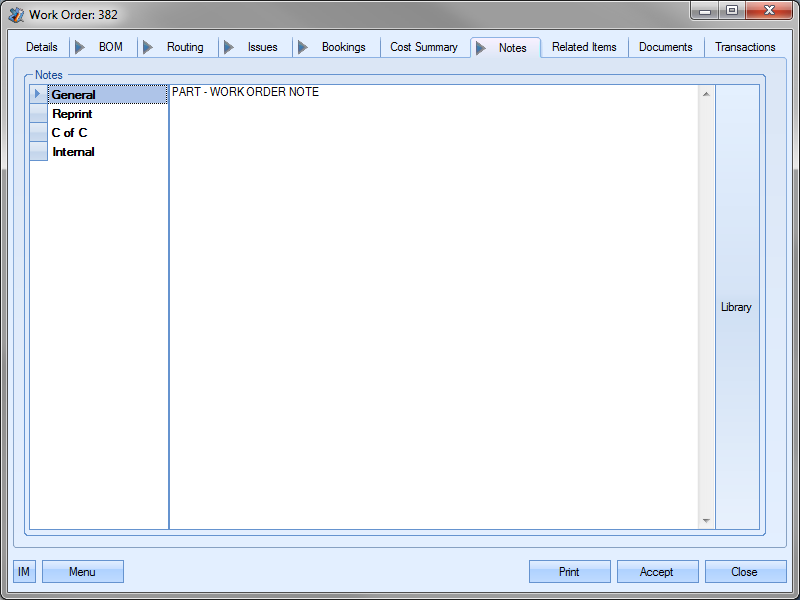
The user can select any of the categories on the left hand side before entering any text they wish on the right hand side of the screen. Once a note has been added to a particular category, the category is highlighted in bold on the left.
The user also has the option of adding notes from the Notes Library within Progress. This can be done by clicking on the LIBRARY option on the right hand side of the screen. This presents the user with the following screen.
The user can then search or filter the notes listed to find the one required. Once located, the user can transfer the note back to the work order notes screen by highlighting the note and clicking the SELECT option. This will pull the selected note through to the current section of the work order notes.
Most of the notes entered on this screen are designed to copy through to the relevant sections of Progress. Each notes category indicates the section of Progress that the note is designed to appear in when the part appears in those sections. The following explains where the notes appear in the different sections of Progress.
| General | These notes are displayed on the work order job card document. |
| Reprint | Optional notes field that can be used to display notes on reprints of work order documents. |
| C of C | Optional notes field that can be used to display notes on certificate of conformity documents. |
| Internal Notes | These notes are held only against the work order record. These are not duplicated to any other section of Progress and are primarily for internal reference only. |
WO Related Items
This section of the work order shows all the related items within Progress that are linked to the current work order.
Each of the options on the left hand side will show the related relevant orders/items for the current work order. Some examples are shown below.
(Sales Order details)
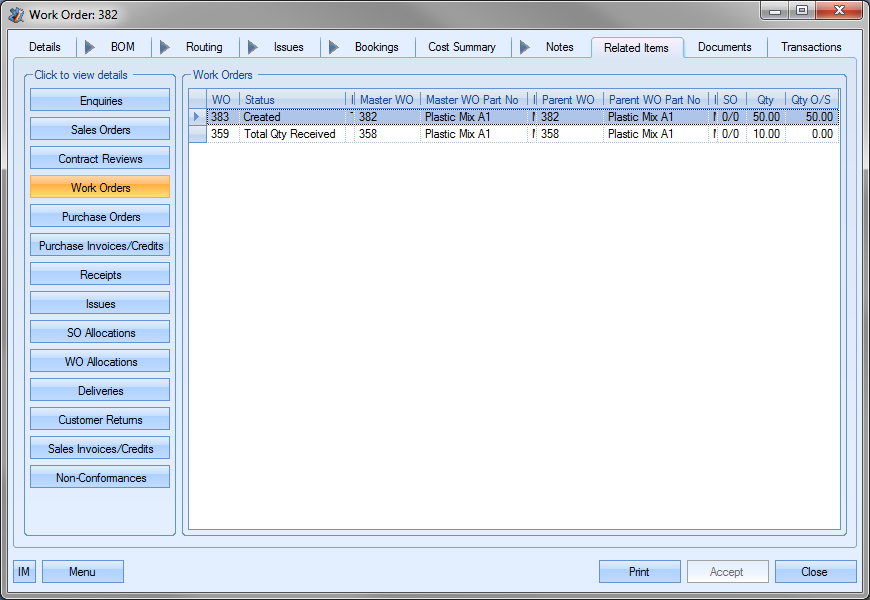
(Work Order details)
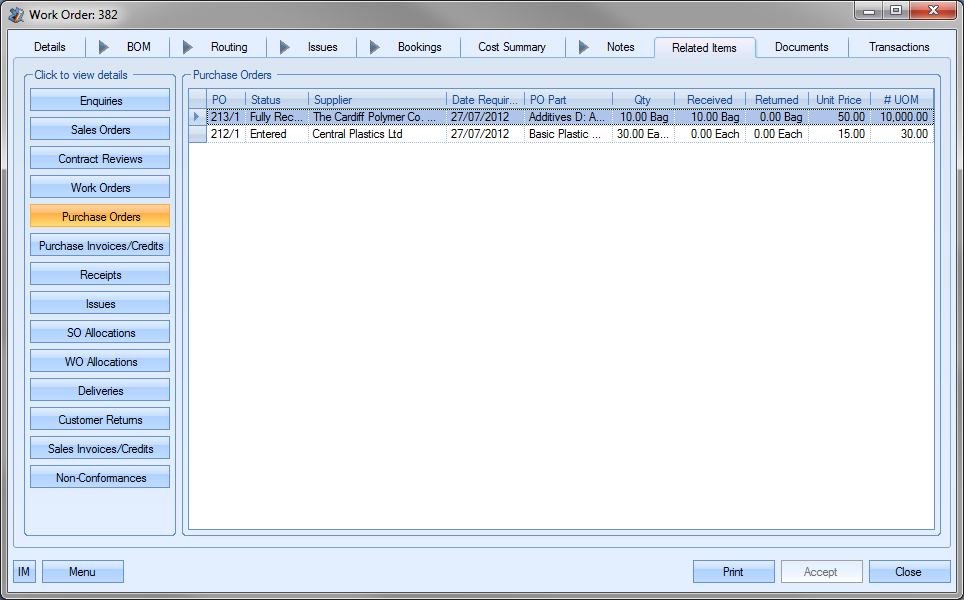
(Purchase Order details)
The user can access any orders/items listed on these screens by double-clicking on the order listed in the grid. An example is shown below.

Double-clicking on the order highlighted opens that purchase order record.
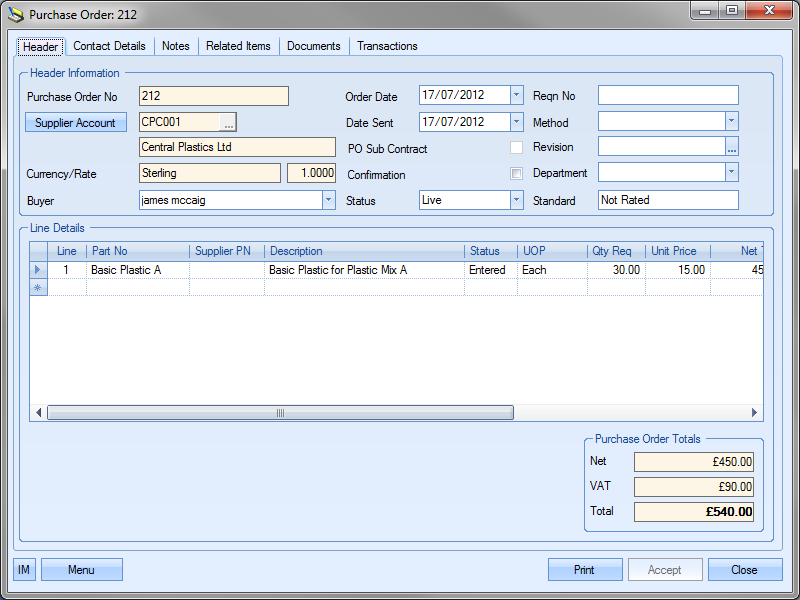
The user can then proceed to view or amend the order as required. Clicking the ACCEPT or CLOSE options will return the user to the part Related Items screen. Any of the screens which display a GRN number allow the user to view the GRN details by clicking on the ![]() option that appears alongside the GRN number.
option that appears alongside the GRN number.
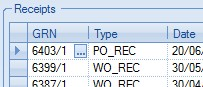
This will present the user with GRN History screen for the selected GRN number. The user can then view or amend as necessary.
Clicking the ACCEPT or CLOSE option will return the user to the part Related Items screen. For more information on the GRN History screen, please refer to the Inventory section of the manual.
WO Documents
This section allows the user to attach any work order-related documents. This can be correspondence emails, drawings, specification or anything else related to the work order.
To add a document, the user clicks the Add Document option,![]() , and then locates the file they wish to add.
, and then locates the file they wish to add.
Once the required document has been selected, it will be listed in the Documents screen with any others that have been added.
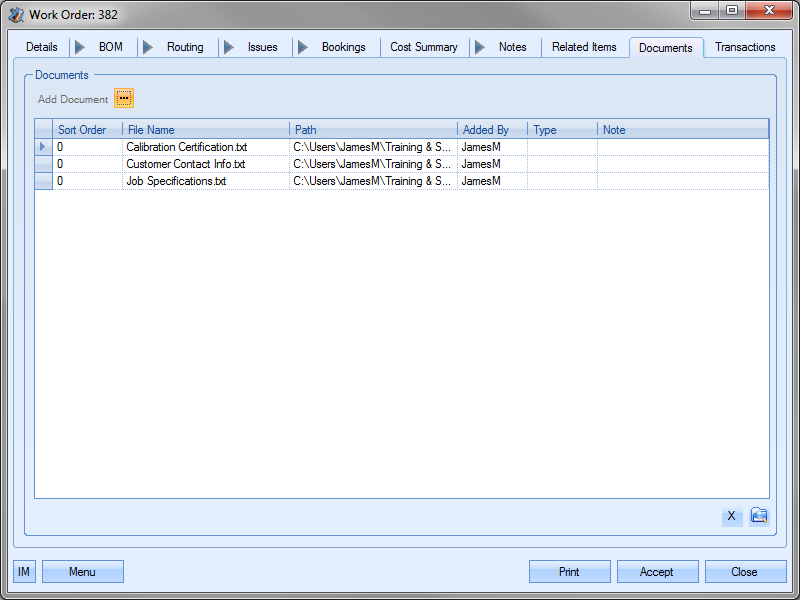
NOTE: To allow access for other users to the files added to the part record, the user must ensure that these files are held in a folder accessible by all users. Typically a shared network folder would be created for this purpose.
Once the file(s) have been specified, the user can specify a file type or comment associated with the document. The Type can be chosen from the drop-down list.

This drop-down list can be populated from the List Maintenance section of Progress in the Document Types list as shown in the screen below.
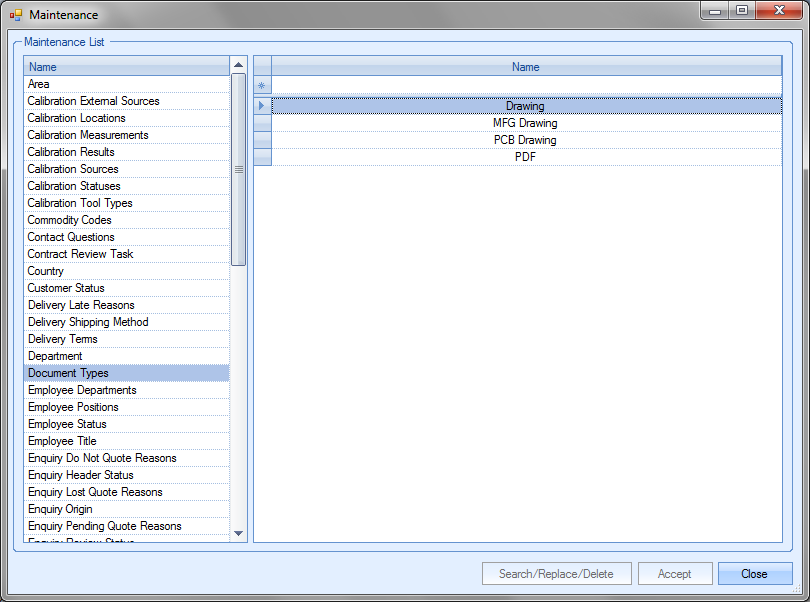
For more information on maintaining lists and the List Maintenance section of Progress, please refer to the List Maintenance section of this manual. A note for the document can be added directly to the Note field as shown.
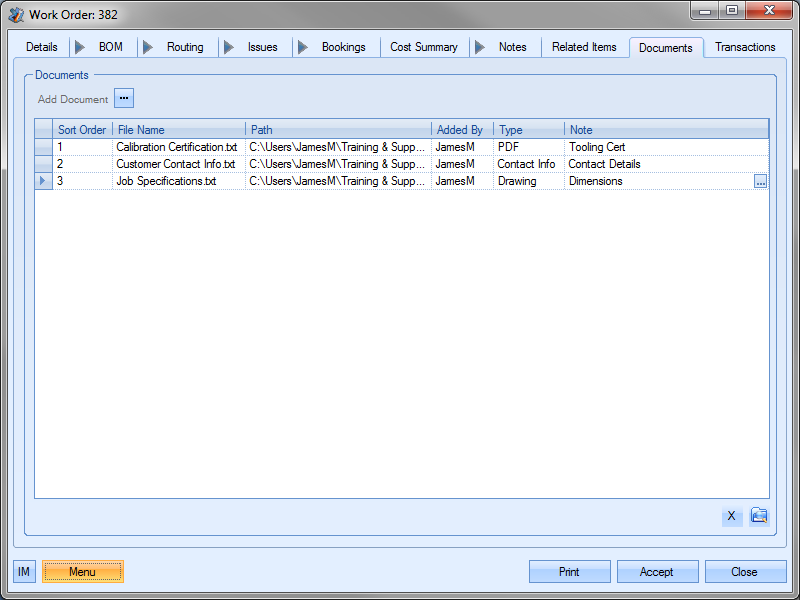
Documents added to this screen can also be hidden from view in SFDC's Associated Documents section. The HIDE IN SFDC option against the document allows the user to stop the document being viewed within SFDC. This is often used where the document may contain sensitive or cost/pricing related information that they do not want the employee to see.
A similar option is also available on the inventory routings operations Documents Tab and also the Work Orders Document tab, again, to allow specific documents to be restricted from view.
NOTE: These options is only available if the SFDC module is active in the system. If this module has not been purchased, then this option will not be displayed.
Once all documents and details have been added, the user can save the changes by clicking on the ACCEPT option.
WO Messages
This section shows all associated messages and emails relating to the work order.
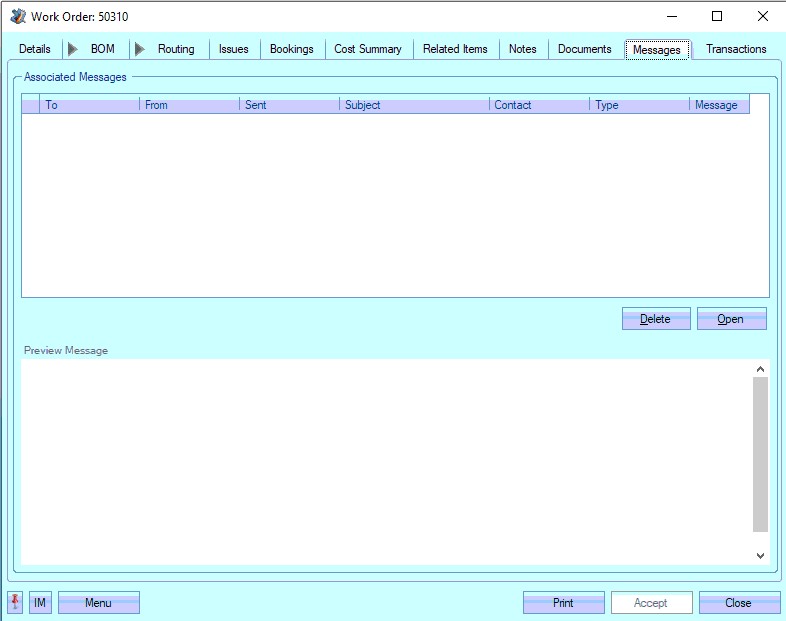
Any communication relating to the work order (i.e. emails, instant messages, etc.) will all be listed here for the user to view.
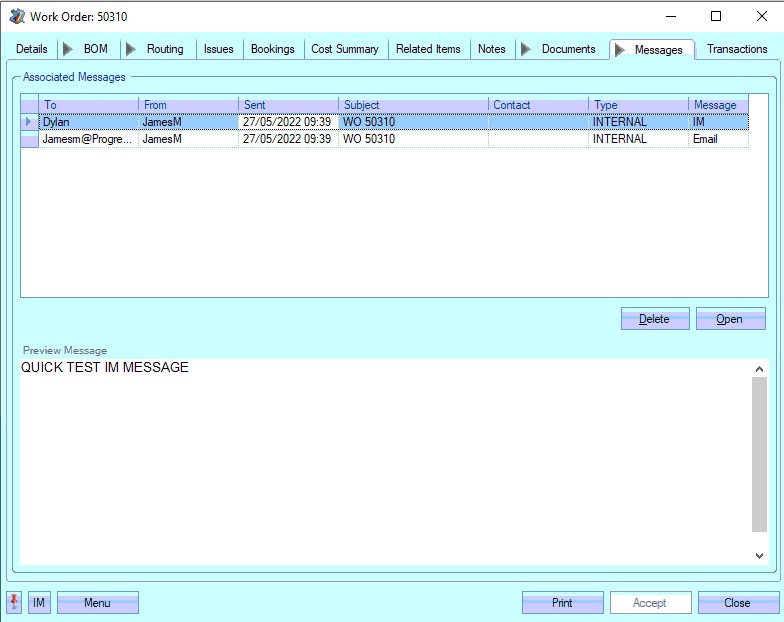
The user can open any of the items listed on this screen but either double-clicking on the listed item or by highlighting and clicking OPEN. The selected item will then be displayed for the user to view.
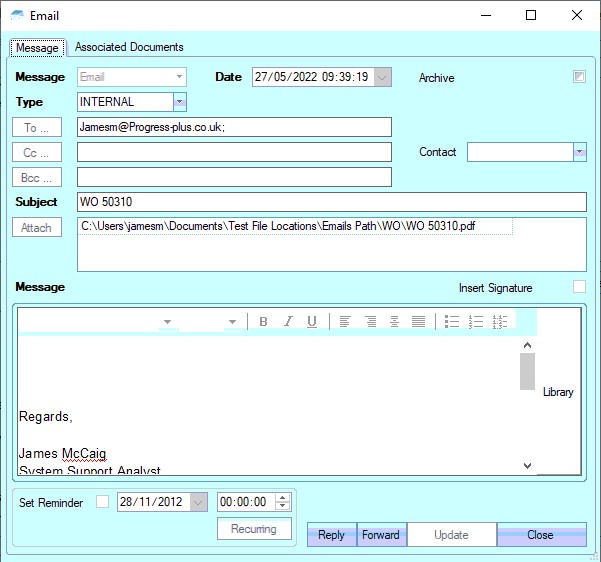
The user also has the ability remove messages recorded, if permitted. Permission to delete messages is set up against the user permissions. For more information on user permissions, please refer to the Administrator Functions > Access section of the manual. If the user has permission to remove messages, then the DELETE option will be available.
Messages can be deleted by simply highlighting the item and clicking the DELETE option. The user will be prompted to confirm the deletion.
Clicking YES will delete the selected message, and the screen will be updated.
WO Transactions
This section shows all transactions that have been made against the work order.

The user can see what transactions have occurred as well as details of the changes made. This is often very useful when trying to find out why something has changed unexpectedly or if the user needs to find out who made a particular change.
| Date/Time: | The date and time that the transaction occurred. |
| Transaction Type: | This field names the type of transaction recorded. This references both the area of Progress and the action, i.e. WOEdited – change made to a work order record, TimesheetEdited – related timesheet amended against this work order, etc. |
| User Name: | User who made the transaction. |
| Related Item(s): | Reference information on the exact data that was amended, i.e. work order, GRN, etc |
| Details: | Brief explanation of edited information. |
The user also has the ability to filter the transaction screen using the filter line shown at the top of the screen.

The user can filter each column to search for specific transactions, words or users. An example is shown below.
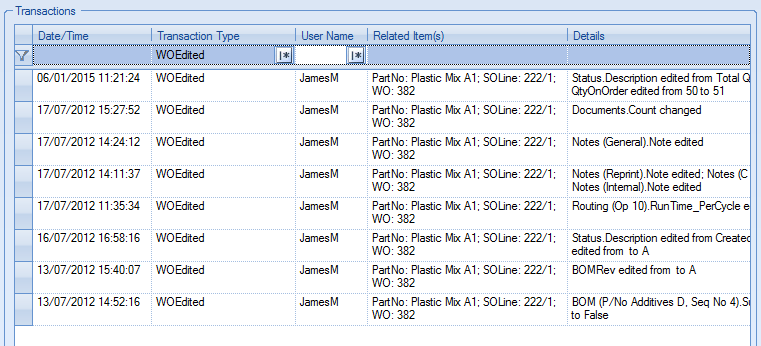
WO Menu Options
The user has some additional options available to them when viewing a work order. These options are accessible via the Menu option.
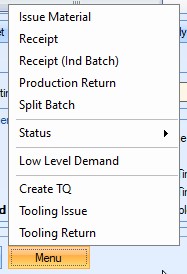
Issue Material
This option takes the user directly to the Production Issue By WO screen for the selected work order. This screen allows the user to issue component material to the current work order from stock. Clicking this option presents the user with the following screen.
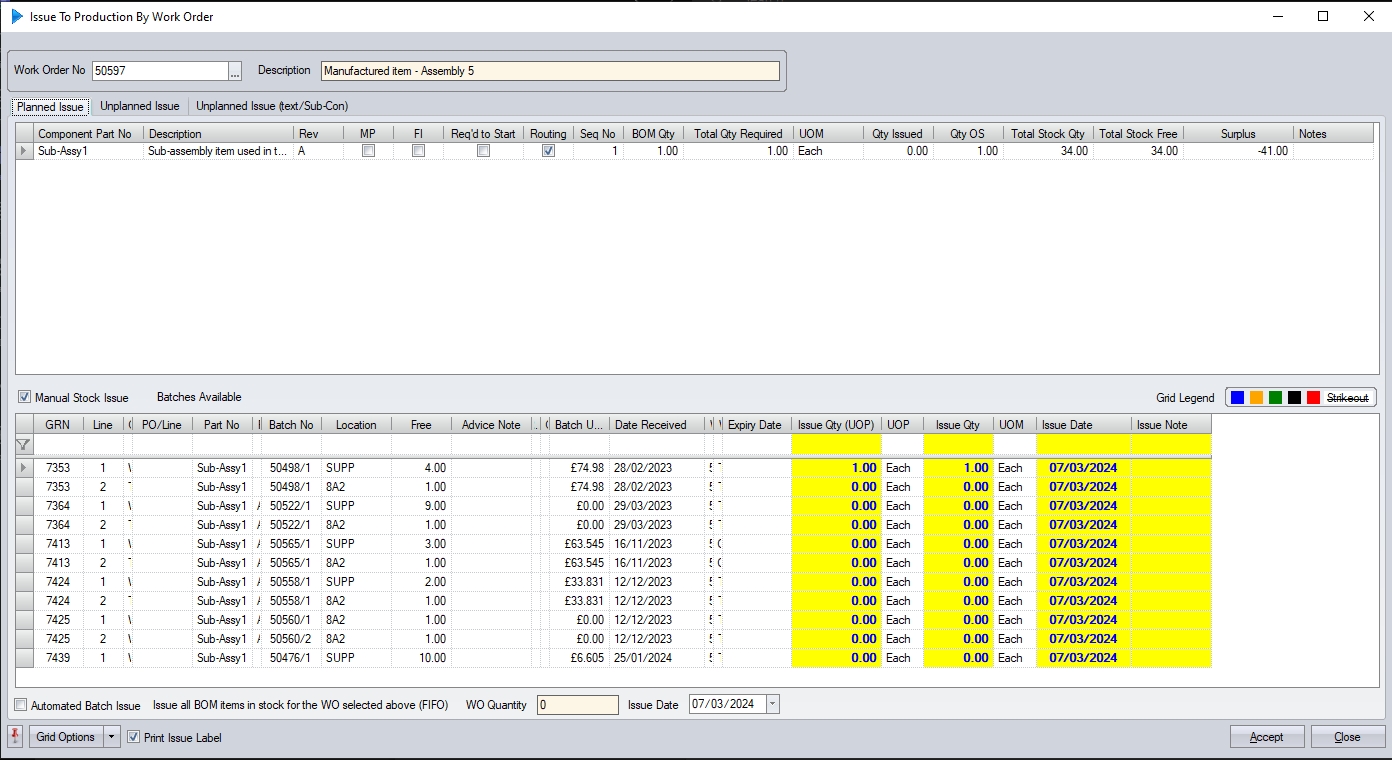
This is the same screen that can be access from the Inventory > Issues section of Progress. For more information on this, please refer to the Inventory > Issues section of the manual, under the Issue To Production By WO option.
This option takes the user directly to the WO Receipt screen for the selected work order. This screen allows the user to receive a quantity of the work order part into stock. Clicking this option presents the user with the following screen.
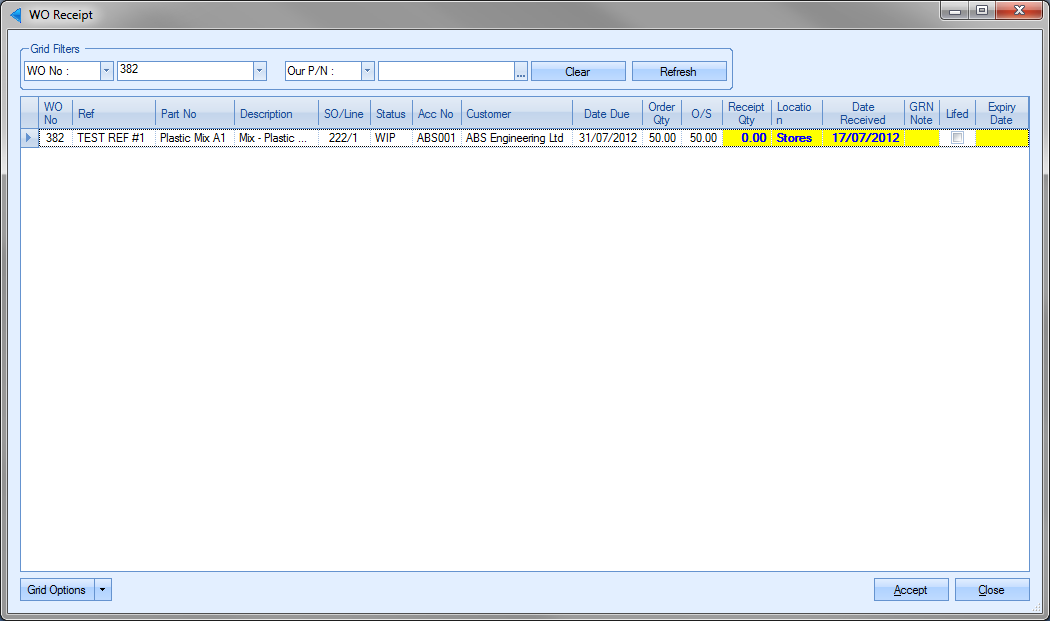
Receipt of a work order can be restricted based on there being outstanding material (i.e. not all the planned material has been issued) or if any of the routing operations are still to be marked as complete. These restrictions are based on system options set in the Admin section of Progress. These can be found in the Work Order options.
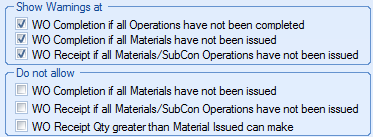
Using these options, the system can be set to simply warn that if there are incomplete subcon operations or material shortages or can stop receipt all together if all the material or subcon elements have not been issued. Only once the relevant criteria has been met will the user be able to complete the WO. Receipt of the WO can also be stopped if the user tries to receive more units than material has been issued for. This limits the user to only receipt what they have issued enough material for based on issue quantities and individual component BOM quantities.
The system can also be configured to allow the user to allocate any receipted units against an SOs that have an outstanding requirement. The system can be configured to do this using the system option below.
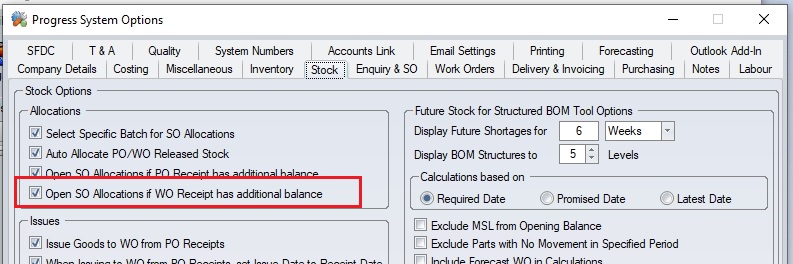
If the system is configured as such, the user will be presented with a screen similar to the following where they can assigned the receipted units to any SO waiting for the stock.
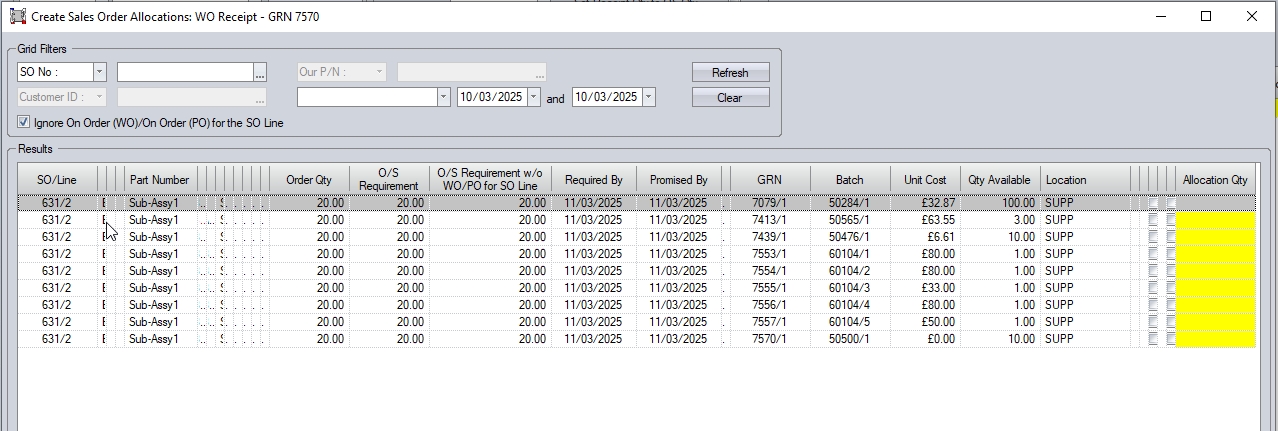
The user can use the filters available to find SO lines to allocate against, and also has an option to override existing WOs linked to SO lines if permitted to.
The WO Receipt screen is the same screen that can be access from the Inventory > Receipts section of Progress. For more information on this screen and the receipt of work orders, please refer to the Inventory Receipts section of the manual.
This option takes the user directly to the WO Receipt (Ind Batch) screen for the selected work order. This screen allows the user to receive a quantity of the work order part into stock in batch-size quantities. Clicking this option presents the user with the following screen.
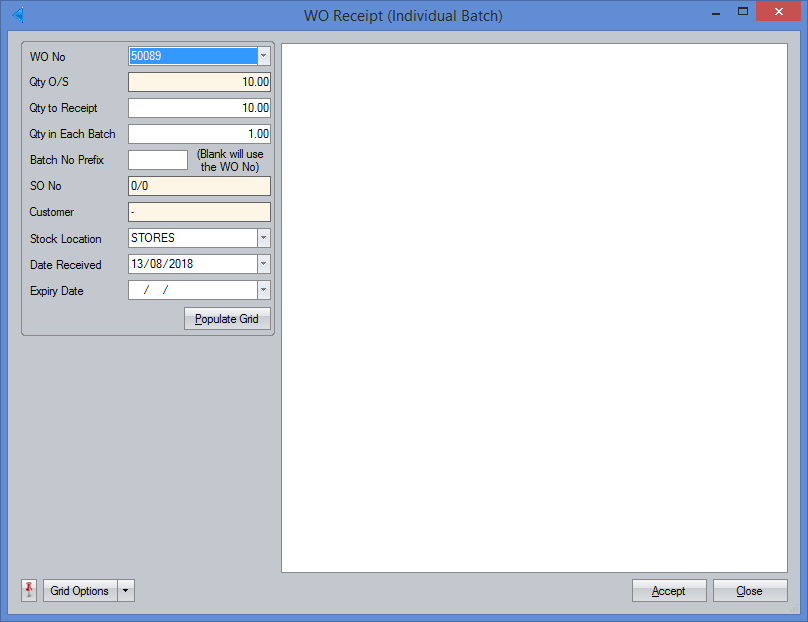
The restrictions described in the WO Receipt option above also apply to this Individual Receipt option.
This is the same screen that can be access from the Inventory Receipts section of Progress. For more information on this screen and the receipt of work orders, please refer to the Inventory Receipts section of the manual.
This option allows the user to reverse material or subcontract issues from the current WO. This will open the Production Return window filtering for the current WO automatically.
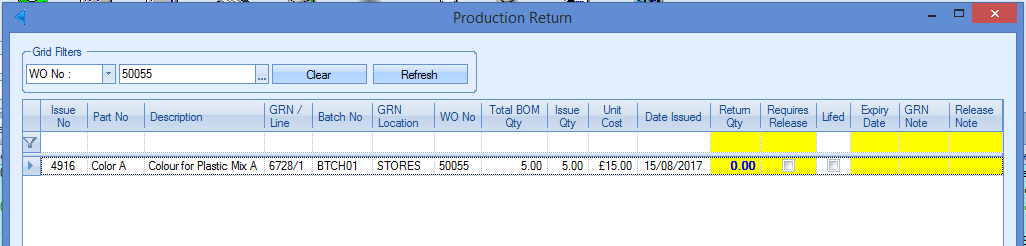
For more information on Production Returns, please refer to the Inventory Issues section of the manual.
This option allows the user can split a work order to create secondary work order for the manufactured part. Any material and labour costs attributed to the original work order can also be transferred over to the new work order if required. This can be useful if a part receipt of a work order is required and the user wants to allocate certain costs to that receipt.
If the original work order is linked to a sales order line, the new work order will also be linked to the same sales order line. If the original work order has a parent and master work order that is different to its own, i.e. it is a sub-assembly, the new work order will also take this parent and master work order. However, if the original work order has the same parent and master work order as its own, the new work order will also use its own work order number as the parent and master (i.e. be a standalone WO).
NOTE: The selected work order must have a status of “Created” or “WIP” in order to use the split batch function.
When the split batch option is selected the following screen appears displaying the information about that work order.

The user can enter the quantity that is required to move to the new work order. The quantity entered must be equal or less than the outstanding quantity on the original work order. The quantity is entered and the CONFIRM QTY button selected. The materials and subcontract issues to the original work order will now be displayed.
The user can select how many of the issued parts are transferred to the new work order by filling in the column “Qty to New WO”. The user can also use the PRO RATA option to have the system calculate the material to be transferred to the new WO based on the new WO quantity in comparison to the original WO quantity.

Where there are subcontract issues on the WO, the system has options to mark the subcontract operations as complete. These options default based on the work order system options, although the user can tick/un-tick as required.
The FULL QTY ISSUED option will mark any subcontract operations on the new WO as complete if the full subcontract issue quantity has been made on the original WO.
The IS COMPLETE ON ORIGINAL WO option will mark the subcontract operation as complete regardless of whether the full subcontract issue quantity has been made on the original WO.
Similarly, if the subcontract operation has first-off requirements/results, the user can choose to carry these across to the new WO to indicate that the inspection requirements have been met based on the sign off from the original WO using the TRANSFER 1ST OFF INSPECTION RESULTS option. THis will default based on the Work Order system settings, but the user has the ablity to amend this when using the WO Split Batch screen for any exceptions that occur. For more information on the default values, please refer to the Work Order system options in the Admin section of Progress.
Once done, the user must then click the CONFIRM ISSUES option. This will then display the labour bookings for the existing WO.

The user can select the time and quantities booked against each operation to be transferred to the new work order with the yellow columns below. The user can also click on the PRO RATA option to have the system calculate the times to be transferred to the new WO based on the new WO quantity in comparison with the original WO quantity. The user can also mark routing operations as complete from here too, either individually or using an option to complete the operations the same as per the original work order.
If any of the operations have first-off inspection requirements, the user also has the option of carrying that across to the new WO operations, to indicate these operations have been inspected and approved as part of the original WO. The on-screen option for this, TRANSFER 1ST OFF INSPECTION RESULTS, will default based on the Work Order system option defaults, but the user does have the ability to change this when on the WO Split Batch screen to allow exceptions.
As per the subcontract issues options above, the user has some additional operations for marking the internal operations as complete on the new WO. These also default based on the system settings for work orders, but the user can tick/un-tick as required. For more information on the default values, please refer to the Work Order system options in the Admin section of Progress.
The FULL QTY BOOKED option will mark the operation on the new WO as complete if the full booked quantity has been recorded against the operation while the IS COMPLETE ON ORIGINAL WO will mark the operation as complete if the same operation is marked as complete on the original WO regardless of whether the full quantity has been booked.
Once everything is confirmed, the SPLIT WO option will be available.
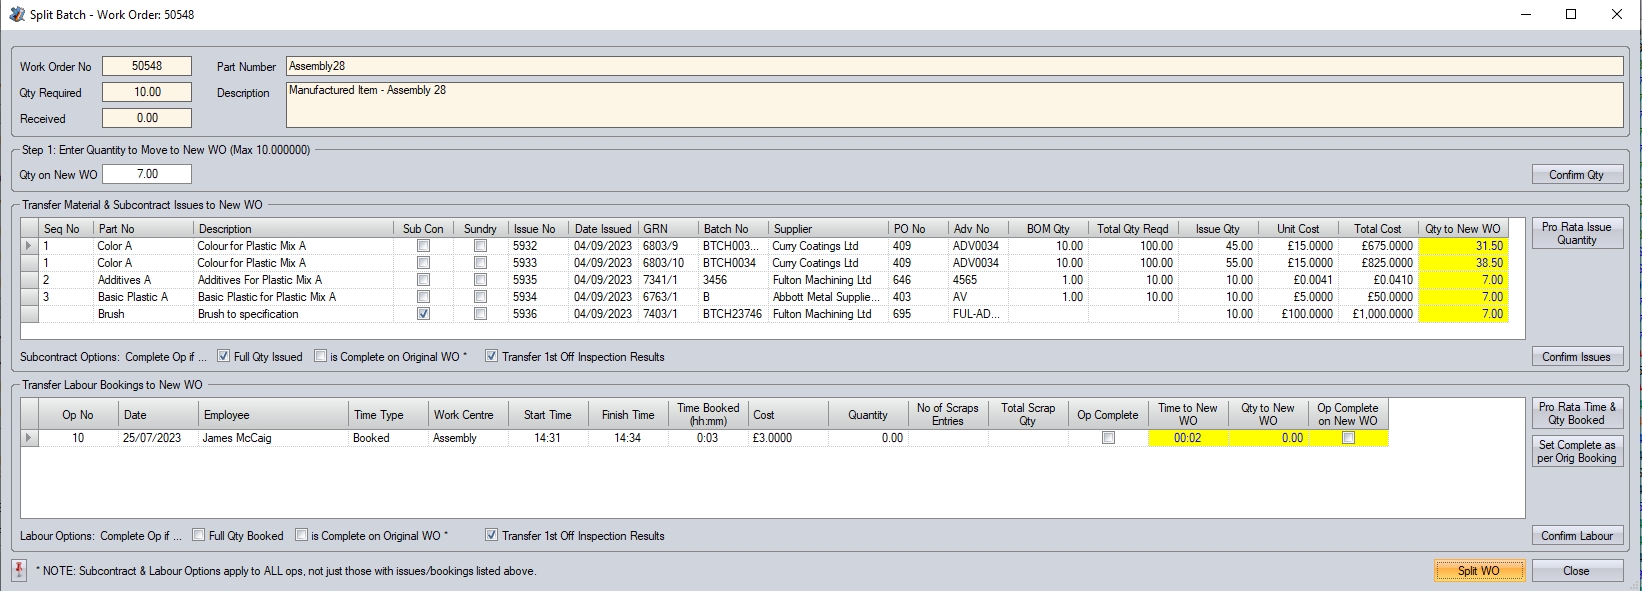
Clicking the SPLIT WO option will create the new work order with the relevant material, subcontract and labour costs attributed to it.
Status
This option allows the user to change the status of the current work order. From this menu option, the user can cancel, complete and re-open as well as place the work order on and off hold. The Status option has a sub-menu to allow the user to select the status change required.

Cancelling a work order
If the user needs to cancel the current work order, they can do so using the CANCEL status option. This will change the status of the work order to cancelled and label the work order as cancelled as shown below.

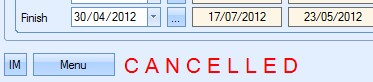
If the work order has links to other child work orders, the user will be prompted to decide their fate also as shown in the screen below.
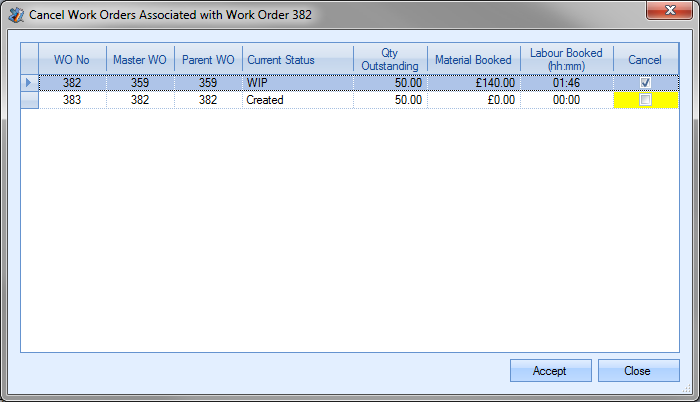
By default, the current work order will be ticked to be cancelled. Any associated work orders will also be listed. From here, the user can decide whether the child work orders are also cancelled or not. The user can see the value of any material that has been issues to the lower level work orders as well as any time that has been booked as well as the current status of the child work order. If the user wishes to cancel the child work orders, they can tick the CANCEL option against the work order and click the ACCEPT option. If they wish to keep the child work orders, they can untick the work orders and then click the ACCEPT option. Once the ACCEPT option has been clicked, the selected work orders will be updated to CANCELLED status.
Once a work order has been finished, all material has been issued and all labour has been booked, the user can change the work order to complete status. This can be done by selecting the COMPLETE status option.
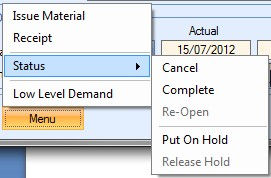
Selecting this option will prompt the user for confirmation of the status change.
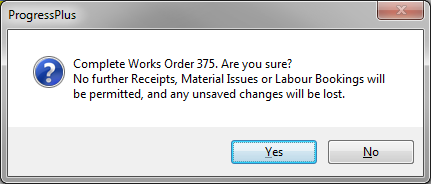
Clicking the YES option will update the current work order to COMPLETE status. This will update the work order screen to the COMPLETE status and label the work order screen accordingly as shown below.


If the current work order has lower level work orders associated with it, the user will be prompted to decide the fate of these too. The user will be presented with the following screen.
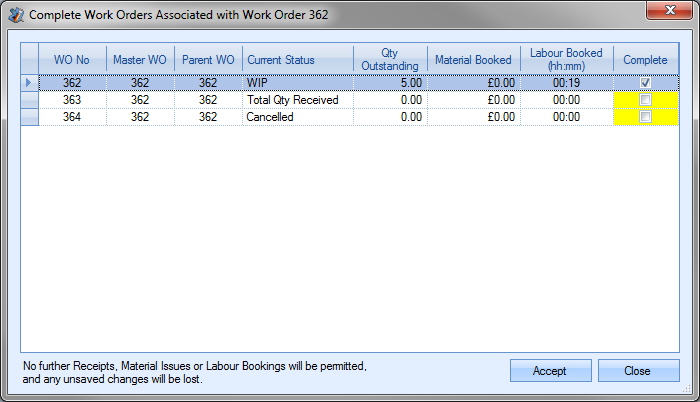
Again, the user is presented with a brief status of the child work orders as well as any outstanding quantities. The current work order will be ticked for completion by default whereas associated work orders are unticked by default. If the user wishes to complete any of the lower level work orders, they can tick the COMPLETE tickbox against them. Once the ACCEPT option has been clicked, the selected work orders will be updated to COMPLETED status.
Marking a work order as complete will stop further amendments from being done, highlighted by the on-screen indications shown below.

Completion of a work order can be restricted based on there being outstanding material (i.e. not all the planned material has been issued) or if any of the routing operations are still to be marked as complete. These restrictions are based on system options set in the Admin section of Progress. These can be found in the Work Order options.
Using these options, the system can be set to simply warn that if there are incomplete routing operations or material shortages or can stop completion all together if all the material has not been issued. Only once the relevant criteria has been met will the user be able to complete the WO.
In the event that a work order is cancelled or completed in error, the user can re-open the work order by using the RE-OPEN status option from the work order menu.
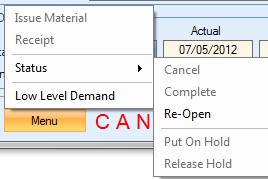
This option is only available in work orders with a cancelled or completed status. Clicking this option will prompt the user to confirm the action.
If the user clicks YES, the work order will return to its previous status.
The user can place work orders on hold. This may be required if quality issues are raised during the manufacturing process. The user can place the work order on hold using the status options from the work order menu.
Selecting the PUT ON HOLD option updates the work order status accordingly.

Releasing work order from On Hold status
The user can release work orders from On Hold status by selecting the RELEASE HOLD option from the work order status menu.
Clicking this option returns the work order to its previous status.

This option allows the user to view any lower level demand that the selected work order has. This is typically where the current work order has sub-assembly components which require their own work orders to be generated. Clicking this option will present the user with the work order demand screen for the current work order.
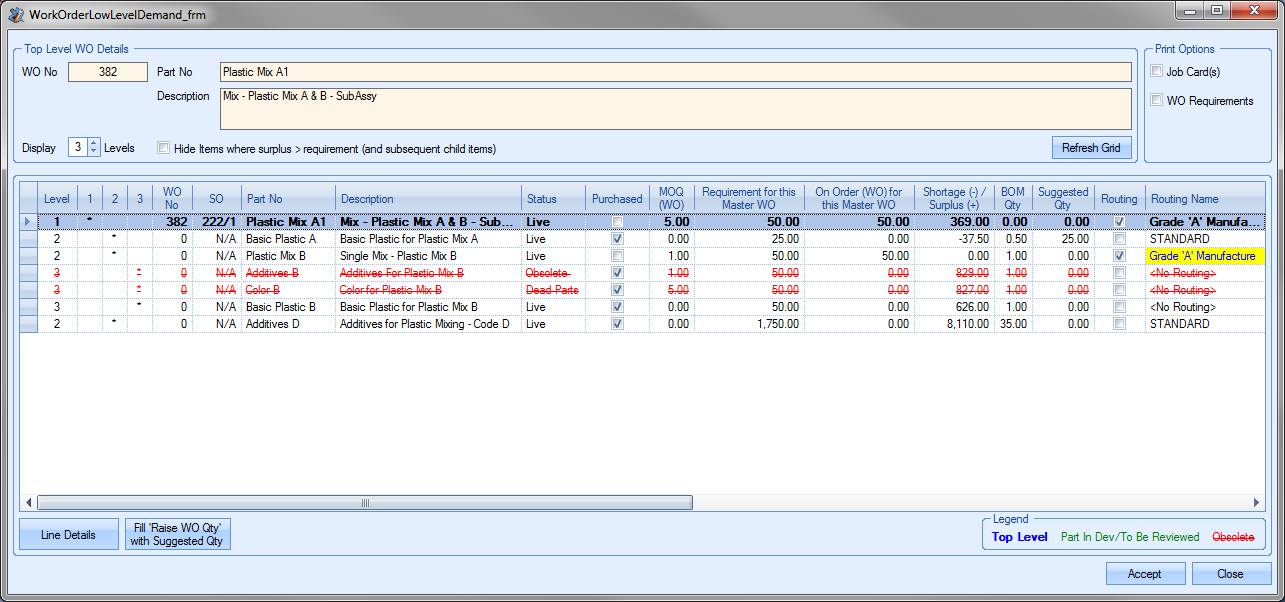
The user can then use this screen to generate the necessary sub-assembly work orders required for the selected work order. For more information on the work order demand screen, please refer to the WO Demand section of this manual.
Create TQ
This option is for raising a technical query from the current work order. Selecting this option will open a new Technical Query record against the WO. The user can add any additional details required before clicking ACCEPT to save the query.
For more information on creating and managing technical queries, please refer to Quality > Technical Query section of the manual.
Tooling Issue
NOTE: These options will only be available if the customer has the additional Quality module.
This option allow the user to issue tools and equipment to the work order based on the work order operations' Tooling Required settings. Selecting this option will present the user with a list of tooling required for the current work order.
Where a tooling group has been assigned to an operation, the user must select one of the tools from the group in the Tool To Use field before ticking for issue. Once the tools have been selected, clicking the ACCEPT option will issue the tooling to the work order.
Tooling Return
This option is the reverse of the Tooling Issue option above. This option allows users to return tooling from a work order sop its available for use elsewhere. Clicking this option will present the user with a list of issued tools.
The user simply selects the tool(s) to be returned from the work order by ticking the box against them. If a Return Reason is required, they can select from the drop-down list.
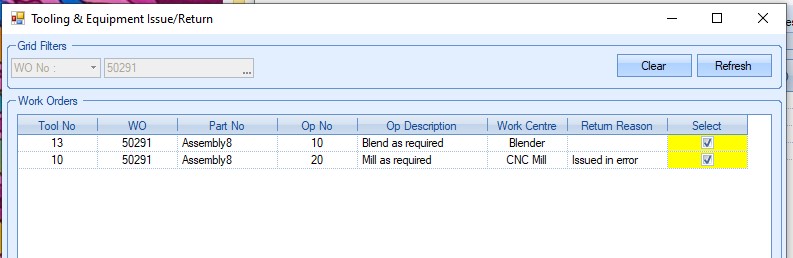
Clicking the ACCEPT option will complete the return process and remove the tools from the work order.
Print Options
The user can generate several documents for a work order. All the documents can be printed by clicking on the PRINT option at the bottom of the work order screen. Clicking this option presents the user with the following print screen.
The user has the option of printing any of the work order’s associated documents from this screen, the WO labels, along with the required work order documents. This will include all part, work order, routing operations and work centre documents associated with the WO. The grid at the top of the screen shows all the associated documents, their relationship with the work order and the file path. If the user has linked a folder to the part, work order, etc. then the user has the ability to see the all files within the folder, and those of any sub-folders too using the options on screen.
![]()
If the user ticks the ASSOCIATED DOCS option and clicks the PRINT option at the bottom of the print options screen, each of the selected associated documents will be printed. If the user only wants to print the work order documents, they can select the required document(s) from the options at the bottom of this screen.
The user can generate any of the WO related documents using the options listed at the bottom of the screen. The user also has options to preview these, and also to combine any associated documents selected into a single printed document.
The Job Card is the most comprehensive work order document as this typically contains the work order, sales order, material and operation details for the current work order. The Material List document typically focuses on the material requirements for the job, while the Operations List focuses on the routing operations to be carried out for the work order.
The user can tick the box next to the documents they wish to print, be it one or all three. The PREVIEW options to the right of each work order document allows the user to view the document on screen as opposed to printing a hard copy. Ticking the PRINT ALL option automatically ticks all of the document options, including the associated documents. This is just a quick way to select all documents. Once the user has selected the required documents, they can click the PRINT option to print hard copies. The CLEAR option will remove all selections already made and allow the user to reselect as required. Examples of the work order documents are shown below.
WO Job Card
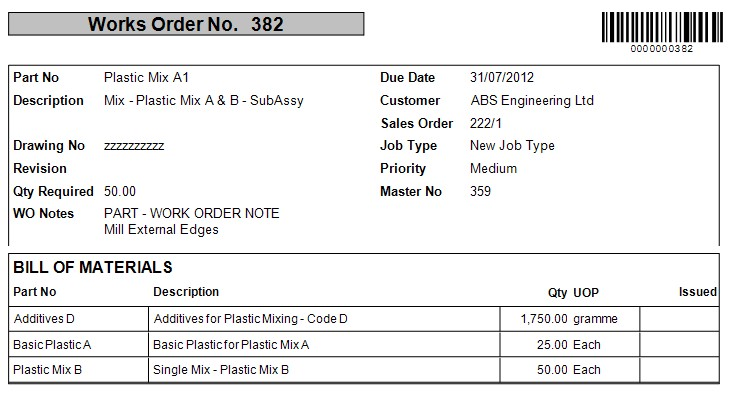
Material List
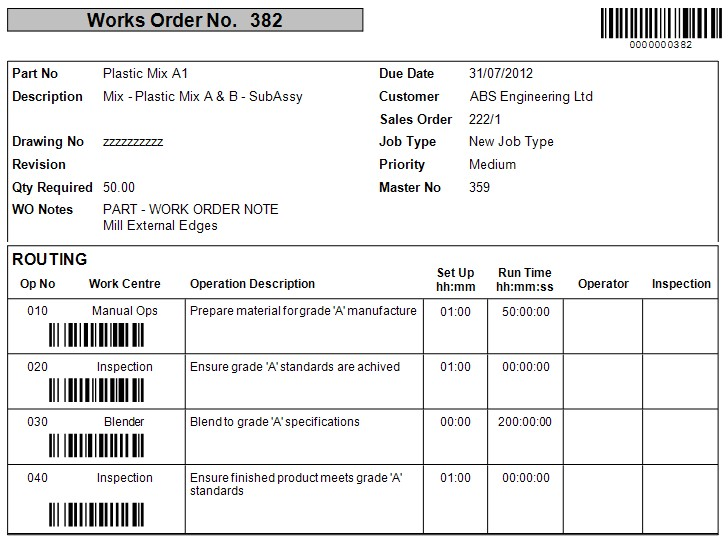
Operations List
The user also has the ability to print WO labels from this PRINT screen too. These labels are WO specific and typically contain general info on the WO. These can be generated via the WO Labels option at the bottom of the screen.
![]()
This option will present the user with the WO Label print screen, filtered specifically for the current WO. The user can then specify the number of labels, the quantity to be shown on each label.
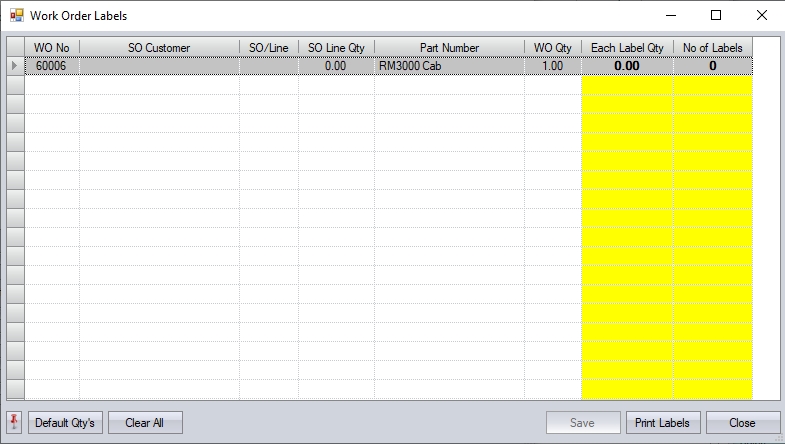
The DEFAULT QTY option will set the number of labels to 1, and the EACH LABEL QTY to the full WO quantity. If multiple labels are required, the user can amend the figures in yellow to get the labels required. The SAVE option will allow the user to save the label values, which can be useful if the labels are used for multiple purposes.
Once the details have been entered by the user, clicking the PRINT LABELS option will print the labels.
Once all the required documents have been printed, the user can return to the main work order screen by clicking on the CLOSE option.