Changes made to any SFDC settings within the Admin options require the SFDC software to be closed and re-opened on each PC running the software in order to take effect.
SFDC (Shop Floor Data Collection) and SFDC Material are additional modules to the standard Progress Plus system that permits users to log time onto Works Order operations or Lost Time categories for the purpose of labour time recording and carry out inventory transactions and searches without needing to use the standard Progress client. For more information on SFDC and SFDC Material, please refer to the relevant sections of the manual to find out more.
These are four sections to the SFDC system options:
SFDC Options This section set the rules and abilities of the SFDC module
SFDC Questions This section sets the employee prompts for the different options within the SFDC module
SFDC Buttons This section sets the available options for employees in the SFDC module
Material Buttons This section sets the available options for employees in the SFDC Material module
SFDC Options
Maximise the SFDC program to Full Screen (Clients)
When logging onto a SFDC Client, if this option is ticked, the SFDC window will cover the whole screen thus preventing users of that PC accessing other programs. This is commonly used on shop floor terminals where there may be a security issue and the administrator only wants the employees to access the SFDC software only.
Maximise the SFDC program to Full Screen (Poller)
Within the SFDC module there is an opportunity to nominate a particular PC as the SFDC Auto Break Machine or Poller. The function of this PC is to control the automatic clocking onto breaks and logging employees out of the system if they should forget to at the end of their shift. This PC is normally constantly running the SFDC software. Clicking this option will maximise the following SFDC form to fill the screen of the Poller PC if required.
SFDC Clients need password to close
This option is available to prevent the SFDC window from being closed by unauthorised users, therefore preventing access to the general MS Windows environment. If this option is ticked the SFDC screen can only be closed by a user who has been awarded progress plus Administrator status within the User Access Rights settings – Miscellaneous Access Rights (Page 5).
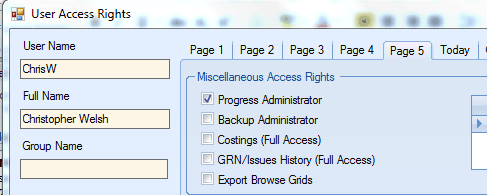
With this option activated if an employee should attempt to close the SFDC window a form will appear to enable a user with administrator privileges to enter their User Name and confirm their Password to continue to close the program.
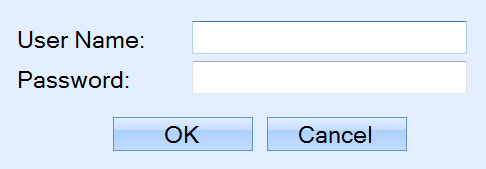
Please note do not enter the Admin user and associated password into this form.
Hide Employee Build Button
Within the SFDC module there are a number of fields in which ‘build buttons’ can be turned on / off. A build button permits the employee to click onto a field to display information from which he or she can click on to choose the desired record. One of these build buttons relates to the Employee ID field.
With this feature activated the employee could choose from list of names to ‘clock in / out’ ‘job on / off’ etc. Some companies, especially those that use barcode identification for employees, prefer that this is hidden to ensure that the employee scans onto the correct barcode or uses the keypad to type in his or her Employee ID.
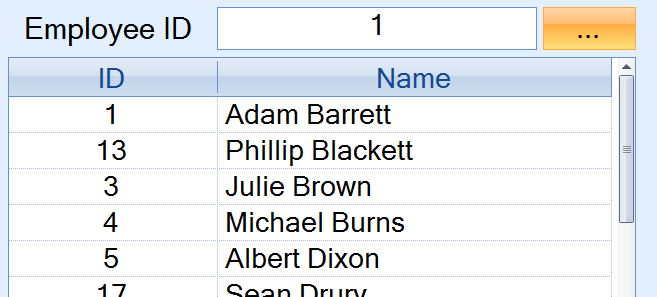
The above example is of the Employee Build Button activated enabling the employee to scroll up and down the list of employees and select the required record. The employee can still scan onto a barcode or enter an Employee ID via the keypad if desired with this button activated.
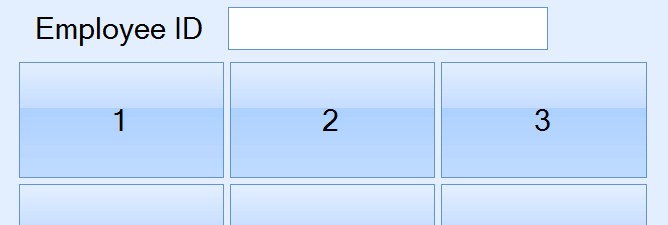
The above example is of the Employee Build Button hidden forcing the employee to either scan onto a barcode or enter an Employee ID via the keypad to continue.
Allow Jobbing Onto Multiple Operations
Activating this option permits the employee to ‘Job On’ to multiple works order operations at the same time as shown in the following diagram.
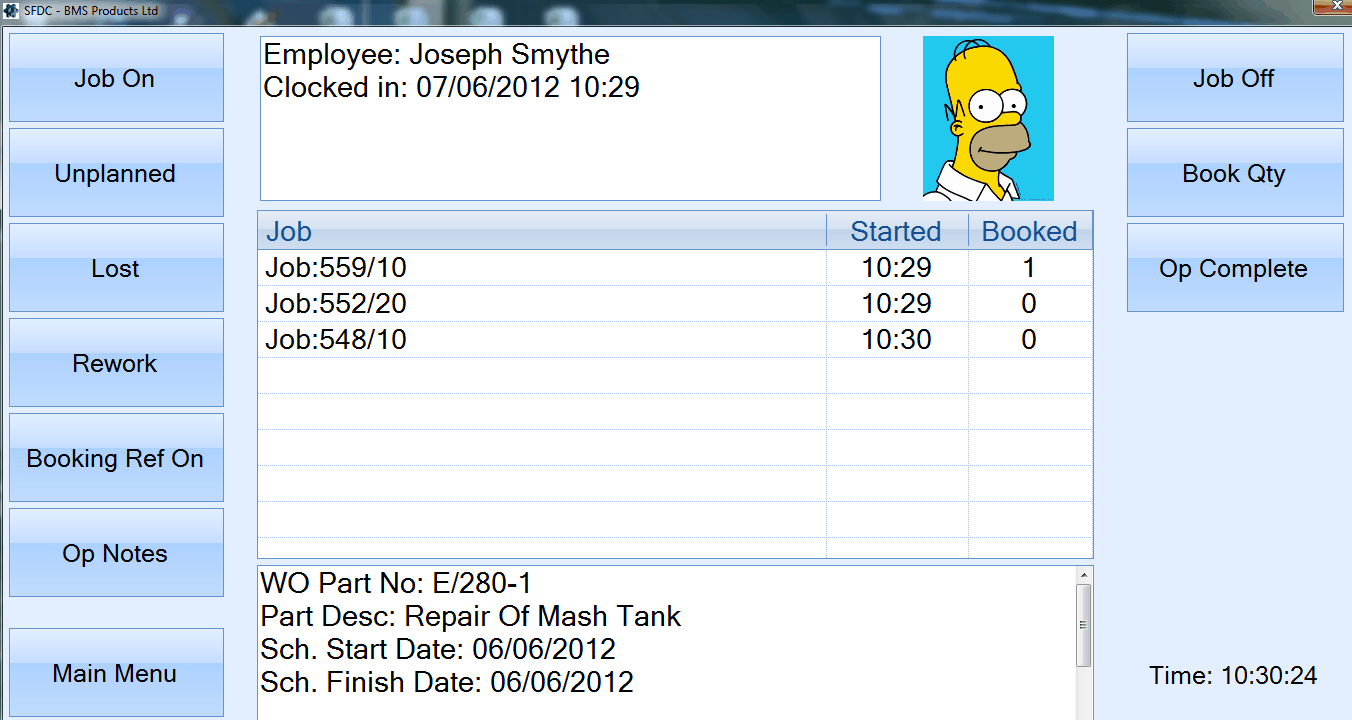
Time logged against multiple operations in this manner will not be split pro rata against the various works orders as happens with booking references but each works order will have the complete time / cost allocated to when the employee clicks the ‘Job Off’ button.
In this scenario if an employee clocks onto 3 different works order operations at the same time e.g. 9am and then clocks off all 3 at 11am then all 3 works order operations will be allocated 2 hours’ worth of time / cost each and the employee will have logged 6 hours of production time.
With the Allow Jobbing Onto Multiple Operations not ticked the employee will only be able to performs functions via the SFDC screen relating to the operation he or she is currently logged on to such as Job Off or Book Qty. Buttons relating to other tasks such as Job On and Unplanned will be deactivated and as such unavailable to the employee as shown in the diagram below.

To access other functions of the SFDC module the employee must first Job Off the current operation before proceeding to choose a new activity.
Default Work Centre to Planned Work Centre (Job On)
This option defaults the work centre ID to that of the planned work centre on the selected works order routing operation. The example below shows how this works.
The work order to be jobbed onto by the employee is shown below. Each operation has planned work centre. In this example, the employee will be jobbing onto the first operation.

When the user jobs onto this work order via SFDC, they are prompted for the work order number and which operation number they are going to start. By selecting the operation number, the system defaults the work centre to the ID of the work centre set on the works order itself.
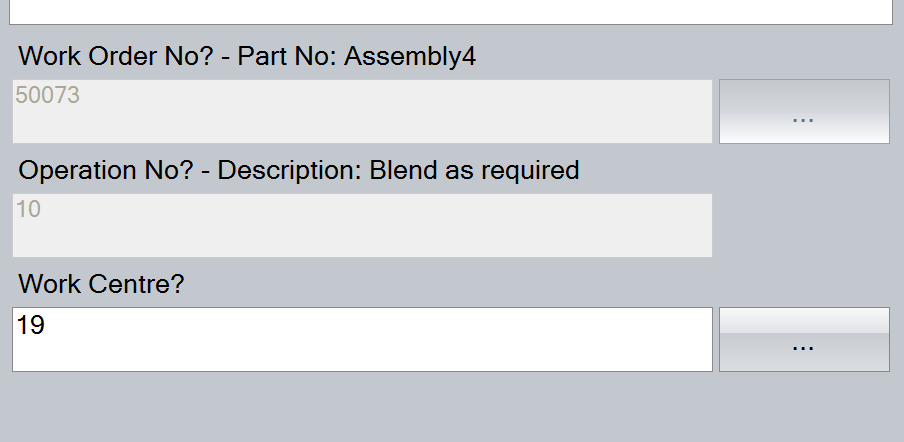
More often than not, the work centre may well be the same one specified on the works order routing operation, however, the employee can still change this if necessary.
Show SFDC Status on Main Screen
This option allows access to the SFDC Status screen from the main SFDC screen without the need for the employee to identify themselves. For more information on the SFDC Status screen, please refer to the Work Order section of the manual.
Barcode Entry Required - Employee ID/Works Order Number
These options force the system to only recognise the employee ID or work order number using specially created barcodes. These barcodes use unique codes embedded within the barcode which employees will not be aware of. Use of these special barcodes forces employees to enter their employee ID using the special barcodes only i.e. they will not be able to manually enter their employee ID when using SFDC. The same applies to the use of these special barcodes for the work order numbers. These barcodes will be generated and displayed on the work order paperwork generated by the system and would force the employee to scan the paperwork as opposed to simply typing in the work order number.
NOTE: If these options are to be used, Berkeley Myles Solutions Ltd must be contacted as the layouts generated by the system must be designed accordingly. Also, these rules are NOT applied if SFDC modules are accessed from within the main WO Browse screen; only via SFDC.
WO Receipt when Booking Qty to Last Operation/Automatically Issue When Receipting
This option will automatically receipt the BOOKED QTY on a timesheet against the final operation of a WO into stock. This eliminates the need to do a WO receipt transaction. The additional option to automatically issue the received goods to a parent WO is also available if required.
SFDC Work To List - All Ops/Previous Op Complete/Prev Op Qty Booked/Only Showing Scheduled Ops
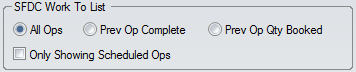
These options allow the configuration of the Work To List screen within the SFDC module. The work to list is the sequence the outstanding work order operations for a selected work centre are to be done in to ensure work orders are completed (in theory) on time to meet the customer requirements. The options allow the work to list to show all outstanding operations, only those where the previous operation is marked as complete or only those where a quantity has been booked through the previous operation. An additional option is available to only apply these filters to operations that have been scheduled via the Shop Floor Loading (SFL) section of Progress.
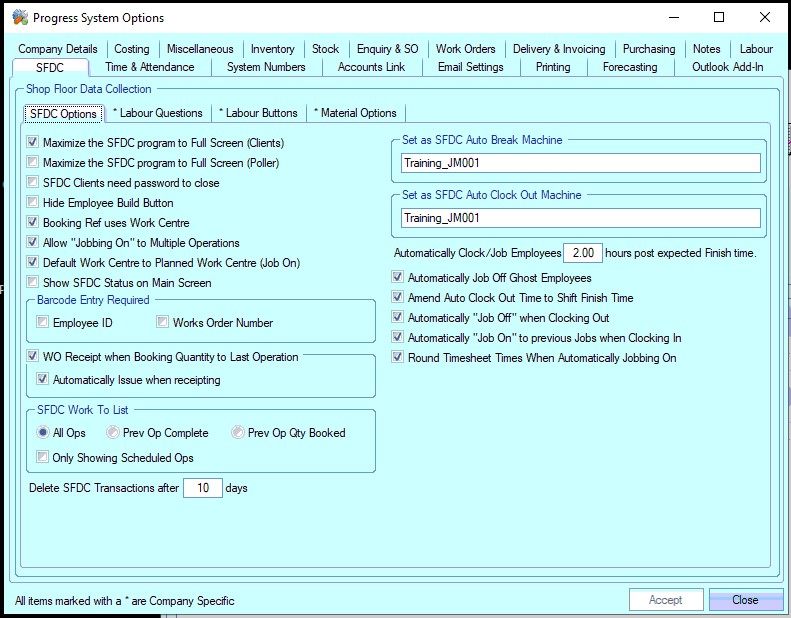
Delete SFDC Transactions After X Days
Within the progress plus system user and employee transactions are recorded when information is updated e.g. entering a new sales order or amending a delivery note etc. A transaction record is also created every time a function is accessed within the SFDC module. The details of these transactions are accessible within the Works Order section – SFDC – SFDC Status – Transactions.
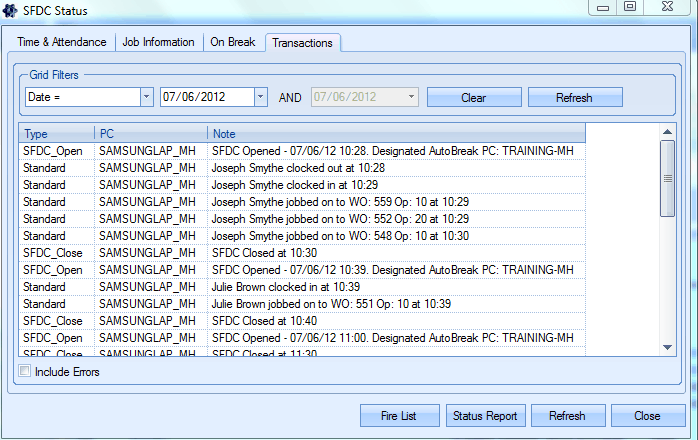
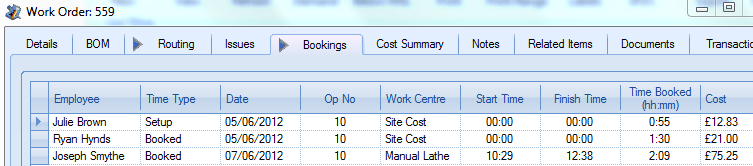
Unlike other types of transaction history records within the system SFDC transactions can be deleted after a certain period of time to save disc space if required. This is possible as information relating to the activity being performed by the employee e.g. logging time to a works order, will be stored against the relevant area of the system. If we should look at a Works Order record and look at the Bookings form which details the time logged against the job this would display the start and finish time for this time recording.
The SFDC transactions for the same time booking would should 2 separate records, 1 displaying when the employee clocked onto the works order and 1 for when he clocked off the operation. It is recommended to maintain SFDC transaction records for a maximum of a month or so as this would enable interrogation of records for those users utilising the T&A module who may have monthly paid employees that have any time discrepancies that require investigation.
Synchronisation of SFDC Machines
The synchronisation of certain computers that are running the SFDC software can have a major effect on the performance and functionality of the system.
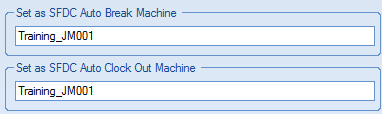
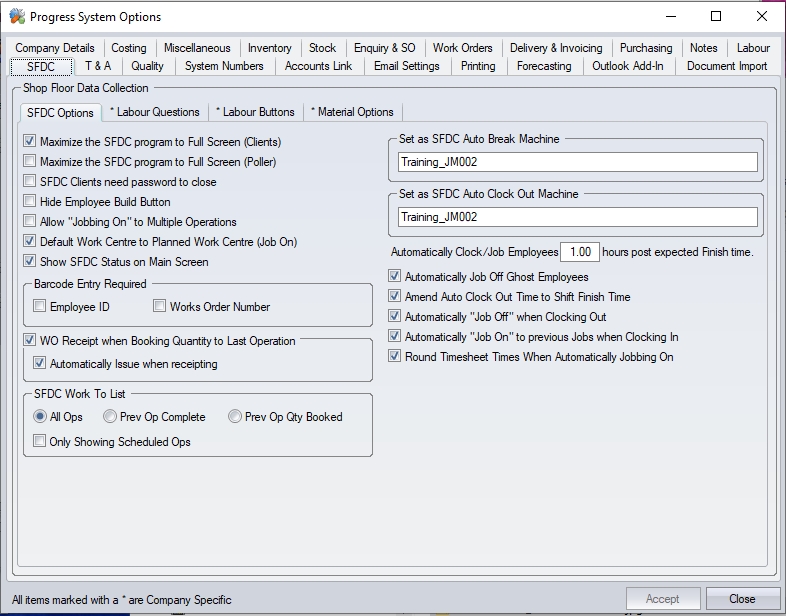
Set as SFDC Auto Break Machine
When setting up Shift Details within the Maintenance section of the system the user can if required set up employee breaks against the shift as shown in the following example.
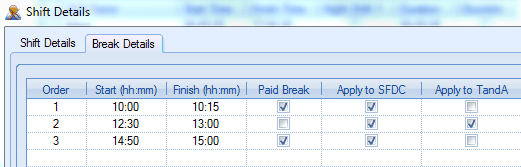
By ticking onto the required field the user can choose to have the system automatically apply these breaks at the appropriate times to the SFDC and/or T&A modules. and there bypass the need for employees to manually clock on/off to these breaks at the local SFDC computer.
In order for this to work a computer that is running the SFDC software must be nominated as the Auto Break Machine. This computer requires the SFDC program to be constantly running during the time of the shift/s though the program can be minimised if require.
Set as SFDC Auto Clock Out Machine
This option works in a similar fashion as to that of the Auto Break Machine. This function differs though in the fact that this option deals with the settings entered within the Automatically Clock Out / Job Off Employees X Hours Post Expected Finish Time option after their expected Finish time rather than those affecting employee break times.
This PC requires to be running the SFDC program constantly in order to be able to automatically clock out employees who have failed to do so manually.
In most cases the PC nominated as the Auto Clock Out Machine and the Auto Break Machine are the same.
Changes made to Shift Patterns and /or Breaks within the Maintenance section of the system require the SFDC software to be closed and re-opened on each PC running the software in order to take effect.
Computer Names for Synchronisation Purposes
The computer name such as BMS-Server can normally be found by accessing the PC and proceeding to the MS Windows Control Panel options. For Windows 7 operating systems the user should then access the System and Security section and then choose the System option. Other versions of MS Windows may slightly differ.
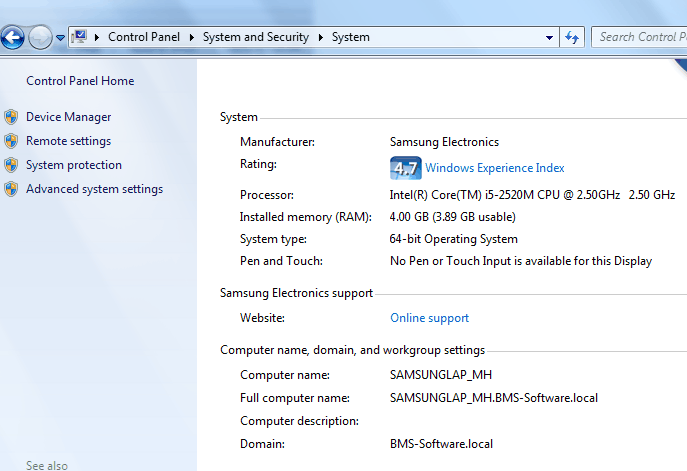
NOTE: It is the Computer name and NOT the Full computer name that is required to be entered as the Timer Server, Auto Break or Auto Clock Out machine.
Automatically Clock Out / Job Off Employees X Hours Post Expected Finish time.
This function permits time bookings to be reversed from the Works Order and / or T & A (Time and Attendance) sections of progress plus relating to employees who fail to Clock Out and / or Job Off at the end of his or her shift. With the SFDC module running on the SFDC Auto Clock Out computer the system can clock out and if necessary log an employee off any operation they may be logged on to after a specified number of hours after their expected shift finish time.
In the above example we have decided to assume that any employee still logged on the SFDC system more than ![]() hours after their shift should have finished has simply ‘forgotten’ or failed to log out in the correct manner. It is important to enter a number of hours that exceed the maximum hours that may possibly be spent working overtime i.e. if the maximum overtime anyone actually works after their normal shift has finished is 4 hours then set this figure to 5 otherwise the system could clock people out early when they are actually still working.
hours after their shift should have finished has simply ‘forgotten’ or failed to log out in the correct manner. It is important to enter a number of hours that exceed the maximum hours that may possibly be spent working overtime i.e. if the maximum overtime anyone actually works after their normal shift has finished is 4 hours then set this figure to 5 otherwise the system could clock people out early when they are actually still working.
In the following example an employee’s shift should normally finish at 4:30pm. If the employee is still clocked into the SFDC system after 7:30pm then he or she will automatically be clocked out based on the number of hours being set as ![]() .
.
If the employee was clocked onto an operation then the extra time spent on this job will be reserved back to that as of the expected shift finish time of 4:30pm. Similarly if the employee is utilising the T&A element of progress plus then he or she will be marked as leaving the building at the normal time of 4:30pm though these figures can be amended if required through the relevant sections of the system.
Please refer to the Maintenance section of the manual for more information on setting up Shift Details.
Amend Auto Clock Out Time To Shift Finish Time
This option will amend the employee clock out time back to their shift finish time as opposed to capturing the time when they are automatically clocked out.
Automatically “Job Off” when Clocking Out
With this option activated when the employee uses the Clock out button at the end of his or her shift then the system can automatically clock them off any works orders or other tasks they are logged on to at the same time. A message similar to the following will appear on the SFDC screen confirming that the employee has been logged off the relevant tasks and clocked out of the system
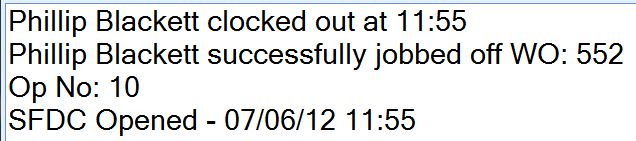
Without this option being selected the employee would not be able to clock out of the system until he or she has successfully logged off the works order operation/s or other activities that they were performing first. A message similar to the following would be displayed to the employee in this eventuality.

Automatically "Job On" to Previous Jobs When Clocking In
This option will automatically job the employee onto the last operation/work centre they were working on when they previously clocked out of the system. This option is useful for operations which have long operation times and saves the employee selecting work order numbers, operation numbers and work centre IDs each time.
Round Timesheets When Automatically Jobbing On
This option is used in conjunction with the Automatically "Job On" to Previous Jobs When Clocking In option above. This option ensures the timesheet start time is not recorded as earlier than the employee's clock in time.
SFDC Labour Questions
This section relates to the questions that an employee can be asked when clicking onto the various options within the SFDC module. Certain questions are mandatory and must be completed where as others can be selected as required. There is also an option to display build buttons as previously described or force the user to use the keypad or barcode reader to enter the required data.
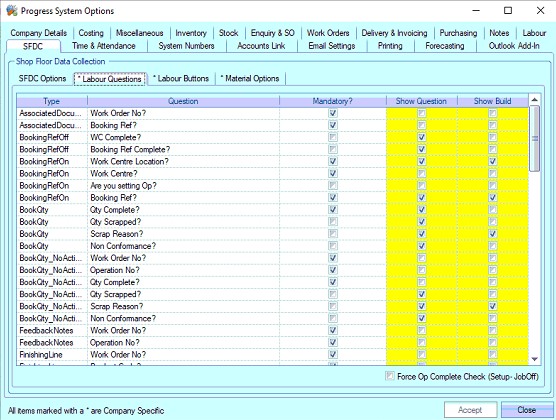
The TYPE field in the following questions relates to the function that is being performed e.g. JobOn – clocking onto a works order.
The QUESTION field displays the question that the user will be asked via the SFDC screen
The MANDATORY? field dictates if this setting is essential for the SFDC to perform correctly. This status cannot be amended by the user.
The SHOW QUESTION field permits the question to be asked on the SFDC screen. However when a Question has been marked as Mandatory this supersedes any choice made to this option and will display the question regardless if this field has been activated or not.
The SHOW BUILD option determines if the employee can click on the button to choose from a list of options related to the field or if he or she must enter the required data via the keypad or barcode reader.
Example SFDC Labour Questions
Booking Ref Off – Is Complete
When clocking off a Booking Ref is an option required declaring the Booking Ref as having been completed?
Booking Ref On – Work Centre Location?
When clocking onto a Booking Ref what Work Centre Location is the employee planning to use? This option is only relevant with the Booking Ref uses Work Centre option deactivated
Booking Ref On – Work Centre?
When clocking onto a Booking Ref what Work Centre is the employee planning to use? This option is only relevant with the Booking Ref uses Work Centre option activated
Booking Ref On – Are you setting op?
When clocking onto a Booking Ref is the employee setting up the work centre or not. This question will require a Yes or No answer only
Booking Ref On – Booking Ref?
When clocking onto a Booking Ref what is the booking reference that the employee is trying to log time against
BookQty?
If using the Book Qty option the employee can manually enter the quantity completed on this operation since he or she last logged a completed quantity without having to log off the operation. This can be useful in an employee is planning to be logged on to an operation for a long period of time and wishes to record every couple of hours how many of a particular operation has been completed. This would give a more accurate ‘real-time’ status of the works order operation without having to wait until the employee jobs off at the end of his or her shift to record the completed quantity.
Joboff – Qty Complete?
When clocking off a works order operation the employee must indicate the quantity completed on this operation since he or she last logged a completed quantity. 0 must be entered if nothing has been completed against this time booking
Joboff – Is Complete?
When clocking off a works order operation the employee must indicate whether this operation has been completed for all quantities on the works order. This question will require a Yes or No answer only. If the employee is in any doubt he or she must choose the No option otherwise other employee may be prevented from logging any more time to this operation
JobOn – Work Centre?
When clocking onto a works order operation the employee must indicate what Work Centre he or she is planning to use.
JobOn – Works Order No?
When clocking onto a works order the employee must indicate what works order number he or she is planning to use.
JobOn – Works Order Op?
After selecting a works order to clock on to the employee must indicate what works order operation he or she is planning to use.
JobOn – Are you setting op?
When clocking onto a works order operation is the employee setting up the work centre or not? This question will require a Yes or No answer only
LostOn – Lost Time Category?
When clocking onto a lost or down time booking the employee must indicate what reason code he or she is planning to use.
LostOn – Work Centre?
When clocking onto a lost or down time booking the employee and after choosing a reason code he or she can if desired choose a work centre to log this lost time against e.g. in the case of machine breakdown etc.
LostOn – Enter Notes Yes / No?
When clocking onto a lost or down time booking the employee can enter notes if required regarding this lost time booking
OpComplete – Works Order No?
If the employee is using the function to mark operations as complete he or she must indicate the required works order
OpComplete – Operation No?
If the employee is using the function to mark operations as complete he or she must indicate the required operation number relating to the selected works order
OpComplete – Is Complete?
If the employee is using the function to mark operations as complete he or she must indicate the required operation number relating to the selected works order and then choose if this operation has been completed. This question will require a Yes or No answer only
ReworkOff – Qty Complete?
When clocking off a rework operation the employee must indicate the quantity completed on this operation since he or she last logged a completed quantity. 0 must be entered if nothing has been completed against this time booking
ReworkOff– Is Complete?
When clocking off a rework operation the employee must indicate whether this operation has been completed. This question will require a Yes or No answer only. If the employee is in any doubt he or she must choose the No option otherwise other employee may be prevented from logging any more time to this operation
ReworkOn – Works Order No?
When clocking onto a rework job the employee must indicate what works order number he or she is planning to use.
ReworkOn – Works Order Op?
After selecting a works order to rework the employee must indicate what works order operation he or she is planning to use.
UnplannedOff – Qty Complete?
When clocking off an unplanned operation the employee must indicate the quantity completed on this operation since he or she last logged a completed quantity. 0 must be entered if nothing has been completed against this time booking
UnplannedOn – Works Order No?
When clocking onto an unplanned operation the employee must indicate what works order number he or she is planning to use.
UnplannedOn – Works Centre?
When clocking onto an unplanned operation the employee after indicating what work centre he or she is planning to use
UnplannedOn – Are you setting Op?
When clocking onto an unplanned operation is the employee setting up the work centre or not? This question will require a Yes or No answer only
WorkToList – Work Centre?
If the employee is using the work to list function to clock on to operations outstanding for a particular work centre he or she must choose the required work centre
WorkToList - Machine Name?
If work centres are set up with multiple machines, this question will allow the employee to select the specific machine name when viewing the Work To List. This option will narrow down the outstanding operations to just those assigned/scheduled against the selected machine name. If this question is not used, the Work To List will show outstanding operations across all machine names.
The user also has an option to force the Op Complete prompt after jobbing off of a setup period. If this option is left unticked, the system will prompt the employee to job onto the current op and start recording runtime. If this option is ticked, it will ask the employee if the op is complete instead. This allows users to use specific set up operations in their routings, saving them the need to mark the op complete separately once jobbed off.
![]()
SFDC Labour Buttons
This section relates to the buttons or options that an employee can choose from within the SFDC module.
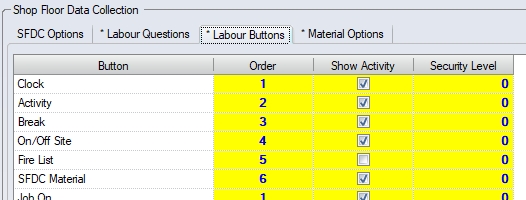
Certain buttons / options are mandatory and must be displayed whereas others can be selected if required. This is achieved by ticking the SHOW ACTIVITY box against the required button. The order in which these buttons are displayed on the SFDC screen can also be amended by the user, although the title of the button cannot. To change the order of any active buttons the user can simply click on to the ORDER field and amend the number.
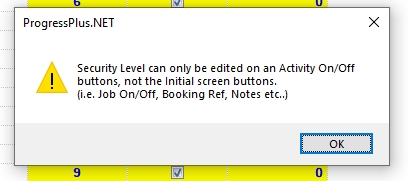
Individual SECURITY LEVELS can also be set against each of the SFDC options. This allows the user to restrict access to certain options within SFDC at an individual employee level. If this is being used, each button will be assigned a security value (0-100). Each employee will also be assigned a security level, and will only see those within their own security level when they use SFDC.
NOTE: The security level controls are only applicable to employee activity on/off options. They cannot be used for any of the main SFDC screen options (i.e. Fire List, SFDC Status, etc.). Changing the security of any of those reserved options will present the user with a warning indicating this.
The following details the activity options available for the SFDC module.
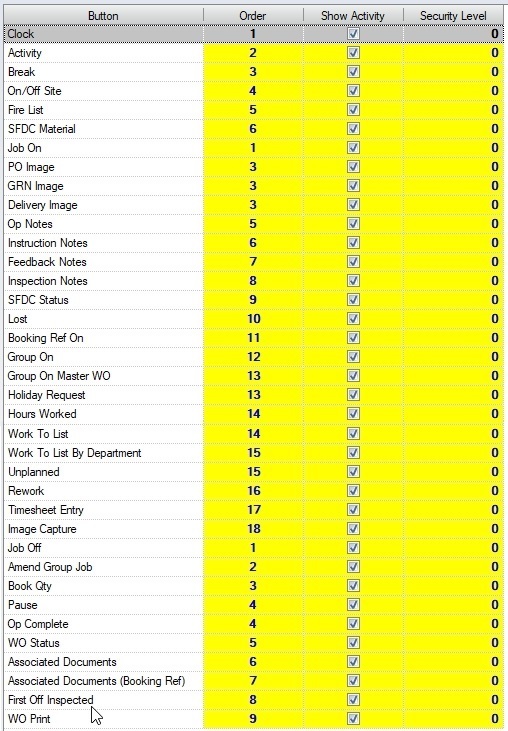
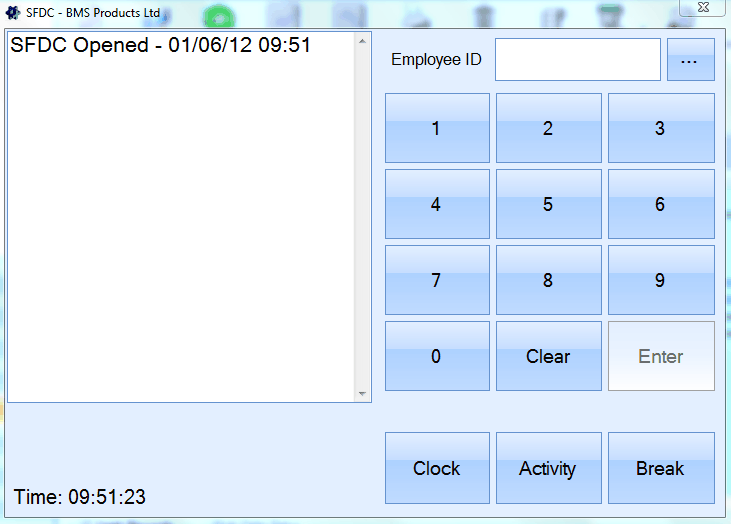
Clock
This option is used for logging employees in and out of the SFDC and / or T&A modules
Activity
After logging into the SFDC system the employee can then choose from a list of activities to perform e.g. Job On, Rework, Lost etc.
Break
This option is used for logging employees manually on and off breaks. This option has an effect on the SFDC and / or T&A modules. This function is normally only used if employees are not being logged onto breaks automatically.
On/Off Site
This allows the user to marked themselves as off site resulting in them being removed from the fire list. More information is available in the On/Off site section of the manual.
Fire List
This option will add a button to SFDC for the Fire List so it can be generated from SFDC clients.
SFDC Material
This option allows the employee to access the SFDC Material module (if active), where they can carry out inventory-related actions.
Job On
This option is used for logging employees onto a works order
PO Image/GRN Image/Delivery Image
These options allow the user to capture an image against these items. Selecting the relevant option will prompt the user for the PO, GRN or delivery number and allow them to capture an image against them.
Op Notes/Instruction Notes/Feedback Notes/Inspection Notes
These options allow the employee to view and/or manually enter/amend works order notes relating to a particular operation.
SFDC Status
This option allows the employee to view the SFDC Status screen from within SFDC itself. This allows them to see details of the employees clock ins and their current activity.
Lost
This option allows employees to record lost time. This is typically used to capture time when they are not working on jobs.
Booking Ref On
This option is used for logging employees onto a works order booking reference, when working with a pre-defined list of WOs at the same time.
Group On/Group On Master WO
This option allows the user to job onto a selection of WOs which they can select (i.e. not pre-defined). The Group On Master WO option will also include all associated child WOs for the selected WOs.
Holiday Request
This option allows the employee to request a holiday from the SFDC client.
Hours Worked
This option allows the employee to see what T&A hours they have recorded for the current and previous week.
Work To List/Work To List By Department
These options allow the user to view the current list of jobs outstanding for a specified work centre/work centre machine, and the sequence they should be done in. The Work To List By Department simply allows the employee to select the department first, narrowing down the list of outstanding jobs to only those associated with the selected department.
Unplanned
This option allows employees to record unplanned timesheet against the selected WO.
Rework
This option is used for logging employees onto a rework timesheet against the selected WO.
Timesheet Entry
This option permits an employee to manually enter a timesheet for a job or manually record some lost time. This can be used if the employee forgets to log on to a works order and wishes to record the time after he or she has finished. If activated this option is usually accessed via the Extra option button on SFDC
Image Capture
This option allows the employee to capture an image against the specified WO.
Job Off
This option is used for logging employees off a works order operation or other activity such as Lost, Unplanned, Booking Ref or Rework
Amend Group Job
This option allows the employee to edit a set of WOs/Ops that they are currently booked onto via the Group On/Group On BY Master WO option.
Book Qty
This option permits employees to book an interim completed quantity against a works order operation without having to log off the job
Pause
This option allows the employee to "pause" what they are currently working on temporarily. Clicking this option automatically places the employee on a default lost time category and records their time as a lost timesheet. Upon returning and clicking PAUSE again, the employee is taken off the lost time timesheet, and returned to the WO/Ops they were previously working.
Op Complete
This option permits employees to manually mark a works order operation as complete. This option should be used with care as wrongly completing an operation can stop employees from logging more time to the operation.
WO Status
This option allows the employee to view the status of the specified WO. This includes current labour bookings, and material issues, as well as the ability to view the WO BOM.
Associated Documents/Associated Documents (Booking Ref)
These options allow the employee to view the associated documents for the selected WO or Booking Ref.
First Off Inspected
This option allows the employee to mark a WO operation as "First Off Inspected" without having to job on/job off the WO operation.
WO Print
This option allows the employee to preview and/or print any of the associated paperwork for the specified WO, allowing them to preview and/or print the WO Job Card, Material List and/or Operations List documents.
For more information on using the SFDC module please refer to the relevant section of the manual.
SFDC Material Options
This section relates to the buttons or options that an employee can choose from within the SFDC Material module.
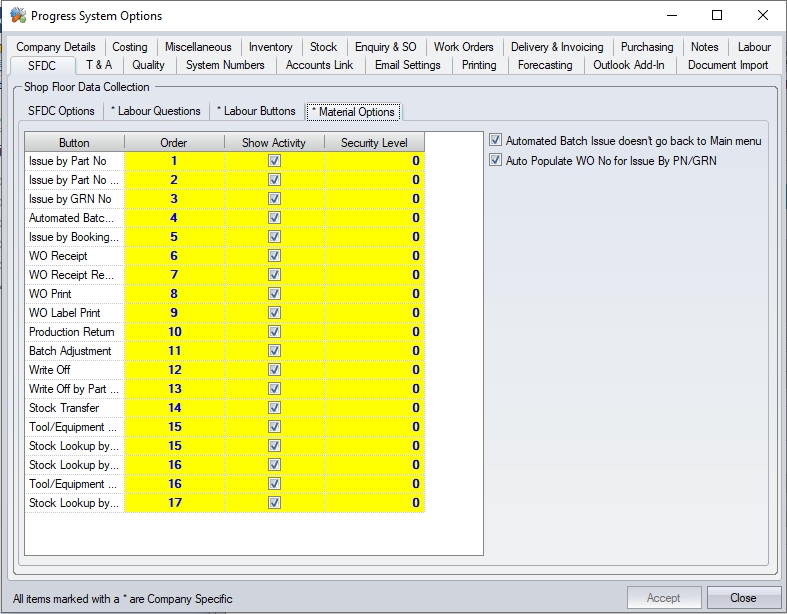
These options are not mandatory, so the user can choose to only make available the options they wish the employees to use. This is achieved by ticking the SHOW ACTIVITY box against the required button. The order in which these buttons are displayed on the SFDC screen can also be amended by the user, though the title of the button cannot. To change the order of any active buttons the user can simply click on to the ORDER field and amend the number.
Individual SECURITY LEVELS can also be set against each of the SFDC Material buttons. This allows the user to restrict access to certain options within SFDC Material at an individual employee level. If this is being used, each button will be assigned a security value (0-100). Each employee will also be assigned a security level, and will only see those within their own security level when they use SFDC.
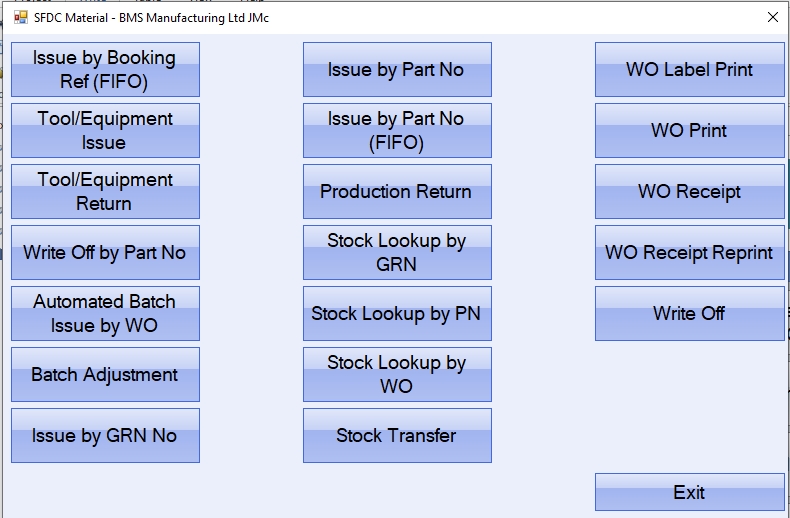
SFDC Material Options
Automated Batch Issue By WO
This option allows the employee to issue material to a work order based on a quantity of finished product which has been made. The system will prompt the employee for the work order number and also how many finished unit's worth of material is to be issued. Upon clicking ENTER, the material will be issued to the work order based on a FIFO approach. Once the issue is complete, the system will return the user to the main SFDC Material screen. If the user would prefer to remain on the Automated Batch Issue By WO screen to see the results of their issue, the following system option can be ticked.
![]()
This will keep the user on the Automated Batch Issue By WO screen and refresh the grid to show the updated WO details.
Batch Adjustment
This option allows the employee to carry out a batch adjustment transaction directly from the SFDC Material module. The employee will be prompted for the GRN number to be adjusted along with the quantity to be adjusted. Clicking accept will adjust the selected GRN with the specified quantity.
Issue By GRN No
This option allows the user to issue material to a work order using the specific GRN number of the material. The employee will be prompted for the work order number being issued to as well as the GRN number along with the number of units being entered. Upon clicking the ENTER option, the specified quantity from the selected batch will be issued to the work order. Once the issue is complete the system will return the user to the main SFDC Material screen. If the user would prefer to remain on the Issue By GRN No screen to issue further material to the WO, the following system option can be ticked.
![]()
This will keep the user on the Issue By GRN No screen and retain the WO so they don't have to select it again.
Issue By Part No
This option allows the user to issue material to a work order using the part number of the material. The employee will be prompted for the work order number being issued to and the part number. The employee can then select from a list of valid GRNs to issue the material from before entering the quantity to be issued. Upon clicking the ENTER option, the specified quantity from the selected batch will be issued to the work order. Once the issue is complete the system will return the user to the main SFDC Material screen. If the user would prefer to remain on the Issue By Part No screen to issue further material to the WO, the following system option can be ticked.
![]()
This will keep the user on the Issue By Part No screen and retain the WO so they don't have to select it again.
Issue By Part No (FIFO)
This option works the same as the Issue By Part No option but will issue the material automatically from the oldest GRN based on the FIFO (First In First Out) approach. The employee will be prompted for the work order number, the part number to be issued and the quantity to be issued. Upon clicking the ENTER option, the specified quantity will be issued to the work order from the oldest batch. Any shortfalls will then be issued from subsequent batches, oldest to newest, until the full quantity has been issued or there is no more stock remaining.
Production Return
This option allows the user to reverse material issued to a work order. The employee will be prompted for the work order number, the material issued and then the return quantity. Upon clicking ENTER, the issued material will be removed from the work order in question and returned to stock.
Stock Lookup By GRN
This option allows the employee to see what stock they have available based on a specific GRN number. The employee will be prompted to enter the GRN number and, upon clicking ENTER, the system will show them what stock is available for that GRN number. The employee also has the ability to print off a stock label from this screen using the PRINT option.
Stock Lookup By PN
This option allows the employee to see what stock they have available based on a specific part number. The employee will be prompted to enter the part number and, upon clicking ENTER, the system will show them what stock is available for that part number. The employee also has the ability to print off a stock label from this screen using the PRINT option.
Stock Lookup By WO
This option allows the employee to see what stock they have available of the required material based on the work order number. The employee will be prompted to enter the work order number and can then select the appropriate BOM component part they wish to enquire on. Upon clicking ENTER, the system will show them what stock is available for the selected part number. The employee also has the ability to print off a stock label from this screen using the PRINT option.
Stock Transfer
This option allows the employee to transfer stock from one location to another. The employee will be prompted for the GRN to be transferred, along with the quantity, destination location and a valid transfer reason . Upon clicking ENTER, the stock transfer will be completed.
WO Label Print
This option allows the employee to generate a work order label for a specified work order. The employee will be prompted for the work order number, the number of labels required and the quantity of units per label. Upon clicking ENTER, the employee will be presented with a PRINT option to generate the labels.
WO Print
This option allows the employee to generate the paperwork for a specified work order. The employee will be prompted for the work order number. Upon clicking ENTER, the employee will be presented with options to print the work order job card, the material list or the operations list for the selected. Clicking PRINT against any of the options will generate the associated document.
WO Receipt
This option allows the user to receipt a number of finished units against a selected work order. The user is prompted for the work order number, the receipt quantity, the stock location its to be received into and the number of GRN labels they would like generated. Upon clicking ENTER, the transaction will be completed and any labels generated.
WO Receipt Reprint
This option allows the employee to regenerate GRN labels for previously received units against a specific work order. The employee is prompted for the work order number before being presented with a list of batches. The employee can select the batch that they need the label(s) for before they are are prompted to specify the number of labels to be generated and the quantity of units to be displayed on each label. Upon clicking ENTER, the system will generate the labels.
Write Off
This option allows the employee to write off stock. The employee is prompted for the GRN number of the batch to be written off before being prompted for the write off quantity and also a valid write off reason. Upon clicking ENTER, the quantity entered will be written off from the selected GRN.