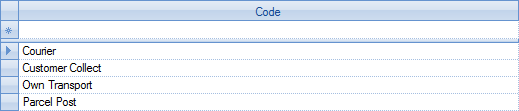
This section of Progress is for the generating of the list entries and their configuration for use within Progress Plus. The number of lists available is quite extensive but all are relatively self-explanatory. The screen shot below shows the main List Maintenance screen when it opens.
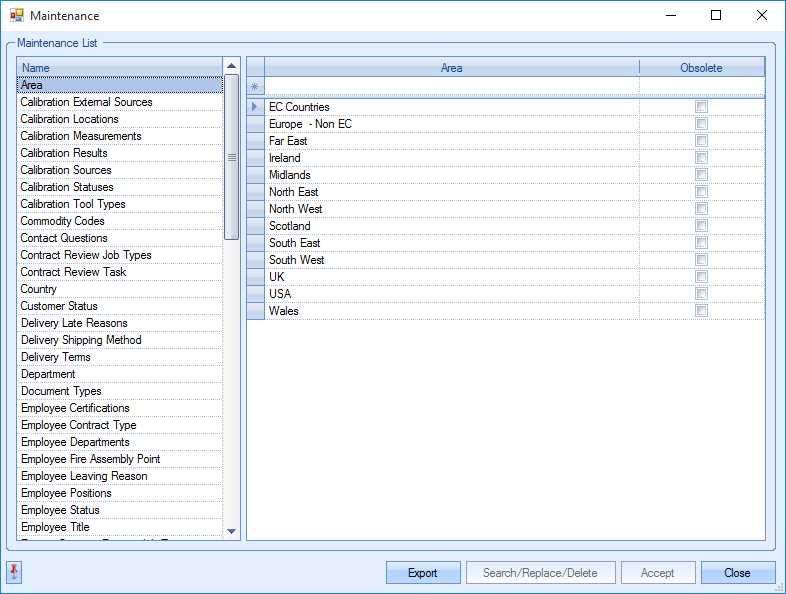
The left hand side of the window lists all the different list categories while the grid on the right displays the current contents of that list. Some categories are simply just text lists (for example Area) while others have various configuration options available for each entry (for example Customer Status).
Adding New Entries to Categories
New entries can be added to all the categories using the blank row at the top of each grid on the right hand side of the window.

Simply enter the details required and then click in the main grid to add the entry to the existing list. Click the ACCEPT option to save the changes.
Amending Existing Category Entries
Many of the categories cannot be amended due to links to existing data or previous use within the system. Any category which allows the user to amend or delete entries will have the SEARCH/REPLACE/DELETE option available at the bottom of the screen.
![]()
Any category where the SEARCH/REPLACE/DELETE option is not available cannot have its entries amended or deleted.
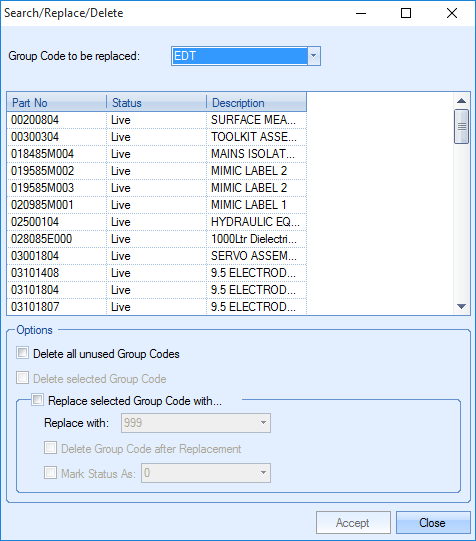
The options at the bottom of this screen allow the user to delete all unused group codes as well as replace an existing group code with another with the option to delete the old one after if required. The new replacement value must already exist in Progress. This can be added via the List Maintenance screens prior to the replacement being done. The only exception to this is the Employee Certifications category. This SEARCH/REPLACE/DELETE option allows deletion of existing certifications assigned to employees without the need to replace them.

All the same SEARCH/REPLACE/DELETE options are available, but the user can use the DELETE SELECTED CERTIFICATION without the need to replace it with another.
This recent change should be rolled out to other similar List Maintenance categories as they are reviewed.
Exporting Data to Excel
The user has the ability to export out any category listed in the List maintenance section if they wish to use this data for another purpose. The export will create an Excel spreadsheet with the details. To do this, the user simply selects the category they wish to export and then clicks the EXPORT option. The user will be prompted for a file name after which the spreadsheet will be displayed. An example is shown below.
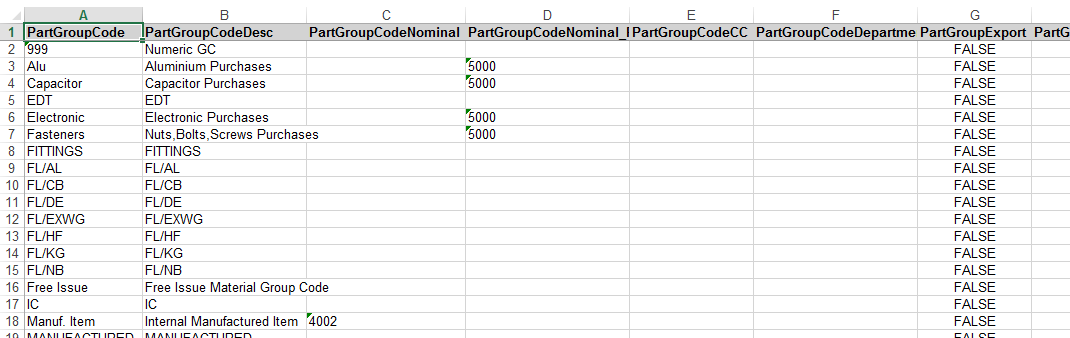
Group Code export - example
The following is a list of some of the categories and their function.
Area
Allows the user to record areas that can be assigned to customers and suppliers. This is commonly used for regions of a country such as Midlands, Far East or South East for example. It allows certain reports to be filtered by area such as the customer turnover report. The obsolete option allows the user to drop them off the drop-down lists it appears in.

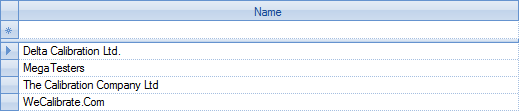
Calibration External Sources
Allows the user to set up external calibration sources. Typically this would be the name of whoever carries out external calibrations such as Delta Calibration Ltd, Jennic Instrumentation etc.
Calibration Locations
Allows the user to record internal locations where calibrated tools are stored. This could be Quality Dept., Supervisors Office etc. Certain reports can also be filtered by the calibration location.

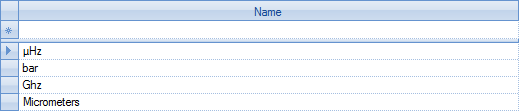
Calibration Measurements
Allows the user to create a list of measurement units which can be used for recording calibration results. This could be microns, metric, µHz etc.
Calibration Results
Allows the user to create a list of statuses for recording against calibration results. This could be simply PASS or FAIL or could include RETEST, REVIEW, etc. depending on how the results are managed. The PASSED tickbox indicates which statuses would be considered as PASSED and which have not.

Calibration Sources
Allows the user to create a list of calibration sources and mark them as internal or external sources. This would usually be set to Internal or External. The External checkbox determines whether an external company is required for calibration or not.
The Default checkbox determines the default source of any new tools recorded in the system.

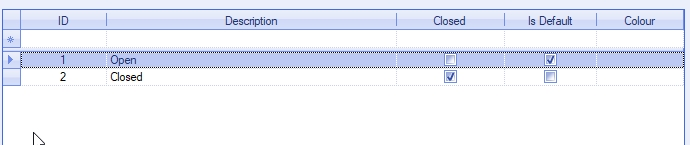
Calibration Statuses
Allows the user to set up a list of statuses for use against the calibration records. By default, OPEN and CLOSED are available but additional statuses can be added. This status determines whether a tool is active or not, which is determined by the CLOSED checkbox against the status. The DEFAULT checkbox indicates the default value of any new tools recorded in the system.

Calibration Tool Types
Allows the user to enter a list of tool categories for recording against the tool records and can be assigned in the tool record. This is purely for record and Progress does not allow any filtering of reports by Tool Types.

Commodity Codes
Allows the user to create a list of available commodity codes along with the associated Intrastat code for assigning against inventory items. This is added to an inventory record in the More Details tab of the part. The Commodity code will appear on the Intrastat reports in Progress.

Company PO Ship To Addresses
Allows the user to add additional purchase order ship to addresses for use within the system. These can be selected by the user when raising a purchase order and also assigned as default PO Ship To addresses for departments too.

Contact Questions
Allows the user to set up a list of common questions that can be used to create notes against any supplier/customer contacts. These can be used to build relationships with contacts on a personal level. The Priority value sets the order of the questions. These can be answered in the Customer/Supplier record > Contacts tab.

Contract Review Job Types
Allows the user to specify a list of job types that can be assigned to sales order contract reviews. Often used to indicate whether a particular job is new, repeat or rework. The IS DEFAULT tickbox allows the user to set which value defaults onto new contract reviews.

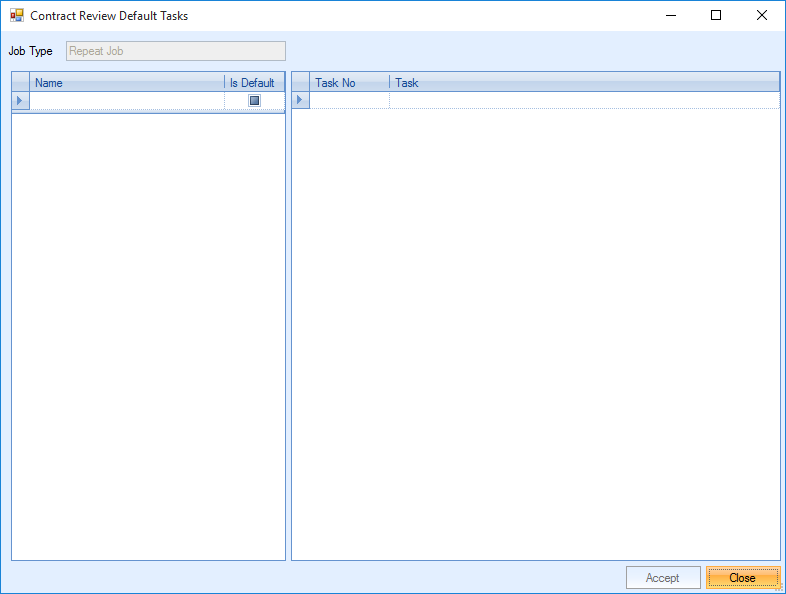
The user can also assign default tasks to a specific Contract Review Job Type. For example, a new job for electrical products may contain different default tasks to a new job for Consumables. The job type is highlighted and the Def. Tasks button selected.
![]()
The following screen will be displayed
The user can create a name for the default tasks such as “Electronics”. Task numbers and tasks can then be added on the right of the screen. The user can select tasks from the drop down box. The tasks are populated in the Contract Review Task screen as described in the Contact Review Tasks section below.
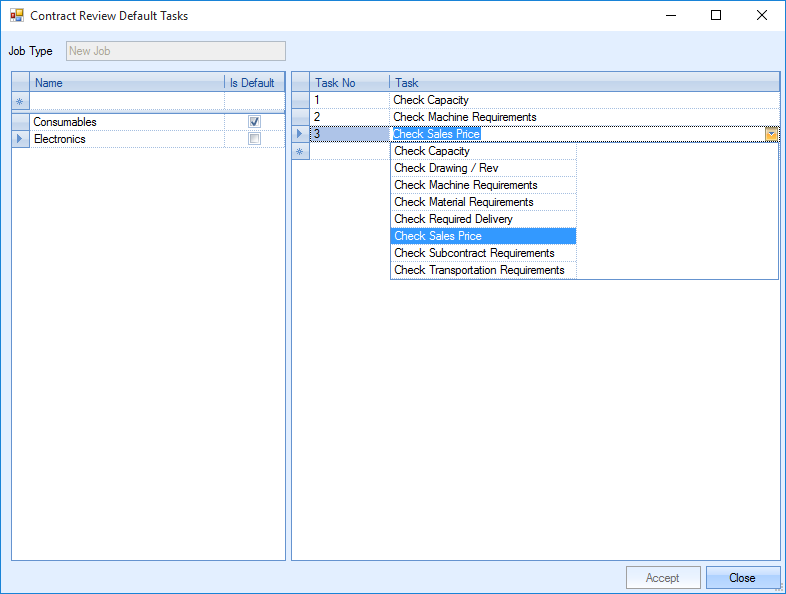
The user can also mark the task list as a default for that job type by selecting the default checkbox. Once the user is happy with the default tasks, the Accept button must be selected.
Contract Review Tasks
Allows the user to set up a list of tasks for use on contract reviews. The user can create new tasks, assign tasks to certain employees/departments and mark which tasks are default using the following screen.

Task: The task description such as Check Capacity or Check Drawing/Rev
| Assigned To: | The default employee that the task will be assigned to. The task will appear in the employees O/S Contract Review screen. If left blank, the task will only appear for employees within the department selected in the next column. This is a default employee but can be changed within the contract review |
| Employee Department: | The default department that the task will be assigned to. The task will appear in the O/S Contract Review screen of all employees within that department. This is a default department but can be changed within the contract review. |
| Actioned By: | This is the employee that can mark the task as complete or cancelled. Unlike the Assigned To option, this can only be changed within the List Maintenance. |
| Actioned By Employee Department: | Any employee within this department can mark the task as complete or cancelled. Unlike the Employee Department option, this can only be changed within the List Maintenance. |
Order: The order that the tasks are to be completed in.
| Default Task: | This marks if the task is a default task or not. All the tasks marked as default will be added to a contract review when the user selects the GET DEFAULT option in the contract review. |
Country
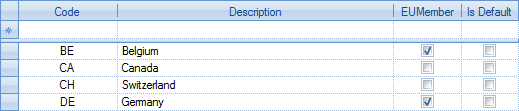
Allows the user to set up a list of countries for use within Progress. Countries can be selected for customers and suppliers allowing reports to be filtered by individual countries The user can set up the country code, the full name, whether the country is an EU member and whether the country is the default country for use in the system. The EU MEMBER tickbox determines whether the country is included in the INTRASTAT reporting options used within the EU for exporting/importing reporting purposes. The default will simply default any new customers/suppliers to that country.
Customer Status
This allows the user to set up a list of customer statuses for assigning to customers. These statuses can be configured to dictate what can and cannot be done in the system against each status. The user can assign a description, indicate whether the status is a CLOSED status and use the tick boxes to indicate what can be done under each status. For example, customers on credit hold will not be sent any more goods as the Sales Order and Delivery check boxes are unticked.
The Proforma option is a default option meaning that any Sales Order created for a customer with Proforma status will default to have Proforma ticked. Having the Proforma unticked does not necessarily mean a proforma cannot be created for customers with that status. The ACCOUNTSLINK field allows the user to link the status to an existing status in the finance package used to sync the data between both packages while the COLOUR column simply indicates the colour used to show the customer in the Customer List screen.

Delivery Late Reasons
Allows the user to set up a list of late reasons to be used against late deliveries, such as Internal Clerical Error or Courier Problems. This can be used for reporting purposes and the delivery Analysis reports can be filtered by the Delivery Late Reasons. The ID number is just a sequential number for use within Progress.

Delivery Shipping Method
Allows the user to create a list of shipping methods for use against deliveries. Shipping methods can be selected on sales orders, deliveries and as a default against a customer. This will default the selected Shipping Method to all the customer’s future sales orders and deliveries.
Delivery Terms
Allows the user to set up a list of delivery terms and the associated code. Again this can be set up against the customer as a default to default against all their sales orders and deliveries. The associated code will also appear on the Intrastat report for analysis.

Department
This allows the user to set up departments for use within Progress. These can be used to assign departments to enquiries, sales orders, work orders, etc. and can be used for reporting purposes against the departments. For example, the user can view the spend of the Research department for a specific month. The departments can also be linked to the departments set up in Sage Line 50 for linking transferred invoices to specific departments in Sage Line 50 Accounts. The ACC DEPT field can be assigned by selecting the appropriate department from the list that appears.
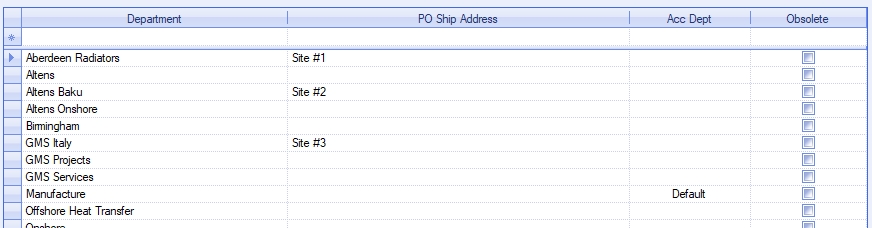
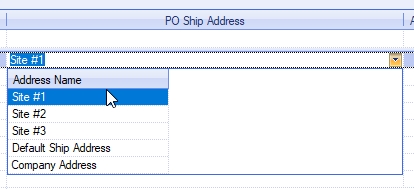
The user can also specify a default PO ship address for each department. If the user specifies the department on a purchase order, the purchase order's ship address will default to the one specified here. This allows different departments to have their own PO Ship To Address, and saves users having to manually select in the purchase order itself. The user can select from the drop-down list available. This list consists of the main company address, the DEFAULT PO SHIP TO address set in the Admin > Options > Purchasing settings, and also from any additional COMPANY PO SHIP TO ADDRESSES that have also been set up in the List Maintenance section.
The user also has the ability to set default departments for different areas of the system as well as options to make the department field mandatory. This is done via the DEPARTMENT DEFAULTS option at the bottom of the screen when viewing the department list.
![]()
This option presents the user with a list of system areas where a default department can be set, as well as the option to make it mandatory.
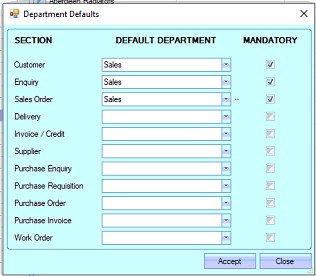
Creation of any of the items listed above, will default the department as per the pre-assigned default.
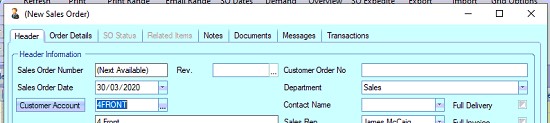
If no default has been set or has been removed, and the item has been marked as having a mandatory department, then the system will highlight this with the message below.
Document Types
Allows the user to create a list of document types for assigning to any documents attached to records in Progress. These are assigned in the Documents tabs when documents are linked to sales orders, inventory items, work orders, etc.

Employee Certifications
Allows the user to set up a list of certifications which can be assigned to employees. A validity period and type can be set up for each certification. For example, a first aid certificate may expire after 1 year. The Validity Period would be set to 1 and the Validity Period Type set to YEARS. Certifications can be selected within the Certifications tab of the employee record.

Certifications can be grouped together so that an employee can be given a group of certifications. To categorise the certifications, the user can use the CATEGORIES button.
![]()
The following screen will appear.
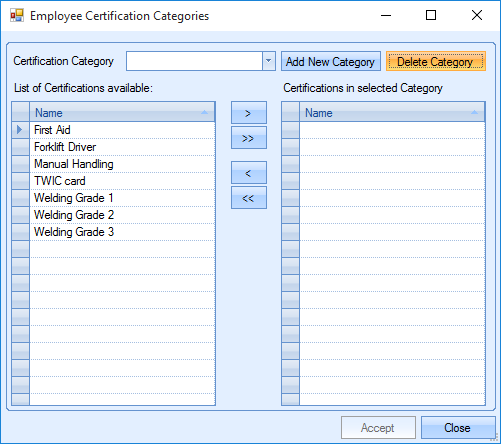
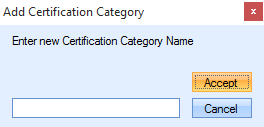
New categories can be created and deleted. Selecting ADD NEW CATEGORY allows the user to enter a new category name.
Once this has been accepted, the user can add certification to that category by highlighting the certification and using the arrow buttons.
![]()
The single arrow will add just the highlighted certification. The double arrow will add all the available certifications to the category.
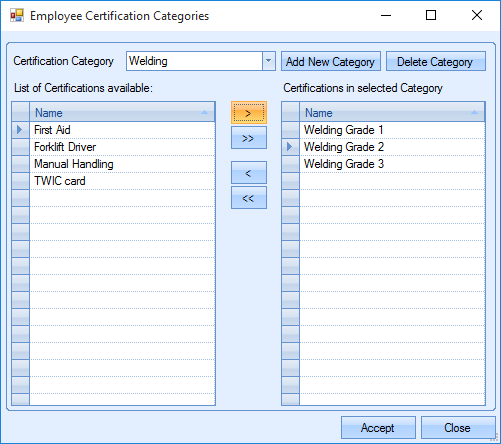
The user can select ACCEPT to confirm the changes made.
When the categories are set up, the user can select the category from the drop-down box in the Certifications tab of the employee record.
Employee Contract Type
Allows the user to set up a list of contract types such as full-time, part-time etc. that can be assigned to employee records. These can be used to filter payroll and T&A reports.

Employee Departments
Allows the user to set up a list of departments for use against employee records. This could be internal departments (Admin, workshop, etc.). The option to set a default department is available by applying the tickbox against the department required.

Employee Fire Assembly Point
Allows the user to create a list of fire assembly points which can be assigned against the employee record. The generation of the Fire List report will group employees by the specified assembly points. This is only for users with the SFDC or Time and Attendance modules.

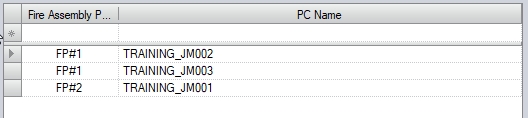
Employee Fire Assembly Point PC
Allows the user to create a list of fire assembly points and associated PCs/clients. If the system is configured to use the client/PC fire assembly point for grouping the Fire List, then this is where the client/assembly pint would be set up. The generation of the Fire List report will group employees by the specified assembly points. This is only for users with the SFDC or Time and Attendance modules.
Employee Leaving Reason
Allows the user to create a list of reasons for an employee leaving. This can be set against the employee record in the Time & Attendance tab once the employee is marked as an “EX” employee.

Employee Positions
Allows the user to set up a list of internal positions that can be assigned against employee records. A default position can be set using the tickbox displayed. When a new employee is created the position will be set to the default position.

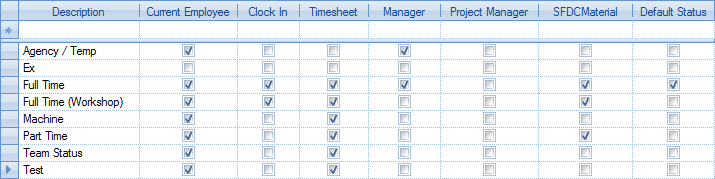
Employee Status
This allows the user to set up a list of employee statuses and indicate what abilities the employee has against each status. The user can enter a status name and tick the relevant boxes to configure. The definitions of each check box are shown below.
| Current Employee | Indicates employees with this status are “active” employees. Typically this is ticked for all statuses except “EX” which is used to indicate the employee is no longer with the company. |
| Clock In | Indicates employees with this status are required to clock in/out of the system. This would be used in conjunction with the T&A section and the recording of employee’s start and finish times. |
| Timesheet | Indicates that employees with this status can job on/off work orders. This would be used in conjunction with the SFDC and/or Labour section to record WO operation times. |
| Manager | Indicates whether employees with this status are listed in the drop-down lists of employees for selecting against enquiries, sales orders, work orders, etc. If this is not ticked, then the employee will not appear in any drop-down lists. |
Project Manager Indicates whether employees with this status are available for selection as a project manager against projects.
| SFDC Material | Indicates whether employees with this status are allowed to use the SFDC Material module in Progress. This is an additional module available for Progress and would be required before this option can be used. |
Default Status Allows a specific status to be the default when creating new employee records.
Employee Title
Allows the user to create a list of titles for use when creating new employees.

Enquiry Contract Review Job Types
Allows the user to specify a list of job types that can be assigned to enquiry contract reviews. This is often used to indicate whether a job is new, repeat or rework. The IS DEFAULT tickbox allows the user to set which value defaults onto new contract reviews.

Enquiry Contract Review Tasks
Allows the user to set up a list of tasks for use on enquiry contract reviews. The user can create new tasks, assign tasks to certain employees, set the order of the tasks and mark which tasks are default using the following details:
Task: The task description such as Check Capacity or Check Drawing/Rev.
Default Task: This marks if the task is a default task or not. All the tasks marked as default will be added to an enquiry contract review when the user selects “Get Default”.
Order: The order that the tasks are to be completed in.
| Assigned To: | The default employee that the task will be assigned to. The task will appear in the employees O/S Enquiry Contract Review screen. If left blank, the task will only appear for employees within the department selected in the next column. This is a default employee but can be changed within the contract review |

Enquiry Do Not Quote Reasons
Allows the user to set up a list of reasons as to why an enquiry line is not being quoted. When an enquiry line status is changed to “Do Not Quote” the user can select the Do Not Quote Reason in the line details.

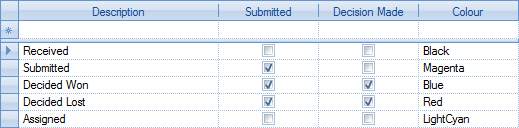
Enquiry Header Status
Allows the user to create a list of applicable statuses for the overall enquiry. There are 3 main stages to any enquiry – Received, Submitted and Decided. These indicate whereabouts the enquiry is in its lifespan and can be viewed/reported upon based on this status. The aforementioned statuses will exist by default in Progress but additional statuses can be added if required. The user can enter a status name and whether this status is deemed submitted and/or decided. Colour coding can also be set against the different statuses to highlight the enquiries on the main Enquiry Browse grid.
Enquiry Lost Quote Reasons
Allows the user to set up a list of reasons for losing a quote. This is used by the Lost Quote Analysis report to show the breakdown of lost quotes. This can be assigned to the enquiry line once it’s marked as lost.

Enquiry Origin
Allows the user to set up a list of origins for their enquiries (for example Trade Show, Magazine Advert, etc.). These can be assigned to the enquiry in the Enquiry Details tab. This is used by the Enquiry Origin Analysis report to show a breakdown of the enquiry origins.

Enquiry Pending Quote Reasons
Allows the user to set up a list of reasons as to why a quote is pending. Can be assigned in the line details to the enquiry line once the status is set to “pending”.

Group Codes
This allows the user to set up the list of group codes that they will assign to inventory parts in the system. These group codes can be set up with a variety of defaults and can be assigned the appropriate financial nominal codes for use with invoicing. In its simplest form, the user can just assign a name and a description against the group code. Discounts can also be set against group codes, as can default locations and various other details.

| Nominal SO | Allows the user to specify the sales nominal code associated with this group code. When selling an item, the system can pick up the correct nominal code from the group code so the correct nominal code is used against the invoice line. |
Nominal PO Allows the user to specify the purchasing nominal code to be used when processing the supplier invoices.
| Exclude from FIFO | Allows the user to mark any group code as being excluded from FIFO issuing. When ticked, any part with this group code can only be manually issued, and cannot be used for automated batch issues. |
| Lead Time | Allows the user to specify a default lead time against all parts assigned this group code. This will be assigned to the manufacturing, sales and purchasing lead time of parts within that group code. |
| Non Productive | Allows users to set parts in a group code as non-productive. This is purely for productivity reporting purposes. The user can group the Productivity Analysis by Group code and view the group codes that are marked as non-productive. |
Job Type Allows the user to specify a WO job type which will automatically be assigned to any WOs created for an inventory part.
Is Default Allows the user to specify a default group code to be assigned against any new inventory parts.
Is Mainly Purchased Allows the user to specify whether the inventory parts assigned this group code are automatically marked as Mainly Purchased items.
Requires Release Allows the user to specify whether the inventory parts assigned this group code are automatically marked as “Requires Release”.
Stock Category Allows the user to specify what the default stock category is for any inventory parts assigned this group code.
Default Mark Up Allows the user to set a default mark up against parts within that group code. Group code mark-ups can be used within the Enquiry section of Progress.
Batch Qty WO Allows the user to set a default batch quantity for WOs
Batch Qty PO Allows the user to set a default batch quantity for POs
Default Location Allows thew user to set a default stock location for the group code.
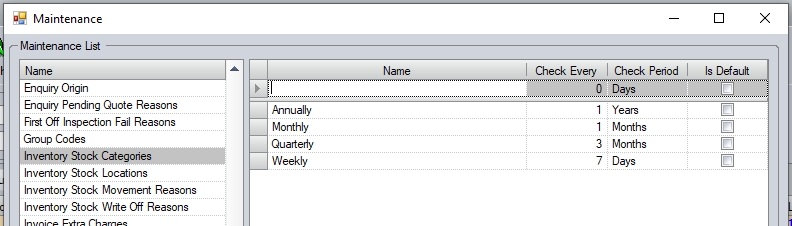
Inventory Stock Categories
Allows the user to set up a list of stock categories for assignment to inventory parts which can be used to dictate how frequently they need to be stock checked. This can be set in the More Details tab of a part or against a group code in the List Maintenance.
The user can select the check period from the drop down list as well as set a default category which will be applied to all new parts created. The check period will affect the Next Check Due date of a part. For example, a part with a stock category of “Frequent” is checked on Monday 19th September and the stock imported via the import function. The Next Check Due date would change to Monday 26th September.
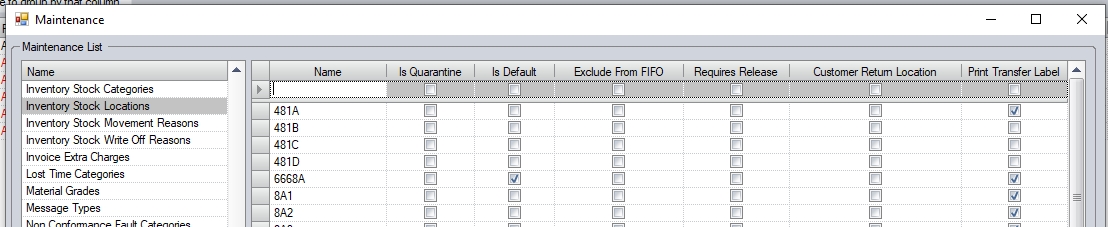
Inventory Stock Location
Allows the user to set up a list of all stock locations required for use in the system. The user can give the location a name and set the options for the location as required.
IS QUARANTINE option allows the user to specify that the stock location in considered a "quarantine" location. Any stock held in such a location will not be able for use in any transactions other than for stock transfers and will not be included in the part's ACTIVE stock quantity (i.e. available stock).
IS DEFAULT allows the user to specify a default location. This will be the location assigned to any new parts created in the system. Its not mandatory and, if no default location is set, the user will have to specify a location for the part when created (if location is mandatory for parts).
EXCLUDE FROM FIFO will prevent any stock from this location being issued on an automated batch basis, and will only allow it to be issued manually.
REQUIRES RELEASE will automatically place all goods on temporary hold if receipted or transferred into the location. This is regardless of how the master parts' or the individual receipts' Requires Release flag is set.
CUSTOMER RETURN LOCATION will be automatically used when a customer return is done against a delivery, placing the returned units into the specified "customer return" location.
PRINT TRANSFER LABEL option will generate a stock transfer label when transferring existing stock into the location.
Inventory Stock Movement Reasons
This allows the user to set up a list of stock transfer reasons which can be selected when stock is transferred between locations.

Invoice Extra Charges
Allows the user to create a list of additional charges that can be applied to invoice lines as text items. These can be assigned a group code which will determine the nominal codes used against this invoice line item.

Lost Time Categories
Allows the user to set up a list of categories that can be assigned to periods of lost time when employees record time. When the employee records a period of lost time, whether it’s via SFDC or on a manual timesheet, they must select a valid category. The lost time categories can be used for reporting purposes.

Nominal Codes
Allows the user to set up a list of nominal codes for use in Progress if they are not linked to a finance package. Not required if there is a valid and active accounts link set up.

Non Conformance Fault Categories
Allows the user to set up a list of fault categories for use in non-conformances. The user can provide a description and also a Fault Category Type. This would usually be set to Internal or External but can be whatever the user requires.

Non Conformance Follow Up Actions
Allows the user to set up a list of follow up actions that can be recorded in non-conformances.

Non Conformance Priorities
Allows the user to set up a list of priorities used within non-conformances. By default, LOW and HIGH priorities exist but additional ones could be added if required. Quality reports can be filtered by the Non-Conformance Priorities.

Non Conformance Sources
Allows the user to set up a list of sources of their non-conformances. Typically, this would be where the non-conformance was raised (for example customer, supplier, internal, etc.). This could also be more specific such as the Quality Dept.

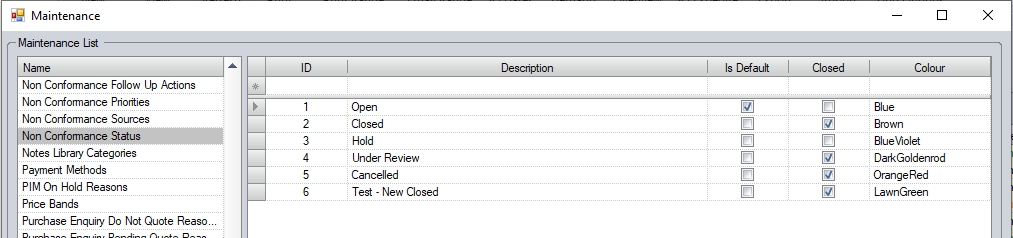
Non Conformance Status
Allows the user to set up a list of suitable statuses for use on the non-conformances. By default, OPEN and CLOSED will be set up, but others can be added if required. The IS DEFAULT option allows the user to set a default status for new non-conformances when created, while the CLOSED tickbox will allow you user to determine whether the statuses created are treated as “closed” statuses. Lastly, the user is able to assign colours to each status for visibility on the main Non Conformance screen itself using the COLOUR drop-down list.
Notes Library Categories
This allows the user to set up a list of categories that can be assigned to notes in the Notes Library section of Progress. The categories can be used to filter the Notes Library to allow quick selection of the appropriate note.

Payment Methods
Allows the user to set up a list of payment methods which can be assigned against scheduled invoices. The user can select a default payment method that will be selected when a Scheduled Invoice is created.

PIM On Hold Reasons
Allows the user to set up a list of reasons which can be used to explain why a PI Match has been placed on hold. This can be assigned to the PI Match line details once it’s been placed on hold and can be used for reporting purposes.

Price Bands
Allows the user to set up a list of price bands and their associated currency for use against customers/suppliers and price matrices. These can be assigned to customers/suppliers and then used to group customers/suppliers together for a certain pricing structure. When selecting the price band, the user will not be able to select a price band of a currency that differs from that of the customer or supplier.

Purchase Methods
Allows the user to set up a list of methods as to how the purchase order was placed. This is assigned to the purchase order in the header section.

Receipt Late Reasons
Allows the user to set up a list of reasons as to why receipts are late. These can be assigned against the receipt itself when the receipt is processed and the receipt date is after the required date.

Sector
Allows the user to set up a list of sectors that can be assigned against suppliers and customers. Can be used to filter reports and screens. Any sectors that are not required can be marked as obsolete but not deleted.

Spend Levels
This allows the user to set up a list of spend categories and the associated limits which are used to assign a spend level against customers. These are visible on the Customer List screen. As invoices are raised for the customer and they go above the limits set, the Spend Level column in the customer list will reflect the change.

Suppliers Capabilities
Allows the user to set up a list of capabilities that can be assigned against the supplier. This is often used to see what specific capabilities a supplier has. Used in conjunction with the Supplier Resources list.

The user can also set up supplier capability groups. These can be done via the GROUPS option at the bottom of the screen.
![]()
Clicking this option will present the user with a new screen, where existing groups can be edited and new groups created.
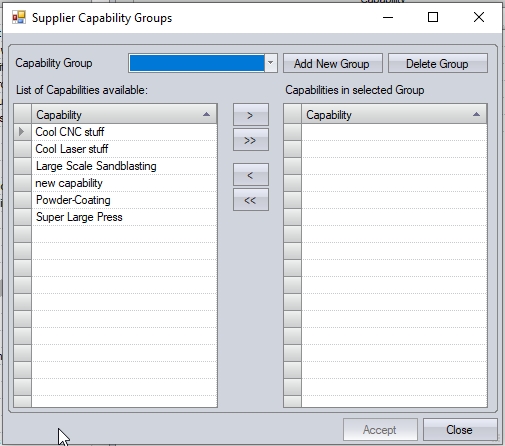
Creating New Supplier Capability Groups
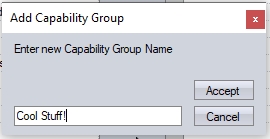
The user can create new groups of capabilities using the ADD NEW GROUP option. This will prompt them to give the group a suitable name, and then allow them to select the capabilities for that group.
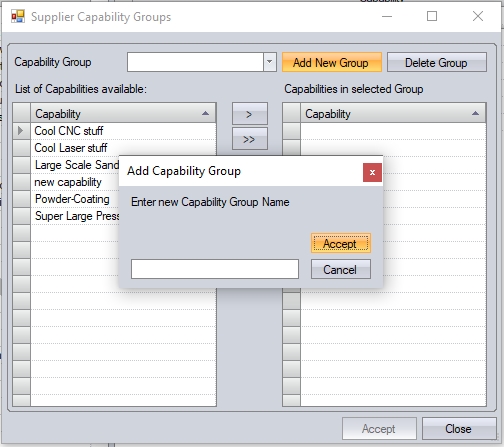
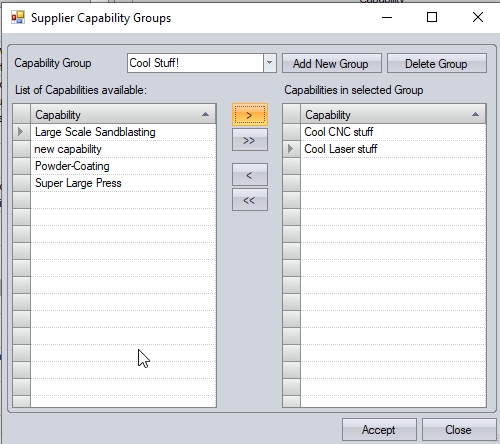
Once the group has been created and the capabilities assigned, the user can click ACCEPT to save the new group. The group can then be used to assign groups of capabilities to supplier.
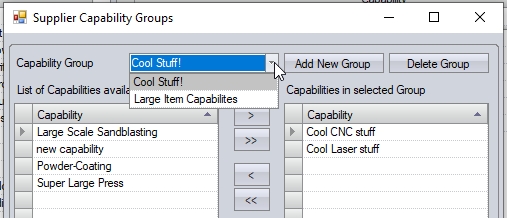
Editing Supplier Capabilities Groups
The user can also edit existing capability groups from the above screen too. The user can select any existing capability group from the drop-down list.
This will present the user with a list of the certificates currently associated with the group, upon which they can add/remove certificates as required.
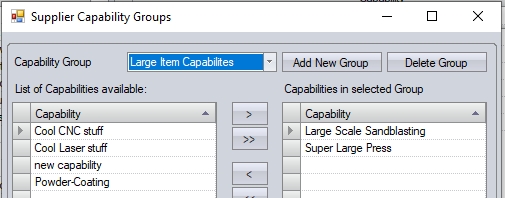
Once any changes have been made, the user can click ACCEPT to save the changes.
Deleting Supplier Capability Groups
The user can delete an existing capability group by selecting the group in question, and clicking the DELETE GROUP option.
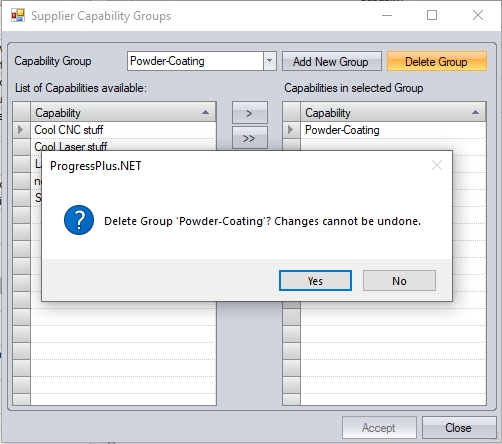
Clicking YES will remove the group from the system.
Once any changes have been made by the user, they can click ACCEPT to return to the List Maintenance screen.
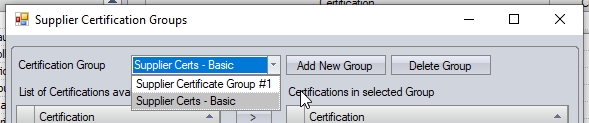
Supplier Certifications
Allows the user to set up a list of certifications (for example ISO 9001, etc.) which can be assigned to suppliers for reference.

The user can also set up supplier capability groups. These can be done via the GROUPS option at the bottom of the screen.
![]()
Clicking this option will present the user with a new screen, where existing groups can be edited and new groups created.

Creating New Supplier Certificate Groups
The user can create new groups of certificates using the ADD NEW GROUP option. This will prompt them to give the group a suitable name, and then allow them to select the certificates for that group.
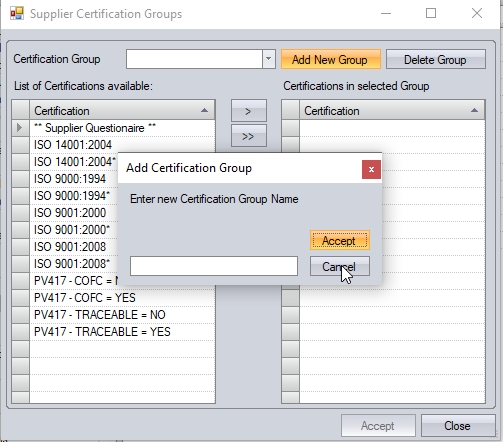

Once the group has been created and the certificates assigned, the user can click ACCEPT to save the new group. The group can then be used to assign groups of certificates to supplier.
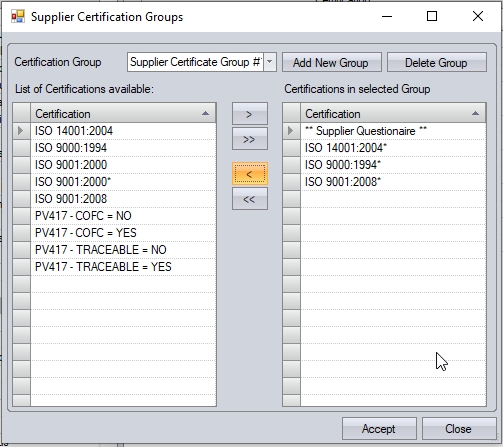
Editing Supplier Certificate Groups
The user can also edit existing certificate groups from the above screen too. The user can select any existing certificate group from the drop-down list.
This will present the user with a list of the certificates currently associated with the group, upon which they can add/remove certificates as required.
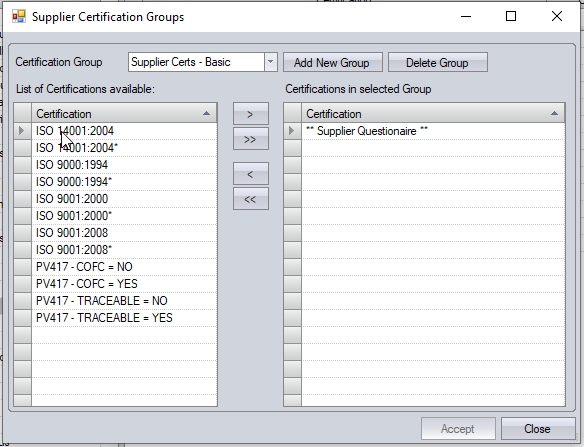
Once any changes have been made, the user can click ACCEPT to save the changes.
Deleting Supplier Certificate Groups
The user can delete an existing certificate group by selecting the group in question, and clicking the DELETE GROUP option.
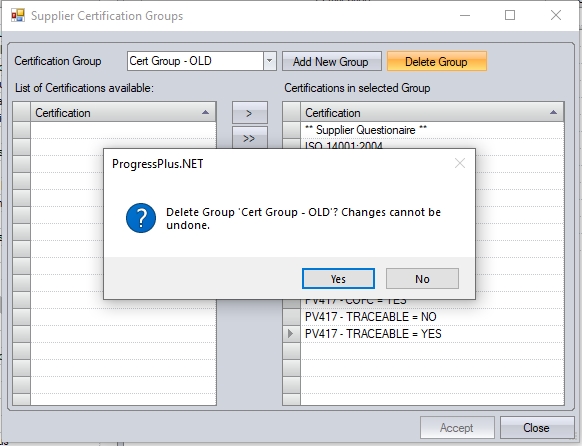
Clicking YES will remove the group from the system.
Once any changes have been made by the user, they can click ACCEPT to return to the List Maintenance screen.
Supplier Resources
Allows the users to set up a list of supplier resources which are used alongside the capabilities.

Supplier Return Reasons
Allows the user to set up a list of reasons which can be recorded against supplier returns. These can be recorded when a supplier return transaction is done.

Supplier Standard
Allows the user to set up a list of supplier standards. These are assigned against the suppliers against the APPROVED status of the supplier. For instance, suppliers may be approved to certain levels of industry.

Supplier Status
Allows the user to set up statuses for assigning to suppliers. The system will have OPEN and CLOSED by default, but the user can add more if required. The user can specify the name/description of the status, can indicate whether the status is treated as a “closed” status and whether the status allows the creation of purchase orders and purchase invoices. The user can also link it to existing Sage statuses to ensure the suppliers in both systems are synchronised when refreshed. The status can also be assigned a colour for easy identification on the main Supplier List too.

T&A Rates
Allows the user to set up the various payroll rates to be used in the system for calculating paid hours. The entries here simply require a sequence number, a rate description and an abbreviated term for display on the payroll report.

T&A Sub Types
Allows the user to set up a list of subcategories for use when recording absences and holidays in Progress. The TATYPE column indicates whether it’s for Absence Unpaid (AU), Absence Paid (AP), Holiday (H) or Normal (N) while the TASUBTYPE column allows the user to record the sub-category (for example doctor app, funeral, maternity leave, off sick etc.) These codes can be used in both the Holiday Planner and the T&A screen when creating or amending T&A records.

Technical Query Status
Allows the user to set up a list of statuses for use when recording technical queries in Progress. Each status is assigned a unique ID, along with a description and flag to indicate whether its a "closed" status and/or the default status. The user also has the ability to assign a colour to the status, which would then be used when displaying the technical queries in the main Technical Query Browse screen.
Technical Query Types
Allows the user to set up a list of query types for use when recording technical queries in Progress. The user also has an option to mark a type as obsolete on this screen. Ticking this will remove any selected types from the drop-down list in a technical query.

Tooling & Equipment Groups
Allows the user to set up a pre-defined list of groups for assigning tooling and equipment to. Again, the user can mark a group as obsolete to remove it from the drop-down list in the tool/equipment record by ticking the OBSOLETE option.

Tooling & Equipment Locations
Allows the user to set up a list of tooling and equipment locations. This list is independent of the stock location list in Progress. Again, the user can mark a location as obsolete to remove it from the drop-down list in the tool/equipment record by ticking the OBSOLETE option.

Tooling & Equipment Return Reasons
Allows the user to set up a list of pre-defined return reasons for use when returning tooling/equipment from use. The user can also specify whether the reason is an "erroneous" reason (i.e. was made in error) as opposed to a genuine return reason. This ensures the usage of the tool/equipment is calculated accordingly and doesn't consider erroneous issues. Again, the user can also mark reasons as obsolete by ticking the OBSOLETE option.

Tooling & Equipment Statuses
Allows the user to set up a list of statuses for use with tooling and equipment records. The user can indicate whether the status is a "closed" status, is the default status and also assign a color coding to the status, which is used on the main Tolling & Equipment Browse screen to indicate the status of the tool.

Units of Measure
Allows the user to set up a list of units of measure which can be used for both UoM and UoP values against parts. These are set against the inventory parts. Once created, the names cannot be changed. Units of measure can be marked as the default UOM or default UOP which will be selected when creating a new inventory part, and marked as obsolete when no longer in use.

The HAS LENGTH, HAS AREA and DIMENSIONS options are used in relation to the OFFCUTS functionality in Progress. This allows the stock of any part marked as HAS AREA or HAS LENGTH to be stocked in units with associated dimensions or lengths against each piece of material. For more information on this, please refer to the Offcuts section of the manual.
VAT Rates
Allows the user to set up VAT codes and rates for use within Progress. The user can enter a description for identification and the required rate of VAT for entry. The ACCOUNTS MAP field allows the user to link the Progress VAT code to the “T” VAT code in their finance package. This simply just needs to be the numerical part of the “T” code (i.e. T1 entered as 1, T6 entered as 6, etc.) This ensures that VAT code synchronisation of data between Progress and Sage is correct. The IS DEFAULT option allows the user to set a default VAT code to be used in the system. The IS DEFAULT PURCHASING option allows the user to set a default VAT rate for purchasing.

Work Centre Cells
Allows the user to set up labels for use against work centres. These are used in the work centre records. Similar to the Work Centre Locations category, this can be used to group different work centres together and allow reporting at a cell level.

Work Centre Locations
Allows the user to set up labels for use against work centres. These are used in the work centre records. Similar to the Work Centre Cells category, this can be used to group different work centres together and allow reporting at a cell level.

Work Centre Op Descriptions
Allows the user to build up a list of operation descriptions along with some default times which are applied when the specific description is selected. These can be selected in both the part routing operation and also in the WO routing operation. The user can select the work centre the description is for along with a description and the default times to be applied to the operation. The times can be left as zero if preferred and set manually when the operation is created on the part/WO. These can be added to the operation from the Notes Library in the routing tab of the part/WO.

Work Order Job Types
Allows the user to create a list of job types which can be used against work orders. This can be used for filtering work order reports as well as use in Shop Floor Loading (SFL) for filtering the WOs. This can also be used in conjunction with the Group Code list to set a default job type value for new parts when they are created.

Work Order Off Plan Reasons
Allows the user to set up a list of reasons which can be used to explain why a work order has not matched its planned costs. This can be assigned to a work order on the cost summary tab when the work order has exceeded its planned costs.

Work Order Priorities
Allows the user to set up a list of priorities that can be assigned to work orders. This can be used to prioritise jobs in the shop floor loading (SFL) section but also allow filtering of work orders on screen. The user simply enters an ID number, a description and has the option to dictate which one is the default priority when creating new work orders.

Work Order Rework Reasons
Allows the user to set up a list of reasons which can be assigned to rework time entries. This can be assigned to rework in SFDC providing the SFDC question is turned on. It can also be assigned to rework in the details of a rework labour time entry.

Work Order Scrap Reasons
Allows the user to set up a list of reasons which can be assigned to scrap quantities when they are recorded against work orders manually via the bookings tab. These can also be assigned to scrap bookings via SFDC.
